Forensic Analysis of ReFS Journaling

Hello, I am Seonho Lee from the Affiliated Institute of ETRI. Today, I talk about the forensic analysis of ReFS Journaling.

Before everything, let me just briefly explain the two key topics of the presentation. I’m going to explain what is ReFS Journaling, and then present how to analyse the ReFS Journal files. Also, I’m going to show you the analysis process that was carried out for the development of our ReFS Journaling forensic tools.

The motivation of this talk is like this. When our research team analysed ReFS repository, I found the signature and log. I guessed that the signature is something like the record signature of the NTFS log file because ReFS is also developed by Microsoft. I expected that the logging concept of NTFS is similar to that of ReFS, and the journal analysis for a Logfile and USN Journal is the most [indecipherable] for NTFS forensics. Therefore, I thought it would be a great help to forensic investigator if the ReFS Journaling is analysed. So, we explore ReFS Journaling and this talk is about the result of the research.

Our research is meaningful in that we confirm the existence and the structure of the Logfile and Change Journal. They can be used as forensic artefacts in ReFS volumes. And based on the analysis result, I developed an open-source tool to analyse the ReFS Journaling files.

We reverse engineered the ReFS parse system driver and ReFS util to understand the internal structure of ReFS. You can see that the ReFS parse system driver has two parts: one for ReFS version one. In other words, there is a big difference between ReFS version one and version three, which will be explained in detail later.

Other things we identified while analysing ReFS refer to driver files, ReFS util system files and event messages. The data structure of ReFS is already known from previous studies, therefore the ReFS data source shown we have been described briefly as necessary to understand journaling.

ReFS use pages to allocate the data. Every page consist of a header and table. The header contains the signature address and object ID for the page. A table is a structure for storing data on a page. Tables store data using a row structure inside. ReFS version three and version one are so different that driver files are developed separately. The changes we were notice the newly added Container Table and Logfile Information Table to the metadata file from ReFS version three.

Of course the rest of the metadata parts also changes slightly in the data structure, but their logs are not very different. We will cover the Logfile Information Table later, and briefly introduce the metadata files necessary to understanding the Logfile. First, Object ID Table stores object ID and location of all directories in the ReFS volume. Therefore, to get directory information to object ID you need to refer to the Object ID Table.

Next, Container Table is metadata file for ReFS new address system. To obtain the physical set information of a file in ReFS it is necessary to convert LCN value differently from NTFS. The conversion mechanism used at this time could be found by reverse engineering the address rate [indecipherable] function of ReFS user.

Lastly, the Parent Child Table is a metadata file that contains information about the parent-child relationship of a directory. The Parent Child Table can be used later to check the purpose of a specific file in the Logfile.

We confirmed the existence of the Change Journal in ReFS. The difference from NTFS USN journal is that they use USN Record Version 3, not Sparse File. Since the ReFS Change Journal files does not have a sparse function, data is recorded in the form of [indecipherable]. And unlike USN journal using record version two, Change Journal use USN record version three, which seems to be to use 16 bytes file and parse number, so fsutil you can create a Change Journal on ReFS volume and query its contents.

Okay, now it’s Logfile, our main research contents. Logfiles also exist in ReFS, however there are some different parts from NTFS. NTFS Logfiles record redo and undo operations, however ReFS only records redo operation and has a new record structure. And as the Logfile system is different, the opcodes that occurs in the Logfile are different.

The mechanism of ReFS Logfile is the record transition that occurs in the ReFS. When an event occurs in ReFS the related page is updated. When a page is updated it means that the row in the page is changing. At this time, the Logfile records information on the row to be changed.

For example, suppose a user create a file, then the log for the Create File will be inserted into the page of the directory. Usually the Create File name or timestamp is entered in the inserted row. In this situation, the inserted row is record in the Logfile. In other words, the name and timestamp of Create File are recorded in the Logfile. Thanks to this mechanism of the Logfile, we will be able to track users’ first behaviour in Logfile.

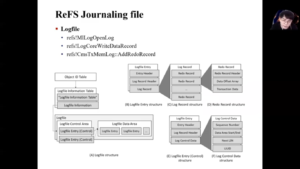
Then let’s look at the internal structure of the ReFS Logfile. The structure of the ReFS Logfile that I analysed is as shown in the figures here. I first analysed the LogFile Information Table among the metadata files that the Object ID Table has. Logfile Information Table contains location of Logfile, it is exactly the location of the Logfile Control Area. From the Logfile Control Area you can find the Logfile Data Area where the Logfile data is located.

Okay, Logfile Entry structure—here we can check the MLog Signature and everything. MLog, mentioned earlier in ‘motivation’, was the signature value of a Logfile entry. What we should be interested in Logfile entry is Log Record, not header.

This is the internal structure of Log Records. Log Records consist of three journaling records. These records store of code and transaction data that can identify which file system operation is. Let’s see this through on the example.

This example you can be seeing when being on this record with Hex Editor. The opcode appeared value is X1, which indicates that this record is data for an operation code Insert Row. Let’s look at which row was added where. If you look at transaction data you can see Object ID for the directory at first here. This means that the data that follow is applied to the Root Directory.

You can see that the key value below is the key value of the row to be added to the Root Directory. In other word, we can infer that an operation related to test that text file, especially an operation related to file creation, occurred in the Root Directory. By interpreting its redo record code like this, we will be able to trace the action that occurred in the ReFS volume.

We found out the meaning of opcode in redo record by analysing the PerformRedo function. Let’s see through IDA flow. Okay, in PerformRedo here, in this function you can see that the function code is different depending on variable 13. On the name of the function being called, variable 13 means the opcode and we can see what operation the opcode refers to.

The opcode and operation of a Redo Record are summarised in this table. We want to track fast file operation that a user did on a ReFS volume. So we conducted an experiment to identify which file operation was performed by analysing the opcode data appearing in several Redo Records. Through the experiment we were able to identify what behaviour the operation patterns appearing in Log Record means.

Log Record does not record the full path of the target file, therefore to obtain the entire path you need to refer to the Object ID Table and the Parent Child Table. For example, if Log Record knows that object ID is x704, you need to know what data in x704 is. Since the object ID is x704, you can find out the name of the directory by finding the log meta key value of x704 in the Object ID Table.

Suppose the directory was named Test Directory. Since Object ID is 0x704 is not the object ID value of the Root Directory, the Parent table data exists. Meta object ID of the Parent’s data or Test Directory ID is 0x600. In the Object ID Table it can be seen that x600 is the Root Directory. After all, we can identify the purpose of the file that we find in the Log Records through this process.

We had to decide which time value is in the Log Record or the time the event occurred. Fortunately, we are able to check the Redo Record where the timestamp of the file was recorded and transaction time could be specified through that timestamp.

We developed a tool that analysed our ReFS Change Journal and Logfile based on all the research result. The tool was developed in file system and given an ReFS image. It is a simple tool that parse and analyse the Change Journal and Logfile.

So, let’s show you how our tool analyses our ReFS journal files. First, to create our ReFS Image a virtual disk was created and formatted with ReFS. Okay, then use fsutil to enable Change Journal on this programme. Okay, and I will create a text file here, “Hello”. The filename will be DFRWS. Save. Now let’s try reading the ReFS volume with FTK Imager. Local Drive. Demo. Okay, let’s wait a minute.

Okay, open the ReFS Image with ARN. No. Okay, and click the ReFShell button to parse the entire file system. Okay, and you can check the Change Journal and Logfile. You can see the result for the Logfile and Change Journal like this and find the DFRWS text you just created. Okay, here, File Create. It is all to developed to analyse the Logfile and was developed to see how the entire operation occurred. Current cstory is developed close to the pure syllable so there may be problems that the ID did not expect, so please understand.

Finally, the conclusion to our study is that forensic analysis is required for ReFS journaling parse. When forensic analysis of our ReFS is visited in the future, the Change Journal and the Logfile introduced today will serve as important artefacts. Okay, that’s it for my presentation. Thank you for listening.

How To Analyze Windows 10 Timeline With Belkasoft Evidence Center

Temporal analysis of events (Timeline) can be beneficial when you want to reconstruct events related to computer incidents, data breaches, or virus attacks taking place on a victim’s computer. 

Historically, digital forensic timeline analysis has been broken down into two parts: 

  • ‘Timeline’ to describe changes associated with temporal file metadata in a file system. In other words, this Timeline is based exclusively on the corresponding file system.
  • ‘Super Timeline’ to describe changes associated with temporal metadata for the maximum number of artifacts possible within both file system and operating system. That is to say, it combines data from both sources.

However, recently Microsoft introduced a new type of Windows artifact: Windows 10 Timeline. It offers new opportunities to investigators, with greater clarity. This article describes these new forensic capabilities with Windows 10 Timeline.  

Windows 10 Timeline

The April 2018 Windows 10 update introduced a new feature called ‘Timeline.’ It enables you to look through a computer user’s activities and to quickly return to previously opened documents, launched programs, and viewed videos and pictures.  To open Windows 10 Timeline, you need to click on an icon located next to the magnifying glass icon, i.e., Task View (or click WinKey + Tab).

After that, thumbnails of programs/documents/sites that have been opened today or some time ago will become available. 

This is how Windows 10 Timeline may look if you press ‘WinKey+Tab.’

Investigators have identified the following two issues related to the new feature: 

  1. Some apps are not displayed in ‘Timeline’ after being opened.
  2. Some data from ‘Timeline’ (earlier data) is transferred to Microsoft Cloud.  

Thus, data obtained via Windows 10 Timeline artifact analysis differs from a customary Timeline and Super Timeline analysis.  

Also, Windows 10 Timeline should not be confused with a timeline generated by forensic utility programs. For example, Timeline created by Belkasoft Evidence Center contains many more entries in comparison with Windows 10 Timeline.

Location of Windows 10 Timeline Database

Windows 10 Timeline info covering user activities is stored in the ‘ActivitiesCache.db’ file with the following path: 

C:\Users\%profile name%\AppData\Local\ConnectedDevicesPlatform\L.%profile name%\

The ‘ActivitiesCache.db’ file is an SQLite database (ver. 3). Just like any other SQLite database, it is characterized by the following two auxiliary files: ‘ActivitiesCache.db-shm’ and ‘ActivitiesCache.db-wal’.

Additional info about deleted records in an SQL database can be obtained via analyzing unallocated space of the database, in freelists and the WAL-file. Examining them for your forensic analysis may increase the volume of your extracted data by 30%.  If you would like to learn more about SQLite database analysis, you can read more in our article ‘Forensic Analysis of SQLite Databases: Free Lists, Write Ahead Log, Unallocated Space and Carving’ available here.

Windows 10 Timeline database files shown by File Explorer in Belkasoft Evidence Center. WAL-file is currently empty, but this is not always the case!

Windows 10 Timeline Anatomy

‘ActivitiesCache.db’ contains the following tables: ‘Activity’, ‘Activity_PackageId’, ‘ActivityAssetCache’, ‘ActivityOperation’, ‘AppSettings’, ‘ManualSequence’, ‘Metadata’.

List of tables

The ‘Activity_PackageId’ and ‘Activity’ tables are of the most significant interest to investigators.  

‘Activity_PackageId’ Table

‘Activity_PackageId’ table

The ‘Activity_PackageId’ table contains records for applications, including paths for executable files. Here is an example string copied from the database: 

Example string copied from the database

You can also find names of executable files as well as expiration time for these records. Values located in the ‘Expiration Time’ column define a moment when the records covering PC user activities will be deleted from this database. They are stored in the ‘Epoch Time’ format.

The records in the ‘Activity_PackageId’ table are stored for a certain period of time. It may cover records for the previous 30 days. There can be records related to executable files or documents that are not already present on a hard drive being investigated. 

‘Activity’ Table

This contains as many as five fields for time tags!

‘Activity’ table

These are LastModifiedTime, ExpirationTime, StartTime, EndTime, LastModifiedOnClient. Their meanings are as follows (datetime in UTC): 

  • ‘StartTime’ means the moment when an application was launched.
  • ‘EndTime’ means the moment when an application ceases to be used.
  • ‘ExpirationTime’ means the moment when the storage duration for a record covering a user activity expires in the database.  
  • LastModifiedTime means the moment when a record covering a PC user activity has been last modified (if such an activity has been repeated several times). 
  • LastModifiedOnClient may be empty. It is filled out only when users themselves modify files.

The table is where you can find paths to executable files

You can also find paths to the executable files in this table:

‘…:”F:\\NirSoft\\x64\\USBDeview.exe“…’.

Gary Hunter (@pr3cur50r) stresses in his article ‘Windows 10 Timeline – Initial Review of Forensic Artefacts that values of time tags for deleted files do not change. As for modified documents, the volumes of time tags do not change instantly, but within 24 hours.

How to Investigate Windows 10 Timeline with Belkasoft Evidence Center

Once you have added a data source (a hard drive, a logical drive, a folder or a file), select ‘Windows Timeline’ in the ‘System Files’ of the ‘Add data source’ window. 

Adding Windows Timeline

Once you have your data extraction process completed, the ‘Windows Timeline’ category will be displayed in your ‘Overview.’ Data extraction results from the ‘ActivitiesCache.db’ will be shown there.

Data extraction results

Since the ‘ActivitiesCache.db’ file is an SQLite database, Belkasoft Evidence Center is capable of restoring deleted records saved in this file and of extracting additional info from the transaction file (WAL-file).

Using Windows 10 Timeline in Computer Forensics

Data contained in Windows 10 Timeline may be used for issues related to incident response and data breaches.

We will show a data fragment of the ‘ActivitiesCache.db’ file from a computer attacked by hackers as an example. 

Info in the ‘sendspace’ block was concealed deliberately since it led to real malware

As you can see in the screenshot below, the attackers installed some files on the victim’s computer.

Among other things, the following programs were installed: 

  • TeamViewera program used for remote computer control
  • Mimikatza program used to steal user identity data
  • RDPWrapa library making it possible for several users to connect to a computer via the RDP protocol.

More than that, analysis of the events stored in Windows 10 Timeline indicates that the attackers opened the TeamViewer journal of logs (TeamViewer14_Logfile.log file) via Notepad (notepad.exe file). They might have done this to delete or modify the file’s info. 

A more convenient search for info across the base being analyzed is available with the Belkasoft Evidence Center built-in filters. 

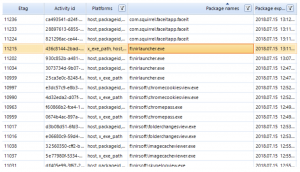
For example, one could perform sorting based on executable file names (‘Package Name’).

Results of sorting by package name

As you can see in the screenshot, the following files were launched on the investigated computer: nirlauncher.exe, chromecookiesview.exe, chromepass.exe, folderchangeview.exe, imagecacheviewer.exe, skypelogview.exe. Looks intriguing!

To locate Microsoft Word-related events, let us enter a search word, namely ‘word’, in the filter panel: 

Filtering Windows 10 Timeline by package name in Belkasoft Evidence Center

Once we have used the filter, we can find info about the launch of the ‘winword.exe’ executable file in the sorted results.   

One can also find info about the files that were opened or edited via Microsoft Word by inspecting the timeline event property named ‘Content”: 

Conclusion

The new Windows 10 artifact category —namely, Windows 10 Timeline— significantly facilitates investigative activities aimed at reconstructing the events that have taken place on an investigated computer over the previous 30 days. 

More than that, Windows 10 Timeline may provide additional info about the files that have launched on the examined computer, including the deleted ones. This is of particular importance when it comes to incident response and data breaches.

Of course, a reliable tool is needed for such investigations based on Windows 10 Timeline artifacts. Belkasoft Evidence Center can help you with these types of investigations. With BEC’s automated search, recovering option for deleted events, analysis of transaction files and SQLite unallocated, and advanced filters at your disposal, your digital forensics or incident response investigation will be much more efficient. 

You can download your free trial of Belkasoft Evidence Center at https://belkasoft.com/get.