Atola Technology introduces a fully revamped Disk editor module for convenient in-depth evidence analysis in a new software update for Atola Insight Forensic, a fast forensic imaging system with the capacity to run 3 simultaneous imaging sessions and work with damaged media.
Version 5.4 of Insight Forensic also includes more than 35 new features and bugfixes and can now detect two or more ambiguous file systems hidden within a single partition.
“For this software update, we’ve thoroughly overhauled our Disk Editor module to make byte-level analysis much easier,” said Vitaliy Mokosiy, CTO at Atola Technology. “Another nice feature: Insight Forensic now recognizes two or more file systems intentionally squeezed into the same sector range and notifies a user about it during the diagnostics. Not to mention more than two dozen small tweaks and improvements to make the examiner’s work more comfortable.”
The New Disk Editor: Find, Read, or Edit Bytes Quicker and Easier
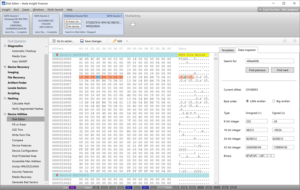
The Disk editor module included in Insight Forensic for analyzing device data on the byte level received a fresher look and feel. Now it lets forensic examiners navigate through disk sectors faster, search for hex strings more easily, and interpret bytes quickly.
Insight Forensic now seamlessly reads device space in infinite mode: bytes are loaded automatically as a user scrolls the hex viewer up or down. To quickly jump to a certain position, examiners can press the Go to sector button or use the Ctrl + G keyboard shortcut. And two more convenient shortcuts: Ctrl + Home immediately brings users to the first sector of a drive and Ctrl + End gets them to the last sector.
To quickly find a certain byte sequence, examiners can go to the Data inspector tab or press Ctrl + F shortcut and enter a string they are searching for. Also, there are Find previous and Find next buttons to see each instance of the found byte sequences.
The new Data inspector feature saves time when interpreting bytes. It converts hex value to decimal (8-, 16-, 24-, 32-bit integer) or binary format on the fly.
Insight Forensic detects file system structures automatically. Master Boot Record, GPT sector, FAT/NTFS/ext Boot Sector, HFS headers, NTFS File Record and other structures are automatically recognized and parsed into a human-readable form.
[img-2]
Find Two or More Ambiguous File Systems Hidden Within a Single Partition
What if someone managed to place two or even more fully functional file systems within a single file system partition on the storage device to conceal data?
Researchers Janine Schneider, Maximilian Eichhorn, and Felix Freiling in their paper titled “Ambiguous File System Partitions” showed that it is possible to create ambiguous file system partitions by integrating a guest file system into the structures of a host file system. The authors point out that since typical file systems that occur in forensic analysis are usually unambiguous, ambiguous file system partitions may serve as useful corner cases in forensic tools and processes.
The Atola engineers were so inspired by this paper that they decided to implement ambiguous file system detection in our product.
Insight Forensic 5.4 now detects host and guest file systems placed within the same sector range during the Automatic checkup and notifies the user about it in the Diagnostics report.
Moreover, forensic examiners can image one or both partitions and also correctly access their files in the File recovery module.
A nice-to-have feature for deep-dive analysis.
[img-3]
About Atola Insight Forensic system
Atola Insight Forensic is a fast forensic imager with the capacity to perform 3 simultaneous imaging sessions on a wide range of media. It also offers complex yet highly automated data recovery functions on failing storage devices and provides utilities for accessing hard drives at the lowest level. The system includes DiskSense 2 hardware forensic unit, hardware extension modules, and Insight Forensic software to operate them.
About Atola Technology
Atola Technology is an innovative company based in Vancouver, Canada, specializing in creating forensic imaging hardware tools for the global forensic market.
Atola’s engineers, including its founder and CEO Dmitry Postrigan, have strong expertise in storage media and data recovery, and focus on creating highly efficient and user-friendly forensic imagers.
Detego Global, provider of award-winning digital forensic software solutions, proudly announces the release of Detego Analyse AI+. This latest offering marks a significant enhancement to Detego’s central analytical platform and incorporates state-of-the-art AI technology to empower investigators and accelerate the analysis of vital evidence.
Detego Analyse AI+ takes the investigator-centric capabilities of Detego Analyse to new heights, cementing its position as the go-to solution for on-scene and lab-based investigators in the corporate, military and law enforcement sectors. Analyse AI+ unveils a suite of cutting-edge tools, such as AI-powered semantic search, rapid identification of similar images and patterns, lightning-fast AI audio/video transcription and the real-time translation and transcription of audio and video evidence. Alongside these groundbreaking features, Detego Analyse AI+ continues to deliver industry-leading capabilities that investigators have come to trust, including advanced AI-powered object detection, multi-language OCR (Optical Character Recognition) and offline document translation from over 230 languages to English.
Among the key features of Detego Analyse AI+ is the advanced semantic search which helps investigators save hours of manual data sifting by leveraging AI to search for broader concepts and contexts within images and videos. This tool significantly reduces the limitations of keyword searches. It helps investigators pinpoint any advanced concepts such as “men in masks with automatic weapons in London at night”, “drug deals in a black sports car belonging to a specific brand”, “screenshots of customer account details”, “distressed children” and “uniformed teams holding flags with terror-related symbology”. The solution also provides investigators with the ability to swiftly scan evidence for similar images by uploading a reference image or by utilising the “show similar” feature on existing images – helping accurately match specific locations, signs, movements and objects as well as unique patterns or designs in tattoos, wallpapers, graffiti or clothes – all in a matter of seconds.
Another ground-breaking feature is Detego Analyse AI+’s rapid AI transcription functionality which accurately transcribes and indexes words from a wide range of audio and video files including voice notes, voicemails, video messages, and social posts and stories, recording transcription speeds well over 1,000 words per minute. This in turn helps eliminate the need to manually review hours of audio/video recordings and helps investigators to identify data that’s related to investigations by using advanced text and keyword matching capabilities on the data indexed from any audio and video files.
Cross-border/international investigations are also further strengthened with the new AI-powered translation capabilities. In addition to the offline document translation capabilities from over 230 languages to English through Detego Analyse, Analyse AI+ allows investigators to translate and transcribe audio/video content from over 50 languages, including Arabic, Swahili and Russian, to English in real-time. This new feature will play a key role in enabling investigators to efficiently analyse and extract critical information that might go unnoticed due to limited access to translation capabilities.
Analyse AI+ also allows investigators to uncover hidden files using enhanced compound file steganography, delivers improved evidence management features and provides users with enhanced tag management capabilities for better organisation and control of evidence. Users can now save filters to specific exhibits or make them available across all exhibits, ensuring seamless and consistent filtering across investigations.
The new release also introduces various other enhancements, including optimised video frame processing, improved support for GrayKey extractions, and greater support for MSAB imports stemming from the technological partnership with MSAB that’s gone from strength to strength.
Sharing his thoughts on this game-changing release, Detego Global’s Managing Director, Andy Lister, had this to say: “We are really thrilled to launch Analyse AI+. With several global technology patents for solutions including Ballistic Imager and Field Triage, we’ve demonstrated our commitment to delivering innovative technology that helps investigators combat crime more effectively, and the release of Analyse AI+ is no different. This release bears testament to our ability to work closely with our customers and experts within the digital forensics community to develop new tools to help overcome their investigative challenges.”
Earlier this year, the previous version of Detego Analyse was selected as a finalist for the UK’s Security and Policing Innovation Award for its application of AI technology, ease of use and ability to automate workflows to deliver greater productivity. While the unique technology that goes into the solution is worth thousands of dollars, Detego Analyse AI+ will remain one of the few comprehensive digital forensic analytical tools provided free of charge. Any investigator purchasing the company’s coveted data extraction tools will get free access to Detego Analyse AI+. These tools include Ballistic Imager, the world’s fastest forensic imaging tool; Field Triage, which delivers fast yet accurate triage; Media Acquisition, which enables the simultaneous analysis and acquisition of data from multiple sources; and Detego MD, the mobile forensic tool powered by GMD SOFT that provides insights from 10,000s of phone models, apps, smart devices and more.
Analyse AI+ is only part of the extensive product roadmap planned out by Detego Global in its bid to empower digital investigators in the military, law enforcement and corporate sectors with cutting-edge solutions that eliminate backlogs and accelerate the delivery of justice.
To learn more about Detego Analyse AI+ and its features, or to get a first-hand look at its capabilities with a fully-functional, 30-day trial, visit www.detegoglobal.com
James Eichbaum: Good morning, everyone. Or maybe evening, depending on where you are, or afternoon. Welcome to the MSAB webinar on XAMN. I just want to make sure that everyone can hear me okay. Alan, can you hear me?
Alan Platt: Yep, I can hear you, James.
James: I can hear you, Right, folks, it looks like we’re, yeah, we’ve got quite a following here for the show. So let’s dive right in. Today, our presentation’s going to be brought to you by me, James Eichbaum MSAB Training Manager; and Alan Platt, MSAB Professional Services.
All right, just a little bit about me. I’ve been the Training Manager for the past five years with MSAB, but I’ve been with MSAB for over 11 and a half years. Prior to that, I was a police officer in California, 17 years total experience starting off as a reserve, working for free, enjoying it so much that I decided well, I might as well get paid for it, as well.
So I became a full-time police officer in 1995 with Modesto Police. I did patrol, I moved on into detectives when, let’s see, around 2000; 2001, assigned to economic crime and fraud; and then within a year moved into high-tech crime, joined to a task force in Sacramento, the High-Tech Crimes Task Force; and then I had lateraled over to the Stanislaus County Sheriff’s Office in 2007 and I spent four years with them, one year on patrol, and then three years as a detective assigned to high-tech crimes.
And then I was also assigned to the same task force, but then also was assigned as a task force officer or TFO with the FBI Cyber Crime Task Force up in Sacramento. I was dealing mostly with child exploitation.
My degrees are Computer Science, Public Health & Safety, and then I have my Bachelor’s in Information System Security. In 2011, I was fortunate to receive the Case of the Year Award for a case I investigated out of Palo Alto, California; a murder and arson of a female real estate agent, just for the forensics on their mobile phones, recovering a bunch of deleted messages on an old iPhone 3GS.
And I had obtained my EnCE back in 2010, so it was quite a long time ago. I was used to using EnCase, so I played with FTK, I didn’t dabble so much with X-Ways. And then of course, I used the gambit of mobile forensic tools. But that’s a little bit about me, but I’m going to let Alan introduce himself, then.
Alan: Yep. Good morning. I’m Alan Platt. I work with MSAB within the Professional Services department as a consultant.
I’ve only worked with MSAB since March of this year. Prior to that, I was a police officer for 24 years. I started my career in the British Transport Police in 1998 and transferred over to the Met Police in 2007. In 2010, I moved on to the Specialist Operations within MPS. And in 2014, I joined a very busy small digital forensics unit within that area.
The last two years of my time within the police, much of it was spent working with XAMN and XRY, but predominantly XAMN. I wrote and developed and presented a course on XAMN, basically aimed at investigators and trying to encourage people to have a better understanding of their own forensics and also how to use XAMN.
And so that went out all across my area, and it’s now going out nationally, and it’s had a massive impact on getting data, understanding the data, finding good data, and a big impact on how the digital forensics are investigated.
I live in Buckinghamshire in England, married, two grown-up children, and no degree, sadly, unlike James. But yeah, that’s me.
James: Okay, thanks, Alan. Okay, so today we plan on giving you, I mean, this is a very short webinar, 90 minutes. There’s so much to cover on XAMN. It’s just crazy to think that we can do everything or show you all the cool features in just that short amount of time.
Heck, our training is even just two full days of XAMN, and that doesn’t even get into the elements part. So, we’re going to try to show you some cool things, some features, maybe some of you have been using XAMN, you may not even know that they exist.
But we want to just provide you some cool things to see, and kind of like maybe whet your appetite for more. So, we’ll be going over some of the basics of XAMN.
In the introduction to it, Alan’s going to go over creating a case and importing some files, maybe talk about that, some quick views. We’ll also go into filtering, showing you some of the different filters, there are so many to show you, but we’re going to show off a few. Talking about persons and timelines and different ways you can view the artifacts in XAMN.
At the end, Alan’s going to go over some creating reports, showing you the report builder. You’ll check out the audit log, and then we’ll also cover some advanced features, that, you know, most likely you’re not even aware of, that are little hidden gems sprinkled throughout XAMN that you can walk away with.
So, there are two versions of XAMN now. There’s our XAMN Viewer, which is the free tool. And that’s when you’re doing your forensic analysis, putting together your reports. Maybe you want to send off an XRY file that you’ve created a subset of with just the things you’ve identified and tagged that’s important, things that are relevant to the case, and you give it to the prosecutor, or maybe in discovery or some civil case, or somebody else that needs just to view that extraction.
The XAMN Viewer’s for them. And that is a free tool they can download for free from our website, or you can provide it to them with the extraction and they can view the data. They have a limited, you know, amount of features within XAMN Viewer, which we’ll take a look at next.
And then there’s the Pro version, which has the full suite of features in XAMN (and please let me know, it’s got a little popup that I may be experiencing degraded audio, so hopefully that’s not the case for you, and you can still hear me okay).
But yeah, this is a paid version and it unlocks all features of XAMN. Talking about those different features coming in here with the Viewer you can only view XRY files, but with the Pro version, not only can you view XRY files, encrypted XRY files, but you can also import in GrayKey extractions, Cellebrite, you can also bring in other data types such as warrant returns or CDRs that you get from cell phone carriers.
Discovery and analysis. Yeah, with Viewer, again, you get the basic views, you get some basic viewers, but with the Pro version, you’re going to have a whole slew of extra filters to be able to make use of.
And then on top of that, you have the power of being able to create persons and link them together. You have the database mapper, which I’ll show you later. And you have access to this very powerful Hex carver built in.
For reporting, the Viewer does allow you to export information to PDF and XLS and documents and yeah, you can create subsets, but with the Pro version, not only can you do that, but you have the Report Builder, which is this new fantastic tool that our developers have most recently placed into XAMN.
That allows you to instead of, you know, at the same time creating a report in say Word or something with that you’re used to with your organization, you can create your report completely within XAMN and have it saved as a PDF.
And then we have extra exporters as well, including Extended XML. And then also with feature comparison here, we have the ability to manage XAMN with XEC with the Pro version, but not with the Viewer version.
But if you are looking for more information we wish that you would get ahold of our website, reach out, and yeah, and let’s get on with the program and show you some cool stuff. So I’m going to hand this back over to Alan.
Alan: Okay. Can you see my screen right and hear me okay?
James: Yes.
Alan: Okay, good. Okay. So, I’m an investigator and the extractions have been done for me. I’m investigating, say for instance, three subjects, and I’ve got five extractions.
So the main subject is Monterey Jack with an iPhone. Extractions that have been done on, say, for instance, a kiosk. I’ve got two subjects, both with Android phones. I’ve got a logical extraction, which has been done by a business as usual, so for instance, a kiosk. And I’ve also got a chat downgrade extraction for each of the Android phones, which have been done for, say, a lab like where I used to work.
So, what I’m going to do is, so first of all, this is the extraction that you’re going to get. So if I was opening up the extraction, Monterey Jack, the iPhone-only extraction, I’m opening it up into XAMN. At the moment I’m in spotlight view for instance, so I haven’t created a case.
So where I used to work, we used to have lots of investigators who wouldn’t necessarily create a case within XAMN because the extraction has been done on XRY on a kiosk, and it hasn’t created a case. When I did it within XRY Office, I would create a case, but they, for instance, wouldn’t have a case.
So, what we want to try and do, and what James and I want to get across today is how it’s really important, or we think you should get into the habit of creating a case for every extraction that you open, even if you only have one subject.
So for instance, this one, as you saw, I have five extractions, but I want to look at all of those five extractions within one case because they’re all linked.
For instance, they might be involved in, say, robbery, and I want to know whether maybe those three subjects, were they communicating with each other around the time of the offense? You know, was there shared location data? Are they discussing the offense? So I want to put them all into one case and view it all as a case.
At the moment, if I go this extraction, I haven’t yet made a case. So if I go into view with artifacts, then yeah, sure I can view the extraction, but there’s data that I’m not going to get.
For instance, if I go to, James will go for these a little bit later, but if I go into connection view, then I haven’t got this available because I haven’t got a case. Also chat view, if I go to chat view, again, there are things that I can’t see because I haven’t created a case. And participants is another big one, which we’ll get to later.
So, how to make a case, very easy. You either go up to the top, create a new case, fill in the details, browse to where you want to save the case, or you can just simply click on ‘open as a case’.
And I’ve saved a particular location. So where I’ve saved my case to or where I want it to be saved to is this location here. So if you have saved 10, 15, 20 extractions you want to put into a case, then you could just put all your extractions into one particular folder and then point the location, save a location to that folder. And I could also create a password, as well.
So this is now how it’s changed to the new case view if you like. So it’s gone from the view you just had to this view. And as you can see here, it says five files have appeared in the case folder, including all.
Now, if I go to data sources, I can just click on each one individually and I can activate it like that, or I’m happy that I know that the five that I’ve selected into that case folder or that want to be into the case folder, I’m happy that they are all part of my case, so I’ve included them all. But you obviously want to double check to make sure that you are included in the cases that you want.
So, select sources. You can see here they’re all ticked. So these are all the extractions I’m looking at. And now data sources, when I click into them, you can see it says deactivate.
So, for instance, if I didn’t want Monterey Jack, so I didn’t want him activated, so I actually did it by mistake, I could just simply deactivate. If I now go to the overview screen, these three little dots just here, next to case info, more options, click onto that, you have the view case log, and you’ll see this is the log of me creating this case, and you can see that I’ve deactivated it.
But I do want Jack involved in the case because he’s the main man. So I’m going to activate him, back into overview, case log, view the case log, and you should see that it’s now activated.
Okay, so on this screen here, you have your quick views, which I will explain more by doing it actually to run the quick views. See how that works. You have the categories within the extractions, and then you have the apps that have been decoded.
And then when you go to data sources, you have exactly the same thing. You have the categories, you have the general information for each and every device, you have the general information of the handsets, so that make, model, the time, et cetera, stuff like that.
And further down you have the summary of the extractions, the data that is in the extraction. What you also have is you have a person screen. So persons are basically made up of names, email addresses, phone numbers, messaging up IDs.
So for instance, for me if I’m thinking to myself, I’ve got WhatsApp, I’m on Twitter, I have other messaging apps. So if you’ve extracted my phone, then for me, you’re going to have not just obviously my contact, you’re going to have all of those different contacts or personal accounts for me, and you want to lump them all together.
So we think of Monterey Jack. So if you start typing the name, then you have all of these persons. Now, I’ve done my research, I’m a good investigator and I’m happy that the phone numbers are the same. The email address is all the same for all of these.
So what I want to do, I want to include them, which you have to do individually. So you just click on, this is Monterey Jack, and before I do that, I might want to edit the name. So I’m going to call in Monty Jack, I want to save that. I can also edit the picture if I wanted to, but at the moment I’m happy.
Yep. This is Monty Jack. So I’m literally just going to include them more. And you’ll see on the left-hand side, that the list is getting shorter as I do this. And then the data at the top for Monty Jack is giving more and more because it’s now lumping all this in together.
Now, I’ve got two more. This one here, I want to join with a person. I want to join it with Monty Jack. Yep. Keep Monty Jack. And I want to join, see if I go back to Monty Jack, join with a person, join with him. Keep Monty Jack.
Okay, so now I’ve got Monty Jack, I’ve got all of these names, phone numbers, email addresses, I’ve got all the different accounts that they’re involved in. I can, if I wanted to just click on show artifacts where the identities from what Monty Jack live, I’m not going to do that just yet, but I also might want to edit the picture.
So I’ve got, if I type in Jack, I’ve saved, you might have for instance, custody imaging, something like that, or a stock file of your subject, and then you can include them in. So, I won’t do it now, but what I’ll do while James is going into his bit, I’ll pass over to James in a minute, but I’ll do exactly the same thing for the other two subjects.
Now, the other thing I want to do for Monty Jack, is I want to make them, as you can see here, first of all, you’ve got five names associated, three phone numbers, two email addresses, six accounts, one XRY file. But over here on the left hand side, I want to mark the person of interest.
So, and you’ll understand where that fits in when I look at participants as a filter a bit later on. And what I’m going to do in a minute, is basically do exactly the same thing for the other two subjects of interest. So eventually when I click on ‘list only subjects of interest’, I’ll have three.
But going back to overview, just before I pass over to James, what I’m going to do is I’m going to open up the extraction. Now, I can open it in a number of ways, but what I want to do for the time being is go into all artifacts.
So this one just here; quick views, all artifacts. So this will open all of the extractions altogether. And here, artifacts, you have 36,499. So artifacts is a terminology for data. So you’ve got that much data within all of the extractions.
So before I hand over to James, if I just go up to options at the top, I just want to show you a couple of things we’re going into here.
There’s geographic, I just want to show you that I’ve changed this so that when I go to, or if ever I’m investigating in XAMN on these particular subjects, I’ve added on decimal degrees. So for my coordinates, you can, if you want to add on offline maps, if I think you have to purchase your offline maps for that.
And also what I want to do is just show you the audit log, which is a really new feature that we’ve got in for XAMN. It’s the first, the early stages of it. It is disabled, so it’ll always be disabled unless you change it. And later on I’ll show the audit log of how we progress through this case. And it basically shows you all of the artifacts that you look at, everything you do.
So, if I want to have full disclosure of everything that I’ve done, I’ve got, a particularly, I don’t know, sensitive investigation, and I’m an investigator and I want to show what I’ve done, the hard work that I’ve put in spending hours and hours investigating in this particular offense, then the audit log will show me, and it can be disclosed and show you exactly what you’ve done.
So, I think I shall hand back over to James. All right, all yours, James.
James: Okay. So, as Alan showed you, he opened up everything in all artifacts. That’s one of the quick views from the main case tab. This is a subset of my own phone.
So, I decided to use this to trim things down. Also, you never know, you might get surprised that something might pop up on your own phone that you don’t want the world to see. So, yeah, I’ve kind of, you know, trimmed it down a bit.
But I want to go over these different views that we can see in this all artifacts tab. Starting with the left hand side, Alan already mentioned that, yeah, this interview here, we can see that in this particular subset of my extraction, there are over 53,000 artifacts or items of those could be databases and pictures and videos and all kinds of things.
But on the left-hand side, we see that we have different ways to view the data, and some filters that are already built into XAMN. One of those filters is the text filter; another one is the categories filter, where right now it’s filtering on everything; below that is the apps filter, which, you know, these are the apps that are in this extraction, this subset.
And if I wanted to view just Apple Messages, I could click on Apple Messages and those would be displayed. And then below that are the tags. And a lot of tags are here that I’ve created. The tags that come with a standard installation are just going to be important and unimportant, that you can use to identify your artifacts.
I do want to show you, though, that those are not just the only filters. We have a whole litany of filters that will pop up if you hit the little ‘plus’ icon. To add a new filter, we’ve separated out where you can see of them at once and just scroll through and pick the filter you’re interested in or you can search for it.
But what I’m going to focus on today are the filters in the pictures group. Alan’s going to touch on similar pictures. I’m going to show a little bit about Project VIC, but first I’m going to jump right into recognized content.
Now, the recognized content, I’m just going to click okay here and get that filter opened up. Let’s sit here for a minute. So, over here on the left hand side, taking a look at the different recognized content that popped up, we can see different categories like weapons and drugs and vehicles.
Now, by default (and I’m sorry, Alan, I’m going to grab this right now and just mention it), in XRY and the process options just for this, and then Alan will cover the rest of these things, and give you some examples.
But in XRY, there are some things that are off by default for decoding, and process options. And one of those things is content recognition. By default, this is not going to be checkboxed.
So when you do an extraction of your phone, and you go through the decoding process, and then later when you open it up in XAMN and you go to apply the content recognition filter, there’ll be nothing there because it wasn’t tickboxed at the time of the extraction, the decoding.
You can always re-decode the phone later or the extraction later and include content recognition if it was time you were interested in saving at the time of the extraction, and then you had all the time in the world later to do your re-decoding.
But I want to give you guys just an example here, you know, make sure you have the latest CUDA drivers installed when using an NVIDIA graphics card. If you don’t have an NVIDIA graphics card and you run content recognition, it’s going to take a considerable amount of time to go through all those images because your CPU is doing all the work.
But if you have an NVIDIA graphics card, with CUDA cores, we can offload that to the GPU which will then take on that responsibility, and it will significantly improve the decoding time.
And to give you an example, my iPhone, 64 gigs, extraction time, beginning to end, most of it was for the decoding of the content recognition, was 13 hours. But with the NVIDIA CUDA drivers going, that dropped down to total with the decoding to just over two hours. So, significant performance increase, if you’re interested in content recognition.
But getting back to this, the list view isn’t quite the best view if we want to look at pictures. So first off, I’m going to go look at all of my images. So in the categories filter, I’m going to go to expand files & media, and then I’m going to filter on pictures. This is the list view, the default view in XAMN.
Again, not the best for viewing images. So I’m going to switch from list view to something a little bit more friendly, and that’s going to be the gallery view. And once we’re in the gallery view, I can change the size of my thumbnails, just defaulting to medium.
And I can also sort by say, size for instance, and bring the larger images to the top, the smaller ones will be at the bottom. Let’s take a look at some of this content, this recognized content. One of those being weapons, for instance.
Select weapons, all right, sometimes there’ll be some false positives, you know? Got a picture of this guy here holding a gun from a toy, and I think we have a picture of somebody wielding a lightsaber. So those are obviously not real, but those are false positives, but sometimes that’ll happen.
Scrolling on down further, we can see some more images. Say, if I just selected one of these guys, the right-hand pane is the details pane. So if whatever I select in the middle in this artifact pane, the details for that artifact will be displayed in the right hand details pane.
In this case, any metadata that shows up with this particular photo or XF data. Here, if I scroll down in the right hand pane, this image also has some GPS location data attached to it, and it pops up an address, as well.
And at the very bottom, I have a map that’s displayed, a built-in map. I can, if I wanted to, I could click the ellipsis here, the three dots, and I can display this in Google Maps for instance. So I could click “Open Google Maps” and it’ll plot it here so I can see where that image was taken.
Alternatively, if I wanted to see all of these images, where were they taken? I can switch from gallery view and I can go to geographic view and I can get a map of where everything was.
And so I can see there’s a bunch of pictures that were over here in California in the US, I could zoom in and get a little more granular. There’s some over in Sweden. There’s some further south in California. And then there’s one all by itself here in Mississippi.
And if I hover, I can see and click it, and it’s a picture of one of our tech sales engineers wielding a sword. So yeah, a weapon. Will, and Will did one of these web webinars last week.
And let’s move on to another, let’s go back to the gallery view and move on to another category, say, vehicles. And here we have some vehicles. Yep, maybe they think that’s a seat inside of a car, but that’s just a movie theater, obviously. Not a real car, but something in the museum. Parts of a car.
So interesting how it’s picking up different things. Oh wow, we even have the Millennium Falcon, of course that is a fictional vehicle. But then we have me sitting in a DeLorean, yeah?
And, also wanted to point out that, you know, we have the little tiny picture here, but you don’t have to just rely on this little small picture. There are different things we can do to view images and make life a little easier for us.
If we want to see many more of these images on the screen, we have a couple options. We can expand our artifact view by taking the panes on the right and left and minimizing them. So we have a little bit more real estate to work with.
In this case, we’re looking at vehicles, you can also rename these tabs. So in this case, I could rename this to vehicles if I wanted to. And also if I wanted to, I could take this and rip this tab out, and then if I had another monitor, I could take it and put it on another monitor all on its own. And I could continue working with XAMN with some other tabs. But I’m going to redoc this.
Another nice little bit is using our built-in picture viewer. You can either double-click one of these images, it’ll open up the picture viewer, or on the right-hand side in our small picture viewer there is a little icon down on the bottom right that’ll allow you to pop it open, as well.
And you can rotate the images if they’re not in the right perspective for you. And of course, you can go full screen. Another thing you could do is have this window on another monitor, and then click this little thumbtack in the bottom left. And then while you’re scrolling over here, just click an image and you can use your arrow button on your keyboard. And you can go through and look at all the images one by one.
And I’ll close that. Right, let me pop this back open. Let’s get back to that DeLorean. I don’t know if you can see this, I have a little magnifying tool here, but there’s this little rectangle around my face.
And then down here there’s a little option with a little red circle around a person. That’s showing that that face has been identified and it’s been identified as James Eichbaum by my iOS, my phone.
And those of you that have iPhones are probably aware, or maybe you’re not that you can search for people in your phone and you can identify people in your phone, give them names, and then match unknown to names so that you can search for your kids, your family members, your friends, and just see all the pictures of them.
Well, that carries over into XAMN because we’ll grab that data. Here in this case, I could take the little square away, I could put it back. But if I scroll on down here just a little bit, you’ll see ‘identify person: James Eichbaum’.
And if I click this hyperlink, it’ll give information about that person that Alan was just talking about and how we can map other things to that person. But here are all the photos that have been identified as that person, James Eichbaum.
Maybe this isn’t the best way to view all of this stuff. So we could come over here and right click and do what we call a pivot filter. We can create a filter in a new tab, and then we get this new tab that pops up that says James Eichbaum.
And then I can choose to view that in geographic, or I can choose to view it in gallery, and I can just see all the images. And it’s interesting to see how some of these came about. Cause here’s just a picture of me on an ID card. That’s my retirement card.
And then, this is funny, there’s that little app you could put on your phone, like, the deepfake your face onto actors and such. So even here where I’ve placed my face on Tom Cruise’s face, it recognized it as James Eichbaum. Quite interesting how that worked out.
But, let’s see, was there anything else I wanted to do before I hand it off to, oh yeah, Project VIC. So, one other thing. Let’s go ahead and open up just all pictures. So I’m going back to my case tab and going from quick views, I’m going to go, just show me all the pictures in the case.
And then here are all the pictures. You can see on the bottom left active filters, I just have one and that just happens to be the pictures category. Project VIC allows us to make use of a database of known images.
And these are going to be indecent images, and they’re graded at different degrees of content. If you have that database and you can make use of it in XAMN by importing it and then applying that database to the images, it’s very helpful when working in child exploitation.
I mean, it’s a difficult job to do where you have to look at images like that all the time or videos, and it can be quite damaging to you as a person, just mentally.
So if you wanted to make use of this; number one, we would want to go into options and there’s a Project VIC section where you can choose the profile or your region, and then you’ll have your database that you can create. And it’ll be placed in the program data MSAB import VIC’s folder.
And by default, it’s going to hide Project VIC images when you run this. So I’ll click ok. But I’m going to come over here to the top and hit the Project VIC button. But there’s also, I think if you saw earlier when I hit the filters pictures, there was a Project VIC filter here, as well.
I’ll just do it from here. Click OK, give it a moment to apply. Let’s do it here. I applied the filter here, but I have to actually check it from the other button. And it shows that there are 32 hits for child abuse material, three hits for exploitive, three hits for animation, and then the rest are uncategorized.
But I can click OK, and I’m going to untick that one. So now I have displayed to me all the ones that it found that were illicit child abuse material, child exploitative. And again, if I go to gallery view, it’s going to be a little better.
And these are now hidden from you. You don’t have to look at them, you know that they are indecent images. So it protects you from the harm of having to view them. If you needed to view it, you could double-click it and you’ll see what the picture actually is.
And then, you know, we can see that these just happen to all be images of Star Wars characters. So there are no real indecent images here on this extraction. But you can see the different categories, yellow being child exploitative so that it could be some other type of image, not quite child abuse. And then I have a couple of CGI animation ones.
Well, and then if you want to turn off the hiding of these images, we can come up here into options and then we come to Project VIC and then go to the bottom and take that checkmark away. And now we can see all those images again.
You know, I personally, I’ve known people who have had to retire early from law enforcement because of having to view these images. They’ve gone through PTSD and that’s not good.
So, this option is there to protect you and also to protect people around you. So, if you’re in an open environment, you don’t want people walking by while you’re investigating this type of case to see this harmful material which could hurt them, right?
I think that’s it for what I wanted to talk about now, and I’ll just hand it back over to Alan.
Alan: Okay, thanks, James. Okay, so where you last left me I had created Monty Jack. Now I’ve created persons. So I did exactly the same thing for the other two subjects as I did for Jack. So I’ve now got, if I click on “List any persons of interest,” I’ve now got three and I’ve made them all persons of interest. I click either there, they will star there or they will star there.
So now I’m in the extraction. What I want to do is show you, basically, how I used to set myself up and how I used and how investigators that we used to train, sort of, how we used to set them up, as well.
So we used to set up basically what’s called a quick view. So the first thing that I’m going to do is create my own quick view. Now up here you see quick views. You don’t create it from clicking on that, you save it from there.
So what I’m going to do is create it, first of all. So I’m going to add on a couple of filters. So at the moment, all of the extraction is just showing the categories, decoded apps, and you’ve got some tags down here. So I want to add on a few more.
So I want to add on just a few, not too many, let’s say deleted artifacts. It’s a logical extraction, so I’m not going to get loads. I also want to add on hash. So as it says here, it’s looking for supported files such as .txt, csv.
So, for instance, I might be looking at CSAM images or trying to investigate CSAM images, or maybe I might be something like a financial investigator, something like that where there’s particular files that I’m aware of that I want to see whether someone has those files on their phone.
So I’m going to save up or create a list of the known files that I’m interested in. And I then want to see whether someone has them on their phone. So, I’m going to select hash, and it’s then going to ask me to add a file. So I’ve got a known data set already. Can I open that? I’ll okay that.
So now it’s running through the extraction. You’ll see it pop down and there are known files on this extraction. It is going to show none at the top as you see there, no artifacts shown, but that’s because I’ve got, as you see here on the left hand side, deleted artifacts and hash.
So it’s basically saying there are no deleted hashes. So all I do is as I create my filters, my quick view at the top here, clear filter selections, really good one to remember is just click on that and it’s taking it back to 36,499.
So I’m going to come back to the hash hits because as you can see, there are 14 down the bottom there, but I want to add on a few more filters.
So you’ve got participants, I could add that on now. So I’m actually going to add that on a bit later because the one thing you need to know about participants is that it doesn’t save. So if you create a quick view, you have to add on the participants manually every time.
But first of all, you have to save the persons, which is what I did. So just cancel that. When I created my persons, you’re not going to get participants appearing unless you create persons. So first of all, you have to save a case or create a case, then you have to create some persons.
So I’m not going to do that for now. And I’m going to add on a word list. So, the investigator I’m sure has a list of words which they’re particularly interested in, that they’re looking for. Might be gang members or whatever. I’m going to add that in and it’s found 186 hits.
So all I’m going to do now is I’m going to clear my filters. I’ve only added on a few. I’m going to add on loads. So I’ve got deleted artifacts here, hash, no notes to it, and I’ve got my word list.
What I’m going to do, this is a new feature to XAMN, is I’m going to click it, but I’m going to move it up cause I actually want my hash hits to be a little bit higher. I don’t want it to be sitting down at the bottom. It might be that you’ve got a smaller screen and you just want it to be a bit more prominent.
So I’m just going to move it above apps. So it’s going to sit there. And what I’m going to do is I’m going to make sure my filters are clear, but then I’m going to select known data set.
And before I save the quick view, I want it to be so that every time I open an extraction, the first thing that I see are the hits to the known data set. And I could have a few. Depends, you know, I might be an investigator in all sorts of different crimes I might have different hash sets that I’ve got created.
So this has found 14. So I go up to the top to quick views and you name it whatever you want to call it. So I’m going to add that and okay that, and down, James showed you this on the left, bottom left here you have active filters, number one.
So the only thing that’s showing at the moment is the known data set. And if we go up to here where it says all artifacts, you’ll see that you have WebinarHash. So if I close this down, so I close the second tab down, let’s go back to where we were when we created the case.
We’ve created the persons. Even if you haven’t created the persons, if you’ve saved your quick view as I have here, and I might have a few different quick views, but I’ve saved this one. So what I want to do is every single time I open an extraction, I’m always going to open it up into a particular quick view.
So I’ve only got one. So I’m going to open up into my webinar hash and it’s going to open up the extraction. And the first thing it’s going to do, all being well, is show me the 14 hits that I have. So it’s working its way down through the categories and it’s found the 14.
So straight away, and this is something that we had a lot of success on in the past where, you know, you’ve got massive extractions, sometimes hundreds and hundreds of gigs of data and you might have limited time and you want to quickly identify whether there’s something on that file that is something that maybe the subject needs to be arrested for, further arrested or whatever.
Just good intelligence, whatever. So I’ve got 14 hits. So straight away I know that there are 14 files on these extractions, bear in mind, these are for all of the subjects. So we go to data sources, it’s for all of them and it tells you individually where the data is.
Now, the one that I’m particularly interested in is this one here. So, on the right hand side you’ve got the photo as James showed you, you can make it bigger by viewing it, you can double-click on it, or you can go in the three little dots launching the default app and you can view it that way.
So I’ve got my picture, it’s a file that I’m aware of. Further down you’ve got the image, the file name, you’ve got the type of file it is, you’ve got the file size, you’ve got the path where it’s sitting, so this is sitting in the digital camera images, so it’s sitting in the gallery or the phone.
So if I right-hand mouse, click over that, I can create a folder filter. And I like to do it in a new tab, personally, it’s easier for my brain. And then you’ll see a third tab will appear here, which I can rename. That could be okay, whatever, rename it as I like.
So this is the 102 bits of data that are sitting in files and media. And if you open up to the subcategories, you’ll see that there are 80 photographs. So there are 80 photographs that sit on that path, okay? And exactly as James did, I can go to gallery view and I can sort them by size. And then I can just really quickly look at the data that is on the DCIM of that particular phone.
So, you’ve also got the created, the modified dates and times and you’ve got the metadata. And further down, if you open it up, if you click on the show technical details, you have the hash. So that’s the MD5. So that’s the file, the hash for that particular image.
I can also do, if I wanted to, so for instance, this might be a particular file of interest that I want to know, okay, what else did they do at that particular time? So right-hand mouse click, create a time filter in a new tab and I can then look at all the data that happened around a particular time.
Naturally defaults to 24 hours. 6 April to 7 April and there’s 1,175 bits of data. I can sort that by time, which makes more sense cause it’s a time filter. And then as you can see, if I go to the data sources, you can look to see exactly what data happened over that period of time.
The other thing I want to show you is something that I personally have had a lot of success on, is the three little dots. Now, you’ve got show similar pictures in a new tab. Now, what this is working on, this is working on the Dhash value, which… Google it if you want a bit more knowledge about it, but basically it’s looking for that particular image.
So, show similar pictures in a new tab and it’s going to tell me where that picture sits. So for instance, if I show a picture of my dog and I show it on WhatsApp and I show it to three or four different people, then that picture’s going to be sitting in my gallery, but it’s also going to be sitting in different folders within my phone. So I’m going to be able to identify really quickly who I shared that picture to.
So we’ve got here, you’ve got the PNG files, that’s actually what I’m going to do, first thing I’m going to do, which I forgot to do, is I’m going to tag it. So I can hover my mouse over here on the left-hand side or I can create a new tag. So I go up to top to tags, I’m going to create a new one, going to give it the color green and we’re going to say hash it.
So I’ve tagged it, I’ve shown it of interest, and certainly now I’ve a time filter that would really stand out because it would be really obvious. But let’s go back to the “show similar pictures in a new tab” and it’s found the five.
So that’s the one that I’m interested in. You’ve got some more, you’ve got some that’s sitting in the gallery, they might just be thumbnails. But the one that I’m really interested in is this one here because this is telling me if I go down to the path, it’s telling me that this has been shared through WhatsApp.
So, within a few clicks, and I’ve done this quite a few times now in the past when I was a police officer, I’ve opened up an extraction, I’ve clicked on “quick view” ‘cause I’ve already set it as I’ve done here, and literally within a few seconds I’ve identified an image or a file, document, whatever, that is something pretty serious that other people, might be me if I’m investigating it, whatever, other people will be really interested in that file.
And within a few seconds you’ve got enough that you might be able to identify that someone can be arrested.
So, this is the one that’s been shared with WhatsApp. And if I go up to the top here, just above the image it says “related artifact messages chat.” I click on that, it then shows me the message. So it’s been from Monty Jack to Gadget Hawkwrench on a date and time.
So what I can do from here, so this message was shared on 6 April. At the top here we’ve got timeline and maps. I click on timeline, so it’s gone straight to 6 April. I could add a custom time. So I click on custom time and then I just go, okay, it’s a bit niche but 15:11-15:12.
Okay, so if I go up here on the left hand side, it’s created a timeline. If I come on the little zoom out button here under maps, if I click onto that, probably want to create another timeline. I just want to see what was happening between aroundabout that sort of time period.
‘Cause it might be that I found a file that is so interesting, I want to know, right, okay, well what was everyone doing around that time? So if I clear my filters and I click on a timeline, so I’ve got the one minute one, I can see that there were 12 artifacts that took place around that time.
If I go to one that’s a bit more, so it was just over an hour, 307, I can also see if I go to data sources, exactly what each and every one was doing around that time. I can get to different views. I can click on list, I can go to gallery, I could just look at pictures that happened around that time. And the same there.
And I could go to, for instance, I’ll get back to this one, 307, go to conversation view, and it tells me the conversations that took place around these times. So if I go to the other one, there was a glitch and say there was a particular crime that I’m investigating that I knew happened exactly, I don’t know, a couple of minutes in time.
Then I could narrow it right down to a couple of minutes to the exact time when I knew it took place, put all the extractions into one case and then identify what all the subjects were doing around that time. Were they discussing the crime or were they taking images, whatever.
So I’m going to clear my filters. I’m going to close this third one down. I’m going to go back to this one. I shouldn’t have closed it down, should I? So I’m going to go back to show similar pictures in the new tab. I’m going to go back to my WhatsApp image, WhatsApp on, back to the message chat.
So from here I can now also go to the conversation. So it’s going to take me to the conversation where that particular image was sent. So it’s highlighted here. You’ve got the yellow. Now, the third pane, if you like, you’ve got quick views, conversation, then you’ve got one that says timeline and maps.
If I drag this up, you’ll see that message there is highlighted. So there are a few things I could do. I could create a PDF. So if I click on the yellow, do a ctrl+a, click up the top here, PDF, then I could create a PDF of the conversation.
Save it to that place there, into the same place where I’ve got all my other extractions. I can zip it if I like. I can also password protect it. So, password protect it and I can also select what I want it to open a file after export, open a folder, so let’s just say open a file after export and then export.
So, it’s going to create a PDF of this conversation. And if I open a folder, click on the PDF, type in my password, and there is my PDF of the conversation. Okay, there’s that. So, I’m going to close that down.
What I also might want to do is I might want to tag this. So I’m going to create a new tag and keep it as that color there. Okay, chat of interest, add that, ok that, and what I’m also going to do while I’m here is going to do my, I like the whole conversation, it’s of interest to me, if I click on the yellow and right hand mouse click, I can add it to the report builder.
So I’ll come to this in my last section. but I’m going to add it to the report builder and it’s going to be chat of interest. Cause this is what happens using it, you have a massive load of extractions to view. You find stuff all the time, a bit here, a bit there.
And if you are going to create a report builder, then as you go along you’re going to add on bits into it. So I’ve added those bits, but I will come to report builder later on.
The last two things I’m going to show is this image here. If for instance this was in another language, you click on the text, you right hand mouse click, you can translate only this. So if you purchase the translation pack, then you have your source text note.
Just to warn you, you do have to identify the text. It might be that you have to use Google Translate or something, for instance, if you have certain languages that you are really not sure what it is, identify the language and then we could choose the language, translate it into that, and then it will translate just that text there.
And then what you do is you save your translation, then close down the box by clicking on the X and then you see in the examiner notes you’ve got there. That might not be perfect, but it would give you enough.
And from my experience, it gives you enough to tell you an idea. It gives you a really good idea as to whether there is anything on there that is something of interest. So, if I click on another message, I do Ctrl+A, back to this text here, if I right hand mouse click that again and I do translate and I can do all selected, it’s now going to do the entire thread and translate it for me.
It won’t take too long. There you go. It’s done. Click on done. And then whatever one I click in, then you’ll see, examiner notes down the bottom here, it’s saved into that. And then what I could do is just save as I go along.
And then for instance, if you had a word list and you had particular words saved and you translated it, say you translated it into English, then you might want to save it, reopen it, open up and run the word list again and see whether the words are hidden there.
I think, James, that is, oh yeah, the last thing I was going to do is show you, so we’ve got this conversation here at the top here, above Gadget Hawkwrench you’ve got a thread. So I can also just look at attachments.
So if it’s a conversation that’s going on for, I don’t know, it could be going on for years ‘cause people don’t delete their chat data, then you might have a whole heap of attachments.
So you can just choose any conversation. So, if I clear my filters on this one, I go to conversation view, then I sort that by most participants first and I’ve got 30, then you could just click on attachments and there are only two. Yeah, I think, James, that is me done for my segment.
James: All right.
Alan: So, I’ll hand it over to you.
James: Thanks. And I’m going to kind of start off in the same kind of place you are with conversations between me and a couple of people. I’ve applied a filter just to kind of narrow it down.
But here I’m taking a look at just one particular message I sent to one of our trainers, Roz. And here I want to segue into going into what’s called ‘source mode’ and then going into hex and maybe dealing with unsupported apps and things that weren’t decoded during the extraction.
Here, of course, you know, we support a wide range of apps and we concentrate on messaging, social media apps, communications. In this case, of course, this is WhatsApp. We’re going to support that as best we can. It’s going to be one of our targeted apps.
And if you’re ever curious, you know, where is this data coming from, whether it’s a system app or a third-party app like WhatsApp or a system app like iMessage, you know, I can select the message, come over here into the details pane, and at the very top right, there’s a little icon and it says examine and source mode if you hover over it.
When I click that, it pops out this new window, this hex viewer. And if I select a particular element in my artifact, like here this text, I can see the text and where it came from and what file.
So this would be good for validating the tool, maybe, if you wanted to, just to make sure it’s doing what it’s supposed to do, and you can go back and check, oh yeah, there is the message. I see it came from this chatstorage.sqlite. And you can find that, okay, that is the WhatsApp database.
And you’re like, well, what about this date and timestamp down here? You say the date is August 18th, 2019. Where’d you get that from? Well, we can click on the time and then that’ll be highlighted as well within the file and this database, for example.
And we see the data highlighted, these hex values, but then we can see up here on the top right, okay, it’s eight bytes; it’s the number of seconds since January 1st, 2001; it’s going to be Mac time in here, so yeah, that’s the date and time.
So yeah, that’s source mode. We can view the file like that, but we also have a more powerful way of viewing data in its native format. And that’s viewing it in Elements, XAMN Elements. and I’m going to go to another extraction for that.
So this is going to give you an example of, okay, we have an app that wasn’t supported, it wasn’t decoded during the time of the extraction, or it could be a device that used a similar profile, we don’t support that device yet.
So some things may have not been decoded properly, and now you’re going after it on your own to try to manually find the data and do some of your own decoding. But I’m going to go to the databases in here, and specifically looking for one for the Zangi app, and it’s this database here.
We do have a built-in database viewer. if I have the database selected and the details pane, they always start out minimized. We have a built-in SQLite viewer built in P-list viewer, built-in XML viewer. But if you want to see more, you have to expand it, all right?
Again, this is probably not the best. I mean, I have to scroll all the way down here to find messages, but we can also put the ellipsis here. More options. I can show it in a new tab.
And now I have it in a more traditional view as if I was viewing it in a third-party database-viewing application. And I can go directly to the message table.
You’ll also notice something strange here because normally if I go to a database and say, I open this one in a default app, so I have SQLite Expert installed on my computer and I go to messages here, I’m not seeing all that stuff in red because database viewers are not designed to display deleted messages to you.
But our built-in viewer here in XAMN does display deleted messages for you. And it’s on by default in the bottom left corner, there’s a tick box here that says ‘show deleted rows’.
And we can take a look at this one in particular. We have a message here, we have a date and time, we have who they’re chatting with and to.
But if I come back over here to file, for instance, I can take a look at the categories and there’s only one message decoded, and it is not from this app. So obviously this database was not decoded at the time the extraction was performed.
But maybe I want to add this data in. And there are a couple ways to do that. One of those ways is to come over here with this database and we can hit the ellipses. And instead of examining it in source mode, which is just review hex, we can examine it in elements again, and it’s a more powerful hex examination tool.
Here we see this file in its raw format, SQLite3. That is the file signature, the file header for this, showing that it’s a SQLite database. We have some really cool built-in features for converting numbers, hex values into their 32-bit, 16-bit, 64-bit values.
So the second line here, say we wanted to see what hex 10 00 converted to, well, over here on the right, we can switch that to a number. And I need to move this thing out of the way. And by default, everything here is going to be a Little Endian.
So I do want to add my own value here. So I click add format, and this is a number I’m dealing with. It is two bytes, so that is going to be 16 bits, and this is going to be a 16-bit Big Endian value. So the value is 4,096.
And I can add that and save that as a new format set. I already have one, my custom Big Endian numbers, so I’m not going to save that other one. But here, 4,096, that’s how big each page is in this database. And this here shows me this four-byte value shows me that there are 57 pages in this database.
But if we wanted to, we could go find some of that text, like, I know the word June was in there, and I can look for all those hits. Let me make sure I’m looking for, yeah, June, and sometimes I want to make sure I don’t do anything case-sensitive, and here are my hits.
And what we can do is from here we can add artifacts directly into XAMN, like this text message here. We know this is a chat message. We know there’s a date and time in here.
But what I can do is construct a property, I can add an artifact and say, yeah, I want to add something to the messages chat category. And this is the message here that I want to add. Say “hi june 19 2020 ay 1407 eastern.”
I can select that, add it as a property. I have to make sure over here on the right is text and I select what kind of text formatting it is, then add property. And this is going to be just text.
And if I come back to file now and I go to messages, rather than having one, I’m going to have two. So this is the one that was already here, but now I’ve added custom, “hi june 19 2020 ay 1407 eastern.”
And if I wanted to find the date and time, which it is in here, it is right, let’s see, make sure I get these right values. It’s going to be about right here or so. And then maybe even more. But I’ll have to play with this because sometimes I forget.
And we have the date and time show up here. And I think this is just a four-byte value if I remember. So let me add a new one. Date, time, and this is going to be just, this one’s milliseconds, and I think I’m going to have to add a couple more bites in here. There it is.
So it’s this six-byte value here. And then I could add that as the property and add that as time. And then if I come over to file again and go to messages, see I have the text and the time, and do notice that when I’ve added this myself, there’s a little image of a human to show that this was created by the user, not by XAMN.
So we can see what was added after the fact. There’s also a filter that can show us, you know, all examiner-mapped data. And there’s only one item right now.
That’s one way of doing it. The other way of doing this is when you have the database open like this and you can see a particular table, messages in this case, and you know they weren’t decoded or added into XAMN and you would like to have these there, at the bottom left, there’s an icon that says export CSV, but there’s another one here to manually map the content.
So if we select that, it’s going to open up like a little walkthrough wizard that’ll allow you to choose what category you want these to go, in this case messages chat. And then click next. And then we get to choose what columns we would like to bring into XAMN.
By default, it’s automatically choosing the deleted record, true or false. But I’m going to come over to the right here and I am going to select date. And I want that one to come in as a time. And again, this time format. So this is the milliseconds since January 1st, 1970. And then I’m going to go and grab the message itself and that’s going to be text.
And next, and then I can get a little preview of what’s going to come in, and then import and open, 25 artifacts are going to come: all the ones that were live plus the ones that were deleted. And now I have a new tab filtered with just those artifacts.
And we can see the ones that are deleted have the little red deleted icon, right? And then one other method I’ll show you real quick, we are running low on time. So I want to end this and then hand it back over to Alan.
Again, unsupported app, you have the database, you’ve identified it in this case we’re looking at an extraction. You can see there are no decoded messages whatsoever. We have some files, that’s it.
One of those files we’d be interested in here is the chatdb.sql database. We can view this database in a new tab, and see maybe we’re after these chat messages, and we want to bring those into XAMN. We can see the date, the timestamp as well is there. And we can see that we’re talking to a particular buddy, but we also have a buddy list where we have those two buddies that we’re talking to.
So we want to relate both of these tables back and forth to each other so we can see who we’re talking to. We want to see the direction of where the messages are coming and then maybe we want to keep them in their own threads.
So, when you install XRY, you’re going to get Python installed, as well. And there’s going to be a folder created in your documents folder on your computer, and that’s where the Python scripts will go when you get them from somebody or create them yourselves.
Here’s a Python script that’s been created to handle this particular app. I right click here; I just want to show you what that Python script looks like.
So we’re going to target this database. We’re going to target a table, buddyList, we’re going to target another table, chat, we’re going to grab data from certain columns, and then we’re going to add that data as artifacts into XAMN.
So let me just run that. When we run Python scripts, we do it in elements, scripts, I parse chat from that chatdb database, run the script, uh oh, let me fix that up real quick. I am going to commented that out and try it one more time.
Here we go. Now it creates a SHA1 value that’s going to be stored in the log so that if you hand this XRY file off somewhere else and they take a look at the log and they say, “Oh, you ran a Python script,” well then you could provide them with the Python script and that should, if it’s the same script, it would match that SHA1 value, so they know they have the exact same one you had, so they can analyze it and see what it’s doing.
Click close and then I’m going to come back in here and view all artifacts again. Now under messages, I can see my messages between me and those other individuals, or I can go into the conversation view. Well, no I can’t because I removed the thread ID.
So when I commented those lines out, I lost my ability to view it in chat view. So I have to come back and take a look at that script one more time.
But that is using Python scripts to bring data in. I know that was very fast and quick, but hopefully, maybe it’s something that you didn’t know about. Okay, back to Alan.
Alan: Okay, cheers, James. There’s not a lot of time left, so there’s proof really of what James was saying that there’s so much we could talk to you about and we could spend hours and hours talking about XAMN.
Okay, so where you last left me, how long have we got? If you’ve got any questions by the way, then put them in. We may not have time to answer them today, or during this, but we get back to you, I’m sure.
So, the other thing I wanted to show you before I ran out time was participants. So if I had a new filter, if I go to participants, click ok, so it’s found three. But what I want to do is I actually want to add on another one. You want to do this if it makes sense.
So we’ve got the two, but I want to see, I might have three particular subjects involved in say, a robbery, and they may be denying that they actually know each other. So I want to see how they talk to each other.
So I can go to Monty Jack, click on Monty Jack and then go to Fat Cat, and there’s 209 data between the two. So communication data; texts, calls, stuff like that. And the same, what did Jack do with Hawkwrench.
So it’s just going to show me, so if you do have subjects that are denying they know each other, then you lump all the data into a case and then really quickly you can identify, and you can also, you could add that into the timeline and then you could just, you’ve already got your saved times.
So you could just add, you could do a custom timeline, so actually cancel that. If I go into 2020, keep clicking in, and then Quarter Two and then April. So I’m now looking at data between Gadget Hawkwrench, Monty Jack in April, there’s 206 bits of data. So that’s participants, clear my filters, get rid of the timeline.
Now I want to go to connection view. So we’ve created the persons, and connection view works so much better when you’ve created persons. I’m going to give myself a bit more space because there’s a lot. So I’m going to move these over.
So for instance now, because I’ve tied it all up by creating persons, and there’d be a lot of other persons if I was investigating this, I could give myself a lot, you know, make it a lot easier. But I’ve got Fat Cat and I want to see the data from Fat Cat to, say, the Disneyland chat group.
So there’s 20, so it’s now displaying 20 chat messages between Fat Cat and the Disneyland group. And it’s displayed here on the right hand side. I can get create a PDF, sort it by oldest to newest, I could just click on Disneyland and it’ll tell me who’s in Disneyland.
And the same thing where I’ve done this, where I’ve mixed up, so for instance, I could now click on timeline, I’m on Disneyland, ‘cause it’s still highlighted there, and I just click on 2020. I can now just go to a particular time, so the Quarter One of that year.
So I’m now in the Disneyland, where I could go to Hawkwrench, I could look at the data that took place. So Hawkwrench communication data took place in that period of time. So if I go again, click on it again, click onto March 2020, I can see exactly what sort of communication was taking place.
So Gadget Hawkwrench took team Snapchat. There you go. And down the left here you have your active filter. So if you want to know how to sort of get back to where you are, just click that and it will take you back to the beginning. And on this one here, we set the zoom, takes me back to that.
So how are we doing for time, James? We’ve got eight minutes. Right, so, what I want to do now is get this one back, move that back, clear my filters, push clear, I’m going to go back to list view. I just want to quickly create a report.
So I’ve got my chats of interest. Actually, what I will do very quickly is go back to my hashes. So I’ve got my known data set, I want to add these onto my report. So I’ve got my 14, going to clear the timeline. I want to tag all 14 of these cause they’re of interest to me.
I’m investigating a particular crime, they’ve got the hash, I click on one, ctrl+a, and then I’m going to create, actually I’m going to tag them as important, so just make them all go red. So now on you and I do that, Ctrl+A again, right hand mouse click, add to report builder. Okay, selected 14 artifacts, data block name is going to be, hash hits. And I might already have one called hash hit. So it’s hash hits_2.
Okay, so at the top, if I clean my filters at the top you have report builder. So add selected data. So let’s have a look at report builder here. So, at the moment I’ve got 14 bits of important, one hash hits, that’s the one that I did all my investigation on, and I’ve got chat of interest.
So at the top you’ve got your cover page. So you just click on it and drag it over, create the details, I want to put in the case ID, the case operator and the report date. And I want to maybe add on a logo. So, I’ve got my logo for the case.
So click OK there, and I might want to add in a few extra bits. So I might want to put in the summary, drag that across on all the data sources, so the summary of all the data sources. And I think I put in the general information, all the data sources.
So select data source, all data sources. I think then I’ll probably put in a page break so it looks nice and neat and I’m going to put in the first one.
So, we’re going to put important, OK, and I also want to click on Hash. I want that data to be put into my report, click OK there, and we’re going to have another page break.
I might then just put a note. And then this could be, what are we doing now, we’re doing hash hits, OK that, and then I’m going to put my hash hits in, and the same for that I’m going to put some hash data in and then chats of interest.
Put that in there. I want it as conversation view. So I click OK there, we can preview it to see what it looks like. And then I’m happy with that. I’m happy with all the data I’ve got there so I can just generate it.
So yeah, webinar case, we’re going to say webinarcase_report, where I want it to go, so that’s exactly I’m happy with that. I’m going to protect it with the password because let’s just say I work in a sensitive role and I don’t want anyone to sort of see what I’m doing. Don’t want it to be widely shared.
So just going to check that I’ve got the right password, I’m not going to allow changes, I’m not going to allow copying and I’m not going to allow printing. I can do, but I’m going to lock it down entirely so that if I share it by an email, then no one can do anything with it. It’s entirely locked down. Okay, and then type in the password. And there you go. And we’re now into the report.
By the way, this is all recorded. So if we’re going super fast, James and I, then you can just go back and view it, slowly. So, everything I’ve been doing, I’ve been looking at lots and lots of data. So if I click on case, click on the three dots, I’ve got my view audit log. So case info, three dots, view audit log.
So remember at the very beginning I said that I’ve selected that I want to do an audit. So I’ve been busy on this. I’ve spent a lot of time looking at this extraction, so it’s recorded everything I do, everything I look at, it’s all recorded there.
So that would be a personal choice for whichever department you work in, whether you want that. There may be reasons why you’re doing or why you don’t, so that you can choose.
Oh yeah, the last thing very quickly, while I’m in this particular extraction, I could, if I go into clear my filters, I can create a subset, which is creating another XRY file. But let’s just say, let’s delete, say for instance, this important data, let’s just say that I don’t want that, so if I click on edit, I can exclude that.
So it’s basically excluded that particular data. So it might well be that I had a lot of experience of dealing with legal privilege material, stuff like that. You might come across stuff that you’re not allowed to look at. So you can exclude it from the file and then, at the top, save a subset.
Now I want the filtered. So as you can see, it’s slightly less, so filtered, and then you can lock it with a password, you can select your options there, name it, and then save it, which I’m not going to do now cause it would just take too long.
But that’s how you do it. So you’re creating, whether or not you exclude data, you are creating a subset as another XRY file.
And the last thing to show you is XRY. So, James showed you this earlier one, if I go onto menu, process, process options, I’ve created one here called Logical_Max_read, so it’s a logical extraction, but if I go to decoding, then I’ve got some extra ones I’ve ticked, and James has showed you some of these, but the one you’ve that is quite good to know about is generate video preview and thumbnails.
So if I go to this extraction, which is my work phone, I go to files and media, go to videos, go to gallery view, it works best in gallery view, sort this by size. Oh, am I in the right one? Oh, I’m in the wrong one. That serves me right.
So, go to that one, all artifacts and then go to gallery view, sort by size, and then you can see here, like this one here, you’ve got thumbnails. So if you’ve got thousands and thousands of videos and you want to make life a lot easier, so if you have the time, it depends on what sort of extraction you’re doing. But if you have the time, set a decode so you can view the videos as thumbnails.
And I think James, there’s loads more to cover, isn’t there? But, I think we’ve probably covered most of it. There’s only about a minute left, I think.
James: Yes, yes. And so one of the questions was, “Where can we find the pre-recorded session?” And I was just informed that that will be sent out, everyone will receive an email, also from GoTo Webinar to view this session later.
Alan: What we going to do with the file?
James: I don’t have that. But the only other question I can see, it looks like the asker is that they had problems adding a GrayKey file in XAMN before and they’re wondering if it was fixed.
I don’t know of any issues. And we just had a new release of XAMN. So I I don’t really know the answer to that one other than it could have been a one-time issue, but as far as I know, there are no issues with GrayKey. I don’t know unless…
Alan: Yeah, I’m not aware otherwise. Yeah, we can find out and get back to that person.
James: Let’s see. Thanks. Thank you. Okay, so yeah, that’s it. So it looks like those are the outstanding questions. Thank everyone for joining. Hopefully you got something out of it that you didn’t know about before, that’ll make using XAMN more fun, more features that you can use toward your investigations. Thanks a lot, Alan. Anything left to say?
Alan: No, no, nothing for me. Just thanks very much. Yeah, I hope you found it interesting and useful.
James: Right. Thanks all. Have a good rest of the day. Take care.
Oxygen Forensics, a global leader in digital forensics for law enforcement, federal agencies, and enterprise clients, announced today the release of the latest version of the all-in-one digital forensic solution, Oxygen Forensic® Detective v.15.1. This version offers multiple advancements to increase access to mobile data, as well as improvements to the popular analytic feature, Facial Categorization.
Enhanced support for MTK devices
Oxygen Forensic® Detective v.15.1 brings enhanced support for MTK-based Android devices. Now Android devices that have TEE Trusty and File-Based Encryption (FBE) and are based on the MT6765 and MT6580 chipsets are supported for passcode brute force.
Moreover, our support now covers Android devices that are based on the MT6739 chipset and have TEE Kinibi and Full-Disk Encryption (FDE).
We’ve also added the ability to decrypt images of Xiaomi and Poco devices based on the Mediatek MT6769T chipset and having File-Based Encryption (FBE). Supported models include Xiaomi Poco M2, Xiaomi Redmi 9 Global, Xiaomi Redmi 9 Prime.
Android Keystore extraction from Qualcomm-based devices
We’ve added the ability to extract encryption keys from the Android Keystore from devices based on the Qualcomm chipsets: MSM8917, MSM8937, MSM8940, and MSM8953.
To use this functionality, select the Qualcomm EDL method in the Oxygen Forensic® Device Extractor. With the extracted encryption keys, Oxygen Forensic® Detective can decrypt Briar, ProtonMail, Silent Phone, and Signal apps.
Other Device Extractor updates
We’ve also included the following extraction updates:
Redesigned extraction method for Spreadtrum-based devices. Now this method is available in the new Oxygen Forensic® Device Extractor.
Updated the ability to extract data from Discord and added selective Discord chat extraction via Android Agent.
Improved the interface of selective iOS data extraction via checkm8, SSH, and iOS Agent.
Full extraction support for iPhone 14, iPhone 14 Plus, iPhone 14 Pro, and iPhone 14 Pro Max via iTunes backup procedure.
App support
In Oxygen Forensic® Detective v.15.1, we’ve added support for the following new apps:
Briar (Android)
AppLock (Android)
Default Sound Recorder (Android)
FileSafe (Android)
Zoho Mail (iOS, Android)
JustTalk (iOS)
Microsoft Bing (iOS)
Shazam (iOS)
IRL (iOS)
The total number of supported app versions now exceeds 34,300.
Brute force for additional MainSpace (Huawei)
A Huawei device may have more than one MainSpace (user profile). In Oxygen Forensic® Detective v.15.1, you can brute force passcodes to the second, third, or more profiles in MainSpace. Please note that a passcode brute force is also available for PrivateSpace.
Import of Microsoft Outlook Data Files
Now you can import and parse Microsoft Outlook Data Files of .pst/.ost file formats. Select this file format under “Desktop Data” options and follow the instructions. The parsed evidence set will include emails, contacts, calendars and tasks.
Import of Snapchat My Data
Oxygen Forensic® Detective v.15.1 allows you to import downloaded Snapchat My Data that can be collected with the “Download My Data” function from Snapchat. The parsed evidence set will include account information, chats, calls, memories, search history, highlights, story views, and more.
We’ve also added support for the latest version of Snapchat Warrant Returns.
Cloud Forensic Updates
We’ve introduced several improvements to Oxygen Forensic® Cloud Extractor:
The last view date is now extracted for Google Drive files
You can set a path to OCB files in the Account Owner information window
We’ve redesigned the Help menu and included new documents
Functionality updates of KeyScout
We’ve improved the software interface and made a number of functional updates to KeyScout.
You can now decrypt passwords, tokens, and cookies collected from other user profiles and computer images. Enter the known password in the Passwords tab within the Search settings for data decryption.
You can select particular drives and partitions for live extraction.
We’ve improved the Search Settings interface by adding detailed descriptions of the system artifacts and memory available for extraction.
More detailed information has been added regarding every step of the data collection and saving process.
New and updated computer artifacts
With the updated Oxygen Forensic® KeyScout, you can collect the following new artifacts:
Windows Diagnostic Infrastructure (WDI) artifact on Windows
System logs on Linux
Microsoft To Do app on Windows
Mail and Calendar app on Windows
Updated artifact support includes:
Most Recently Used (MRU) artifact on Windows
WMI persistence artifact on Windows
System events artifact on macOS
Microsoft Outlook app on Windows
Signal app on Windows, macOS, and Linux
Facial Categorization on video frames
In the Files section, we’ve added the ability to categorize faces from video frames. If an extracted video has a face, you can now right-click on a video frame and add it to the Faces section by selecting the “Detect face” option.
Updates in Oxygen Forensic® Viewer
We’ve added support for Project VIC files in Oxygen Forensic® Viewer. You can now:
Assign Project VIC categories to images in the Files section
Add Project VIC hash sets in the Hash Sets Manager
Customize Project VIC categories in the Options menu
Long before I started working with Detego Global, I had an extensive career in law enforcement. For almost three decades, I worked in the Commonwealth of Massachusetts’ Division of State Police. Here, I took charge of various roles, including that of a Narcotics Detective, Tactical Flight Officer, and the Sergeant of the Detective Unit.
I headed a team of investigators responsible for carrying out digital forensics investigations, to help uncover evidence capable of solving homicides and other serious crimes. The work I did with the police even inspired me to start my own company, where I provided Digital Forensics solutions to help those navigating the complexities of digital investigations.
As crimes continue to evolve in the face of new technology, devices and encryption, so has the need for powerful digital forensics tools and services. For years, teams like mine found it challenging to surface critical evidence rapidly, accurately and efficiently from digital devices. And as the world has continued to transform, the demand for these solutions has become greater than ever.
How Detego Would Have Helped In My Previous Role
Now that I’ve started my role as Technical Sales Engineer for Detego, I can look back and see clearly how such a platform would have been indispensable to me and my team during my career in law enforcement. It’s also become increasingly evident to me how valuable Detego would have been when I first launched my own forensic consulting company.
Here’s how I believe Detego would have transformed my previous roles:
Decreasing processing times
Digital forensics can be a long, drawn-out, and extensive process. In the past, I would often have to tie up forensic machines overnight just to acquire copies of hard drive evidence, preventing other teams from accessing them. This often caused significant backlogs of evidence, leading to huge queues of cases just waiting to be handled.
Ballistic Imager provided by Detego would have allowed me to decrease the processing times involved in managing complex cases, thanks to its phenomenal speed – enabling 1 TB of data to be captured in less than 8 minutes.
Reducing backlogs
The capabilities offered by Detego’s Field Triage module would have saved my team hours of manpower and reduced the backlogs we faced every day. Being able to scan data instantly and determine the value of evidence with quick alerts would have meant investigators were able to rapidly focus their attention on the correct area.
The extra ability to customize the Field Triage module would have given each team member in the field more scope to fine-tune their examination and weed out non-pertinent items that would’ve otherwise added to the backlog of devices that needed to be investigated.
Solving cases
The Fusion functionality offered by Detego could have been extremely useful to the investigations conducted by the detective unit. Our investigators frequently found it tough to link suspects, witnesses and families to various crimes. At the end of my career, we were working tirelessly on the ongoing fentanyl epidemic, responding to deaths by overdose. Each case was investigated to attempt to locate the supplier.
Being able to leverage link analysis with a dedicated tool, rather than having to export data files into separate software packages, would have allowed us to reach crucial conclusions faster.
Better data analysis
The Analyse suite offered by Detego could have been indispensable to my team as well. The customized workflow elements of the solution, combined with the ability to centrally view and analyze data from exhibits from a variety of different devices, would have allowed us to get to actionable data faster.
Not to mention, the integration of AI and the ability to instantaneously view data as it was added to the platform could have accelerated the results we achieved in the field and in the lab.
Detego Can Transform Law Enforcement Teams
Looking back now, with the experience I have in the industry, it’s easy to say Detego would have been a world-changing solution for my role. I’ve tested and used many of the available hardware and software tools available to digital forensics practitioners to date, but I’ve never encountered anything as efficient and impactful as Detego.
The unified nature of the Detego Platform and its various modules helps law enforcement professionals to make the complex and often daunting task of searching through digital evidence much simpler. I believe this platform has the power to change the way investigators operate for the better in the years to come.
Holly: Hi everyone. My name is Holly Hagene, welcome to today’s webcast. We’ll get started in just a minute. First, a few reminders: all the lines have been muted to reduce background noise. We also encourage you to submit questions or counterpoints at any time through the webinar control panel. We will do our best to work those in throughout the discussion. This webcast is being recorded and will be posted along with a copy of the slides to Exterro’s website. We’ll also be sending you a link to those materials later today over email.
Today we’re excited to present the third webinar in our Masters of Digital Forensics webinars series. This series is an educational program focused on best practices for optimizing the digital forensic investigation process. There are five complementary courses in the series, and in today’s course, we will be diving into the analysis phase, part one. If you attend all five webinars, you’ll receive your Masters in Digital Forensics certificate at the end of the series.
This Masters of Digital Forensic series is brought to you by Exterro. Exterro is the leading provider of e-discovery and data privacy software, specifically designed for in-house legal privacy, and ITP at global 2000 and AmLaw 200 organizations. Exterro also recently acquired Access Data, the makers of FTK. By combining forces with Access Data, Exterro can now provide company government agencies, the law enforcement, law firms and legal service providers with the only solution available to address all legal GRC and visual investigation needs in one integrated platform. For more information, visit exterro.com.
Now I’d like to introduce our speaker today. We are happy to have Allan Buxton back as our speaker. Allan is the director of forensics at Secure Data. He is a former law enforcement forensic analysts, has provided expert witness testimony in both state and federal courts, holds multiple forensic certifications and is a former international instructor and course developer. With that, I’ll turn things over to you, Allan.
Allan: Thanks, Holly. And good afternoon or morning, depending on where you’re at. That’s enough about me. So let’s talk about low hanging fruit, which we can talk about, say, triage versus analysis. And I don’t know that this is going to categorize easily or neatly into the either one of those. You could use it in both situations. For me, when I talk about low hanging fruit, I’m talking about the types of data or bits of information that tell me that this is an item worth focusing my attention on. Not necessarily am I going to seize it, because I may very well have already seized it, but is this worth devoting resources to crawling through the whole drive, or building a full-text index, or loading it down with keywords? Because all those types of searches take time. I think in terms of size of information out there, your standard hard disk you buy off the shelf now is at least a terabyte. Solid state disc started…I don’t know anyone who buys a 256 gig anymore in a machine, it’s 512 or up, and all those things take time to parse. So if you’re dealing with one evidence item, or multiple evidence items, the question becomes what is the best use of my time?
If you’re a government agency, I’ll be amazed if you tell me you have no backlog. If you’re working on the corporate side, we’re talking about spending the client’s money…even if that’s just your employers. So trying to find bits of information, say, “this is where we’re best off focusing” is a huge bonus in my book. You can tell pretty quickly usually whether or not something’s worth your time, if you know something about the case, and that is one thing I will caveat straight upfront: this sort of information is contextual. You have to know what you’re looking for, what is expected in terms of the scenario being investigated and known details already. So low-hanging fruit are going to change based on the type of case you’re working in. We will go through some examples.
I do consider this an analysis step, because I’m a big believer of “when in doubt preserve”: it’s better to have more evidence items than less evidence items and preservation is arguably the least expensive in terms of time and analysis comparison, right? Storage is cheap. If you have a dedicated imaging platform, then it’s a matter of stacking stuff up. Even if it’s mobile, figuring out which devices to extract, rather than screwing with extracting, checking, extracting, checking, it’s just easier to grab them all and then work through them. So, because you can always say, look, “I didn’t need those evidence items, I didn’t need to look through those, we felt like we made our case”, or “we found the information we needed at a later date”. So no one really argues if you find what you have efficiently. The question is always, “well, isn’t there some that may be exculpatory or would argue a different side of the case?” You can say “sure”, but contextually, my goal is to find XYZ. Someone else’s goal might be to find the exculpatory information. So, low-hanging fruit is not a complete analysis. It is strictly a way of prioritizing where and how you’re going to focus your analysis.
First thing first: is there data? If you’ve taking your phones, and it boots up to a new user screen, the odds are good it’s been reset, so probably no data to look at. Likewise with the hard disc, or a solid state disc. If I’m looking very quickly at a file system (and I am using X-Ways for this, because X-Ways parses the file system quickly without having to pre-process of boatload of stuff) they’ll tell me, are there deleted file system markers, right? Are the first clusters reassigned? In the first screen capture, you will see that…the “first cluster not available” means that that cluster is being used by another file. So the contents are probably overwritten, right? If we look at a couple of others, it says data unchanged, there are previously existing, and tells me there’s data there that may still correspond to those files. So maybe I’m not dealing with a wiping situation.
Now in the second screen cap on this, we’re looking at free space on the drive. All starting zeros is not a good sign, especially if it’s a solid state disc. We have a good guess garbage collection has taken place, or someone has taken a few steps to wipe the drive. So easiest step first, do I have data to look at? Not a hard one, by all means, a very fast one, depending on the tool you use. This is the kind of thing I would argue for using triage mode in something like FTK, as opposed to building the index right off the bat and doing all the parsing, because you’ll know real fast, if that’s even worth doing.
And then example-wise, we talk about the context. Pictures or video case types. And then if you’re in law enforcement, you know exactly what I’m talking about. If you’re not law enforcement, understand that there are cases where pictures or video or your most damning kind of evidence. So if you’re looking for a producer, even if it’s like a hidden camera case, look for a large file sizes for video, or B proprietary file types, right? If they’re working with a specific set of cameras, it’s easy enough to hit the support forum and see what types of camera formats are used. I listed a few here. If you’re using the RAW formats, which is your highest picture quality in most situations, Canon still uses a CR2 extension, Nikon uses in NEF, Sony uses an ARW.
What I will call your attention to in the screen capture though, is the directory content: directory names can also be indicative. If you, if you’re dealing with a GoPro, almost all your video is in a folder labeled 100, 101, 102 GoPro. Nikon D750, the camera models are generally dependent on the directory. Those kinds of things are global. That tells you that you’re dealing with someone who does have access to video or camera systems. And so maybe we have something to look at.
If we’re talking mobile, those of you who own an Android phone or have worked with a Pixel before, we’ll see that the camera app shows the PXL prefix, and then the day/time of the image capture. That’s good info to have, right? PXL_20210826 etc. And that not only gives me a day/timeframe for when the device was last in use, but tells me that I’m dealing with someone using a mobile camera. So, these are very fast things you can flip through in a file system display, or even in a recursive explorer. So they’re not bad to go looking for. I mean…straight up, even if you’re dealing with the hidden camera stuff people buy on Amazon, they almost always have a prefix appended as a directory structure. So pulling down a manual for the evidence item in front of you, can very well tell you where to go looking for those types of files.
The other thing I look for, that I have highlighted in the screen capture, is the overly generic file name. Like…old joke in the industry is that anyone who’s got a folder labeled “stuff” is hiding something in it, because the name is so boring, that no one feels compelled to go looking! So I threw that in there as just a reminder that an overly generic name, like…we know our defaults: documents, pictures, and video, desktop…all of those exist. So if someone’s gone ahead and conned the links to make a folder even more boring than those names, maybe it’s worth poking around in, just to see what you have.
If we’re dealing with a disseminator or recipient, you may very well find names consistent with the transfer. If you’re looking at the right, that is a screen capture of my first birdie putt of the summer. And if you’ve ever gone golfing with me, it may very well be my last birdie part of the summer. But the arrow there will show you that that file is named 20210820_193040, which is a date/time stamp. But it didn’t originate from my camera. My camera doesn’t create that file naming convention, it’s indicative of a transfer via data. So I go looking for pictures or video that have names consistent with – or prefixes consistent with – a transfer. You know, a lot of older phones still will use an MMS prefix for a file saved from an MMS text message. If you’re looking at Facebook Messenger, everything’s prefixed with FB_IMG. Others will just have an IMG_ for other types of camera or transfer apps. So very quickly…if you pull an SD card or you do already have a phone extraction to go through, and you’re like, “where’s the smoke, where’s the fire?” Start here! Transfers are usually compressed, so you won’t have the massive file sizes you might with a RAW image or a full-sized JPEG taken by a camera, or a 4K video taken by a GoPro or whatever. But you will definitely have a prefix or a file name indicative of that transfer..
And then again, directories are consistent with known tools, right? For transfers. (I think I’ve got a screen…I had a screencap coming up. It doesn’t look like it’s here at the moment.) But you know, if you’re dealing with any of the download links from peer-to-peer, they all have an app, they all have a folder, received files. Shareaza, any of those, will very much have some sort of directory structure. So if you’re dealing with even like One Drive or Dropbox cloud transfers, those directories jump right out at you. So they’re not hard to go looking for real quick with just a quick directory parse. Show me what’s there inside program files, show me what’s in my user directories: all that good stuff. And you will very much see that you are rolling along with, “do I have things that may have been transferred?”
Moving on: stalking and harassment. There is no good anonymized GPS location data. So you have a creative commons location screen cap for this. So stalking and harassment location data…sometimes what I’ll do is I’ll take their location data, map it all out, but then I’ll just tack on one waypoint for my victim, right? Address for home, address for work, and see where it falls inside all of their location data. Because if you’re stalking or harassing them, sooner or later there’s gotta be an overlap. Now, if your suspect works with them, that’s a little less incriminating than maybe we would hope for. But if they don’t work with them, or if it’s someone they no longer have a reason to associate with (maybe they’ve been fired, maybe there’s a restraining order in place) the date/time stamps, that location data could very well come into play. Now, most of the time, this is often mobile. So we do have to parse the mobile device to get this. So it could be a little faster than digging around for SMS, MMS or any kind of messaging apps. It may not be faster. But it is a quick way to see if you’re dealing with physical interaction. You may also get this kind of information from call detail records, if you’ve got the probable cause to build that up. So there’s an option there. I did highlight also browsing history because people tend to look up addresses, they tend to look up locations, especially if they’re stalking or scouting someplace out.
In terms of other things on mobile, right. Does their name even exist in the contact entries? Does it exist as an address, as a phone number, as an email address? None of this is rocket science, but it may very well save you from keyword searching and waiting for the returns on a full analysis of that device. So, it’s just tricky. You got to tailor it to what you’re dealing with. If they’re sending threats, or if they’re faking being the recipient of threats, sometimes the data here will tell you where that information is coming from. A little faster than possibly reading through all the messages to say, “look, do they have some interaction? Or does this match what’s been reported?”
So misbehaving employees would either call soon to be ex employees, or possibly ex employees already. The first thing we want to tell you is when in doubt, pull the browsing history. If they’re goofing off at work, they’re probably in a browser. If they’re in incognito mode, we got to go a little deeper, we’re talking full analysis. But what I want to draw your attention to in the screenshot is the search?q=. Pretty much every search engine artifact out there has a ?q= in it followed by the phrase they’re searching for.
So if you just pull places.sqlite. (I honestly think SQLite is the one that won the browser wars, as far as history, right? I don’t think there’s a modern browser that isn’t using a SQLite database.) You don’t even have to pull the dates and times. Pull your table for places visited, and then just do a filter for ?q=, see what’s there for searches, and then start working backwards. If they’re looking “how do I delete my records?” “How do I copy stuff?” “How do I quit a job?” Or if they’re searching for new jobs, you’ll see a search engine for jobs in your area, jobs that match their experiences, or maybe they did not match the experience levels. You’ll see all of that real quick, just by checking what they’ve searched for. And by pulling the database and just checking it quickly, you don’t have to wait on all the parsing and returns.
Now you do have to be comfortable with the manual tool, right? But SQLite is not a complex beast as far as browsing and exploring. Things like DB browser or…there’s a million different SQLite browsing parsing tools out there. There’s a million scripts for pulling history. So, you can do that very quickly with just a couple of right click file copy out, and then load in tool to see what’s there. You don’t have to wait on a full parse. Quantity events, history entries will give you some idea as well. Are they deleting entries or they’re using incognito mode because there’s just not much there? In some of that’s going to come into their job functions. If you’ve got someone whose job is to work with a lot of web interaction, you’ll see…you should see more quantity, not less. What you’ll see though, are types of sites, names of domains that tie into what’s work appropriate. If that job runs their own series of web apps, you should see that URL over and over and over, right? So maybe we filter that one out and then work our way backwards as to what’s left. If you’re not seeing it over and over and over, how much work is actually getting done?
Likewise with bookmarks. Bookmarks can tell you what their interests are, what their interests should be and everything in between. I don’t know how many people link their personal browsing bookmarks to their work profile, or if they load a second profile on a work machine anymore. Seems like most people keep that on mobile now, but the work profile alone should give you some idea of what’s going on. If they’re spending all their time on their phone, how many records do you expect to see on their machine? Probably not as many as you would hope.
Same thing with the files on the desktop or documents. I like to ask, do they have a network share for storing files? Do they use a Google Drive in the cloud age? Do they use One Drive? Where should I expect to see their work product for an employee investigation? Counsel or the HR or their supervisor will tell you where they expect to see files, maybe it’s just back and forth and email and the local disk, they don’t have any redundancy policies in place. That happens.
And if that’s the case, that’s a goldmine for me, because that machine will tell me everything I need to know. If their data is elsewhere, I still check the recents. Where are they accessing those files? If I only have, like, in this screenshot, 10 or 12 link files, how many files are they really pushing through in any given day? I should see hundreds, if not allocated and certainly erased old file markers as they get updated and moved around. And this is just browsing through these folders is faster than parsing all my jump lists and back files. Certainly I’m going to do that to paint a picture, to really dig in deep as to what’s going on, but I’m not going to spend a lot of time doing that if it’s painfully obvious that this disc either has had those records purged and wiped, or was never configured to keep them to begin with.
How many people keep a clean desktop anymore? I get a little ridiculed because I…computer and recycle bin are the only thing on my desktop, unless I’m working on it in that moment, and then it gets moved into my storage hierarchy. So I get a little PTSD when I sit down in front of a machine that has a couple hundred icons spread across two or three screens. But that’s a person who’s generating and creating files and content. Likewise, in the documents folder, which is where you’ll find most of my stuff that hasn’t been backed up to a network share, you’ll see hundreds, if not thousands of files or files that have been erased as they’ve been updated and moved. You should see revision history as things go from draft one to draft five or six or final.
All of that, those directories will tell a very fast tale. Quantity alone will give you some idea, file name transitions will give you another. So again, in terms of browsing through folders, very quickly, can I work through my user accounts. It’s not hard. I can take a quick assessment. Is there stuff here? Is there not stuff here? More importantly, in terms of recents, where do these links point to? Something to think about there as well is that those link targets will either point to this machine, or a removable drive or a network drive. So if you’re worried about data exfiltration (which might be our next slide) checking those recent files, and then maybe digging into the jump list and whatnot are all options for checking targets.
I like to still pull the registry, see how many storage devices I have floating around. If we look at this one, we see a great many USB devices have been connected at some point in the past. So now it’s a question of what’s your USB device policy? Have you issued any? Would that be irregular use? Which of these might be IT functions or left over from data loads? All those questions come into play. The only thing we don’t see any more that people tend to overlook is that this one has a DVD drive in it, that’s capable of burning disks. How many people have had data dumped on a disk anymore? Everybody sneers if you hand them a blank DVD, but something to consider is maybe I need to go looking at other artifacts along that route.
I mentioned cloud uploads earlier. Clearly the browser URLs are of interest there if there’s no application loaded, but what we’re seeing more and more is, there’s always at least one application loaded. If you’re in the Windows world, it’s One Drive, if you’re in the Apple world, it’s iCloud. And the push is to use those services. A lot of corporate environment…the cloud sites enable a lot of collaboration, especially in the last year and a half. So when…it’s just faster and easier to roll out a cloud deployment of some sort than it is to build resources when no one’s allowed in the office, or there’s only two guys permitted to work on the infrastructure at any given time…then you got a VPN.
I mean, I don’t know, I would…if we were all in a room, I’d say, raise your hand If you didn’t roll out some sort of cloud cloud management or document sharing solution in the last year and a half. And I would be surprised if there weren’t quite a few hands raised. So we go looking, right? We’ve got to go looking in the applications folder to see what’s installed, check the app data folder, check the program data folder, check the program files folder in the Windows world. And and see what’s there, and more importantly, what may have used to have been there.. It’s not uncommon for people to remove an application thinking it covers all their bases, but I think we both know that…the LocalLow and the app data has a way of hanging around just in case the programs are reinstalled.
Sometimes program data does as well. Program files tends to go away, but occasionally program data is left behind in case the app is reinstalled as well. So we can find some artifacts very quickly. And the second screenshot here, you’ll see some of that app data stuff floating around, and here we have Dropbox, we know the app was at least installed at some point in time. We also have some peer to peer apps, right? eMule, Shareaza, there’s a Google folder, might very well just be a browser. Could also be Google drive. I would expect to see some One Drive settings. I don’t know if I would expect to see some One Drive data without digging deep into the Microsoft settings. But a quick run through here will give me an idea of what I may have seen in programs that wasn’t there now, or what would have been previously allocated.
So again, all I’m really talking about here is hitting the directory view. Maybe in the case of the registry, I’m pulling three files: system, software and SAM. Why am I pulling SAM? I’m not busting passwords, I don’t have time for it. What I am doing is seeing if the accounts listed in SAM match the accounts listed in my user’s hierarchy. There’s probably a service account that has never been logged into and that’s easily identified. But if I have, say, two local accounts on a box, and I have three or four accounts, I would expect those three or four…those other two accounts to be domain accounts of some sort, or why is there a disparity all of a sudden? Do I need to go looking for an older version of the registry files? Am I dealing with deleted accounts? With account data left behind? Am I dealing with cached accounts from a reuse? Generally, if you have your suspect on the machine, you have a good idea of what account is theirs. So is their account even present? And again, in the last year and a half more and more it’s local accounts because VPNs and domains don’t always play nice. Or it’s BYOD, since you’re working from home. So local accounts are still of interest to me in terms of pulling the SAM. Software hives tell me what programs are there also. So…and then maybe what some settings are. I can tell from software, if there was a One Drive account loaded and configured for use. Likewise with Dropbox or a few of the others. So, if there is an active cloud account, I’m very much in business, just digging around that way.
So something to think about here is sometimes all you have to do to assess something is have good access to the folder structure and the types of files…easily viewed types of files. In this case, three or four registry files or recent location, or their equivalents on Mac. Which would be normally hidden under the user’s home folder and then library. Safari uses a SQLite database too. USB devices are logged in their debug files. So, Mac is not…panic on the Mac side is not necessarily appropriate. What’s the bigger issue with Macs now, is if it’s been built in the last two, two and a half years deleted data’s not an option, right? T2 max, the M1 Mac, all of those automatically discard file-based keys as files are erased, so there’s no getting anything back from an allocated space. So all you have is what you see in front of you.
In which case what’s missing becomes a little more important. If I do not have a user’s home folder, or if I don’t even see an account that matches what I’m being told they should have been using, now we have a big concern. Do I focus resources on that device? Probably not. I know I’m not going to get any more than what’s there, and all I can do is quantify what’s there now. Now you can write 30 pages about what I should anticipate seeing or what should be there, if that were the case, but what should and what is comes in the tampering when you can prove a case, when you have a case to prove.
So I am probably moving on from a device, in the last two and a half years on a Mac that I cannot get deleted data back from. It’s abundantly clear to me that there is no data to review. It’s an unfortunate truth right now. We don’t have to start the Apple hates investigators talk because I don’t know that it’s appropriate. But the truth of the matter is that if you’re dealing with a Mac, even the luckiest can catch a real break by deleting their data. Someday, maybe we’ll like Macs again…maybe.
And then mobile: there’s always a lot of questions about mobile, which is kind of where I’m at until we get questions. I put a tiny old phone up here for one reason alone, and that’s that last bullet point. The temptation is always to look through the phone rather than waste the time with the extraction and parsing, because most tools are designed to extract everything and then parse everything. And if you’ve ever tried to run the extraction wizard with the 17 different options and the different security options and patches that might enable which one works, you can spend hours on one device. So the temptation is “let’s just look and see if this is worth doing”.
If you couldn’t tell from the golf shot, I don’t have hands sized for mobile. And these are the size phones I started with, and about the third time you inadvertently hit draft or create…going through text messages, or you take a picture of your hand as it covers half the camera, and you’re stuck writing a memo or adding two reports that the last picture on the camera extraction is yours because you inadvertently pressed the button, you’re kind of done with it. Now, smartphones don’t actually even have buttons, they just have a screen and somehow the screens have gotten larger, but the buttons still don’t fit my hands. So for me, even with a Stylus, I will avoid hand parsing a device because when I’m doing that, I’m creating records.
And any phone extraction where the phone remains functional, we’re creating a little bit of data. We’re either loading a client on the device, leaving the client on the device, or removing the client after the extraction. We’re changing settings, even temporarily, then we’re changing them back. We’re making a series of controlled changes. And for me, I want to keep that control at the minimum. I want to say “these are the changes I made to extract information, and then I want to get out of it.” I do not want to get in the spot where I’m like, “well, before I did all that, I went ahead and took a look to see if this is the first phone I should start with.” It just doesn’t work for me.
Tools are slowly evolving. There’s starting to be some options. There’s always been some options for limited extraction of either what’s supported or what’s desired, skipping pictures and video. If you’re strictly dealing with SMS, MMS…is occasionally an option. I tend not to because of MMS moves pictures and video, but do I need ringtones? No. I don’t think I’ve worked a case yet where a ringtone is incriminating. Although I’m sure someone’s got that story, and I will buy you a drink if we ever meet up, you have a chance to convince me it’s true! Do I need contacts? Almost always. Do I need every app on the device? Probably not. Like, there’s a lot of apps that just don’t tell a story.
So I may streamline an extraction based on what I know about the case. I may want to go back and re-extract that as things change. For me, it’s just easier to pull all that data. There’s not a lot of low hanging fruit to be had in a phone until you’ve done your extraction and run your parse. So I don’t do a lot of limited analysis on phones, unless that’s all the analysis I have in front of me. Just kind of the way things shake out.
So, we talk about infotainment systems, in vehicles: do you rip the dash apart and do the full extraction or do you push the buttons and see what’s there? Now that’s an 8 inch, 12 inch touch screen, so it’s a little easier to look at that information, so I might be a little more bold and dig through what’s cached as far as contacts or SMS. But if something’s read or unread (I guess I should say if something’s read) I don’t want to flag it as read, I’d rather extract the data in its unread status than try to explain that I moved that data to read prior to extraction. So I’m even very careful with infotainment devices. It’s just easier to say “this is the data I’ve found, these are the steps I took to preserve that data”, than it is to say, “I made a call to change some data, to find out if it was worth doing some data.” Now you may be in a different spot on that. That’s why all this is contextual and largely a judgment call. It’s not the end of the world, we can agree to disagree on some of that. It really comes down to how you articulate it later. For me, I tend to go back to preservation.
I think…let’s see, we got PCs, Mac…Mac prior to M1 T2: very useful. If you had the firewall keys or…I still see Macs that don’t have this encryption enabled so those are very informative. Everything we’ve talked about with PC translates for the most part over to the Mac side of life on that front, if you can get that far. So, buyer beware, I guess, on which version of Mac you have. I do tend to run every…yes, color codes, gunmetal Mac versus silver Mac versus brushed steel Mac versus plastic Mac. But I do tend to avoid assuming I know what model Mac that is from the color or from the shape of it. I will check every serial number and I will run every model number and look at which options are available before I start with those.
Having said that, let’s…any questions? I don’t feel like I flew through that, but it certainly ended a little quick. So if you have some questions, let’s run them.
Holly: Yeah, if you have something to ask, please post your question in the question box and we can go ahead and answer those. Have you had any instances where you’ve had to extract from smart refrigerators or anything like that? What kind of information do you get from that?
Allan: So interesting things, smart fridges, smart TVs: largely Android based or Linux based, custom kernel. So you get account names, you can get a lot of information about usage of viewing…if we talk about a smart fridge, we’re not quite at the stage of the game where it’ll tell me how many times the door has been opened and when the milk’s been removed. But that’s really where they’re trying to get to. Most of the time it’s what accounts loaded on the box? Which apps have been run. A lot of people like to stream music from their fridge…and more power to them. I guess I don’t quite see the benefit personally, but you can get patterns. If someone says they’re in the kitchen doing things then the fridge becomes in the play as confirming or debunking an alibi. Otherwise it’s not super useful.
The smart TV is great because it will tell you viewing patterns, it will tell you what apps have been launched, and it gives you a whole slew of accounts. So if you’re really struggling for email IDs or account names, or even handles for individuals, sometimes those places are better places to look because they tend to overlook them. I’ve worked a lot of cases where people have reset their laptops, reset their phone, and haven’t touched a single bit of their smart speakers or tablets. And you can get IDs off of all of that to start building that paper trail back. So, a lot of that stuff syncs to the clouds, so you’re dealing with a lot of court orders to get that information. But there’s some good info there. I liked the IoT stuff for building patterns of being home or not being home. And like even the video doorbells can give you an idea of what the traffic is around the house or outside the house.
Holly: Okay. This might be a similar question: how would you extract data from an Alexa or Google home systems like that?
Allan: All right. So when we’re dealing with the actual devices, it’s going to be chip subtraction, most likely. I haven’t seen a whole lot with ISB ports still intact, or they’ve been so small that you’re better off removing the chip. But it would be chip subtraction. I’ve done some smart speakers. I haven’t looked at a Google home controller, but I’ve looked at similar style home controllers, and they contain logs for what devices are talking, what modes have been engaged, what sensors have been tripped or what things have moved in and around on the smart home.
So, even a schedule, like a pattern, helps sometimes. If the lights are all set to go off at 11:30 at night, or if they have a very advanced house where they can control their locks, or tie them to the doorbell, you can build a pattern of activity from that sort of information. It’s a lot of manual decoding. Some of it’s SQLite databases, some of it is just raw text log entries. So timelining becomes a very manual process. But it’s very informative for telling you about the actions of the people around.
I haven’t dealt with a very, very heavily integrated smart home yet where they’re controlling the TV and the speakers and the lights and the locks and the doorbells. But largely because I don’t think we really hit full integration on that stage, unless you’re a real power user. But I love to build a pattern of activity. What’s a normal day? And the patterns in those smart home controllers tell you what they expect their day to be. This is when I get home. Or is it when my phone hits the driveway that the lights start warming up?
That sort of thing…a lot of smart home thermostats will bring the temperature of a house back up or back down, depending on the climate, within an hour of people usually coming home. All of that gives you a pattern. So if you’re dealing with a missing person, you know what they may have been…what they expect their day to be and what their day has been in the past, I should say, as a pattern goes. So what days are anomalies? What day did their phone ID, their Bluetooth ID, their wifi Mac address, not trigger the, “I am home” function. Those are the kinds of things those devices can tell you. Is that low hanging fruit? Probably not. You’re doing a deep dive to get that information. You got to put some resources into it, but it’s well worth doing if it fits the context of your case.
Holly: Any additional advice on Macs?
Allan: Man. Additional advice on Macs? I guess, for right now, the best advice is: make zero assumptions about what preservation tool or what analysis tool is going to work for you. Yes, Macs are really good about forcing updates out for the same OS version. But you’re in a world where there’s potentially three different platforms floating around, sometimes four, in terms of processor architecture, and what those features were enabled. And then also they have an amazing amount of controls for how to safeguard that. If you’ve got an M1 Mac, you have integrated storage, you have a full disk encryption, based on file on file. And if they’ve taken the time to set the recovery options to be locked to a password, there’s not a tool out there that’s going to let you do anything with that, much less log into the desktop and build a logical acquisition.
So for me, I always check the model number. I always check the serial number, and I do a deep dive as to which version of the Mac that is. And then I start slow. Can I boot the Mac to the recovery console? Will it load target disc mode? I.e. do I have a chance at making any form of preservation? Because even a preservation of an encrypted disc, I don’t have the code for. May be useful in the future.
And then it becomes, can I get a logical acquisition? You know, if it’s old enough and I have the firewall password of people are cooperating, can I build a decrypted version of the disc? Great. Can I log in and build a logical acquisition? Even if it’s a limited one. Am I limited to just my user account and what it has permission to do? Can I escalate that privilege to the whole drive by taking ownership? All of those are options that are incredibly controlled on a system where those exploits aren’t there, and the exploits that do exist don’t necessarily help you with getting raw access to information.
So Macs…proceed slowly with a Mac. Yes, the pressure’s on for results sometimes. But bear in mind that, even with full disk encryption (if it’s solid state) you still have all your maintenance functions running. So wear leveling, garbage collection, come into play as well. And while that may not affect the allocated information, it could affect things like your virtual swap file or your hibernation file, where data isn’t expected to reside and the controller is well aware of that, that that data is not necessarily going to be used more than once. So yeah, I would say go very slowly with most Macs, and especially in a situation where you do not have a good log on and password, or you have steps taken to protect the storage beyond the desktop login.
Holly: Okay. Do you have a worksheet for your workflows of the choices you make for your cases? For example, start with A, branch to B or C depending on what you find, etc.
Allan: I build a new one in my mind for every case. I have charted them out before, and it’s certainly something that is an option as far as flow, but I guess my response to that would be, when is a forensic analysis finished? There’s a lot of jaded answers to that, there’s a lot of philosophical answers to that. Is it finished when the client runs out of money? Is it finished when your boss tells you he has to have a report by 5pm the next day? And the simple answer is though it’s finished when you’ve exhausted all your questions. If we go back to: is there data on the device? The next question would be is any of that data pertinent or informative as to the scenario being investigated? That’s our contextual categorizing of that information.
Once I go through that (not just low hanging fruit, but a deep dive on analysis) the question becomes: is there other information on the disc or the device in front of me that would make me doubt my findings? I.e. are there wiping tools? Is there malware that may permit remote access or be suggestive of another user? Is there even date/time stamps that call into question the integrity of the data as I see it on the box, and can I reconcile that information?
So I’m doing my own mini cross-examination as the third phase of my exam. And then the fourth step then is: are there other avenues to examine? Are there court records or subpoenas that need to go out, or are there other devices to examine? And then once I’ve worked through all that, or if those are not options (if it’s strictly, yes, there are, but no they’re not available or no one’s going to do it or the timeframe doesn’t permit it) then my exam is done, right? Like I’m ready to quantify all of that information into a report.
But in terms of a flow chart, that tends to branch the changes with what you see in front of it. If we start with, say, like this screenshot here of a C drive that has some allocated files, some overwritten files, some files are not overwritten, then where do I go from there? I’m dealing with a Windows box. So maybe my next check is: what version of Windows? The reality of it is though my next check is probably: who are the user accounts and do any of them match my suspect? And if I don’t have that, then it branches again. And so your flow chart could be 300 boxes very quickly, and it’s just things you’re eliminating. So, do I have a flow chart? Kind of. Do I have it committed to paper? No. Could I work one up? I could, but I don’t know if you’d be satisfied with it the third time you used it, if that makes sense.
Holly: Can you speak to retrieving low hanging fruit from Linux system?
Allan: Low hanging fruit from Linux? Yeah. So Linux, you know…var/log tells you a lot about the behavior of the device. (I should have put some Linux slides in here. I apologize. Wasn’t thinking about it at the time, and that’s on me.) Var/log is usually my go-to for: is the device functioning normally? Or are there things not not appropriate in terms of hardware errors or even user fail authentication, because Apache logs are in var/log, buried deep in there. And what I will do, I will not use a forensics tool to do those, because all the forensics tools is going to give you is usually a text output (which I do not have a screen cap of anything along those lines).
What I will do, is take those logs and move them into a commercial log aggregator, something like Splunk, which is designed to ingest those logs and build a timeline and let me search it as individual entries. It’ll do the same thing with Windows event logs, but I start there. Obviously the user’s home folder, you know, also very informative. Bin, sbin for executables, USR, all of those, right? I’ll take a look at mount points. And depending on the flavor of Linux, it could be under mount, it could be under media. It’s largely the same locations for the same types of data, but you also have to remember that in Linux, most people will jump into the command prompt, and at best your log may have 30 or 40 entries. So if they’re desktop user, if they’re using the browser, using apps that are designed to work off of a GUI, you can start pulling that apart in the same way we’ve pulled apart Windows or Mac. Does that help?
Holly: Perfect. We have a few more questions. So what is your process on selecting tools for analysis? Do you have a standard set that you use?
Allan: So I’m a picky guy, right? Like most of the screenshots you see here are X-Ways because X-Ways works very quick. If I load a disc, it parses the partitions…as I load a partition it’ll parse the file system in that partition, if there is one, and then it stops. So unless it’s a corrupt partition or a corrupt file system, I’m usually looking at my data (be that a live disc on a write blocker, or a logical preview, or an image file) I’m usually looking at data within 10 minutes of starting the tool. I don’t have much metadata to configure for it. And then for me, the other thing I want to see is…I want raw access to information. I want to see the hex. If it’s good news or bad news, I want to see it because…even things like zip files that aren’t recoverable, or non-intact, if you’re looking at the first four or five clusters of that zip file, there’ll be a listing of files that used to be inside it still.
Even data that the tool knows isn’t necessarily useful, can be useful in the right situations. So I have a whole stack of tools, always evaluating new tools. In terms of criteria, I really want to know what the tool is designed to handle. What file systems, what disc structures, what media types is it designed to handle? I want to know what file systems are supported? Does it have built-in processing? And if so, what artifacts? If it’s a Windows specific tool, does it run Windows 10, Windows 7, Windows 8? Does it go back to Windows 98 and Windows XP? Because we still see some old data, or I might be dealing with a virtual machine…can I use one tool for?
More importantly, how does it handle errors? If it’s an imaging tool, do I want to list the bad sectors? Absolutely. Do I want to know how it pads those sectors? Yes. More and more recently, and I touched on this briefly in the imaging thing is: do I want to be able to control how it pads those sectors? And my answer is yes, because if you’re dealing with garbage collection, on a solid state disc, it’s either all zeros or all Fs, depending on the age of the chip. All zeros is kind of the default padding for most imaging tools. Can I change that to something where I know that that is padding from my tool and not zeros from something the user has done? Like a wiping tool, or the disc has done with garbage collection, wear leveling. So that’s kind of one of my newer criteria. I do want to know how it handles errors, if there’s a tool that can’t parse…if it crashes consistently, or if it defaults to a preview where it tries to parse it, as opposed to maybe hex view, I’m going to want to be able to change that setting. Because default hex view is the fastest way to look at data, and then I’ll figure out if it’s valid.
And then how long does it take to work with information? The full-text index has its place in this world, still. Email parsing has its place in the world. Every tool can be a good tool in the right situation. With mobile it’s: how up-to-date are the extraction engines? How good is the parsing? What parsing does it do? And what options does it have for me to work in the tool – A – to parse stuff it doesn’t do automatically – or B – move data outside of that tool so that I can work with it in something else, or manually decode it. I’m not big on vendor lock-in formats. So, if you’ve got a format that is like, “well, it’s proprietary only it works with our tool and tools that have licensed that format”, I’m probably gonna pass on that to something that works universally. I want to be able to move data between tools or into a place where I can work with it myself, if I need to.
That’s in a nutshell, that’s my flow chart for evaluating a tool: what does it do? What does it do better than some other tools? What does it do maybe not as good as their tools? Because you want to know your tools limitations also. It’s one thing to know what it does well, it’s another thing to know what it’s not doing well, so that when you encounter that, you know to go to another tool. I want a tool that tells me, “I don’t know what’s going on right now”.
The dialog box in X-Ways can be really annoying some days when you’re dealing with corrupt file system, because it pops up constantly. But that feedback tells me that I need to consider another tool or I need to make a change. Maybe it’s time to create a copy of the image, mount it and run a check disc, or something, and correct some of those file system errors so that other tools parse it well. And I’m working off a copy, so I can do that. Maybe I just want to document the errors. It kind of depends on where those errors are occurring. If they’re occurring in files I want to review, I will take those steps, but I need to know that it’s having a problem parsing that data.
So I like a tool that gives me feedback as to how it’s working also without having to go digging through a bunch of logs. FTK’sindexing engine will create a huge log of problems, and it’ll populate that dialog box, and that’s great because it tells me what file formats I should not expect to be able to review in that as it builds. So there’s two tools that I know what they do well, and I know what they don’t do well. I’m not looking for one size fits all, I’m looking for tools that solve problems. So if I know a problem is out there, I can go to another tool that will address that particular issue.
Holly: Alright. What is a good technique or tool to handle iPhone acquisition?
Allan: Man! So iTunes backup, right? It’s still a thing, until Apple says it’s done again. I do use the Cellebrite UFED extraction wizard. I’ve used Magnet’s AXIOM wizard, I’ve used iTunes. Whatever is available is available. So there are some other limited subsets…I’m not big on jailbreaking phones, if they’re not already jailbroken. If it comes to me jailbroken, that’s one thing. If I have to escalate something, I will explain to the client what the risks are involved or what changes are taking place and we can work through it. But I will take just about every iTunes backup engine out there. Even some data recovery one-offs that’ll create an iTunes-like backup. I’ll use them all if I’m looking for different types of data or I think I’m not getting good data with the tool I have. It’s not uncommon to use a couple tools, but again, Apple really controls what data you can get off those devices now. So it’s almost dealer’s choice until you have a problem or an error with the extraction you’re using.
Holly: How do you extract data from a Google Chromebook?
Allan: Oh, man, that is a tough one! There is a series of steps out there for pulling data off of a Chromebook. And I want to say that Magnet put out a plugin that lets you work with it. You have to be able to log into the Chromebook as a user. So it’s no different than basically performing a logical acquisition from an M1 Mac. There’s a series of steps out there. I’m pretty sure Magnet is the one who built it into a tool of their own as well. Accrediting the original author whose name escapes me at the moment as well. But Chromebooks are tricky. When I get Chromebooks, I usually do not get a login name and password. It’s either been abandoned by the user, or maybe an ex-employee, or they know very well that they’re required to turn it over, but “I forgot my password” is the name of the game. So Chromebooks are tricky and can be every bit as frustrating as Apple devices.
Holly: Okay. This might be related to something you said before. Could you obtain the information the system overheard since the systems are in passive listening mode? Assuming that’s regarding Alexa.
Allan: Sure. I actually just did this on a device. And honestly it’s better to do it from the Amazon plugin and a cloud host than it is from the device. Because the device is only going to have the last thing you recorded, maybe the last two things that recorded until it synced up. But if you were to go to an Amazon account and pull up the Alexa devices tied to it and then view the recordings, they have a category for things not meant for Alexa. And a lot of times it catches the commercials…the Alexa commercials, but you’d be surprised what it picks up just on its own. So those are the things the speaker picks up and sends on to Amazon. Amazon keeps them.
I will tell you the downside to their format at the moment is that you cannot download those actual files. You can erase them. You can clear them. You do have to log in as a user or serve them with court orders, but even from the user log in, you can’t download them. So you have to capture the audio as you play them. I use Audacity. Set the input to your direct sound output, play the device, and record that, play whatever that recording is and record it. And then you’re writing a memo about what that recording represents. I’ll screencap it or maybe videocap the process as I go if it’s something I’m doing for the first time with the crew. But you can get those recordings. If you’re looking for the very last thing picked up, then certainly you can do a chip subtraction on the device and parse for audio. But if you’re dealing with something that would have been synced up, it’s better to go to the Amazon accountant in question and get the recordings either via legal process, via cooperation with whoever was the registered owner of that device.
Holly: Have you had an opportunity to work with Zoom history that is stored in the user’s profile? Wondering if it is possible to decrypt the history file?
Allan: I have started in on it, but I haven’t spent a lot of time working on it yet. Most of my misbehaving employees don’t get as far as Zoom! What they’ve done on the conference call…it’s more about what they’re doing during working hours. So stay tuned, I guess, on the Zoom stuff. I’ve started playing with it, but I do not have a full solution on it yet. But I do say that log exists for a reason. Zoom knows how to parse it. So it’s just a matter of working backwards with a lot of testing and evaluation to figure out how that log can be interpreted.
Holly: Somebody was wondering what tool you use to produce the output displayed on the current slide?
Allan: So these are both X-Ways. This is your data view on the bottom right hand pane. This is the directory view. And again the whole point of this was speed and grabbing stuff quickly. So X-Ways is a great tool for that if you’re fluent with the tool. It’s like any other tool, if you’re not fluent with it, it can be a very frustrating time-waster. So what I use is a great starting point, but you need to take the time to learn your tools as well. I mentioned before X-Ways will parse just about anything out that doesn’t have errors in about 10 minutes flat to get to a file system. But you got to know what you’re looking at inside that.
So these are X-Ways. I don’t think there’s anything in here other than my computer and then some creative commons. The registry entries are from a tool that just parses registry files. So I told you about copying those out and moving them out into a place where I can use a registry viewer on it. This is actually a tool that the creator opted not to continue supporting past Windows 8, so it’s listed on a discontinued section of their website.
But having said that with Windows 10, all your key hive locations haven’t changed. So if I’m looking for basic data in the registry is still not a bad tool for digging into it. It’s not my only tool, it’s strictly a triage tool for looking at registry entries quickly. But I think that’s the only other screencap. (This one is also X-Ways, I think.) So most of the tools I’ve highlighted for you are things that work very quickly or efficiently in terms of finding stuff quickly. Sort of, full keyword search and text index or carving for files.
Holly: Alright. So we are at the end of our time, however, we have three more questions. If we can get through them, I would love to. If the hard drive has a full disk encryption and a RAM dump was not done, is there a way to access the data on a hard drive?
Allan: Sure. All you needed the keys. Fun fact with BitLocker: default OEM config from BitLocker for most you Dells and HP’s of the world started off as a clear key encryption, meaning the key is stored in the metadata for the device. We’re finally starting to recognize that and offer automatic decryption of them. I know Magnet’s one of them. You can also just mount the disk image in something like Arsenal Recon, where it presents as a physical device, and Windows will offer to unlock it for you.
So, again, work off a copy in that situation, so you’re not modifying your original. If you can identify the encryption algorithm, if it’s something commercial like Checkpoint or any of the McAfee and Norton stuff out there, if it’s something that a company has put in place, or they’ve gone…taken the steps to use appropriately secured BitLocker implementation, then they can provide you with a set of credentials or a decryption key, as long as they’ve been managing those keys.
I think this last year and a half has been a little bit of a learning curve on that front. A lot of companies rushed out to full disk encryption, employing the single device option, and then realizing that they had no control over those keys. So we’re starting to see more and more of the commercial management packages for full disk encryption, which is a huge boon for us because the company will cooperate 9 times out of 10 and help you with the decryption of that desk with credentials or the appropriate unlock via their server.
Holly: All right. Do you have any advice on evidence collection processes for a Chromebook in which the disc is not removable? For example, how do you grab an image and leave the smallest footprint possible?
Allan: So the smallest footprint possible is kind of what I talked about before. You have to log in as a user, use a logical acquisition tool to grab your files and then get out of there, turn it back off. The other option, you could do a chip subtraction, you could remove the storage and read it. And then note that it’s encrypted in a preservation copy and then put the chip back on the device.
Chip transplants are becoming more and more common. You have to be a very skilled examiner, you have to have the right tools to do it, in terms of extraction. But, you could do it that way. Unfortunately the logical extraction is still the only way I know of to get data off of Chromebook. So, you have one option and that is, “I logged in, I followed these steps, I pulled this data and then I turned the box off.”
Holly: All right. Final question. Have you worked with TFK and how does it compare to some of the commercial offerings, like at FTK and case X-Ways etc.
Allan: I’m not familiar with the TFK acronym. I’ve used a lot of the open source tools, the autopsy plugins and whatnot. Well, TFK is not one I’m familiar with, but now I’m going to have to go look it up!
Holly: Perfect. All right. I’m just going to the very last slide with all of our contact information. If you have any additional questions or comments, please feel free to reach out. Thank you, Allan, thank you everyone for attending and for all your great questions. Once again, this webcast was recorded and will be posted along with a copy of the slides to Exterro’s website. And we’ll be sending you a link to these materials later in the day over email. Along with that will be a link to the last two webinars in the series that you can register for. And that concludes our webinar today. Thank you so much and have a great day, everyone.
As the costs associated with running a mobile devices forensic laboratory can be considered to be high, this article is aimed at providing alternative options for small organisations or individuals looking to reduce overheads.
Case Management Tools
There are numerous case management systems available online which are free to download, and premium features offered by some of the paid software are not worth losing coin over at the small business stage.
These case management systems, however, are a double-edged sword. Although many have built-in data loss mitigation features such as real-time backup, the feature requires a constant internet connection. This can open up your system to possible attacks and manipulation of case information.
Although lacking in features compared to the online programs, Microsoft Excel [1] is a viable option which can be used to design a functional case management system with little skill. The added bonus of services such as Air Tables [2] is that you can download premade templates into Excel, skipping all the messing around with fonts and table making.
Mobile Forensic Tools
Now, this is the big saver part, and as most of us probably know, any decent software used in digital forensics is expensive. So how do you break up costs?
Building a PC that can handle Cellebrite [3] or XRY [4] will cost you around £500.00 if you’re smart, and while an expensive graphics card is not required, a decent amount of RAM and processing speed is.
Write blockers aren’t required unless you wish to perform SD card extractions. The usage of SD cards by mobile phones has generally decreased as a result of their more substantial internal storage capabilities. If you are required to examine an SD card then NIST [5] provides free validation test reports on multiple software write blockers, thus ensuring the most suitable tool is used for the work.
SIM card readers themselves don’t cost a lot and can be purchased on Amazon for around £10.00.
Extraction
Mobile phone extraction software can seem expensive, but it doesn’t have to be. The main difference between the more expensive ones versus the cheaper ones is ease of use. Tools like Cellebrite and XRY are great at combining lots of different mobile extraction methods into a streamlined and efficient solution. The less expensive tools require slightly more training and time spent becoming familiar with the steps involved, but practice makes perfect. Starting with the simple task of being able to extract only images or texts until your requirements outgrow the tool, at which point the more expensive software becomes the more viable tool.
Adb [6]–[8] is an option for Android devices, but you run the risk of breaking the phone if you don’t learn the correct commands.
Autopsy [9] is an option that should be considered as it is capable of extracting text messages (SMS / MMS), call logs, contacts, and GPS data. The downside to these types of software is that they have limited coverage as each device can have a different OS version. The aforementioned software will therefore only work on specific mobile devices.
A document entitled “Open Source Mobile Device Forensics” authored by Heather Mahalik in 2014 provides further options to consider when looking at open source solutions [10].
Analysis
As with the extraction stage, cheaper options are available for the analysis of data. The presentation of extracted data for analysis is crucial as there is a vast amount of data available to an examiner and it needs to be presented in a logical fashion.
In most mobile phone extractions, however, large amounts of data are recovered, and so subsequently require a more professional touch. This can be achieved by using a software which inputs the raw data extracted from the phone and outputs it in graphical displays.
Autopsy[11] has a GUI interface which comes with features like Timeline Analysis, Hash Filtering, File System Analysis and Keyword Searching out of the box, and has the ability to add other modules for extended functionality.
Services like Splunk [12] offer a great way to transform messy looking data sets into clear and understandable models and tables.
Validation
Validation of tools and methods is a massive, exhaustive process which never seems to end.
But keep calm and keep validating.
To ensure reproducibility and repeatability a laboratory must be able to validate results by demonstrating the reliability of the tools used to ascertain those results. For example, if instructed to locate a specific image stored on a mobile device, an examiner should be able to extract an image and confirm the hash checksum. A useful tool to accomplish this task is Jacksum [10], which is free open-source software that calculates a variety of hash checksums and can be incorporated into Microsoft Windows and accessed by simply right-clicking on a file. Another great tool for image analysis is Image Magick [11], which is also free and can provide detailed analysis of specific aspects of an image.
Validation needs to be tackled in an efficient manner with an appropriate strategy that meets your end-user requirements. Mobile phone validation can seem like a daunting task at first, but breaking it down into smaller parts will make it easier. First validating the fundamental features which exist on every make and model of phone such as contacts, SMS messages and call logs can set you on the right path, and the scope can be increased later on.
Validating every phone you encounter would be ridiculous. It would literally never end as new models are hitting the market quicker than we are able to validate. Instead, initially focus on a specific type of phone, or do a Google search for the most commonly purchased phones and pick a nice selection which represents a sample of the market. Commonly used phones can be expensive, so look for second-hand ones and perform a factory reset. Before conducting any tests perform an extraction of the phone and make note of any remaining data so it can be ignored in tests.
Buying new phones should be avoided not only to reduce costs, but also because second-hand devices have the advantage of being more closely aligned with the types of devices used in casework.
Documents published by NIST [13], [14] provide validation results [15] for you to set acceptable pass criteria for your own testing. The FSR [16] has also published guidance regarding validation, as has the Scientific Working Group on Digital Forensics [16] [17]. Combining these documents can help provide a solid overview when creating validation plans.
Digital Storage
Digital storage goes hand in hand with a good case management system. It’s crucial that exhibits for a specific case are kept as one and are not lost, and this can be achieved by keeping your case management system in sync with exhibit logs. Exhibit logs should state where an exhibit is being kept and if it has been returned to the instructing party.
The security of physical exhibits is as vital as the safety of any digital exhibits and should be made a priority. Depending on your work environment you will need a safe, stored within an area of restricted access. Ensuring only workstations with no internet capabilities have access to case data, and using only encrypted USB flash drives, will ensure safety from most outside dangers.
A NAS system can be of great use but can cost a lot, so again, either look for cheaper alternatives like simply swapping out hard drives, or browse eBay until the right one comes up for a reasonable price.
If that’s too expensive you can build your own, but consider that whatever route you take will require validation testing. Security is yet another key aspect to consider when using a NAS, as you can never be too careful in digital forensics. Most extracted data have the potential to contain viruses or malware which could compromise confidential files. The best way to ensure the safety of these files is to keep the NAS separated from the internet completely, but if you do need to connect to the NAS remotely an article by How-to Geek describes the necessary steps to keep it safe [19].
Report Writing
Reporting the results of a case needs to be completed with no grammatical errors and should be accessible to the reader. One way of ensuring this is by using software that picks up any grammatical errors found in reports, thus preventing any misunderstandings. Software like Grammarly [20] is free to use and offers a premium option for more advanced grammatical errors that perhaps Microsoft Word might not pick up. However, this and similar software require an internet connection to function, leaving you again open to any online attacks. With that being said, a few ways around this are available.
The first option would be to set up a low specification workstation for running internet searches and to operate Word with Grammarly installed. The finished report can then be put onto an encrypted memory stick, thus minimising the risk.
A safer option would be to make some tweaks to the spellcheck available within Word [21] and create your own dictionary of keywords and phrases you wish Word not to pick up on.
Peer Review
Peer reviewing of each other’s work is obviously a free thing to do if you work with someone else with a similar skill set, but if you work alone then you must make some friends who work in your area of expertise. Peer review is essential in ensuring reliability and error mitigation and is advised to ensure compliance with the FSR Codes of Practice[22].
When peer reviewing work, don’t waste time and money (and trees) printing out forms. Try using the comment feature in Word for areas that need addressing. This could also be a good way of recording improvement actions to show how your company finds errors and makes improvements.
Delivery
Sending confidential documents online can be a risky game, so procedures should be put in place to mitigate against said risks. Tresorit [23] and Sophos [24] provide end-to-end encrypted file-sharing services and each offer free trials which should be taken full advantage of before making a decision on which to commit.
Transporting important case data via an external device requires security while in transit. This can be achieved by using strong encryption with software such as VeraCrypt [25], a free tool for encrypting hard drives and USB flash drives.
Conclusion
It’s currently a difficult time for smaller laboratories to compete against larger ones, due to the stress of ISO 17025 accreditation looming over us all every second of our already stressful day-to-day lives. The chance to cut costs should be seized at every opportunity, to save money for those accreditation visits and rainy days. Not everything has to be state-of-the-art, cutting-edge tech. If you learn the necessary skills and are prepared to accept fewer flashy features, then try some of these alternative methods instead of forking out cash at every turn. I want my final words in this article to be positive and push for more cooperation between smaller digital forensic laboratories, as I believe that this will not only benefit everyone in setting a higher standard, but will also significantly improve our justice system.
[7]Chris Hoffman, ‘How to Install and Use ADB, the Android Debug Bridge Utility’. [Online]. Available: https://www.howtogeek.com/125769/how-to-install-and-use-abd-the-android-debug-bridge-utility/. [Accessed: 16-Aug-2019].
[8]Doug Lynch, ‘How to Install ADB on Windows, macOS, and Linux’. .
[14]NIST, ‘Mobile Device Data Population Setup Guide’. [Online]. Available: https://www.nist.gov/sites/default/files/documents/2017/05/09/mobile_device_data_population_setup_guide.pdf. [Accessed: 15-Sep-2019].
[15]NIST, ‘Test Results for Mobile Device Acquisition Tool Cellebrite’.
[16]FSR, ‘Validation Guidance’. FSR, 2014.
[17]SWGDE, ‘SWGDE Minimum Requirements for Testing Tools used in Digital and Multimedia Forensics’. 2018.
[18]SWGDE, ‘SWGDE Recommended Guidelines for Validation Testing’. 2014.
[19]Craig Lloyd, ‘6 Things You Should Do to Secure Your NAS’. [Online]. Available: https://www.howtogeek.com/350919/6-things-you-should-do-to-secure-your-nas/. [Accessed: 17-Aug-2019].
Alex Moeller is a Mobile Phone Forensics Examiner at Verden Forensics in Birmingham, UK, and has experience in conducting examinations in a variety of cases, both criminal and civil. He holds a degree in Forensic Computing from Birmingham City University and is currently preparing the laboratory for ISO 17025 accreditation in Mobile Device Forensics.
From the 11th to the 13th of March 2019, Forensic Focus will be attending the Techno Security & Digital Forensics Conference in San Diego, CA, USA. If there are any topics you’d particularly like us to cover, or any speakers you think we should interview, please let us know in the comments.
Below is an overview of the subjects and speakers that will be featured at Techno Security. The conference has four tracks: audit / risk management; forensics; information security; and investigations, along with sponsor demos. Forensic Focus will be concentrating on the digital forensics track throughout the event.
Monday March 11th
The first forensics talk of the conference will be given by Jimmy Schroering from DME Forensics, who will talk through some case studies of advanced DVR analysis. At the same time, Yulia Samoteykina and Vitaliy Mokosiy from Atola Technology will discuss how the need for rapid triage and extraction can be a challenge for digital forensic evidence acquisition. Meanwhile in the security track, Michael Prins from HackerOne will talk about how to leverage relationships with ‘friendly’ hackers who are willing to help companies to improve their security.
Directly following this, Angel Grant will discuss how a better understanding of the cultural elements of hacking can improve cyber investigations. Vico Marziale from BlackBag will talk about how much has changed in Windows 10, and what forensic investigators need to know when they encounter Windows 10 in their cases. Michael Riedijck from PageFreezer Software will discuss social media evidence collection and how it can be used for ediscovery. Both Oxygen Forensics and Susteen will be giving demonstrations of their forensic solutions at the same time.
The penultimate session of day one will see MSAB’s James Eichbaum talking about mobile application analysis and demonstrating how to manually investigate app data and SQLite databases. There will also be a law enforcement panel happening at the same time, the exact nature of which will be confirmed at a later date. Demos from 2:45-3:45pm will be available from Hawk Analytics and Magnet Forensics.
Keith Leavitt from Cellebrite will be the final speaker in the digital forensics track on Monday, looking at mobile evidence in P2P investigations. Meanwhile Don Brister from Berla will talk through some examples of vehicle forensics, and Richard Gurecki will show attendees how to extract data from water damaged devices, focusing on iPhones and Android phones. An IoT panel will convene at 4pm, discussing how to tackle a data breach, and Arman Gungor from Metaspike will demonstrate how to leverage server metadata in email investigations.
Tuesday March 12th
Tuesday’s sessions will begin at 9:30am with the intriguingly named ‘1+1 Is Not Always 2’, which will look at how to bypass multi-factor authentication. Meanwhile Keith Leavitt will take to the stage again to demonstrate some advanced techniques for mobile analysis. A panel will convene in the Grande E room to discuss the challenge of impermanence in forensic analysis and ediscovery, and what happens when we collect ephemeral evidence from messaging services, social networks and similar media. From 9:30 attendees will also have the chance to see demos from BlackBag Technologies and Truxton Forensics.
The next session’s demos will be from Magnet Forensics and Oxygen. Alongside these, Jason Hale from One Source Discovery will talk about how to improve USB device forensics, and Kirby Plessas will show us how to use open source intelligence techniques for cryptocurrency attribution.
The excellent Women In Cyber panel will be returning after lunch, to discuss some of the challenges faced by women in the industry and how they can be addressed. Meanwhile Jessica Hyde from Magnet will be talking about how to handle IoT evidence more effectively, and Julie Lewis from Digital Mountain will demonstrate how to extract and analyse digital evidence from social networking sites and smartphone applications. MSAB’s Global Training Manager will talk attendees through XAMN and XEC Director, showing how they can save time and speed up investigations.
Eric Schmidt from the CATCH Task Force will show attendees how to think outside the box when conducting OSINT investigations, and Kathy Helenek will demonstrate the effective analysis of cloud storage services. Two speakers from Nike’s forensics department will tackle the popular topic of lab accreditation and explain how to make it work.
In the last session of the day, Mike Melson and Nick Barker from Hawk Analytics will talk about how to testify on cell data records, which can be a tricky subject to discuss in court. Steven Watson from VTO Labs will talk us through some case studies of drone forensic investigations, and discuss some current challenges, while in the Canyon room Richard Spradley will demonstrate Whooster’s ability to bring back accurate and useful real-time investigative data results.
Wednesday March 13th
The final day of the conference will begin with two ‘early riser’ options at 8am: Jennine Gilbeau from the US Department of Homeland Security will talk about securing the digital landscape, and another session will look at the dark web, though the speaker and details are still to be confirmed.
At 9:15am attendees will be able to discover how to use the GDPR to improve their companies’ bottom line, culture and IT practices. Jay Cooper from Sumuri will be discussing some APFS imaging considerations, while Michele Stuart from JAG Investigations will show attendees how to use OSINT and social media data to identify and locate individuals of interest. In the computer security track, Donald Malloy from OATH will be tackling the tricky topic of how to let the good guys in while keeping the bad guys out when it comes to IoT security. There will also be a Cellebrite demo happening in the Canyon room.
In the last session of the morning Passware will be in the Canyon room demonstrating their forensic solutions. Greg Scarbro from the FBI will be showing attendees the FBI’s Next Generation Identification system – this was a fascinating talk at Techno Security TX and is highly recommended! Jessica Hyde will be talking about Apple’s “tween years”, from iOS 10 through to 12.
Following lunch there will be a session about preventing common cloud migration mistakes, alongside two speakers from Whooster who will show attendees how to access unique investigative data in real time. Oxygen’s Lee Reiber will look at how to get hold of location data and put it to use in investigations, while Jeremy Kirby from Susteen will show how to acquire immediate evidence from cell phones in the field.
The final sessions of the conference will focus on examining the WhatsApp messenger on Android devices; how to use the Windows PowerShell and command prompt as investigative tools; and how to address the challenge of user privacy in cars.
To view the full conference program and register to attend, please visit the official website. Forensic Focus readers can enjoy a 30% discount on the registration price by entering the code FFOCUS19 when booking.
If there are any talks you would specifically like us to cover, or any speakers you’d especially like to see interviewed, please leave a comment below or email scar@forensicfocus.com.
The primary goal of this paper is to raise awareness regarding legal loopholes and enabling technologies, which facilitate acts of cyber crime. In perusing these avenues of inquiry, the author seeks to identify systemic impediments which obstruct police investigations, prosecutions, and digital forensics interrogations. Existing academic research on this topic has tended to highlight theoretical perspectives when attempting to explain technology aided crime, rather than presenting practical insights from those actually tasked with working cyber crime cases. The author offers a grounded, pragmatic approach based on the in-depth experience gained serving with police task-forces, government agencies, private sector, and international organizations.
The secondary objective of this research encourages policy makers to reevaluate strategies for combating the ubiquitous and evolving threat posed by cybercriminality. Research in this paper has been guided by the firsthand global accounts via the author’s core involvement in the preparation of the Comprehensive Study on Cybercrime (United Nations Office on Drugs and Crime, 2013) and is keenly focused on core issues of concern, as voiced by the international community. Further, a fictional case study is used as a vehicle to stimulate thinking and exemplify key points of reference. In this way, the author invites the reader to contemplate the reality of a cyber crime inquiry and the practical limits of the criminal justice process.
Introduction
With escalations in reports of serious cyber crime, one would expect to see a corresponding increase in conviction rates (Broadhurst, Grabosky, Alazab, Chon, 2014; Kaspersky Lab, 2015; Ponemon Institute, 2015). However, this has not been the case with many investigations and prosecutions failing to get off the ground (Frolova, 2011; Onyshikiv & Bondarev, 2012; Zavrsnik, 2010). The chief causes of this outcome may be attributed to trans-jurisdictional barriers, subterfuge, and the inability of key stakeholders in criminal justice systems to grasp fundamental aspects of technology aided crime. In the same way that science influences the utility of forensic inquiry, the capacity of investigators, prosecutors, judges and jurors to understand illicit use of technology also directly impacts conviction rates (Dubord, 2008; Leibolt, 2010). The ease with which cyber crime crosses national borders, irreconcilable differences between national legal frameworks, and deceptions employed by cyber criminals impedes attribution, and prevents crime fighters from interrogating suspects and apprehending offenders.
Cyber crime offending can be technically complex and legally intricate. Rapid advancements in the functionality of information communication technologies (ICTs) and innate disparities between systems of law globally are stark challenges for first responders, investigating authorities, forensic interrogators, prosecuting agencies, and administrators of criminal justice. It is critically important to explore factors impeding investigation and prosecution of cyber crime offending to raise awareness and expose these barriers to justice. This paper examines criminal justice responses to cyber crime under the common law model. The capacity of criminal justice actors to perform their core function is analyzed and discussed. The author contends that the investigation and prosecution of cyber crime offending, including forensic services in support of inquiries, is hampered by a confluence of factors that influence the criminal justice process. This thesis is illustrated with aid of a case study examining the criminal justice lifecycle throughout a cyber crime inquiry. Based on notorious instances of cyber crime offending, Mary’s Case charts the initial commission of criminal activity through until the ultimate determination of culpability at trial.
This paper proposes a practical definition of cyber crime, which is linked to the impact of technology on modes of criminal offending. Victimology and impediments to cyber crime reporting are outlined. The common law model of criminal justice is surveyed, with a focus on the effect of both law and technology on policing cyber crime globally. Investigative techniques and operational challenges are discussed in detail. Evidentiary issues surrounding collection and presentation of electronically stored information (ESI) in criminal trials are evaluated. The key elements that coalesce to constitute serious criminal offending are deduced and contrasted with defenses to criminal capacity and culpability. The author also highlights issues concerning evidence admissibility, roles performed by lawyers, experts, and adjudicators during legal proceedings, and the media’s influence upon public perceptions of forensic science. Finally, recommendations for removing barriers to the effectiveness of cyber crime inquiry are considered, including new strategies for streamlining the administration of criminal justice.
The complete article is freely available at: http://www.cybercrimejournal.com/Brown2015vol9issue1.pdf
Do you have an article or paper to submit? Add it here.
Microsoft released Windows 8 in 2012. With this new version, Microsoft made a fundamental shift in Windows 8 as compare to older versions of Windows. It does not only target netbooks, laptops and traditional computers, instead they decided to use the same technology in Windows 8 tablets. This is why Windows 8 operating system is far more touch screen oriented for use on tablets as well as traditional PCs.
According to Microsoft, ‘In Windows 8, a Windows pointer device refers to devices that support the pen, or touch, functionality. In the context of a Windows Pointer Device, a pen is a single contact point active stylus input, also known as tablet-pen that supports hovering. Touch functionality refers to a single finger contact point or two or more concurrent finger contacts.’ Windows pointer devices use HID (Human Interface Device) protocol to communicate with Windows operating system. Below snapshot shows the interface of the touch keyboard.
Fig 1-1
Why Touch Keyboard Forensics?
Number of touch screen devices is increasing exponentially. According to a report from DisplayBank, shipments of touch screen equipped notebooks increased by 51.8% in Q1 2013 to 4.57 million units. Looking at the trend, it is quite obvious to expect more touch screen enabled laptops, PCs, and tablets in forensic labs for examination. Though the basic file structure remains same in Windows 8 as compare to its predecessors, but the huge difference in user interface and addition of new features and metro apps have introduced greater use of touch technology in the form of virtual keyboard and other touch enabled apps. Touch keyboard allows users to enter data on handwriting touch panel. This data is stored in ISF format containing details of user’s input, number of strokes etc. To understand it better, we can create an analogy between ISF file and a piece of paper note found while conducting a search for evidence. This might add another piece to the puzzle in investigation or turn out to be an important clue for handwriting analyst team. Thus, touch analysis deserves consideration in the field of forensics.
ISFViewer
In Windows, the InkStore folder, located at C:\Users\(username)\AppData\Local\Microsoft\InputPersonalization, contains ISF Files. ISF stands for Input Serialized Format. It is a Microsoft standard format to store written ink information. This format is specially used to store data entered using stylus in devices like mobile phones, tablet PCs, touch screen laptops, personal digital assistants.
According to Wikipedia “An ink object is simply a sequence of strokes, where each stroke is a sequence of points, and the points are X, and Y coordinates. Many of the new mobile devices can also provide information such as pressure, and angle. In addition can be used to store custom information along with the ink data.“
ISFViewer is written in C# and available at https://github.com/cybercuffs/ISFViewer. It takes a single ISF file or a folder with multiple ISF files as two different input options and converts them into GIF image format. The .gif file can later be viewed with Windows Photo Viewer or any other image viewer.
Fig 1-2
Following screenshot depicts the output of the ISFViewer
Fig 1-3
Registry Artifacts
One can use the MS device manager in order to disable/enable the touch screen functionality. Fig 1-4 shows the device manager view of Windows 8 and 8.1. Note that in Windows 8, Microsoft labels all the devices as HID – Compliant Device that makes it a hit and try effort to turn the touch screen on/off. On the other hand Windows 8.1, adds the device name like ‘touch screen’ in front of HID – compliant device.
Fig 1-4
Now look at the Fig 1-5 to see how the two registry entries IsTabletPC and DeviceKind is changed.
Fig 1-5
References
Microsoft. (n.d.). Handwriting personalization on a Tablet PC. Retrieved October 16, 2013, from http://windows.microsoft.com/en-us/windows-vista/handwriting-personalization-on-a-tablet-pc
Microsoft. (n.d.). Ink.Load Method. Retrieved October 14, 2013, from Microsoft Developer Network: http://msdn.microsoft.com/En-us/Library/microsoft.ink.ink.load(v=vs.90).aspx
Microsoft. (2013, Oct 17). Input: Ink sample. Retrieved October 22, 2013, from Dev Center – Windows Store apps: http://code.msdn.microsoft.com/windowsapps/Ink-App-sample-61abaec3/sourcecode?fileId=52118&pathId=1927408783
Microsoft. (2013, Oct 12). Microsoft Developer Network. Retrieved October 2013, 2013, from Windows Touch Gesture Sample (MTGestures): http://msdn.microsoft.com/en-us/library/dd940544(v=vs.85).aspx
Microsoft. (2006, February). Using the Ink Explorer. Retrieved October 29, 2013, from Microsoft Developer Network: http://msdn.microsoft.com/en-us/library/aa480682.aspx
Rousset, D. (2013, March 22). noupe. Retrieved October 20, 2013, from IE10 and Beyond: Unifying Touch and Mouse Made Easy with Pointer Events: http://www.noupe.com/webdev/ie10-and-beyond-unifying-touch-and-mouse-made-easy-with-pointer-events-75564.html
Wikipedia. (2013, April 4). Ink Serialized Format. Retrieved October 14, 2013, from Wikipedia: http://en.wikipedia.org/wiki/Ink_Serialized_Format
Timestamps are critical for analysts; they usually deal with different filesystems and understanding how the file timestamps work on each is crucial to what they do.
If you do an online search for linux timestamps, you’ll get ton of information but the idea here is to put together different common file operations such as move, copy, download and their effect on timestamps. This can be a helpful guide for anyone who is trying to figure out what might have happened to a file based on timestamp analysis.
Abbreviations used throughout this article:
m – modify time
a – access time
c – change time
cr – creation time
For this article, the experiments were performed on a RHEL 6 Ext4 file system.
c time
Change time is the metadata change time. As the name indicates, it reflects the metadata modification of a file (e.g. chown, rename).
cr time
Creation time is one of the most critical timestamps for an analyst. Few points to keep in mind while searching for crtime in linux:
Ext3 filesystem only supports three timestamps – m, a and c.
Ext4 added the support to fourth timestamp that is cr time but the stat utility still shows only three timestamps.
The most common timestomping technique noticed to be used by the attackers is making use of touch command as touch malicious_file -r existing_legit_file. This will create a file malicious_file with the m and a time same as existing_legit_file. ma times can also be changed individually, for example, touch -m -d ‘1 Feb 2007 10:31′ malicious_file; touch -a -d ’22 Jan 2008 11:09’ malicious_file.
An analyst can view the crtime on Ext4 filesystem using debugfs, example: sudo debugfs -R “stat /home/user/malicious_file” /dev/vda | grep crtime <The mount point /dev/vda could vary in each case> (Reference 1)
On a side note, don’t confuse the ls -U option in RHEL with the one in OS X that shows the cr time.
In Linux, man ls
“ -U do not sort; list entries in directory order”
In OS X, man ls
“-U Use time of file creation, instead of last modification for sorting (-t) or long output (-l).”
a time
Access time appeared to be the most unreliable and unpredictable timestamp. It changes as you expect but once per file per some given time. After that, no matter how many times you perform the same or other operation on the same file that should change it, it doesn’t. A quick research said, access time changes once/day but this has not been tested here. (Reference 2)
Therefore, it is unwise to guess a file’s access operation (such as doing cat or GET on file) by looking at the access time. It was tested on Ubuntu 14.04.1 LTS, Ext4.
File Download – Wget vs Curl
Wget
Example: wget http://anysite.com/file
Downloaded file preserved the m time.
Downloaded file’s c time changed to the time when download operation is completed.
Downloaded file’s mc changed to the time when download operation is completed.
File Download/Upload – SCP
SCP from remote to local (downloading)
Resulting downloaded file’s mac times change to the time when download operation is completed.
The a time of the original file changes to the time when download operation is completed. (Note: same a time change rule applies – therefore it may or may not change)
SCP from local to remote (uploading)
Resulting downloaded file’s mac times change to the time when upload operation is completed.
The a time of the original file changes to the time when upload operation is completed. (Note: same a time change rule applies – therefore it may or may not change)
File Copy vs Move
Copying a file to a directory
Inherits the ownership from the directory it is copied to.
The file’s mac times change to the time when the file is copied.
The directory’s mc times change to the time when the file is copied.
Moving a file to a directory
Does not inherit the ownership from the directory it is copied to
The file’s c time changes to the time when the file is moved.
The directory’s mc times change to the time when the file is moved.
Network Attached Storage (NAS) have a long track history of corporate deployments. Their scaled-down versions (ranging from single-bay to four-drive enclosures) are frequently used at homes and in offices. These smaller-size appliances are often called “personal clouds” for providing some parts of functionality of online cloud services.
More and more people prefer using their laptop computers at home instead of a full-size desktop. As many laptops are equipped with relatively small, non-expandable storage, NAS becomes an obvious and convenient way to increase available storage. In home environments, NAS storage are often used for keeping backups and/or storing large amounts of multimedia data such as videos, music and pictures, often including illicit materials. Due to the sheer size of these storage devices and their rapidly increasing popularity with home users, NAS forensics becomes increasingly important.
When acquiring information from the suspect’s computer, investigators often face a challenge of extracting information also from all external storage devices. Why is NAS acquisition a challenge, and what can be done to overcome it?
NAS and External Enclosures
First and foremost, let us rule out one question: what is the difference between a single-bay NAS and a hard drive enclosure? Hard drive enclosures such as WD Passport, Seagate Expansion or Toshiba STOR and Canvio series are just that: 2.5” hard drives enclosed into a slim shell with one or more outputs allowing users to hot-plug these devices to their computers. USB is the most common connection used in these devices, but eSATA, FireWire and even wireless connectivity options are not uncommon. However, as these drives are connected directly to the computer, and that computer is most probably going to be a Windows PC, external hard drives are commonly formatted with either NTFS (mostly) or FAT32 (in rare cases, as FAT32 imposes a 4GB limitation on the maximum file size).
As a result, acquiring external hard drives is relatively easy and not different at all from acquiring a built-in hard drive.
NAS storage systems, on the other hand, are computer devices running an operating system of their own. There is no option for outside low-level access to the hard drive(s) used inside a NAS unit. Instead, the internal operating system manages all reads and writes, only allowing users to access information stored on its hard drives via a network share (SMB and DLNA are the most common communication protocols supported by NAS drives).
As a result, connecting a NAS unit as is to the investigator’s PC via the Ethernet link will do little in terms of forensic acquisition. Granted, the file system (or a part of the file system) may be available to read out of the box. However, unallocated space analysis is not available for network shares. In order to properly acquire and analyze information from NAS devices, you will need to take the drive(s) out and perform low-level acquisition.
NAS: a Linux Machine
Most NAS devices run a custom version of Linux, FreeBSD or similar system. For example, Synology (one of the higher-end manufacturers of a wide range of NAS devices) develops Synology DiskStation Manager (DSM), a Linux based software package that is the operating system for their NAS products. Synology’s main competitor, QNAP, uses QTS, an operating system for their range of Turbo NAS units. According to the company, QTS is “built on a Linux foundation”. Shuttle uses embedded Linux in their NAS appliances, and WD makes use of embedded Linux in its MyCloud NAS series. Buffalo LinkStation units run on a custom version of Linux as well. Most other home-based NAS appliances are also using Linux, while some manufacturers opted to use a variation of the FreeBSD OS.
What does this mean for digital forensics? Well, you will need your Linux skills to read data from a NAS drive or array.
Linux File Systems: Acquiring Single-Bay NAS
The first obstacle in the acquisition of a NAS device is their choice of the native file system. As most NAS devices run versions of embedded Linux, their choice of the file system falls down to ext3, ext4, JFS or XFS. While ext3 and ext4 are fairly common with Linux users, and there are a lot of forensic acquisition tools supporting them natively, the XFS is far less common – even as this file system is arguably the better choice for network storage.
Developed by Silicon Graphics, Inc. (SGI) back in 1993, XFS is an extremely robust file system under heavy load. Supported by most Linux distributions, XFS is frequently used by manufacturers of file servers and network attached storage (NAS) devices. At the time, Google considered upgrade options from the aged ext2, the company tested ext4, JFS and XFS as possible upgrade paths and found these file systems as “close enough” in performance in the areas they cared about. The company went with ext4 due to the much smoother upgrade path from ext2.
Once again, NAS devices use Linux (or, generally, UNIX-originated) file systems. Native support of some of these file systems is available in most forensic tools. For example, Belkasoft Evidence Center natively supports ext2, ext3 and ext4 file systems. However, if you bumped into a NAS formatted with XFS (such as Shuttle KS10 or KD20), your analysis options suddenly become limited. As of today, only one tool (X-Ways Forensics) can natively deal with XFS-formatted devices.
Forensic support for XFS is rather limited. However, Linux-based forensic packages (and Linux computers in general) have native support of this file system, making them a possible choice for XFS forensics.
NAS: a RAID Storage
While single-bay NAS devices are widely available and extremely popular, two- and four-bay units are common. Consumer NAS devices are commonly configured into one of the following RAID configurations:
JBOD (a single contiguous storage space with total storage capacity equal to the sum of all participating drives’ capacities),
RAID 0 (or “striped” array, again with increased storage capacity at expense of reliability),
RAID 5 (similar to RAID 0 but with partial redundancy for greater storage reliability),
Depending on the user’s proficiency level and their particular requirements, you are likely to encounter one of either types of RAID.
From forensic perspective, you will need to extract individual drives out of the NAS unit, connect them to the computer you are using to acquire information, image the disks one by one, and then somehow remount the array on the computer you will be using to analyze information. While there are plenty of tools on the market allowing you to mount most common types of RAID arrays, the choice of tools that are able to work with proprietary RAID types such as Synology SHA can be extremely limiting. More information on RAID forensics in “RAID Reassembly – A forensic Challenge”http://pyflag.sourceforge.net/Documentation/articles/raid/reconstruction.html.
After remounting the array, you will be able to perform the usual analysis routine including unallocated space analysis with your forensic tools of choice. For instance, recently released v.7.3 of Belkasoft Evidence Center not only supports Linux as well as other Unix-like systems, but also allows you to choose which particular parts of the disc you would like to analyze, whether that be just unallocated space, disc partitions, or the whole disc:
SSD Drives in NAS
Using SSD drives in NAS storage systems is an interesting and controversial topic. As you may know from our SSD whitepaper (http://belkasoft.com/ssd-2014), SSD drives feature certain performance and lifespan optimization measures such as trimming erased data and using background garbage collecting mechanisms. However, support for these mechanisms in today’s NAS units is extremely limited. Most NAS units will not pass the TRIM command to SSD drives at all, effectively blocking most maintenance algorithms erasing released data blocks (and wiping unallocated space) performed by SSD drives in background. In turn, this means that evidence stored on SSD drives used in most NAS units WILL BE UNAFFECTED by the TRIM command and background garbage collection, and you may be able to recover deleted files. This is different from situations where SSD drives are used in a PC, trimming evidence soon after it has been deleted.
A notable exception from this rule are some NAS units manufactured by Synology. According to the document “Does Synology NAS support the SSD TRIM function?” https://www.synology.com/en-us/knowledgebase/faq/591, the company supports TRIM in a variety of NAS units running DSM 4.3 and later. After sending an inquiry to Synology regarding the complete list of NAS units supporting TRIM with SSD drives, we received a more definite reply: “SSD TRIM is available for all models, starting with DSM 4.3”.
Encrypted NAS
Most consumer NAS devices (e.g. WD MyCloud, Shuttle KS10 and similar) do not offer self-encryption either on hardware or software level. Higher-grade NAS units such as those manufactured by Synology (https://www.synology.com/en-us/knowledgebase/tutorials/455) and QNAP (https://www.qnap.com/i/en/trade_teach/con_show.php?op=showone&cid=5) do support transparent data encryption using the industry-standard AES 256-bit encryption algorithm. Supplying (or recovering) the correct plain-text password is the only option for decrypting encrypted data, as attacking 256-bit AES encryption keys is unfeasible.
Conclusion
In this paper, we had a look at challenges presented to forensic analysts by consumer NAS devices, reviewed common problems and their solutions. We learned about the differences between network attached storage (NAS) and external hard drives, looked at the different file systems used in today’s NAS units, covered the types of RAID arrays employed by multi-bay NAS, and briefly talked about the use of data encryption and SSD drives in NAS.
About the authors
Oleg Afonin is Belkasoft sales and marketing manager. He is an author, expert, and consultant in digital forensics.
Danil Nikolaev is Belkasoft sales and marketing manager, co-author, and content manager.
Yuri Gubanov is a renowned digital forensics expert. He is a frequent speaker at industry-known conferences such as CEIC, HTCIA, TechnoSecurity, FT-Day, DE-Day and others. Yuri is the Founder and CEO of Belkasoft, the manufacturer of digital forensic software empowering police departments in about 70 countries. With years of experience in digital forensics and security domain, Yuri led forensic training courses for multiple law enforcement departments in several countries. You can add Yuri Gubanov to your LinkedIn network at http://linkedin.com/in/yurigubanov.
In our previous article, we talked about acquiring tablets running Windows 8 and 8.1. In this publication, we will talk about the acquisition of Windows computers – desktops and laptops. This class of devices has their own share of surprises when it comes to acquisition.
The obvious path of acquiring a Windows PC has always been “pull the plug, take the disk out, connect to an imaging device and collect evidence”. Sound familiar? Well, in today’s connected world things do not work quite like that.
In this article, we will have a look at measures the investigator has to take before taking the disk out, and even before pulling the plug, review Windows security measures and how they can work in combination with the computer’s hardware.
Windows Security Model
In our previous article, we mentioned Windows RT as an exemplary platform with strict and thorough implementation of a straightforward security model, which made forensic acquisition of Windows RT devices difficult. Fortunately for us, in general, Windows PCs and laptops are not anywhere close to reaching that security level, relying instead on restricting physical access to computer hardware and locking user accounts with passwords. This, however, does not protect the actual data.
Locked bootloader? We do not see that often on Windows laptops, let alone desktop computers. Secure Boot? Disabled by default or easily deactivated from the computer’s UEFI BIOS. BitLocker encryption? Not if the computer’s motherboard lacks TPM support. NTFS encryption? Can be attacked offline by recovering (or breaking) the user’s account password.
So does that all mean one can follow with the familiar pull-the-plug approach? Not quite. By powering down the device, you’ll be losing the content of the computer’s volatile memory, missing the chance to obtain valuable evidence – or even accessing the disk at all, if encrypted volumes are present.
Windows 7, BitLocker and TPM (Trusted Platform Module)
While BitLocker is an essential part of the Windows security model, it has never been all that popular on Windows desktops, and is only available on counted laptops. Why is it so?
Let us have a look at the Windows ecosystem consisting today of Windows tablets, laptops and desktop PCs. As mentioned in our previous article, Windows tablets run either Windows RT or Windows 8/8.1. These tablets often include TPM (Trusted Platform Module) hardware that is required for BitLocker to work. All Windows RT tablets and many mid-range and high-end Windows 8 devices such as Microsoft Surface Pro and Surface 3 are equipped with a TPM module and BitLocker, which activates automatically when the user logs in under their Microsoft Account credentials as an administrator.
This is not the case for many Windows desktops and laptops. First and most importantly, BitLocker is only available to Windows 7 (and Windows Vista) users in the Ultimate and Enterprise editions. These are the most expensive editions of Windows; relatively few of them were sold compared to the Professional edition.
Things have changed with the advent of Windows 8. While Windows 8 and 8.1 users can have BitLocker in the Pro and Enterprise editions, the core edition (as well as Windows RT) also supports BitLocker device encryption, a feature-limited version of BitLocker that encrypts the whole disk C: partition. Moreover, device encryption activates automatically when the user logs in as an administrator with their Microsoft Account.
While BitLocker device encryption is offered on all versions of Windows 8.1, device encryption requires that the device meets a number of specifications. Notably, the device must support Connected Standby, which requires solid-state drives, have non-removable RAM (to protect against cold boot attacks) and a Trusted Platform Module (TPM) 2.0 chip. Few laptops and very few desktops meet all specifications required for the activation of device encryption.
Are We Likely to See BitLocker Running on a Windows PC?
How likely is an investigator to encounter a BitLocker-protected device? If we were acquiring a Windows tablet, the chances would be pretty high, as BitLocker device encryption is activated automatically on most tablets. The chance of encountering BitLocker protection on a desktop or laptop computer are much lower.
By Q2 2015, about 16% of Windows computers are still running Windows XP, while over 60% are Windows 7 and Vista. That is 76% of devices that most likely will not have BitLocker protection (unless the user has Windows 7 Ultimate or Enterprise and manually activated BitLocker). Windows 8 and 8.1 together take a combined share of roughly 15% of the market. How many of those devices running Windows 8.x are using hardware that is not equipped with either a TPU chip, a solid-state storage or soldered memory chips is anyone’s guess. While we can expect BitLocker device encryption on most Windows tablets, the same cannot be said about Windows desktops and laptops. However, with more devices (especially laptops) manufactured to meet the required security standards, in time we will be seeing more BitLocker-encrypted computers.
Dealing with BitLocker Encryption
If you know the user’s Microsoft Account credentials, the user’s BitLocker Recovery Key can be retrieved from https://onedrive.live.com/recoverykey. Alternatively, when investigating a corporate computer, BitLocker Recovery Key can be obtained from the company’s Active Directory.
However, if the Recovery Key is not available, your only option of imaging a BitLocker disk would be capturing the content of the computer’s RAM (with a tool like Belkasoft Live RAM Capturer) and using a product such as Passware Kit Forensic or ElcomSoft Forensic Disc Decryptor to extract the binary key used by BitLocker to decrypt information. That key can be then used in the same product to mount BitLocker-protected partitions.
Making a RAM Dump
The importance of capturing memory dumps before shutting the computer down is hard to underestimate. Note that without a memory dump, you may be locked out of encrypted volumes and faced with the possibility of spending days or weeks trying to break into a crypto container – with dubious results.
Our tool of choice for making memory dumps is Belkasoft Live RAM Capturer. The tool runs in the system’s kernel mode, and allows acquisition of the complete contents of the computer’s ram along with protected memory areas.
Once RAM is captured, you will need to use a tool that has a Live RAM analysis feature. Belkasoft’s Evidence Center allows searching for various forensic artifacts inside the memory, like browser histories, including deleted data and Private browsing history, SQLite databases, pictures, documents, messenger chat histories, registry files, and more.
Conclusion
To sum up, acquiring Windows computers is more complex than simply pulling the plug and taking the disk out. Even if the computer is not protected by Windows security features such as BitLocker, acquiring data from a turned-off machine means missing evidence from Live RAM, where we are extremely likely to find some forensically important artifacts. That is why we strongly recommend creating a memory dump before powering down the computer.
About the authors
Oleg Afonin is Belkasoft’s sales and marketing director. He is an author, expert, and consultant in computer forensics.
Danil Nikolaev is Belkasoft’s sales and marketing manager, co-author, and content manager.
Yuri Gubanov is a renowned digital forensics expert. He is a frequent speaker at industry-known conferences such as CEIC, HTCIA, TechnoSecurity, FT-Day, DE-Day and others. Yuri is the Founder and CEO of Belkasoft, the manufacturer of digital forensic software empowering police departments in about 70 countries. With years of experience in digital forensics and security domain, Yuri led forensic training courses for multiple law enforcement departments in several countries. You can add Yuri Gubanov to your LinkedIn network at http://linkedin.com/in/yurigubanov.
Belkasoft Research is based in St. Petersburg State University, performing non-commercial researches and scientific activities. A list of articles by Belkasoft Research can be found at http://belkasoft.com/articles. To learn more about forensic analysis of RAM, please read Belkasoft article “Catching the ghost: how to discover ephemeral evidence with Live RAM analysis” at http://belkasoft.com/live-ram-forensics. Belkasoft’s previous article, Capturing RAM Dumps and Imaging eMMC Storage on Windows Tablets, can be found at http://belkasoft.com/en/ram-capture-on-windows-tablets. For more information about Belkasoft’s Live RAM Capturer, please visit http://belkasoft.com/en/ram-capturer.
While Windows desktops and laptops are relatively easy to acquire, the same cannot be said about portable Windows devices such as tablets and convertibles (devices with detachable keyboards). Having no FireWire ports and supplied with a limited set of external ports, these devices make attaching acquisition media more complicated in comparison to their full-size counterparts. Equipped with soldered, non-removable eMMC storage, Windows tablets are extremely difficult to image while following the required forensic routine. Finally, the obscure Windows RT does not allow running unsigned desktop applications at all while restricting the ability to boot into a different OS, making forensic acquisition iffy at best.
In this article, we will have a look at how Windows-based portable electronic devices are different from traditional laptops and desktops, review new security measures and energy saving modes presented by Windows tablets and discuss hardware, methods and tools we can use to acquire the content of their RAM and persistent storage.
Security Model of Windows Tablets
Tablets running Windows 8, 8.1 and Windows RT are designed with certain security measures to prevent unauthorized access to their content if a device is lost or stolen. These security measures are similar to those present in desktop devices, and differ significantly from the approach employed by Google and Apple.
In Windows 8 and 8.1 installed on a tablet, security measures include optional whole-disk encryption (with BitLocker) and Secure Boot, an option to prevent booting into a non-recognized (unsigned) OS, effectively preventing the use of Linux-based bootable drives often used for digital forensics.
Note that Secure Boot is optional, but is often activated by default in the system’s UEFI. BitLocker keys can be retrieved from the user’s Microsoft Account (http://windows.microsoft.com/recoverykey) or extracted from a memory dump (if captured while the tablet is running).
Secure Boot
Secure Boot, even if activated in the tablet’s UEFI BIOS, can usually be disabled by booting into UEFI (by using the combination of Volume-DOWN and Power keys). However, if UEFI BIOS is protected with a password, resetting the password could be difficult. Notably, Secure Boot does not prevent booting from external media per se. If you have a bootable recovery image of Windows 8.1 or a bootable Windows PE 5.1 flash drive, these already carry the required signatures and can be used to start the tablet even if Secure Boot is enabled.
It is important to note that Secure Boot is permanently activated on Windows RT devices such as Microsoft Surface RT, Surface 2, Nokia Lumia 2520 and other RT-based tablets. Since these ARM tablets are locked with Secure Boot, and there is no way to disable that option, there is no known method to boot them into anything other than Windows RT or its recovery image. While one can technically use a Windows RT recovery image such as one provided by Microsoft (http://www.microsoft.com/surface/en-us/support/warranty-service-and-recovery/downloadablerecoveryimage), there are no forensic tools available for that OS. However, one can still use a built-in DSIM tool to capture the content of a Windows RT computer but that is out of the focus of this article.
BitLocker
BitLocker is an essential part of Windows security model. On many tablets, BitLocker encryption protects the C: partition. By default, BitLocker is activated on all Windows RT and many Windows 8 and 8.1 tablets. With BitLocker, one cannot access encrypted partitions without either logging in to Windows (by supplying the correct login and password) or providing the correct Recovery Key. This especially concerns situations with booting from an external device.
If the user’s BitLocker Recovery Key is unknown, it can be retrieved from https://onedrive.live.com/recoverykey (providing that the user’s Microsoft Account credentials are known).
Drives protected with BitLocker will be unlocked automatically every time the user logs in. As a result, if you have the user’s local login credentials for the given device, BitLocker does not represent a major problem.
Important note, however : If the Windows tablet you are about to acquire is running, or if it is in the Connected Standby mode, DO NOT TURN IT OFF before trying anything to capture the system’s live memory dump. If the C: partition is protected with BitLocker, capturing a live memory image is your chance to obtain (and retrieve) the binary key used by BitLocker to decrypt information. If you are able to extract that key, you will be able to use a tool such as Passware Kit Forensic to mount BitLocker-protected partitions even if you know neither the user’s login and password, nor Microsoft Account credentials.
Note that BitLocker is frequently disabled by default on cheaper, mass-produced tablets with smaller screens such as those running Windows 8.1 with Bing.
eMMC Storage
Most Windows tablets are equipped with built-in non-removable eMMC storage. Physically, an eMMC module (Embedded Multi Media Card) is a BGA chip that is soldered onto the main board. As such, standard acquisition methods involving the use of a write-blocking SATA imaging device are not applicable.
In order to acquire partitions from eMMC storage, you will need to boot from an external drive containing a bootable recovery image (such as Windows PE) and a set of forensic imaging tools. However, even that may present a problem with Windows tablets.
Compatibility
Some Windows tablets are equipped with 32-bit UEFI ROM, while few other devices come with fully featured 64-bit UEFI. As a result, you may be unable to boot a 64-bit Windows PE image (or 64-bit Linux) even if the tablet is equipped with a 64-bit capable CPU.
UEFI Secure Boot
The majority of Windows tablets come with the Secure Boot option activated in their UEFI BIOS. Contrary to popular belief, you will NOT need to disable Secure Boot in order to start the system from an external device, PROVIDED that the OS you are about to boot is signed. In other words, you will be able to boot into a Windows 8.1 Recovery and Repair Environment (WinRE) or use a custom Windows PE 5.1 image. However, with Secure Boot activated, you may be unable to boot into a Linux-based forensic image.
In order to disable Secure Boot, you will need to access the system’s UEFI by pressing and holding the Power-DOWN key while starting the device. However, access to Secure Boot is not required if you simply want to boot from a USB device containing a Windows PE or WinRE image.
Booting from an External USB Device
In order to boot from an external USB device, you’ll need to have a properly prepared WinRE or Windows PE based bootable media and a USB OTG (On-The-Go) cable. In order to change the boot sequence and make the system start from an external device, follow these steps:
Start the tablet.
At the login prompt, tap the Ease of access icon.
Select On-Screen Keyboard.
Tap the Shift key, the shift key should remain lit.
In the lower right corner, tap the power key and select Restart.
When the unit reboots, select the Troubleshoot option.
From here select Advanced options.
Select UEFI Firmware Settings. You will be transferred into UEFI BIOS.
From there, change the boot order to allow starting from a USB device.
If you are using a non-Windows PE (or WinRE) based image, disable the Secure Boot option. There is no need to touch this option if you are using a Windows PE 5.1 image.
Connect a bootable USB device via a USB OTG adapter.
Save settings and reboot. The system will start from the bootable image on your USB drive.
Follow the acquisition routine of your forensic toolkit.
Capturing a Memory Dump
Capturing a RAM dump of a Windows tablet is essential for digital investigations, and is one of the recommended practices by ACPO Guidelines. Most principles of capturing a live memory dump remain the same as compared to full-size PCs. The goals, tools and the process of capturing volatile memory images are described in Belkasoft whitepaper “Catching the ghost: how to discover ephemeral evidence with Live RAM analysis”.
However, there are minor differences between capturing volatile memory images on a PC and doing the same on a small tablet. One thing to consider is the lack of expansion ports such as FireWire on most tablets, which makes the FireWire attack impossible. Moreover, there is usually no possibility to add a FireWire port via an add-on card.
As such, on Windows tablets (with a notable exception of Windows RT devices) we are limited to using software tools such as Belkasoft Live RAM Capturer.
Since most Windows tablets lack full-size USB ports, you will need to use a USB OTG (USB On-The-Go) adapter in order to connect a flash drive. Since tablets are usually equipped with one or two gigabytes of RAM, even a small USB stick or memory card will suffice.
Analyzing a Memory Dump
Once RAM is acquired, you will need to analyze it with a forensic tool equipped with a Live RAM dump analysis feature, like Belkasoft Evidence Center:
There is a high chance of finding various forensically important artifacts. You can see some data found inside RAM dump by Evidence Center:
Conclusion
To conclude, acquiring Windows tablets is similar to dealing with full-size PCs, yet the process has its share of obstacles. We learned how to image partitions saved on soldered eMMC chips and how to deal with BitLocker protection. We figured out the meaning of Secure Boot, when and how to deactivate it if required. Finally, we reviewed steps to access the tablet’s UEFI BIOS and change device boot order in order to allow booting from a USB flash drive containing a set of forensic tools for imaging the device.
About the Authors
Oleg Afonin is Belkasoft sales and marketing director. He is an author, expert, and consultant in computer forensics. Danil Nikolaev is Belkasoft sales and marketing manager, co-author, and content manager. Yuri Gubanov is a renowned digital forensics expert. He is a frequent speaker at industry-known conferences such as CEIC, HTCIA, TechnoSecurity, FT-Day, DE-Day and others. Yuri is the Founder and CEO of Belkasoft, the manufacturer of digital forensic software empowering police departments in about 70 countries. With years of experience in digital forensics and security domain, Yuri led forensic training courses for multiple law enforcement departments in several countries. You can add Yuri Gubanov to your LinkedIn network at http://linkedin.com/in/yurigubanov.
Belkasoft Research is based in St. Petersburg State University, performing non-commercial researches and scientific activities. A list of articles by Belkasoft Research can be found at http://belkasoft.com/articles.
As part of my third year studying Digital Security,Forensics & Ethical Hacking at GCU, I took part in a group research project to study the artifacts created when using the notes app on an iPad Mini, and if they could be used as evidence. This post is really just going to explain what I did, what I found and how you can go about doing it too.
Equipment used:
2 x Apple iPad Minis (Jailbroken)
2 x Wireless Access Points (1 with internet access / 1 without)
1 computer with a database manager
I jailbroke the iPads, solely because I wanted to use iFile to view what was happening in real-time, rather than examine the data by backing it up and viewing the file system that way.
I used two wireless access points, so that I could control access to the internet and thus, the ability for each iPad to sync. The computer was used to view the SQLite database that iOS stores the data in, however you can also view the SQLite database in iFile, if you’re lazy.
On the database manager front, I found that when using windows the “SQLite Manager” add-on for Firefox did the trick. On Ubuntu, “SQLite Manager” from the repository was my preferred option.
Overview of the Notes.sqlite file:
The Notes.sqlite file is a sqlite3 file, used by iOS to store all the data regarding each note and the device.
It consists of nine tables :
ZACCOUNT: This table relates to iTunes account information
ZNEXTID : This table relates to ID creation
ZNOTE : This table contains information about the note, such as title, subtitle,author,modification and creation dates as well as foreign key links to ZNOTEBODY
ZNOTEBODY: Contains the full body of the note, represented in HTML.
ZNOTECHANGE: Contains information that could be related to syncing although doesn’t appear to have any function.
ZPROPERTY : Links to the constraints plist file, that contains information about the notes application itself.
ZSTORE: Contains information relating to icloud stored / local storage
Z_PRIMARYKEY: Contains the primary keys for each table
Z_METADATA : Contains metadata
Methodology:
I carried out seven main tests, each test being based on a different action carried out on a note, repeating each one a handful of times in order to verify the results and findings:
Test 1 : Creation of a note (On iPad 1)
Test 2: Deletion of a note (From iPad 1)
Test 3: Modification of a note (From iPad 1)
Test 4: Modification of a note (From iPad 2)
Test 5: Accessing a note (From iPad 1)
Test 6: Accessing a note (From iPad 2)
Test 1:
When a note is created, a record is added to the ZNOTE & ZNOTEBODY tables respectively. The ZNOTE record containing information like the Author, Server ID, date created and date modified. the ZNOTEBODY record containing the actual content of the note, stored in HTML format. Before syncing, each non-synced not has a negative Server ID. After syncing, it has a new Server ID, the value of which is the same across both iPads. It’s also noteworthy to mention that syncing has no effect on the creation and modification date stored on iPad 2.
Test 2:
When a note is deleted from iPad 1, the record is dropped from the tables and that’s all that happens. I was hoping that the server i.d would be used to “mark” the note for deletion, but no, it’s simply dropped from existence. After syncing, the same happens on the second iPad. So apart from a missing private_key, there is no way to know that a note has been deleted and there is no way to recover deleted files using any traditional methods.
Test 3:
When a note is modified from the same device it was created on, the database is changed in two ways. The first is that the modification time stamp is updated to reflect the current time and the second is that the note content in the ZNOTEBODY table is updated to contain the new text.
Unfortunately, this means that there is no way to “roll back” to a previous version of the note.
Test 4:
When a note that was created on iPad 1 is modified from iPad 2, the same changed seen during test 3 were observed, however, what was a interesting, is the value stored in the ZAUTHOR field in the ZNOTE table. Before modification, on iPad 1, this had a value of “NULL” after the modification had synced it had a value of “Stewart Wallace […]” where […] is the iCloud email address the account is registered to.
Test 5:
When a note was accessed (but not edited) by the primary iPad, there was no changes to the database, or the modified time value.
Test 6:
When a note was accessed by the secondary device, there was once again, no changes to the database.
Conclusions
From the analysis of one device and its database, it is possible to determine if a note originated from that device and if it was edited from another secondary device.
If you have more than one device and database, you can cross reference them to deduce what device created the note, if a note has been edited, what device edited it, sadly, it is not possible to see what was edited or at the moment – recover any deleted notes.
Towards the end of August, I was part of the team who were offered to help out and participate at an exciting event held at Glasgow Caledonian University. The event ran over five days with each day varied in content and different challenges. In this post I aim to give a rough breakdown of each day and discuss what we have learned and experienced during this time. This is the first time that the Cyber Security Challenge was held in Scotland and it was successfully hosted by Glasgow Caledonian University & sponsored by BlackBerry, RBS and other companies. Read on to see how the event unfolded.
Introduction
In order to help build and maintain the high standard of the current digital age, an increasingly talented and dedicated workforce is required. Cyber Security Challenge believes the value of getting young people involved will be beneficial in helping them progress to a professional path within the security field. The content of each challenge varies but in the past, the following topics and skills have been covered:
Forensics
Penetration Testing
Defensive
Analytical
Knowledge based
Business continuity
Capture The Flag
Backtrack
If you’d like to find out more information on the Cyber Security Challenge or are interested in registering for future competitions then check out their website at the bottom of the article.
As you may already know, the main contributors to Techwi.re are students at Glasgow Caledonian University, who are part of the (Hons) Digital Security, Forensics & Ethical Hacking course and precisely five of us were asked to help out at and organize sections of this event. Below is a first hand account of the entire event.
Day 1
The first day of the challenge was spent welcoming the arriving contestants and seeing them to their private halls residences. This gave us a chance to interact first hand with the variety selection of people who were participating in the challenge – ranging from different professional backgrounds. The challenge is open to a wide audience so there were people who have already spent years in the industry and guys who were only just starting their degrees in related subjects.
A pub quiz was planned for the evening at a local bar however, due to the football being on, we were not given the chance do it on the night. Nevertheless, the night was not wasted and everyone got to know one another whilst sharing a drink or two (or three!). The evening ended with guys from England complaining on why the pub closed too early on.
Day 2 (Business orientated)
After a rough morning start for majority of the contestants, it was time to get down to business – literally. This entire day was focused on developing and strengthening the challengers’ business, problem solving and analytical skills. In the morning, the contestants were briefed on a mock scenario in which a company executive is looking for a business idea and is willing to invest millions of pounds into pursuing. Challengers were split into small groups and several points were to be considered:
Length of the pitch is 7 minutes
An average of 30 seconds to grab the attention of the CEO
Gathering market research data and estimated profits
A limited time of five hours to complete task
These were just the few of the challenges the contestants faced. On top of all of this, the pressure was on to come up with an interesting idea that would be feasible in the real world and could generate revenue. For the rest of the afternoon, the challengers had roughly five hours to complete their 7 minute pitch. We were allowed to observe each group as they went through their initial brainstorming to finalizing the pitch content and delivery. From a different perspective, I was quite surprised at how well each member of each group participated and contributed in on the task at hand, considering they only know each other for a few hours.
Professor Jonathan Levie from Strathclyde Business School leads the business challenge as contestants look on.
By the end of the day, each group managed to prepare very interesting 7 minute pitches that varied in content and direction. Overall the generalized theme of the products or services offered was computing and security solutions. From my perspective, the pitches varied in quality, with some highlighting what their product does and others concentrating more on numbers, figures and revenue output.
Keynote speech from RBS
Dinner that evening included two Keynote speeches – one from RBS and another from Dr Michelle Govan announcing the new (MEng) Digital Security, Forensics & Ethical Hacking course at Glasgow Caledonian University.
Day 3 (Police College Visit)
The morning kicked off with a coach transfer to Scottish Police College, based at Tulliallan Castle. We were greeted with an interesting presentation that outlined the course of the day. The plan was for the contestants to split into groups and forensically analyse a mobile device that has been linked to a mock court case. They were then to create a forensic experts’ report that would be used during trial to present their findings and conclusions.
With many industry-standard forensic tools such as EnCase and XRY at the teams’ disposal, the possibilities for digging through the BlackBerry device were endless. It was a bigger challenge to piece all the different aspects together and connect all the dots. Since the teams were given a real life scenario, it was important to record the entire process and all findings correctly and professionally – using contemporaneous notes.
Forensic analysis of the mobile device and the case documentation provided for the challenge.
Teams spent the majority of their afternoon preparing documentation to be presented to the judge. Part of the challenge was an entire session in court, in which a panel of experts tear the forensic report apart and question a member of each team. This gave the contestants a chance to experience an actual court environment and see just how strong their reports have to be in order to hold up well.
Every member of the team that took the stand had no idea which report they will be defending and this made things interesting as it allowed us to see how they adapt and amend their responses each time. Some of the errors in the report were put in deliberately – in order to see who holds up the longest and provides the most sound explanation without giving too much away.
Contestant takes the stand whilst the panel prepares.
Dinner was hosted by BlackBerry with prizes given out to the contestants that held up their position in court and those who performed exceptionally well during the forensic analysis stage of the mobile device.
Day 4 (NetWars Challenge)
It was time for the ultimate hackfest. We helped set up a computer lab with customized VMWare images that are connected to the same system in England enabling challengers to participate in the lab, live against other opponents on the other side of the country competing in the same event. With merely a command prompt and a brief overview of the scenario at their disposal, the contestants set out to compete against each other in a scripted and from what I thought, a well planned scenario.
Contestants hard at work during the NetWars challenge.
We also had the opportunity to participate in this challenge and the following aspects were included:
Gaining access to different email accounts
Extracting hashes using reverse steganography methods
Analyzing SQL files for table entries and browser history/cookies
Piecing the bits together to form a bigger outlook
Questions testing your technical and problem solving skills
Come study at Glasgow Caledonian University. We have pimped out Mac labs and unique Digital Security, Forensics & Ethical Hacking Honours & Masters degrees!
Conclusion
Speaking from personal experience during the event, I think it was a great success and I have learned many new aspects to cyber security which would become useful in the years to come both in the industry and my current degree. Overall, the event was organised well and even with some minor hiccups, everyone stuck together to form an interesting experience for all involved. As a final note – we did manage to run that pub quiz that evening and it was a great success!