JTAG-Based Memory Acquisition Framework

Multicolored cables connect small electronic boxes

Hello everyone. My name is Muhammad Haris Rais. I am a PhD student at SAFE lab – Security And Forensics Engineering lab at Virginia Commonwealth University.  The lab is led by Dr. Irfan Ahmed and is mostly focused around industrial cybersecurity, and its forensics.

Today, I’m presenting a hardware based  PLC memory acquisition framework called Kyros. And in this work, we are collaborating with Rima Asmar Awad and Dr Juan Lopez Jr from Oakridge National Lab.

An Industrial Control System is a collection of devices, a variety of network and control software, to basically operate or automate a physical process. A physical process could be a gas pipeline, power grid, a nuclear power plant, water treatment, any other.

And these physical or field devices, they actually interact with the physical process to connect it to the cyber world, and field devices themselves are connected to a variety of  networks,  to a control center that hosts different controls, software – engineering software, and HMI. And this control center is connected to corporate LANS, which are typically connected to internet.

If we see the uniqueness of this industrial control system, it lies in the, this interfacing layer,  where we have these field devices, which are most commonly programmable logic controllers or PLCs.

A PLC is a rugged industry specs embedded system. It has a CPU volatile/non-volatile memory component and optionally, some removable storage, and a host of input and output modules to connect to the physical process.

The control application running on the firmware in the PLC is usually called control logic program and PLC executes a loop, a continuous loop in which it gets the state, current state of the system through the sensors, and then applies some control logic over that state, and calculates new output values that are applied to the actuators where they tend to steer the physical process to a new state, and then began the new state of the system, and the loop continues.

If you talk of memory forensics of PLCs, there are two distinct research areas in memory forensics. One is the acquisition of memory and another is the analysis of memory. As far as acquisition of PLC memory is concerned, so far the research is mostly focused on the software tools like debugging tools or ICS protocols, or maybe analyzing the network data.

But if we have the physical access of the device available, so why not to explore the hardware based approach? JTAG interface is explored in the past as well, but only for modifying PLC firmware. So far, there is no work or framework that guides a forensic investigator on the process of extracting memory, complete memory of a PLC through JTAG.

A little bit on the JTAG. In 1980s, when ICs were shrinking and circuit boards were getting more and more complex, so the testing of the circuits became difficult with the existing approaches. For example, if you see this IC, it’s a ball grid array design, where the contacts are not on the sides, rather on the bottom of the IC.

And when we put this IC on a circuit board and solder it, and if there are some errors, like if you see it from the side view, if there is an open circuit, or there are some short circuits, so with conventional approach it is very difficult to find these types of errors.

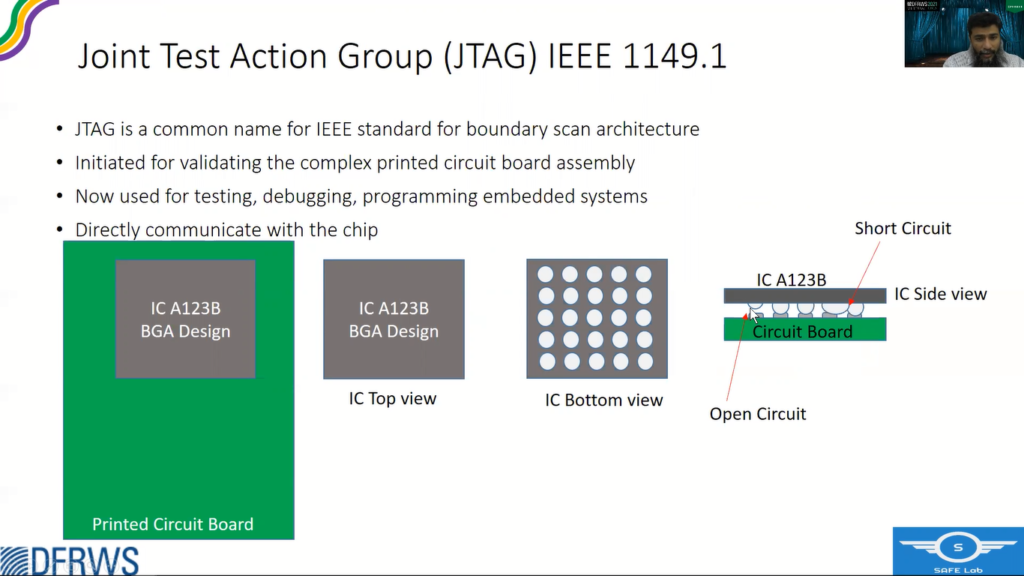
Then the vendors sat together and came up with an idea of including some kind of circuitry within the chip that should facilitate the testing. And later this was standardized by IEEE as IEEE 1149.1. for boundary scan architecture.

If you see this is a normal IC package, where the core circuitry, comprising of target cells and gates, they are connected to the outside pins of the IC. In JTAG, there is a boundary scan, serial register or shift register that is, that sits between the core circuitry and the pins.

And there is a TAP Controller, which is a smart state machine that can control these registers and through these registers, a user can control the output going out of the pins, or can also read the input that is coming into a particular pin, and that’s how it facilitates circuit testing. But later on this approach was also utilized for debugging and embedded system programming also.

Kyros framework constitutes two phases.

In the first phase we create a memory profile using a test PLC, and in the second phase, we use that profile to acquire the memory of a suspect PLC.

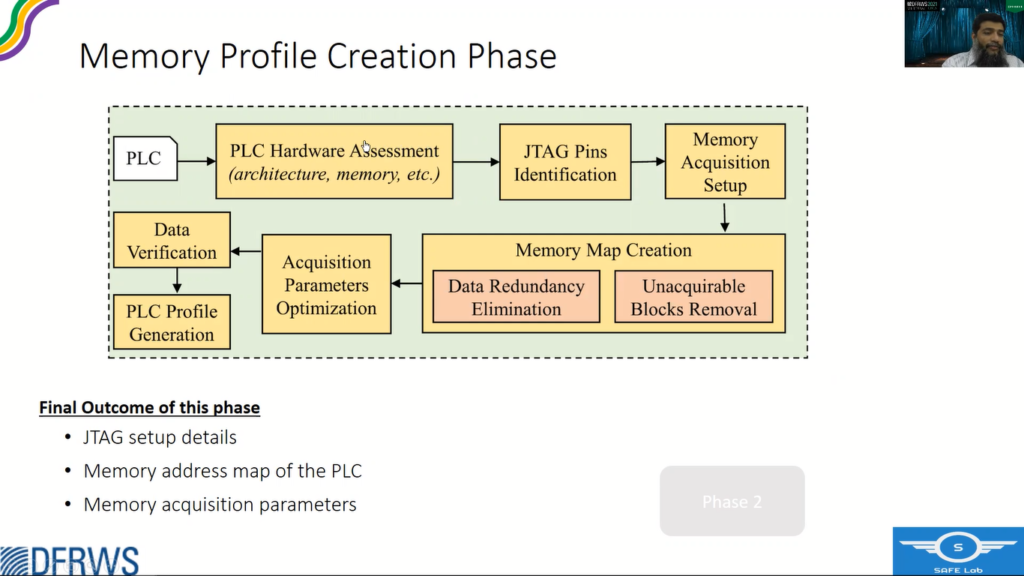
So in phase one, the first step is Hardware Assessment. So while analyzing the hardware of a PLC we are mostly interested in the microcontroller, the architecture of the microcontroller and its internal memory and volatile, and non-volatile memory components, the JTAG pins of the microcontroller and the memory address map, like where the flash resides and where the RAM resides, what are the peripheral addresses and so on.

The other components are the memory elements that are available in most circuit boards because the internal memory of a microcontroller is not sufficient, so there are external memory components as well, like volatile memory components or non-volatile memory components, and then the removable storage, which is also not part of the memory, but it facilitates in verification of the memory content that we require.

The main sources of information for hardware assessment.

The first one is the PLC hardware manuals, although they don’t specify a lot of details, but there are some hints like, well, how much is the Code memory or the IO memory or controller architecture and the backup options available or not? So they give a hint of what type of, how much is the memory that is available.

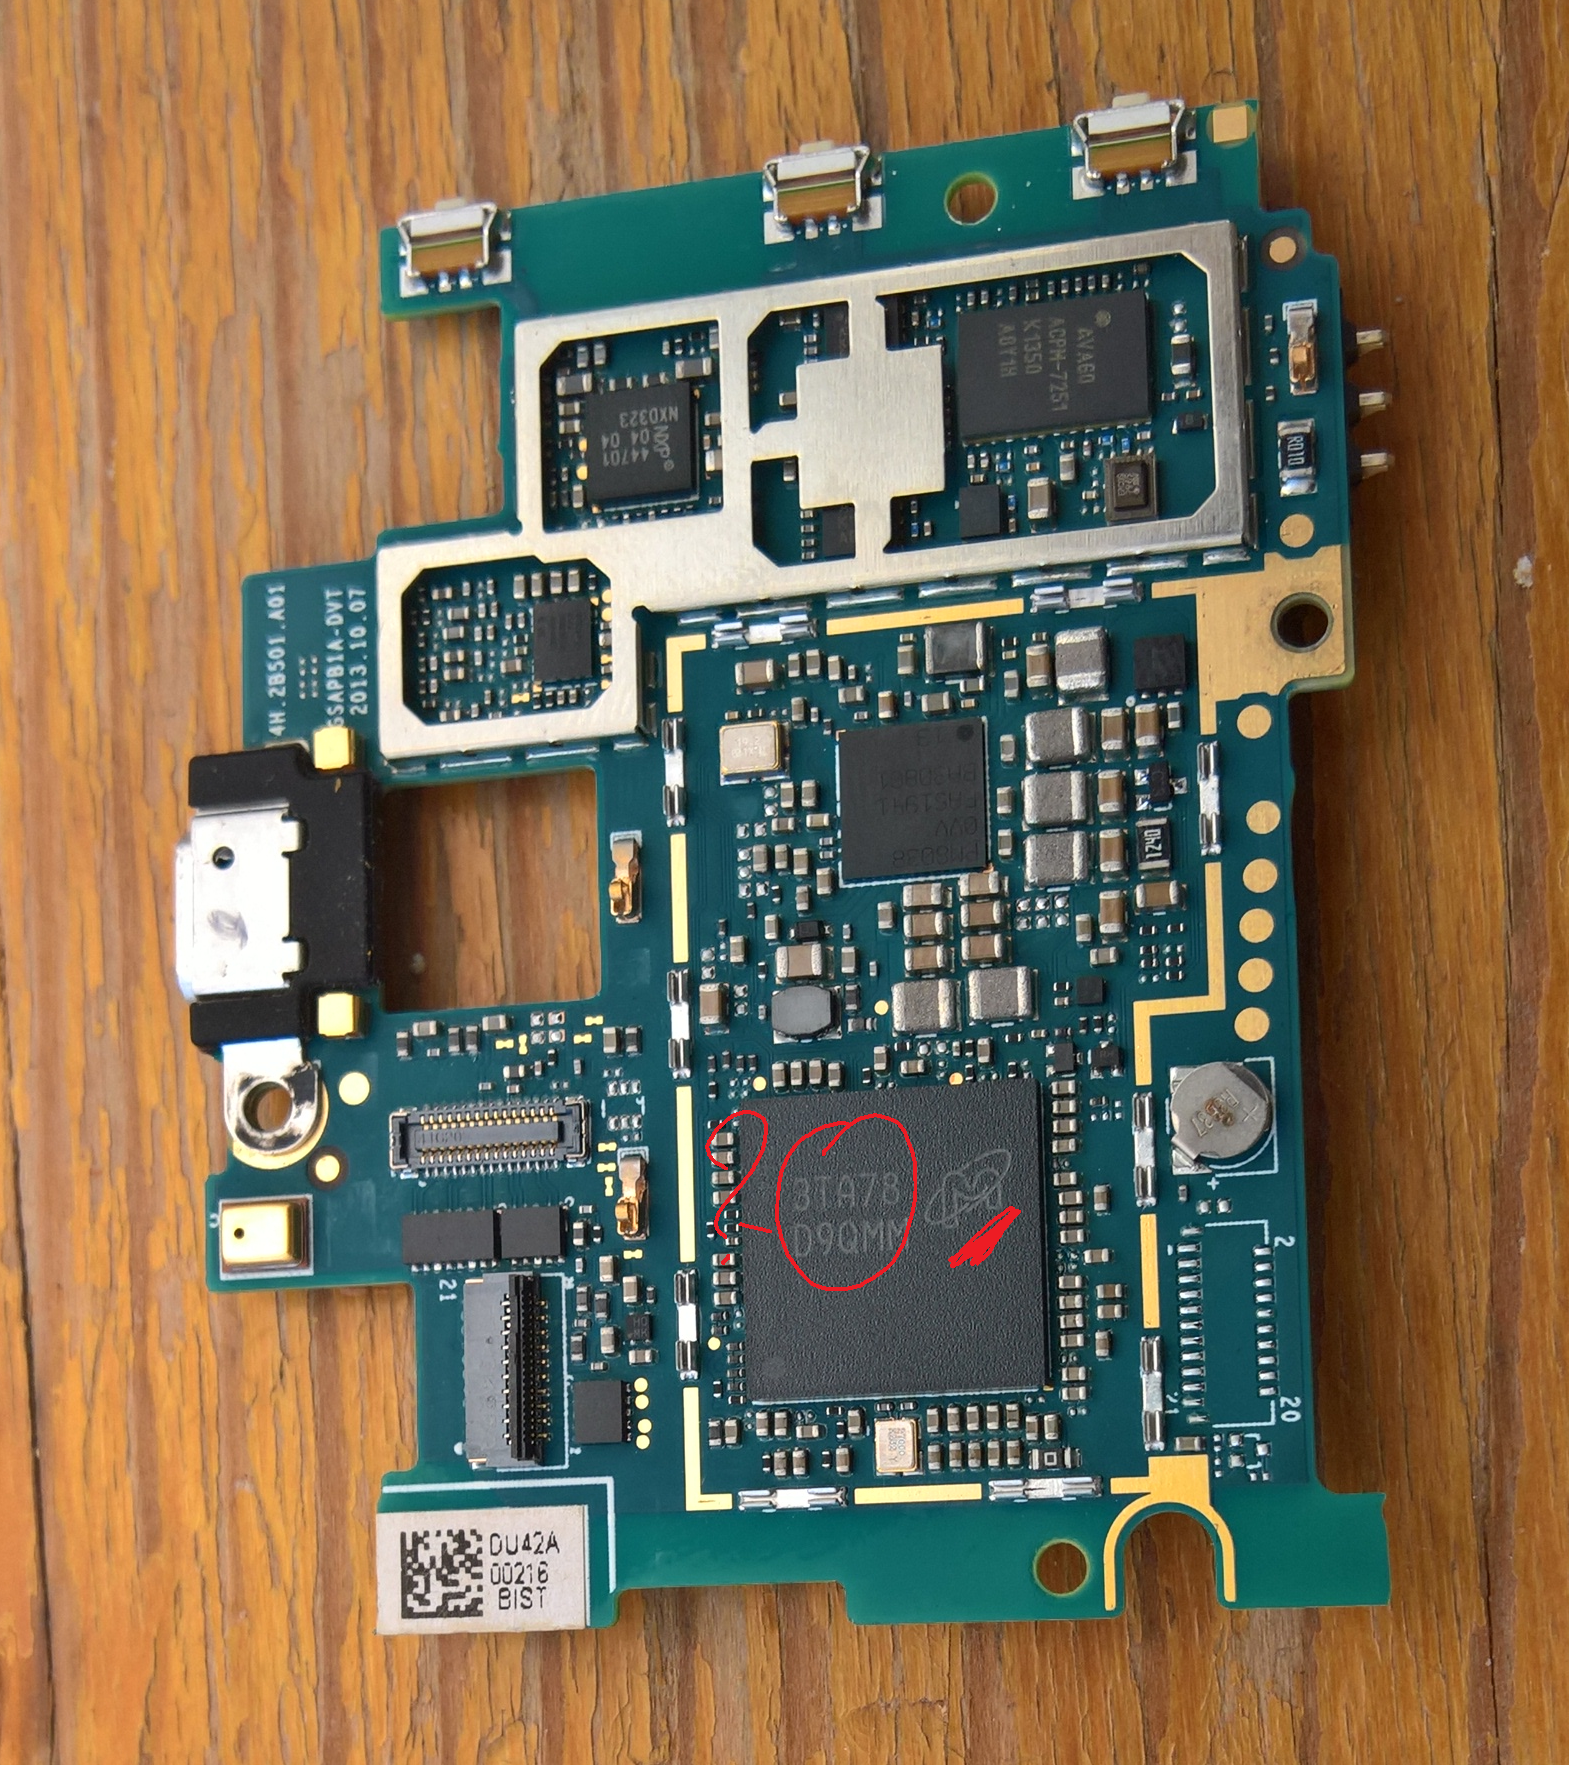
Next is the visual inspection by disassembling. So we disassemble the PLC and see the boards. There could be like four types of boards, communication, main board, power, but we are interested in the main boards, and we examine the ICS that are available on the circuit board.

And again, we are looking at the controller IC and the memory elements IC. Once you find the IC there, hopefully there are part numbers, then we search the data sheets and find out the details of the memory, like how much is the capacity of the memory and what are the different parameters, what’s the type of memory and so on.

So the next step is to identify the JTAG pins from the Processor Datasheet.  If the Processor Datasheet is available, it clearly tells us which pin is the JTAG pin, mode selector or input output pins.

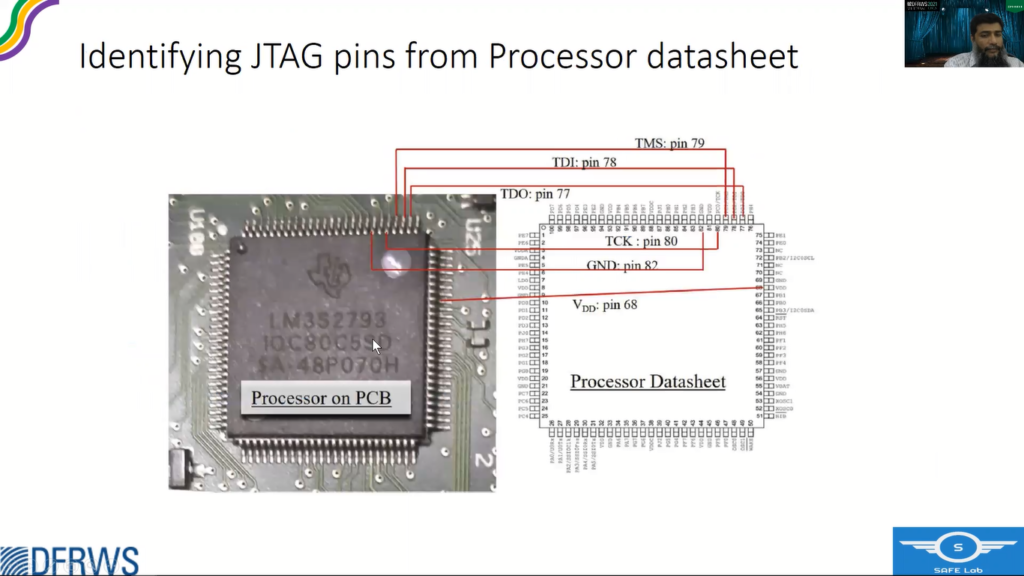
So what we can do, if we have those available, we can clearly see on the processor IC where those pins are located, and once we do that, the next step is to identify the JTAG contact pad,  although like, we identify the pin on the processor, but it is very risky to use these pins for extracting information or controlling the TAP controller.

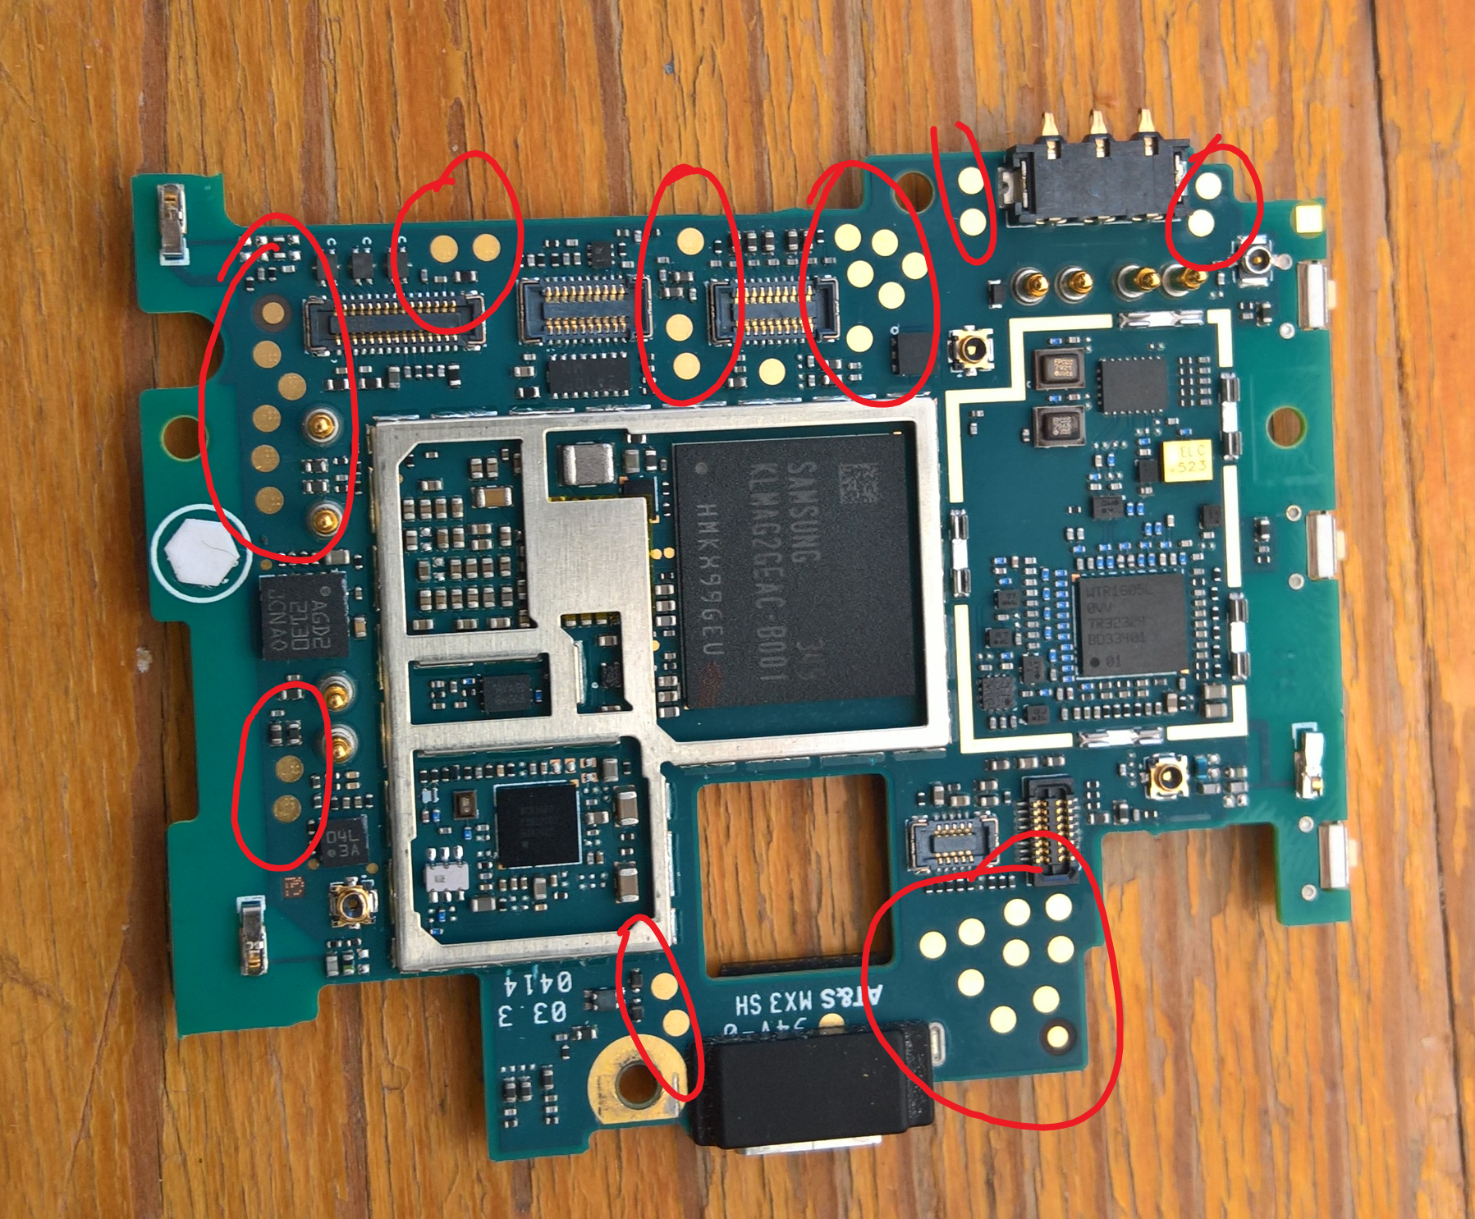
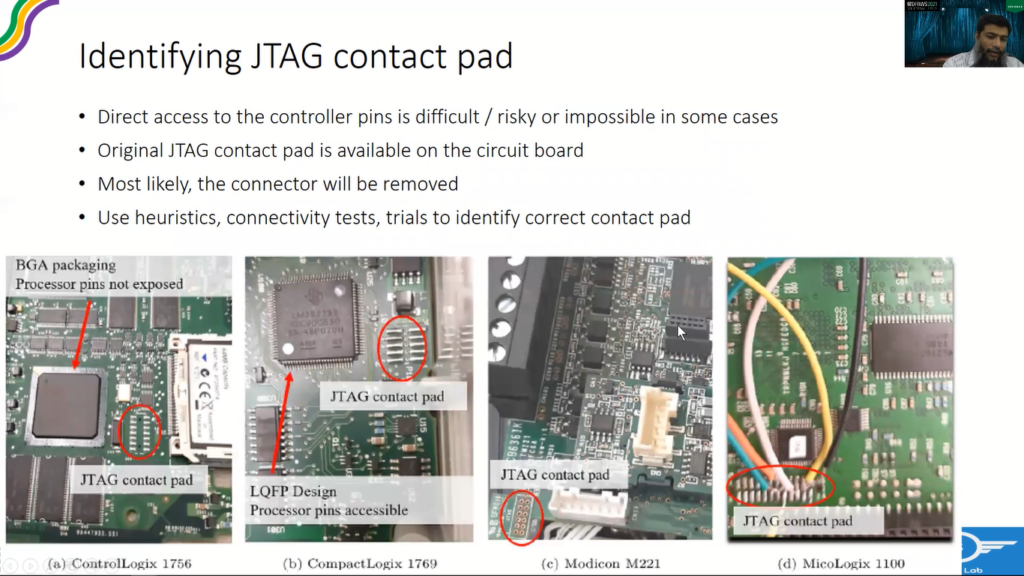
So even the vendors, they use a pad, contact pad through which they control the TAP controllers. And once the circuit testing is completed, they usually remove the connector on that pad, but we can still find that contact pad available on the circuit board.

So how do we find it? One way is to do connectivity tests through multimeters, or use some heuristics, like what are the pads that are available in the vicinity, empty pads that are available in that vicinity.

So just to quote an example, like there are four different PLC that we were working on, and these are their JTAG contact pads. In one case, it is even labeled like, but in most other cases, there are no Headers installed, and there is no labeling, but it’s still the JTAG. As you can see, it’s very near to the processor.

So if the data sheet is available and we know the pins and we see a potential pad, we can do a connectivity test, like through multimeters we can find which of the pins is actually connected to these particular pins of the processor. And then once we identify a contact pad as a JTAG pad, what we do, we install a header on it, solder a header on it, and route the cable out of it, because to use JTAG, we have to power up the PLC, and for that, we have to reassemble the PLC.

So another way is just to solder the wires on the contact pad as we already identified the pins, so instead of going for a complete header, just solder the wires, but this approach is not that robust and it’s risky as well. It’s a small, extra effort actually gives more dividends.

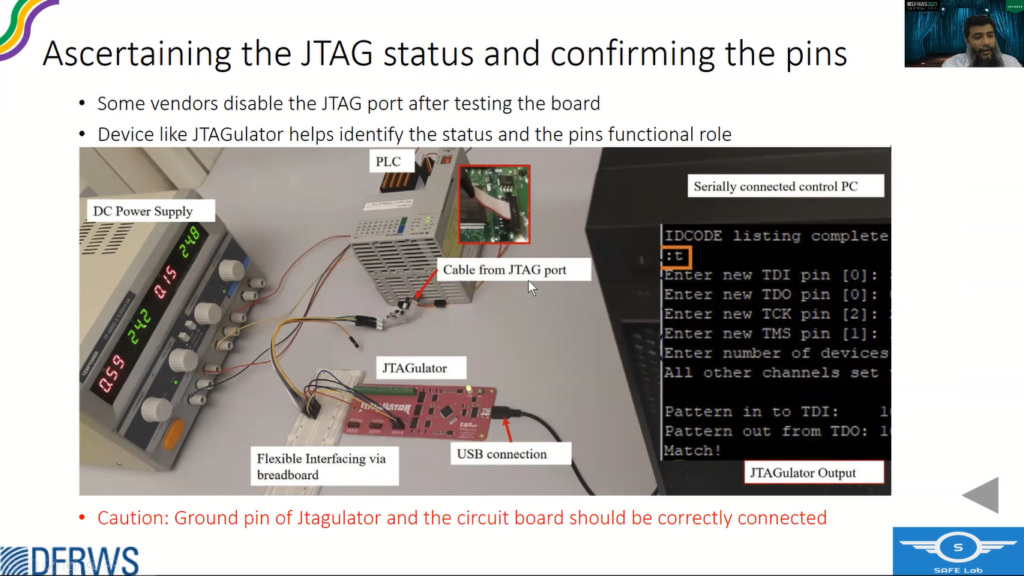
So at times, vendors do disable the JTAG after testing, so we need to ascertain the status of the JTAG. And for that, we use a small device called JTAGULATOR and actually we connect the contact pad that was available on the circuit board to the connector available on the JTAGULATOR and what it does it do all sorts of combinations and permutations to find out the exact pins, JTAG pins. And if it successfully finds out, that also confirms that the JTAG is still functional right.

One caution, that while using JTAGULATOR the ground should match, so you have to manually match the ground before starting the JTAGULATOR.

The next step is our memory acquisition setup.

So once you find the JTAG pins, like how to use a JTAG for memory acquisition? So JTAG has like few pin outs and they, these pins work at the controllers’ operating voltages. So how do, I mean, we need, we would require some voltage converters, then we would also require some BSDL files and then create programs to exploit JTAG for reading memory.

And instead of going through all that hassle, the simpler approach is to use off the shelf JTAG debuggers that have very extensive libraries for the data, for the processors that they support. So like these are some famous debuggers that we can choose after verifying if they support our architecture.

So once the setup is ready, the next step is to create the memory map. So memory acquisition through JTAG is a very slow and risky process. However, fortunately PLCs only use a fraction of the complete address space of the processor. Like for a 32 bit processor of a probable four GB space, usually PLC uses a hundred MB, or even less than that, or a bit more than that.

So if we are able to eliminate the unused spaces, unused address ranges and redundant address blocks, address blocks that point to the same memory location, and the unacquirable addresses, which are pointing to the peripherals. So if we are able to eliminate this, we can actually find out that small fraction, which really helps us in catering for this slow process of JTAG recovery.

Now, if you see here, I mean these are the address ranges that actually point to unique address blocks, and some of the addresses may point to same address blocks. So we are not interested in both of them, or all of them, we are only interested in one of them. If you acquire one, we are good and we don’t need others.

Then there are some address ranges that are pointing to peripherals, which may crash the PLC, and we are not we are not interested in acquiring these address spaces. We have to eliminate that. And then there are other ranges that are pointing to nowhere, and we are not interested in them as well.

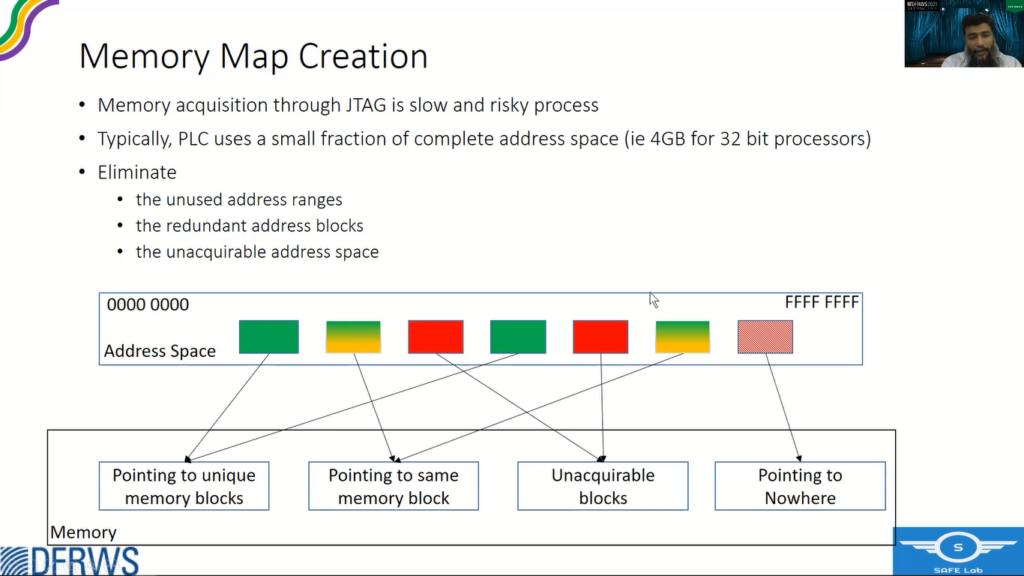
So one caution in eliminating the data redundancy. So not all duplicate address blocks are redundant. So this is an important thing. For example, if the firmware is loaded in the non-volatile memory and the volatile memory is in the Ram as well, so these two are considered as two different artifacts from forensic perspective.

So if we just see like these are both the same, so they may be pointing to the same address, these are the same  memory, and we just ignore one, that won’t be correct. So what we should do, we should  employ some kind of logic like address boundaries. If no unused pins are identified, then we have to keep the copies. And another approach is to write to an address and to see the effect on other copies.

The next step is to eliminate the unacquirable address blocks, which are originally pointing to peripherals and they can crash the PLC. So to identify them in one way is to check the processor data sheets. If they’re not available, then do a ‘Crash and Learn’ exercise, it’s a patient exercise that we have to perform on the test PLC.

And it will crash the PLC, so if we have some kind of software based or device recovery technique, like maybe PLC provides some kind of mechanism to reboot it, or if not, then we can also use power supplies that can be controlled through software. It can really facilitate this ‘Crash and Learn’ exercise to identify unacquirable address blocks.

So the next step is to optimize the acquisition parameters. So as JTAG based acquisition is below the firmware level, it may expire some watchdog timers, resulting in a PLC crash. As a matter of fact optimisation also helps in speeding up the process involved, and it should be performed on a per IC or more specifically per address block basis.

The parameters that we should optimise include like acquisition speed, block size,  Debugger’s buffer size, and wait time between consecutive read operations.

And how to find these, the values from these parameters, one way is to theoretically derive them from the processor information, the ICS information like the refresh rates, et cetera, and the debugger specifications.

And the other approach is a practical approach to discover through a ‘ramp up till crash’  approach, like we speed up as we do in DCP that you speed it up until it crashes. So as there are very limited memory regions after the first initial exercise, the second approach is feasible and faster and easier as well.

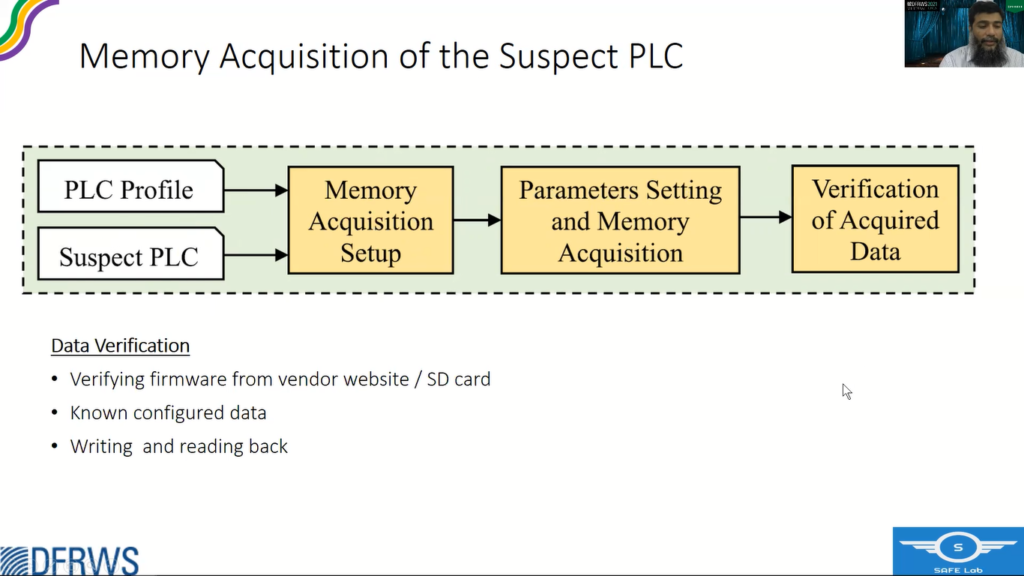
So once we get that memory profile, we do the memory acquisition of the suspect PLC. So instead of test PLC we have the suspect PLC we set up the acquisition mechanism and set the parameters and acquire the memory and do a verification exercise.

For  verification, firmware is very helpful. It’s a big file, and we can verify if we are getting the correct data from the, through our mechanism acquisition process.

Other way is to find through the known configured data like the IP addresses and other ASCII characters, for example inventory of the PLC, or maybe the project file name, et cetera.

Third approach is writing and reading back. So you write, through JTAG we can write to the memory content as well. So we write and then read back to verify whether we are writing it right and are reading it correctly or not. So that actually verifies the acquisition process.

Coming over to the case study, we did a case study on a famous Allen-Bradley control logic, 1756, which is a modeler PLC, and it was hosting a controller 1756-L61.

So coming over to the hardware assessment that main controller it’s using is like V Y 2 2 5 7 5, which is an ARM processor that’s written on it, but we were unable to find the data sheet even after contacting the vendor, so it was regretted.

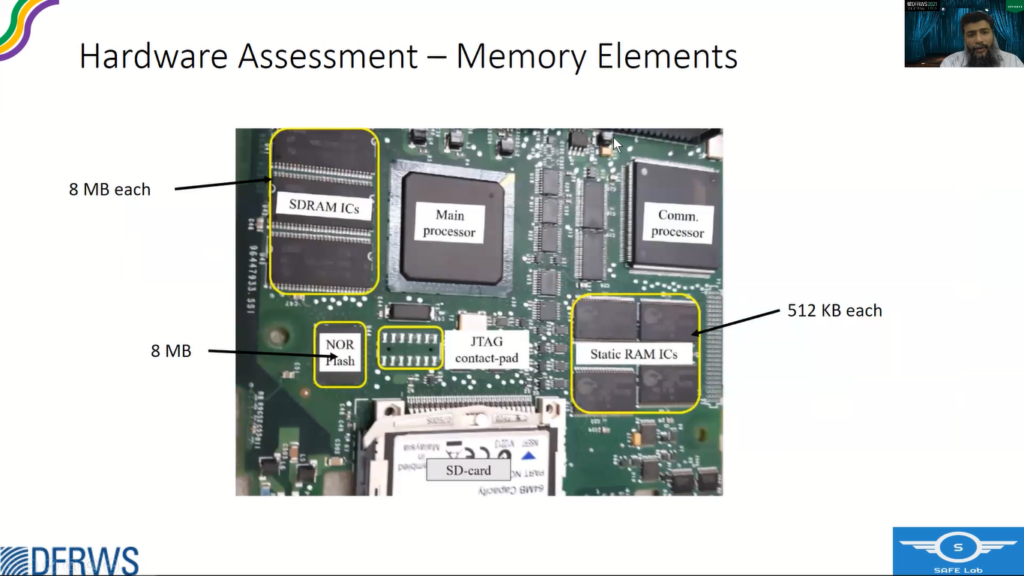
So what we did, so we examined the complete board and that memory contents that are available are static Ram ICs. There are four of them, each with 5, 1, 2 kilobytes, and a NOR Flash, and  three SDRAM ICs. There was an SD card as well that can hold like the firmware backup or the program backup.

So to identify the JTAG pins, there was a two by seven big contact pad, which was a potential candidate, and because of the BGA design and no availability of data sheet, we could not do any connectivity testing. So what we did, we installed the header on it, and a cable and routed it out and then used the JTagulator to confirm the JTAG pins and the JTAG  working status.

So this is where typical memory acquisitions that we used Segger J-Link debugger for it. And this is the hole that we punctured in the chassis to extract the cable out and connect it to the debugger.

So talking about redundant data. This is an example case, like all these memory addresses are pointing to one single memory location. And if you see here these are the offset, memory offset, and this is like where it is pointing to a particular device. And these are unused pins, i.e. they don’t, or you can say don’t care pins.

So after acquiring the data, we perform on them a Parameter Optimisation exercise as well. So there were only 28 distinct ranges of different sizes. So we applied a ramping up technique instead of going through the theoretical exercise of finding the parameters, parameter values.

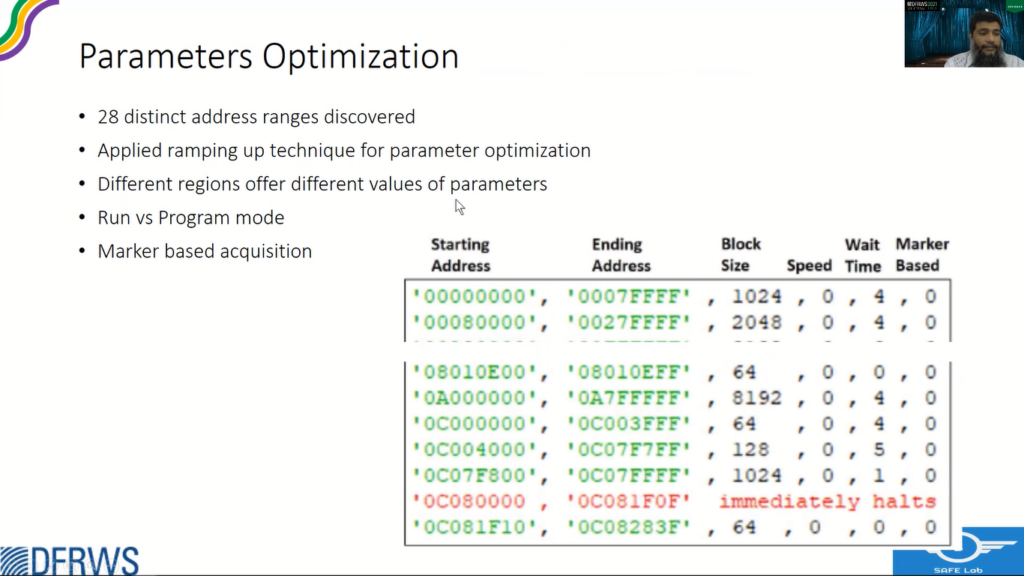
And one more important thing is like, if the PLC is in run mode or the PLC is in program mode, it may respond differently to different acquisition parameters.

The finalized address ranges. Some of them, if you see here this, these three it’s like 16 MB block, and it is repeated like eight times till this particular address. So only acquisition once is sufficient. And then there are some addresses that actually hang the processor, which probably pointing to some peripherals and we should avoid them.

And then if you see here, the data above the six, eight, all zeros was not in use. It was, the data was nil ended until all left. So like more than half of the address space was not utilized.

So Phase Two was the acquisition, memory acquisition of suspect PLC. So we did not have another PLC of the same model, so we used the same test PLC for the next phase.

We programmed, we wrote a small program using a Pylink library that was available for Segger J-Link debugger, and our program can operate in three modes. It can acquire all the complete acquirable memory, or we can provide a customized range to extract that particular memory region. And we can also do signature based acquisition, like if you have some markers available for the start and end of a particular zone, we  can acquire that particular memory as well.

So for verification, reasonable confidence was already attained during the profile creation, like when we were identifying the redundant blocks. So what we were doing, we were actually confirming the acquisition correctness as well, because we were matching the different region data.

But we also downloaded the firmware from the vendor’s website and then matched it from the multiple instances that we were getting from available memories, and we perfectly matched them. So we also did an exercise of acquiring data across the memory, all different regions over multiple restarts, and the result was a hundred percent.

Limitations. We need a separate PLC for profile creation, as you can not risk using the suspect PLC. It’s a hardware based acquisition, definitely requires hardware interference, disassembly, soldering, header installation, et cetera. And if the vendor has disabled the JTAG interface, this approach can not work.

In the future we are intending to employ and evaluate the Kyros framework on other PLCs as well.

So to conclude, we presented Kyros framework for hardware based memory acquisition of PLCs. Kyros guides a forensic researcher on how to tackle the hardware challenges related to JTAG and deal with proprietary hardware and customized ICs, with no data sheets, and to generate a memory map and optimize the acquisition parameters. And we also presented a case study of the framework on Allen-Bradley ControlLogix 1756.

Thank you.

Meeting A Forensic Challenge: Recovering Data From A Jolla Smartphone

by Davide Gabrini, Andrea Ghirardini, Mattia Epifani and Francesco Acchiappati

Preface

During the hacking camp MOCA 2016, at the end of a talk held by Davide “Rebus” Gabrini on passcode circumvention methods on mobile devices, a bystander offered an intriguing challenge: he offered for research purposes a smartphone to find out if and how someone could crack it, overcome security and extract information.

The smartphone was a Jolla White 16GB JP-1301, equipped with the Sailfish 2.0.1.11 operating system. The device was previously reset twice by the owner and it was protected by a 5-digit PIN without encryption on the internal storage. Moreover, the developer mode was not active because it required a Jolla account that was not available.

The challenge was accepted during the following End Summer Camp 2016 (ESC 2016), where a dream team of Italian forensic experts addressed the problem at the Ville Forensics, among the curious eyes of other hackers. The team was composed of Davide “Rebus” Gabrini, Andrea “Pila” Ghirardini, Mattia “Lo Zio” Epifani and Francesco “Swappage” Acchiappati.

Acquisition

The phone did not expose a service similar to ADB like on Android devices, but only the internal data partition as a Mass Storage Device*. In this case it is possible to perform a logical copy of the visible files and folders, but we are bound to the MTP protocol limitations; although the user data exposed in this way can be significant, the method is still partial and unsatisfactory.

As expected, attempts to acquire the device using well known forensics products like UFED4PC and Magnet Acquire failed, as these tools couldn’t even detect the device at all.

*For accessing the internal storage, the device must be unlocked, and therefore the passcode is required.

Physical Examination

When tackling a challenge, the first step is to know your enemy, therefore the handset was dismantled in its entirety and the motherboard exposed. All connectors were ZIF and the shields were partially interlocking and partially attached using clips on the mainboard.

Two things stood out.

The first is that SOC is not visible since is a SOC with POP for RAM on top, so the big chip with 3TA78 D9QMM codes on top  is a RAM chip (produced by Micron) which hides the Qualcomm SOC behind (kudos Andrea Barisani).

SEQ Illustration \* ARABIC1: Device motherboard with a MediaTek SOC installed

The second is that there are a plethora of test pads on the mainboard. From a certain point of view this helps, but on the other hand it does not allow to easily find and understand which are the ones needed for accessing at a service level (JTAG where are you? Please reveal yourself!)

SEQ Illustration \* ARABIC2: A quick look at the test pads on the motherboard

We also tried to connect the phone without battery through the USB port the system to check if it has a behavior similar of a MediaTek SOC based device that, when connected over USB without battery, exposes a USB interface from which it’s possible to perform a system flash or memory dump.

By adopting a procedure found on the Internet:

  1. remove the battery
  2. insert the battery while holding the volume down button
  3. while holding the volume down, press power and keep it pressed until the phone vibrates
  4. release power and volume down
    the system goes into recovery mode.

When connected in this mode, the device is being heralded as a new USB device named “Generic RNDIS device”. On Microsoft Windows 10 the driver is not loaded automatically, but if you proceed by manually installing a “Generic RNDIS device” driver among those written by Microsoft, the device is properly recognized as a network card.

By connecting the phone to a Linux operating system, the device is instead immediately recognized as a USB Ethernet adapter. We could then enable the interface and notice that the phone runs a DHCP daemon that assigns an IP address to the computer.

The phone only exposes the port 23 (telnet); once inside, without being asked for any kind of authentication, it provides the access to a shell with root privileges.

Running the mount command to check the list of file systems we realized that the main partition of the system is not mounted, and the device (/dev/ mmcblk0) has a GPT partitioning with 28 partitions.

A recovery system based on Linux is undoubtedly an aid, as it’s already equipped with the whole toolchain that is needed to perform a physical acquisition of the phone’s flash memory: there are both “dd” and “netcat”, and therefore the easiest method is to use the existing network connection between the computer and Jolla’s smartphone to perform a “dd over netcat” acquisition.

This procedure requires a netcat listening on the virtual Ethernet of the computer (there are also many ports for windows platform) on an arbitrary port (ex. 8888), and then to launch these commands:

first on the computer:
nc -lvp 8888 | dd of=/path/to/destination/image.raw
and then on the phone:
dd if=/dev/mmcblk0 conv=noerror,sync | nc [ip of the PC interface] 8888

The whole process takes about 3 hours, but the result is a full physical extraction of the internal device flash memory, which we can now analyze using our favorite tools.

CHINEX

Since the phone disassembly revealed the use of an MTK processor, we also attempted the acquisition through the Chinex kit that is available with UFED from Cellebrite, but we didn’t succeed since the device couldn’t successfully pass the MTK Pinfind procedure. We had the same behavior using the other methods available for generic MTK devices.

Analysis

Once the acquisition was successfully completed, we obtained a 16GB bit stream image.

The first thing we wanted to check out was the partitioning. To achieve this goal we opened the image with X-Ways Forensics. GPT partitioning was interpreted correctly by the software and 28 partitions were detected. That made us think: great, we are the champions! 😛

Another unlucky attempt was using UFED Physical Analyzer: predefined profiles, script chains configured for MTK processors and individual Python plugins were not able to extract useful information from the raw dump. The best result we get was with a generic profile for MTK device, which seemed to point out a few email messages and deleted messages but then we realized that most of them were false positives. Again a dry shot.

Another part of the team started analyzing the individual partitions with X-Ways Forensics and found out that the largest ones (and therefore potentially containing juicy information) were number 24 (Linux Swap, even if it was recognized as “Linux Filesystem”, as big as 500 MB) and number 28 (13.5 GB). Unfortunately, we had another issue: the partition is formatted with the bleeding edge BTRFS file system, which, while we are writing this document, is not supported by either X-Ways or UFED PA. We had the same outcome during image inspection with FTK Imager and Autopsy, but the same would also be achieved by Encase or FTK: none of the most popular forensic analysis software, yet, supports BTRFS. But Linux does!

We then decided to “split” the work: someone decided to mount the file system on a Linux workstation for pulling out a TAR archive containing all the allocated data, while the remaining team members started to carve at raw level searching for information and fragments of meaningful content.

The first activity was completed successfully and the TAR file was turned back to X-Ways Forensics: as we could have expected, existing files on the device do not contain any data because the device had been reset by the owner before the delivery.

So what was left to explore was the path of the unknown: the raw data. We started with a byte-level carving with X-Ways Forensics and PhotoRec, while seeking more structured information with Internet Evidence Finder (IEF) and Bulk Extractor.

After a few seconds X-Ways extracted pictures related to Internet browsing activities on medical websites and shortly after both IEF and Bulk Extractor provided a long series of keywords used on Google and related to a specific medical treatment. The carving continued and some SQLite databases were detected (569 by X-Ways, over 600 by PhotoRec). Among them we identify the Cookies database, which provided us with the URL to which the medical images belong: we were then able to pinpoint the Google search and medical web site access to a specific date and time.

We continued with the file carving and we found the screenshots of a GPS application, probably the one that was installed by default on the system. From these screenshots it was possible to figure out where and how the owner moved with the device and, in some cases, it was possible to determine exactly the origin and destination of the trip.

As a final activity we decided to try to trace communications with third parties in an attempt to uncover as much as possible about the identity of the device owner. We managed to extract a complete email in EML format: in this email we found the sender and the recipient, indicating the name, last name and, of course, the email address.

At this point we launched a keyword search using the address of the sender and recipient, and this allowed us to recover about 400 matches: a detailed analysis of the results allowed to recover about 200 email messages, only partially overwritten but full of information about the owner’s job and several customers’ names. We of course also found private and personal emails exchanged on the phone.

At this point we decided to stop as the collected results were enough to prove that even when a phone is not supported by common forensic tools and is subjected to reset, it is possible to successfully retrieve meaningful data useful during investigations!

Happy with the results, we decided that it was time to move on to the next beer, but not before enjoying the phone owner’s reaction and his face going pale, when we began asking him if he knew anything about the subject matter and whether he had been in certain places.

ESC “Ville Forensics” beats Jolla Phone 2-0 (at least!).

Categorization of embedded system forensic collection methodologies

There are many classifications as far as forensic data collection is concerned, but much of it is still a de facto and Wild West when it comes to naming convention. This is especially true in the embedded system area.

When I refer to embedded systems, I think of specialized devices, sometimes in a larger system or machine. Embedded systems usually have at least one microprocessor with dedicated program, and limited options to extract the information in a sound forensic way. Cell phones, smart phones, tablets, DVD and BluRay players, advanced digital watches, TVs, cars, elevators, and even washers & dryers can have embedded systems.

I would like to suggest a more structured way to represent data collection methods for such systems. As this is a work in progress, I look forward to constructive criticisms that can benefit the forensics community.

The classification is broken down into six methodologies.

  1. Manual acquisition
  2. Logical acquisition
  3. Pseudo-physical acquisition
  4. Support-port acquisition
  5. Circuit read acquisition
  6. Gate read acquisition

Each methodology has their shortcomings and benefits. I categorized these into four areas, and ranked them in a scale of 1 to 10, with one for “least” and 10 “most”.

Destructiveness is the impact on the target device, and how likely that everything is fully functional after data collection.

Technical & Training is the required understanding and education in the area required to attempt the methodology.

Cost is simply the expenses involved with the resources required, such as equipment, tools and consumables, to attempt the methodology.

Forensically Sound, the final measurement, is how likely the original data is modified, knowingly or not.

Acquisition Methodology Comparison

Manual

This is the oldest and least training and equipment required methodology. The examiner takes advantage of the devices display and user interface and a camera to record all relevant information, as much as possible. The target device may record all display and user interface activity, and update system data as normal housekeeping.

Example: Secure cell phone in holding bracket, then using the keypad scroll through all relevant items while taking pictures of the cell phone with an external camera. A commercial product used for this kind of acquisition is Paraben Project-A-Phone.

Logical

Logical acquisition method is where the device’s operating system (OS) is in full control of what can be accessed, and provides the method to transfer the data. The examiner connects the device to a forensic workstation, and using various software packages communicates with the OS on the target device. The OS may record the connection, and communication on the target device, and update system data as normal housekeeping.

Example: Connect cell phone’s external port to USB port, using proprietary cable. Run Software to initiate serial communication with device, and request information from device using proprietary and device specific commands. A software, such as BitPim would be used for this type of acquisition.

Pseudo-Physical

The process of pseudo-physical collection involves forcing program code onto the target device in some way which allows access to most data areas. The code may only provide access and takes advantage of the target device’s OS to provide communication, or is a complete replacement of the OS with just collection functionality. Thereafter, the examiner connects the device to a forensic workstation, and using various software packages communicates with the program code, or the OS on the target device. The OS may record the connection, and communication on the target device, and update system data as normal housekeeping. The forced-on code may also impact the information on the target device.

Although often touted as physical acquisition by almost all vendors, this process is not, in my opinion, truly physical as most forensics examiners expect it to be. Most forensics examiners think “bit-by-bit” when they hear “physical”. In my experience, this is not the case, as unallocated and slack areas of the storage are not collected.

Example: Target device is connected to the forensic workstation with a USB to proprietary serial cable. The target device is placed in Device Firmware Update (UDF) mode. The software on the forensic workstation at this time may load a special program code onto the target device. The code allows the software on the forensic workstation to access most information on the target device. Sometimes the target device’s UDF mode software provides the communication features.

Support-Port

Most mass produced electronic devices have ports for testing the electronics, or for updating firmware on various onboard integrated circuitry. These “ports” can be implemented as user accessible ports such as a USB, RS232 or even some pin and socket connector (Molex), non-user accessible ports including pin headers or insulation-displacement connector, and finally test connection pads that appear on the printed circuit assembly (PCA).

To access these ports, almost all small electronics require disassembly, often voiding the manufacturer’s warranty. Once the device is disassembled, the port must be identified on the PCA, and the specific communication protocol must also be found. Communication is established with the specific storage circuitry, and data is requested. This data is then stored for further analysis.

The most often used protocols are Boundary Scan (often referred to by the standardizing group name Joint Test Action Group [JTAG]), Inter-Integrated Circuit (I2C), Serial Peripheral Interface (SPI), Enhanced Synchronous Serial Interface (ESSI), Controller Area Network (CAN), Local Interconnect Network (LIN), and Background Debug Mode (BDM).

Example: The target device is disassembled, and test access points (TAP) are located. Leads are soldered or clamped onto the TAP, and connected to a protocol specific universal asynchronous receiver/transmitter (UART). This device in turn is connected to a USB port of the forensic workstation. Specialized software using circuit-specific commands instructs the on-board device to download data from the circuit. The returned data is stored on the forensic workstation. No information is stored or written to the target device besides the temporary instructions.

Circuit Read

For this acquisition methodology, the integrated circuits (IC) such as memory chips are desoldered from the PCA and data is extracted using chip specific pin-out and communication. This is often referred to as “chip-off” process.

There are several critical points with this method, including the possibility to permanently damage the IC during desoldering, dealing with stacked ICs (3D packaging) or monolithic configuration.

In this particular method, the IC is removed, socketed or soldered, and specific signals are sent to extract the data from the specific chip, using specialized software.

Example: The target device is disassembled, and data storage ICs are located. Pin out information, and timing details for communication with the IC is researched. Target device is preheated, and then the specific ICs are desoldered. The ICs are either placed in temporary sockets, or leads are soldered to appropriate pins. The socket or leads are connected to a communication device using proper communication protocol, such as a Transistor-Transistor Logic (TTL), which in turn is connected to the forensics workstation.

Specialized software using IC-specific commands instructs the socket to download data from the IC. The returned data is stored on the forensic workstation. No information is stored or written to the target IC.

Gate Read

This methodology requires both equipment, and chemicals that are usually not found in most digital forensics labs. The process involves the removal of the target IC in similar fashion as the Circuit Read acquisition methodology. Instead of attempting to communicate with the IC through electronic signals, the chip is literally sliced into multiple layers, to expose each original semiconductor lithographic layer, and information is reverse engineered from the layers.

The layers are measured in nanometers (1 x 10⁻⁹ m) or a billionth of a meter. Each layer is removed, photographed, and then reverse engineered from the photograph. The process is as much guess work as it is a very high level understanding of IC internals and IC lithography. The process works best with planarized chips. The steps of the process are device depoting or package removal, delayering, imaging, annotation, schematic, organization and finally analysis.

Example: The target device is disassembled, and data storage ICs are located. Pin out information for the IC is researched. Target device is preheated, and then the specific ICs are desoldered. The IC is bathed in chemicals to remove potting, or encasing. At this point, the only remaining items are the leads to a piece of silicon die. The leads are noted and photographed. The die using lapping (or other very precise slicing or abrasion method) removes each layer, and photographed. The layers are stacked in software, and reverse engineered using the shape, color density and interconnection of the layers. This process requires identification amongst other things the N-type, P-type silicon, the gates, power and ground.

Reference:

  Manual Logical Pseudo-Physical Support-port Read Direct Circuit Read Gate Read
Destructiveness 1 1 2 3 5 10
Technical & Training 1 2 3 5 6 9
Cost 1 2 3 3 5 7
Forensically Sound 1 2 5 8 9 7

Rankings are on a scale of 1 to 10, with one for “least” and 10 “most”. Ex. Most destructive would be a 10; Least costly would be a 1.