
Discover how tailored, culturally aware mental health support can help digital forensic investigators cope with the hidden trauma of their work....
Discover how tailored, culturally aware mental health support can help digital forensic investigators cope with the hidden trauma of their work....

20th August 2025
Read the latest digital forensics news – SANS releases DFIR Summit playlist, UAC launches v3.2.0, Neal Ysart discusses the Coalition of Cyber Investigators, and more....read more

20th August 2025
Explore S21 Transcriber: a fully offline, court-ready tool with free 30-day access and training....read more
19th August 2025
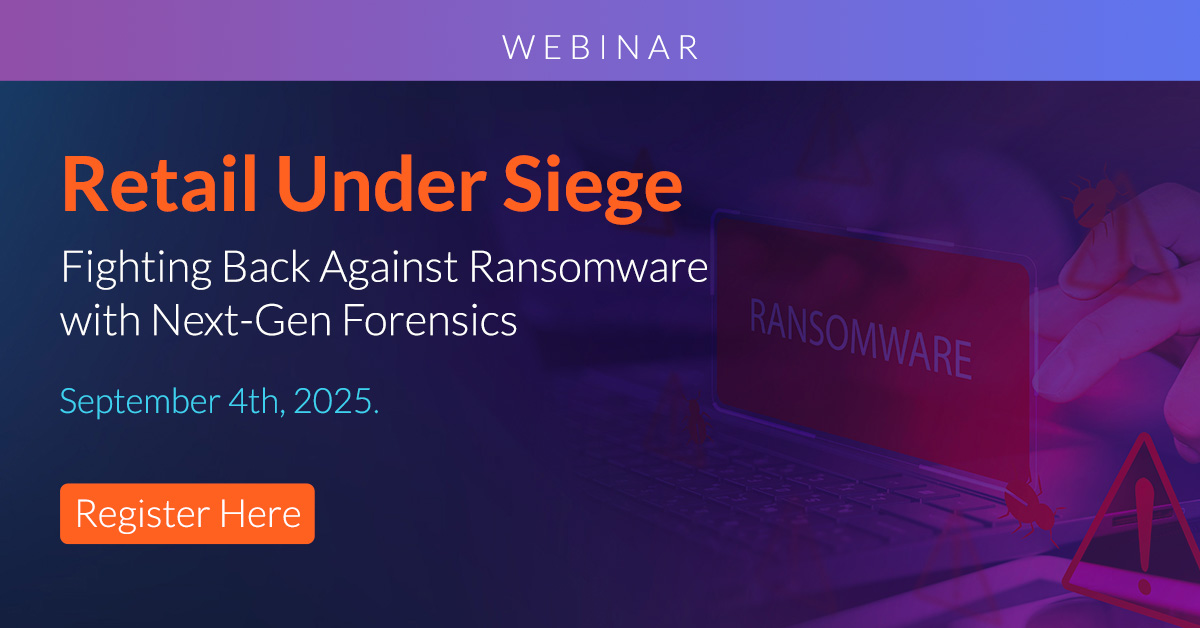
Retailers face rising cyber threats—join Exterro's Sept 4 webinar to learn fast, modern forensic response strategies and protect your brand....read more
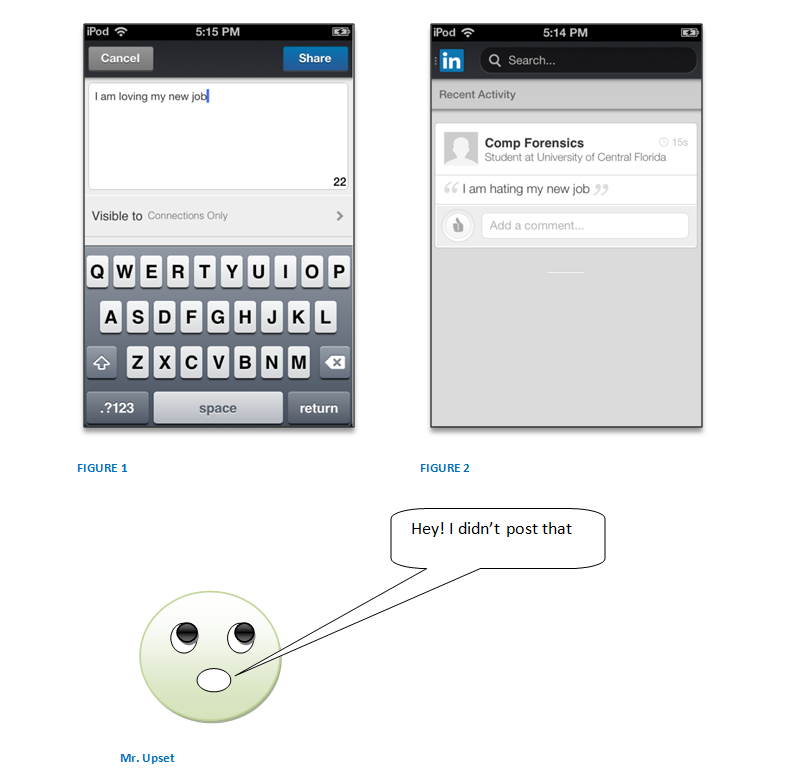
Yes, that’s right! Mr. Upset did not post ‘I am hating my new job’ as it appears in Figure 2, instead he wrote ‘I am loving my new job’. Then how did it happen and who did it? This article aims at addressing these questions. We fabricate a case where a person is an object of a Man In the Middle Attack and subsequently analyze victim’s device to corroborate the facts and trace the perpetrator. The paper is divided into two sections. Section 1 demonstrates how did the attacker tamper the original message posted on LinkedIn by using Man In The Middle (MITM) attack. In section 2, we will dissect the forensic side of it to determine if Mr. Upset (victim) is making a reasonable claim.
It is assumed that Mr. Upset’s mobile device i.e. iPod touch is already compromised by the bad guy which involves installation of malicious certificate or profile (Figure 3) and changing the proxy settings on the device (Figure 4). By modifying the proxy setting, the victim’s device is prepared to direct the IP traffic towards the attacker. With the Charles proxy tool (acting as a proxy server), bad guy is able to capture and monitor IP packets coming to and from Mr. Upset’s device. The Charles SSL CA certificate is assumed to be already added into the list of trusted root certificates on the victim’s iPod that will help the attacker to decrypt the encrypted SSL packets.

Given below is the detail of the steps that attacker follows to intercept the LinkedIn communication and alter the original message using Charles proxy tool.
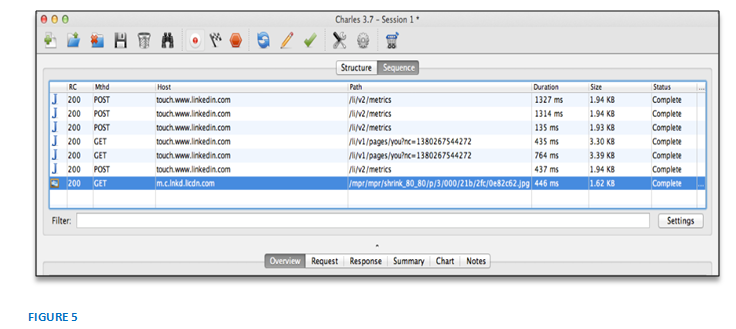
1- The bad guy launches Charles proxy tool and starts eavesdropping and noticing victim’s activity. He observes LinkedIn URL touch.www.linkedin.com in the host column illustrated in Figure 5. This leads him to believe that victim is using LinkedIn application.
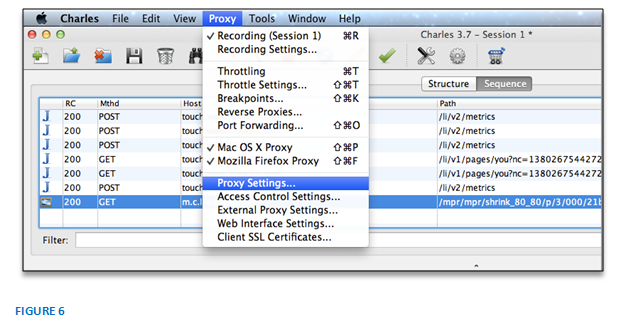
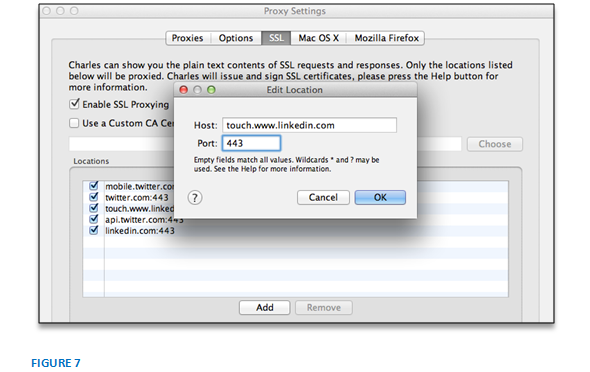
2- He adds that LinkedIn URL into SSL list under SSL tab in the Proxy Settings, refer to Figure 6 and Figure 7. Note that the port number 443 is entered for https traffic.
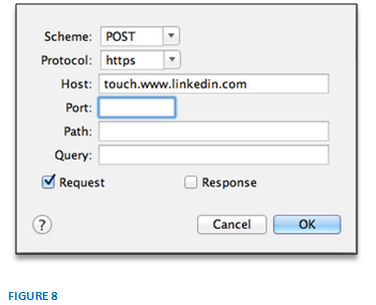
3- Next, he applies the break point on POST (Proxy -> Breakpoints). Notice that scheme is POST, protocol is https and host is touch.www.linkedin.com. Since he is interested in holding request packets, therefore he selected Request type, as shown in Figure 8. Now, as soon as Mr. Upset posts a message, he is able to hold these packets before they set out to the LinkedIn server, edits them and let them go to the server.
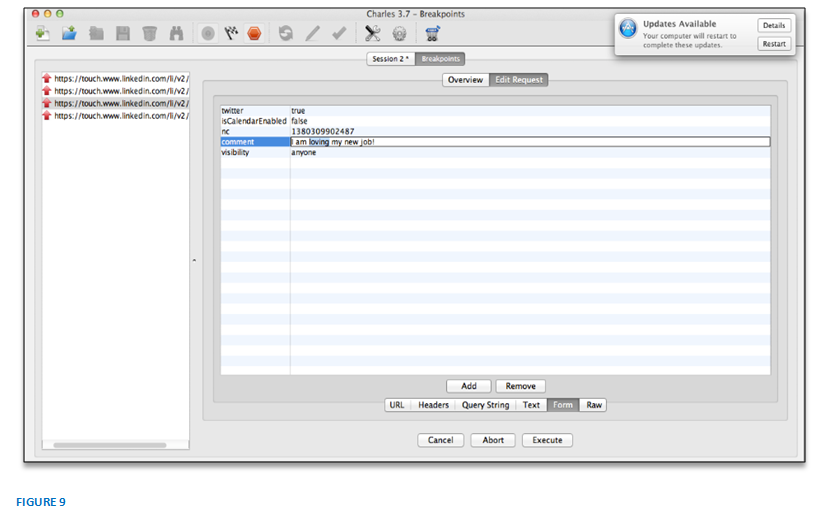
4- Now is the real show time for the bad guy. The breakpoint is active and in the meanwhile Mr. Upset posts a comment ‘I am loving my new job’ on his LinkedIn account as shown in Figure 1. Soon as he hits the Share button, POST request packets are sent to LinkedIn server. But the man in the middle gets to see and modify the packet(s) before it reaches to final destination i.e. LinkedIn server. The attacker tampers the packet by hitting the Edit request from top menu and selects Form display option at the bottom (Figure 9).
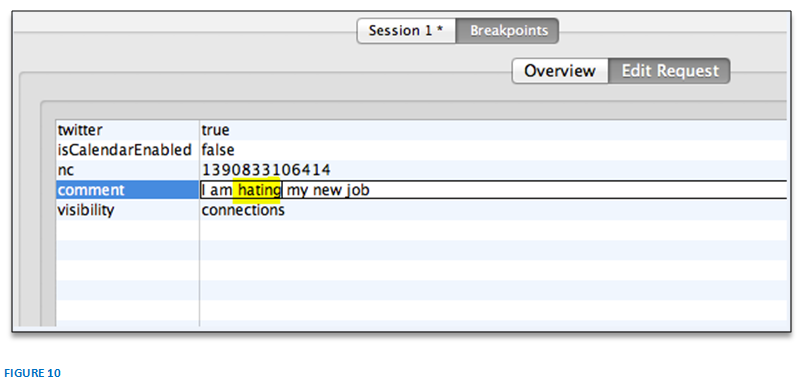
He replaces the word loving with hating as depicted by Figure 10.
5- Finally, he removes the breakpoint by tapping the red button at the top and hit Execute. This will let the packets leave the proxy server towards LinkedIn server and complete victim’s POST action.
In section 1, we demonstrated a simple MITM attack. What is next? How can one prove that Mr. Upset did not post that message but was interfered. In order to determine this, in this section, we are going to examine the victim’s device i.e. iPod touch.
One can start the investigation of an iOS device by looking at the files listed below.
Note that the name and/or location of the file(s) might change with the iOS version number. The given name and paths are validated on iOS 5.1.1 and 6.1.3.
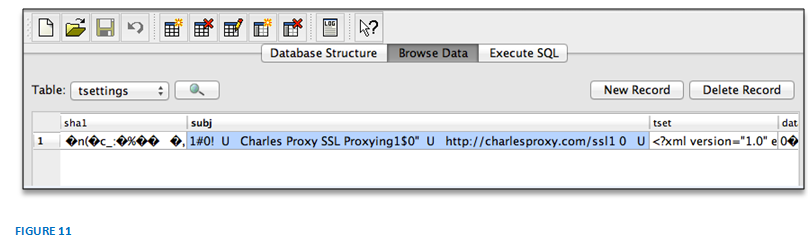
TrustStore.sqlite3 contains profile information. For example in this case, Figure 11 spots the sign of installed Charles SSL certificate. Modified time of this database changes after installing a new certificate, therefore this time could be critical in drawing a timeline especially if the malicious certificate is the last installed certificate.
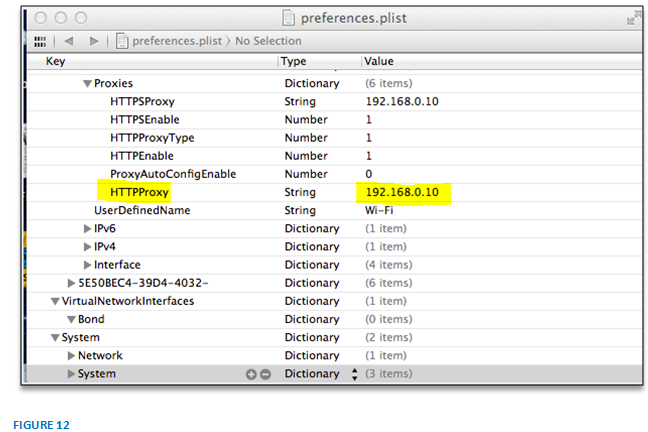
The preferences.plist file typically stores network preferences. Since we are investigating a MITM attack and after the traces of proxy setting on the device, this file could be our smoking gun. In this case (Figure 12), we observed a proxy server IP 192.168.0.10 which is the potential malicious proxy server address. It is worth noticing that this file saves history of previously configured proxies.
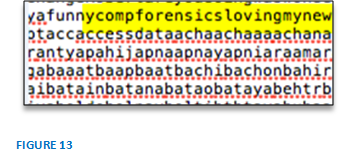
Though dynamic-text records the keystrokes of an iOS user in random fashion, but still some times if you are lucky, you may find complete sentences or words enough to make sense. Thus examining the content of this file is a good idea especially for a given case where we need to know if the user did type hating or loving. Chances are one might find out the exact word in the sentence. When we examined the file we found ‘lovingmynew’ as shown below in Figure 13. This indicates that the user typed ‘lovingmynew’.
Based on the above analysis, few questions that can be addressed are as follows.
Yes, there are signs of malicious activities on the device – un-trusted certificate and proxy setting.
More likely, Mr. Upset did not post the word hating.
In this example scenario, we found the involvement of a proxy server of IP 192.168.0.10. In real world case, this could be a public IP or a private IP leading to remote or an insider attack. Whatever be the case, the next potential step is to trace the IP and proceed with the investigation.
FYI: After the analysis, Mr. Upset is not upset anymore 🙂
The article attempts to demonstrate how a posted message can be tampered on the fly using MITM attack and the purpose of this article is to apply forensic techniques on a compromised system and unearth the information.
@NOODLEWERK. (2011, October 19). Noodlewerk blog. Retrieved July 25, 2013, from Tutorial: Using Charles proxy to debug HTTP(S) communication between server and iOS apps: http://blog.noodlewerk.com/general/tutorial-using-charles-proxy-to-debug-https-communication-between-server-and-ios-apps/
Charles. (n.d.). SSL Proxying. Retrieved July 20, 2013, from Charles: http://www.charlesproxy.com/documentation/proxying/ssl-proxying/
mit proxy 0.9. (2013). Retrieved July 21, 2013, from How mitmproxy works: http://mitmproxy.org/doc/howmitmproxy.html
Using Geolocation Artifacts and Timeline Analysis to Solve the Case: A Digital Forensics Case Study
http://info.magnetforensics.com/Digital-Forensics-Case-Study-Webinar/
Date: Wednesday December 11, 2013
Time: 11:00am GMT (6:00am EST)
Duration: 60 mins
In this webinar, Jad Saliba of Magnet Forensics will take you through a fictional case study involving child luring that led to murder. You will discover how digital forensics, geolocation artifacts and timeline analysis in particular can be critical in solving cases like these and where you can look to find the artifacts. The data analyzed will include a PC image and a mobile device image, showing how both sources of evidence can provide valuable insight into what happened, where to start a search for a missing person, and the corroborating evidence to support criminal charges.
File History is a new backup service introduced in Windows 8. By default this feature is off and to turn it on, user has to select a backup location – either a network drive or external storage media. Thus, it does not allow user to use the same disk. File History backs up files of the Libraries, Desktop, Contacts and Favorites folders. There is an option to exclude any folder(s) that users don’t want to backup. Notice that File History is unable to backup your folders synced with cloud storage service(s). According to Microsoft, “File History doesn’t back up files on your PC that you have synced with SkyDrive, even if they’re in folders that File History backs up.” Once turned on, File History automatically backs up the folders after every hour by default; however this interval can be changed easily in advanced settings. In addition, at any time, user can manually run the service. File History appears as fhsvc in the Task Manager and some associated dlls are fhcfg.dll, fhcpl.dll and fhsvcctl.dll…
Every rootkit employs a wide range of masquerading techniques to prevent its detection. Anti-virus and anti-malware tools must perform what is called, in forensic terms, “live box analysis”, performing a real-time scan of a live system. No wonder rootkits can actively resist detection by either hiding themselves or messing with anti-virus software or the system kernel. This constant battle makes rootkit detection not only difficult and unreliable, but disruptive and potentially dangerous to system stability and the integrity of user data.
This paper proposes going away from live box analysis approach, and analyzing raw memory dumps offline. Authors propose a new rootkit analysis methodology based on using Windows built-in debugger, WinDbg, to analyze snapshots of the computer’s volatile memory. This paper proposes comprehensive classification of rootkits and their masquerading techniques, and demonstrates which types of rootkits can be detected with proposed analysis methodology. Some of the described algorithms can be quickly implemented by using WinDbg’s built-in scripting language. Finally, the proposed methodology is tested in real-world to detect existing rootkits…
DFRWS USA has a long history of being the foremost digital forensics research venue and has decided to hold a sister conference to bring the same opportunities to Europe. The first annual DFRWS EU conference will be held from May 7 to 9, 2014 in Amsterdam, NL.
The annual DFRWS conference allows leading digital forensics researchers from government, industry, and academia to present their work and results to fellow researchers and practitioners. Many of the most cited digital forensics papers have been presented at DFRWS and the annual challenge has spawned research in important areas. Initial results and tool prototypes are also presented during the Works in Progress and demo sessions.The conference typically has about 100 people and is therefore small enough so that attendees meet each other and can interact with the speakers. A tradition of DFRWS as been its casual and interactive atmosphere where break-out sessions exist to discuss topics related to the presentations. There are also opportunities to interact during the welcome reception and banquet. After the banquet, attendees can put their forensics skills to the test when they form teams to participate in the annual Forensics Rodeo, which is a challenge that requires participants to analyze data and answer questions.
For more information and to register, please see the DFRWS EU website
This article describes common approaches used for the recovery of cleared Skype histories and deleted chat logs, and discusses methods and techniques for recovering evidence from cleared and damaged SQLite databases.
It is difficult to underestimate popularity of Skype. Hundreds of millions of people use Skype every day, generating a lot of potential evidence.
Recent versions of Skype are using SQLite databases to keep all history items. Chat logs, information about voice calls made and received, and a lot of other information is available in these SQLite databases. Accessing and analyzing this evidence is essential for many investigations involving a seized PC.
At this time, there are lots of tools that can be used to view and analyze SQLite databases. These tools range from freeware utilities to fully featured and highly expensive forensic suites. While viewing records an existing, healthy SQLite database is not a big deal, performing a forensic analysis of such database has quite different requirements.
Suspects may and do destroy evidence by clearing chat histories and/or physically deleting Skype logs. At this point, only dedicated forensic tools can still be used to recover deleted databases and extract evidence from cleared Skype logs.
In this article, we’ll look at tools, methods and techniques used by forensic specialists to handle evidence contained in cleared Skype histories and deleted SQLite databases, particularly those located on formatted or repartitioned hard drives or discovered in the computer’s volatile memory.
Before we begin analyzing Skype databases, let’s have a brief look at how Skype keeps its records.
Having said that, it’s pretty obvious that any Skype analysis tool used in the course of a forensic investigation must be able to recognize and recover records kept in the freelist.
In this article, we’ll be using several tools to analyze a sample Skype database. Our tools of choice are (in alphabetical order):
During the investigation, experts often use automated disk scanning facilities provided by forensic analysis tools to locate all available Skype databases. Different tools use different approaches, and may or may not be able to locate certain files.
To see how the tools from our shortlist will behave in the course of a forensic investigation, we have created a set of sample Skype databases. The first database (DB1) was a Skype database containing empty strings. The second file (DB2) was a temporary Skype file. The third file (DB3) was also a Skype temporary file, yet it was named “driver_3.stl” (that is, it did not follow the naming convention for Skype temporary files).
Then we used the tools from our list trying to locate these files and extract any evidence available. The results are provided below in Table 1.
Table 1
Results for DB1
|
Tool |
Result |
| Belkasoft Evidence Center | DB1 recognized as a SQLite database. Discovered 61 chat messages, 1 call |
| Chat Examiner | DB1 is not recognized as a SQLite database |
| Epilog | DB1 recognized as a SQLite database. Discovered 1 chat message, 1 call |
| Forensic Assistant | The tool crashed |
| Internet Evidence Finder | DB1 is not recognized as a SQLite database |
| Skype Extractor | DB1 recognized as a SQLite database. Discovered 2 chat messages, 1 call |
| SkypeAlyzer | DB1 recognized as a SQLite database. Discovered 61 chat messages, 1 call |
| SkypeLogview | DB1 is not recognized as a SQLite database |
When analyzing the results for DB2 and DB3, we decided to put them into one table as the results were similar.
Table 2
Results for DB2, DB3
|
Tool |
Result |
| Belkasoft Evidence Center | DB2 and DB3 not recognized as valid Skype files. |
| Chat Examiner | DB2 and DB3 not recognized as valid Skype files. |
| Epilog | DB2 and DB3 not recognized as valid Skype files. |
| Forensic Assistant | DB2 correctly recognized as a Skype temporary file. Discovered 2 chat messages.
DB3 correctly recognized as a Skype temporary file. Discovered 4 chat messages.
|
| Internet Evidence Finder | DB2 correctly recognized as a Skype temporary file. Discovered 2 chat messages.
DB3 correctly recognized as a Skype temporary file. Discovered 4 chat messages.
|
| Skype Extractor | DB2 and DB3 not recognized as valid Skype files. |
| SkypeAlyzer | DB2 and DB3 not recognized as valid Skype files. |
| SkypeLogview | DB2 and DB3 not recognized as valid Skype files. |
.
In real life, the evidence often is not easily available. Deleted files, formatted hard drives, reinstalled operating systems, the use of privacy protection software and cleared histories are routinely encountered during investigations. As a result, a forensic tool working with Skype must be able to carve the hard drive (or disk image) for any remaining evidence. The ability to access deleted records in Skype/SQLite databases is a must as well.
For our test, we prepared a 250 GB disk image in the DD format. The disk was mounted with FTK Imager 3.1.3. The image was taken from a live system, and contained the following information:
– The operating system was first installed on Mar 16, 2011
– Skype was installed on Sep 28, 2012
– Skype was being actively used until the operating system was re-installed on January 16, 2013
– At the same time, the hard drive was formatted before having the new OS installed
– A different Skype instance was installed on Mar 5, 2013
– The system was in active use for 4 month until it was seized
Upon acquisition, the active copy of Skype “main.db” contained records going back to March 5th, 2013. It contained 29948 records, but did not contain information for 2012.
Our goal was attempting to recover old Skype records going all the way back to the initial instance.
We used a data recovery tool Recover My Files 5.2.1.1964 to recover an old partition on the hard drive being acquired. However, the tools was unable to locate and recover Skype “main.db”. At the same time, the tool was able to recover a number of temporary files created by that old instance of Skype. In order to analyze the files, we used the following tools: Belkasoft Evidence Center, Forensic Assistant and Internet Evidence Finder .
As a result, Internet Evidence Finder was able to extract 21152 records; Forensic Assistant extracted 20395 records, Belkasoft Evidence Center extracted 5352 records. What’s important, all of these records belong to the period of interest before the new operating system was installed on January 16, 2013.
Another method of recovering Skype data that goes missing involves carving of the fragments of SQLite databases used by the Skype instance of interest. The carving is a complex and time-consuming process. For that reason, it’s only implemented by few forensic tools. In our sample, only three products have the ability to carve SQLite databases: Belkasoft Evidence Center, Internet Evidence Finder and SkypeAlyzer. SkypeAlyzer was not tested but does have this facility.
To give an idea on how fast (or how slow) the carving process can be, here is our test bench configuration:
– Supermicro – X8DTH-6F-O motherboard with Intel i5520 chip set supporting Intel Xeon X5500 series CPUs
– Dual-CPU configuration with two Intel Xeon E5620 processors (2.4 GHz, 12 MB second-level cache)
– 48 GB DDR3 RAM (Kingston KVR1333D3D8R9S/4G DDR3-10600)
– NVIDIA Quadro2000 with 1 GB DDR5 RAM, PCIExpressx16
– Two HDDs Western Digital HDD SATA-II 2000Gb RE4, 7200 RPM, configured as a RAID1 array
– Four HDDs Seagate 2000 GB SAS Constellation ES 64Mb, 7200 RPM, configured as RAID0
– Windows 7 Ultimate 64-bit SP1
By no means is this a high-end configuration for a PC used in the course of forensic investigations. In our experience, this is a typical configuration for intended use in 2013.
We used the corresponding carving features of Internet Evidence Finder and Belkasoft Evidence Center to collect SQLite/Skype evidence. Both tools offer fully automated carving, so we timed the process from start to finish.
– Belkasoft Evidence Center: located 245,948 records in 110 minutes (2235 records per minute)
– Internet Evidence Finder: located 154,056 records in 190 minutes (811 records per minute)
We performed a series of tests using real-world scenarios to discover Skype evidence located in SQLite databases as well as temporary files produced by Skype using multiple forensic tools including Belkasoft Evidence Center, Chat Examiner, Epilog, Forensic Assistant, Internet Evidence Finder, Skype Extractor, SkypeAlyzer, SkypeLogview. We have experienced the following results:
– When analyzing corrupted and cleared Skype SQLite databases, Belkasoft Evidence Center and SkypeAlyzer revealed the most evidence.
– When analyzing temporary files produced by Skype, Belkasoft Evidence Center, Internet Evidence Finder and Forensic Assistant are the best tools.
– When carving the disk image for SQLite records Belkasoft Evidence Center and Internet Evidence Finder recover a similar number of records. However, Belkasoft Evidence Center demonstrates almost double the performance compared to Internet Evidence Finder.
| About the Author: | Igor Mikhaylov |
| Interests: | Computer, Cell Phone & Chip-Off Forensics |
| Contacting the Author: | http://linkedin.com/in/igormikhaylovcf |
| Site: | http://computer-forensics-lab.org |
Every rootkit employs a wide range of masquerading techniques to prevent its detection. Anti-virus and anti-malware tools must perform what is called, in forensic terms, “live box analysis”, performing a real-time scan of a live system. No wonder rootkits can actively resist detection by either hiding themselves or messing with anti-virus software or the system kernel. This constant battle makes rootkit detection not only difficult and unreliable, but disruptive and potentially dangerous to system stability and the integrity of user data.
This paper proposes going away from live box analysis approach, and analyzing raw memory dumps offline. Authors propose a new rootkit analysis methodology based on using Windows built-in debugger, WinDbg, to analyze snapshots of the computer’s volatile memory. This paper proposes comprehensive classification of rootkits and their masquerading techniques, and demonstrates which types of rootkits can be detected with proposed analysis methodology. Some of the described algorithms can be quickly implemented by using WinDbg’s built-in scripting language. Finally, the proposed methodology is tested in real-world to detect existing rootkits.
Keywords: memory dump analysis, malware detection, malware debugging, offline analysis, system call interception, rootkit detection, system hook detection
The term “rootkit” is known for more than 15 years [1]. Originally, the term “rootkit” referred to a group of small, handy tools allowing developers keep “root” (“administrator”, in Windows terms) access to the functions of the operating system. “Rootkits: Subverting the Windows Kernel” [2]defines rootkits as programs ensuring persistent, robust and undetectable presence in the computer.
Essentially, rootkits are merely tools using certain techniques to bypass system protection mechanisms and algorithms to masquerade their very presence in the system. As pretty much any technology, rootkits can be used for malicious and legitimate purposes. As much as having sustained associations with malware, rootkits were still used (although in a quite controversial manner) by legitimate companies. For example, SONY used to embed rootkit-based technology into several audio CD titles in an attempt to prevent unauthorized duplication. As it turned out, using rootkits was not the best idea after all, and following several lawsuits the company was forced to recall affected CD titles [3].
Interestingly, rootkits can still be used for legitimate purposes. For example, many anti-debugging protection schemes are using rootkit-like technologies. Most anti-rootkit programs are also using rootkit-like technologies.
At the same time, most rootkits are used in combination with viruses, Trojans and computer worms for explicitly malicious purposes. Therefore, antivirus developers created a variety of tools for discovering rootkits. There are multiple types of anti-rootkit tools based on several principles.
Let’s have a look at certain rootkit detection techniques based on memory dump analysis
This paper proposes a method of discovering the presence of a hidden rootkit by performing an offline analysis of raw memory dumps captured on the suspected computer. Authors propose methodology based on using Windows built-in debugger, WinDbg, to perform the analysis. Repeated actions are implemented in the form of WinDbg scripts by using the debugger’s built-in scripting language.
Memory dumps contain static snapshots of the computer’s volatile memory (RAM). It is possible to create a memory dump for a single process, system kernel or the entire system. By analyzing memory dumps, examiners can ensure clean working environment and no active resistance from the rootkit. Techniques used in memory dump analysis can be also deployed on a live system, with restrictions.
There are several techniques available to detect rootkits.
This method uses characteristic signatures (fixed byte sequences) from known rootkits. Most anti-virus tools use signatures extracted from rootkit bodies (e.g. file or network packet). In addition, there are heuristic and behavioral patterns based on certain activities typical for rootkits (e.g. an aggressive use of a certain network port on the computer).
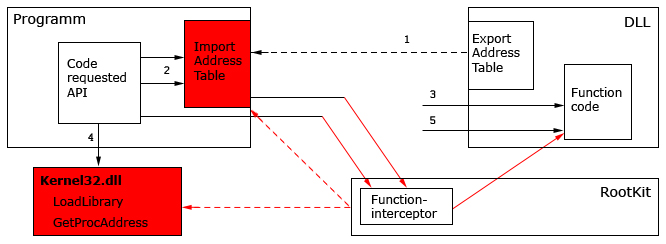
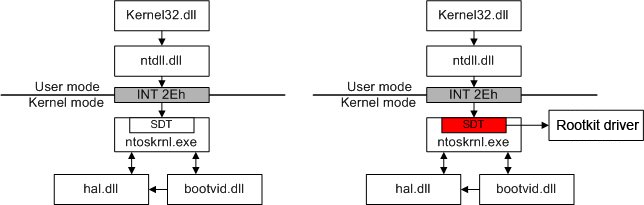
Windows uses pointer tables to redirect system requests e.g. IDT (Interrupt Descriptor Table), SSDT (System Service Descriptor Table), IAT (Import Address Table).Rootkits can either replace or modify these tables to specify its own handlers for certain interrupts. As a result, requests for certain OS functions will always be handed to the rootkit, allowing the rootkit to detect and counter detection efforts.
In order to masquerade their presence, rootkits may alter certain data returned to the examiner. For example, by substituting high-level API’s with their own handlers. Therefore, it is possible to detect their presence by comparing results returned with high-level and low-level system calls.
Another variation of this method is based on comparing process memory loaded into the computer’s volatile memory with the content of the file stored on the hard disk (tools such as RootkitRevealer [7] are using this approach).
This method helps identifying hidden resources, but does not identify what exactly was intercepted.
A digital signature (e.g. with a cryptographic hash function) is calculated for every system library at the very beginning (when the system is clean). After that, libraries can be checked for code alteration. Tools such as Tripwire [8] are using this method.
In Windows, rootkits work by modifying data and executable code in the computer’s volatile memory (RAM) [2]. From this point of view there are two groups of rootkits [2]:
Another classification deals with memory areas affected by rootkits.
These rootkits execute their code in the lease privileged user mode (“Ring 3” [9]). These rootkits use program extensions and plugins (e.g. Windows Explorer or Internet Explorer extensions). They can intercept interrupts or use a debugger , exploit security weaknesses and use function hooking of widely used API in data sets of every process’.
These rootkits are running in the system’s most privileged kernel mode (“Ring 0” [9]). They can embed into device drivers, directly modify kernel objects (DKOM), and affect the interaction between user and kernel modes. The following figure displays a kernel-mode rootkit.
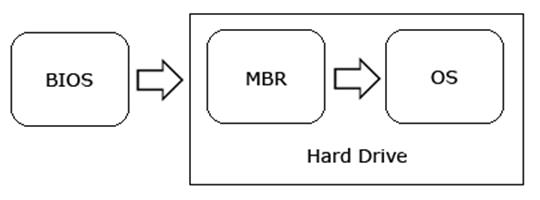
This type of rootkits modifies the master boot record (MBR).
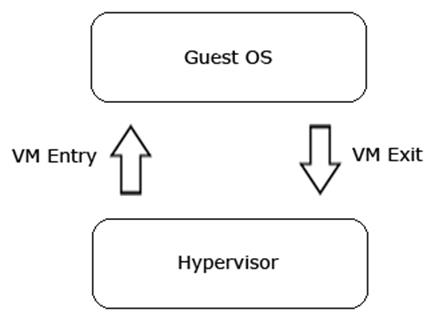
Some recent CPUs offer an additional operation mode known as the Hypervisor mode. Hypervisor is a small kernel that controls resource distribution between multiple operating systems. It works one level lower than the operating systems (see image below). In x86 terms, this mode is referred to as “Ring -1”. At this level, rootkits can intercept hardware requests of the host operating system. At this time, there are no known rootkits implementing this approach in the wild, only some demonstration versions exist [10].
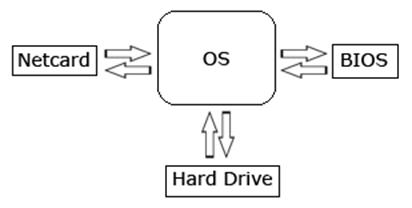
These rootkits modify firmware of certain devices such as network cards, hard drives or computer’s BIOS (see image above).
There are four types of memory dumps:
Crash dumps are files created when the computer crashes. The entire content of system memory is saved into a file.
Raw dumps are complete snapshots of the operating system memory.
Hiberfil.sys is a file used by the operating system for enabling hibernation. When the operating system is hibernated, the content of the computer’s volatile memory is stored into this file. The size of this file will equal the size of the computer’s RAM. Note that memory-mapped areas that are stored on the hard drive are not saved into hiberfil.sys.
Vmem is a file created by VMware [11]. This file contains the entire volatile memory of a virtual machine (including page file content).
WinDbg is a multi-functional debugging tool provided by Microsoft with Microsoft Windows. It can be used to debug applications, drivers, or the operating system itself in kernel mode. WinDbg offers a convenient graphical user interface.
WinDbg works exclusively with crash dumps. Every other type of memory dump can be converted into that format with Moonsols Windows Memory Toolkit Community Edition [12].
Windows contains several pointer tables to handle request redirects. These tables include IDT, SSDT, and IAT.
A rootkit can modify any pointer in these tables, or swap the table itself.
User-mode applications requesting execution of a system-level function will need to raise their privilege level. This is implemented via program interrupts.
In Windows NT, system request are initialized by executing the “int 2e” command. The “int” command makes the CPU generate a program interrupt, referring to IDT index “2e” and reading data from that address. The processor then sets pointer value to the offset of the interrupt service routine stored in the table. System calls are using dispatcher service (KiSystemService).
In WinDbg, the “!idt 2e” command displays the routine pointer value. Normally, the routine pointer is set to the address of “KiSystemService”. If this is not the case, the routine has been intercepted.
In order to alter the program’s execution, one can either modify system call addresses or alter the code of those system calls. The calls can be modified in-place, or can be altered to re-address execution to a certain code segment (in simple cases, via a single “jump” command).
WinDbg includes facilities for discovering such alterations. A command is available to check code integrity of system calls by comparing volatile memory content with code stored on the symbol server. In order to validate the integrity of system calls, one can use the following command:
!chkimg -d nt
As a result, the debugger will list the differences, if any, between resident code and symbol copies.
|
kd> !chkimg -d nt 804d90c9-804d90cd 5 bytes – nt!KiXMMIZeroPage+30 [ fa f7 80 0c 02:e9 08 82 c7 00 ] 804d910c – nt!KiXMMIZeroPage+73 (+0x43) [ fb:90 ] 804d9112-804d9115 4 bytes – nt!KiXMMIZeroPage+79 (+0x06) [ 57 ff ff ff:6d c6 c1 00 ] 804d9545-804d954a 6 bytes – nt!ExAcquireResourceSharedLite+10 (+0x433) [ fa 8b 75 08 33 db:e9 a3 c2 c1 00 cc ] 804d9564 – nt!ExAcquireResourceSharedLite+98 (+0x1f) [ fb:90 ] ……………………..some entries were left out…………………….. 804ed809-804ed80f 7 bytes – nt!CcGetActiveVacb+5 (+0x4670) [ fa 8b 45 08 8b 48 48:e9 ee 7f c0 00 cc cc ] 804ef1dc-804ef1e3 8 bytes – nt!CcSetActiveVacb+7 (+0x19d3) [ fa 8b 45 08 83 78 48 00:e9 70 66 c0 00 cc cc cc ] 804ef1ff-804ef20c 14 bytes – nt!CcSetActiveVacb+a3 (+0x23) [ 8b 0a 89 48 48 89 58 50:e9 3d 66 c0 00 e9 2c 66 ] 804f0c70-804f0c73 4 bytes – nt!ExAcquireSharedStarveExclusive+7 (+0x1a71) [ 64 a1 24 01:e9 cf 05 c6 ] 805745a3-805745a7 5 bytes – nt!NtOpenProcess+5 [ 68 60 a5 4e 80:e9 d8 b4 7b 78 ] 161 errors : nt (804d90c9-805745a7) |
The listing above demonstrates that certain parts of system code were altered.
Some rootkits load their executable images directly into the system memory.
Windows executable files in PE (Portable Executable) format can be identified with the “MZ” signature appearing in the very beginning of the image. WinDbg can help searching for this signature through the entire OS memory.
The search command:
|
|
As a result, the debugger will list all entries containing the “MZ” signature.
|
01000000 00905a4d 00000003 00000004 0000ffff MZ………….. 5ad70000 00905a4d 00000003 00000004 0000ffff MZ………….. 74720000 00905a4d 00000003 00000004 0000ffff MZ………….. …………………………………………………………………….. |
The first column contains the address of the executable module. The other four columns display the first four words in the module.
If the module was properly loaded into the system memory, the “!lmi” command will list information about the module.
|
Loaded Module Info: [01000000] Module: calc Base Address: 01000000 Image Name: C:\windows\system32\calc.exe Machine Type: 332 (I386) Time Stamp: 3b7d8410 Fri Aug 17 15:52:32 2001 Size: 1f000 CheckSum: 1d7fc Characteristics: 10f Debug Data Dirs: Type Size VA Pointer CODEVIEW 19, 160c, a0c NB10 – Sig: 3b7d8410, Age: 1, Pdb: calc.pdb Symbol Type: DEFERRED – No error – symbol load deferred Load Report: no symbols loaded |
If, however, the module was infused directly into the memory, the system will know nothing about the process. If this is the case, the “!lmi” command will produce the following output:
|
fffffffff883ecc0 is not a valid address |
It is possible to automate this search, as manually checking each and every entry can be extremely time-consuming. Automating procedures in WinDbg can be performed via the use of a script written in WinDbg internal language.
WinDbg scripts are plain-text files containing any set of debugger commands along with control directives such as .if, .else, .elsif, .foreach, .for, .while, .do, .break, .continue, .catch, .leave, .printf, .block. Variables are substituted with aliases or pseudo-registers ($tn, with n being an integer) assigned with the “r” command. Logical constructions can be programmed with MASM or C type syntaxes. C-like expressions are used like this: @@c++(expression).
|
{ .echo start; !lmi start; }; |
WinDbg can be used for further in-depth analysis of suspicious memory areas. Extracting the executable module is possible by reading its size (data located at offset 0x140) and saving the data to a file with “.writemem” command.
SSDT (System Service Descriptor Table) is a system service dispatch table that contains entry point addresses of NT kernel services [13]. The following figures demonstrate normal execution of a system routine “WriteFile” vs. the execution of the same service after the rootkit replaced an SSDT pointer to its own routine. This way, a rootkit can control system routines, filtering out “unwanted” data.
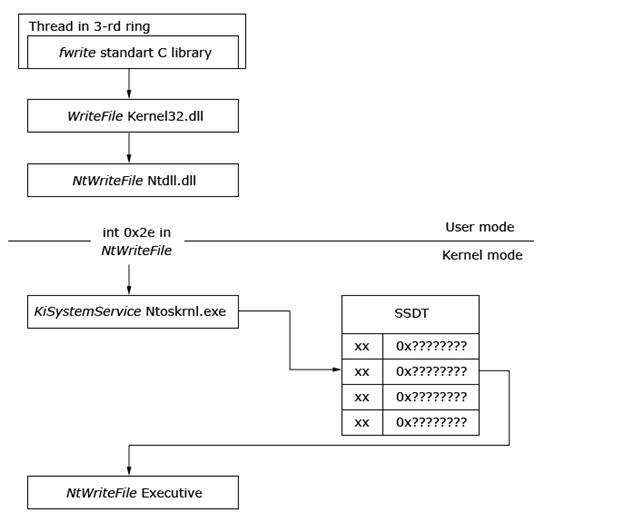
Normal execution of WriteFile
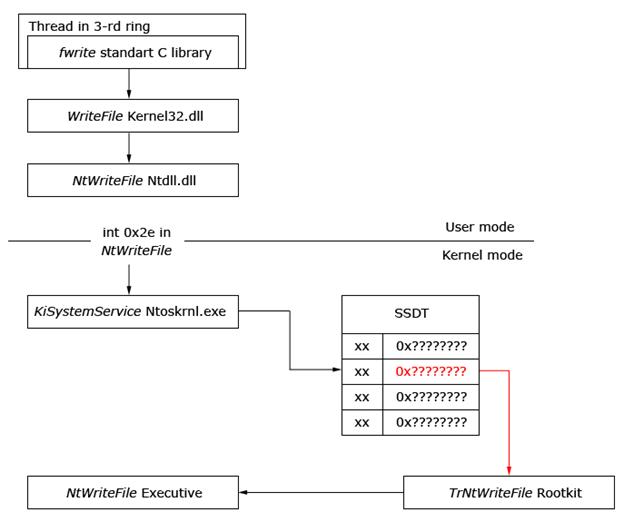
Code flow using the WriteFile routine from modified SSDT. This leads to rootkit activation.
All pointers referenced in SSDT must refer to routines implemented in either “nt” or “win32k” library. Therefore, when checking these pointers for interceptions, one must verify whether SSDT pointers actually refer to one of those memory areas.
We developed a script to automate the process. The script returns a list of all SSDT pointers as well as memory modules they refer to. If the script detects a third-party library instead of a system one, it will mark such occurrences with the word “HOOK”.
Threads are the system’s base execution units. Threads are represented by kernel structure KTHREAD (as well as by its executive extension ETHREAD). The (K/E)THREAD structure varies greatly from one kernel version to another. However, certain fields keep their format and purpose, e.g. “ServiceTable”. Normally, the field stores a pointer to either KeServiceDescriptorTable or KeServiceDescriptorTableShadow; however, a thread can redefine its table for its own use. If this value is redefined, this should be a red flag.
The following figure displays two threads. The first thread did not invoke a USER or GDI routine, and its “pServiceDescriptorTable” points to routines serviced by “ntoskrnl”. The “PServiceDescriptorTable” of the second thread points to the descriptor table, including the descriptor serving USER and GDI routines, the “win32k”. At the following image, one can observe that the rootkit copied an old SSDT, modified its pointers with its own handlers, and set a new pointer to the modified descriptor table into KTHREAD.
Ppointer in ETHREAD structures points to SSDT of the core
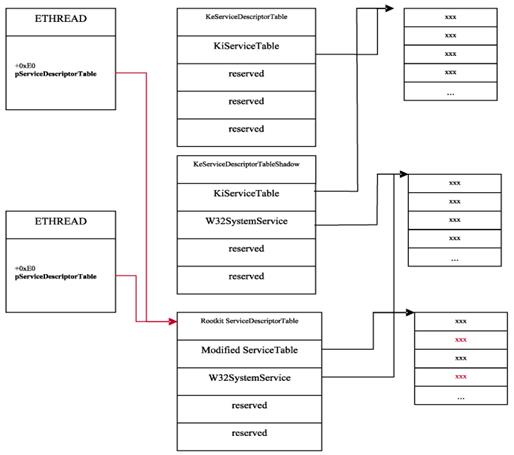
SSDT pointer in ETHREAD structures points to rootkit SSDT
In order to verify this, one can enumerate all processes and their threads, and check this field’s value. This algorithm is implemented in WinDbg scripting language. The script returns all executable threads with their SSDT pointers. The validity of the pointers is verified by comparing their values with the result returned by system funtsions “nt!KeServiceDescriptorTable” (SSDT table pointer) and “nt!KeServiceDescriptorTableShadow” (shadow SSDT table pointer) [14]. If the pointer set in the thread has a different value, a warning such as “Changed value of KTHREAD::ServiceTable” will be displayed.
Rootkits that modify system’s kernel object queue can hide processes as follows. In Windows NT 5.x all processes active in the system are linked in a single bidirectional list. The rootkit swaps pointers of the two objects neighboring its own process. This way, when the kernel enumerates processes by following the links, it won’t see that process. The following figure demonstrates system queue, while the other image demonstrates that the rootkit hid the second process.
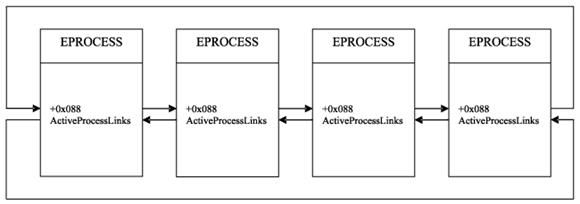
Process queue in OS
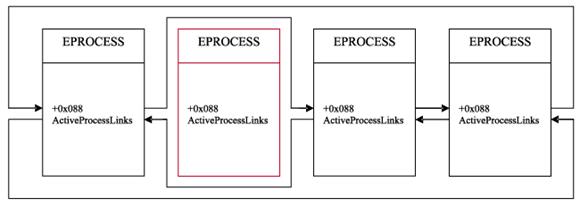
Process queue modified by a rootkit
Windows NT distributes CPU cycles between threads. Processes do not participate in this distribution; the system gives equal treatment to threads belonging to the same or different process. Context switching is implemented by the system scheduler (thread dispatcher). There are three queues: KiDispatcherReadyListHead (queues threads that are ready to execute), KiWaitInListHead and KiWaitOutListHead (two queues listing threads that are not yet scheduled because they are waiting for a certain event, e.g. the completion of an i/o operation).
A script automating this approach enumerates the four thread lists (KiDispatcherReadyListHead, KiWaitInListHead, KiWaitOutListHead, KiStackInSwapListHead), refers to a process owning a particular thread, and verifies if the process is listed in the process list.
In order to verify the ability of proposed detection methods to discover actual rootkits, the following tools were used:
Steps 3 through 8 are repeated for every rootkit.
The scripts are available as plain text files. Before launching the scripts, one needs to insert the complete path to the script file, e.g.
| aS ${/v:rep_root} “C:\\rootkit”; |
To launch scripts in WinDbg command line, the following command must be executed:
| $$><“FullPathToFile” |
The results of using the detection scripts on a range of malware applications are summarized in the following table.
|
Viruses |
IDT 2e interception |
Modifying code of system functions |
Searching for Hidden Resident Modules |
Intercepting routines via SSDT |
Modifying the KTHREAD.pServiceDescriptorTable pointer |
Searching hidden processes |
|
Email-Flooder.Win32.Hotmail.c |
– |
– |
+ |
– |
+ |
– |
|
Email-Flooder.Win32.SpyDerWeb |
– |
– |
+ |
– |
+ |
– |
|
Email-Worm.BAT.BWG.f |
– |
– |
+ |
– |
+ |
– |
|
Email-Worm.JS.Spth.Jsg.b |
– |
– |
+ |
– |
+ |
– |
|
Rootkit.Win32.Agent.aek |
– |
+ |
+ |
– |
– |
– |
|
Rootkit.Win32.Agent.bfh |
– |
+ |
+ |
– |
– |
– |
|
Rootkit.Win32.HideProc.o |
– |
+ |
+ |
– |
– |
+ |
|
Rootkit.Win32KernelBot.a |
– |
+ |
+ |
– |
– |
– |
|
Rootkit.Win32.Pakes.a |
+ |
– |
+ |
– |
– |
– |
|
Rootkit.Win32.Podnuha.aaf |
– |
+ |
+ |
– |
– |
– |
|
Rootkit.Win32.Podnuha.ti |
– |
+ |
+ |
– |
– |
– |
|
Rootkit.Win32.Qandr.an |
– |
+ |
+ |
– |
– |
– |
|
Rootkit.Win32.Qandr.r |
– |
+ |
+ |
– |
– |
– |
|
SpamTool.Win32.Delf.cs |
– |
– |
+ |
– |
– |
– |
|
Trojan.BAT.Adduser.e |
– |
– |
+ |
+ |
– |
– |
|
Trojan.BAT.HalfWin.c |
– |
– |
+ |
+ |
– |
– |
|
Worm.Win32.Radminer.c |
– |
– |
+ |
– |
– |
– |
|
Worm.Win32.Runfer.js |
– |
– |
+ |
– |
– |
+ |
|
Worm.Win32.Viking.t |
– |
– |
+ |
– |
– |
– |
|
Rootkit.Win32.Stuxnet |
– |
+ |
+ |
+ |
– |
– |
|
Trojan-Spy.Win32.Zbot |
– |
– |
+ |
– |
– |
– |
|
Rootkit.Win32.Fu |
– |
– |
+ |
– |
– |
+ |
|
Kido |
– |
– |
+ |
– |
– |
– |
|
Email-Worm.Win32.Lover |
– |
– |
+ |
– |
– |
– |
|
Duqu |
– |
– |
+ |
– |
– |
– |
|
Win95.CIH |
– |
– |
+ |
– |
– |
– |
|
MyDoom |
– |
– |
+ |
– |
– |
– |
|
Rootkit.Win32.TDSS |
– |
– |
– |
– |
– |
– |
|
Trojan-Dropper.Win32.Cidox |
– |
– |
– |
– |
– |
– |
As shown in the table, not all algorithms demonstrated equal performance. For example, out of 27 viruses tested, only one uses IDT 2e interception, and only 3 hide their processes by removing them from the process queue. However, we still believe that the test results prove our proposed methodology for detecting rootkits based on the analysis of a memory dump. The results, however, clearly show that just the few detection algorithms reviewed in this paper are not enough to reliably detect the presence of a rootkit; additional research and additional algorithms are required to make the detection really effective.
The work allows detecting many types of rootkits by analyzing offline memory dumps. Belkasoft already had a tool for acquiring memory dumps. Would you like to chat with Belkasoft about Malware Detection Plugin? Write us at contact@belkasoft.com for an insight! Belkasoft is looking forward to enhancing its forensic software with highly innovative heuristic rootkit detection algorithms. Detecting rootkits residing in the computer’s volatile memory opens additional opportunities in digital investigations, allowing forensic specialists differenciate between suspicious activities and ones generated by the rootkit.
Authors can be contacted via email: research@belkasoft.com
Belkasoft Research is based in St. Petersburg State University. The company performs non-commercial researches and scientific activities.
| [1] | A. Shevchenko, “Rootkit evolution,” 28 August 2008. [Online]. Available: http://www.securelist.com/en/analysis/204792016/Rootkit_evolution. |
| [2] | J. B. Greg Hoglund, Rootkits: Subverting the Windows Kernel, Boston: Addison-Wesley Professional, 2005. |
| [3] | Wikipedia, “Sony BMG copy protection rootkit scandal,” 24 апрель 2012. [Online]. Available: http://en.wikipedia.org/wiki/Sony_BMG_copy_protection_rootkit_scandal. |
| [4] | wikipedia, “Windows Firewall,” 7 March 2013. [Online]. Available: http://en.wikipedia.org/wiki/Windows_Firewall. |
| [5] | wikipedia, “Intrusion detection system,” 21 March 2013. [Online]. Available: http://en.wikipedia.org/wiki/Intrusion_detection_system. |
| [6] | wikipedia, “Intrusion prevention system,” 3 April 2013. [Online]. Available: http://en.wikipedia.org/wiki/Intrusion_prevention_system. |
| [7] | B. C. Mark Russinovich, “RootkitRevealer v1.71,” 1 November 2006. [Online]. Available: http://technet.microsoft.com/en-us/sysinternals/bb897445.aspx. |
| [8] | Wikipedia, “Open Source Tripwire,” 2 апрель 2012. [Online]. Available: http://en.wikipedia.org/wiki/Open_Source_Tripwire. |
| [9] | G. F. Alexander Frolov, Защищенный режим процессоров Intel 80286/80386/80486, vol. 4, Moscow: Диалог-МИФИ, 1993, p. 234. |
| [10] | Gangsta, “Гипервизор в роли антируткита,” 10 Febrary 2011. [Online]. Available: http://habrahabr.ru/post/113519/. |
| [11] | VMware, “VMware,” [Online]. Available: http://www.vmware.com. |
| [12] | Moonsols, “Moonsols Windows Memory Toolkit,” [Online]. Available: http://www.moonsols.com. |
| [13] | S. Schreiber, Undocumented Windows 2000 Secrets: A Programmer’s Cookbook, Boston: Addison-Wesley Professional, 2001. |
| [14] | M. Russinovich and D. Solomon, Microsoft Windows Internals (Fourth ed.), Microsoft Press, 2004. |
| [15] | S. Advisory, “Microsoft Security Advisory (2286198),” 2 Август 2010. [Online]. Available: http://technet.microsoft.com/en-us/security/advisory/2286198. |
| [16] | M. Rem, “Process Hunter,” [Online]. Available: http://ms-rem.dot-link.net/. |
| [17] | F-Secure, “F-Secure,” [Online]. Available: http://www.f-secure.com. |
| [18] | Greatis, “Unhackme,” [Online]. Available: http://www.greatis.com/unhackme/. |
| [19] | IceSword, “IceSword,” [Online]. Available: http://www.antirootkit.com. |
| [20] | J. Rutkovska, “System Virginity Verifier,” [Online]. Available: http://www.softpedia.com/get/System/System-Info/System-Virginity-Verifier.shtml. |
| [21] | “GMER,” [Online]. Available: http://www.gmer.net/. |
| [22] | GPL, “The Volatility Framework,” [Online]. Available: https://www.volatilesystems.com/default/volatility. |
| [23] | Kaspersky lab, “Rootkit.Win32.Fu.b,” 9 June 2006. [Online]. Available: http://www.securelist.com/en/descriptions/158955/Rootkit.Win32.Fu.b. |
| [24] | Kaspersky lab, “Rootkit.Win32.Stuxnet.a,” 20 September 2010. [Online]. Available: http://www.securelist.com/en/descriptions/15071647/Rootkit.Win32.Stuxnet.a. |
| [25] | Kaspersky lab, “Trojan-Spy.Win32.Zbot.a,” 24 December 2008. [Online]. Available: http://www.securelist.com/en/descriptions/253057/Trojan-Spy.Win32.Zbot.a. |
| [26] | wikipedia, “Direct memory access,” 7 March 2013. [Online]. Available: http://en.wikipedia.org/wiki/Direct_memory_access. |
Apple recently released the newest version of their desktop operating system, Mac OS X Mavericks. As a free update to all supported Apple desktops and laptops, a wide adoption rate was expected, and in fact it was estimated that within the first 24 hours, 5.5% of all Mac laptops and desktops were already running the new operating system. It becomes necessary for a forensic examiner to understand how changes to the file metadata system can be used as a source of new evidence during an investigation. In this article, I would like to cover two significant changes to the metadata generated by OS X Mavericks that, if properly preserved, can be a useful source of evidence.
There is a convenient feature in OS X Mavericks, which allows you to open a document that has been saved from an email, make a change to that document (applying a signature to a PDF for example), and “Reply” to the original email from within the preview app’s share function…
Nuix, a worldwide provider of information management technologies, and ADF Solutions, the market leader in media exploitation and digital forensic triage tools, today announced they have formed a technology, sales and marketing partnership to combine their strengths in digital forensic triage, indexing and investigation.
Investigators can use ADF’s Triage-G2, Triage-Examiner and Triage-Responder applications to rapidly analyze and triage large numbers of potential evidence sources including computers and flash storage media. ADF’s software exports forensic images together with all work product for indexing and analysis in the Nuix Investigator range of applications. Investigators can then process the selected devices, gather and cross-reference intelligence, analyze the evidence and conduct collaborative investigations with multiple investigators and subject matter experts.“By joining forces, ADF and Nuix can offer the digital forensic market a best-in-class efficient workflow for investigations,” said J.J. Wallia, CEO and co-founder of ADF Solutions. “Our combined strengths can help investigators quickly get across large numbers of evidence sources with massive volumes of data.”
The combined solution aims to addresses the large case backlogs facing digital forensic investigators today due to traditional forensic tools’ lack of workable triage methodology, inability to process large volumes of data in a timely fashion, poor coverage of file formats and diminishing vendor support.
“The two largest forensic software providers have slackened the pace of innovation in their products’ core capabilities—they are more focused on other markets,” said Eddie Sheehy, CEO of Nuix. “Nuix and ADF remain committed to the digital forensics market – we provide ongoing support and innovation to deliver the new features and performance improvements the market is asking for.”
Nuix and ADF Solutions will also be co-sponsoring HTCIA Asia, the premier event for law enforcement and private investigators in high-tech crime, on December 2 – 4, 2013. To learn more about HTCIA Asia, visit www.htcia.asia.
About ADF Solutions
Advanced Digital Forensic Solutions, Inc. (ADF Solutions), is the market leader in media exploitation and digital forensic triage tools used for scanning computers and peripheral devices. Leveraging an intelligence-led approach, these easy-to-use tools rapidly extract actionable intelligence to help identify and capture suspects who are a threat to public safety or national security, and accelerate prosecution of criminals. These proven tools are actively used by field operatives in defense, intelligence, law enforcement, border security, and other government agencies worldwide.
About Nuix
Nuix is a worldwide provider of information management technologies, including eDiscovery, electronic investigation and information governance software. Nuix customers include the world’s leading advisory firms, litigation support providers, enterprises, government departments, law enforcement agencies, and all of the world’s major corporate regulatory bodies.
Leading search engine companies Google and Microsoft have agreed measures to make it harder to find child abuse images online. As many as 100,000 search terms will now return no results that find illegal material, and will trigger warnings that child abuse imagery is illegal.
PM David Cameron has welcomed the move but said it must be delivered or he would bring forward new legislation. Child protection experts have warned most images are on hidden networks…
Welcome to this round-up of recent posts to the Forensic Focus forums
Is it possible to establish when an image was viewed in Firefox?
A guitar pick and a sharp blade is all you need to open a NAS drive.
Forum users confer about how to identify a Paypal account name.
What are the pros and cons of ISO 17025 accreditation?
Forum members discuss improvements they’d like to see in future forensic suites.
Chip off or JTAG? Let us know in the poll.
Forum users discuss how graduates can make themselves stand out from the competition.
How vital are industrial qualifications in digital forensics?
In an earlier article Jad Saliba of Magnet Forensics talked about Bitcoin, Tor and some of the hidden websites only accessible via Tor, such as Silk Road, which was shut down by the FBI on October 1st. Well, just over a month later and Silk Road is back online.
Time will tell how long the new Silk Road lasts, but it’s clear that these secret websites and Tor aren’t going away anytime soon, and neither is the currency that drives these sites, Bitcoin…
In last week’s post, we talked about Bitcoin, Tor and some of the hidden websites only accessible via Tor, such as Silk Road, which was shut down by the FBI on October 1st.
Well, just over a month later and Silk Road is back online:

You can reach the new site at this link (again, only via Tor) if you’d like to check it out: http://silkroad6ownowfk.onion
It only took a day and they already had over 20,000+ users on the site:

The new admin of the site? “Dread Pirate Roberts”. How’s that possible, he’s been arrested right? Those familiar with the movie “The Princess Bride” will get the joke here – the Dread Pirate Roberts was not one man, but rather a series of individuals who periodically pass the name and reputation on to a chosen successor.
Time will tell how long the new Silk Road lasts, but it’s clear that these secret websites and Tor aren’t going away anytime soon, and neither is the currency that drives these sites, Bitcoin.
We received a lot of positive feedback on the last Bitcoin post and some suggestions for follow-up posts. One of the themes was around identifying Bitcoin wallets, especially on a USB flash drive or other removable media.
First, let’s take a look at the Bitcoin wallet software out there:

As you can see, there are a few different options. This time I’ll focus on the Bitcoin-Qt client, which is a full Bitcoin client and builds the backbone of the network, the standard client used.
If you’re examining an image with the Bitcoin-Qt client present you’ll see a folder structure and files under the Users\[username]\AppData\Roaming\Bitcoin folder similar to this:

Note the “wallet.dat” file and “debug.log”. The wallet.dat file is (you guessed it!) the file containing the wallet data for the user. The debug.log file contains (you guessed it again) debugging information, including communication on the Bitcoin P2P network, including timestamps in some cases.
The wallet.dat file is easy to identify by filename, but backups of the wallet can be made, and can be called whatever the user chooses. If you are examining removable media or other locations where you suspect you are dealing with a Bitcoin wallet file (from the Bitcoin-Qt client), you can check a couple bytes at offset 0x12 for the string “b1” which may identify the file as being a Bitcoin wallet:

Another easy check is to export the file and rename it to “wallet.dat”. Run IEF on that file by using the “Files/Folders” button on the main screen and then unchecking all the artifacts except for the Bitcoin artifact on the artifact selection screen. Here is a sample of what you’d see recovered from the wallet by IEF:

I hope this answers some of the questions you may have had after my last post on Bitcoin forensics.
We’ll do our best to continue bringing you interesting topics in future posts, and as always, I’m eager to hear your suggestions for what you’d like to see in future blog posts. Please feel free to email suggestions, feature requests, and feedback on IEF to jad(at)magnetforensics(dot)com.
Have a great week!
Jad and the Magnet team
Nuix, a worldwide provider of information management technologies, today announced it has appointed Stuart Clarke as Director of Investigation Services. Clarke will be responsible globally for developing the Nuix Investigator product suite and collaborating with customers and partners to ensure Nuix software helps them improve the way they conduct digital investigations.
Clarke is highly experienced in criminal and civil computer forensic investigations and holds a first class honours degree in Computer Forensics from Northumbria University. He was most recently Head of Forensics and Technical Operations at Millnet and formerly Principal Consultant at PA Consulting Group. He has also provided expert evidence to civil and criminal courts across multiple jurisdictions including the United Kingdom’s Technology and Construction Court.“Stuart’s experience and hands-on approach to developing our investigative product will help ensure Nuix becomes the tool of choice in all digital forensic investigations,” said Dr Jim Kent, CEO, EMEA and Global Head of Investigations at Nuix. “Stuart is yet another world-class digital forensic expert who has joined Nuix, solidifying our place as the leading investigation team.”
Clarke has managed diverse teams of digital forensics, eDiscovery and information management practitioners. He has developed and delivered professional and academic training, forming part of a Master’s degree in Computer Security and Forensics.
“I have worked with Nuix products since they first arrived in the UK and have seen first-hand how powerful they are as investigator tools so I am very excited to be part of the team,” said Clarke. “In the age of big data, digital investigators must adapt their workflows and improve their productivity. Nuix is the obvious choice with its strong heritage and proven record in handling masses of data.”
Apple recently released the newest version of their desktop operating system, Mac OS X Mavericks. As a free update to all supported Apple desktops and laptops, a wide adoption rate was expected, and in fact it was estimated that within the first 24 hours, 5.5% of all Mac laptops and desktops were already running the new operating system. It becomes necessary for a forensic examiner to understand how changes to the file metadata system can be used as a source of new evidence during an investigation. In this article, I would like to cover two significant changes to the metadata generated by OS X Mavericks that, if properly preserved, can be a useful source of evidence.
Files saved from email attachments
There is a convenient feature in OS X Mavericks, which allows you to open a document that has been saved from an email, make a change to that document (applying a signature to a PDF for example), and “Reply” to the original email from within the preview app’s share function.

In order to accomplish this function, the operating system must maintain a link between the document resident in the file system and the email from which the document originated. In the case of OS X, the information describing this relationship is stored in the metadata of the saved attachment. Upon examination of a file’s metadata, a forensic investigator could quickly gather useful information about to the origin of the file before it was saved to the file system. For example, if the file was saved from an email message, the additional metadata in OSX Mavericks allows an examiner to identify the mail application used, the email message ID, the sender of the email message and the email subject line.
The following metadata fields are new to OS X Mavericks:
In the previous version of Mac OS X, Mountain Lion, some of this information was available but it was all encapsulated in one metadata field called kMDItemWhereFroms. The new structure will allow forensic tools to more easily identify the origin of files and more definitively connect a file saved to a computer back to a particular email and sender adding additional context to an otherwise “loose” file.
Files tagged with the new tagging system
In addition to the new metadata described above, OS X Mavericks also includes a new feature that allows users to organize files in the OS through a tagging system. Right clicking on a file and selecting a “Tag” allows a user to organize files into categories.
By default these are color-based categories but can be modified to represent words. Unlike the color labels in previous versions of Mac OS X, these tags are searchable and their text can be customized. A single file can also have more than one tag associated with it. This tag information is stored in the file metadata under the field kMDItemUserTags. This new user generated metadata can be an important source of context when examining a file because it can indicate how a user chose to categorize a document. Similarly, documents can be searched and grouped by their tags in order to discover potentially related items.
The new metadata generated in Mac OS X Mavericks can be used as a critical tool in a forensic examiner’s belt, subsequently facilitating a better understanding of the context surrounding the creation and classification of a document.
Daniel Barak is the Director of Technology and Digital Forensics at Vdiscovery, a litigation support and electronic discovery service provider in New York City.
There has been a lot of buzz around Tor, Bitcoin, and the so-called “dark web” (or “deep web”) since the FBI shut down the underground website “Silk Road” on Oct 1st.
As many of you already know, Tor is a network of encrypted, virtual tunnels that allows people to use the internet anonymously, hiding their identity and network traffic. Using Tor’s hidden service protocol, people can also host websites anonymously that are only accessible by those on the Tor network. Enter Silk Road. Silk Road was an online black market where you could buy virtually anything, including but not limited to drugs, weapons, credit card data, contract killers, and more. One of the key “features” of Silk Road was that it was only accessible via the Tor network, hidden from the mainstream web…