Reviewed by Scar de Courcier, Forensic Focus
BlackBag Technologies was co-founded by Ben Charnota and Derrick Donnelly – both ex-Apple employees who also happen to come from law enforcement backgrounds. With their combined experience, it’s no wonder BlackBag is a world leader in Mac forensics.The only company with an end-to-end solution for the new Apple File System (APFS), BlackBag offers four forensic products:
1. BlackLight analyzes data from Windows, Mac, Android and iOS systems.
2. Mobilyze is an Android and iOS triage solution aimed at frontline law enforcement officers.
3. MacQuisition is a powerful 3 in 1 solution for live data acquisition, targeted data collection, and forensic imaging.
4. Softblock is a write-blocking tool for Mac OS X forensic analysis machines.
Many of BlackBag’s customers use a combination of their tools, often in conjunction with other industry options. Today, we will be taking a look at MacQuisition and its capabilities.
MacQuisition allows for live data acquisition (including memory acquisition), targeted file collection and forensic imaging solely for Mac computers. Although there are some limitations and restrictions imposed by Apple, BlackBag tries to work around these to acquire the necessary data, not to circumvent security and break Apple’s systems.
Key features:
– Boots over 200 Macs – no need for take-apart the computer to access the drive
– Recognizes and handles APFS, FileVault and Fusion drives (natively)
– 26 data collection options
– 100% accuracy on Macs
MacQuisition is used mainly by analysts and examiners. The interface on all BlackBag’s products is similar, so if you’ve used one of their products, it is easy to pick up another. Although BlackBag offers free two-day BlackLight training courses, as well as two advanced paid courses, the design is intuitive enough to be picked up as you go along. This is especially true if you’re a Mac user: the interface has a similar feel to Apple’s devices.
Targeted data collection is one of MacQuisition’s key features. Rather than having to fully image a device, you can simply acquire what you need from a specific location in a forensically sound way.
Live data acquisition means MacQuisition can also capture RAM. Investigators need this feature to counteract the “It wasn’t me; it was malware” defense. To deal with this, you’ll need to capture the RAM since malware doesn’t always reside on hard drives.
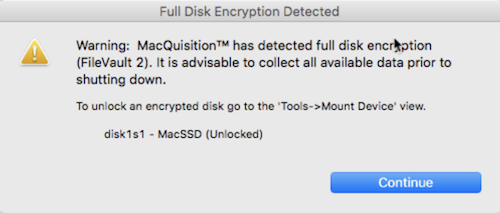
MacQuisition automatically recognizes if FileVault 2 is enabled on the target device. It also identifies APFS and allows for logical file collection should obtaining a full forensic image not be required.
The latest version of MacQuisition comes on either a 120GB or 1TB SSD, giving the user a lot more flexibility. Also, it is supplied with both USB A and C connector cables allowing it to seamlessly image the latest MacBooks and MacBook Pros. Acquisitions have the option to be sent directly to the MacQuisition Data partition. If you are using a separate destination drive, you can also format these additional drives to NTFS, as MacQuisition now includes Paragon NTFS drivers.
Analysts will need to be cognizant during live data acquisition as the source’s operating system is being utilized and MacQuisition cannot provide full write protection. However, if you are booting into MacQuisition, you will be operating in an entirely forensically sound environment.
MacQuisition doesn’t expire: the perpetual license you bought continues to run. Yearly subscription options allow you to download the most up to date version of the software, but you can upgrade your license at any time.
When you insert MacQuisition into your source’s machine, several volumes will appear on your desktop. The first three contain the licensed copies of MacOS and are entitled MacQuisition 2018 R1.2, MacQuisition Secondary, and MacQuisition Legacy.
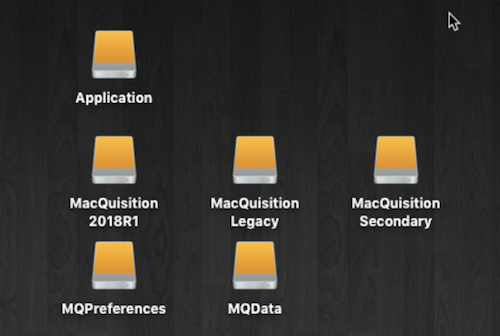
The ‘Application’ volume contains the MacQuisition application which is used to perform live data acquisitions. You will also find a number of ‘Quick Start’ guides in this volume.
‘MQPreferences’ is a volume used to store preference files allowing you to customize MacQuisiton.
‘MQData’ contains the available free space on the SSD. This will vary in size depending on the version purchased but can be used to store acquired data or even acquire a full forensic.
If your source’s machine is not powered on, you can avoid the complicated process of taking apart the computer to access the drive by booting directly from the MacQuisition device. Connect the device to the appropriate USB port and power the machine on holding the ‘ALT’ or ‘Option’ key down. Then you will be presented with the Boot Manager and the three MacQuisition volumes (MacQuisition 2018 R1.2, MacQuisition Secondary and MacQuisition Legacy) containing the various versions of MacOS will show themselves.
Select MacQuisition 2018 R1.2 initially. You will either see the BlackBag logo and the MacQuisition application will load or a ‘No Entry’ sign, in which case power down the machine and repeat the process. However, this time, you will select MacQuisition Secondary. If you still see the ‘No Entry’ sign repeat the process a third time, selecting MacQuisition Legacy.
When you first open MacQuisition in a live data collection scenario, it will request the user’s login for the user account the machine is logged into.
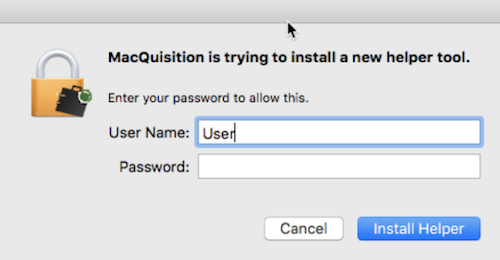
This allows you to elevate user privileges and collect data from multiple user accounts, as well as the computer’s RAM. If you don’t have admin privileges, you can run the application with restricted permissions instead, but of course, this means you won’t have the rights to collect everything. Please note if you are booting into MacQuisition you will automatically have root privileges over the device.
MacQuisition will initially look for FileVault and confirm if FileVault is enabled on the device. Then the User Interface will appear, and you can begin collection or acquisition.
The initial screen is the Case Details screen and contains what you’d expect: a space for you to fill in case details such as the case number, investigator’s name and so on. Along the top of the screen you will see three other options: Data Collection, Image Device, and Tools.
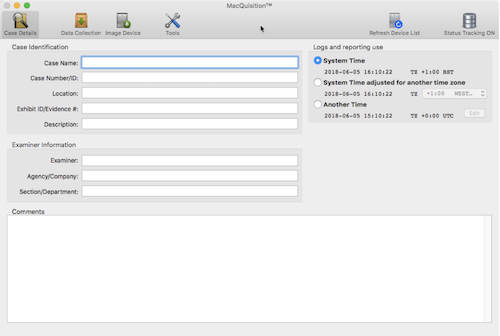
None of the fields in the initial ‘Case Details’ screen are required, but you can fill them in if you want to. You also have the option of altering the time zone: this will ONLY impact the log files that MacQuisition creates. If the machine is set to a different time zone and you want the logs to reflect the time where you are currently, then this is where those adjustments can be made.
This section allows for targeted data collection from a live running machine. A list of different system processes and files are available for collection, including KeyChains, iOS Backups, Office Documents, and many others. If what you are seeking is not on the list of files, selecting ‘Additional Files’ at the bottom of the list will allow you navigate to any location in the file system and locate the records you want to acquire.
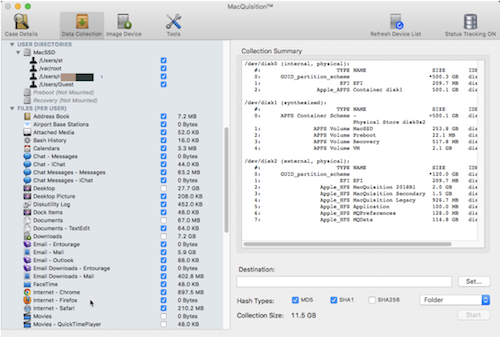
In the Data Collection menu, CTRL+Click will allow you to select all/deselect all. Once you’ve specified your files and folders, MacQuisition calculates the file sizes down the side and then tells you the total collection size at the bottom. It also shows locations from which it’s pulling data on the right hand side of the screen; you can then set the location to which you’d like to save the files to. The best thing to do is to select the MQData drive and keep your acquisitions in there.
MacQuisition supports various hashing options including MD5, SHA1, and SHA256. It can export data either as a folder or as a sparse image (similar to a logical evidence file).
Once you’ve selected your destination and specified any file hashing, click ‘Start’. MacQuisition will now collect and save the data, which you can then analyze in Blacklight.
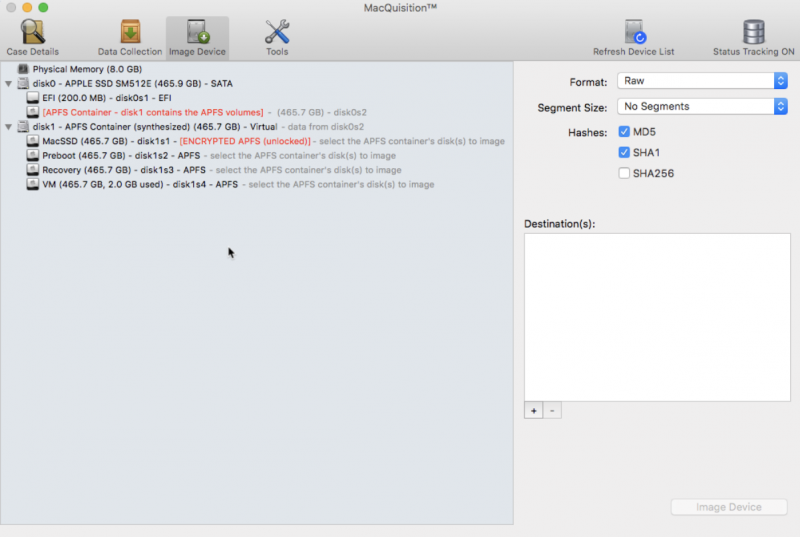
Imaging with MacQuisition is simple. Select the ‘Image Device’ tab, and you will see all the currently connected physical drives and the volumes or partitions they contain.
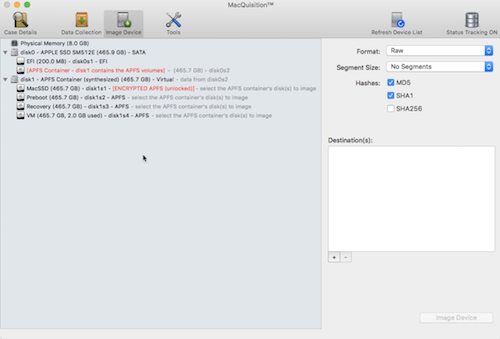
MacQuistion clearly displays which volumes are encrypted (with FileVault 2) and which of those volumes are unlocked. It also shows if the drives contain Apple File System (APFS) containers (and the volumes contained within the container).
Just select the physical drive or RAM you wish to image, for non-APFS drives you can also select individual volumes, but this is no longer possible for APFS formatted drives.
Next, choose which image file format you would like (RAW, DMG or EO1 – compressed or not). You can segment the image and select to hash the image with MD5, SHA1 or SHA256.
Once completed, you then need to select a destination drive for your image files. Clicking on the + button provides a list of available volumes, where you are then given the option to create a separate directory for your image. You can add multiple destination drives. In this case, multiple copies of the same image will be sent to the selected destinations. This is helpful if you are collaborating or need a master and working copy of your image files. Having a couple of destination drives will not impact imaging speed significantly. If there are several destinations drives, performance may be impacted.
Once the destination is locked in, clicking the Image Device button will start the process and imaging will begin. A warning message will appear on the screen advising that imaging is in progress.
At the conclusion of the imaging process you are presented with the relevant MD5, SHA1 or SHA256 values and confirmation that the image has been created successfully.
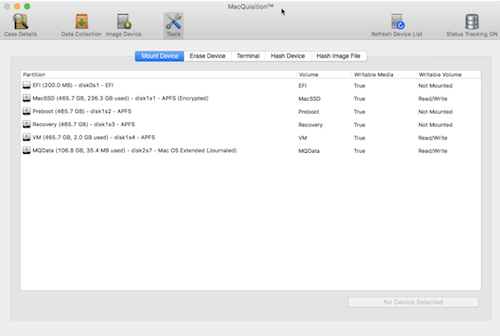
Tools
Back to the menus: under ‘Tools’ you can see all the drives currently connected or within the system. Selecting ‘Mount Device’ will mount it as a read-only. If you want to add a USB, you have to select ‘Mount Selected Device Read/Write’. This pops up an “Are you sure?” so they don’t accidentally overwrite data.
If you’ve connected a full evidence drive, or if your drive is in the wrong format, you can erase and reformat a drive within MacQuisition. You’ll need to give it a name, then select how you want it to be formatted. BlackBag recommends formatting it as HFS+ if you’re going to put it onto an Apple computer. If you’re going to be analyzing your evidence using a Windows machine, you can format the destination drive as NTFS. This is a really big advantage and an important recent update, since most forensic labs are Windows-based.
‘Terminal’ is another option in the Tools menu. This allows you to run different commands as a root user, so you can run Terminal through MacQuisition rather than through the computer itself. This has been introduced because many Mac users have set up the option to ask for the password when Terminal is run; if the password isn’t provided, then the computer locks itself. Running Terminal from inside MacQuisition prevents this from happening. It looks exactly the same, and you can run all commands as root, but it won’t activate all the security settings.
The ‘Hash Device’ option lets you hash devices before you do anything with them if you want to make sure you’re not tampering with evidence. ‘Hash Image File’ does the same, but for individual files.
If you think you might need to update MacQuisition, you can click the menu next to the Apple sign to check which version you’re running. If you do need to update to a new version, this will automatically download to your machine once you’ve clicked ‘Check for Updates’. Alternatively, you can download the software from BlackBag’s website, enter your license key, and run it.
The Preferences menu allows you to verify hashes before and after the imaging process if you want to. Data Collection describes the formatting of reports and allows you to specify any extra options related to an acquisition.
The Quick Guide and Comprehensive User Guide, both available on BlackBag’s website, are handy points of reference if you get stuck.
MacQuisition is a great solution for data acquisition and forensic imaging. The interface is intuitive, especially if you’re a Mac user, and it shouldn’t take long for you to feel comfortable using it.
The options for data acquisition are easy to understand, and there are enough of them to be able to customize everything to the specific needs of your investigation. I particularly like how you can specify which folders and files you want to acquire, rather than having to acquire an entire drive and then triage afterward. This can save a lot of time in investigations!
Although Apple is gradually making it harder for their devices to be imaged and analyzed, BlackBag have several handy workarounds for a lot of these options, and I’m confident that they’ll continue enabling investigators to find the data they need in the future.
In summary, I’d certainly recommend MacQuisition to anyone who needs to image an Apple device: it’s easy to use, comprehensive and will make your investigations run more smoothly.