You’re bought in to the idea of virtualizing your forensics lab with an AWS EC2 instance and you’re ready to get started! Now you just need to know how to actually set up your EC2 instance and get Magnet AXIOM Cyber running in it.
Don’t worry! This practical guide will provide some tips along with step-by-step instructions on how to set up your EC2 instance.
This guide is by no means intended to be a replacement for Amazon EC2 user documentation (which you can check out here) but rather the things you can do in EC2 to securely and efficiently get it ready for running AXIOM Cyber.
Let’s get started!
Getting Started
First, you’ll need login credentials to your organization’s AWS Management Console. Once you’re in there it can be a bit daunting since there are so many options, but you’re just interested in EC2 which is under the Compute heading. Click on that and you’ll be led to the EC2 Dashboard which looks like this:

One more thing: to get AXIOM Cyber up and running in EC2, you’ll need to ensure that a.) your version of AXIOM Cyber is 4.8 or higher; and b.) that you have AXIOM Cyber licensed for CLS (Cloud License Server).
Setting Up Security Groups
We believe one of the key benefits of setting up Magnet AXIOM Cyber in AWS EC2 is that you’ll have the ability to perform remote collections of off-network endpoints. If that’s something that you’re interested in doing, the very first thing you’ll have to do is ensure that your Security Groups are set up properly so you can actually perform the collection.
What are Security Groups? AWS provides this nice definition of a Security Group in their Amazon EC2 User Guide for Windows Instances:
A security group acts as a virtual firewall for your EC2 instances to control incoming and outgoing traffic. Inbound rules control the incoming traffic to your instance, and outbound rules control the outgoing traffic from your instance.
Setting up a Security Group is something that you should do before you set up your EC2 instance. This is so you can connect to your EC2 instance through an RDP session and to allow the Security Group to your EC2 instances to allow traffic from the host that you’re collecting from to the EC2 instance running Windows that you have AXIOM Cyber running on it.
Step-by-Step: Creating A New Security Group
① To create a Security Group—from the Security Groups page in your AWS Management Console—you want to click on the orange button “Create security group” in the top right corner.
② Give your new Security Group a name and a description (easy enough).
③ VPC stands for Virtual Private Cloud. You don’t have to change anything here, simply use the default VPC provided.
④ Inbound rules will be used to define what traffic can come into you EC2 instance. To get started configuring your inbound rules, click Add rule.
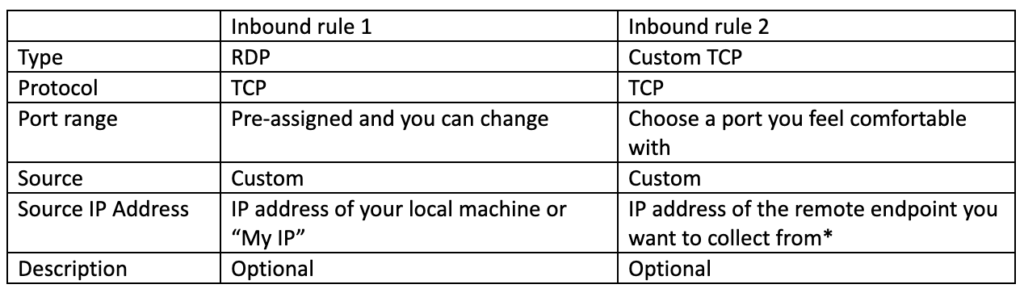
You’ll need to setup two inbound rules:
- RDP: used to access and manage your EC2 instance
- Custom TCP: used for AXIOM Cyber’s remote agent on the target endpoint to communicate with AXIOM Cyber when it’s running in your EC2 instance
Type: There are a handful of different types of inbound rules that you can choose from; the two that you’re interested in—for the purposes of this guide at least—are RDP and Custom TCP.
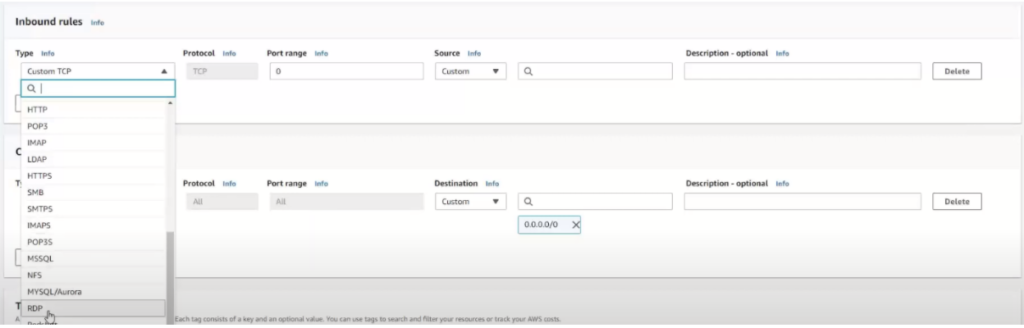
Port range: A port will be preassigned to you. You can choose to keep this port and then remember it for later on when you go to actually perform the remote collection of the endpoint. Or you can choose your own port if you have a preference.
Protocol: These will be automatically populated for you so you don’t have to worry about them.
Source: This will be set to Custom which is what you want to keep it as, then enter an IP address for the machine that you’ll be performing the remote acquisition from. For example, if you as the examiner are going to be performing the remote collection from home, you’ll want to enter your home IP address. If you’re going to be at the office and collecting the collection from there, you’ll want to use your office IP address.
A handy shortcut here is using “My IP” which will automatically populate the Source with the IP address of wherever you are.
For added security, each IP address will have /32 CIDR notation meaning that is the only IP address that is allowed to connect to your EC2 instance.
Description: This field is optional and pretty self explanatory.
When you setup your two inbound rules, this is what you’ll want to mimic:
*You may not always know the IP address of your target endpoint. The user of the endpoint could be at home, or they could be travelling for example. If you don’t know where that endpoint is, you may want to consider using 0.0.0.0/0, so essentially anything, as the IP address. Wait a second, you may be thinking, that’s not a good idea! And you’re right: generally, it’s not a good idea but there are a couple of factors to consider that mitigate the security risk:
- AXIOM Cyber is only bound to that port and listening when you are actively trying to connect to a particular agent. Otherwise, nothing is listening on that port.
- Each agent has a unique GUID embedded in it and when AXIOM Cyber is connecting to a particular agent it expects to see that unique GUID before completing the connection. Otherwise, the connection is dropped.
When you’re done setting up your security group, it should look something like this:

The Source in this image is blurred out, you’ll have your own source IP addresses there.
⑤ Outbound rules… good news, you don’t need to add any since you’re the one who is generating outbound traffic.
⑥ Tags are optional and helpful to find a specific one if you’ve created many different Security Groups.
⑦ Click the orange button in the bottom right “Create security group”. Congratulations, you’re done with setting up your Security Group!
Creating an EC2 Instance
If you don’t have an image of an already existing instance saved already, you’ll want to create a new instance. Since you’re reading this guide, you probably haven’t gone through those steps yet, so let’s start at the beginning by creating a new instance. This is a seven-step process and we’ll walk through each one in and provide some helpful information along the way.
Thankfully, Amazon has made this seven-step process relatively easy with a setup wizard that walks you through the process. We’ll take you through that process and provide some helpful information along the way.
To begin the wizard, you want to click the orange button in the top right labelled “Launch instances” from the Instances tab in the AWS Management Console.
Step 1: Choose AMI
An AMI (Amazon Machine Image) is Amazon EC2 speak for your base image. You have to specify an AMI when you launch an instance; and you can even launch multiple instances from a single AMI if you need multiple instances with the same configuration.
Because we’re going to be running AXIOM Cyber on this Instance, you’ll want to select Microsoft Windows Server 2019 Base since it’s the only image type that AXIOM Cyber is supported on.

Step 2: Choose Instance Type
Next, you’ll be presented with a slew of options for Instance Types.
You’ll want to make sure you choose the right instance for the job that you have to do. Are you just doing analysis or examination of data? You’ll probably want to go with a simple t3.2xlarge. If you’re processing data, you may want to go with something a bit beefier to get through the job faster, so you’d choose a c5.2xlarge.
By choosing the right instance you’ll save time and/or cost. The choices for instances are seemingly limitless and you can choose to pay by the hour or even by the second!
We’ve made it a bit easy for you and through our own testing we’ve identified three different Instance Types that are ideal for running AXIOM Cyber depending on what you want to do. We recommend choosing one of three instance types based on the purpose that you need it for and how much budget you have:

Note that cost varies by region, to get an idea of pricing for instance types, check out Amazon EC2 On-Demand Pricing.
The Difference Between EBS and SSD
Each instance type will have either EBS storage or some configuration of SSD storage; these storage types are already assigned to the Instance Type, so you actually don’t get to choose this once you’ve selected an Instance Type. However it’s worthwhile to understand what the differences are between EBS and SSD and how they may affect your choice of Instance Type.
SSD are faster since there is no network latency; however SSD are ephemeral so you can’t detach it from an instance and attach it to another one. Generally SSD are for more powerful instances and the cost reflects that.
EBS on the other hand can be detached from one instance and attached to another which makes it much more flexible than SSD. They are however slower—and less expensive—than SSD which makes them a good choice for general purpose jobs.
Now that we have all of that out of the way, choose the Instance Type that best suits your need and then in the bottom right corner, click the button “Next: Configure Instance Details”.
Step 3: Configure Instance
There are many different settings here that you can configure, you’re going to leave them all as they are except for one:
Auto-assign Public IP: It’s best to change this setting from its default “Use subnet setting (Disable)” to “Enable”.
The reason for this is that to ensure that you can successfully perform an off-network remote collection using AXIOM Cyber, you’re going to need a public IP address to create the remote agent. If you don’t have a public IP address, you’d only have an internal private IP address and that wouldn’t work to go over the routed Internet and actually collect from an endpoint that could potentially be on another continent.
Note: You may not always know the Source IP that your agent will appear to be coming from so you may need to have the Security Group wide open. The same security concerns that we discussed for outbound rules of using an IP address of 0.0.0.0/0 apply here too.
To move on to the next step, click “Next: Add Storage”.
Step 4: Add Storage
Your instance will come preconfigured with one volume that has 30 GiB of storage. This—as you can guess—will most likely not be enough for the work that you need to do.
We generally recommend that you want 3x more storage than the amount of evidence that you’re acquiring.
Now that you’re done with adding storage, click “Next: Add Tags” to continue.
Step 5: Add Tags
Adding Tags is another optional step, however if you’re in a cloud savvy organization you may want to consider using Tags to more easily keep track of costs or budget allocation or to make searching for instances easier.
Some of the Tags that we have found to be helpful are Name and BestBefore to keep track of who created the instance and its longevity, respectfully.

Add any tags that you may want or leave them blank. Click “Next: Configure Security Group”.
Step 6: Configure Security Group
Remember that Security Group and rules we created earlier? This is where it’s needed. If you don’t have the proper Inbound Rules setup, you won’t be able to successfully perform a remote collection with AXIOM Cyber.
If you skipped that step earlier and haven’t created it yet, don’t worry, you can do it now. Select “Create a new security group” and then go through the steps earlier in this guide.
Let’s assume however that you did setup a Security Group already, you’ll want to choose “Select an existing security group”.
You’ll be presented with a list of existing Security Groups, check the one that you want and now you get to click that blue button in the bottom right “Review and Launch”.
Step 7: Review
Make sure everything is setup as you want it to be and change anything if necessary. Once everything looks good click “Launch”.
Congrats! You’ve set up your EC2 instance.
The last step here will be to create a new key pair if don’t have one yet. A key pair consists of a public key that AWS stores, and a private key that you store. Together, they allow you to securely connect to your instance.
For Windows AMIs, the private key file is required to obtain the password used to log into your instance.
If you don’t have a key pair yet, this is where you will create one. From the dropdown in the screen you’re now presented with choose “Create a new key pair”, give it a name, download it and keep it somewhere safe for you to access later.
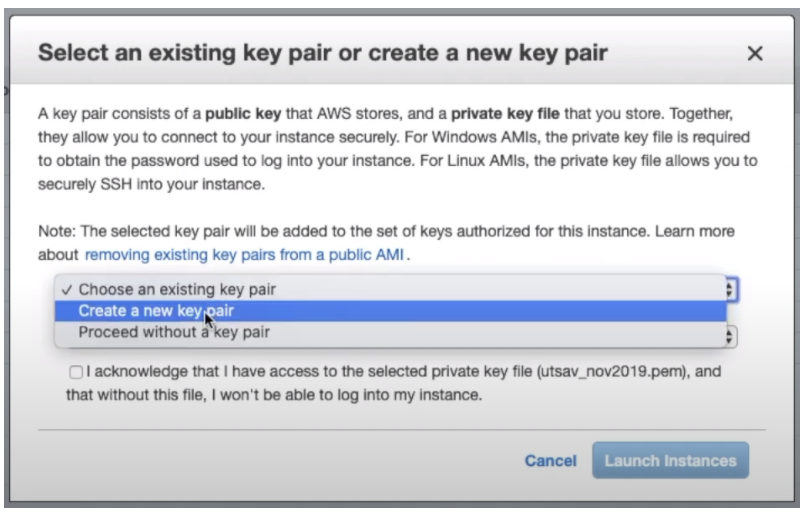
Note: For security purposes, it’s generally a good idea to create a new key pair every few months.
Installing AXIOM Cyber on Your Running EC2 Instance
Now that your EC2 instance is up and running, the next step is to get AXIOM Cyber loaded on to it.
Keep in mind, you’ll need to ensure that you have the proper licensing of Magnet AXIOM Cyber—the CLS or LLS license—to successfully get AXIOM Cyber installed in EC2.
Step-by-Step: Connecting to Your EC2 Instance
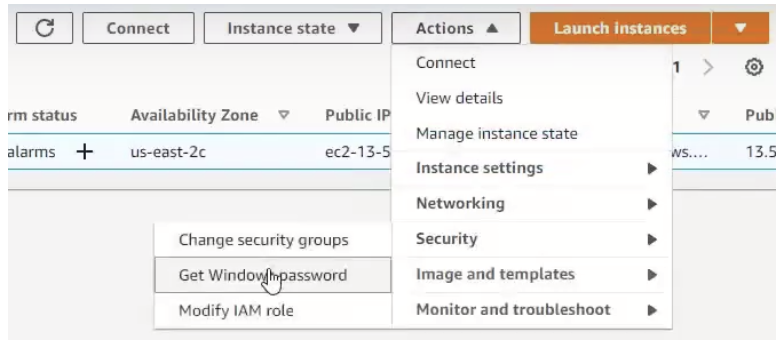
① To gain access to the instance you’ve just created, you’ll first need to recover your Admin account password so you can RDP into that instance. From the Instances view, you’re going to click the dropdown of the “Actions” button, and then select “Security” and from there choose “Get Windows password”.
② Remember that key pair that you created earlier? This is where you are going to use it. Click “Browse” to find that key pair wherever you have it saved (it’s a .pem file) and then copy and paste it into the field provided. Click “Decrypt Password” and then your password will actually appear. Copy that password because you’ll need it in a moment. You can even store that password somewhere safe for use in the future as well.
③ Next, we’ll connect to your instance using an RDP client. In the top right, you wan to click on “Connect” which will take you to a new window “Connect to your instance”. There are two tabs, choose the RDP client tab and you’ll see the option to “Download remote desktop file”, which is exactly what you’ll want to do.
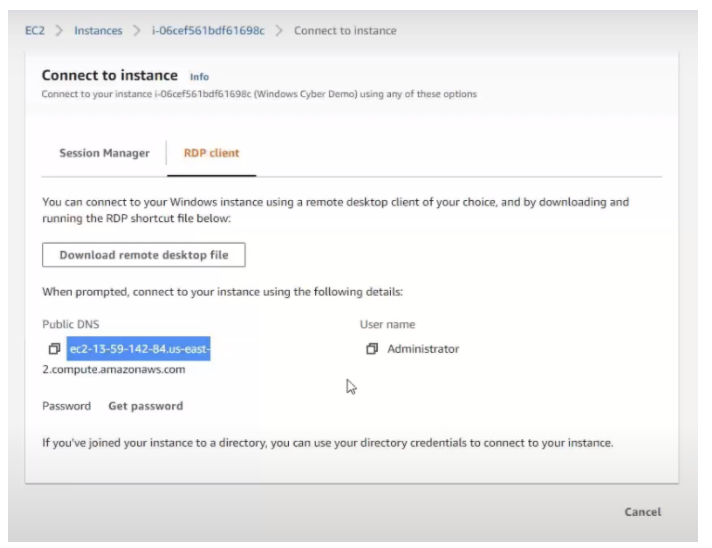
Note that unless you have an elastic IP, the external IP changes each time you restart the instance. So, you’ll need to re-download a new RDP profile or edit the existing one to reflect the new hostname each time.
④ Once you’ve downloaded the remote desktop file, open it up. When you do, you’ll be presented with another window that has some of your credentials on it and then you’ll enter your password that got earlier and you’ll enter it here.
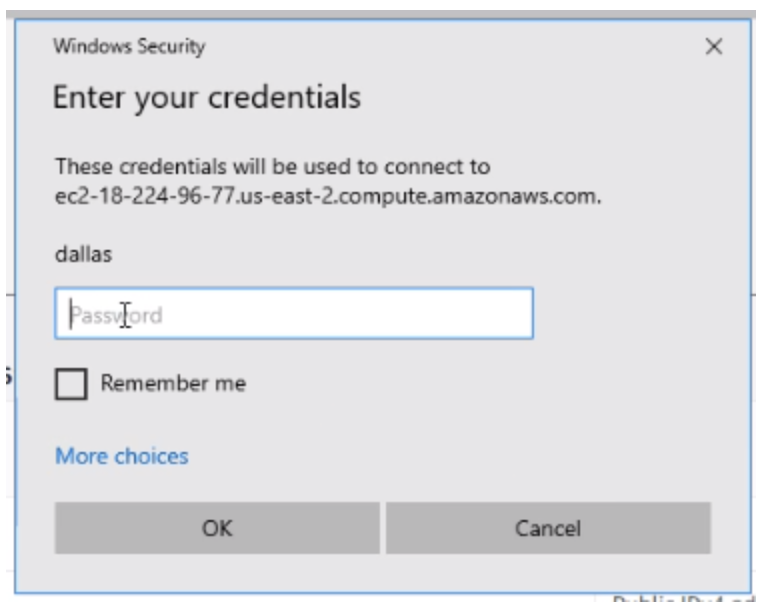
That’s it! You’re now able to remote desktop into the VM that you’ve set up in your EC2 instance.
Installing Magnet AXIOM Cyber
Now that you have your fancy new EC2 instance all set up, the final step will be to actually get AXIOM Cyber onto your VM.
Download the latest version of AXIOM from the Magnet Forensics Support site.
Even though the download package is for Magnet AXIOM (and not Magnet AXIOM Cyber), when you enter your AXIOM Cyber license key, you will indeed activate AXIOM Cyber.
You’ve officially virtualized your forensics lab (or part of it at least) in the cloud!
Now you can enjoy all the benefits of using the cloud to run AXIOM Cyber including being able to perform remote collections of endpoints that aren’t connected to your corporate network. Check out this blog Harnessing the Cloud to Collect Off-Network Endpoints using AXIOM Cyber.
The blog will walk you through how to do a remote collection and also has a video if you want to watch along.
References
[1] https://docs.aws.amazon.com/AWSEC2/latest/WindowsGuide/index.html
[2] https://docs.aws.amazon.com/AWSEC2/latest/WindowsGuide/ec2-security-groups.html
[3] https://aws.amazon.com/ec2/pricing/on-demand/
[4] https://aws.amazon.com/ebs/features/
Other Resources
Like we said earlier, this guide is not meant to be exhaustive. Hopefully, it gave you what you needed to get AXIOM Cyber up and running in an EC2 instance that you created.
Here are few other resources which may be helpful for you:
Amazon EC2 User Guide for Windows Instances
https://docs.aws.amazon.com/AWSEC2/latest/WindowsGuide/index.html
Brief Magnet Forensics video demonstrating how to set up an EC2 instance (6:22)
https://www.youtube.com/watch?v=E7LbRFhOdX0
Brief Magnet Forensics video showing you how to collect an off-network endpoint using AXIOM Cyber (6:12)
https://www.youtube.com/watch?v=CBPTIr9AoEw
Magnet Forensics webinar presentation “Collect and Analyze Data from Off-Network Endpoints with AXIOM Cyber” (39:25)
https://www.magnetforensics.com/resources/collect-and-analyze-data-from-off-network-endpoints-with-axiom-cyber-recorded-webinar-feb-24/
To connect with a member of our Sales team, email [email protected]
Follow us on Twitter @MagnetForensics
Technical Advice Disclaimer
Magnet Forensics is dedicated to engaging with the DFIR community through our blogs and whitepapers. However, properly addressing technological issues often includes numerous variables that require independent assessment and strategies designed for each specific circumstance. Since Magnet Forensics cannot have complete insight into all variables involved in a specific situation, this blog/whitepaper is for informational purposes and should not be read as professional advice recommending techniques or technologies to address your specific situation. We do not accept responsibility for any omission, error, or inaccuracy in this blog/whitepaper or any action taken in reliance thereon.