Hey everybody. This is Josh Smith with the Oxygen Forensics training team. And today I’m going to show you a new extraction method: the Android APK Downgrade method. The Android ADB backup is, like I said, a very common method, but the issue with this Android backup is that many of the newer applications that are out today do not allow backing up. So you’re inevitably going to miss some artifacts if you’re doing a standard Android ADB backup.
Fortunately, Oxygen has released version 14 and implements a long-awaited Android app downgrade method as one of our extraction methods. It allows investigators and examiners to extract a variety of app data from a wide selection of unlocked Android devices. And it’s key to mention, this APK Downgrade will only work on an Android device that is unlocked, and it is also compatible with Android iOS versions 5-11, which is a pretty wide spectrum of Android devices.
I mean, there are obviously certain exceptions that are going to apply, but that is a pretty wide scope of phones that this will work on. And currently, Oxygen supports 46 applications on these types of third-party applications where we can downgrade to a previous APK version. And again, to explain this, essentially what happens is Oxygen goes in, finds particular third-party applications that are supported, and it will allow Oxygen to create a backup of that specific application, rolling back to a previous version that allows backups. Like I said, the newer versions of some of these applications do not allow for them to do backups. Therefore we’re required to do this downgrading process to a previous version of the application that does allow backing up.
First things first with that, if you’re going to do an extraction of any type, you need to go ahead and get your phone into airplane mode, get it off the network and protect it from any outside networks or anyone reaching out over the wires to do anything nefarious to that device. The next thing you need to do for this unlocked device to successfully complete an APK Downgrade is you need to place the device into developer mode. And I’ve queued up a little video here to show what it looks like and how to do that.
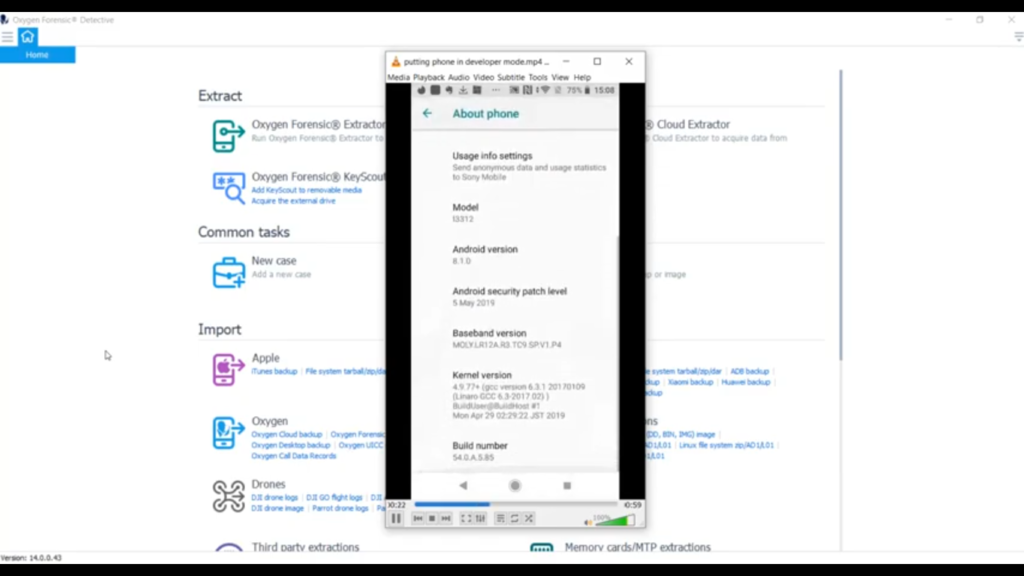
So, first things first, you go into your settings and you’re going to look for the ‘System’ tab. Once you get under the ‘System’ tab, you want to look at ‘About phone’ and then you’re going to navigate down into your ‘Build number’. And what you want to do is tap on ‘Build number’ a total of seven times. As you can see, it’s going to give you a little warning there when you’re halfway through, it’ll let you know you’re a developer. And the next thing you do is go back one level and you’re going to notice this ‘Developer options’ screen. You select ‘Developer options’ and then what you’re going to do is select your screen stay awake, and you want to allow for USB debugging. That’s just in a quick nutshell how to get your device into download or correction into developer mode.
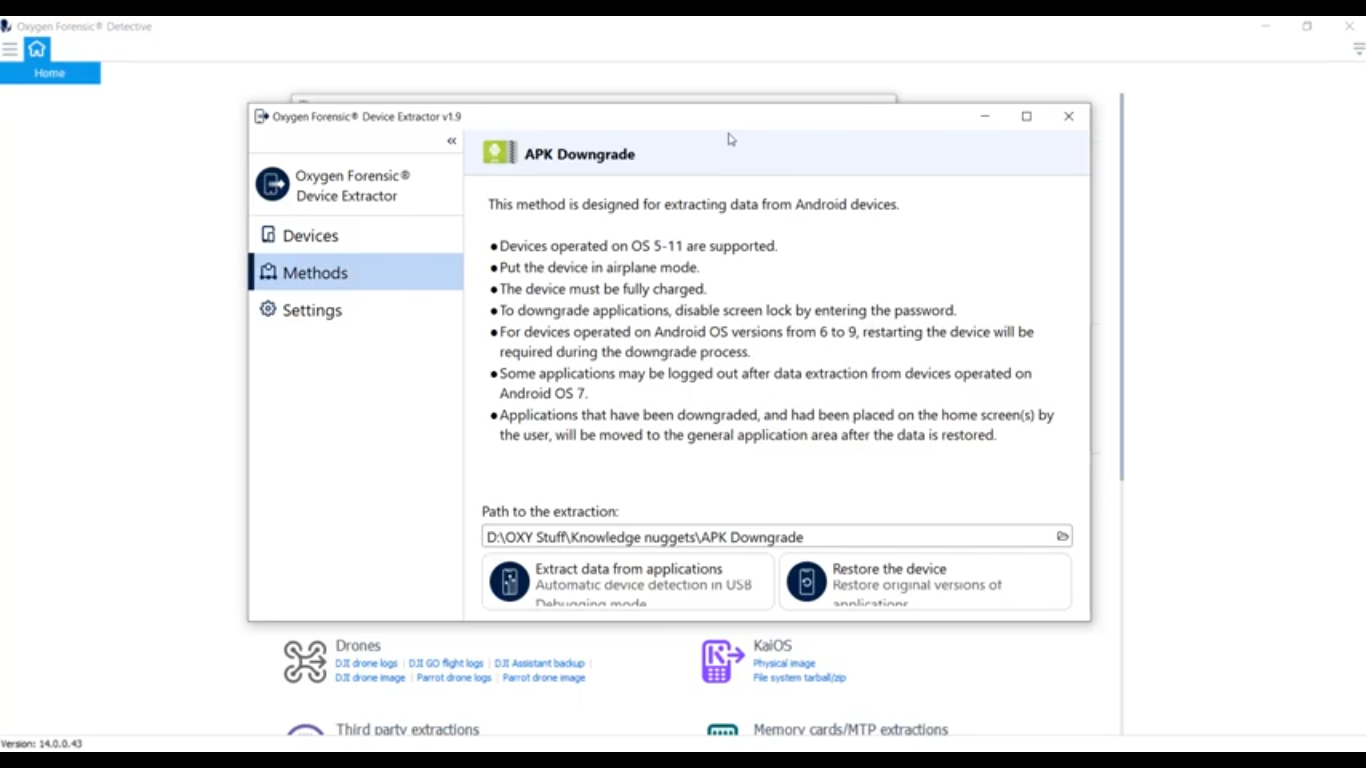
Now that we successfully have our device in developer mode and we’ve enabled USB debugging, we can go ahead and start the process. I’m going to go ahead and open up my Oxygen Forensic Extractor. And as you can see there it’s going to be under our Android extractions. It’s going to be right here, the APK Downgrade. Go ahead and click on that and open it up. And you can take a look here. This is our new extractor window, and you can see it gives us a couple bits of instruction here.
And I had mentioned at the beginning of the presentation, this does only support Android iOS devices operating OS 5-11. And we’re going to get that phone into airplane mode and connect it or keep it safe from the outside world so no one can do anything nefarious remotely. We want to recommend that that device is fully charged, if possible. And again, this is an exploit that’s used on only unlocked Android phones. So, it mentions here, to downgrade the applications we’ve got to disable our screen lock by entering that password. And on some Android devices, versions 6-9, it’s going to reboot the device. So no worries there, don’t be alarmed. Just let it do its thing.
Another thing to mention is some applications may be logged out after data extraction. Another thing to mention here is when the device is doing the downgrading, it’s actually going to take the downgraded applications and put them in a folder for you in the event that something goes wrong and you need to replace those. But at the end of the extraction, it’s going to do that for you regardless. So I’ve got a location where I want to save it to, and I’m going to go ahead down here and select ‘Extract data from applications’. And for this particular scenario, I’m going to be using a Sony Xperia as our test device. I’ll go ahead and plug it in.

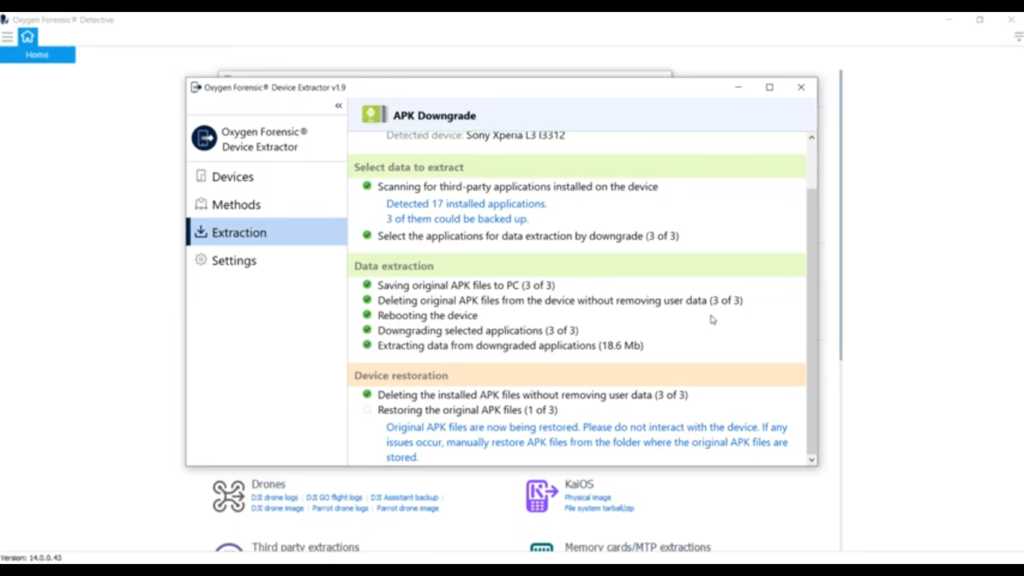
As you can see, Oxygen has picked up the device there, it’s listed as the Sony Xperia L3 l3312, and I’ll go ahead and select ’Start the extraction’. And at this point it’s actually scanning the phone, looking for all the third-party applications and seeing, it’s going to give you a list of what you have, and then also a list of what you can downgrade. So you can see it has detected a total of 17 installed applications, and it says three of them could be backed up.
So here you have a couple of choices. If your investigation allows you and you wanted to do it, you could extract the data from all the applications. In this case, it’s three. Or if you’re, for example, a warrant or any sort of search authorization limits you, to scope, you can select ‘Specific applications’ and do that here. And the three applications that we’re going to get artifacts out of are Viber, Tinder, and Evernote. So what I want to do is I’m going to go ahead and extract the data from all three of these applications. And right now it’s actually saving out those original APK files so it can restore them later.
Once it saves them out, it will delete them and it’ll delete it in a way that doesn’t remove any user data. Now, as the process comes along, it actually is going to go ahead and reboot the device, which is totally fine. Just pay attention to what’s going on with all the prompts. It’ll tell us here, ‘After the reboot please unlock the device and confirm USB debugging authorization’, which we know is good, we’ve already set that up. And right now it’s simply just waiting to reboot and you can see it’s picked up the device has rebooted. I’m going to verify that it’s completely rebooted and I’ll go ahead and hit ‘Continue’.
And right now it’s going through and actually downgrading these three applications to pull out the data that we’re after. An important note here is do not interact with the device until the backing up starts. So once it actually goes through and starts the backup, it’ll prompt you on your device that, “Hey, I need to do a backup here.” So we’ll wait for that to happen. So it’s telling us now, ‘Go ahead and please unlock the device and make sure that it operates’, which it does, everything’s good to go. I’m going to select ‘Continue’. And this is where on the device will actually pop up the screen for backup.
Now, if your device requires a password to backup, Detective is going to instruct you right here to go ahead and put in the backup password of ‘1234’, if required. My particular phone does not require it, so I’ll just go ahead and hit ‘Backup my data’. But if yours did, you would have to go ahead. If it required a password, you can put that ‘1234’, and we’ll enter that when we bring it into Detective, bring the extraction in. Looks like it’s successfully completed the application extraction from those three apps. We have a total of 18.6 megabytes of data.
Now it’s reversing the whole process, it’s going through and deleting those, rolled back those downgraded APKs without removing the user data, and it’s going to restore the original APKs back onto the device. And it’s important here not to mess with the device. It says, “Please do not interact with the device. If any issues occur, you can actually manually restore these APK files from the folders where they’re saved next to your extraction.”
I just like to point out as well, as you can see it just finished, but if you are downgrading a large number of applications, this could be a very time-consuming process, just FYI, because some of those APK files are quite large and it’s having to copy back and forth. So as you can see, our extraction is complete. It gives us sort of a summary here, tells us the device type, which was at Sony Xperia L3, APK Downgrade extraction success, extraction was a success, it was able to restore those APK files successfully, gives us our elapsed time, which is six minutes, and the extracted size of the data. And what we can do here, I just want to point this out to you, I’m going to show you the extracted data.
And if you take a look right here, this is our extraction, and you’ll notice a folder: original_apk. And in that folder are those original APK files like I had been mentioning. This is where they sit. If you have to do some sort of manual re-install it automatically saves these here for you as part of your extraction.
Now that our extraction is complete, we’ll go ahead and open it in Oxygen and import as such. You can see, I already have the extraction pulled over here. I went ahead and opened it up. And just to point out a couple of things, this is a backup method, similar to ADB, but it’s very targeted and it’s to specific third-party applications. So, I also have an ADB backup of the same phone here. And I just wanted to show you a couple of the key differences between the two extractions.
So the Android ADB backup tries to get a little bit of everything for you here. However, it’s not the best method and it will not pull a lot. If you can see, it did pull four applications: FreeFlight Pro, Instagram and some WhatsApp data. It did miss a lot of other things. As I mentioned, there are 17 applications on here, and we were specifically interested in three of them. So, I’ll go ahead and come down here to my APK extraction, which is under the Sony Xperia, lives under that. And you can see here are the three applications that we pulled out: Evernote, Tinder, and Viber. And it’s pretty comprehensive in what it pulls from these applications. Let me go ahead and show you, we’ll go ahead and scroll down here and take a look at Evernote.
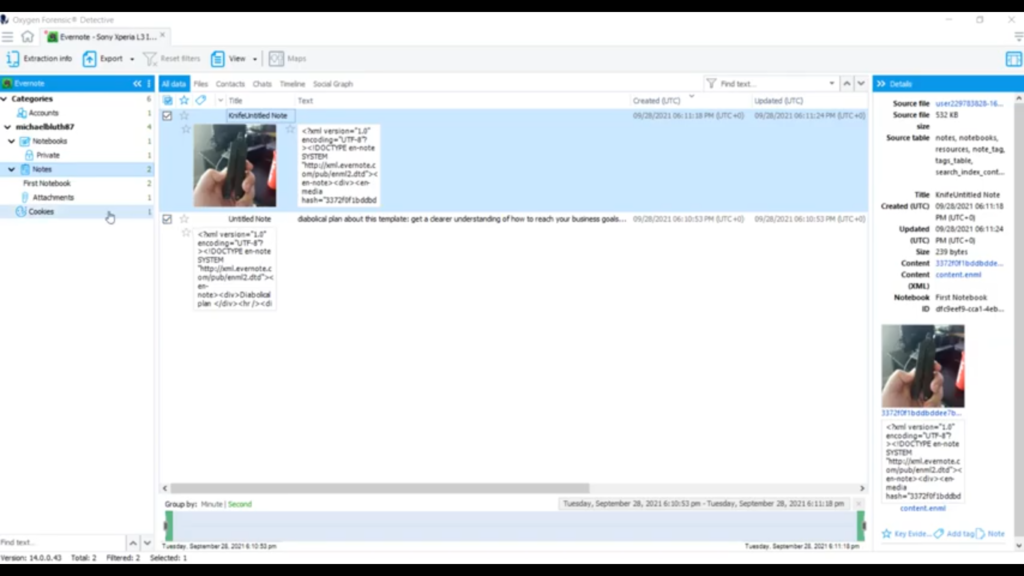
If we take a quick look at some of these artifacts, you can see it has some of my notes that I’ve created, my account information is under there, which is very handy, any attachments I’ve added to the note. If we take a quick look at Tinder, you’re going to get much of the same information, account information and photos, if there were any chats it would pull that. And for Viber any calls, contacts, chats, and et cetera. So you can see that the APK Downgrade method does have a lot of value in it. We were able to pull some of these applications out that weren’t originally parsed in the ADB backup. And this is just one tool in your tool set.
So we’ve gone over both ADB and the APK Downgrade, but look what you have now, you have these two extractions from the same device. Let’s say I wanted to put those together, maybe merge the two. Let’s take a look at that real quick. I control, I control, I’m going to right click and I’m going to select ‘Merge these two extractions’. I’m going to get the best of both extractions and put them into one extraction. I’m gonna go ahead and hit ‘Create a merged extraction’, let Oxygen do its thing, merge those two extractions, Oxygen’s all done. And look at that, we got a merged extraction. And if you want to learn more about that, tune into a later knowledge nugget. For more information about Oxygen Forensic Detective, or other training opportunities, please contact us at Oxygen Forensics.