Image and video authenticity verification is one of the most prominent challenges nowadays in digital forensics. The rapid proliferation of all sorts of image manipulation software, together with the increasing popularity of deepfakes, make it so that seeing is no longer believing. This is especially true for contents found on the web and, even more, on social media platforms. It is extremely hard to establish the trustworthiness of a random social media user, and to do so in a timely fashion.
Researchers have worked hard in the last twenty years to create image forgery detection tools. You can find hundreds of papers about tampering localization, cut-and-paste attack detection, copy-move detection, and so on [Korus17]. Most of the existing tools, however, share a common drawback: they work nicely if you feed them with a “freshly tampered” image – for example, a version recently saved in Photoshop. But if you take the hoax and upload it to, say, Twitter, and then analyze the shared version, performance drops [Verdoliva20] significantly.
Why is that? It is because social media sites process images during upload: most of the time, they scale them down and recompress quite aggressively [Giudice17]. This simple ‘size reduction’ processing turns out to be an amazingly effective counter-forensic technique: most traces of tampering will become undetectable. And so, what can we do if we are tasked with analyzing a picture coming from social media? Well, there is some good news.
The first piece of good news is that researchers developed a class of algorithms falling under the class of Geometrical and Physical analysis. Instead of looking for anomalies in pixel statistics, noise levels, compression artifacts, etc., these algorithms let you check the coherence of geometrical features, such as proportions, perspective and shadows. Quite intuitively, these kind of features are way less affected by downscaling and recompression, and they are our best ally when working on “laundered” images.
The second piece of good news is that, since Rev 17658, Amped Authenticate features the most powerful geometrical technique: Shadows analysis. Just a few lines in case you have never heard of Amped Authenticate: it was born to make the most powerful forgery detection algorithms easily accessible in a single forensic tool, which comes with all sorts of reporting features. With more than 40 filters and tools, Authenticate is the most complete and comprehensive suite on the market in years. So, let’s dig into the wonders of shadows analysis with it!
Let’s say we were given this image and asked to check for manipulations (the image is part of the Realistic Tampering Dataset [Korus16], kindly made available by Prof. Pawel Korus on the web).

At a first look, the two red-dressed dancers are suspiciously similar. However, the forgery is well made, and the image comes in the TIFF format, which rules out all JPEG-based analysis tools.
The image does have a nice property though: it contains lots of shadows originating from sunlight. These are the ideal conditions for the shadow analysis tool. The shadow analysis tool allows us to check the consistency of shadows in the image under one main hypothesis: there is a single, point-wise light source. It could be the sun, but it could also be a single lamp in a room.
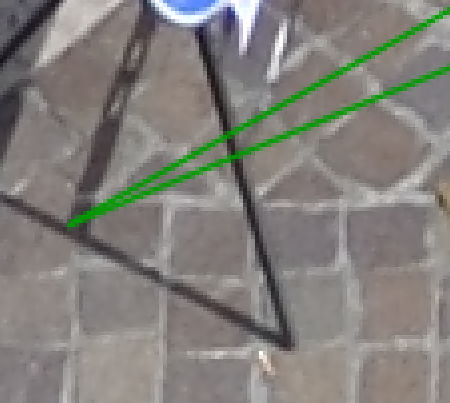
The idea is that, if we connect a point on a shadow to the corresponding point on the object, we will get a line over which the light should lie, as in the example shown below.

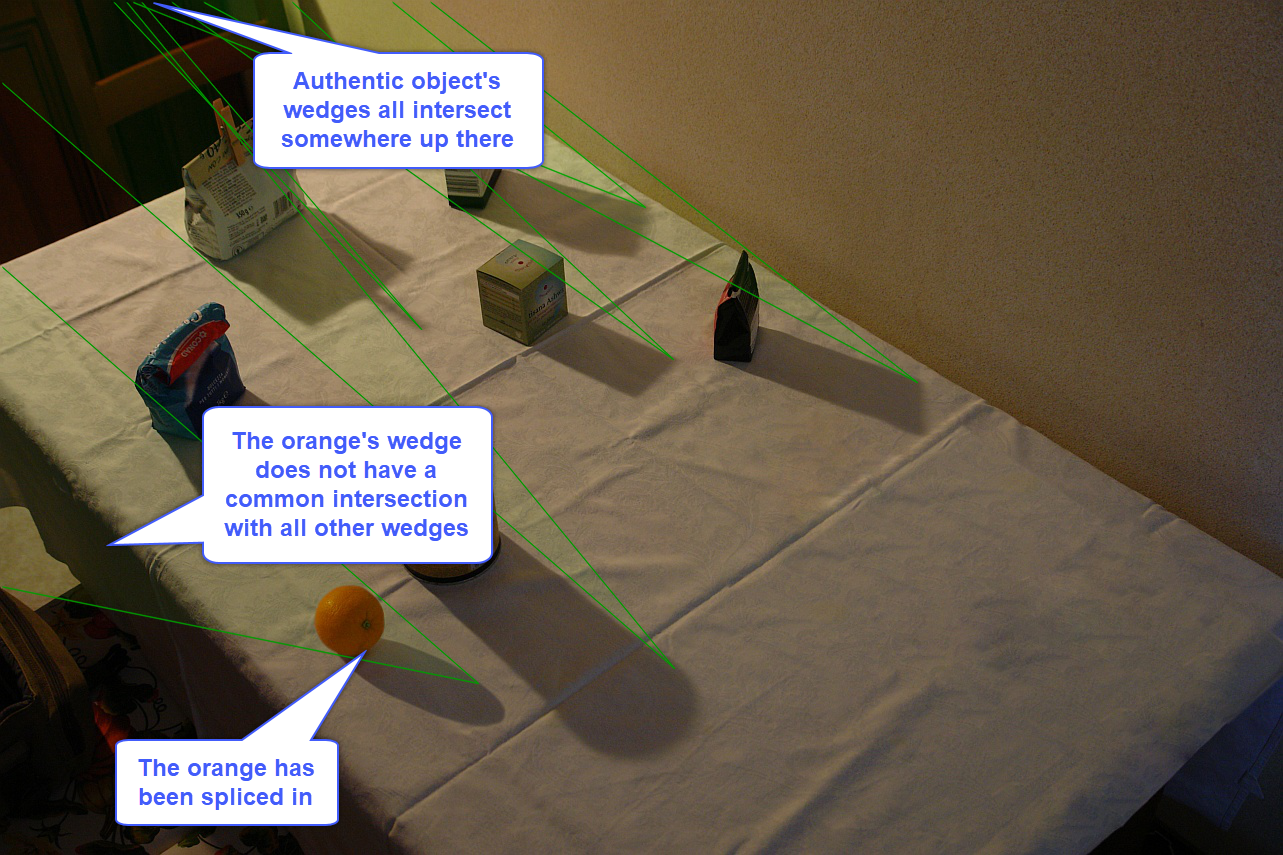
However, it is often hard to understand which exact point of an object is responsible for a specific point on the cast shadow. For this reason, researchers came up with a much more user-friendly idea [Kee14]: instead of asking users to connect point to point, we can let them click on a point on the shadow and then draw a range over the object, which contains the shadow’s corresponding point. This way, the user defines a wedge, instead of a line, with each selection. If everything is consistent, then all wedges will have a common intersection area which contains the (projection on the image plane of the) light source, as shown in the image below.

Instead, if one of the selected shadows is not consistent because it is fake, then its wedge will hopefully make the system unfeasible, meaning that no common region exists anymore.
Clever, isn’t it? Now let’s see how all of this can be accomplished with Amped Authenticate, using the image at the beginning of this article as a test case! The Shadows tool is available under the Geometric filter category. Let’s click on it and drag the image into the filter.

On the right side, you see the input and output controls of the filter. As you see, we have two tables, one called Adding Cast Shadow Constraints and one called Adding Attached Shadow Constraints. Let’s focus on the first one, which is selected by default. We can start clicking on one point on a shadow (1 in the figure below), and then on the two points over the casting object that contain the shadow-originating element (2) and (3):

After clicking, we can still adjust the wedge orientation by moving the mouse or give a final left-click to confirm and save it. The wedge is now stored in the input table and we’re ready for introducing a new one.
Now, time for a bit of thinking. When adding edges, what we aim to do is make the feasible region (the intersection of all wedges) smaller and smaller. So, we should prefer those objects/shadows that allow us to draw narrow wedges. The traffic sign is a good example for the image at hand:
We keep adding constraints until we reach this situation.

Now, let’s focus on the bottom-right controls.
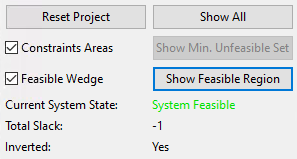
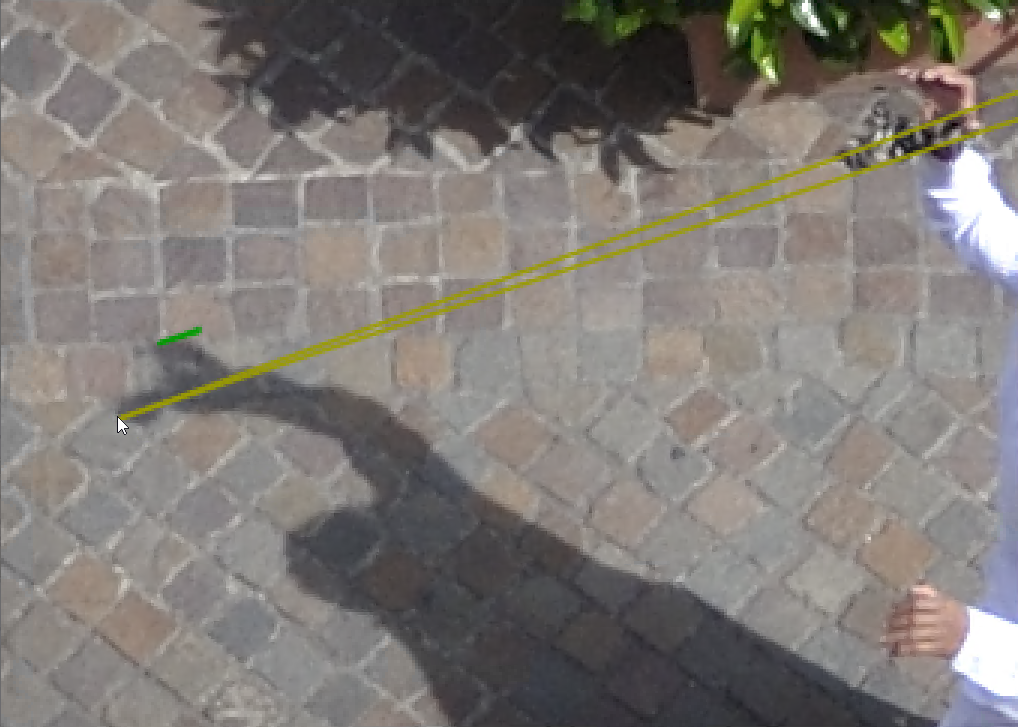
The Constraint Areas checkbox (which is off by default) determines whether we want to show all the selected green wedges, or we want them to be hidden for keeping the image “cleaner” during our work. The Feasible Wedge checkbox, instead, determines whether we want Authenticate to show a yellow wedge that automatically shows, for our mouse’s position, which is the projection of the currently feasible area to that point, as shown below:
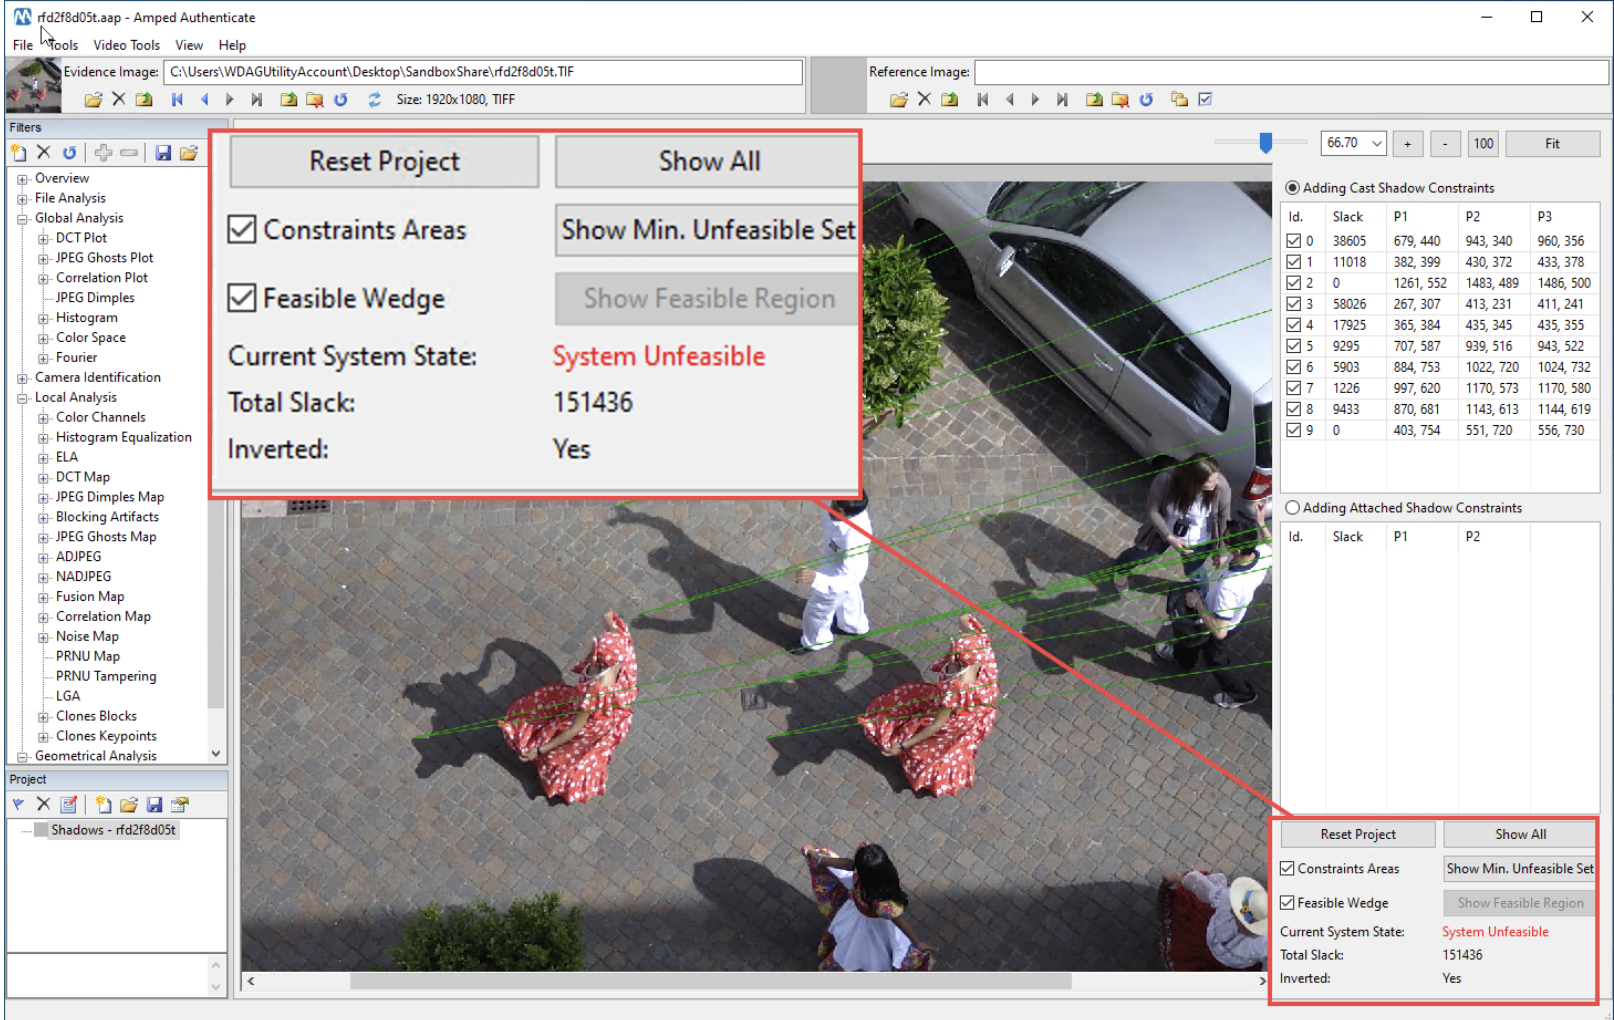
The Show Feasible Region button allows showing where the intersection of all current wedges is located, even when it’s outside of the image. Let’s try it in our case:

Quite surprisingly, the feasible region is not in the direction of the sun, it’s on the other side. This is not an error. When you create a wedge, the Shadows tool also creates its inverted version, and looks for intersections on both sides.
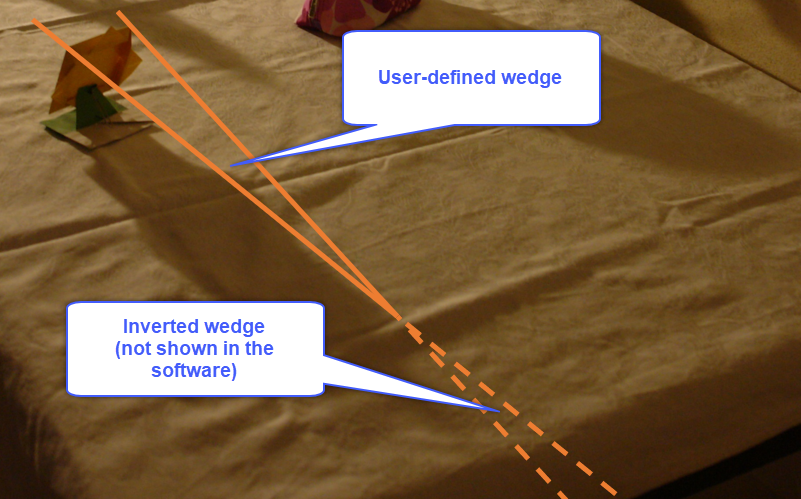
When the intersection is found in inverted wedges, the bottom text of the panel reads “Inverted: Yes”. This does not have any implication for the authenticity of the image!
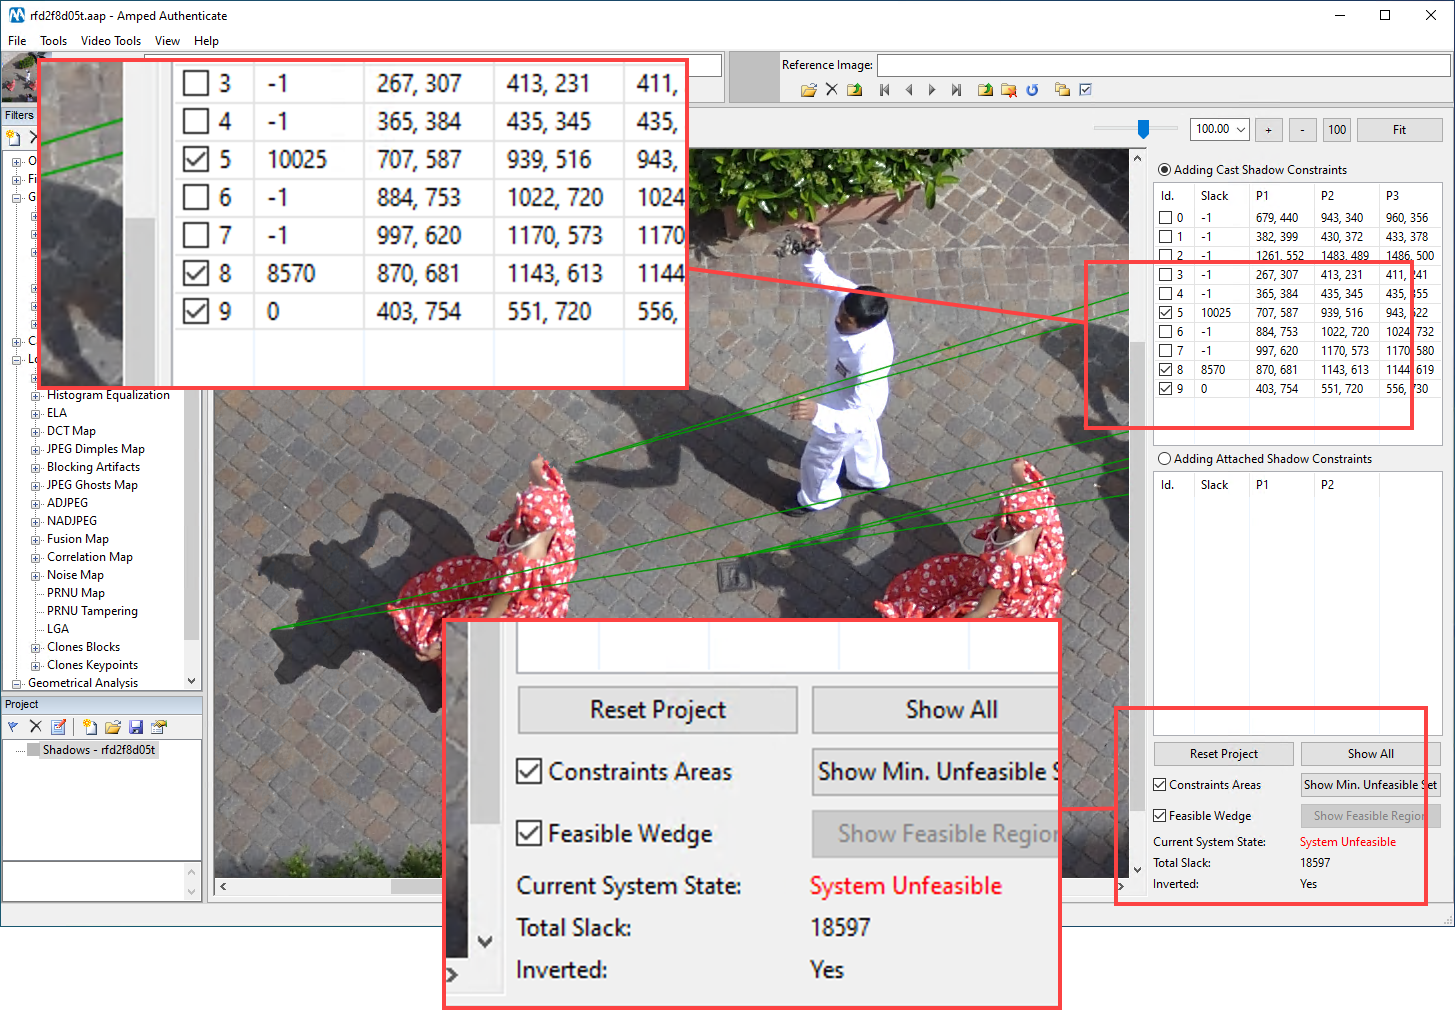
Okay, now let’s add some more constraints for the rightmost red-dressed dancer: the system is still in a feasible state.

Let’s do the same for the left dancer and… bingo! The system becomes unfeasible.

Of course, the Shadows tool cannot know which one(s) of the constraints belongs to the fake object. It simply tells that all those constraints are not consistent with each other. And since we have selected 10 constraints, it would be hard to identify the most suspicious one. Luckily, the Shadows tool helps us once more with its Show Min. Unfeasible Set button. By clicking there, we let the tool search for a smaller subset of constraints that are unfeasible (usually, three of four are sufficient). Here is an example where three constraints alone belong to an unfeasible system.
Of course, there are normally several combinations which bring us to an unfeasible set. By switching between Show All and Show Min. Unfeasible Set multiple times, we can explore several of them, as demonstrated below.
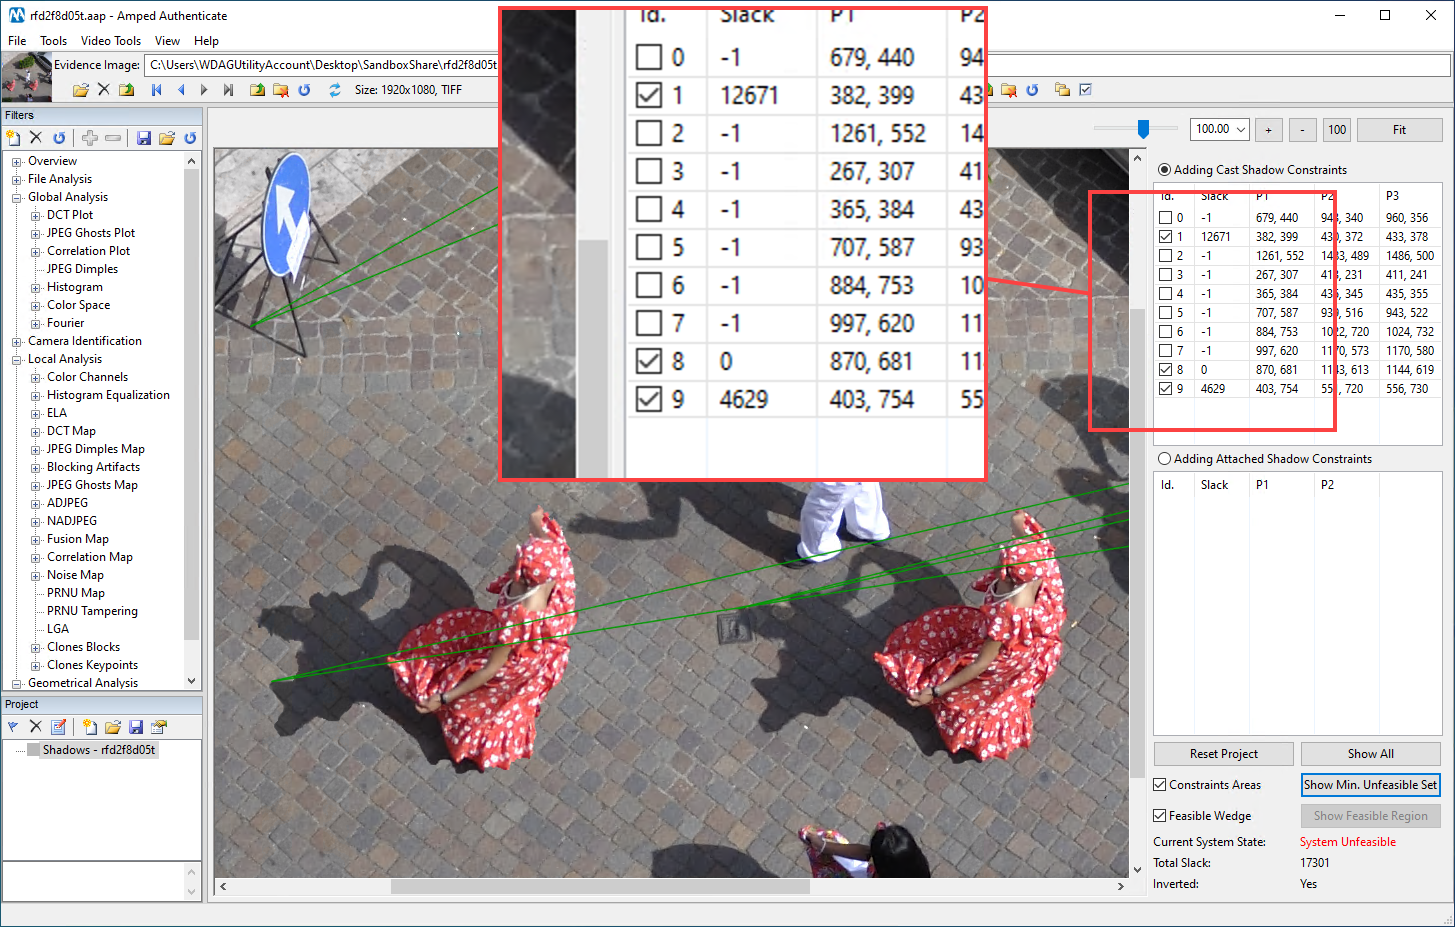
The idea is that the constraint related to the fake object will appear in all of them. After a few attempts, it will become quite evident that the leftmost red-dressed dancer is the fake object here.
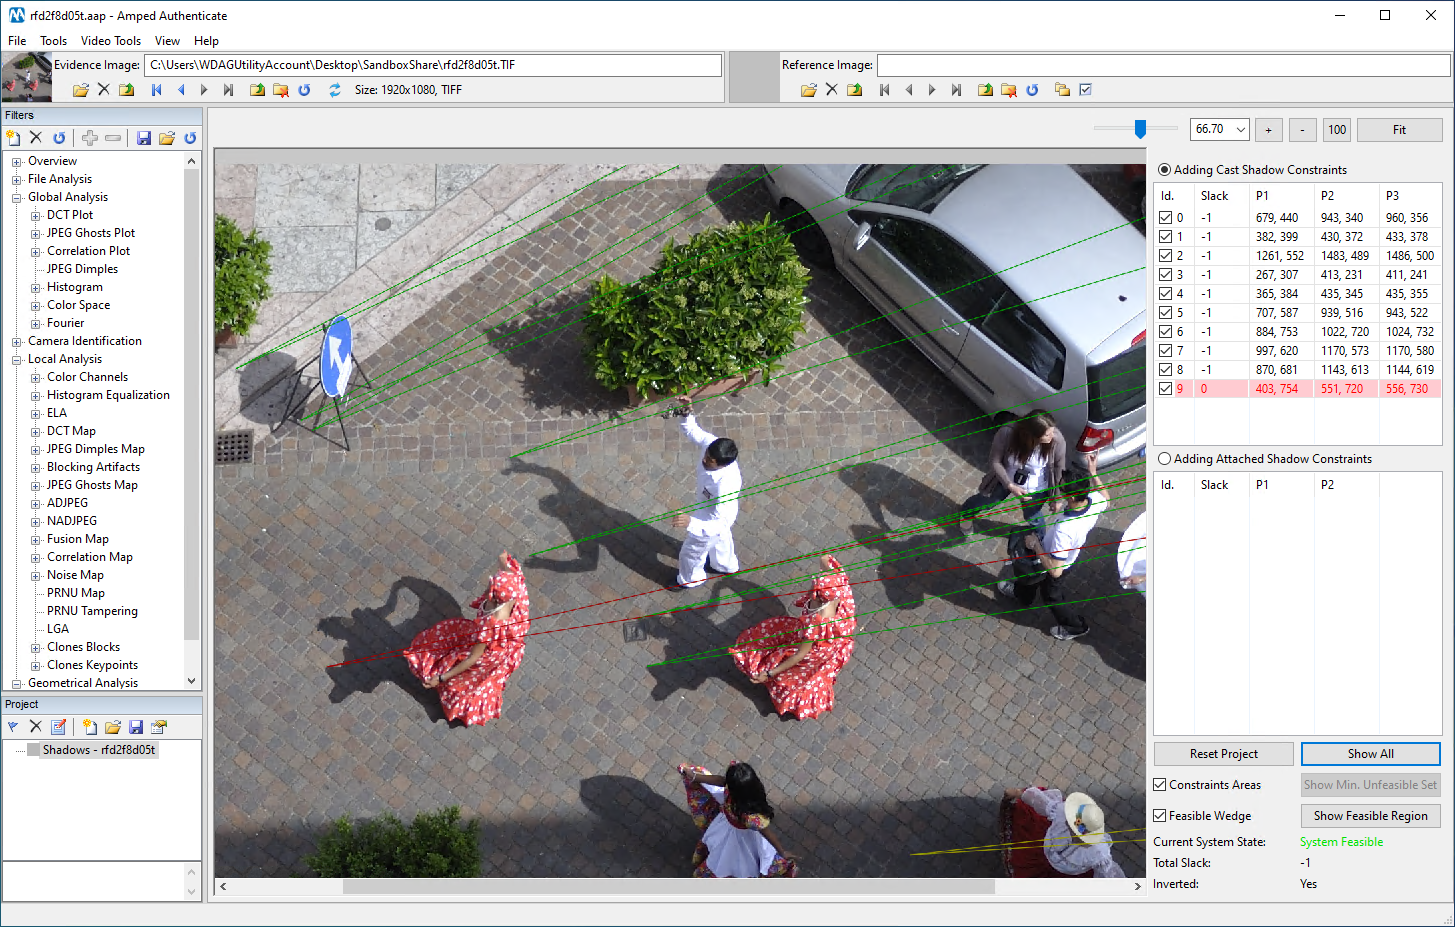
We can thus right click on her constraint and mark it as Inconsistent:

That way, it will be marked in red over the image and excluded from the calculation: the system becomes feasible again.
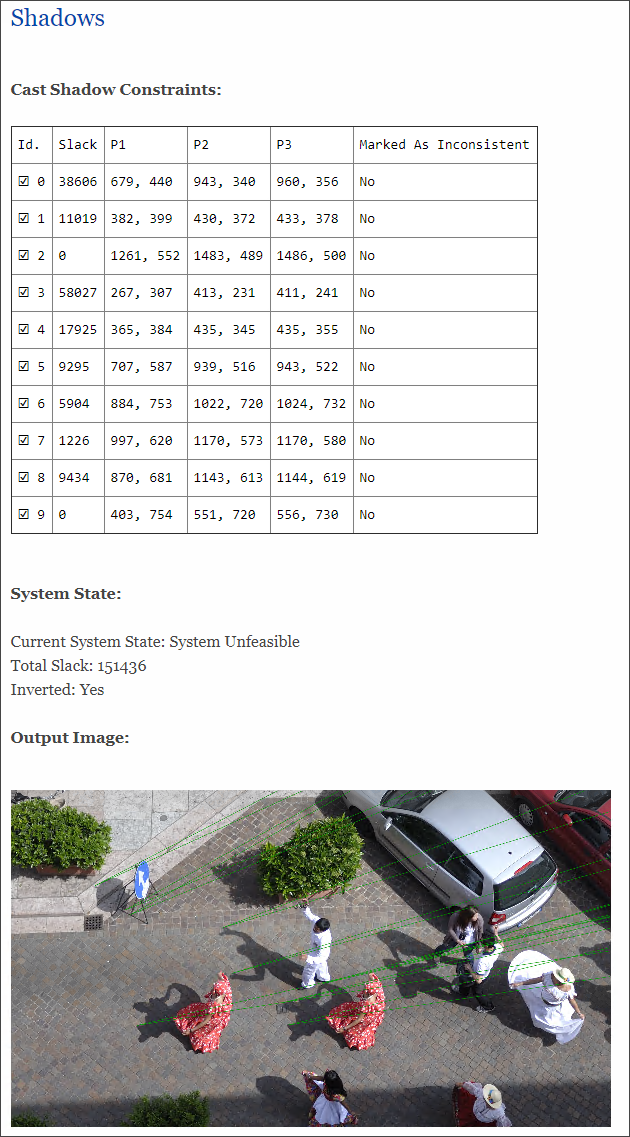
We can now export the picture by clicking on File -> Save Result As, or we can add a bookmark to the Authenticate project panel to have everything included in the final report, as shown below.
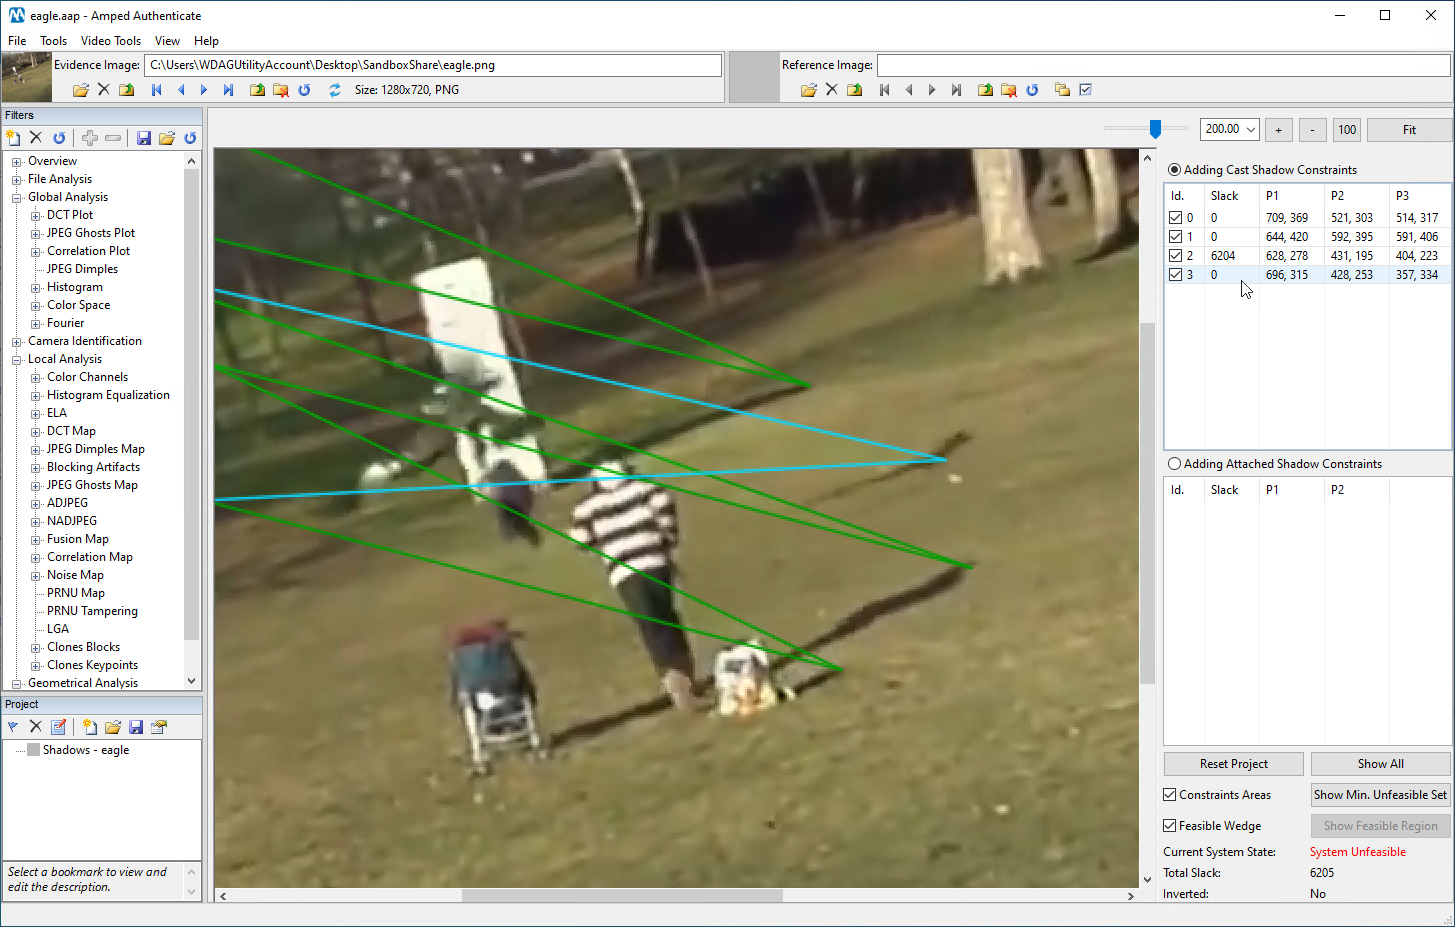
This was a high quality image, but what if we had a lower quality one? Well, let’s try on a video, and a poor resolution one. Do you remember this YouTube video that went viral a few years ago?
If we take a frame and analyze the shadows, it emerges that the eagle is likely fake! You would hardly be able to prove that using common, pixel- or container-based image forensic algorithms.
And that is all! We have shown the potential of shadows analysis and how it can be carried out using Amped Authenticate’s Shadows tool. Most noticeably, being based on geometrical features, shadow analysis is not affected by many “laundering” operations such as re-compression, downscaling, printing, scanning and recapturing. It proves also extremely useful for video authenticity verification: it is very hard to create a fake video and get the shadows right for each and every frame!
Bibliography
[Giudice17] Giudice, Oliver, Antonino Paratore, Marco Moltisanti, and Sebastiano Battiato. “A classification engine for image ballistics of social data.” In International Conference on Image Analysis and Processing, pp. 625-636. Springer, Cham, 2017. [Kee14] Kee, Eric, James F. O’brien, and Hany Farid. “Exposing Photo Manipulation from Shading and Shadows.” ACM Trans. Graph. 33, no. 5 (2014): 165-1. [Korus17] Korus, Paweł. “Digital image integrity–a survey of protection and verification techniques.” Digital Signal Processing 71 (2017): 1-26. [Korus16] Korus, Paweł, and Jiwu Huang. “Multi-scale analysis strategies in PRNU-based tampering localization.” IEEE Transactions on Information Forensics and Security 12, no. 4 (2016): 809-824. [Verdoliva20] Verdoliva, Luisa. “Media forensics and deepfakes: an overview.” IEEE Journal of Selected Topics in Signal Processing 14, no. 5 (2020): 910-932.