Join the forum discussion here.
View the webinar on YouTube here.
Read a full transcript of the webinar here.Transcript
Ashley: Hello. My name is Ashley Hernandez and I’m the Product Manager at BlackBag. And I’m excited today to introduce our speaker, Dr. Joe Sylve. And he’s going to be talking about the importance of APFS snapshots. So, I’m going to go ahead and hand it over to you, Joe.
Joe: Thank you, Ashley. As Ashley said, my name is Dr. Joe Sylve, I’m the Director of Research and Development at BlackBag Technologies.
And as you may know, one of the recent developments our team has come up with is support for processing Apple’s new APFS file system. We’ve got very good support, and today we’re going to talk about the next phase of that support, which is APFS snapshots.
We’ll talk a little bit … I’ll give a quick introduction about existing backup systems and how they compare, and we’ll talk a little bit about why we want to analyze backup systems in the first place. And then we’ll go into a little bit of detail about APFS snapshots and how to analyze them. And then, kind of a mid- to high-level overview of how APFS implements snapshots under the hood.
The first backup solution we’ll talk about is Time Machine. Time Machine has been around for quite some time. It was first introduced in OSX 10.5 and it provides incremental backups of files, so that you can restore them later.
Unlike the other backup solutions that we’ll talk about today, Time Machine is primarily used to back up files from the local volume to another volume, either an external disk or a network-connected drive. Because HFS has no built-in support for backups at the file system layer, Time Machine was created to work and do backups at the logical file level. And because it works at the file layer, it’s pretty much file system-agnostic, so HFS+ and APFS, anything on your … any of the major file systems on OSX.
So, how does this work? Like I said, it happens at the logical file level. So, basically, every time you run a Time Machine backup, a new directory structure is created – and I’ll show that on the next slide – which basically recreates the entire directory structure of the current disk. But every single file is not copied because that would be wasteful and take a lot of time. If you have duplicate files or directories that have completely been unchanged, the new backup is simply deduplicated using [hard links] against the existing file on the backup medium.
If we look at a Time Machine backup, this is sort of what you’ll see. The top-level directory is going to be the machine’s name itself, and that’s because you can actually backup multiple machines to the same storage media. And then, for every time there’s a backup, there will be next-level directory, named with the date and the time of the backup itself. And then you’ll basically see you have the entire structure of the file system. And whether those files or folders are [hard links] or not is pretty much irrelevant.
But we’ll see here is … for this example, two different backups, one of which gives you the documents of the backup from March 30. And you can see that there’s only, simply only one file or folder in there, I’ve called it the BlackLight case, which is about 4 gigs. And you can see in the next backup, which happened about a week or two later, you can see that there are more files in the same directory. So, at this point, you can go and restore content, at any [04:13] [point] of those times that the backup was taken.
If you want to get a quick look at the different backups that are on the system, you can run this tmutil utility, and using the command tmutil, list backups. And you’ll go ahead and you’ll get an easy list of all backups here.
The next backup solution we’re going to talk about is the backup solution that’s been built into Windows for quite some time. It’s called Volume Shadow Copies. This was introduced first in Windows XP Service Pack 2. And it provides logical backups of volumes even when these volumes are in use.
Again, NTFS has no built-in support for backups at the file system later, so the volume shadow service was created and implements backups at the logical volume layer. And because it happens at the volume layer, again, it’s pretty file system-agnostic, so it’s going to work on all your Windows file systems, NTFS and ReFS.
A little bit about how this service works. Basically, all your allocated volume sectors are going to be copied to unused sectors on that same disk. So, you’re not usually using this to back up a disk to another disk, you’re using it to back up a disk – the same disk. So, this is not going to be for fault tolerance, it’s more of … [write] a volume shadow copy before you’re doing an update or something else that you might want to go back and roll back the entire file system.
In this way, only changed sectors need to be copied, and what they’ll do is if you change a sector, it’ll be copied somewhere else on disk, and then there’s some metadata that’s stored, that records the mapping of where that sector logically should be. So, in this way, you can re-mount a volume’s shadow copy volume, and the volume layer itself will go ahead and pretend that those sectors are where they should be, and give you a view that looks just like a volume.
You can also list the volume’s shadow copies here using the vssadmin command – that’s just [“vssadmin list shadows”]. And if you notice here, both of these shadow copy volumes have a path here. And this path, you can actually use that path to image the volume’s shadow copy volume, and what you’ll get is an image that looks like the volume at the time of that volume’s shadow copy. And then you can bring that image into any one of your tools and analyze it even if your tool doesn’t support volume shadow copies [themselves].
When Mac OS rolled out its support for the APFS file system, the file system was actually designed with built-in support for backups. So, now we don’t have to back up at the file level, we don’t have to back up at a lower level, at the volume level. The file system itself handles the backups. And that comes with some performance benefits and some space-saving cost.
The snapshots are actually very easy to implement in APFS, because APFS, as we talked about in our last presentation, is actually a copy-on-write file system, meaning any time that you change an object in the file system, rather than actually changing the object itself on the disk, another object will be created, and then all other objects are just going to point to this new object.
By doing that, usually, the older object is now free to be overwritten, but with snapshots, if you have a snapshot of that object, the object sticks around and is still counted as allocated. That way, it cannot be overwritten, and we can restore the state of the file system at any time. We’ll talk a little bit more about the specifics of how this works in the future.
And just like volume shadow copies, with APFS you can mount snapshots as read-only volumes, which will give you a volume that’s an exact copy of the file system’s state at the time that the snapshot was taken.
To see which snapshots are on this system, you can run this tmutil command – it’s “tmutil list local snapshots”. And then you have to give it the volume name that you want to give the snapshots for. Because snapshots are volume-specific in APFS. So, if you have multiple APFS volumes on the same disk, they’re going to have different sets of snapshots. So, in this case, I’m doing “tmutil list local snapshots” and just giving it the root directory, so I can get all the list of the snapshots there, that are creating. And you can see the snapshots are named and they also have an associated timestamp, and based off of this pattern, you can see that a snapshot here is being taken approximately every hour.
Why do we care about backups in the first place? Well, a backup is a historical state and time of the file system, so it’s recording something that happens in the past. And as forensic analysts, what we’re trying to do is we’re trying to re-put together and recover things that happened some time in the past, even far in the past. This allows us to quickly locate files that maybe have been deleted or are no longer on the active disk, without using recovering techniques like file carving, which may take some time and which will remove metadata. In most cases, with our backup systems, we’ll be able to recover all of the file system metadata, just as if it were the current state of the file system.
By doing differential analysis over our different points-in-time backups, we can see how the file system has changed over time, and maybe if a suspect has been changing files and actively trying to delete files or cover things up. A couple of scenarios we talk about in our training – one of the scenarios they use, where we have a disk image that, if you just did analysis on the local disk itself, you would not be able to find any sort of iTunes backups which might have an iPhone backup on it. However, if you process the volume’s shadow copies in BlackLight, one of the volume’s shadow copies itself has a version of an iTunes backup in there, which you’re able to parse and bring in and get all the text messages and everything from the phone. And this is just because the iTunes database existed at some point in time, the user updated the machine, a volume shadow copy was created without their knowledge, and then they went ahead and later tried to delete the backup off their system. So, it wasn’t available in the active snapshot, but it was available in the old volume shadow copy.
Scenario two we talk about – it’s not uncommon for a suspect that, when they’re in the process of being raided by law enforcement, if they have access to their computer, they might go through it and try to mass delete files in an effort to destroy data. So, we can imagine a scenario here where that might happen on a Mac system that’s running APFS, and maybe they had backups turned on but they pulled the disk and the backup disk is encrypted. But the snapshots might still exist, and the snapshots might still exist … we’re still able to see all our files that they had deleted.
With that being said, are there any questions about this general overview?
Ashley: Hi Joe. I do have a couple of questions. The first question was: Does Apple tell the user that these snapshots are being created?
Joe: No, actually. This happens pretty silently. We’ll talk a little bit about when they’re created in the next selection and under which conditions. But there’s really nothing in the UI that tells you a snapshot is being created. So, when you’re analyzing your images, you might find that you have images that have snapshots on them right now that you aren’t aware of.
Ashley: Alright. And then, “Is there a log to show what files are in the snapshot?” is another question.
Joe: There are not. There is not, because this doesn’t happen like … a Time Machine, for instance, happens at the file level. So, you can set exclusions and say, “Hey, only back up these files and don’t back up these other files.” APFS snapshots are actually instant – and we’ll talk about how that works coming up later in the presentation. But it’s the entire file system at that time. So, [enable to …] to know which files have changed between the current active and past snapshot, currently you’d have to go through and parse the file system at the time of the snapshot and do some differential analysis. So, that’s not really an easy log.
But we have some ways in our tool in BlackLight that makes this a little bit easier for you, so you can quickly point out what are the change files. But that’s not recorded – as far as we’ve found so far, it’s not recorded at the file system layer.
Ashley: Okay. And I have a person who wants a clarification. If a user deletes a file, it does not automatically get deleted from the snapshot, correct?
Joe: Correct. The snapshots are basically immutable. You create a snapshot, the file system will preserve the file system data, it will preserve your file system metadata at the time of that snapshot. So, if you delete a file and you don’t delete the snapshot, or if the snapshot is not automatically deleted – we’ll talk about which conditions that happens as well – that data will stay there.
Ashley: Great. And one last question before we move on to the next section. Are FS events still being used for Time Machine [services] on APFS volumes?
Joe: Well, FS events are still used on APFS. Time Machine works on APFS identically as it does on HFS+. Time Machine still exists. Again, Time Machine’s primary use here is to back up to external storage media, whereas snapshot is just going to retain the state on the same storage media. So, Time Machine is more for archival fault tolerance, if your disk dies, now you have a copy of your backup. Snapshots are intended to basically be used to be able to roll back the system to a state in time. So yes, Time Machine is recently unchanged with APFS, in respect to HFS+.
Ashley: Great. Thank you. I think that’s the questions for this section.
Joe: Great. So, we’ll move on.
Next, we’ll talk about how can we analyze these APFS snapshots, both on the live system and do offline analysis with a disk image. Before we get into that, we’ll talk about whatever I hinted at in the questions section – a little bit about the behavior.
If a user has Time Machine enabled on the system, whether or not the backup disk is actually plugged into the system itself, the APFS snapshots are automatically enabled and will happen approximately hourly. So, snapshots are created approximately every hour or before each Time Machine backup.
So, if you manually trigger Time Machine backup, it’s actually going to manually trigger a snapshot before that backup happens. Also, before certain system updates, a snapshot will be created. Our research suggested this might even happen if you do not have Time Machine enabled. So, remember, these hourly snapshots only happen when you have Time Machine enabled.
And my intuition there is that it’s a side effect of having Time Machine being enabled, because the system tries to do a snapshot every time Time Machine tries a backup, and maybe Time Machine does a query every hour or so.
But even if Time Machine is not enabled, you may still see snapshots that happen before a major system update. And that’s probably more if the update itself fails, that gives the operating system a way to roll back. But because all files in the file systems are preserved in the snapshot, not just the files that are currently, actively being updated, we still have a state, point in time, from that snapshot.
Unfortunately, the lifetime of snapshots are limited. Volume shadow copies on Windows tend to stick around for as long as you have disk space. Snapshots are way limited. The lifetime itself depends on a number of factors, but generally, a good rule of thumb is that they’ll stick around for about 24 hours. They may be deleted sooner if you have lower disk space and they may stick around longer if your Time Machine backups have been unsuccessful. But there’s some complex formula there that decides how aggressively these things should be deleted based off a number of factors. But in general, you can think that maybe if Time Machine is enabled, you’ll get a snapshot every hour, and they’ll stick around for about 24 hours.
So, how do we analyze these? On a live system, I’ve already mentioned that tmutil utility can be used to list local snapshots. There’s also the diskutil utility that you can use to list snapshots, and it pretty much gives you identical information. So, it’s just [diskutil apfs snapshots], and then you give it the volume. But the only additional information you get by using diskutil is you’ll get something that’s called an XID that’s associated with this backup. And from it, an analysis perspective, that XID probably won’t be too relevant. But it’s very relevant when understanding how snapshots work under the hood, and we’ll talk about that at the end of the presentation.
So, either way, what you want to do is run either one of these commands, then get a list of the snapshots, and what you’re going to need for the next step here is just the name of the snapshot.
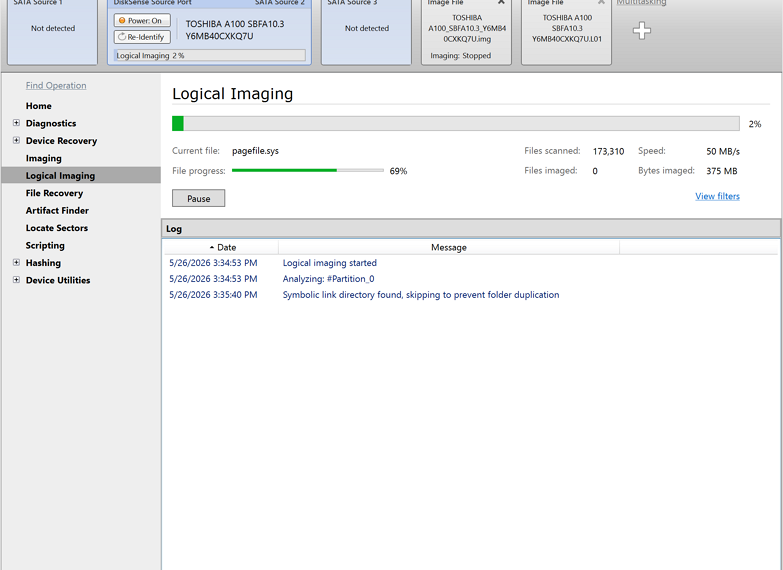
To analyze these on a live system, you can use the mount_apfs command. And you’re going to have to have root privileges here, so your account needs to be in the [18:42] group. So, you would run [pseudo mount_apfs] and then dash s, which says you want to mount a specific snapshot. Then you give the name of the snapshot, the volume which is associated with the snapshot – so again, if it’s the main directory, just a slash – and then the mount point, which is just a directory of where you’re going to mount this snapshot. And at this point, mounted snapshots work exactly like any other mounted file system, with the exception that they’re read-only of course. And you can analyze them with any tools of your choice that can analyze logical files on the disk – strings, [19:16], what have you. And we have an example here on the right-hand side, where I’m mounting a snapshot from July 7th, and I’m mounting it in a volume [slash] snapshot directory. And then, you can just list that directory, you can use any tool you like.
That’s how you analyze these things on a live system if you don’t have any tools on hand. How do we do it in offline?
Well, currently, we’re not aware of any tools that support this, but with our upcoming version of BlackLight 2018 R3, you’ll be able to analyze snapshots, just as you were able to analyze volume shadow copies in the current version of BlackLight. So, you’ll bring in your image and you’ll get the familiar Add Evidence screen that you always see here in BlackLight, and you can select which APFS volume you would like to process. If you’d like to process the snapshot, you click on our Advanced options, click the little button next to it. You’ll be presented with this window, where you can select the options. You can either select [our] snapshots or, if you want … and that’ll go ahead and automatically parse all of them. But if you want to see and parse specific snapshots, click on the little button next to it.
And all of this, everything that I’m saying, is also true for volume shadow copies on Windows. In BlackLight 2018 R3, volume shadow copies and APFS snapshots work identically to one another.
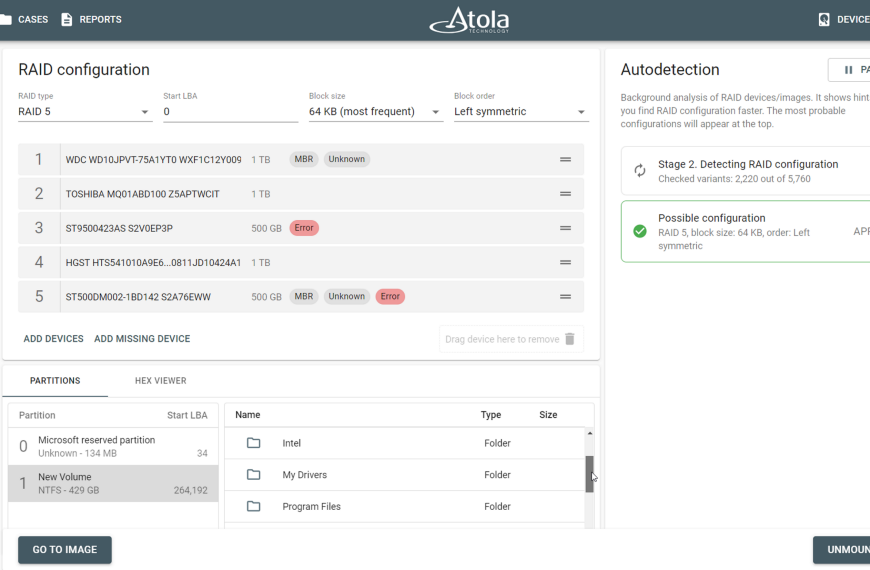
When listing here … this is the window that [you’d get it – you click next to] that button and it’ll just list all the different snapshots, so you can select which snapshots you’d like to process. When you click OK and you start processing it, you’re going to see a window like this. What’s happening here is you’re going to see several different partitions. It’d be like if you brought in multiple volumes to process, but you’re going to get the active volume itself and the snapshots. And if you hover over the snapshots on the left-hand side here, you’ll be able to see the date that the snapshot’s coming – if you need a reminder.
Then you’ll notice something that’s new with BlackLight 2018 R2, is each of the volumes here have checkboxes next to them. So, you can select a checkbox of which volume or volumes that you want to analyze, because BlackLight 2018 R2 allows you to analyze multiple volumes at the same time, so you can do comparisons against them, which is going to be very powerful.
So, when you select a volume – and in this example, we’re going to select snapshot one, you’ll see that all of the normal BlackLight functionality now becomes available for that snapshot. All of the windows that would work in an active partition are going to work at that snapshot. So, by doing this approach, you’re going to be basically analyzing the system at the state and time of that snapshot. So, all of the views are now active for that snapshot, or volume shadow copy, if you’re doing NTFS.
If you’d like to do some sort of differential analysis, because of the functionality that we’ve added in BlackLight 2018 R2, you can actually select all of the partitions or any subset of them that you like, and go to our file filter view. And our file filter view allows you to filter and only display certain types of files or anything you want – you can build up complex filters. One of the filter that we have built in is to only show files that have changed in the snapshots.
So, in this example, I’ve selected the active partition and I’ve selected both of the snapshots. We’ll go to the file filter view and then I’ll use that ‘only files with changes in a snapshot’ filter built in, and we can see that these are 278 files that have changed across this snapshot. So, these 278 files have different versions between the active partitions in the different snapshots. So, if you’re only interested in what has changed since the last snapshot, this is the screen that allows you to easily see those changes.
We’ve talked about how to process this on a live system, and we’ll talk about how you’ll be able to process this in the next version of BlackLight. Are there any questions about analysis?
Ashley: I have a couple of questions about the storage mechanism for the snapshot. One question is: Is there a particular directory path that these files are stored? Another is: Is the snapshot file able to be moved and mounted to a different computer? I think there were some just asking clarifications about how are these stored on disk and how would I either locate them on disk itself and move them around [23:54].
Joe: These are incredibly relevant questions, and we have … the very next section talks about the APFS snapshot implementation, which will explain all of that. But I will say, to answer the question directly: No, these files are not stored as files on the disk. They’re stored in the file system, at the file system level, but not as logical files. The file system metadata itself is preserved. So, to get the access to these snapshots, you either have to mount it on the live system, or your forensic tool of choice needs to be able to know how to parse these snapshots themselves and give the information for you.
The question was are you able to copy off a snapshot from disk and put it on to another system. No, you’re not, because this is built into … not directly at least, because this is built into the file system metadata itself. That would be like saying, “Can I export half of the files from an MFT to another disk?” Yes, you can do it logically, you can mount the snapshot and then use whatever logical acquisition tool you like to copy these files off and hopefully preserve the metadata, but again, it’s not just like a backup directory like a Time Machine, where you can just copy these files over to another directory. It’s built into the file system itself.
Ashley: Okay, another question is: Do I need to mount all the snapshots when I bring evidence in or can I do it later? Can I do some at a certain point and add them –
[crosstalk]Joe: Yeah, so for acquisition purposes, if you were doing a physical acquisition, not a logical acquisition, and MacQuisition supports imaging the disk and imaging the APFS volume containers, you don’t have to mount anything. You can … even if the disk is encrypted and you have it … you don’t right now have the key, you can just image the disk, and you’ll be able to analyze this offline. If you’re doing logical acquisition and you want to get the files [from the type] of the snapshot, obviously you need to mount the snapshot to get that, because logical acquisition is only going to get the files that it can read from the snapshot itself.
If you’re talking about on the analysis side of the house, you do not need to select the snapshots during evidence ingestion to analyze them. At any time, you can go back and decide, hey, now that I’ve dug around here, I can go back and go ahead and parse this other snapshot, just by clicking on the Advanced tab in our Ingestion window. Hopefully, that [26:38] answers the questions.
Ashley: Yeah. Another question is how many snapshots can you compare at a time, during that kind of differential analysis?
Joe: Currently, I do not believe that that’s limited at all. You can compare as many snapshots as you like. Obviously, the more data that we’re throwing at a system, the longer it might take to be able to do that analysis, because we’re doing somewhat complex SQL queries. But it’s not artificially limited.
Ashley: Okay, and then a couple of questions around a user’s ability to delete snapshots, or also, is there a way someone could feasibly add files to an older snapshot to [forge its content]? So, there’s a couple of questions around are we able to ensure that the snapshot hasn’t changed and [are users] able to modify the snapshots or delete them in any way?
Joe: That’s a very good question. So, again, snapshots will automatically be deleted, and generally, what’ll happen is when a new snapshot is created, we believe that that’s when the analysis is happening, it’ll determine how much file system space do we have, how many of these [27:53] snapshots do we need to retain? If you want to prevent these things from automatically being deleted, we need to do a little bit of more research. There’s no obvious way to turn off this functionality, to keep them from being deleted from the file system itself. We think maybe if you turn off Time Machine, then the snapshots will automatically not be created, so maybe the other ones won’t be deleted, but we haven’t actually done enough research to give a good answer on that yet. But hopefully, look forward to a blog post of that. Because the question was asked yesterday internally, and it’s definitely something I want to dig into.
There is a command – the tmutil command does allow the user, a user with a [28:34] of privileges, to delete snapshots. So, if a user is aware that snapshots exist, they can be deleted. However, existing snapshots themselves are immutable. There is no way for a user to add or remove files selectively from a snapshot. When you mount the snapshot volumes, those volumes are mounted read-only, so you can’t make any changes at that level, even as a [root]. And when the snapshot itself is not mounted, the file system gives you no access to the data at all.
Did that cover all the questions?
Ashley: That covered those ones, and I have one last question. Is there a way to manually create a snapshot, like when you’re seizing a machine, to get a snapshot at that point in time?
Joe: Yes, you can. You can run a tmutil command to create a snapshot. However, I do not currently know of a way to ensure that that snapshot will be retained for the lifetime of the system. Again, it might be deleted in a day, it might be deleted in a week, depending on a number of factors. I do not think the tmutil utility has anything built in to tell the system, “Hey, I want you to retain this snapshot, basically forever,” but this is still an active area of research for us.
Ashley: That covers the questions we had on this section.
Joe: Alright. Next, we’re going to cover a little bit about how these snapshots are actually implemented in the file system. To my knowledge, this information is actually first being presented publicly today, right now, in this webinar. I don’t think this has been covered by anyone else.
I’m not going to be able to go into in detail how APFS is implemented in its entirety – that would take quite too long. But in general terms, [APF’s] file system is a collection of objects, and you take all of these [40k] objects and they’re going to be connected together in some series of ways, based off of their block numbers and the container, and by parsing all of these objects, we can put together all of the metadata for the file system itself. So, it’s important to know that an APFS object is just a four-kilobyte block of data that has an object header and some type-specific data. And the object header is just going to be very simple, just going to be an object ID, which is going to be unique for that object, and will be the same for the entire lifetime of that object, as well as an XID, which is … I don’t know why they call it an XID, I don’t know what that stands for, but it’s a version identifier. So, every time this object is updated – and again, APFS [is copy-on-write], so when we update an object, what we’re actually is creating a new version of this object somewhere else on disk that has a different version, and maybe marking the old object to be deleted. The object ID will stay the same, but the XID will be [incremented]. So, if there are multiple versions of this object on the file system, the one with the higher XID is always going to be the newer object.
Along with [4k] objects, which are true APFS objects, there’s something that they call internally [j-objects]. And [j-objects] are embedded inside of these larger [4k] objects in a very specific subset of objects, and these are tiny little objects that give you different information about the entries inside of the file system. For example, you’re going to have … for every file in the file system, there’ll be a [j-object] somewhere in the file system that gives you the inode information, which will be the file’s name and its create, write, modify timestamps, and all the other associated metadata that you use too, such as user ID, group ID, etc., etc., etc.
For every file [32:58] being run on disk, starting at this block, go through this number of blocks, there’ll be a separate [j-object] for each one of these files. So, you’ll have multiple [j-objects that you’ll have to correspond together, maybe the inode [j-object] for this specific file, maybe one or more of these file extent objects, and possibly even other types of objects that you have to correlate together to get the information that you need that might … for example, just being an MFT record on NTFS, we have to correlate all of these tiny, little objects that might actually exist in different places on disk, for APFS. Another example here I give is the directory records. For every directory on the file system, there is a [j-object] for every single child note, so that’s how you’re able to build the directory tree, right? You go ahead and you parse these [j-objects].
So, these [j-objects] will live inside root nodes, inside of a tree that we’re going to be able to find. So, [j-objects are structured to be able to locate them in a tree. They’re stored in what we call a [j-object] tree, for lack of a better term. What your nodes that use a combination of the inode number and an XID as key inside of a b-tree, which we’ll talk about next. These trees are structured as b-trees, whose leaf nodes form another logical b-tree. And I know that sounds a little bit confusing, I’m going to try my best to explain it. And each APF snapshot has its own logical b-tree.
So, what is a b-tree? This isn’t something new. B-trees are data structures that have existed in computer science for quite some time, and they’re very often used in file systems because of their properties. B-trees are structured in such a way that allows you to search the tree, access an element in the tree, insert an element into a tree, or delete an element in a tree. In what we call logarithmic time. That means in general, you’re not going to have to scan through every object. In even the worst-case scenario, you only have to take the number of objects in the tree, and scan through them and [log in time]. It’s not necessary to understand the math – just know that that’s pretty darn good from an algorithm perspective.
If you know what a binary search tree is … b-tree is sort of a generalization of a binary search tree, where a difference is binary search trees are restricted to have two nodes – you either go left or right. B-trees are balanced trees that can have more than two children.
If we look at this tree here, as an example, on the right, what you’ll have here is you’ll have these leaf nodes, which are all the nodes that are at the bottom of the tree. And say these didn’t exist, then this guy here would be a leaf node. So, it’s basically all the nodes that don’t point to any other nodes, we call those leaf nodes.
Now, all of our data itself, and if this a logical b-tree, all of our [j-objects] are going to be stored inside of these nodes. The leaf nodes contain the actual data that we’re trying to search for or access. And all of these other internal nodes don’t contain any data itself, they just contain the information of how you’re going to get to the next node so you can find the information you want.
So, say here we’re searching for node 35, which we know here that just object 35 exists in this node. But how do we find that? Well, you start at the root, and the root here has two entries, a one and a 50. So, 35 is greater than or equal to one, but less than 50, so we’re going to go left.
Then, that’s going to bring us to this node. This node here tells us, okay, we’ve got three entries – one, 20, and 40. So, where’s 35 going to fit in? 35 is going to be somewhere here between 20 and 40, so we follow the 20 record.
And then, that’s going to get us to our leaf node, then we can search through this leaf node, and find here our object 35.
So, in that way, b-trees allow us to look up things very quickly, without having to scan through all of the nodes. We’re only having to look through one, two, three nodes, to find what we needed here, rather than all of the nine nodes themselves.
Now, I mentioned that a [j-object] tree is actually a b-tree made out of leaf nodes from a b-tree. So, this is sort of how this is going to look. You’re going to have your tree, and your tree is going to have some XID, some version number here, one. And we’re going to have that same sort of thing. We’re going to have information here, with object numbers and a version number, and these nodes here just tell us how to reach our leaf nodes. And then, we’re going to take all of our leaf nodes, and I just … these leaf nodes are going to contain multiple [j-objects], but just for the sake of keeping track of the objects, I’ve named each of these nodes with a letter from the alphabet.
So, all of these leaf nodes are here, and once we’re able to find all of these leaf nodes, we can parse through, we’re going to know that one of these leaf nodes is the root node, and that’s going to give us the information we need to do the form … another logical b-tree itself.
Now, you might ask why do we need to do this, why wouldn’t we just use the one b-tree – which is a very good question, but it starts to makes sense when you start to take an account of snapshots, when you want to have multiple different versions of the file system existing at a time. What happens when we create a snapshot? If this is our initial state of our file system, and we want to go ahead and create a snapshot …
Well, the only thing that happens … nothing at all changed in the file system itself. The only thing that really happens here is that we record a snapshot’s name and what version of the XID it is. So our tree is here – version one of the tree. So, we’re saying okay, version one of this tree needs to be preserved. This is a snapshot. So, now none of these nodes will be deleted if another file is created.
Let’s say we update a j-object that exists in one of these types of nodes. And it’s going to happen to exist in object B here. Because a version … object B was created, we know a copy of object B is going to be made with the changes. So, that gives us here our B prime. And then you’ll see here, object B in our tree has been replaced with this new version, B prime, which is just green to show that it’s changed. But of course we can’t just only change this one node, because the other node, the old D object was pointing to our old B.
So, we have to create a new D and we have to create a new F, because F points to D. So, rather than recreating an entirely new file system, we only have to change the ones in our search path for B. So, we’re going to actually create three new nodes, B prime, D prime … well, four new nodes. Actually, this is a mistake. There actually should not necessarily have to be an E prime here. And an F prime, right?
So, we’re creating F, D, and B. And each of these are going to be put alongside of the existing node. So, what we get here is if we want to recreate … we want to parse the current file system, when we’re going through and when we’re parsing these interior nodes here that point to which leaf nodes we’re selecting, we’re going to come here to where we have a conflict. We have a conflict here between object ID 20 and object ID 22. Well, if we’re going to parse the current version, if we’re parsing the active version, we just always choose the one that has the highest XID. Because that’s going to be the most recent file. And by parsing through those, we’re going to be able to select … we have one, two, three, four, five, six nodes here in our system, so rather than going through all of these 10 nodes, we’re only selecting the six of these leaf nodes that we want to use for our current snapshot, and then those are the ones that are used to form the next logical b-tree.
Similarly, if we want to return this snapshot for snapshot one, we basically parse through these interior nodes, these same interior nodes, but we ignore any node that has a version ID that is greater than XID one. So, rather than here, where we’re [going now on 20], rather than going to the most recent one, we’re going to ignore that, because two is greater than one, so we’re going to follow this guy, and we’re going to get our original node. And by using this logic, we’re actually able to reconstruct the exact same tree that we had initially, when we created our snapshot. And if you can see, just based off the paths that we choose to follow, based off of the XIDs, with the most active one being choosing just whatever the highest XID is when you get a conflict, and the … when you’re doing a snapshot basically ignoring any XID that is greater than the snapshot XID that we’ve recorded … we’re able to reconstruct the file system, exact same objects as they existed at the time of the individual snapshot.
So, I guess we’re just going to go ahead and open this up to questions. We have a couple of review slides, but I can do those afterwards.
Ashley: So, there’s only one question that I have right now, which is: If the j-nodes are stored separately to a file object, how do you relate a j-node to a file? Does each version of the file have its own j-node?
Joe: Yes. So, the j-nodes are … again, the j-nodes are stored in this tree, and again, this is kind of an overly simplified version, but you can look at this as being … this is going to have several j-nodes in it here, and our leaves here. The j-nodes themselves have keys that are associated with them, so the j-nodes that are stored here in C: are all going to have keys, and those keys are going to be associated basically with the inode number. So, you’d parse through and say, “Hey, I’m looking for j-node 20,” or whatever is here, and we’re going to parse all of the j-nodes that are for version 20, they’re all going to be here in order. If they run off … in here, they’ll be in the next object. So on.
So, you need to parse all of these j-nodes, and then you take them and you can put them together for an object. So yes, if you create a different version of a file, you might get new j-nodes that are being created, depending on what has changed. But those j-nodes are also going to have … basically, the keys are going to be … object ID and the type of the j-node.
Ashley: Well, I think that’s all the questions on the actual implementation information that was presented.
Joe: Okay. This is really complicated – I expected more questions.
So, go ahead, on to the review, while people consider their questions. This is only a couple of slides.
In review, we talked about three different backup solutions. We talked about Time Machine for MacOS, volume shadow copies for Windows, and snapshots for MacOS. And which file systems they work for, a little bit about how each of them works. Time Machine is at the file level, volume shadow copies at the volume level, and APFS snapshots are built in at the file system level. And we talked a little bit about how each of them works, and we talked a little bit more in depth about APFS snapshots. And any one of these you can parse in BlackLight. And I may not have mentioned it earlier, but you can parse any of these offline in BlackLight, both on a Windows system, when you’re analyzing on a Windows system, or on a Mac system. We’re not using any of the operating system APIs to do this. We’re doing analysis straight from the bits that are on the disk image itself.
When talking about APFS snapshots, your key takeaways here are that APF snapshots are automatically enabled with Time Machine. So, whether or not the user is aware, they’re happening. They’re happening pretty much hourly when Time Machine backups are created, they happen regardless of Time Machine functionality under certain conditions, which we believe were system updates. And they … a general rule of thumb is that they may stick around for about 24 hours, but this could be longer with unsuccessful Time Machine backups.
We talked a little bit about how you can list them and analyze them offline, and we showed you how you’ll be able to analyze them offline with BlackLight 2018 R3, which is planned at the end of summer 2018. So, I would look for that soon.
You can analyze an individual snapshot or you can do differential analysis across multiple snapshots or volume shadow copies.
And that being said, are there any questions about anything at all?
Ashley: Yeah, we have a couple of other questions. If you’re using an external disk for Time Machine backups, like a time capsule, does that limit the analysis process in any way or is there anything in the Time Machine backups that’s different if it was based off of snapshot information.
Joe: It does not. Just remember that a Time Machine backup is going to be a logical copy of a file. So, you’re going to … it basically would be the same as if you did a logical acquisition of the disk itself. So, if you only have the Time Machine backup media, you’re still going to get all of the data on the disk, but you’re not going to have any sort of unallocated data or anything like that. You’re not going to be able to carve your Time Machine backup to recover deleted files. The only thing you’re going to get there, maybe deleted files that used to be on the backup and no longer exist.
But you’re still going to get somewhat reasonable metadata as far as the creation timestamp and stuff like this. APFS snapshots, when you’re parsing those, you’re actually parsing the physical image of the disk, so you’re getting all of the file system metadata as it existed on the disk at the time. So, you may be able to use some advanced techniques to even recover files that have been deleted or snapshots that have been deleted, because remember, APFS is copy-on-write. There are many, many older versions of these APFS objects that exist on disk. We just need to develop the techniques to recover those and analyze them.
So, you could have much more raw info to deal with when you’re actually imaging the disk itself. I would not solely rely on a Time Machine backup and say, “Hey, this is all the information I need to analyze a Mac system.”
Ashley: [A bit of a] clarification to that is: Do you need to complete a full disk image in order to gather the snapshot information that’s on disk?
Joe: You do. Well, not necessarily full disk image, you’re going to at least need to image the APFS container, but we recommend going ahead and yes, doing a full disk image. You can do a logical acquisition if you’re on the system and you mount the snapshot, and then collect it that way. But again, you’re going to be limited with the information that you’re able to get in that direction.
Ashley: Great. And then a question – within the file system, is there any logging functionality to track automatic and/or user deletions of snapshots?
Joe: I do not know the answer to that question. I would have to do some research and follow up. My gut feeling is that yes, there’s probably going to be something in the unified log that records when a snapshot happens or is deleted, but I do not know that for a fact.
Ashley: Great. Let me see if there are … [49:48] there’s a question about is this going to be in MacQuisition, meaning are we going to … I think the question there is are we going to add the ability for a logically acquired snapshot in MacQuisition? I don’t think I … I think there’s no technical reason we couldn’t do that. Correct, Joe?
Joe: There is no technical reason that we could not do that in MacQuisition – we could put in a future request for that. Just from a standpoint of having been a practitioner at some point, I guess the only benefit for doing that is if your analysis tool of choice cannot process these snapshots themselves. So, maybe there is … or you could just use BlackLight.
Ashley: [chuckles] And then, I think there’s still a little bit of question about is the snapshot backed up in Time Machine? Because the Time Machine backups are filed and snapshots are not filed …
Joe: Right. Yeah, the snapshots exist at the logical file system level … and we’re talking layers here. So, at the bottom, you’re going to have your physical storage media layer. That’s going to be your disk and the sectors on the disk. Then you’re going to have a volume layer … a volume system layer and a volume layer, which is … [which of the] sectors that we’re saying that we’re going to go ahead to be for this volume. And then you’ve got your file system layer, which is how are these sectors being organized, which files go for which sector and stuff like this. And then you have your logical file level, which is just data that’s associated with one file. Time Machine works at that logical file level, so it would be the same as if you just went ahead and copied these files from the disk. And maybe just a little bit more, whereas the [51:45] files you’re copying retain some of the timestamps, but you’re only getting that file copy. You’re not going to get anything that’s actually existing at the file system level or below. So, you’re not getting unallocated stuff, and since the snapshots aren’t represented as files on the disk, the Time Machine is not backing them up.
Ashley: Thanks. And then the last question is: On the Time Machine backups, what is the date stamp based on? I think we showed the date stamp on the Mac interface itself – was that the last file was written or when the first file was written into that Time Machine backup?
Joe: The Time Machine backup, the date stamp is actually the time that the backup happened. Oh, I guess the question was: Was that when the backup started was it when the backup completed?
Ashley: Correct.
Joe: I believe it’s when the backup completed. Because the … but I’m not 100% … I wouldn’t testify to that.
Ashley: Alright, so I think that’s the time that we have for questions. There’s a few more that we will answer, as Joe mentioned, in a blog post after. But we appreciate everyone joining us today. Thank you, Joe, for taking the time to answer so many questions. And we look forward to getting the functionality out to folks in BlackLight.
End of Transcript