Watch the full interview now!
About the Case
On the evening of February 25, 2022, Ms. Clair Ablewhite was found with multiple stab wounds at her residence in Hall Lane, Colston Bassett, Nottinghamshire. She was 47 years old.
After the end of her marriage, Ms. Ablewhite relocated to Colston Bassett with the intention of beginning a new life and establishing a business providing dog walking and boarding services.
The couple had three sons, and two of them have previously praised their mother as a unique and exceptional person.
Upon conducting their investigation, the Nottinghamshire Police discovered that Ms. Ablewhite had utilized a dating website upon relocating to Colston Bassett. Upon checking her Whatsapp messages, law enforcement officials uncovered proof that John Jessop of Sherwood Avenue in Newark had been communicating with the 47-year-old woman and was the sole individual who failed to come forward and assist authorities in their inquiry.
In September 2021, the couple began an intimate relationship that came to a close on February 19, 2022, mere days before her passing. Detective Inspector Mel Crutchley of Nottinghamshire Police disclosed that the reason for their separation was primarily due to apprehension regarding their age disparity. Nevertheless, he also noted that Jessop had visited Ms. Ablewhite’s residence – which was situated approximately 17 miles away from his own – indicating some level of continued involvement between them.
Nottinghamshire Police released CCTV footage of Jessop’s 17-mile bike ride from his residence in Newark to Colston Bassett. The video shows him cycling toward Ms. Ablewhite’s home, with multiple security cameras capturing the journey. After stopping to purchase a pasty on the way to Rushcliffe village, police were able to link Jessop’s clothing and bike to other CCTV footage. Shortly before stabbing the mother-of-three in her home, he was caught hiding his bike in a nearby bush and walking along Hall Lane near Ms. Ablewhite’s house. According to police, audio from the fatal attack was captured by CCTV belonging to Ms. Ablewhite’s neighbor before Jessop retrieved his bike and cycled back 17 miles to Newark.
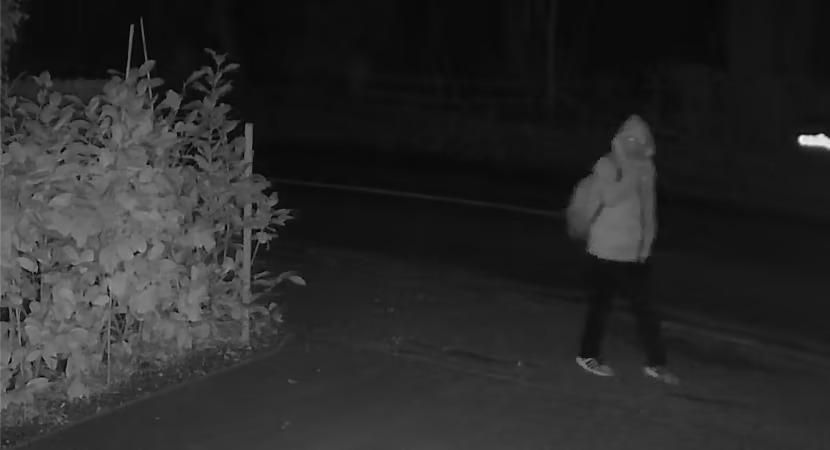
Credit: Nottinghamshire Police
According to reports, Jessop attempted to conceal his movements by leaving his mobile phone at home and using cash to make purchases during his journey. However, he was apprehended and charged soon after Ms. Ablewhite’s discovery in February. As a result of pleading guilty, he has been sentenced to life imprisonment.
Workflow with Amped FIVE
Foreword
It is important to notice that, according to Paul Hopcroft, Certified Forensic Video Technician at Nottinghamshire Police, the quality of the video evidence was not too bad. The video surveillance system was set up properly and it was an NVR (Network Video Recorder). On a normal day, investigators would have done a “Reverse Projection”, but while they removed the hard drive and got back to their office, the main camera had gone down. It did turn out in the end that a maintenance team that was on the property doing some landscaping work had actually tarnished the wiring. The view they had was the nighttime view and some daytime footage. That was everything they had to work with.
Investigators were struggling to process the files in the first instance, but they managed to do that within Amped FIVE.
Reverse Projection or Measure 3D?
On this occasion, because they didn’t have that camera to go back to and comb through, that threw Reverse Projection completely out of the equation. The video analyst’s only option was then to use the Measure 3D filter in Amped FIVE.
Learn here what filters to use when measuring the height of an unknown person.
The Workflow
Let’s see now how Paul Hopcroft used Amped FIVE to measure the height of the suspect caught on the CCTV camera and helped to solve the murder investigation.
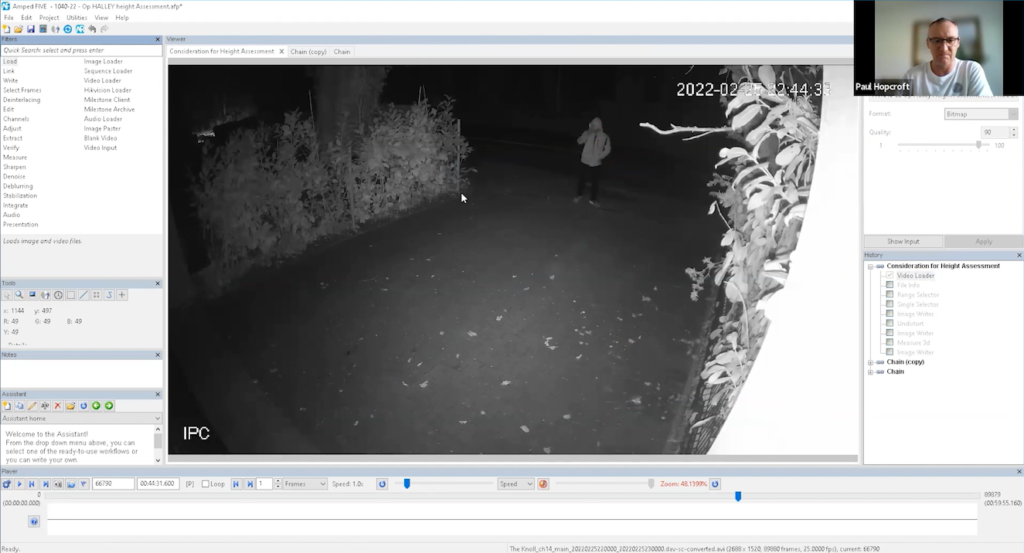
The initial step was to identify a measuring point. Paul opted for the bar on the right side of the suspect as it was closest and provided a reasonable comparison. This reference point is now known as Post A, with the second bar being referred to as Post B.
Lens distortion also needed addressing, as it was particularly evident looking at the right-hand side of the CCTV camera image.
In order to rectify the issue of lens distortion, Paul employed a specific line that was known to him to be straight due to his on-site experience. This line runs straight across the bottom of the bushes and intersects all relevant reference points. By utilizing “File info” and subsequently narrowing it down via “Range selector”, he was able to isolate a small group for processing purposes using “Single selector”. The next step involved implementing the “Undistort” filter which effectively addressed the problem of lens distortion by utilizing the straight line he pulled across the bottom of the bushes. This way he got rid of distortion.
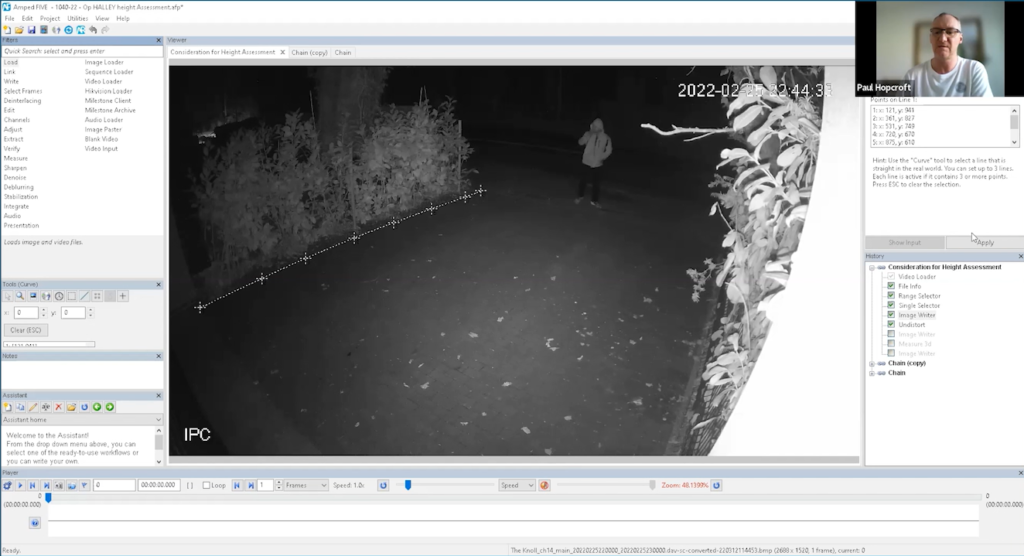
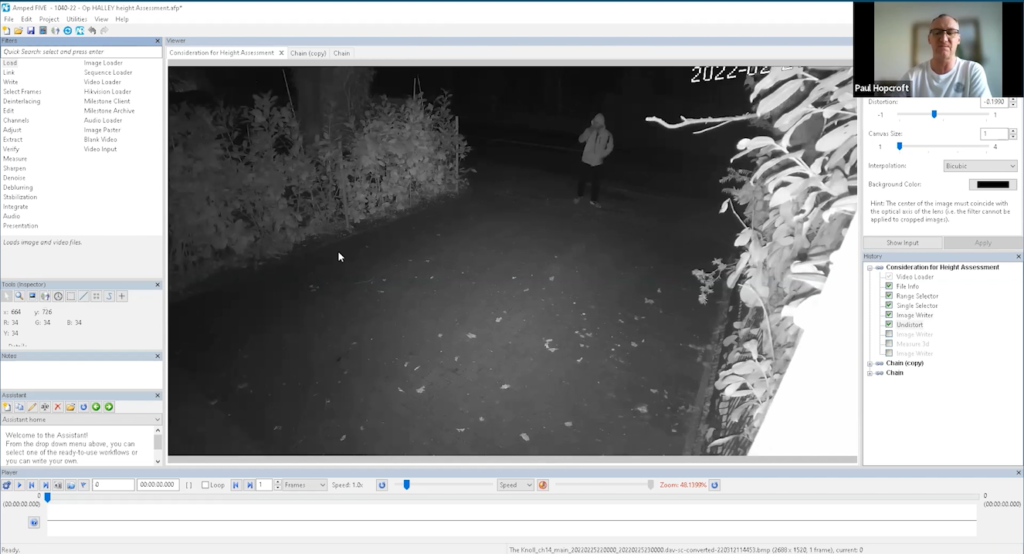
Once he had saved his work, he clicked on Image Writer and selected Measure 3D. The block pavement appeared perfectly straight all along its length. Although it was difficult to see the pavement’s blocks clearly, he compared their position with a daytime view to trace their path accurately.
He felt confident in most of what he had done so far. Starting from one end of the driveway and moving towards where his subject stood, he drew two lines to mark out his measurements.
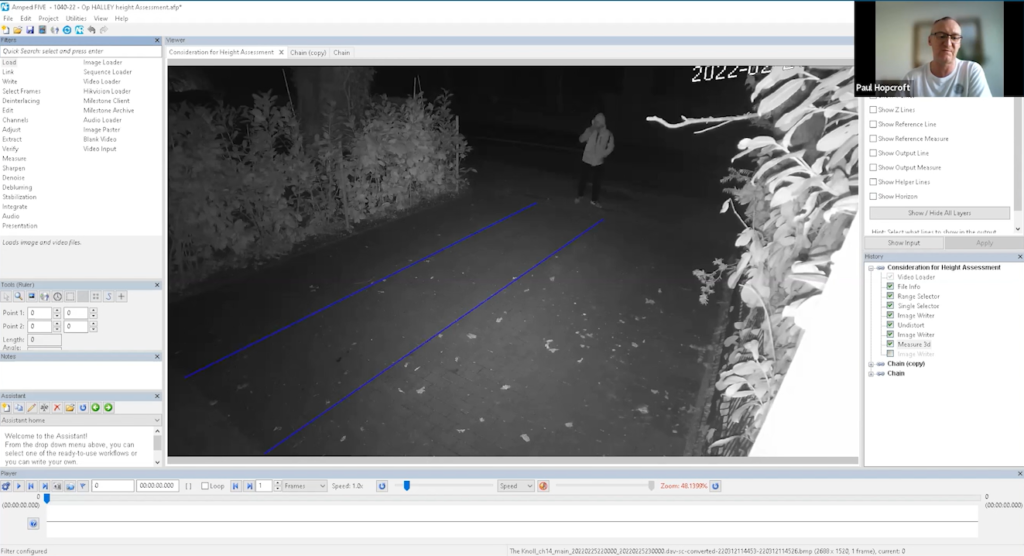
He then carried on by adding the two lines across the pavement.
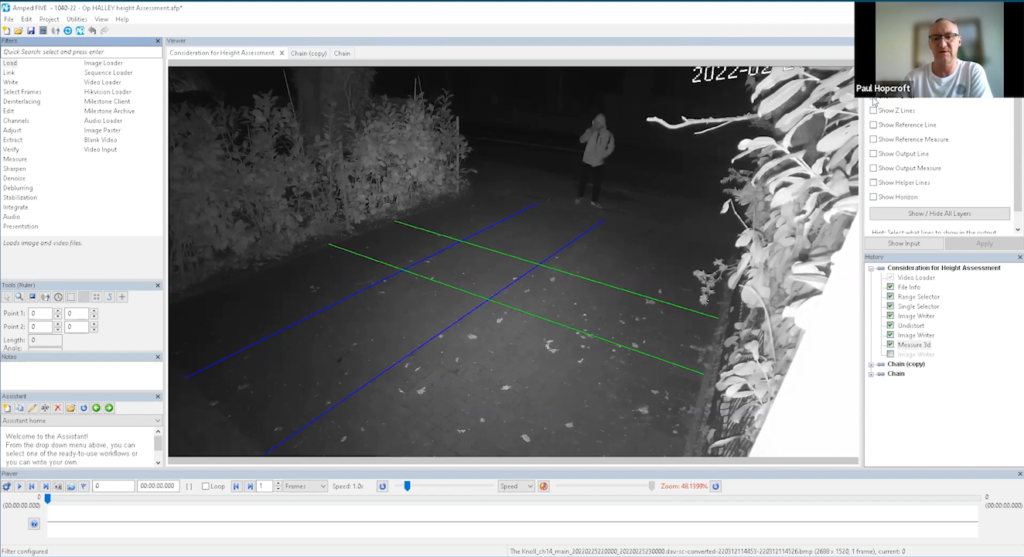
He then added the vertical lines.
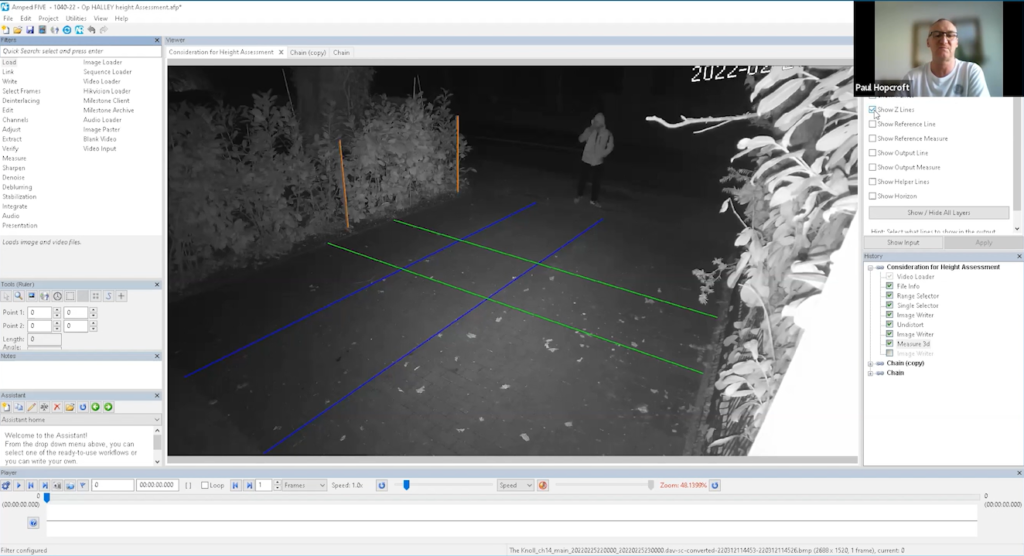
The bars are the straightest objects he could find in the scene. He first used Post A as a fixed reference line, which he knew was 1.445 cm tall.
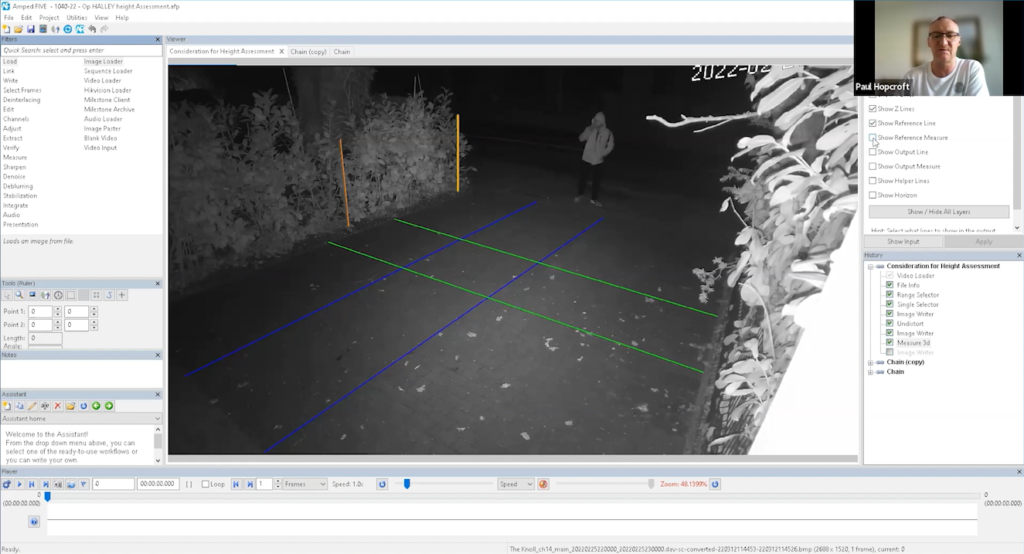
He then proceeded in calculating the height of the suspect which was determined from top to bottom, with a small black mark placed at the post’s base for verification purposes. This provides a fixed reference point at the bottom and allows one to easily locate the bar’s top.
Next, he attempted to measure from the subject’s feet up through their body, aligning as closely as possible with their center line all the way to their head.
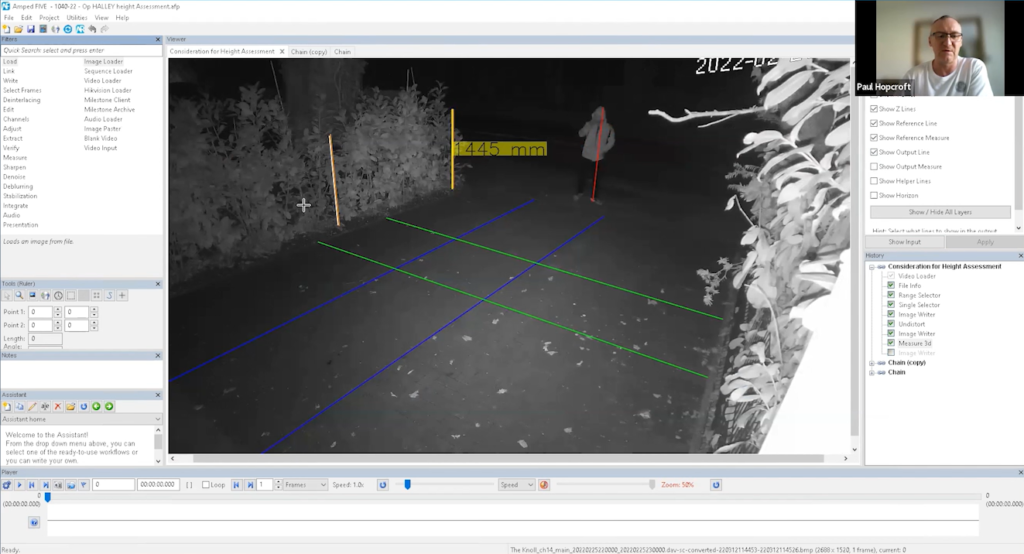
He proceeded to draw the second line using the same technique of marking a small black spot at the base of the post and measuring up to its top.
Upon selecting “Show Output Measure,” he confirmed that both lines were accurately drawn.
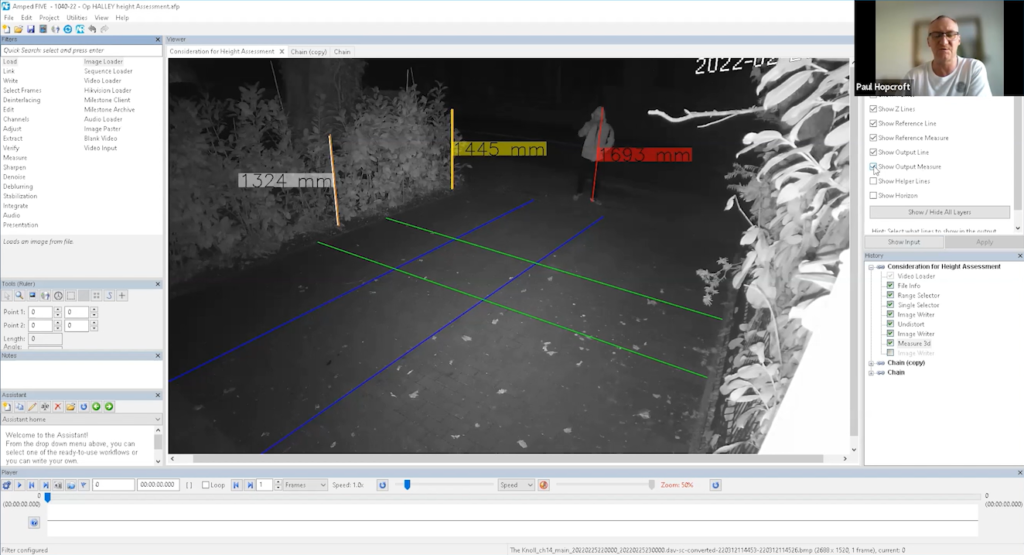
The subject’s height was found to be slightly less than 1.7 meters.
It has been discovered that Post B’s measurement is actually 1.319 cm, which means it deviates by a mere 5 millimeters from the expected value.
While reviewing the evening view, one issue that emerged was the effect of wind on a leaf positioned at the top, an element that had not been accounted for during daytime observations.
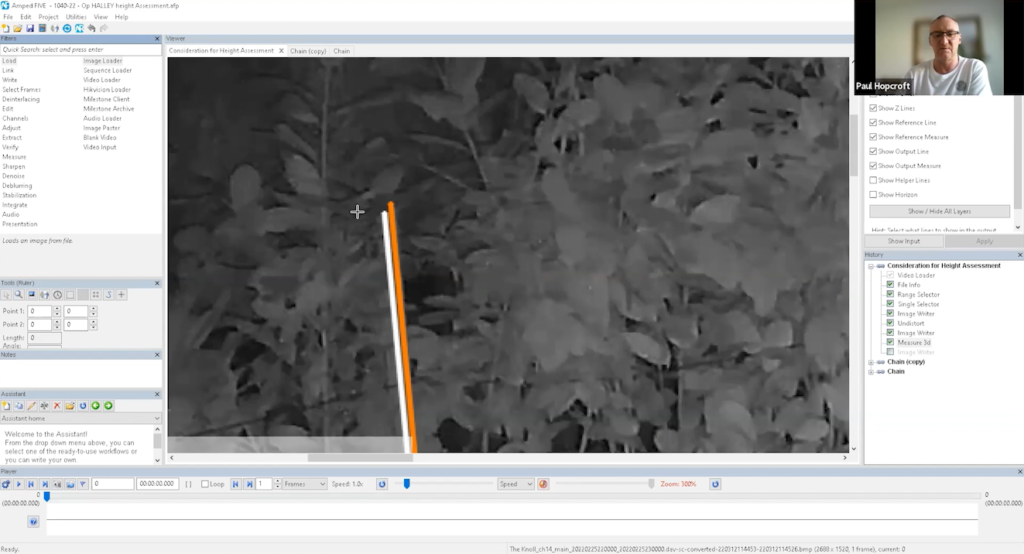
He had difficulty selecting the top of the post, so he settled on the nearest visible point.
This step was taken to evaluate and limit potential suspects. It proved useful as it eliminated shorter individuals from consideration. A comprehensive report was compiled for use in court, incorporating data from Amped FIVE that Paul included and cited appropriately.
The investigation progressed with typical procedures: tracing a person who rode a bike 17 miles before abandoning it three-quarters of a mile away from the scene, followed by additional inquiries and interviews leading to a successful prosecution.
Challenges & Solution
Initially, the file format posed a challenge, but Amped FIVE was already able to resolve it. Paul reports that the project proceeded smoothly from there. Attention to detail in measuring is crucial, ensuring accurate measurements of all points. According to Paul, an on-site survey plays a critical role in achieving this accuracy later on.
The brick pavement markings are slightly off and can cause a 6-millimeter height discrepancy for subjects. To mitigate this issue, one can double-check the calibration lines using daytime recording, since lines are often more visible in that condition. So if daytime recording from the same camera is available, you can load it in FIVE and simply copy-paste the Measure 3D filter into that chain, and check that calibration lines are well positioned.
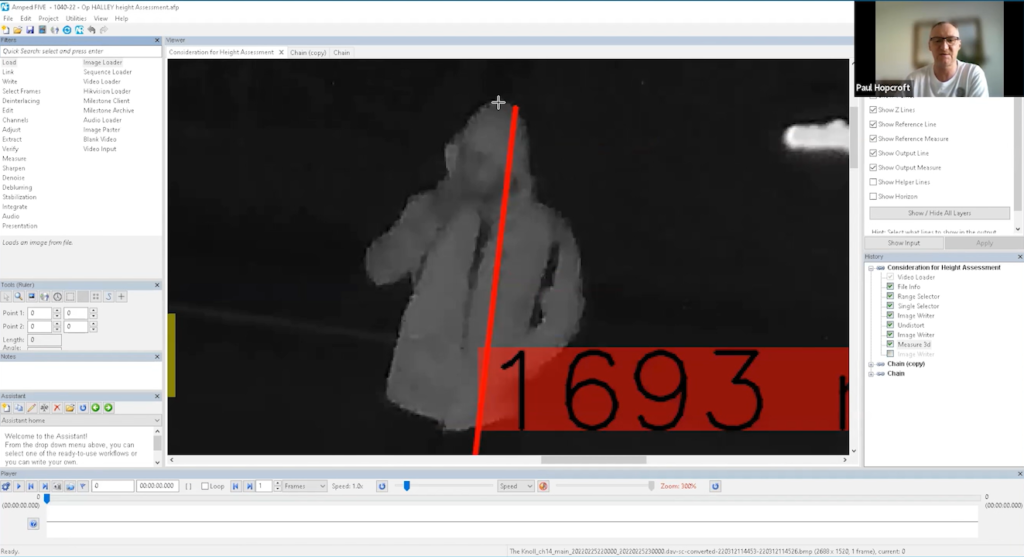
Overall, Paul found the process fairly easy after completing the Amped FIVE training and recommends others do so as well. Clothing and posture must also be taken into account when analyzing images; for example, in the following image where the subject wears a hooded jacket, Paul believes his head may not align with the red line marker above them.
Importance of Correcting Optical Distortion
Paul utilized the Undistort function to rectify lens distortion, but Amped FIVE also offers the Correct Fisheye filter. Despite this, Paul opted for Undistort as he could easily identify a straight line and had greater control over his adjustments. He did not experiment with the Correct Fisheye filter because he achieved satisfactory results using his chosen method. Having personally visited the location and observed its daytime view, Paul was familiar with where he needed to begin his corrections.
However, if presented with an unfamiliar case, Paul would test both features to determine which yielded better outcomes. Ultimately, being present at the scene gave him an advantage in making informed decisions about image correction techniques. Learn more about lens distortion here.
Conclusion
Paul and the Nottinghamshire Police Department ventured into uncharted territory for their unit, as they employed the Measure 3D filter in Amped FIVE for the first time during this murder trial. The pressure was on them to provide swift answers, but it was crucial to take their time and ensure everything was done correctly. By doing so, if needed, they could have confidently addressed any questions or concerns raised by other agencies down the line.
In cases like these, attention to detail is of utmost importance. It’s imperative to approach each step methodically and make full use of available training resources. If necessary, seek guidance from others who may offer fresh perspectives that can simplify your work. Ultimately, you must do the legwork yourself but tapping into outside knowledge can be invaluable in achieving success.
In conclusion, measuring the height of a suspect in 3D with Amped FIVE is an incredibly useful tool for law enforcement professionals. With its advanced capabilities, this software makes it easy to accurately determine the height of suspects from any angle or distance. Whether you are investigating a crime scene or conducting surveillance operations, Amped FIVE can help you obtain reliable measurements that can make all the difference in your case.
Amped Software strongly recommends that law enforcement agencies invest in this powerful software to enhance their investigative capabilities and improve their overall effectiveness. The ability to quickly and accurately measure suspect heights can be invaluable when trying to identify potential suspects or gather evidence for criminal investigations.
Lastly, training is essential for any law enforcement departments and agencies that want to stay ahead of the curve and effectively investigate crimes. The training provides officers with the skills and knowledge needed to properly collect, enhance, analyze, and present video evidence in court. By investing in this type of training, departments and agencies can increase their success rates when it comes to solving cases and bringing criminals to justice. Remember, every piece of evidence counts when it comes to catching criminals and keeping communities safe!
So if you’re looking for a powerful tool that will give you an edge in your investigations, look no further than Amped FIVE. With its cutting-edge technology and ease of use, it’s sure to become an essential part of your toolkit. Thanks for reading!


