Very important part of HDD functioning is a principle of heads parking while device is turned off. During the decades of HDD development, numerous improvements in this area were seen. These changes positively affected data security, capacity, product lifetime and decreased device dimensions.
When hard drive is turned off, its sensitive heads must be parked at a “safe place”. This safe area, must be designed in such way, that read/write heads can’t be damaged and that valuable data is not threatened in any way.”Landing zones” or CSS (Contact Start/Stop) parking principle implies the existence of a non-magnetic area on hard disk platters, that is specially designed and intended for read/write heads parking. These “landing zones” are located near the inner diameter of the platters – on the spot where reading/writing data would take most time.
Also, these zones are specially made to be rougher (“texturing”), than the platter area which is used for data storage. This way, effect of sticking between smooth surfaces of heads and platters is prevented.
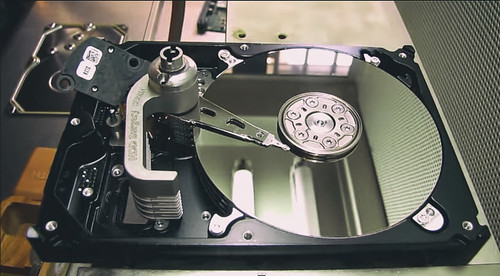
Photo 1: Seagate landing zone drive with Hddsurgery tool mounted on it
Most of the hard drives made until beginning of the current decade, had CSS parking principle implemented. Before HddSurgery tools were designed, in order to perform head swap process on such drives, it was necessary to slide heads over the platters surface, where valuable data is stored in the form of magnetic recording.
This contact is very undesirable in terms of data recovery and can lead to various damages of HDD platter surface. Permanent data loss can be result of impossibility to read data from these damaged areas. Also, functional (donor) heads, used after head replacement process in order to read data from a patient drive, can be damaged or destroyed.
After sliding the heads outside the platters area, different materials such as pieces of paper, rubber or similar, were used to prevent mutual contact between the heads themselves, after taking them off the platters. Positioning of these materials was of critical importance and there was always a danger of slipping between the heads, which they should separate.
Data recovery professionals were in need for an equipment which will assure that client data is not threatened in any way during the process. It was actually a call for a tool which will surely not make any additional damage to the platters and the donor heads as well.
First HddSurgery head replacement tool was a long waited solution for all DR experts. It was designed for safe&easy head swap for Maxtor DM9s and DM10s, which were at the time the most present hard drives on the market.
A high value of the tool was a fact that its use enabled dismounting of the read/write heads, integrally with the actuator arm and electronic components, moving them to a position where they can be safely dismantled and replaced, the whole time staying free from any contact with the platters. In addition, the installation of new, properly working heads is also performed in a contact-free manner.
Absence of any contact between the sensitive surface of the platters and hard ferrite surfaces of the read/write heads enabled simple and in terms of data recovery – safe operation . Described contact-free head replacement technique enabled the same heads i.e. the integral head assembly to be used number of times without a danger of being damaged.
However, due to existence of great number of different HDD models from different manufacturers, it was not possible to use one head replacement tool to perform head replacement on all HDDs with CSS parking system.
Components, principle of operation and shape are identical for all head replacement tools, but for the sake of successful operation certain differences in dimension and some construction details were necessary.
So, since first HddSurgery head replacement tool for Maxtor got great reception from DR community, development for other HDD brands and models continued. Until now, HddSurgery developed 12 different tools for Maxtor, Seagate, Western Digital and Samsung CSS hard drives.
Flagship and the best selling product among HddSurgery head combs is HDDS Sea 7200.11/.12/LP/ES.2 p3-4. The reasons which stand behind this fact are great number of supported models, high presence of these models on the market and a fact that tool is designed for use on (among others) hard drives which have 4 platters/8 heads. Head replacement process, without professional tool, on such hard drives can be a real nightmare for DR professionals.
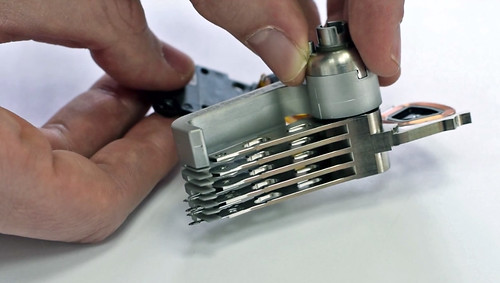
Photo 2: Disassembled heads secured with Hddsurgery tool
Head replacement process can go in many wrong ways, especially on HDDs with multiple platters. By following HddSurgery standardized head swap procedure and using HddSurgery head combs lead to only one way – successful head replacement.
Today, CSS parking principle is considered obsolete and leading HDD manufacturers stopped producing such hard drives in the first years of this decade. However, there are lot of such drives which are still working and keeping valuable data.
Currently, all new hard drives are produced with load/unload heads parking principle. Implementation of this new principle was a new challenge for HddSurgery. About it, our head change solution for such drives read in the next article. So, stay tuned.
Žarko Damjanović
Development engineer
Follow HddSurgery on Facebook, Twitter, Google +, You tube, Instagram and LinkedIn.