Reviewed by Scar de Courcier
Magnet AXIOM is an all-in-one digital forensics tool that lets examiners analyse evidence from both computer and mobile devices in the same case.
Some of the latest features, along with points of comparison with Magnet’s Internet Evidence Finder, are outlined below.
This review will focus on AXIOM 2.5. The current version at the time of writing is 2.6; with new versions coming out every month, it’s worth keeping an eye on the new features in each release. One of the main ideas behind version 2.5 was to focus heavily on improving speed performance.IEF has a similar workflow to AXIOM’s, but it is just an artifacts tool, whereas AXIOM is a full forensics tool. In IEF you choose your evidence sources, fill in the case details and hit ‘Find Evidence’. It will then process your evidence and give you a report on the artifacts. The point of IEF is to have everything in front of you in a format that is easy to analyse, making it simpler to find the most important things and deal with those as a priority.
One big difference between IEF and AXIOM is that AXIOM performs acquisitions, whereas IEF will just load sources that have already been acquired.
IEF and AXIOM don’t distinguish between parsing and carving artifacts; they’ll pull everything from the file system including the unallocated space. Most artifacts have a carving component when possible to maximise the data returned that might be important to the investigation.
If you’re especially pressed for time, this is another strong point in AXIOM’s favour. IEF allows you to perform basic tasks such as bookmarking, reporting and world maps, but it’s much less powerful than AXIOM.
The workflow of AXIOM is very similar to IEF, except that there are some added features here which will come in very handy. AXIOM is actually made up of two programs: Process and Examine, which install as part of the package and work together to help investigators work on cases.
When you open AXIOM it will prompt you to fill in some case details and then choose an evidence source. This can be a computer, a mobile, or a cloud account. The cloud component is new and includes most popular cloud options such as iCloud, Google and Box accounts.
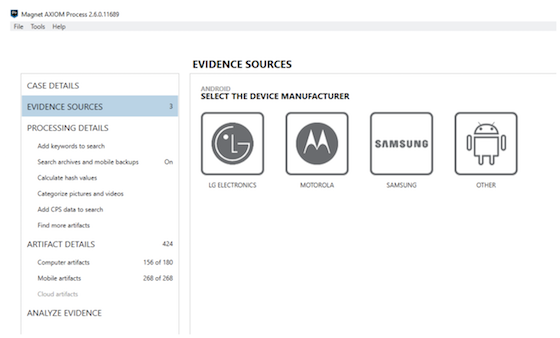
The mobile option also includes acquisition of both locked and unlocked devices. The options for locked devices are dependent on the device, but there’s a fair amount of choice available, including options for chip-off forensics if required.
There is a new option for memory analysis as well; Magnet have integrated the Volatility framework within AXIOM, which is no doubt going to be a very popular feature. It’s actually easier to use than Volatility itself for those who are less technical, since there’s a user interface and you don’t have to work in the command line. Volatility within AXIOM also integrates with everything else in the tool, meaning you can look at memory data alongside the rest of your case.
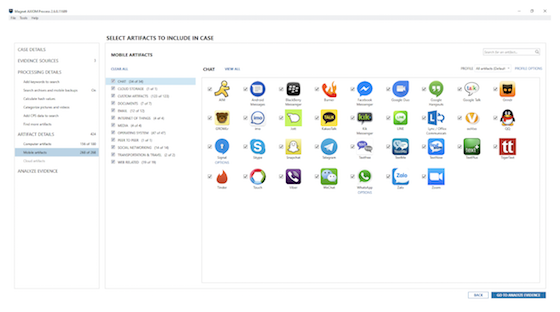
Once you’ve added your evidence sources, click ‘Go to processing details’. You can then add keywords to search, either as a list or as individual terms.
When searching, you can either do an artifact search or an all content search. ‘All content’ does a binary search across all the data, similar to what you’d get from most large forensic tools on the market. ‘Artifact search’ just searches the artifacts themselves.
One feature I particularly liked was AXIOM’s ability to search backups and archives. If it finds an iCloud backup on the machine, for example, it will automatically open and search this, and add the data into your case.
You can add hash values to your searches: calculating hashes, tagging files with matching hashes, and ignoring certain ones. It is also possible to load in hashsets from CAID or Project VIC if you are a law enforcement investigator. CPS data can be added to the searches as well; this allows you to add specific identifiers around people, due to Magnet’s partnership with the Child Rescue Coalition.
The ‘Find more artifacts’ button is a dynamic artifact finder. It’s impossible to support every single app, so the Dynamic App Finder looks for SQLite databases on the device and tells the examiner if they look interesting. It will flag up elements like sender, recipient, geolocation data and timestamps even if the data isn’t coming from a known application.
Custom Artifacts allows people to add their own artifacts into AXIOM. There are a couple of ways to do this: you can either code it in Python, or fill in an XML template form which has step by step instructions for pulling in data. I particularly liked how user friendly this tool was, having seen many in the past that require labyrinthine forms or learning a whole new language!
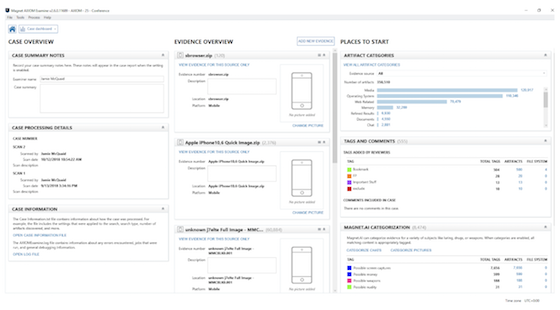
Once you’ve imported your evidence, click ‘Analyze Evidence’. You will then see an overview of your case.
Artificial intelligence is another new feature in AXIOM: it categorises chats and then searches for grooming or conversations of a sexual nature. This is particularly helpful for triage purposes, helping you to pull out the data you need to look at first in order to build your case. As well as text, it also analyses pictures looking for child abuse images, drugs, IDs, money, nudity, screen captures and weapons.
On your case dashboard you will see keywords, passwords and tokens on the right hand side. These can be useful for adding cloud evidence; even if you don’t know the password, you might still be able to get into a user’s cloud account if you have the token for it.
Clicking the dropdown menu under ‘Case dashboard’ lets you choose what to do next. Most people start with Artifacts and then narrow it down to whatever is most likely to be of relevance in their case.
One feature Magnet have introduced is the ability to compare similar artifacts. For example, you can now compare web history across multiple browsers. Although not all the headings will be the same for each browser, they take the ones that do match up and put them in an easy to read table view, so that you can show a person’s browsing history across all browsers at a given time.
The source location is always listed next to the artifact you’re looking at, so you can work out exactly where it came from. In IEF this is just listed as text, but in AXIOM it is hyperlinked, which means you can click on it and immediately see where the file is and view it as hex or text.
There are global filters across the top of the screen, but you can also do artifact- or column-specific filters if you prefer.
Another clever feature is the splitting of date and time. When AXIOM is processing your case data it will split the date and time so that they’re stored separately in the database. This allows investigators to do date and time sorting independently of each other; for example, “Monday-Friday between 9am and 5pm.”
Date and time filters have two options: Absolute or Relative. Absolute shows you everything within a time frame you specify; Relative lets you choose a moment in time and then see everything that happened within a given range around it.
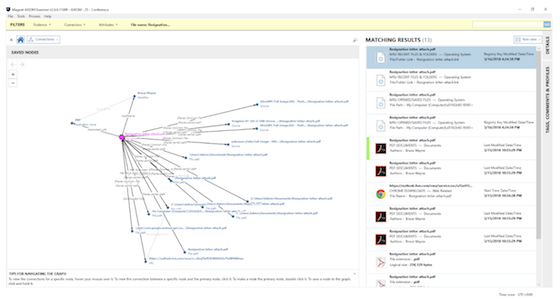
Once you’ve found an important item, clicking the ‘Connections’ icon will show you where it first appeared and its trajectory since then; for example, if it’s been sent via email, or copied and pasted elsewhere. This is particularly helpful in cases where people use the “I didn’t know it was there” defence – if you can quickly demonstrate that a file has been copied and shared, then this greatly weakens their defence.
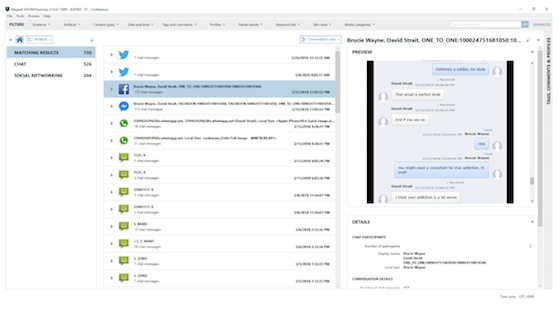
You can view the evidence in different ways. Conversation view shows conversations in an intuitive, user-friendly format that would be helpful for judges, juries and other non-technical stakeholders who need to look at the evidence within a case. AXIOM will automatically include anything that can be grouped into a conversation here, from social networking apps to messaging.
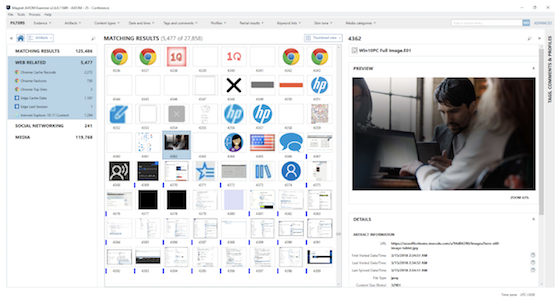
The Thumbnail view is best if you need to look at a lot of pictures. As well as just viewing everything within the global case, you can also break this down by artifact; for example you can see all the pictures that came from browsing activity.
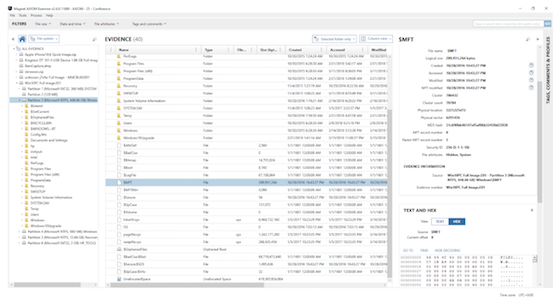
The File System view is similar to what you’d normally see from a forensic tool, and has a valuable filter that can be especially useful in cases where there is more than one user on a machine. Finding the user’s profile in the list on the left, you can right click and select ‘View related artifacts’ to just analyse the artifacts contained within that folder.
There are a lot of custom options for tagging and commenting, which is excellent, including creating new tags and assigning colours. This allows for quick bookmarking across a case and means you can easily assess the items you have bookmarked in their own separate view.
Once you’ve tagged everything you want to include in your case, you can then create a report. The usual options are all available: HTML, CSV, PDF, JSON, XML and so on. If you’ll be working on a case alongside other people, you can also choose ‘Portable case’ within the reporting view and this will allow you to export the case for someone else to work on. Choosing ‘Items in current view’ under ‘Items to include’ just adds whatever is on your screen into the report. The ‘Tagged items’ option is probably the most helpful, as you can add items from multiple tags. There is also an option to add all the evidence to your report, although it’s rare that this is necessary!
In summary, the latest version of AXIOM compares very favourably not just to IEF and to previous AXIOM releases, but to the forensic market in general. It remains a powerful tool, particularly with the addition of Volatility and AI, and its flexibility means it can be of use in many different case scenarios.