by Jade James
ADF Digital Evidence Investigator PRO (DEI PRO) is a multi-purpose tool which can be used to collect files and artifacts on a multitude of digital devices, including computers, laptops, mobile devices and removable media. It includes all of the computer forensic functionality of DEI PRO, along with Mobile Device Investigator (MDI, for mobile forensics) in one package. Forensic Focus’ review of Mobile Device Investigator can be found here.
This tool can be customised to be used in the field for triage or it can be used in the lab. With DEI PRO, you can quickly identify and acquire files and artifacts of interest, analyse the data collected to make connections within a case, and easily export and present the data in comprehensive reports.Due to the simplicity of evidence collection and use in the field and lab, you will be able to use DEI PRO with minimal training. The tool is very intuitive and supports the collection of artifacts from devices running Windows and macOS. DEI PRO allows the user to investigate attached devices, create forensic images and explore the contents of folders and network shares. With the assistance of a collection key, you are able to acquire data from live systems and acquire RAM dumps.
A good feature of DEI PRO allows the user to view results from a scan whilst it is still running, which will help the user to make informed decisions within an investigation.
Within the analysis phase of the investigation, the user can filter search results using dates, hash values, tags and filters. Pictures and videos can be organised by visual classes such as faces, people, currency, weapons, vehicles and indecent images of children.
Reports can be created to be viewed within a standalone report viewer and the tool allows you to export data in HTML, PDF and CSV as well as a Project VIC JSON file.
A full Digital Evidence Investigator PRO kit will include:
● USB Authentication key
● USB Collection key (Samsung T5 256GB SSD)
● 4-port USB hub
● Boot CD
● CD opener
● Installation Reference Booklet
ADF DEI PRO runs on Windows 7, Windows 8 and Windows 10. It requires a minimum of 8GB of RAM and 20GB of free hard drive space.
You can either install the tool from the offline executable file, or download the program installer from the ADF website. Then it is a case of following the prompts and agreeing to the licensing agreement. You also need to specify the location in which you want the tool to be installed; it is at this point that you will install the Windows Assessment and Deployment Kit. There are also different features you can select to install, which will enhance your capabilities later on.
Once you have installed the tool, you will also need to install the Android and iOS USB drivers which allow the tool to successfully detect connected mobile devices.
A full technical specification document can be found on the ADF website.
DEI PRO allows the user to scan devices and images that are connected to the host system which has the tool installed. The Pro version also allows the user to scan mobile devices and mobile backups.
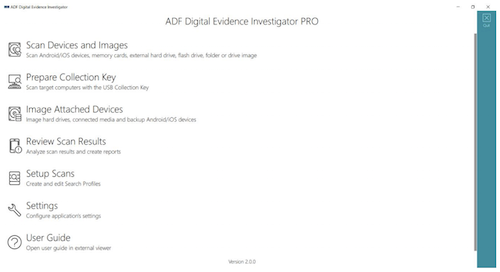
Upon opening DEI PRO you will be presented with various options: add a folder, add an image, add a phone, or add a phone backup. It is possible to run a scan on multiple target devices: you simply need to select which devices you wish to target. Once you have selected a search profile and entered the necessary case information details, you simply click the ‘scan’ button. DEI PRO will start to create a backup if a mobile device is selected, otherwise it will run the scan.
In order to scan a mobile device or mobile backup, it will be necessary to complete certain steps to ensure that the device is readable by the tool. Android devices need to have Developer mode activated, USB debugging enabled, and the execution of apps from unknown sources to be authorised. The USB connection will need to be set to ‘file transfer’. For iOS devices, it is only necessary from the device to be unlocked (which means you will need the passcode), and then a prompt will ask the user to trust the device.
The Authentication key will need to be connected to the host system or the user will be given a message that no license file is found. The user will be shown the progress of the scan, as well as an estimated percentage of completeness and given options to ‘view results’, ‘image’ or ‘pause’. A prompt will be displayed when the scan has fully completed. Viewing the results of the scan may slow down the processing speed but will not impact the investigation too severely. Selecting the ‘image’ option will prompt the user to stop the scan and go through the imaging process.
The DEI PRO kit comes with a collection key, but if you need to create one of your own then you will require a storage medium which has at least a 16GB capacity and a 512 byte sector size, or 4096 byte sector size with a logical 512 byte emulation. Devices with 4096 byte native sector size are not currently supported.
To make a collection key, the user would need to have installed the Windows Assessment and Deployment kit (Windows ADK). Creating the key is simple: just select the ‘Prepare Collection Key’ option from the main menu. You will be presented with a screen, as shown below, which shows you the attached devices to choose from. Once you have selected the device, you will need to choose from a wide variety of different search profiles including quick, intermediate or comprehensive profiles, or profiles that are for a specific media type such as a mobile device. At this stage, the user can also choose to select custom search profiles created at an earlier stage of the investigation.
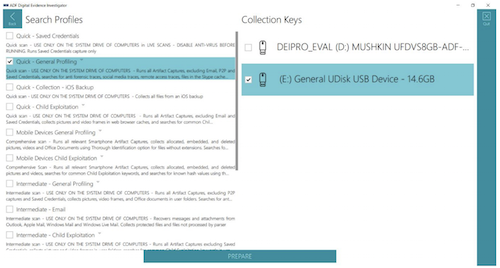
After the preparation is complete, the tool will ask you to unplug the key and it will be ready to use. With DEI PRO, you can create and deploy as many collection keys as you wish, which would be beneficial in the field if there are a large number of digital devices which need to examined.
During the test, I created a Collection key and deployed it on a live Windows system.
It is crucial to consider the consequences of these actions, as I was prompted to allow the app to make changes to the system. In a real life situation, you would want to avoid making any changes to a target system in accordance to the first principle of the ACPO guidelines: “That no action take is taken that should change data held on a digital device including a computer or mobile phone that may subsequently be relied upon as evidence in court”. However, when an investigator is out in the field and may be faced with a limited amount of time to examine and seize exhibits, it may be crucial to image on site.
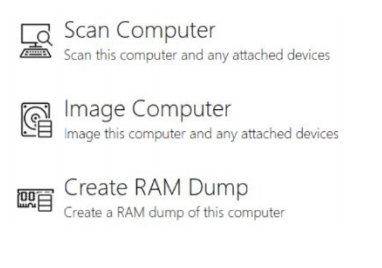
The user will be given access to a stripped-down version of DEI PRO which allows you to either scan or image the computer, or create a RAM dump. The data acquired can then be processed using the full version of DEI PRO, except for a RAM dump, which will need to be processed using a third-party tool.
You can plug the Collector key you have created into a system which is powered down and boot into it through DEI PRO, which is forensically sound. It is important to be aware of the BIOS key, which can be easily found from a quick internet search of the target system. ADF’s DEI PRO user guide also has a very useful BIOS key table.
Before you enter the BIOS settings, you will need to select the ‘Windows Boot Manager’ option, then the ADF Boot BIOS. The user is then given two options – ‘Scan Computer’ or ‘Image Computer’.
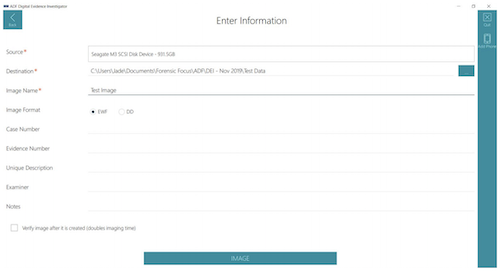
To create a forensically sound image of the target media, you will need to ensure that write-blocking methods have been used (i.e. hardware write blocker such as a Tableau device). When you have selected a source device and destination device, you will be presented with further options to add more detailed case information, such as inputting the image format (EWF or DD), case number, evidence number, unique description, examiner and notes. There is also a tick box you can select so that DEI PRO will verify the image after the acquisition, but this will double the imaging time.
It may be necessary to add a mobile device manually if it is not shown within the source list. The option to ‘add phone’ is on the right hand side of the screen.
Selecting the ‘Review Scan Results’ option will allow you to analyse the results, filter, tag, and create comprehensive reports. The Summary page will give core information including scan, search profile, statistics, captures and target device information.
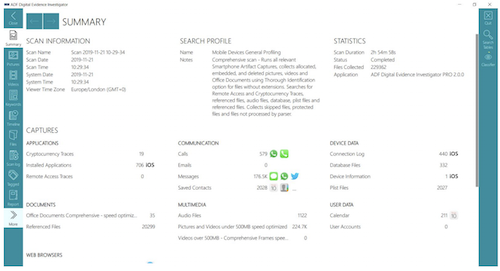
On the left-hand side, there are buttons for quick navigation to different aspects of the results. It is also possible to navigate to different subsections of the capture by clicking on the headings shown in the ‘Captures’ section.
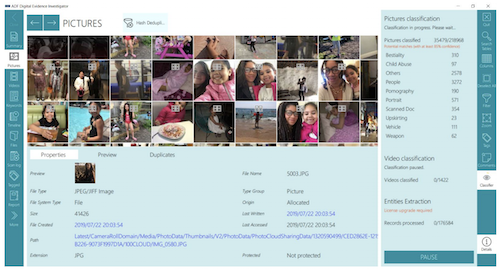
When viewing images in DEI PRO, hash deduplication is automatically set as a filter, meaning that any duplicate photos will be stacked and the number of images you will be shown is reduced. This is indicated by the ‘hash deduplication’ icon, which looks like four squares on top of the image, and the record number will show ‘[number]/[number]’.
The properties of the image provide in-depth information such as file path, last written, creation date, and MD5 hash. There are also hyperlinks associated with certain properties, so you can navigate to a file on the Timeline tab or view the file within its associated folders. Some files may have linked artifacts associated to them, which is interesting as you are able to create a picture of the origin, for example, if a file was embedded in a message. The classification of pictures will run in the background and organise the pictures based on the main visual classes.
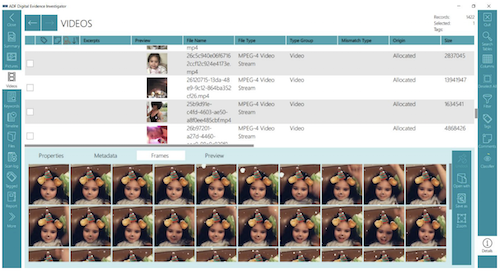
Viewing videos is comparable to viewing pictures as they have the same properties and sometimes metadata, however you can also view 50 frames of the video which have been taken at regular intervals. If for any reason it is not possible to preview the video in DEI PRO, you can choose to open the video with another media viewer.
DEI PRO comes with 14 default search profiles in which the user is able to duplicate and modify to fit the investigation. The artifact captures within a search profile recover specific records or information, e.g. user account information or anti forensic traces. Therefore, a search profile is a combination of captures. A user cannot create or edit artifact captures: you can only change the combination used to make up a search profile.
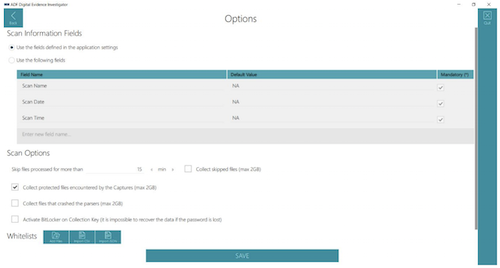
When you are configuring a search profile, you are able to set DEI PRO to collect files that crashed the parsers; activate BitLocker on the Collection key; or add Whitelists. A Whitelist is essentially a list of files the user would want the scan to ignore: these files could be system files, known images, or files which are irrelevant to the investigation.
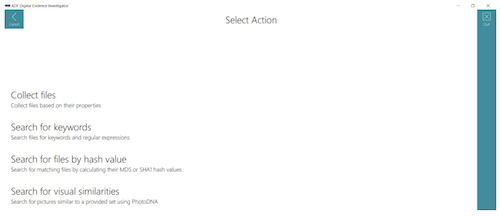
Selecting ‘New Capture’ as an option will allow the user to collect files based on their properties, search files for keywords and regular expressions, search for matching files by hash value, and search pictures for visual similarities using PhotoDNA.
These options really allow the user to narrow down their searching efforts in order to collect clear and concise data and minimise the exposure to unnecessary or potentially distressing data. The newly created capture will be added to the categories of the search profile and you could even choose to just set up the search profile with one capture.
As mentioned above, the ‘Report’ view allows for the creation of reports in various formats including HTML, PDF, CSV, Project VIC JSON file (and an export of the associated files), and the creation of Standalone Viewer report.
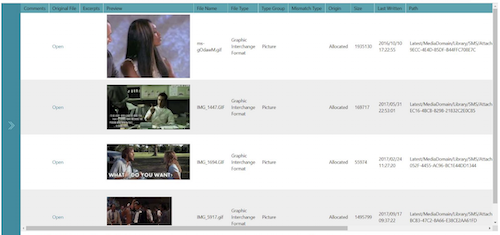
Reports can only be created while you are using DEI PRO on a desktop, not during a live or boot scan. The reporting function is fully customisable. For example, I was able to filter the files down from a mobile device scan, so that I could view and tag GIFs. I then tagged these files and included them in an HTML report, as shown.
ADF’s Digital Evidence Investigator PRO is a simple but effective tool. It allows the user to completely customise the way that they extract and preview evidence in an investigation. The process is made simple by the easy setup and navigation of the tool. There is only a need for minimal training, as you are completely guided through the investigation.
The advanced filtering capabilities are phenomenal, with the ability to filter down data based on specific types. This is one of few digital forensic tools which allow you to process both computer and mobile device data within the same tool, and which can be used effectively in the lab as well as out in the field.
About The Reviewer
Jade James BSc (Hons) is currently a Cyber Security and Forensics Postgraduate Student. She has previous professional digital forensic experience from working at the UK’s Serious Fraud Office, IntaForensics, the Home Office Centre for Applied Science and Technology, and the City of London Police. Jade has gained experience from conducting computer and mobile device examinations as well as drone forensics, and has been involved with ISO 17025 and Quality Standards both as a Digital Forensic Practitioner and Quality Manager.


