Holli: Actually, it looks like everybody’s in here, so we can go ahead and get started. Hi everyone, my name is Holli Hagene. Welcome to today’s webcast. A few reminders: all of the lines have been muted to reduce background noise, and we encourage you to submit questions at any time through the webinar control panel. We’ll do our best to work those in throughout the discussion, and if not, we’ll answer them at the end. This webcast is being recorded and will be posted along with a copy of the slides to Exterro’s website. We’ll also be sending you a link to those materials later today, over email.
So onto the webinar. Today, we are excited to present a webinar on how you can eliminate hours of manual work with AI based video recognition. This webcast is brought to you by Exterro. Exterro delivers a fully integrated legal GRC platform that enables our clients to address their privacy, regulatory compliance, digital forensics, and litigation risks more effectively, and at lower costs. For more information, visit exterro.com. Now I’d like to welcome our speaker, Justin Tolman, forensic subject matter expert with Exterro. Justin.
Justin: Thanks, Holli. And, I didn’t cycle the slide on time while you were talking, but here it is.
Holli: No problem.
Justin: Here it is. All right, so thanks everyone for jumping in on this. Yep, that’s me. She already said it. So what we’re gonna talk about, we’re actually gonna talk about AI based video and image recognition. We’ll cover both, might as well. We added this…well, we actually added this a few versions ago (maybe two versions ago) but we’ve improved it over a couple things, so this will be good.
And as it says, we can find things like guns, knives, money, drugs etc, when we take a look at these things. So, and again, it is in FTK and FTK Plus. Now, I’ll show you both, I’ll tell you what my preference is, and we’ll also use this as kind of an introduction to FTK Plus as it’s a little bit newer within the last couple versions, I guess, of FTK, and if you’re not using it, hopefully, we can show you some reasons why you may want to, and it comes with FTK.
So anyway, let’s just do it, get out of the slides, let’s just take a look at what we’re gonna do. All right. So, jumping into FTK: Explore pane…not pane, Explorer tab. This is the default starting spot. Now the first thing we’re gonna talk about is the features that I’m gonna show you can do in both, and I’ll show you the menus in FTK and we’ll look at it in FTK Plus.
But what I wanna point out is when you install FTK now (in 7.5, in the 7.4 versions, anything above 7.4), you’ll have this FTK Plus button right here, which is new. This is not like an extra add-on or anything like that you have to pay for, it just comes with every license of FTK.
If I minimize FTK when you install (my background’s not really conducive to this icon, I guess) when you install FTK you get the normal stuff like FTK imager, registry viewer, that sort of thing (plus FTK, of course), but you’ll also have this icon for FTK Plus. (Let me close down FTK Plus that I had open.)
And you can actually launch FTK Plus either from here, from your desktop, or you can launch it from this button in here, and it will launch the same interface. The only advantage of launching it from within the interface is it will automatically load up the case that you launched it from. And we’ll have to log in. I’m using just a Windows authentication, so no user name, password, we’ll just hit login.
So this is FTK Plus. What is it? Well, it’s kind of a new interface for FTK. Not all the features of FTK are in FTK Plus, but we’ve been adding some things here and there, some quality of life things, some different ways to look at stuff. It’s a interface designed for purely review. You’re not really gonna do your hex diving, your carving, stuff like that in FTK Plus, that’s why, you still have FTK, but, you notice you can quickly get to evidence types and we’re gonna actually take a look at AI and video recognition, image recognition features within FTK Plus.
But we’ll start with maybe what you might be more familiar with here to activate that processing. So once you’ve loaded up your case with anything else that you wanted processed or whatever, once you’re in here, you can go up to “tools”, come down to “image analysis”, and we can go to “image recognition”. And don’t worry about this QuinC service thing, it will pop up every time.
Chances are, if you did the the default (I was gonna say normal, but yeah, sure) normal or default install, you’re just gonna click on “no”. What that’s doing is that’s firing off the service that the AI image recognition stuff is going to use. Again, it’ll say QuinC, hopefully that gets changed, that’s just the name of the service, it’s just running in the background, so we hit that and now it fires off that service in the background.
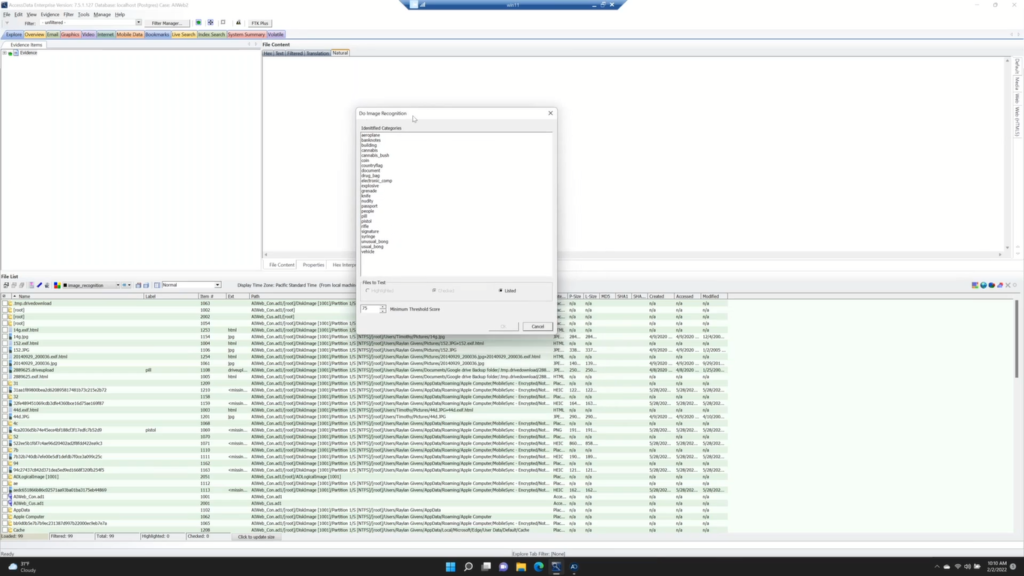
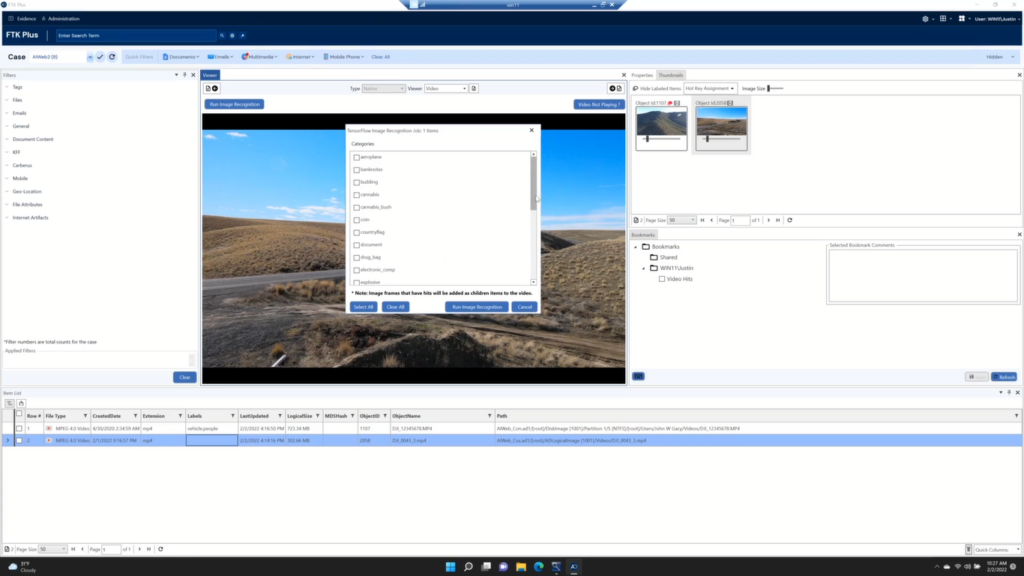
So what do we have? “Do image recognition”. All right. So we have these different categories here that we can search for. And we can see airplanes, bank notes, guns, drugs…kind of things we look for. Nudity, grenade (grenades, I guess, is a big thing!), drug paraphernalia, syringes, bongs etc. You can look for signatures, that sort of thing.
And what it’s going to do is scan through your graphics, videos, whatever, and try to find these things. Notice that you do have the ability, and I would recommend doing some filtering down to highlight it or checked. And what I mean by this is we may have a case, that has, it’s not uncommon, a million graphics or something.
Well, a lot of those will be PNGs, JPEGs or something that may build websites, or maybe just app images, or advertisements, or whatever. That kind of garbage. Well, they are images, so the system will want to scan them.
So it would be good, in my opinion, to at least filter down to either larger graphics or JPEG EXIF, which usually implies (not always) but usually we will narrow you down to user created, such as camera shot or phone shot photos. And that way you’ll speed up the process of searching through all those graphics. The other thing is by removing those, you get a lot of false hits. It is a computer searching for…it’s basically image pattern searching.
So for example, I did a search on “pill” the other day, and it brought back a Candy Crush image, because I did it on everything. And, I mean, the little candy things on top of the whatever look like pills, and it’s cool. So like, yeah, sure it hit, but I don’t really care about the Candy Crush frosting sprinkles or whatever.
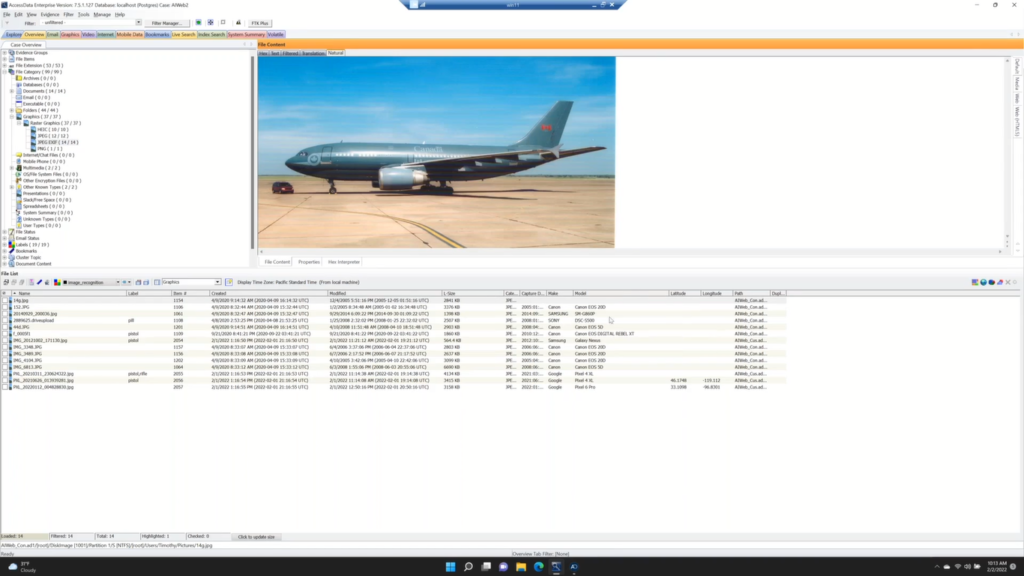
So prior to running that, you can either come over to the overview tab and you can run…just come in and select “Raster graphics”, and go to like JPEG EXIF, and then you only have these ones. Which again, not always, but typically will imply that this is camera or phone shot.
And we can see over here that, sure enough, at least all but one of them…and I’m not sure what this one is. (What is it? Oh, it’s a picture of a plane or something.) Yeah, so all, but one of these have a recorded camera and model. Here’s some phones, some camera etc. And then you could run it on this and at least you’re at a good place to start in finding those things.
Why might you run this instead of just manually looking through? Well, having the computer look through and find it for you is a time saving, in that you can run this when you’re not working, the computer can work. So you can do your normal analysis stuff, like determining which images are relevant documents, emails, things that you have to read, things that you have to make judgment calls on. That can be what you spend your 8 to 10 hours a day (if that’s all we work!) determining.
And then when you get ready to head home for the day, you can kick off an AI job to say, “hey, go through and make an initial scan of…I’m looking for pills or something.” Then you can come back and your content will be auto labeled in here, and you can just filter based on that, “hey, show me everything with pills.”
In the overview tab, again, we will have the labels here, so you don’t have to write a filter or anything, you can just come to the overview tab, notice that we have pills, people, pistol, rifle, vehicles, that sort of thing, that’s just listed in there. And you come back the next morning and you start looking through the ones that hit on those labels.
So the labels are automatically put there when you run the job. Like we saw in the menu here, those are the label names as well. So if you ran one for “rifle”, you can see there that it comes up as “rifle”, or “pistol”, In this case, “pistol rifle”, it kind of like found it for both. And so it will automatically apply those labels. You don’t have to do that.
So, again, fire it off over the weekend and you’re going home for the night, come back in the morning, it’s gonna be ready for you here and you can then just go through the things that you want. This is out of a video, but notice that it’s still identified this little ATV here, and we’ll take a look at video processing here in a little bit.

So it’s automatically hitting on those, automatically labeling them so that you can just come back in, it gives you a narrow down on those things. You can also scan for like, money, drugs, all that sort of stuff. And it’ll just create these label.
So that’s the basic workflow here in the FTK interface. Just come up to “tools”, “image analysis” and “image recognition”, choose the ones that you wanna search for, hit it off. You can work while it’s running, that’s not a problem. It’s just gonna do its thing in the background, so you can fire it off.
If you’re gonna be looking at emails and documents and other things, or you’re just going out for lunch or whatever, you can fire it off, come back, look at other evidence, see its progress as these labels will fill in as it goes through. So however you wanna do that.
This is especially a good workflow if your lab uses, say, reviewers. If you have a primary investigator, and then you can distribute evidence out for reviewers, then you can run this as the primary analyst, the forensic specialist, whatever you may be there, and just kick them off and then assign these different labels to different reviewers within your department. You can export out to FTK’s portable case function, you can assign them a new case in FTK Plus to look at them that way.
And so it helps distribute that workout, that sort of thing, especially if you’re gonna go outside of your department. If you are a centralized lab, and you have, say, detectives or analysts from other companies, you’re, you’re doing most of the work for them. You can break it down into these labels so that they can just quickly look through as well, while you’re working other cases, and that sort of thing.
Set up requirements: so the set up requirements for this to work are on the website. It’s all free…like FTK, you’ve already bought, but the downloads and the install packages for this are free downloads. And it’s walk through on the website. We’ll be sure to link that to you. (I don’t have it right now. I’ll look it up here in a little bit.) But it walks you through those steps to get it going.
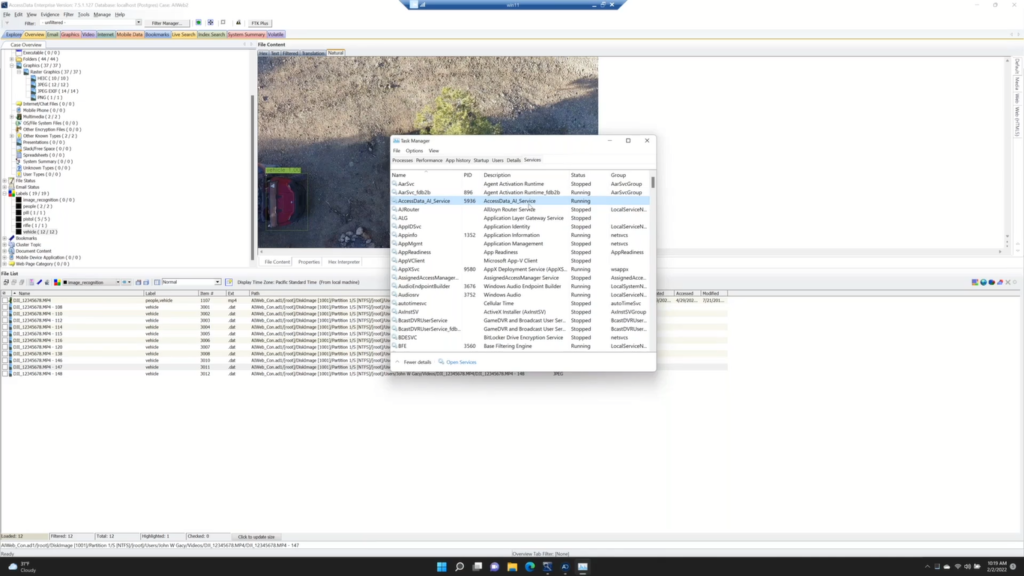
Basically it depends on what you want. If you want just the AI abilities for it to scan these images, it’s a one installer which installs the…let’s see here (task manager, we’ll go over to services) and it installs the AccessData AI service. So that will install, get it going, it connects in, and those filters that we saw are already trained. You don’t have to train FTK to do, or to find those things, it’s already trained in there. And it will load those objects in by installing this AccessData AI service.
Now the other thing you have option of installing, but it’s not required by Exterro FTK, is if you have, say, an Nvidia card or another graphics card that has CUDA cores, and you want to take advantage of those CUDA cores, you do have to install some additional Nvidia packages.
And again, that’s all in the user guide as well. It is optional, not necessary for this to work, but adding those CUDAs will of course speed up the processing. But it is a kind of a more involved install.
But as far as the base run, it’s just a download from our website, the AccessData AI service, I’m sure that’ll change whenever they get around to it, to maybe the Exterro AI service or something, but as of right now (you know, because Exterro bought AccessData ), you just need to install that and then you’re good to go.
How do you know if you installed it correctly? Well when you install this, it should be running, that’s your first clue! And then the second one is if something didn’t install correct, again, it’s just a one installer so it should go through, but you won’t have those items selectable. When you go to “tools”, “image analysis”, “image recognition” and say “no”, you won’t have the list of items. Like, it’ll be blank. And so you’ll just have to go back, reinstall it.
But again, pretty straightforward, the user guide is on the website on the FTK page. The more powerful your system is, obviously the quicker it will go, but no crazy requirements there. If this list doesn’t populate, if you come in and it’s blank, then either you haven’t installed the AI service or something kind of messed up there. But, again, it’s pretty much just a one step through install and you should be good to go.
We’ll jump back into FTK in a bit. Let’s go over to FTK Plus. Again, you can launch it from the shortcut on your desktop, or you can launch it from within the case. Now nothing’s loaded here because notice that we have not selected a case. This is pretty cool here in that you can quickly see all cases that are assigned to you as a user.
So you can load up one or multiple. This does have the ability to do multi case, so if I select 2AIWeb and AIWeb2, notice that we can see both of them here and can cycle through and we can search both at the same time. For this one though, we only need AIWeb2, at least for now. So it quickly loads the case. Again, you will see all cases that are assigned to you. If you are an admin level user, then you will see all cases in this list, but this is a way you can do it.
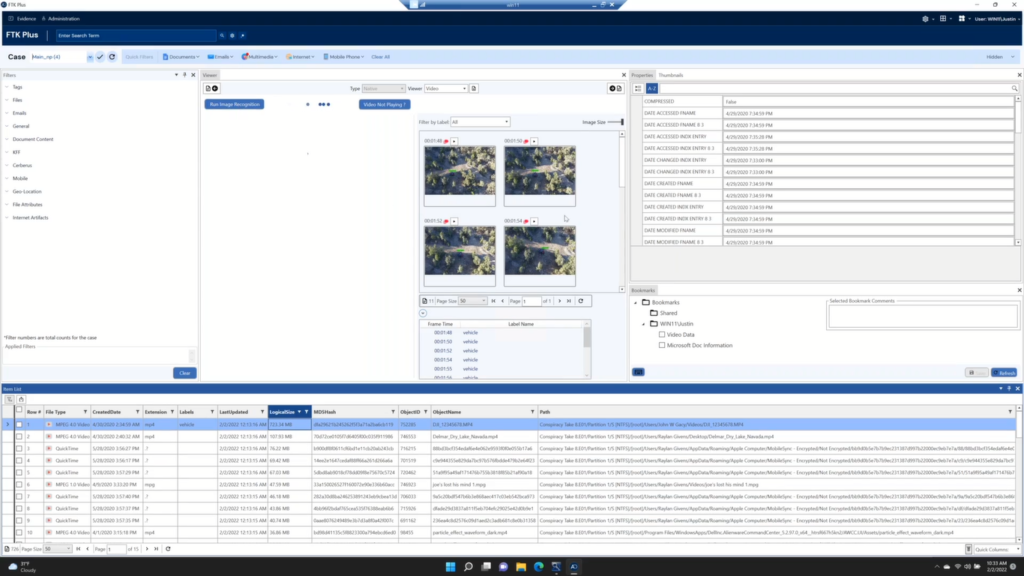
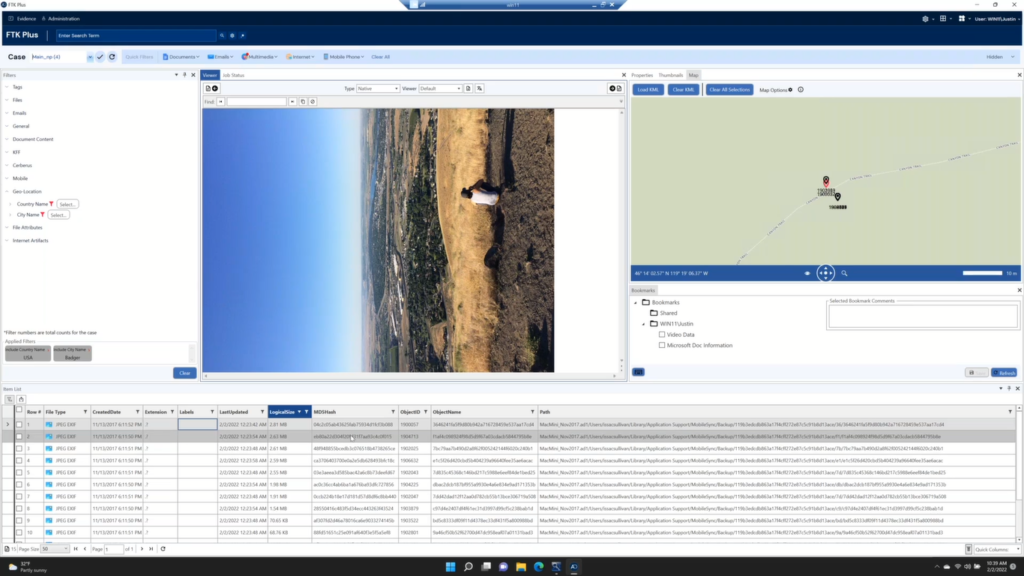
So let’s first go to video, and we’ll filter down by the videos. And we have a video here, and we can see that the labels (because I’ve ran the AI scan or the video scan for vehicle and people earlier). So we have our label here. And then what we get generated is also these thumbnails over here on the right that show where we’ve got various hits.
So I could play this video and it’s a really riveting video of the desert or whatever. But these shortcuts here will take us right to where it detected the thing. So in this case, I scanned for a vehicle and we get a hit on this ATV. (Let me scan up my thumb size.)
And it might be a little small, but there is a little green bounding box. I’ll show you where you can see those a little better for reporting and bookmarking here a bit. But then we also have people getting detected here because we have somebody there flying this drone. So you can jump in at the various parts.
Now this is a short video, so it wouldn’t take too long to just watch it yourself. But we know that a lot of times we can have long videos that people have recorded of contraband or things that they shouldn’t have and you can run this on there. We also have our timestamps here that you can use as well.
So, if you wanted to say, bookmark this…so we come in and we have a hit here on this and we wanted to take a look. So, we can double click on this to view this larger image. (Let me scale this. If I can grab that edge there and bring it up.) And notice that we have our hit here, “people” and we have a car as well, but this one is marking the person. This one is marking the vehicle. So vehicle down here.
We can also right-click on these and we can give it a bookmark. And we’ll add it to here. (Close.) And it will add that screenshot as a bookmark. Actually we gotta create a bookmark first, so we’ll just say “video thumbs” or “video hits” because we’re not bookmarking the thumbnail, we’re bookmarking the hits. So we can do “bookmark assignment”, and assign it to that and “save bookmark”. There we go. (Close.) So that’ll put that in there for us.
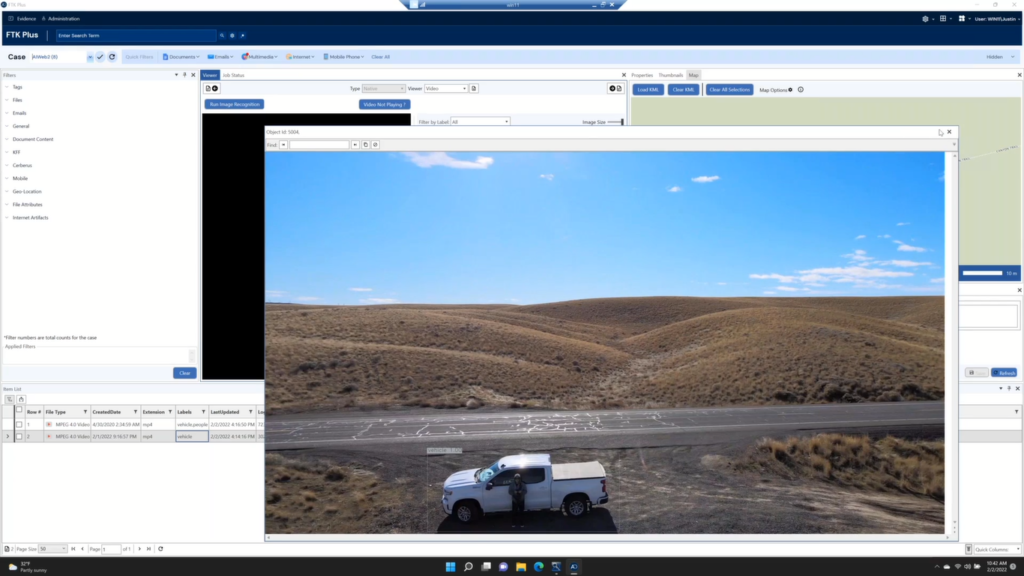
If you haven’t got a hit on there, you’ll get this where it is the video. We can still watch the video here, another desert: a theme! But notice we don’t have the thumbnails. Now, how do we process this video for objects? So we…notice this button right on the video, we can click “run image recognition” and it’s going to bring up our categories that we have.
So we could click on say “vehicle”, if we wanted to hit on vehicles, we have people, rifles, guns, cannabis, billing, whatever. So we’d select “vehicle” and then we could click “run image recognition” and that’s gonna kick off for a little bit here while it scans. But it’s gonna generate that same thing if it finds anything through here. So, again, short video, so it wouldn’t take long for us to just scan through, but notice we car coming and once it finishes we’ll see if it detects it.
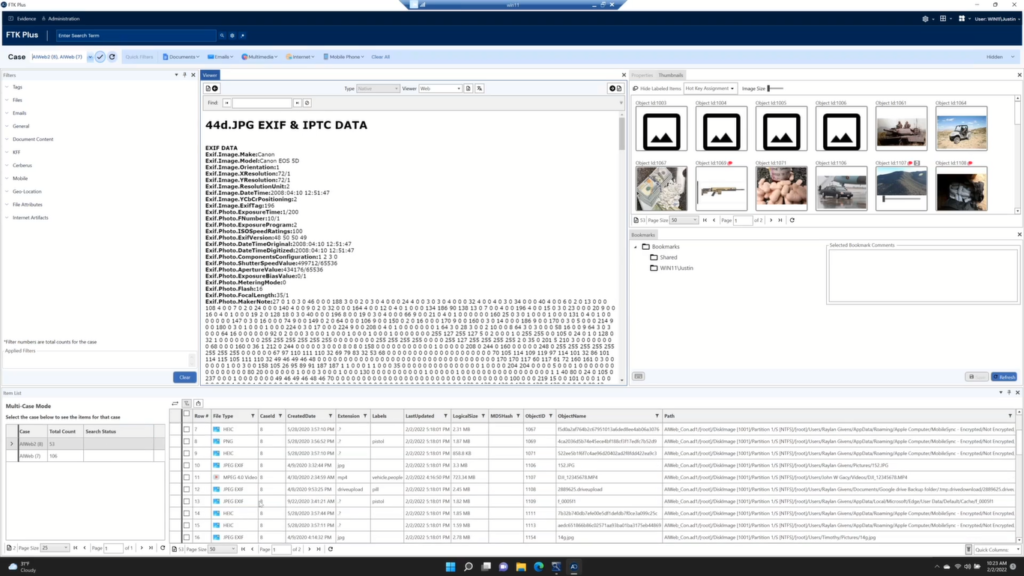
Now while that’s running, let me go back to my graphics (again, we’ll just select our graphics over here). And one of the things that we saw in FTK is we needed to go to the overview tab…not needed to, but it’s the easiest way to look at your hits on the overview tab, because it has that label menu there where you can jump through.
In FTK Plus it’s nice because you can just do all of it from the file list pane, down here. So I can select like this and just select, “OK, I want to take a look at pill” and hit filter, and then I have my image here. And I can always just cycle it and come down to vehicle, I guess, or pistol, or whatever, and choose what I want. Or I can clear that pill and get back to what I want to take a look at.
The other nice thing here is, again, it is auto labeling. I didn’t have to put these in, I can quickly filter, I can see all my information side by side, in here as well. If I quickly switch cases here (so I’m gonna deselect that and I’m gonna switch over to this case).
That’s one thing I like about FTK Plus a little more than FTK, is that you can quickly switch between your cases, and load them up. This case is slightly larger here, so we’ll load this up real quick. I got that processing job going, so it might hang up for a second here. Hold for it. There we go.
Holli: Hey Justin, we had a couple questions that I could insert in here. I think you just answered this, but the labels shown are automatically created. Is it…are they created when they’re identified or are they already in there?
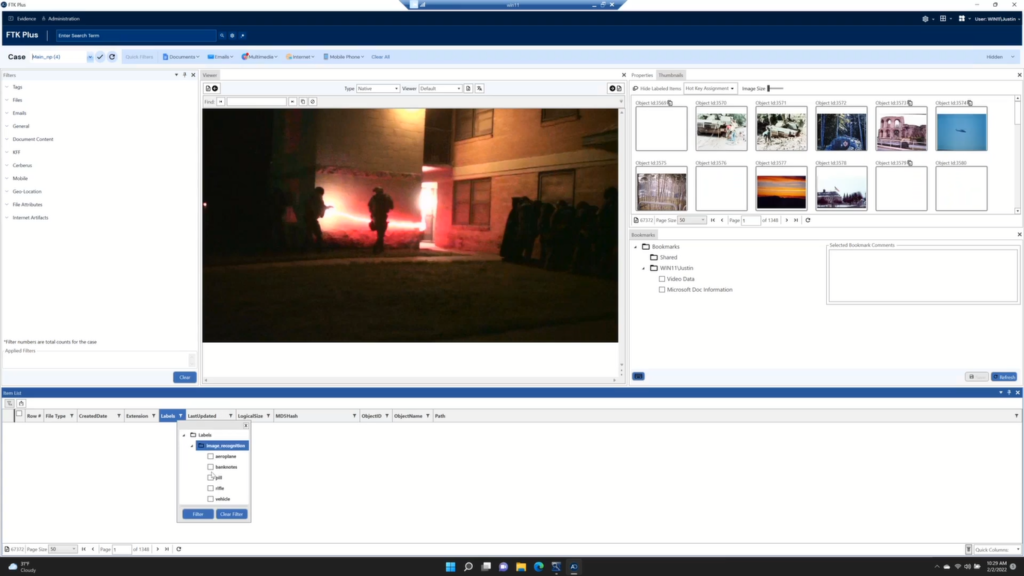
Justin: Yeah. Good question. So they’re only created when they’re identified. Yep. Only created once they’re identified. So all these here (that’s not an airplane), but these graphics only get labeled, of course, when they get found.
But this is not…you’re not gonna open up your label menu and see a bunch of junk. Notice that I switched cases, and this one has airplane, bank notes, where the other one didn’t. So it will…whoops. It will create the label (as I break my interface here). It will create the label when it’s detected. Yep. But they are pre-named just the same as the category there.
And we can look through here. I think this is the data set. Airplane will also get helicopters, as you can see, so that’s nice if you’re looking for that. But it’ll also get like some cars here, and then I like how it goes off and gets some sharks! Remember it’s AI. (And this is technically an airplane.)
But notice that we are…we’ve cut down our images. This case has…I can’t remember, I wanna say like around 100,000 graphics. So, we’ve cut it down to 51. You know, where if you were looking for airplanes, that’s… a couple miss hits on a satellite or a old car with kind of stylized edges or whatever: 51’s a lot easier to go through than 100,000.
So, again, you can run those, the labels are there. You can toggle the filters on and off, so we can go down to “vehicle” and see what we have over there. And different things: roads, inside of a vehicle here, cityscape, vehicles in the background, those types of things. And you can just quit toggle through. Clear your filter down as well.
So, again, let me just show you where that video one was. Just because it’s not really a menu necessarily. You can run it through that (and I’ll show you here in a second), but usually the button will just show up right over the top. (We don’t need our thumbnail pane for videos here on this setup, I don’t think I processed for that.)
So if I sort by size here to get the big ones to the top, and I’m lagging because I was like, “oh, I’ll kick off a job!” I don’t know why I do that after all these years of presenting and teaching, why I still think I should kick off a job during a presentation!
But notice the run image recognition button right here. We’ve already ran it, we saw this earlier. And you can take a look, so that’s where you’d kick that off.
And again, where this, I think, really shines is working while you don’t, of course. You can kick it off and just come back and have it good to go. There is a nudity scan. I’ll be honest, I haven’t tested it! Haven’t loaded up a bunch of that.
But, if you’ve had those cases where it’s embedded within other videos, and you know the drill where you hit play, scrub, scrub, scrub, trying to figure out whatever. Well, you can set it to scan for nudity and it will highlight thumbs just like this as well. And you can start playing from that location.
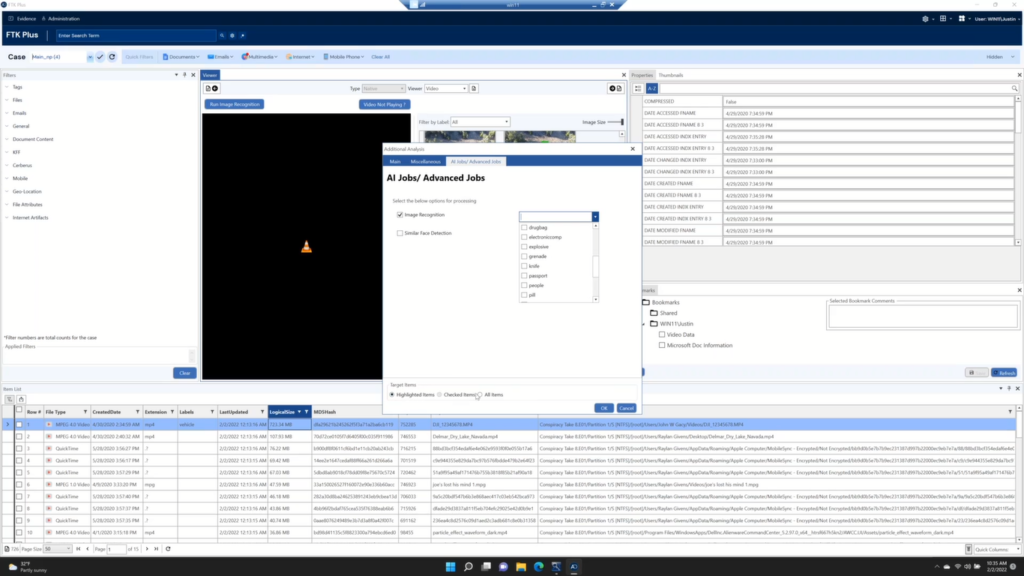
Now let’s say you’re using FTK Plus to do some other stuff, and you decide, “well, hey, I was looking at email or documents or whatever. I want to kick off a processing job to look for that stuff. Can I do that within the FTK Plus interface?” Yes, you can. You actually have most options within FTK Plus to process evidence.
So we can go to “additional analysis” here (and that’s, if you’re FTK familiar, the same thing). We can come over to “AI jobs”, “advanced jobs”, select “image recognition”. We’ll do face detection in another thing, but you can select what you want to scan for. Select whether you wanna run it on your highlighted items, checked items, or everything in the case, and kick it off, and hit “OK”. And it’s gonna say “job started” and you’ll be off to the races.
Again, you can still continue to work while it runs, you can even open up a job status window here to see what’s going on. I don’t have any active jobs on this case going. So if I refresh my completed jobs, you can see all the different things I’ve kicked off and been running here on that, and see stuff like that. So this interface, just like FTK, is customizable. You can move panes around, you can get it to where you like it.
So, again, simple point and click. Now, the thing here is if you find that you are missing a category, say you wanna scan for something that we don’t have loaded in, you will have to contact us. Currently there is no way in the tool to add extra categories. This was a simplicity decision. To get a feature in here that works well, is simple to use, they focused on that. If you have another category, like, “hey, I come across this all the time.” Let us know. My instructions were to tell you that. So let us know, we can train it and add stuff in that way.
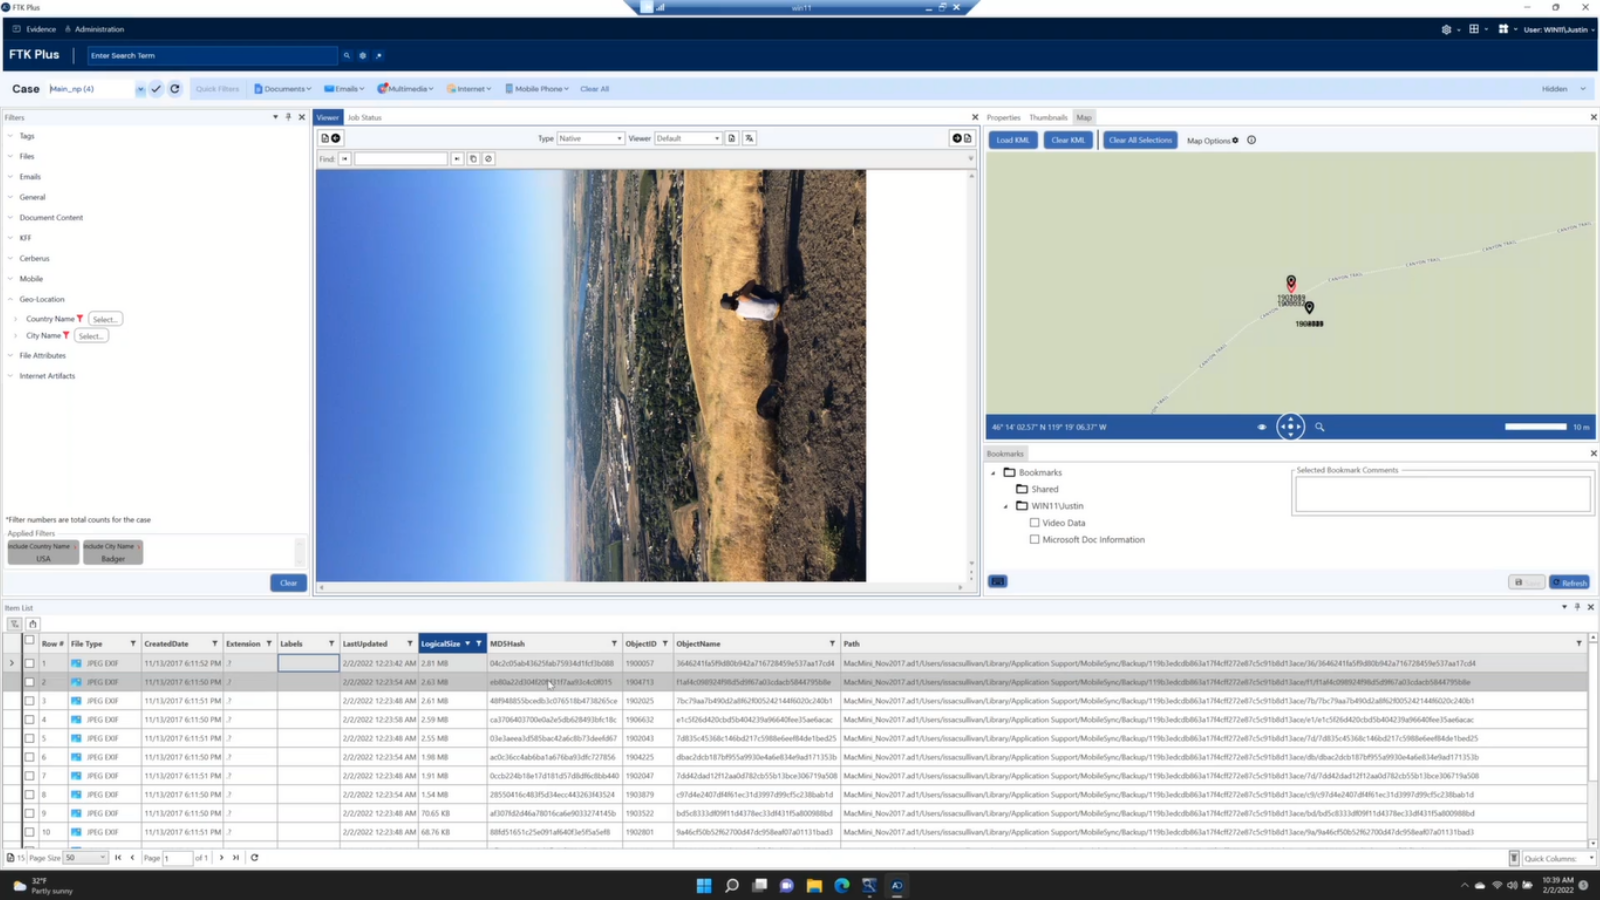
Now, lastly, as far as graphics and AI detection, this isn’t so much AI detection, but we have improved the ability to (let me switch back over to graphics here) categorize and map. So, again, within FTK, if you wanted to use the map function it would launch a new window, and that window wasn’t as full featured as the main tool, or you have to run a Python script that ships with it to open it up in Google Earth, which is cool, but you know how it is.
So, here we’ve simplified that to where we can just click “country name” and it’s going to load up all the countries that it has detected in the images or videos here so you can quickly narrow down. You don’t have to write a filter. You don’t have to even search. I mean, you can if you had a lot, but you have your different countries here.
So like we could select “USA” there and it’s gonna filter, we can close that. And then I can come over to my city and it’s gonna populate my city here, and I could do, you know, Badger. And images are rotated, must be from an iPhone because they store theirs 90 degrees rotated to the left.
So we’ve quickly filtered down and then we can just come up and we can open up our map, and we can scan over to Badger and see the little points. Now they’re all on top of each other from that range, we’ll have to zero down a little bit. (If we can find them there.)
And then once we get to them, they’re kind of right on top of each other, but we can select them, and they’ll highlight down here in the list. (Zero down a little more to spread those out. There we go. So it’s right here.) And I’ll drag my map over. Let’s put it into this guy here so we can get a side by side view, and we’ll switch to our viewer, and so we have our graphic there.
And notice it’s moving as we select them, it moves our little pin to where they are. There’s just a bunch of images taken right on top of each other, so it’s just kind of how it be, but it will move around as you select it. I find this a lot more usable than the FTK proper implementation.
And again, this doesn’t cost you anything extra, it’s a one button push to launch this interface, where we’ve put some stuff into this code base (and I’m not a programmer) offers our team a bunch of flexibility in how they build stuff, and so we can get some better flow here.
Let’s see if this is done, and then I think we’ve covered the features that I wanted to show you guys today. We’re about five minutes shy from the end anyway. And Holli, if we have any questions…oh, do we need internet for the map? No.
So the maps are loaded in the background, so you don’t need internet to run the map. If you – and same with FTK – if you use the Python script in there to generate a Google Earth map, you don’t need the internet, but you would obviously need the internet to use Google Earth, but it generates a file that you can put on a jumpdrive or a cloud drive or something and do whatever. Is your map an offline instead of…? Yea, system tied. So it is an offline map. Yep.
What were we processing? Video on this other guy. So let’s switch over to this, and this one. So remember we didn’t have anything, but now we do. So it’s ran through this video and it’s detected the vehicle. (I just wanna open this up a little bit. There we go.)
So it’s detected the vehicle coming down the road, and then it’s detected the truck here as a vehicle. And if we ran “person”, we could also get person in there. So, notice that we scanned that video while we were talking about other stuff and it cut out all the different things in there that we told it to scan for. In this case, it was only vehicle, but we could have done person, etc.
So the applications are kind of whatever you do, but…I mean, you got a large demonstration, you’re flying drones over the top. Cool. You’re taking pictures of…one of the applications that was brought up to us is pictures of prison cells and stuff to find contraband. Cool.
Setting up for review sets. You’re not gonna actually analyze this case right now, you’re just here to get it ready for somebody else, or even for you, but for later. Cool. Kick it off, run it, when you come back, a lot of the work has been done for you. You just need to review what it found, say what’s good or what’s not good, and you’re, you’re good to go. So it’s gonna to save you time, or save your team time in the long run.
That’s some of the big improvements we’ve made, and there’s more work being done on these in future versions. This is not like, “hey, we’ve done this and that’s good!” They’re really dedicated to this feature, so they’re putting a lot of effort into it and I’ve enjoyed playing with it. And I think it’ll help you guys find the stuff that you’re looking for quicker and allow you to multitask easier without burning your brain down! Any questions? We’re two minutes up to where…
Are these static max the same as connected with FTK? Now that’s a good question. I am not sure if they’re the static max, the same ones as connected to FTK. I know the ones I played with here are pretty up to date. That’s a good question. I will have to check to see if they’re using the same map data as FTK.
One thing you can do, and again, just on that topic (not really AI connected), but you can export out graphic data in two different ways for Google Earth. You can either our Python Scriptor to do a KMZ, or you can right click and just export file list information and select the KML option here, and notice you would need to set the columns to geolocation, but then that will create a Google Earth compatible file as well. So if you need to deliver it to someone else with a dynamic map, so they can do directions or distance mapping or anything like that, you can do that.
Let me see if I can expand this window. Is the AI service only required for your workstation or does Exterro recommend having the AI service on a separate network server, which performs better local service or network service? I believe you can do both. I believe you can do both. But this one is installed on the local machine, but that would be a question for our technical engineering team, but I believe it’s both. You can put your AI service on a server. Why is this go-to webinar window so bad?!
Holli: I can read them if you want!
Justin: Yes, please do. It’s so tiny on my screen!
Holli: I’m gonna go back up to a couple that I missed. (Well, I guess you got them.) If I’m working with obscure video formats, such as DVR formats, will converting them to something like MP4 affect FKT’s ability to parse them for image detail.
Justin: No. As long…MP4 is actually the recommended format, so that would be good. That would be a good play.
Holli: OK. Does FTK work on air gap networks? Does it phone home like QuinC?
Justin: No. FTK is total air gap supported. The only thing you need is to be able to get the installer to that machine. So some USB installer, whatever, but yeah, both FTK and FTK Plus work without network connection.
Holli: Awesome. And then somebody came late, they had asked what the setup requirements are for this to work. I think you answered that, but just thought we’d say it again, reiterate.
Justin: Sure. So on the website…let me see. I don’t think they’ve migrated it yet, maybe they have, we’ll find out. Product downloads, Forensic Toolkit, 7.1, go to the download page. (Dark mode is not my friend on this!) There we go. And then we want to do…where is it? Image recognition set up information.
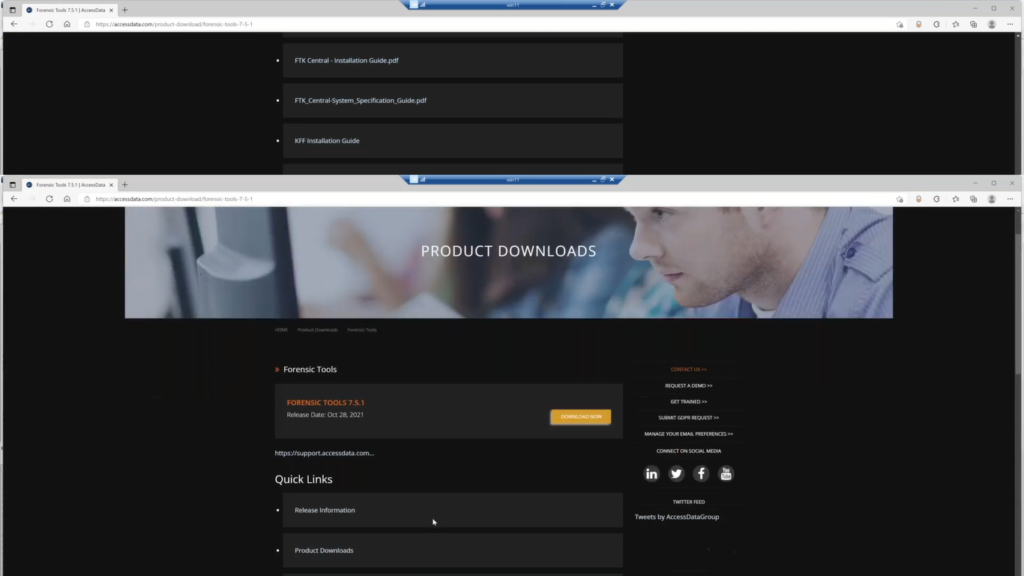
So if we come here, it’ll just walk you through…this is the CUDA install stuff, but it’ll just walk you through that. If you wanna do the CUDA….I didn’t wanna close that. And the download was on that page as well. I skipped over it, I think. Oh right here: the AD image recognition installer, right here. So you just need to install that, and this document here is for the CUDA core installers.
Holli: Awesome. I will include those links on the email we send out with the recording later. And I believe those are all the questions we had. Yep. That’s all that has come in, and we’re at…over our time!
Justin: If anybody has any questions or whatever, feel free to reach out to me: [email protected]. I’m always happy to answer questions. If I don’t know the answer, I have access to our support training and technical engineering teams, product teams. I can try to get you the answers that you need.
You can connect with me on LinkedIn as well, I’m on there. And also you can check out my YouTube page if you want more FTK information, forensic stuff: Justin Tolman Forensics on YouTube, I post stuff there weekly, so subscribe. There’s my plug. See? There you go. I’m out, I’m done. Thank you.
Holli: Thank you, Justin. Please fill out the brief survey at the end letting us know how we did and what topics you’d like to see in the future. That concludes our webcast. Thank you for joining us today. Thanks everyone.