Josh: Good morning everyone, we’ll just give you another minute or so, I think people are still logging in, and then we’ll get started.
[pause]
Good morning to our live viewers across the Asia-Pacific region, and if you are listening to this as a recording, welcome to you, wherever and whenever you are.
I’m Josh Melman from the Nuix marketing team, and our topic today is defeating encryption and password protection using Nuix Workstation.
Just a few housekeeping details before we get started: please view this webinar in full screen mode so that you can see our slides and screenshare in full size and easily read them. If you have any questions throughout the presentation, please use the ‘ask a question’ tab. We’ll have some time for questions and answers at the end of the webinar, although if anything really important comes up during the presentation, I may interrupt.
This webinar is being recorded, and the recording will be available using the same URL that you used to join us today. You can watch it at your leisure or share it.
Our presenter today is Robert O’Leary, who is the Head of Investigations US government and corporate at Nuix. Over to you, Bob.
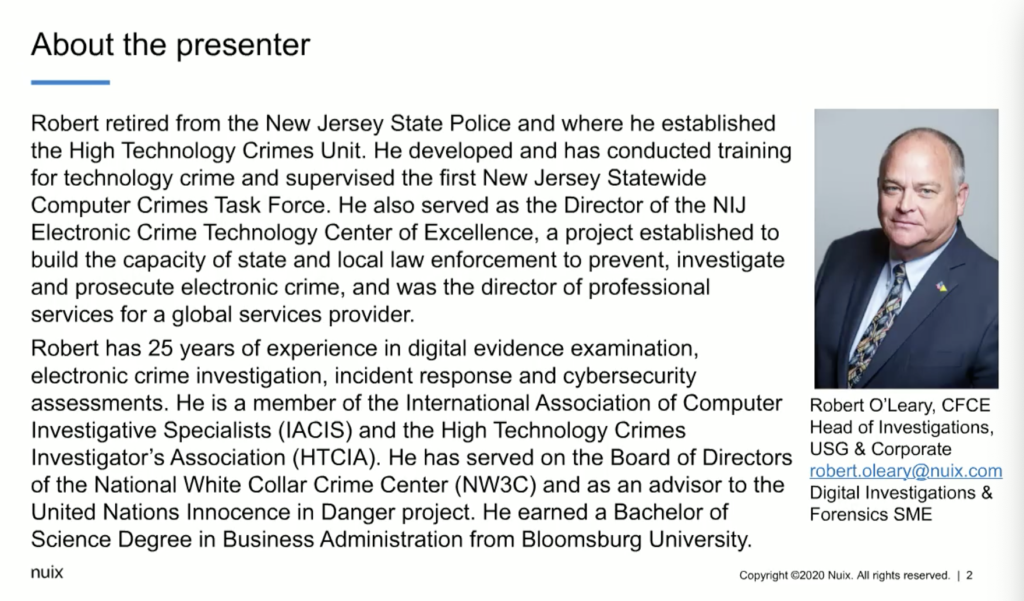
Robert: Thank you, Josh. As Josh said, I am the head of investigations for Nuix US government and corporate, but by way of background, I’ll give a little introduction. I started my career with the New Jersey state police as a trooper, moved on to detective, and I started the high-tech crime unit: one of the first statewide high-tech crime units in the United States.
While I was there, I supervised the first computer crimes task force, and I also supervised the forensics unit and the investigations teams. After I retired from the New Jersey state police, I moved on to a role with the National Institute of Justice here in the US as an agency within the Department of Justice. And I was the director of the Electronic Crime Technology Center of Excellence. Primarily there, we did tool testing and evaluation. We also developed training and conducted the needs assessment surveys for the National Institute of Kustice, particularly for state and local law enforcement to investigate and forensically examine digital evidence.
After my career with the National Institute of Justice, I served as the director of professional services for an international company, and then came to Nuix about six years ago now.
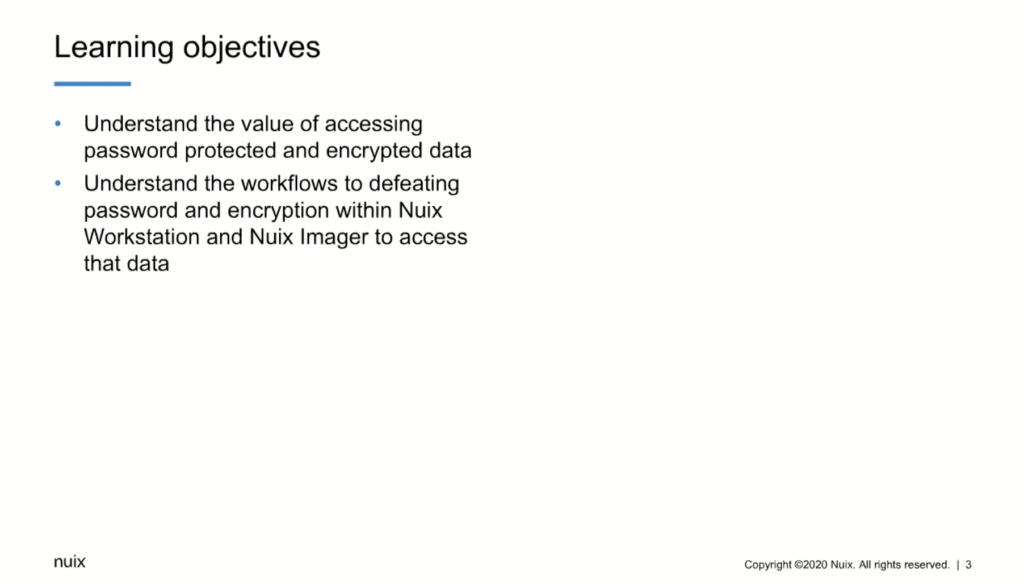
For today’s presentation, the learning objectives are basically understanding the value of accessing password protected and encrypted data within your datasets. And then also understanding some of the workflows to defeating that password protection and encryption within the Nuix Workstation and in Nuix Imager, to avoid the need to export that data out of your case, import it into another tool, and then re-import the results back into Nuix Workstation.
Some of the most important things to understand with password protection is that it is a security process used to protect information and restrict access. Whereas password protection allows only those with access to the password, will access the information. Conversely, encryption is the process of actually converting that data to an unrecognizable or unreadable form, and it’s to protect information so that only authorized people with authorization can view it.
Files, folders, or entire volumes can be encrypted. We’ve seen this with BitLocker, things like TrueCrypt, the various other volume and full disk encryption products that are available. And an encrypted file will appear to be scrambled if you try to view it in its hexadecimal or through a forensic tool or any other method. It must be decrypted in order to make it human readable or understandable. So it’s very important to understand the the value of getting to that data.
One other point — and we’ll cover it here in the presentation, as well as the demonstration that’ll follow — is that most of the encryption tools can be decrypted with either a key or a passphrase. So we’ll use both. And you’ll be able to see that.
The value of defeating encryption and password protection impacts all areas of electronically stored information or electronically stored data. Ediscovery, cybersecurity, investigations and incident response, as well as risk management. So in order to actually understand the data that’s in those datasets — the information that’s in there — we need to understand how we can access it. If it’s password protected or encrypted.
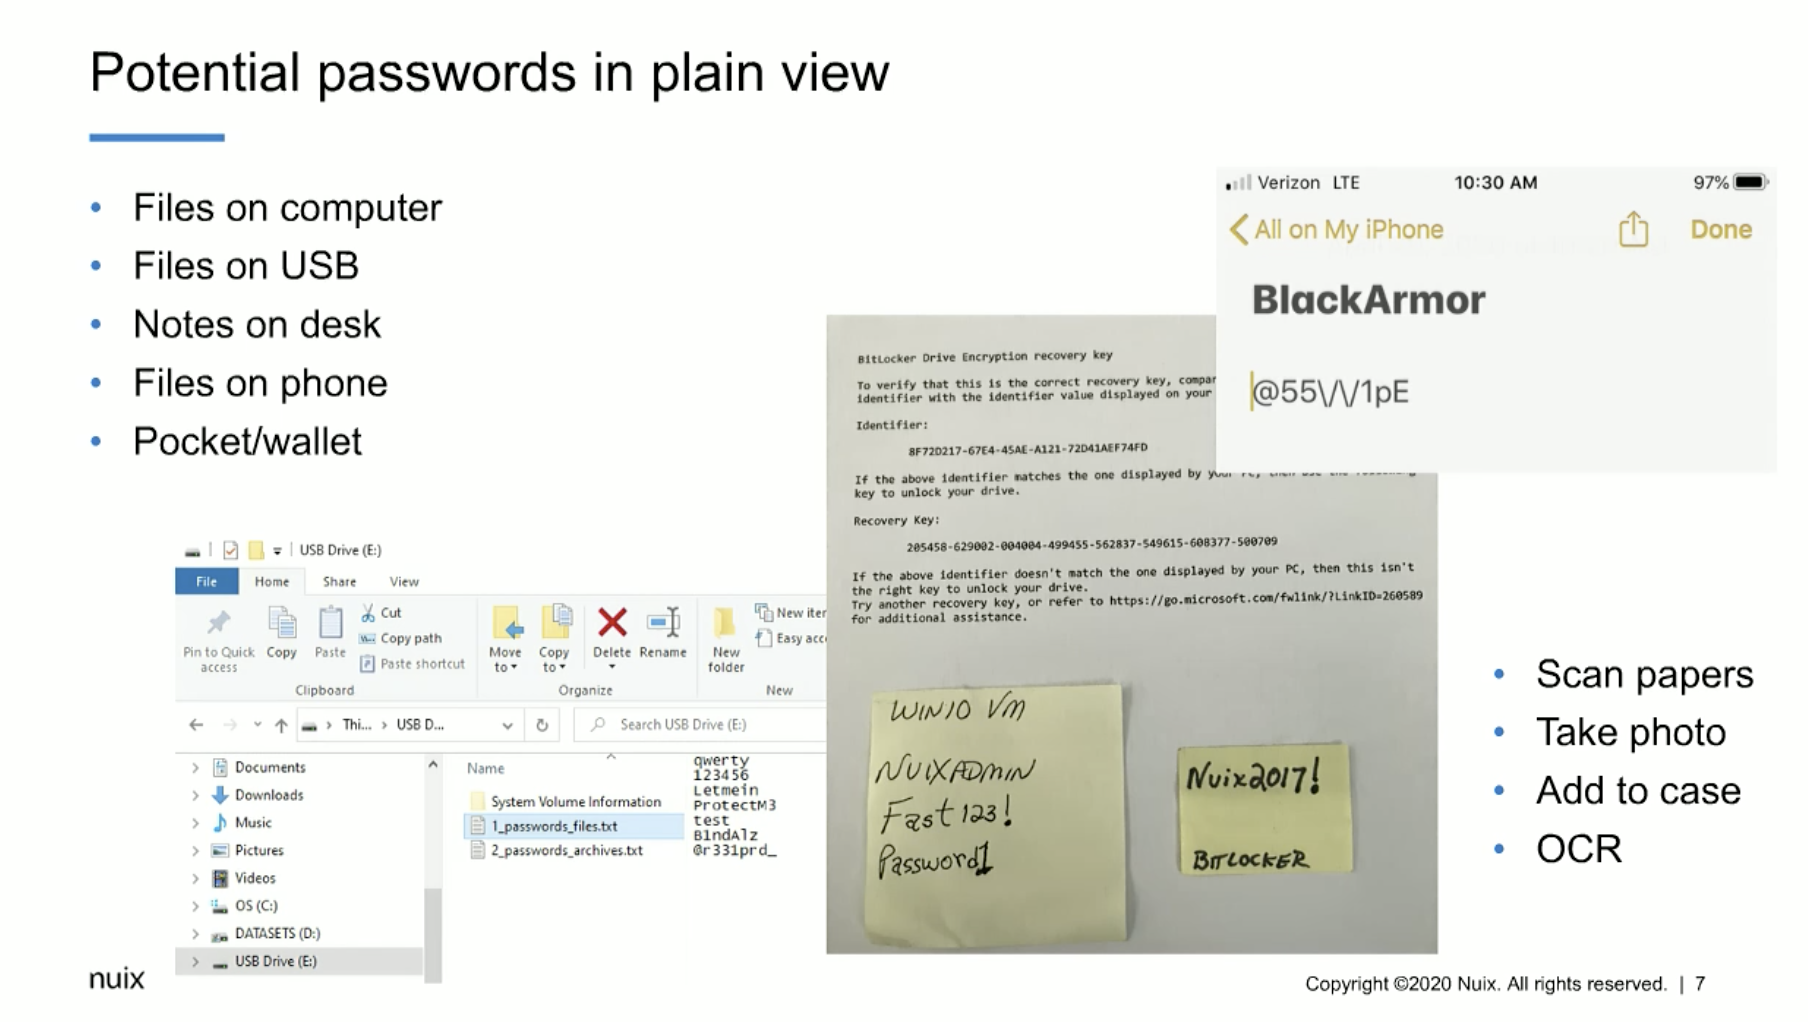
Some of the things to keep in mind are potential passwords in plain view, and these can be files on a computer. They could be files on a USB device. They could be notes on a desk, even files on a phone can be extremely important. And also what we consider pocket litter, so to speak. So it’s information that may be just in somebody’s wallet, or in a document or a piece of paper they carry around with them. So any of these things can be used, can contain a password or information that you need to access that password protected or encrypted data.

Some of the things that we recommend is being able to scan those papers or take a photo, and then we can add that to the case and OCR it. And we’ve had a great deal of success even taking photos of screens on a cell phone, if we can’t actually grab the phone or take the phone, we can take a picture of the screen. And we’re able to enter that picture into the… just that picture into the Nuix case and OCR it. And we’ve had a great deal of success doing that.
Some of the things I’d like to go through initially is understanding how we can use Nuix Imager and the encryption capability in Nuix Imager for an early case assessment into the data and understand whether or not there may be password protected or encrypted items in there, and whether or not we’re able to defeat it.
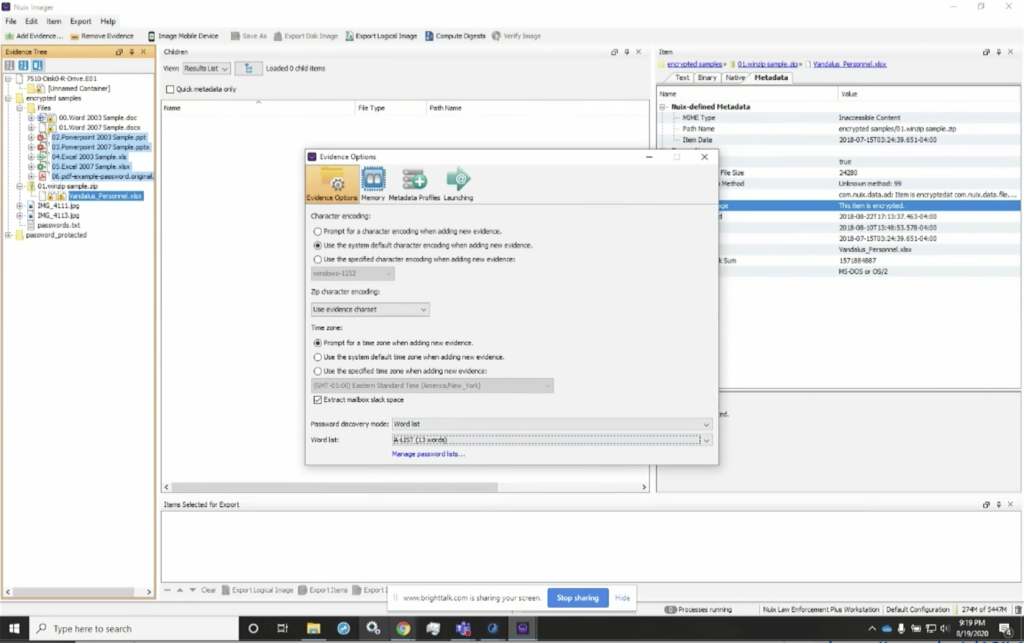
So in this case, I can add evidence into the case. But before I do, I can simply go to the global options in Nuix Imager and down below here in the global options, we can see that we have the ability to manage word lists. And in this particular instance, I have multiple word lists available to me. So I can employ a word list for my BitLockered image that I want to take a look at and see whether or not the key or the passphrase actually works to decrypt it before I process the entire thing in Workstation.
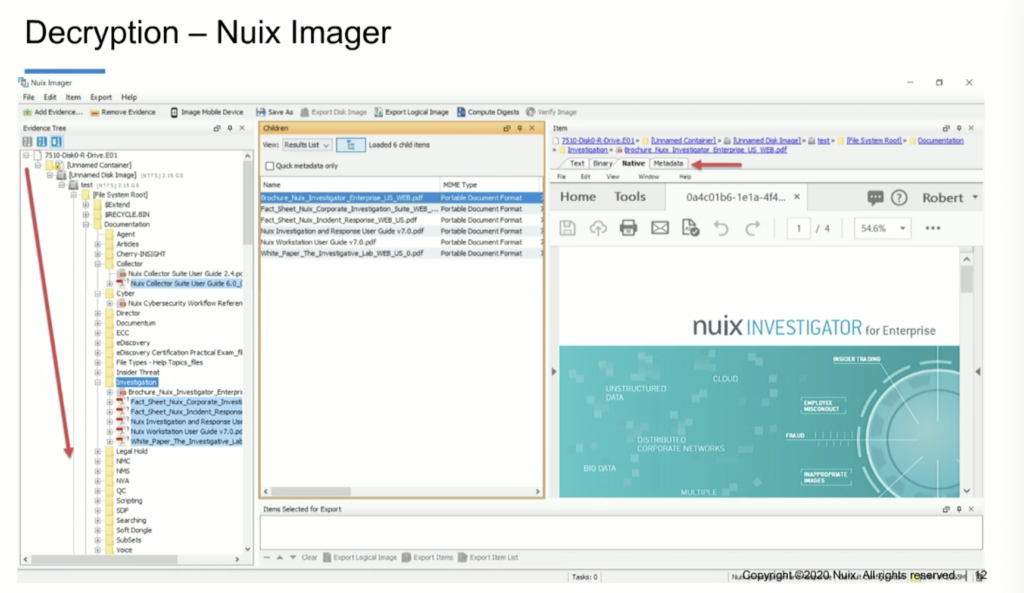
So I can simply select ‘add evidence’ and ‘add file.’ And when I do that, I’ll navigate to a BitLockered image. Here, I’ve got a BitLockered image from a laptop computer. I can add that in as a[n] evidence file. And when I do the word list that I selected in my global options, it actually contains the decryption key for this particular BitLockered image. And you can see that when I process it in Imager, it’s going to show me the contents of the entire volume. And now I can also go through and actually do a preliminary assessment of the contents of that encrypted volume. So I can see what types of data’s in there.
Looking at decryption in Nuix Workstation is very similar. What this allows me to do is select evidence and add it to my case. So as I go through this case — and actually I’m going to do these steps — I’m going to add evidence in here, including that BitLockered image that I looked at in Imager, and I can also go through and pre-filter. And as I pre-filter, you’ll notice that next to some of these items, as I expand out the directory structure, you’ll see a lock. And that lock is indicating to us that it’s password protected or encrypted. So we know that we have password protected items in this case. And what I’m going to do is go ahead and select these items, process them. And now you can see that I can select metadata profiles to be able to more closely examine the metadata around those items that are encrypted or password-protected.
Here I can start to go through. And when I use that metadata profile, I can see whether or not the item is encrypted and whether or not it’s been decrypted yet. And I can also navigate to looking at those encrypted items in my irregular items filter. So when I narrow it down very closely, I could see here that I’ve got a category for encrypted items, and I could select them and process it now, however, there’s a step that I recommend in this workflow that you perform before you just go into decrypting. And that would be to understand whether or not there are any non searchable PDFs, or unreadable PDFs, that haven’t been indexed yet. And in this particular case that we’re going to look at, I believe it’s eight. It’s very small there, but I believe it’s eight items. One of the things that we, that I, recommend is the first thing we do is OCR these.
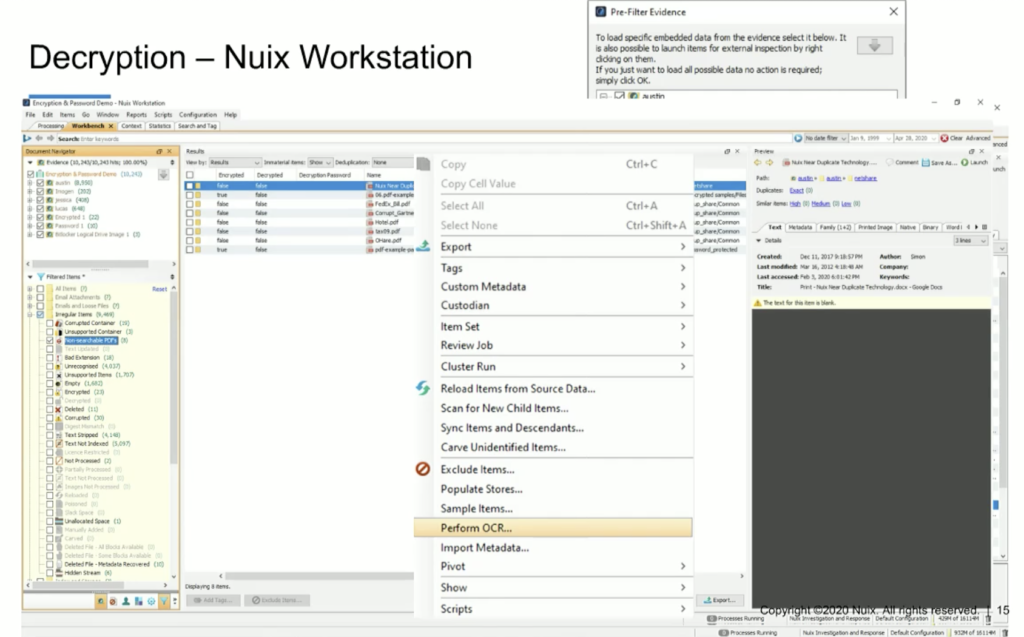
So we can simply select these items, right click on them, and perform OCR. And when we perform OCR, what Nuix is going to do is perform optical character recognition, index these items, and then add the contents of those items that were rendered searchable, and add them into the indexes that were initially created in this case. So we’re going to enrich our case.
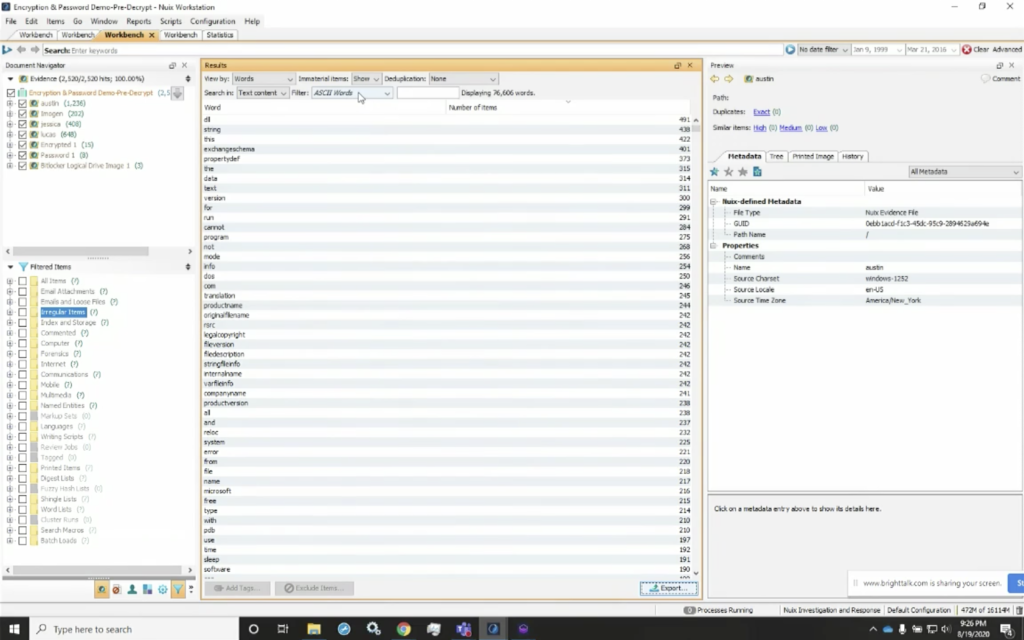
And now what we’re able to do is select, in the results pane. we can select all of the words that were indexed when we processed this case and when we OCRed those non searchable PDFs. When we look at all of those words, you’ll notice in the lower right corner of the results pane, we have an export option. So we’re going to select the export option. And what that allows us to do is export a CSV — or a comma separated value — spreadsheet, basically, with all of the words and the number of instances that those words were discovered when the data was indexed.
The next thing I’m going to do is open up that CSV, those exported words. And all I need to do is copy out the left column. I only want all of the words. So I can highlight that column of words and I can copy it. And then I’m going to paste it into a text file. And when I paste it into a text file, what I’m going to have is — as you see here in this pane — I’m going to have a text file of all the words in this case. The reason that we’re going to do this is we’re going to use these words initially to reprocess those encrypted items and reload them from source, using these words that were indexed in this dataset, based on the theory that 85% of the time you’ll have the password within the dataset. It’s a matter of identifying it and locating it. This is particularly valuable when you get the individual’s computer you have file shares and you have a cell phone or a mobile device, or some other device that may have the passwords stored separately from the computer. So now you can see that we’re going to reprocess those encrypted items, and we’re going to close the tabs, add them back into the case.
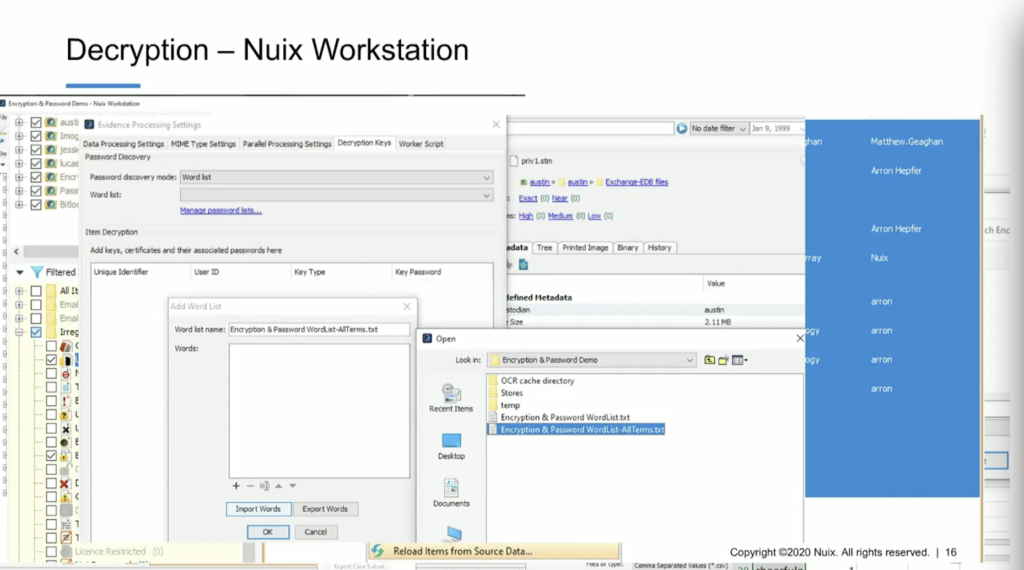
And you’ll see that we’ve imported all 114,000 words into the word list. We’re going to leverage that word list now to defeat the encryption or password protection. And you’ll notice as you go through, we’re going to go through that data. We’re going to start identifying documents or password protected items in the data set that we have the password for. And now it’s going to add them back into the case.
And if we select a metadata profile that allows us to look at encrypted items, decrypted items, and the password used to decrypt it, you’ll see that we’re able to list those out. And I’m going to take you through all of this in a live demo at the end of this presentation, but I wanted to give you an idea of what we’re looking at. One other thing that I wanted you to be aware of is we do have a document that we wrote a couple of years ago now, but it’s basically early case assessment of encrypted drives and image in Nuix Imager, and processing encrypted drives and images in Workstation. So these steps have also been documented in a Nuix publication that is available. And you can let us know if you’d like to see that.
I’m going to go ahead and start my screen share now, and I’ll walk us through the live presentation.
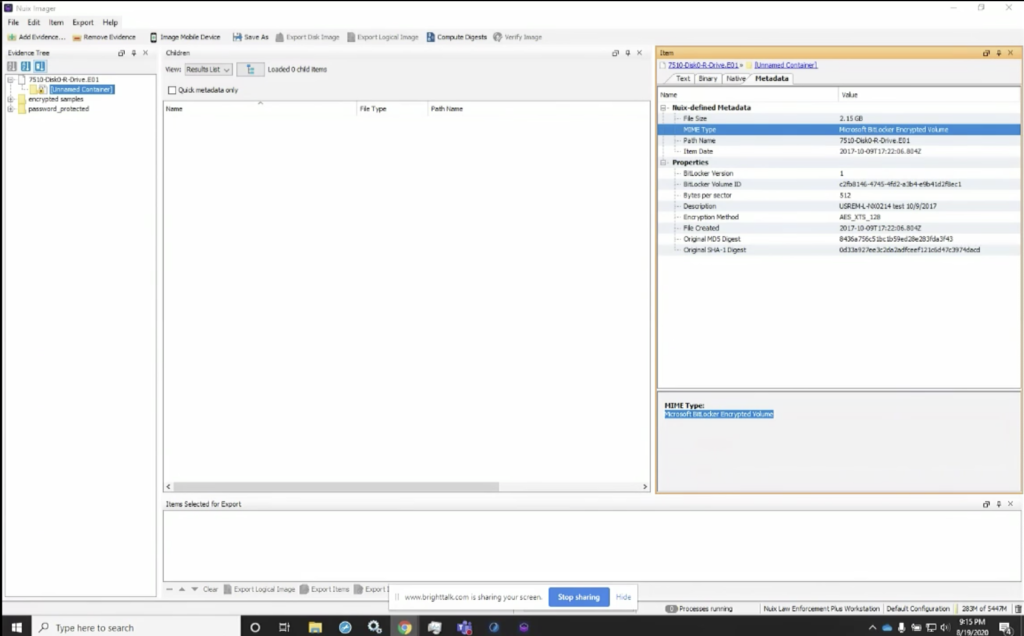
Here I’m going to load up the screen share, and you can see that I’ve got Nuix Imager loaded up on my screen. If you’ll look, you’ll notice that I use the add evidence tab, and I’ve already populated this for sake of speed, so we didn’t have to navigate through and find these pieces. But if you look here, you can see that I have the BitLocker drive image and it’s a forensic container. And if we look over at the MIME type, you’ll notice that on the right, Nuix identifies this as a Microsoft BitLocker, encrypted volume.
One of the things that’s very valuable here in the properties: if you look, you’ll see the BitLocker ID is also identified, one of the reasons this can be important is that often if the user saved off the BitLocker key, that key is often saved with an indicator that it is the key for volume ID that starts with this string of characters, C2FB. So this is a random string that’s generated when BitLocker encrypts the volume, but the key, when it’s saved off, often I’ve found it saved with that string, that first string, as the identifier for what that key will decrypt.
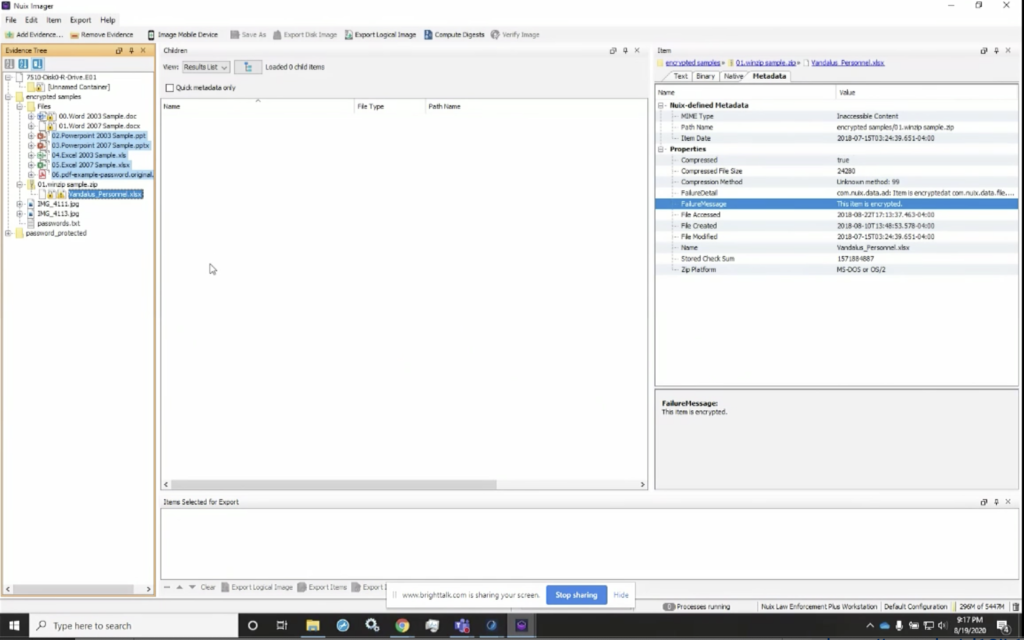
Some of the other things we can look at here is, if I look at my folder full of encrypted items, I could see here that I’ve got multiple encrypted items, and here are the same. If I go down, you’ll notice that I get MIME type is inaccessible content, but I also get the failure message that this item is encrypted. So as I go through here, I can do the exact same thing. And I can notice that there are multiple items that are encrypted in my data set.
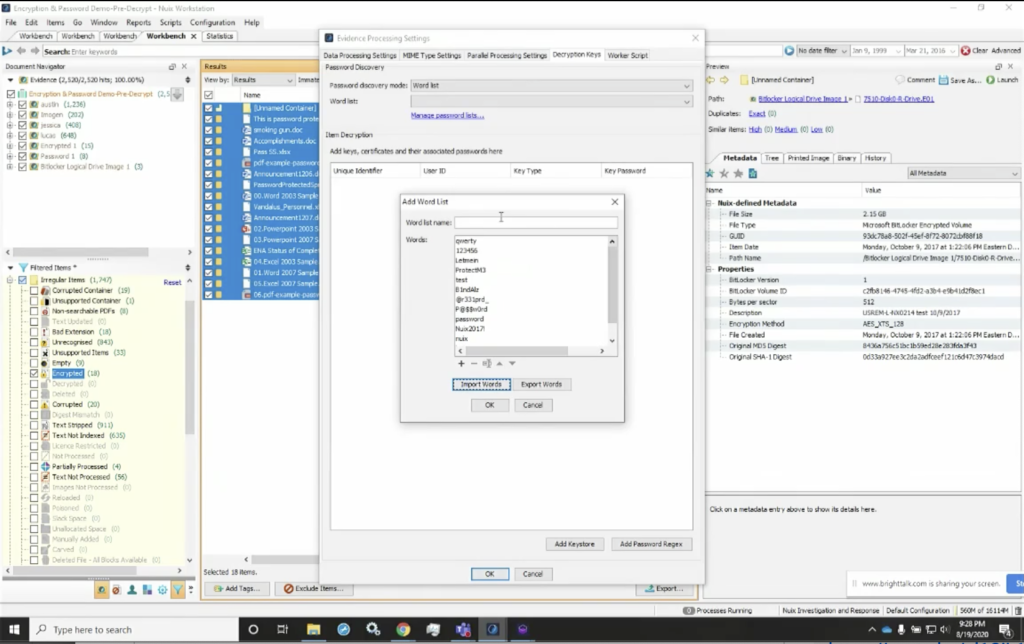
However, if I have word lists, or I have lists that I believe could be valuable in identifying this, I can simply go to global options. And as I showed earlier, I can manage these word lists. So here I have the ability to select a word list. I can manage the word list in here. I can actually import them. So if I wanted to look at the BitLocker word lists, I’ve got it here. And I can see that I’ve got the key. I’ve also got the password that I used when I encrypted that volume.
The other thing I could do is import words. So if I wanted to import a new word list, I could simply go to… let me see. I’ll go to the actual case that I have here. I can go in here, grab this list, and I’ve imported these 13 words. So I can now add this as my A list. And now I can use this as my list. So I can apply that list, and now when I select that, it’s one of my options is what word lists I want to use.
So you can actually generate lists that you can now manage and which list you want to apply. You can also merge those lists or combine them. One of the other options we have, and I’ll show you in Workstation, is where we can import all of the words in a case. In the example that I showed you in the PowerPoint presentation, it was 114,000, I believe, 601 words. We can also ingest those as well. So now that I have them, what I’m going to do, I’m not going to go through, and it is a very quick process, but I’ve already got it done.
So I’m going to take you through the same data. What you will have to do is remove it from your case and then reload it, but reload it with the word list applied. So here, when we go into those global options and I have that A list generated, I can now go through here. And when I add these items in here, it’s still going to tell me in the metadata that this is a disk image, and it’s a BitLockered image, but I’ve now decrypted it. So now I can go through and see all of the data that’s in here. So I can see, I can actually navigate through the items in this dataset or in this directory structure. And I’m able to see all of the information that’s in here and begin to explore it more closely.
Some of the other things that we’re able to do is look at the other data that’s in here and make a decision, or an early case assessment, as to whether or not the preview tells us whether or not this data is worth processing right away. Or we can prioritize it in our overall caseload to make a determination as to which would be the highest priority of data to go through. So now when we go through, I could see… actually, if I select an item, I’m able to view the contents of it as well.
The other thing I could do is make a determination as to what date I want to look at. One of the other things I can do in here is actually start to look at my data in my case. And in this particular case, what I’m going to do is open up Workstation. And I’m going to do the exact same steps that we looked at previously. In this case, I have that same case with multiple custodians in my case. I also added that encrypted folder. I added the password protected items folder, and I added that BitLocker image.

And so here again, if I look at that BitLockerws image, I can see, again, the file type tells me it’s an encrypted volume. And I also get the BitLocker volume ID again, that can be a very important string of data. If I find a BitLocker key that is identified volume ID for that particular item, I know that I can grab that BitLocker key and use it in my word list.
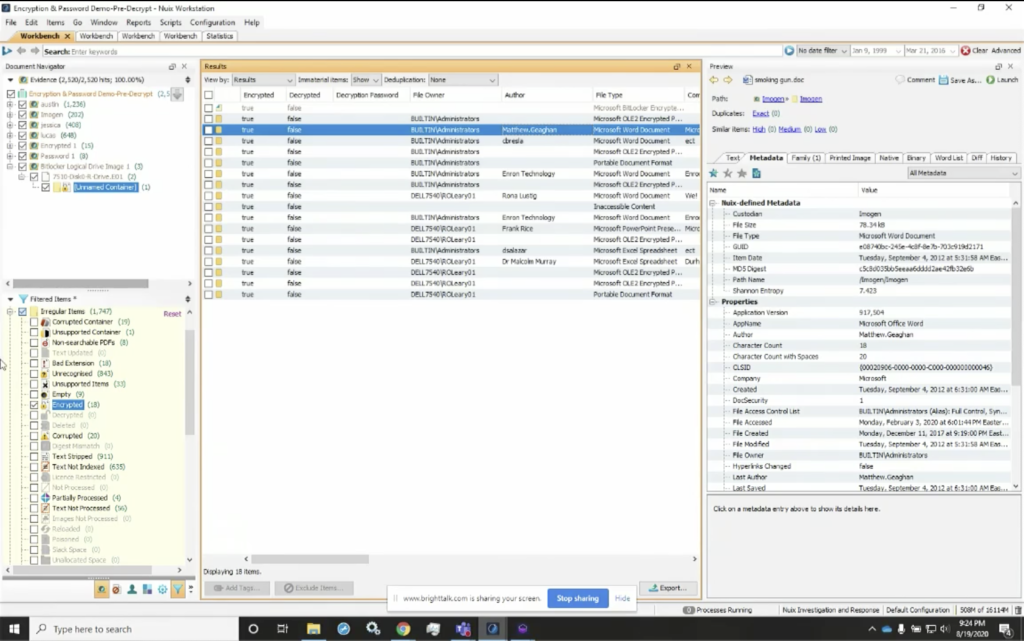
Some of the other things I want to make sure that we cover is that there’s some data in here we can look at very quickly by going to our filtered items. And again, I look at my encrypted items, and I can also change my metadata profile here. And I’ve got a metadata profile that I identified as decryption tips. And the reason I use this is because I can also go through here, and you’ll see that I can look down the encrypted column and see everything is encrypted. And none of it’s been decrypted, but if I needed to understand what other information is in here, you can see that I’ve got a column for the author. So for these encrypted items, I can identify the author. So if I know who the author is, or the last file owner, for instance, I’ve got, I can look at that. I can also see the last author here. So any one of these authors could have password protected these. I may need to go to that particular individual, or I may need to go back to the company and see what passwords may have been used to encrypt their items.
And I can also go through and see the parent name, as well as the children name, for these items. So I can see what other tips can I get out of this to understand where I would best find the potential passwords for these. So, as I go through here, one of the other things I wanted to look at again was, I’ve got the encrypted metadata profile and you’ll see that I’ve got similar information, but I don’t have the tips in there. And that’s why it’s important, I believe, to use this particular view so I can see who the author is. And if I see for instance, Matthew Gagan, and know what passwords Matthew tends to use, or I’ve seen them before, or I can talk to someone that knows Matthew that may have gotten a document for all of them and gotten a password, we may have been able to use that same password.
So again, it’s tips that may get you closer to understanding where the valuable information is. Some of the other things that I wanted to show you was here. If we look at the non searchable PDFs, again, I can simply select these. I can right click on them and I can select OCR. And I can perform OCR — or optical character recognition — right within the Nuix Workstation. And I’m able to decrypt these items within the Nuix Workstation. So I’ve got the items that are in this case. And it’ll change now from, for instance, this message here that this item is encrypted, to a[n] actual content of the text, once I’ve performed optical character recognition on it.
Next thing I want to do after I’ve performed optical character recognition, because the words in those previously unsearchable PDFs or other documents have been now added to my index. I can add them into my index. And now I can change my view from results to my word list. And here in my word list, I’ve got all the words that are in my case, and I can start to look at them. And now I also have again the option to export them.
And I can export them to a file. When I export them to a file, much like we saw here, I’m going to be able to give it a CSV. And when I give it that CSV — or comma separated value — you’ll see that I can go into my case here, and I’ve already done it. I’ve got my password and encrypted word list. You’ll notice I also have the all terms list. Then we’ll take it, take you through that. And this is going to show me all ASCII words here. Nuix also allows me to look at all the non ASCII words, all the atypical length and all the terms in the dataset.
So if I were to change to that, this will render out in a few minutes here, but I’ve got all of the strings that are in here. So it’s all terms, not just the ASCII alphanumeric characters that are in here. So I can use either one. And if I exported out those ASCII terms, and now my next step would be to go into… oh, one of the other things I did want to point out quickly: when we process the data, you’ll notice here that we’ve got a column for encrypted. So if I look here at the encrypted items, this is going to show me all the file types that were encrypted. So I’ve got six [indecipherable], I’ve got five Word documents, two PDFs, some spreadsheets, and that type of thing. So I’ve got all the data and I know what was encrypted when I processed it, but I could also select the irregular category. And now look at my encrypted items category, and I’ve got 18, and that matches my statistics totals and here are all of those password protected items.
So if I look at it again, I can see that this tells me that it’s an encrypted package file. And the name of the document, this is password protected. So I can go through here as well. And I can see I’ve got the smoking gun item. It tells me that it’s an encrypted item, but I can also see who the owner is. And again, the last author, I believe I have the owner and some other information. So again, you can still parse or glean valuable information out of this.
But the easiest thing to do is select this item — these 18 items — I can right click, and when I right click on that, Nuix is going to give me the option to reprocess these items. So I can reload these items from source data, which basically means we’re going to reload them, but we’re going to select new processing options. And I’m going to leave all of my processing options the same, except for my decryption keys here. And here are my decryption keys. I’m going to select word lists. And when I go in, I’m going to add a word list and I can import those words. And for this one, I’ll import the words here from my A list, same A list I used before, and now I can import those in here and give it a name and I’ll name it again, A list for this case.
And now I’ve got those, that list that I can use. So again, if I want to add that, I’m going to go ahead and process it. Now when I hit OK, it’s going to go ahead and reprocess this, however for the sake of brevity, I’ve gone ahead and redone it, already done it for you. And here, if we look, I’ve got the same view, so you can see here that I’ve reprocessed, this; this gives me my processing settings, where I reprocess those items. It’ll also take me through and show me all of the encrypted and decrypted items together. Again, my statistics, if I were to look at that, I could see how many were processed. And then I could also go through and look at all of the items in my case.
So now what I’ve got is my encrypted files metadata profile. If I look at it here, that’s looking at all the data in my case, but I really only want to look at those items that were previously loaded. So now, if I look at those 18, you’ll see that I’ve got them. Those decrypted items are here, and I can select those.
And there is one that I wanted to show you why it showed up that way. The count is different because this unnamed container was actually an immaterial item. So if I look at that immaterial item, it’s actually the container for that BitLocker image. So we can explain why when I hit hide, you’ll see that the count drops down to 17, which were the total number that were decrypted. So my encrypted items were 18, which included one immaterial item, or the container. We know from our view that we’re looking at the unnamed disk image was in fact decrypted and now we can see the entire contents of it and we’re able to navigate through it. So we can see all of those items here that are decrypted, and now our count matches up.
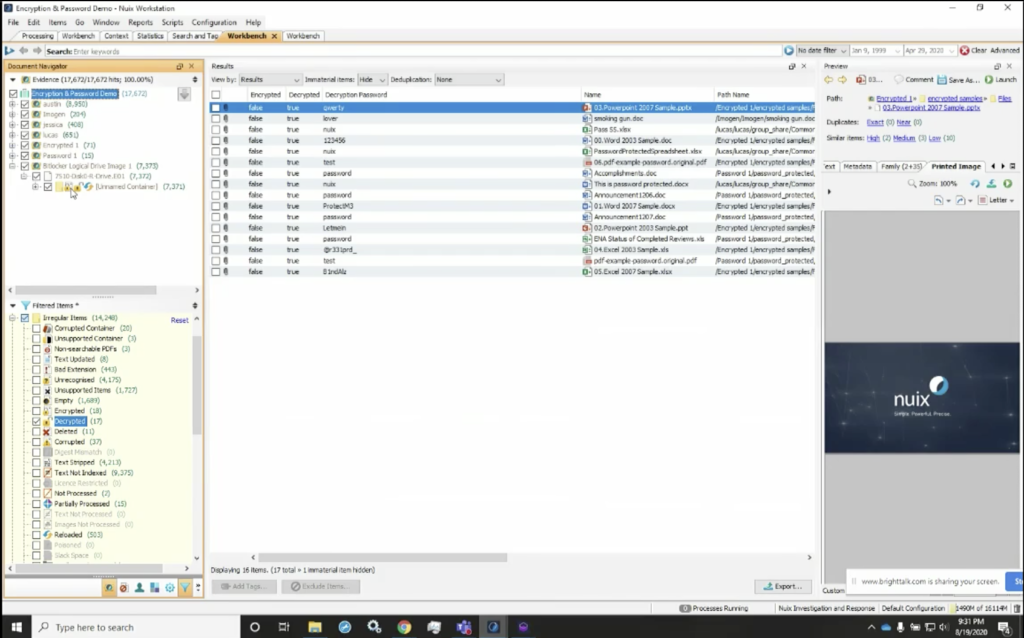
And you’ll also notice the icons here in the upper left. The navigator pane shows us that it was an encrypted item with the lock. It also shows us that there’s an unlocked icon, which tells us the item was initially encrypted, but decrypted with the supplied keys. So the BitLocker key that I added to the word list was used to decrypt it.
If I go through here again, I can start to see what password was used to decrypt these items. And the reason this is valuable is, I can export these out again and add them to my global password list. So I’m able to take this data and now look at it and maintain a global list, or a list of successful used passwords, particularly if I’m working in a corporate or agency environment where perhaps, maybe, the documents are often used or passed around, and the password is shared.
The other thing that’s important to understand is when we look at things like we’re going to go back to that decryption keys password, I could see who the owner was, but just as important, I can see who this was in the possession of. So I could see the parent name, but also who had possession of it. So it may be important to look at not only who the author was, but also the file owner. So I could see that file owner category if they’re in there as well.
So I’m able to go through that and start to look at those valuable pieces of information, and they could see that I’ve decrypted these items, and I could see the content within my case. The other thing that I wanted to show you was if we notice there, if you noticed previously when this item encrypted, it was just the smoking gun document, and we can see the test of it, the text, now it just says the smoking gun. But if we look, we’ll also see that there was a unnamed image in this particular document, if we look at the image tab, we can see that it actually did, in fact, contain a picture of a gun that appears to have smoke coming out of it. So we’ll get all of the data out of it, as well as the… understand the passwords that were used to password protect it.
Now, one thing I do want you to keep in mind is that this was all generated information. So the passwords obviously were not necessarily that complex or that difficult to guess, and some were very fundamental or rudimentary, but the actual processing time is extremely fast using the the Nuix workers, and to be able to go through an index and a password… or defeat the password protection on this very small subset of items within this dataset.
Let me see if we have some… okay. I think we have some questions that came in from the audience, Josh.
Josh: I had a question first, so if you’re in the audience and you have a question, please submit it in the questions tab. But in the meantime: when you’re decrypting files based on a word list, are you basically brute forcing them? So trying each one until you get one that works?
Robert: Essentially that’s, yeah, that’s what it is. It’s a dictionary attack, or a dictionary process. So we’ve got a list of words and yes, Nuix is going to try each of the words in that list against the password or encrypted file until it works. As soon as it does, it moves on to the next one.
Josh: And that’s still pretty quick, even if you have, you know, a hundred thousand words to try?
Robert: Yeah, actually it is. As a matter of fact we have a little bit of time and while we’re talking, I think what I’ll do is go ahead and take us over to the the word list that we used. So I’m going to go ahead and select that. And here we’ve got these 18 items, and we’ll let this run while we start looking at some of the some of the other questions that we may have had. So if we look at this, we’re going to see that — I’m pretty sure I set that up correctly — that Nuix is now going to reprocess these 18 items that are currently password protected in the pre-decryption case that I started with.
Let me just see here. The next… how common are encrypted files and drives and datasets that we see today?
Actually, we’re starting to see a great deal more encryption in files, particularly email attachments. One of the things I do like about finding them that way. One thing that Nuix does extremely well is being able to use processed data from multiple sources. So as we process data from those multiple sources, we find that there may be an email with an encrypted attachment to it, but the password is then sent using another method of communication, maybe a phone message over your cell phone; could be a Teams message; Skype message; we’ll process all of those. I’ve got a really cool case where we start to look at communication across four phones. And when we look at that, we’re able to start to see all the communications.
Now, when we timeline it. We may see that email with the attachment. And then we see a text message very quickly after that contains simply a single word, or it may even say as explicit: “the password is,” and then there’s a term in there. So we can start to look at that data as well. So it can be very valuable for us to be able to look at all of those sources of information and be able to glean that data out of there.
Let’s see, I think we have some more questions that have come in from the audience.
Is there a password dictionary available to use? Generally, it’s a good question. Well, there is. What we recommend is, though, you can customize that password list from the items within your case. So using these workflow steps outlined in the document that I had referenced in my PowerPoint presentation, we can get you that. It’s probably more advantageous to use all the words within the case, and perhaps augment them with passwords that you have known to be successful, particularly in a corporate or agency environment, that may have used the same password as the document was shared among a team of people.
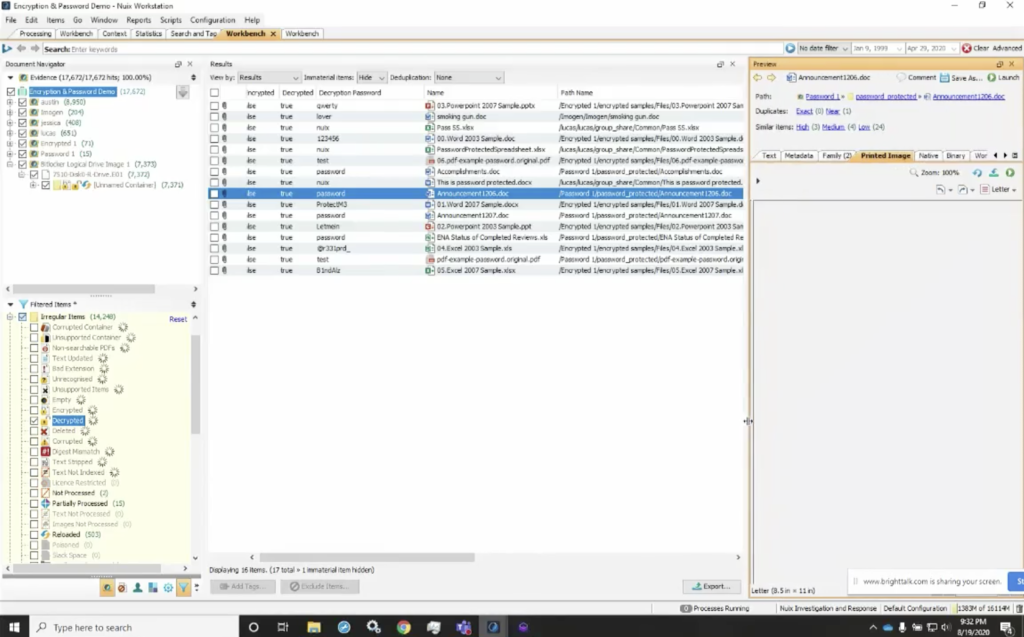
Next question that came in is: when documents are decrypted, do the original encrypted files become the parents of the decrypted files? That’s actually a good question too, as we go back to this, let me show you in this case. And I like to show it this way because it can be really interesting to see. You’ll notice that if I select these two categories for encrypted and decrypted, we maintain the encrypted version of that document within the case. So here, when I saw it on the name, you’ll see that I get two copies of each of them. And when I look where they came from, one came out of the encrypted category, one came out of the decrypted. So basically what we’re doing is keeping your data set the same as it was, we are maintaining the integrity. However, for the Nuix case, we’re augmenting that with a decrypted version of that file.
So while this doesn’t go back into your EO1 or your 81, or your MFS01, the Nuix forensic container, the decrypted version doesn’t go back into your evidence, for the purposes of your case we’ve maintained the integrity of that original evidence, but we’ve augmented your case by adding the decrypted version into your Nuix case.
So you can see here, we’ve got two versions of, for instance, this PowerPoint, and the password was QWERTY. So if we look at where that came from, we know that came out of the decrypted category. This version of that same document came out of the encrypted version of that encrypted category. So this was the original that was in your forensic container. And the second was the version that we augmented your case with.
Okay. Any other questions, anything else that you’d like to you’d like me to cover? All right. Let me see if we’ve got any other questions that came in while I was talking. I did get a question previously, how robust is Nuix decryption when compared to Passware? Candidly, I don’t own Passware. I don’t have it. But frankly, the workflow, I think for me as a forensic examiner and having been in the field, I like the capability to work within a single platform and not have to export my data out to use it in another tool and then readjust it back into my case. You know, I obviously, as diligent as we all try to be, there’s always an opportunity for errors and mistakes being made there by transferring data in and out of a tool or from one tool to another.
I think one of the best scenarios for me in my experience is being able to decrypt these within a single platform here, the Nuix platform, and be able to keep all my data in a single place and all my files within that without having to export them out and explain basically, you know, often a free… if you’ve had to testify in court or write that report, you know, you can obviously find that sometimes it can be difficult to have laypeople or people that aren’t necessarily as technologically adept as most of the forensic examiners. It might be a little more challenging to explain to them if I can explain to them that everything was done right within this tool. And it’s a built in feature and functionality, it’s obviously much easier in the explanation and reporting processes.
Okay. So we had another question came in: after a document has been decrypted, what would you recommend as the workflow for not exporting the original encrypted files? Oh, very good question. If I don’t want to export those original encrypted, I can simply select the decrypted category here. If you look at my case here, I can select that decrypted category, grab just those decrypted versions of those same documents. And you can see now I’ve de-duplicated them essentially by unchecking the encrypted, and now simply use the export capability. And I have the ability to export these items, or I can export them out as a logical image. The other thing I can do is export them as a case subset, the value in case subsetting, particularly this is a feature of Nuix that I really love because I’ve had to do it.
I’ve had cases where privilege was asserted. And so therefore the examiner can’t look at certain items within that, because otherwise it may prejudice them. So we need to subset it. So often we’ve been able to use Nuix to identify anything that fell under privileged, whether it was clergy, attorney, spousal privilege, any other privilege that could be asserted, and we can subset, we can process the entire thing, exclude those privileged items and subset the remainder, so that the ultimate forensic examiner, reviewer, or anyone else that needs access to that, doesn’t ever see that privileged information because it’s been excluded out. And then the case was subsetted to only include those items that were not subject to privilege.
So it gives us a couple of different items, a couple different options, but basically to answer your question, I would select the decrypted items only, and then export them out of the case if you needed to add them to another matter.
That one is answered. And I think that covers everything that we had so far. If for some reason I overlooked or I missed any of the questions, please let us know through Nuix marketing, or you can get in touch with me and I’ll follow up with you. Also, there will be a recording of this presentation if you’d like to review it or share it with your friends.
Josh: Terrific. Thank you, Bob. So, if you loved this webinar, or hated it, please leave us feedback in the feedback section on your screen. This helps us improve our webinars and better target them in the future. Coming up soon, we have a couple of great power user webinars for Nuix Discover. So one is on using dashboards for greater efficiency, and one is on best practices for Nuix Discover ingestions. Those are coming up in the next few weeks, and you can sign up for those in the Nuix channel on BrightTalk. And there are links to those in the attachments and links section of the screen.
Also coming up, we have a webinar on the faces of innovation report, which was produced by Nuix and Ari Kaplan advisors. And this is a webinar that will discuss the implications for law firms in the Asia Pacific region of trends uncovered in the faces of innovation report, which is all about using knowledge management in your legal and discovery practices.
All right. And with that, I think we will call the webinar to a close. Thank you very much, Bob. Thank you everyone for joining us.
Robert: Thanks, Josh.