by Emi Polito, Forensic Analyst at Amped Software
Video and audio redaction of digital media evidence is now a regular affair within law enforcement agencies. When a video enters the courtroom, the identity of any parties not involved in the case under trial or that of witnesses and victims need to be protected.
Historically, this work used to be done by in-house video or CCTV evidence units. However, the volume of evidence in need of redaction is now so vast that software tools facilitating the process are in high demand pretty much everywhere. Manual redaction has already been available in Amped Replay for quite some time. However, when dealing with newer forms of video evidence, such as body worn video footage or mobile phone video, both prone to camera shaking and unpredictable movement, it is becoming increasingly important to automate the process.
With this article, we review the newest assisted redaction solution offered in Amped Replay. Join in if you want to learn some useful hints and tips and start your journey into assisted video redactions right away!
Before Using Assisted Redaction
Machine Learning in Amped Software Products
The team at Amped Software strives to ensure their users always work with their image and video evidence in a safe and sound forensic manner. This is why they never rush to implement new machine learning models in their products without due care and consideration.
With Amped FIVE, their stance is pretty firm. The desktop version does not contain any machine learning based filters. This is because using these to enhance images in a forensic environment is simply unsafe with current technologies. They did, however, release DeepPlate a few years back to assist FIVE users with the interpretation of license plate characters in a safe online environment. DeepPlate uses a neural network trained to recognize license plate characters within a specific country. This is offered as an investigation tool, warning users that, like any human, the network can still make mistakes.
The company also recently introduced two analytical filters in Amped Authenticate to help detect images created by diffusion models and generative adversarial networks. They use machine learning, effectively, to help detect images created synthetically. Again, they are totally transparent with their user base. These tools can certainly help spot deepfakes, but they should always be used in conjunction with other traditional tampering detection filters to get a more complete picture (no pun intended) on integrity and authentication.
Machine Learning in Amped Replay
Amped Replay can be used to carry out basic image and video enhancements as well as annotations. However, it is also a tool used by many Police officers and investigators to find meaningful evidential clues in images and videos in support of their investigations. It can also perform redactions, both visually and aurally, to protect the identity of persons and identifiable vehicles and to comply with legislation. In this respect, a neural network trained to locate and redact relevant content in digital multimedia evidence can be helpful, if used safely and if reviewed by a human. This is where Assisted Reaction comes in. It is a machine learning tool capable of detecting persons, faces, vehicles and license plates in videos. It helps speed up an otherwise tedious and time-consuming process that cannot be avoided for obvious legal reasons.
Installation
If you are an Amped Replay user and haven’t updated the program yet, you should stop for a minute and ask yourself:
- Do you want to use a machine learning tool within the program?
- Does your organization allow you to do so?
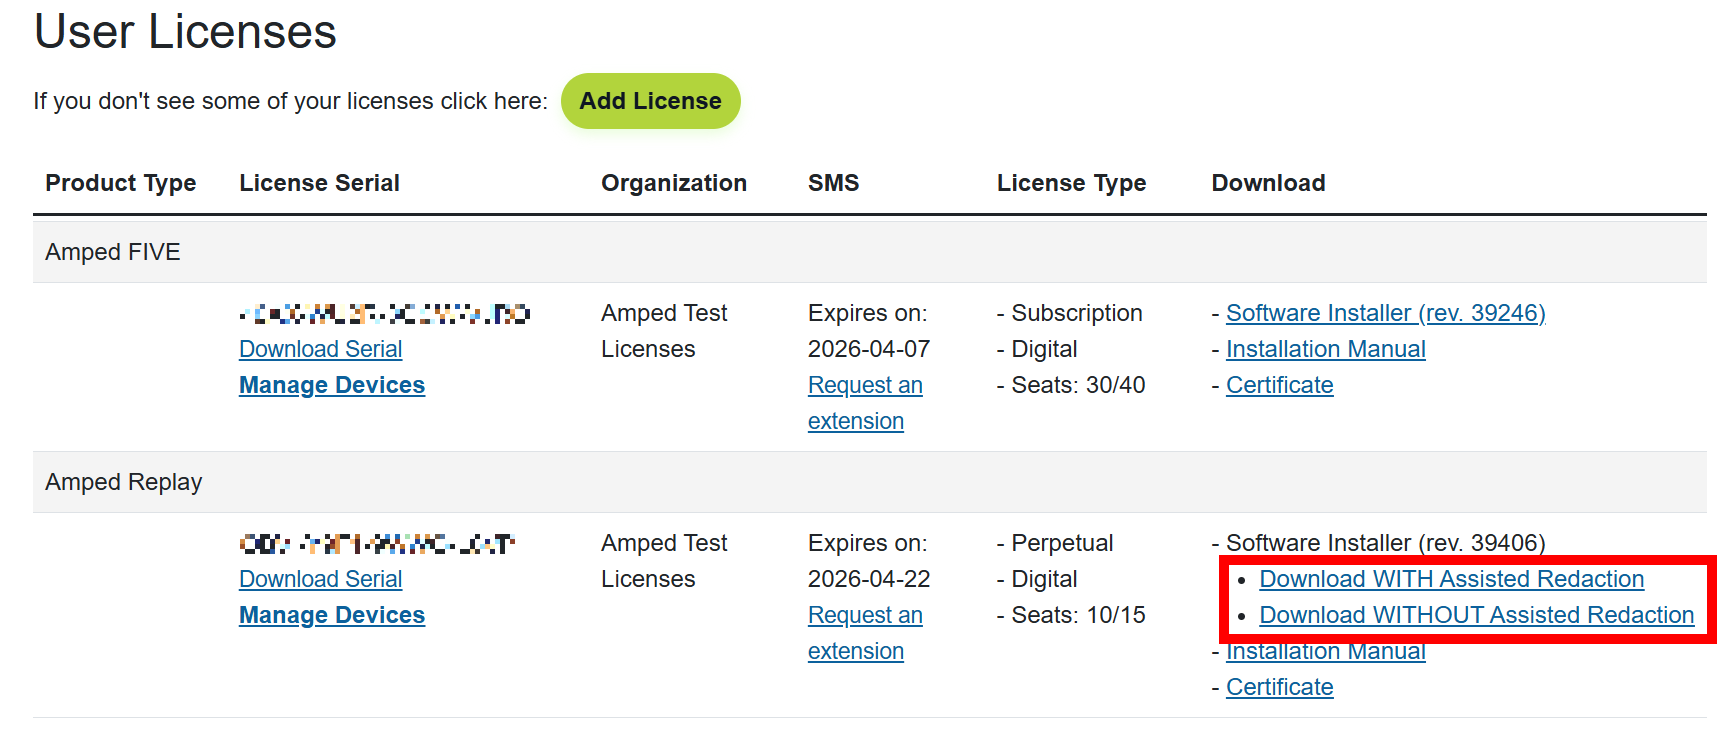
If the answer to these questions is yes, then log in to the Amped Support Portal and click on the “Download WITH Assisted Redaction” link. Install the product to start enjoying the new feature right away. If the answer is no, then click on the “Download WITHOUT Assisted Redaction” link. You will enjoy the other new features included in the release. However, the product won’t include assisted redaction or any machine learning tools.
Performance
There is a lot of thinking involved in any machine learning tools. Any process associated with this new technology can take some time, especially when there are images and videos to be processed. The new Assisted Redaction feature does not have any specific hardware requirements. However, it does use the Graphic Processing Unit (or GPU) to analyze pixels and find elements to be redacted.
For this reason, Amped Software recommends a decently powerful graphics card to speed up the initial object analysis, especially for long videos and/or when many persons or vehicles are present. The faster and better the GPU, the quicker this process will be. However, if no GPU is available, the system will fall back to using the CPU.
Using Assisted Redaction in Amped Replay
Usage of the new tool is designed to be easy and intuitive for everyone. But in this article, some hints and tips are freely offered to master it quickly.
Preparation in the Play and Enhance Tabs
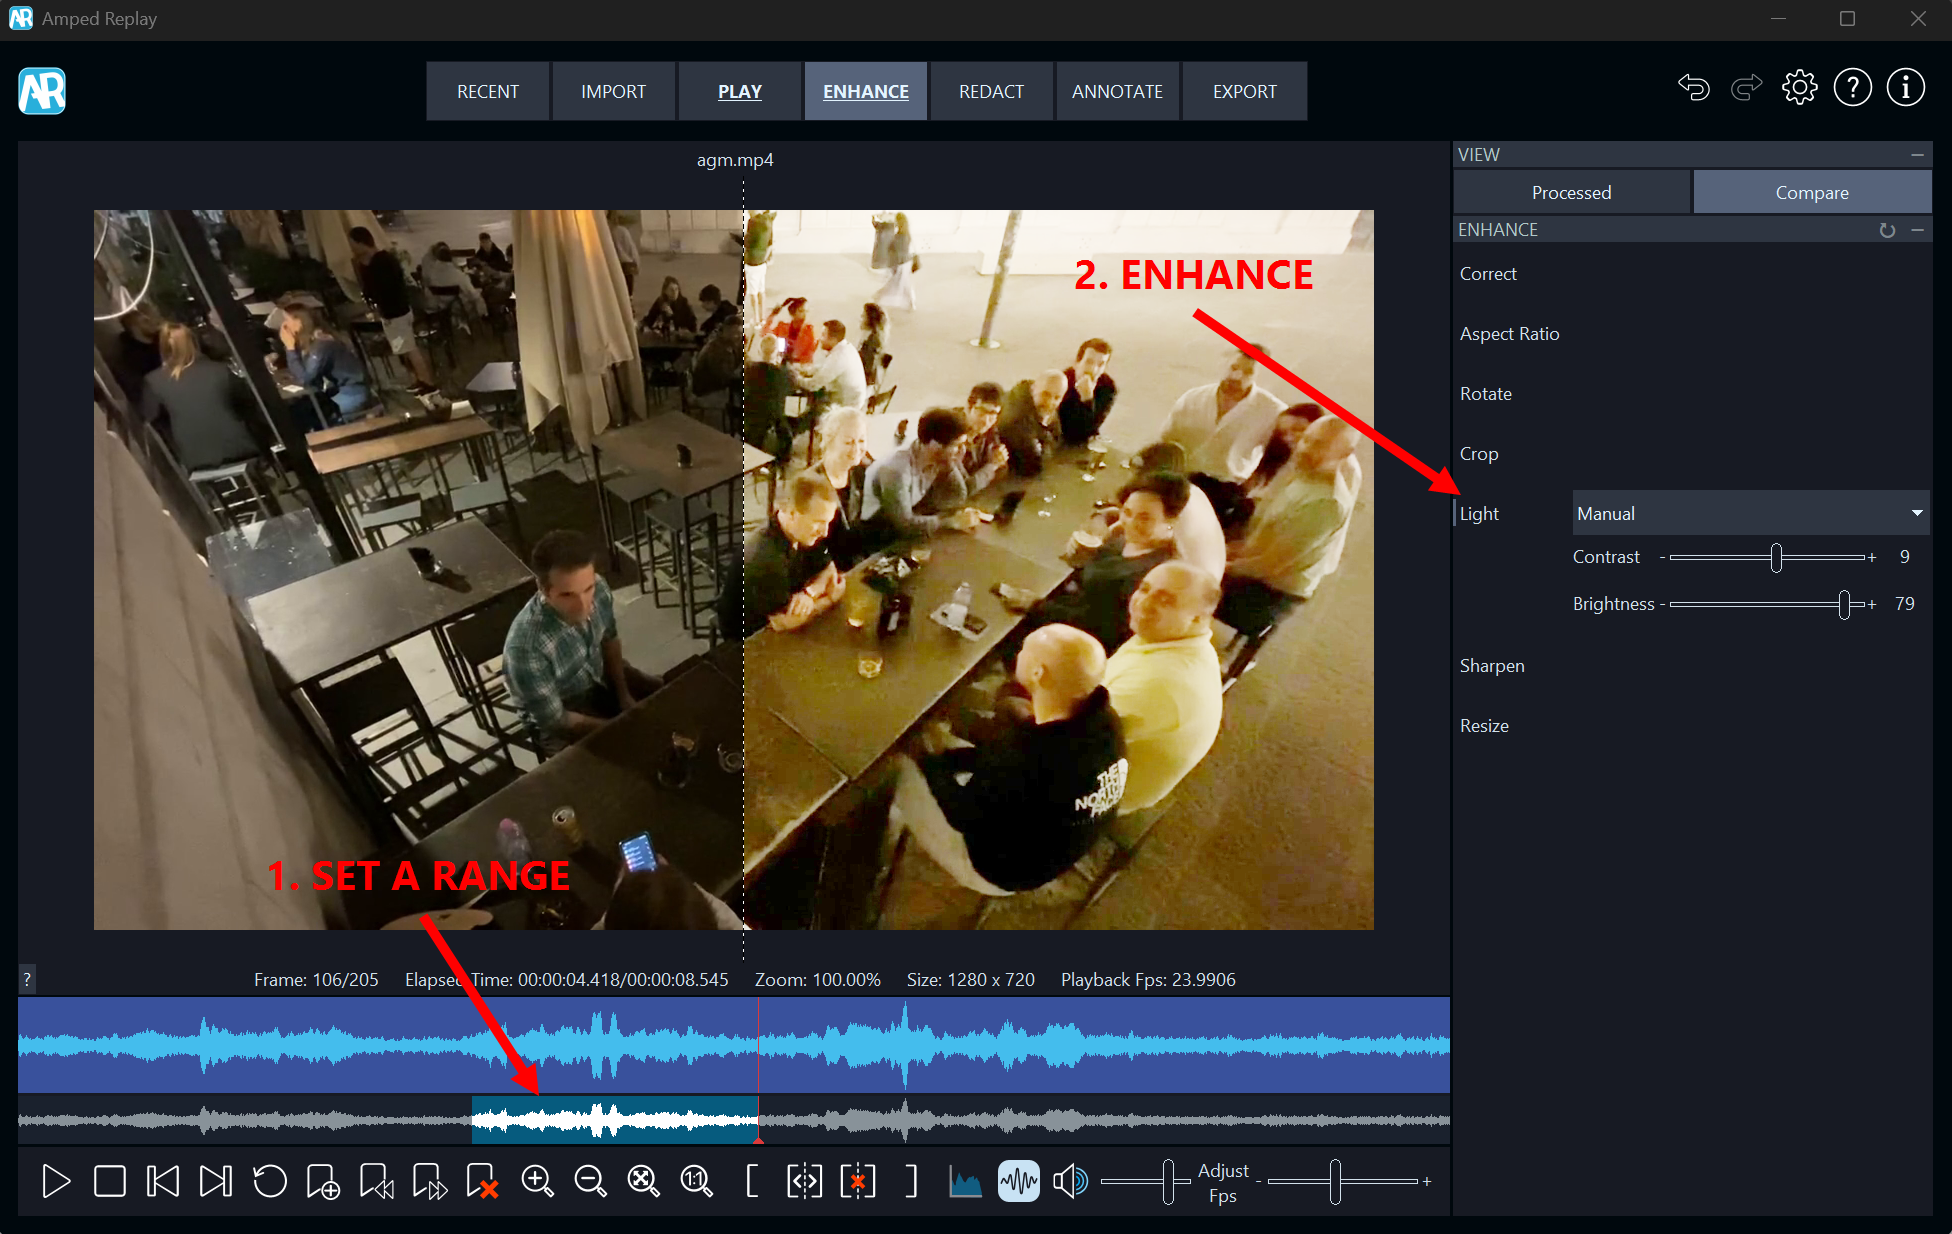
Before using assisted redaction or before redacting in general, you should prepare your clips by selecting a range of relevant material in the Play tab (if applicable) and by adding any relevant filters in the Enhance tab. By selecting a range first, you will ensure the assisted redaction analysis is quicker. By enhancing the footage, you will increase its accuracy when applied later. In the clip below, a relevant portion of the video has been selected for redaction and a Light filter has been added to improve the contrast between identifiable persons and the background.
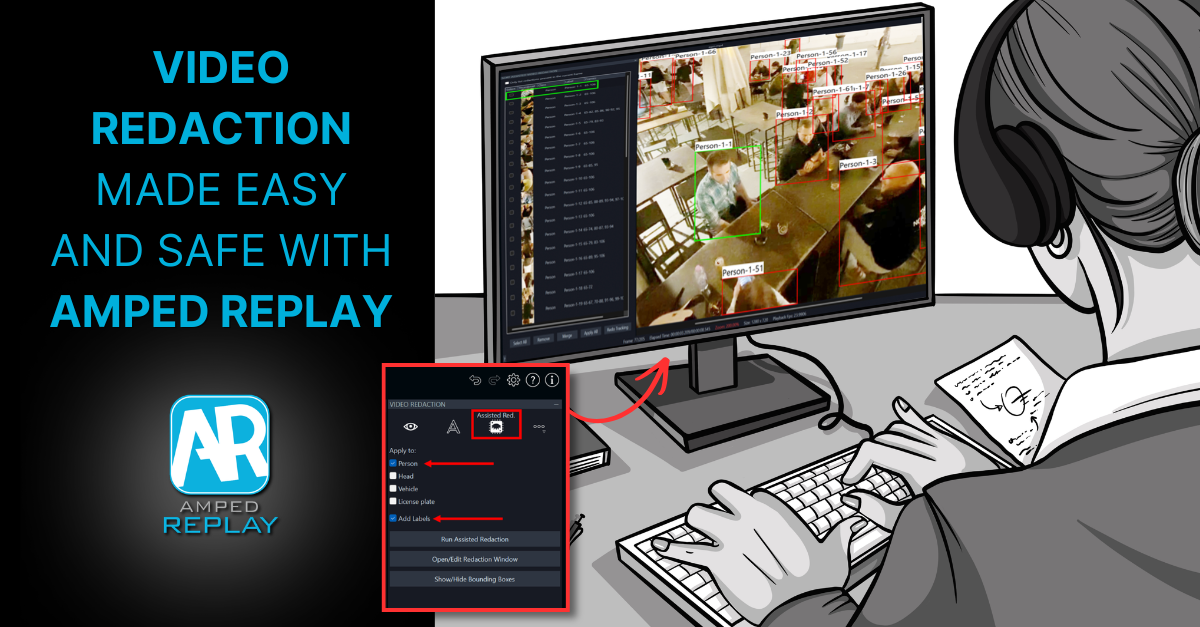
The Assisted Redaction Panel
You will find the new tool in the Redact tab. Click on the Assisted Red. button and you will see the contents of the new panel on the right-hand side.
Note: if you don’t have this button, you may have installed the version WITHOUT assisted redaction or your antivirus may be blocking the assisted redaction executable. Contact Amped Technical Support for immediate assistance.
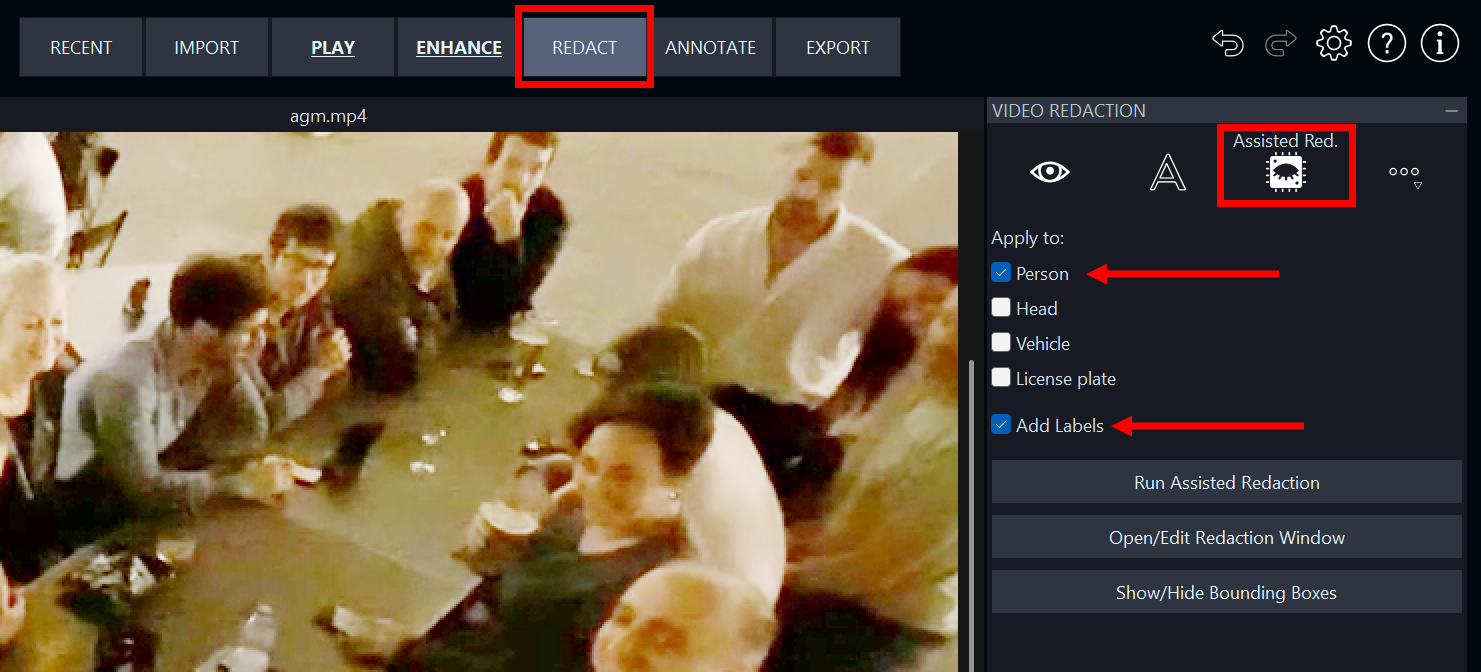
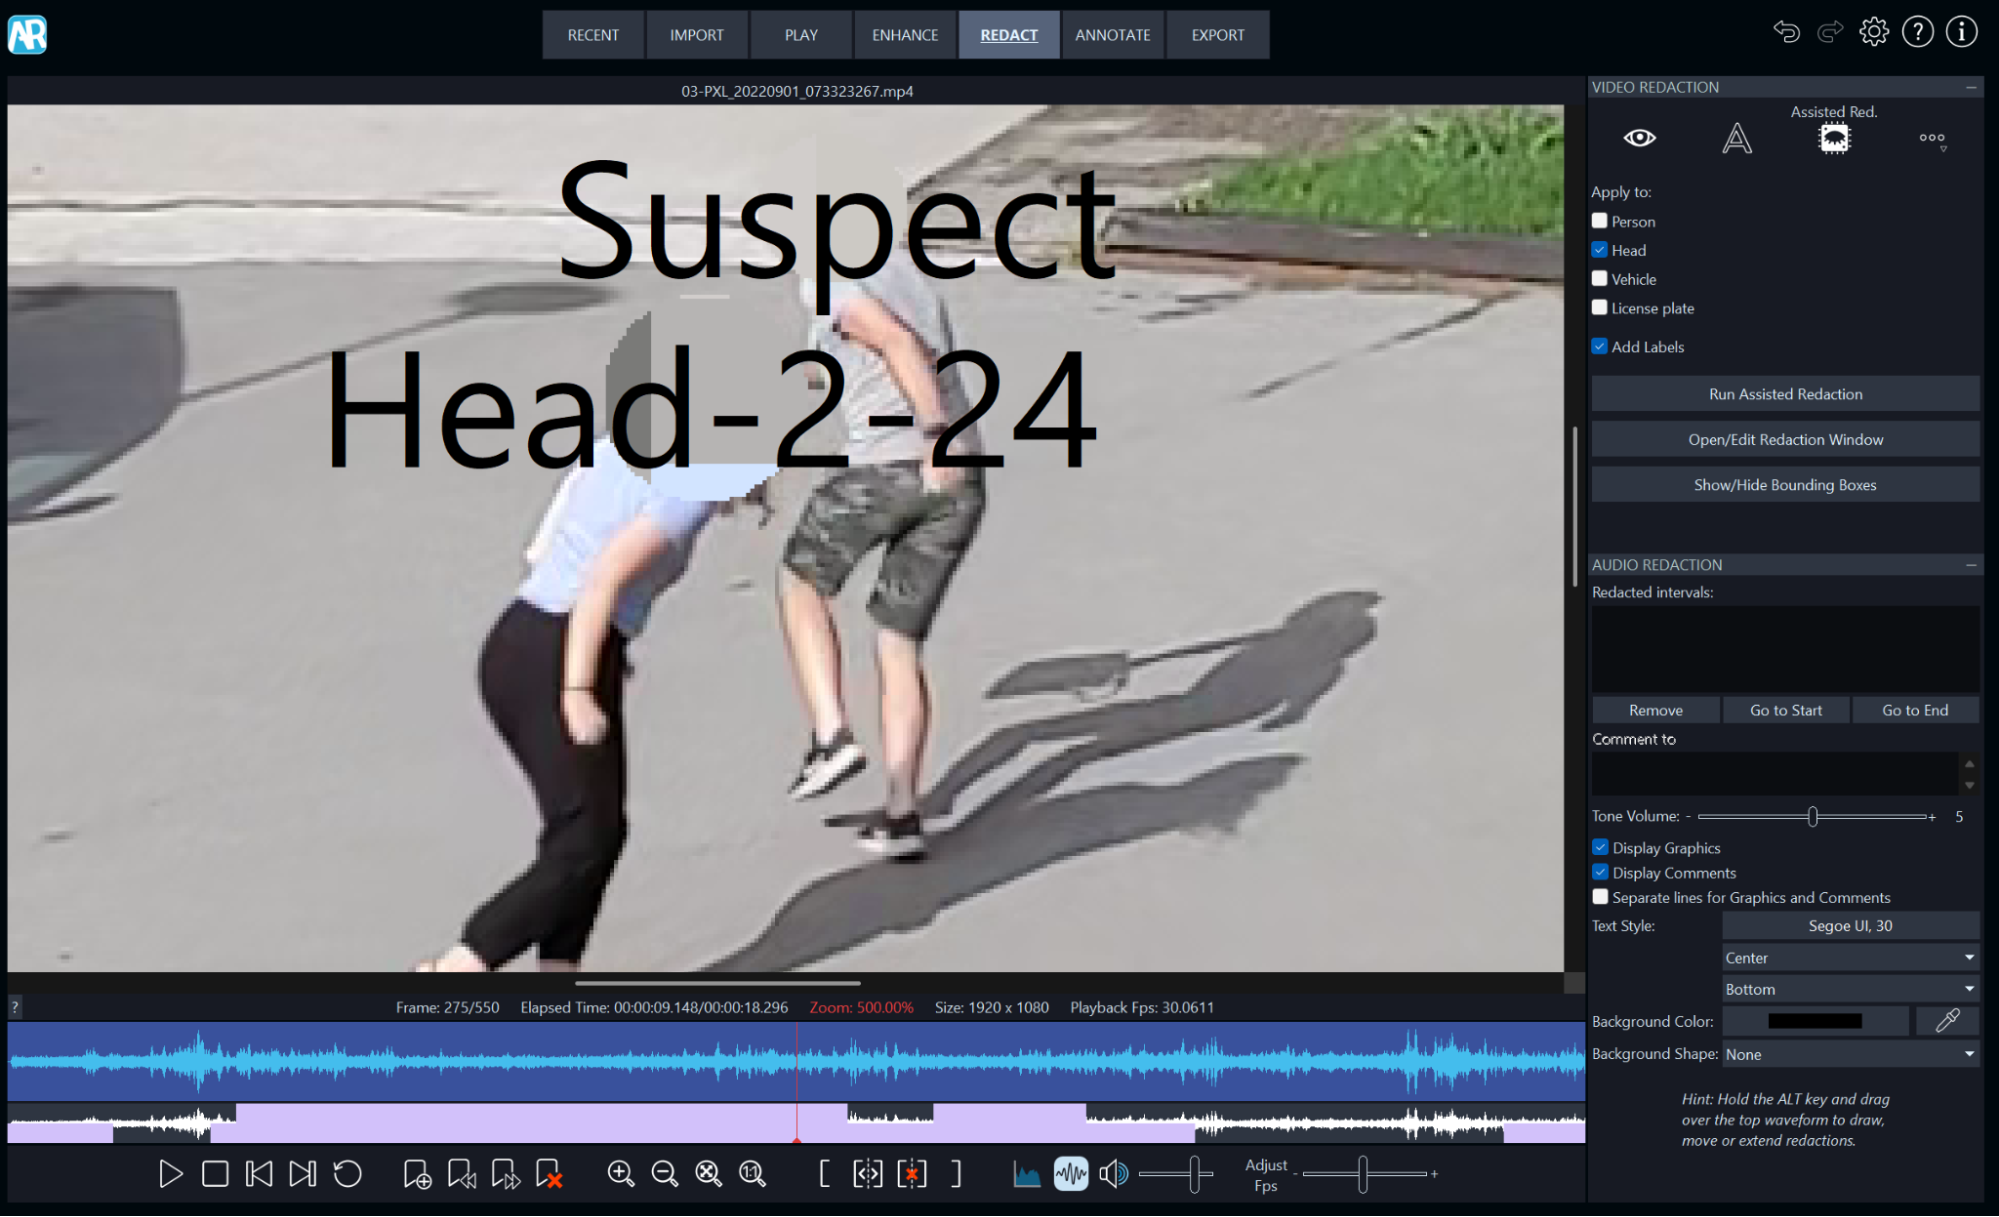
You can apply the assisted redaction to persons (full body), human heads (front, profile and back), vehicles (of all kinds) and license plates (front and back). Tick on any object you want to redact. In the example above, only persons have been redacted. The “Add labels” option has been ticked; this will add a text label above each bounding box. The rectangular outline encompassing the detected object is referred to as the Bounding Box.
The Sort Assisted Video Redaction Panel
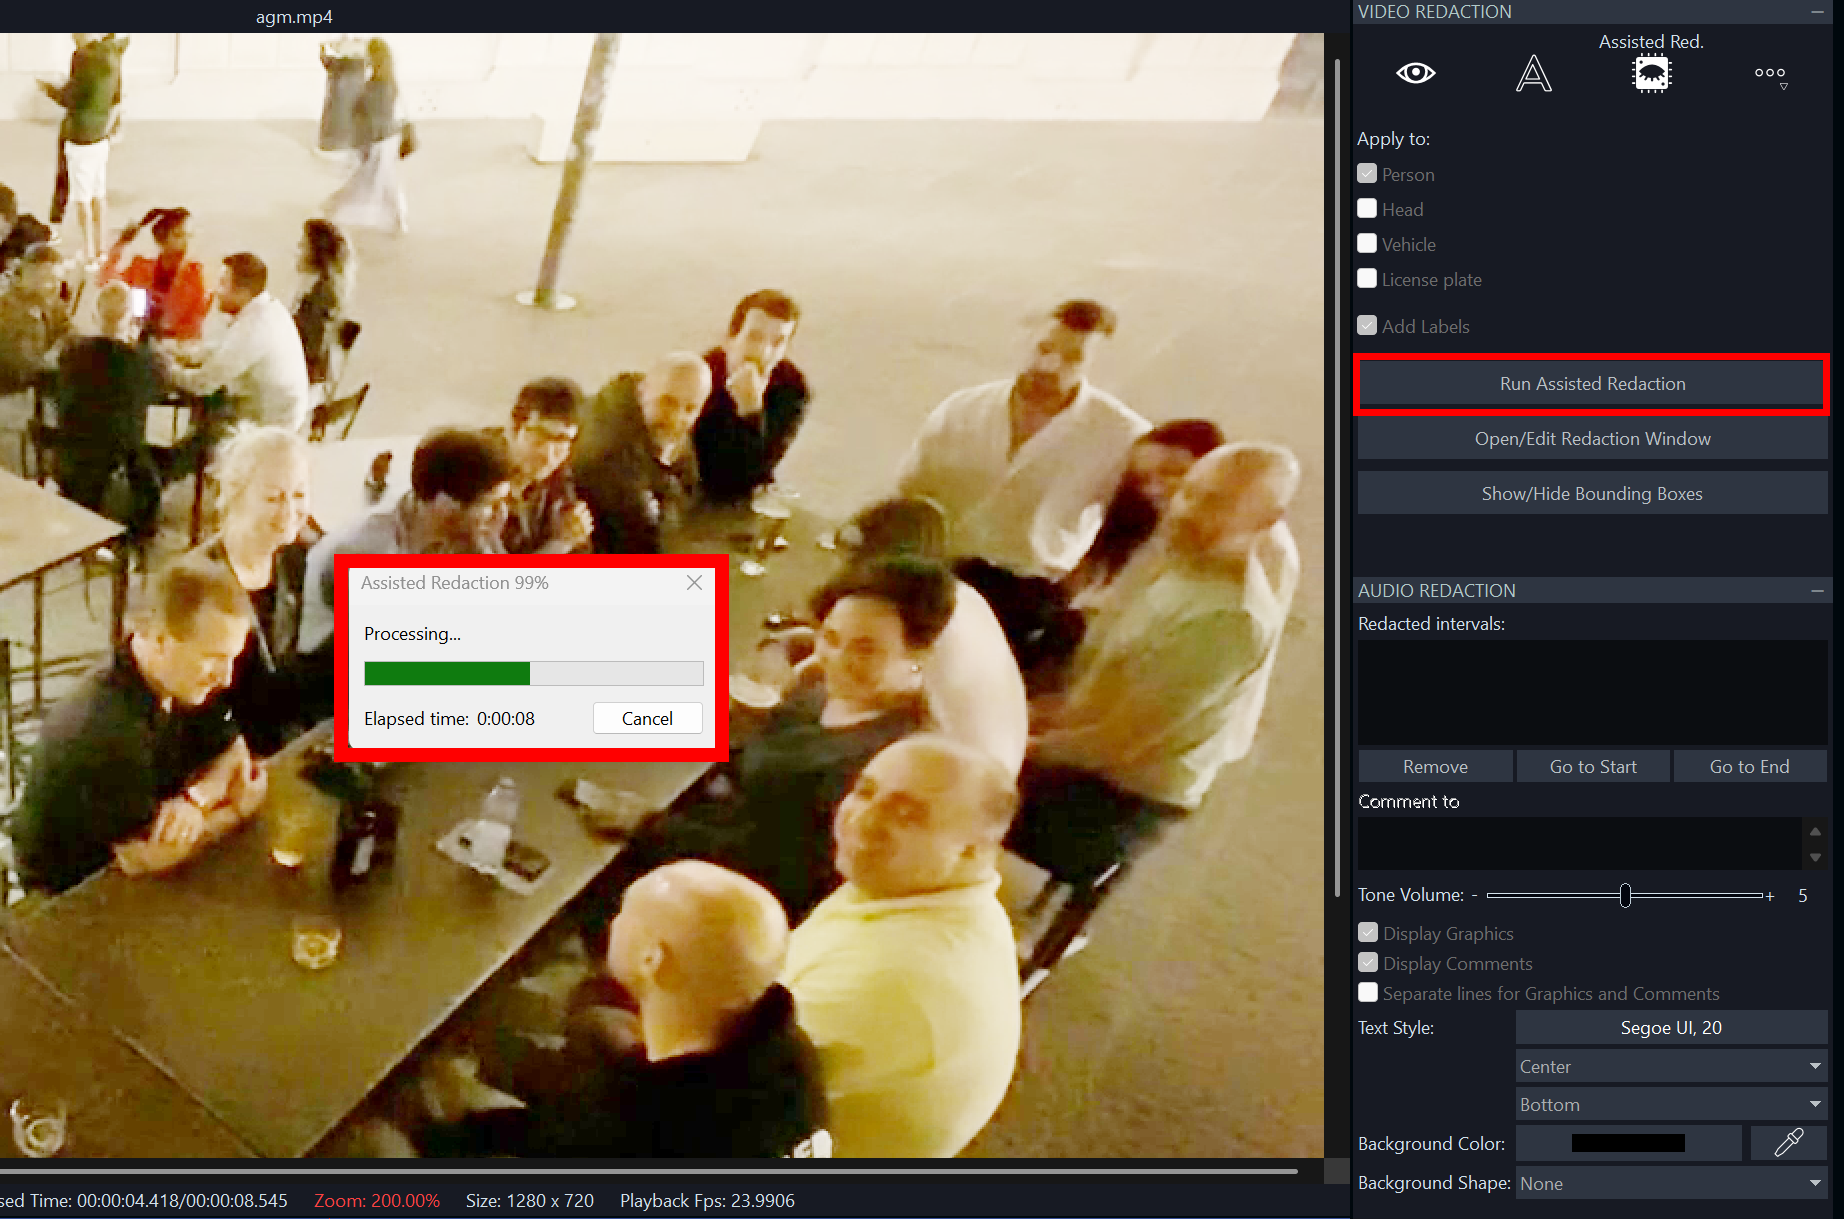
Now, click on the Run Assisted Redaction button and wait until the detection process is completed. A progress bar will give you an indication of progress so that you can plan your time ahead. For longer clips (or ranges) and/or clips containing many objects, it may be advisable to grab a cup of coffee, also depending on your hardware capabilities and GPU power.
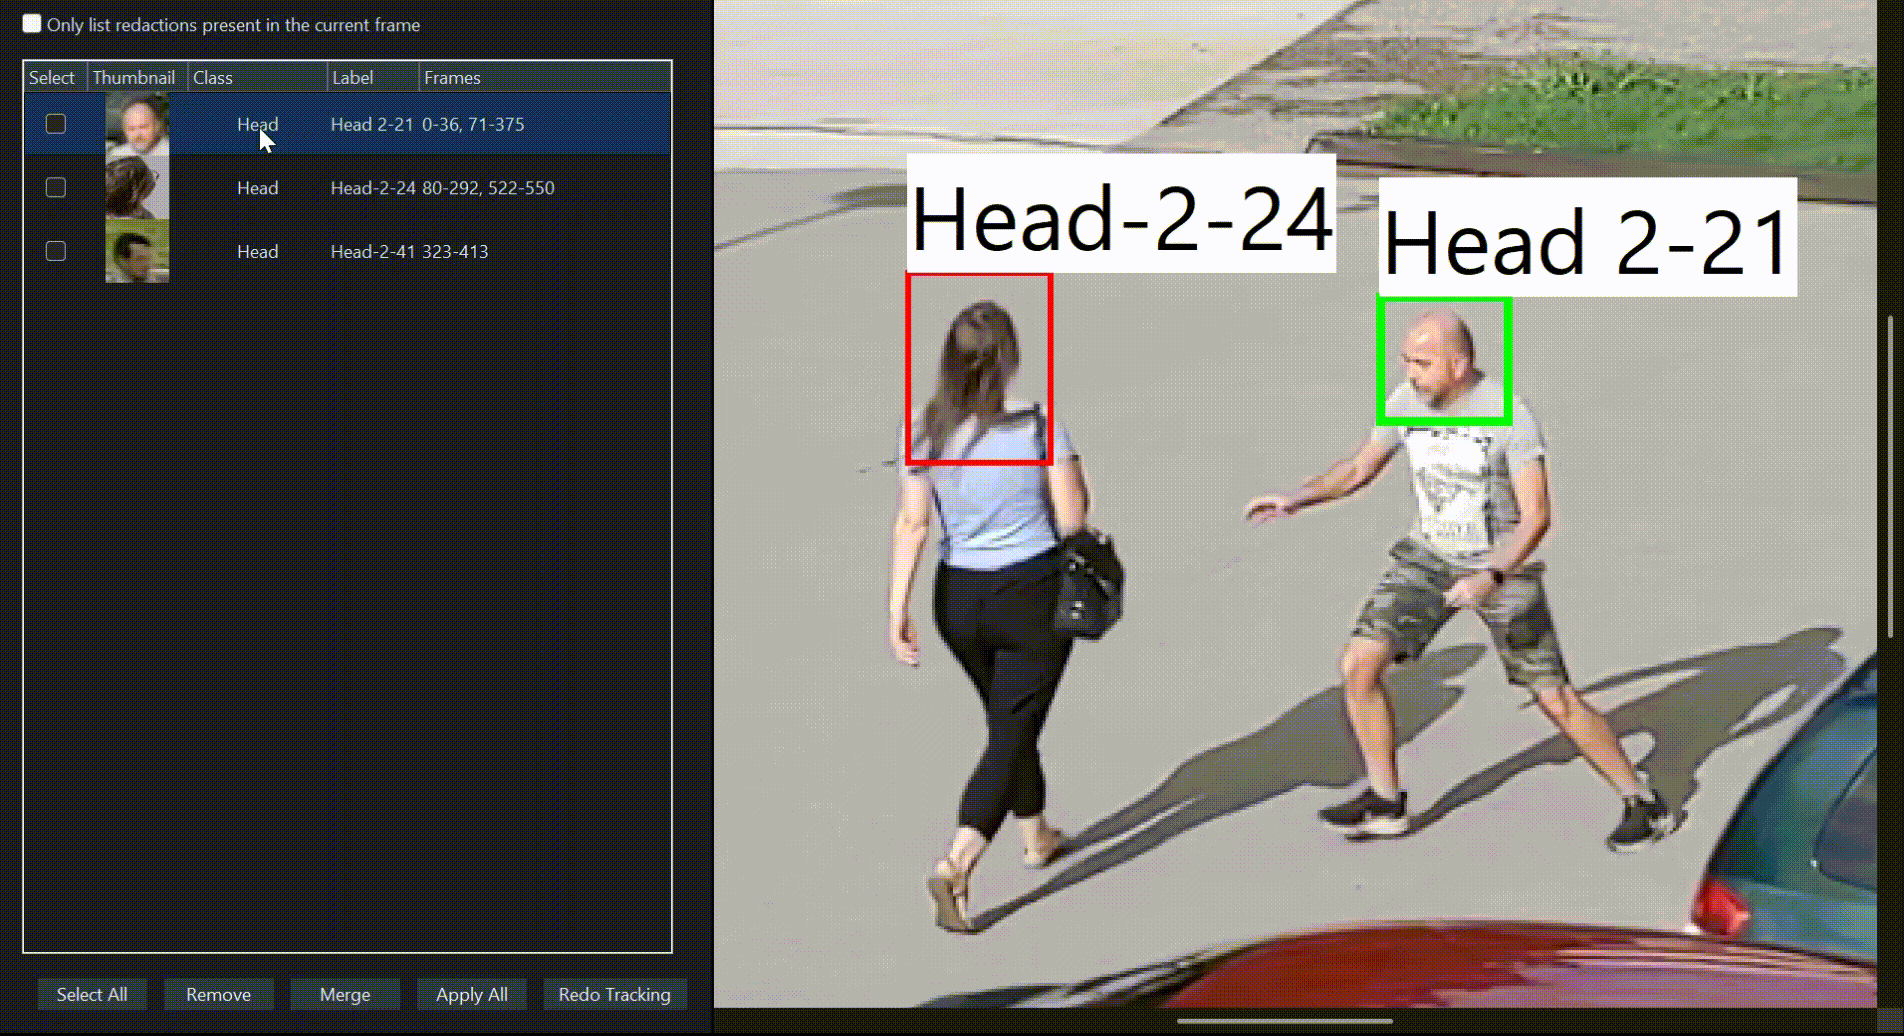
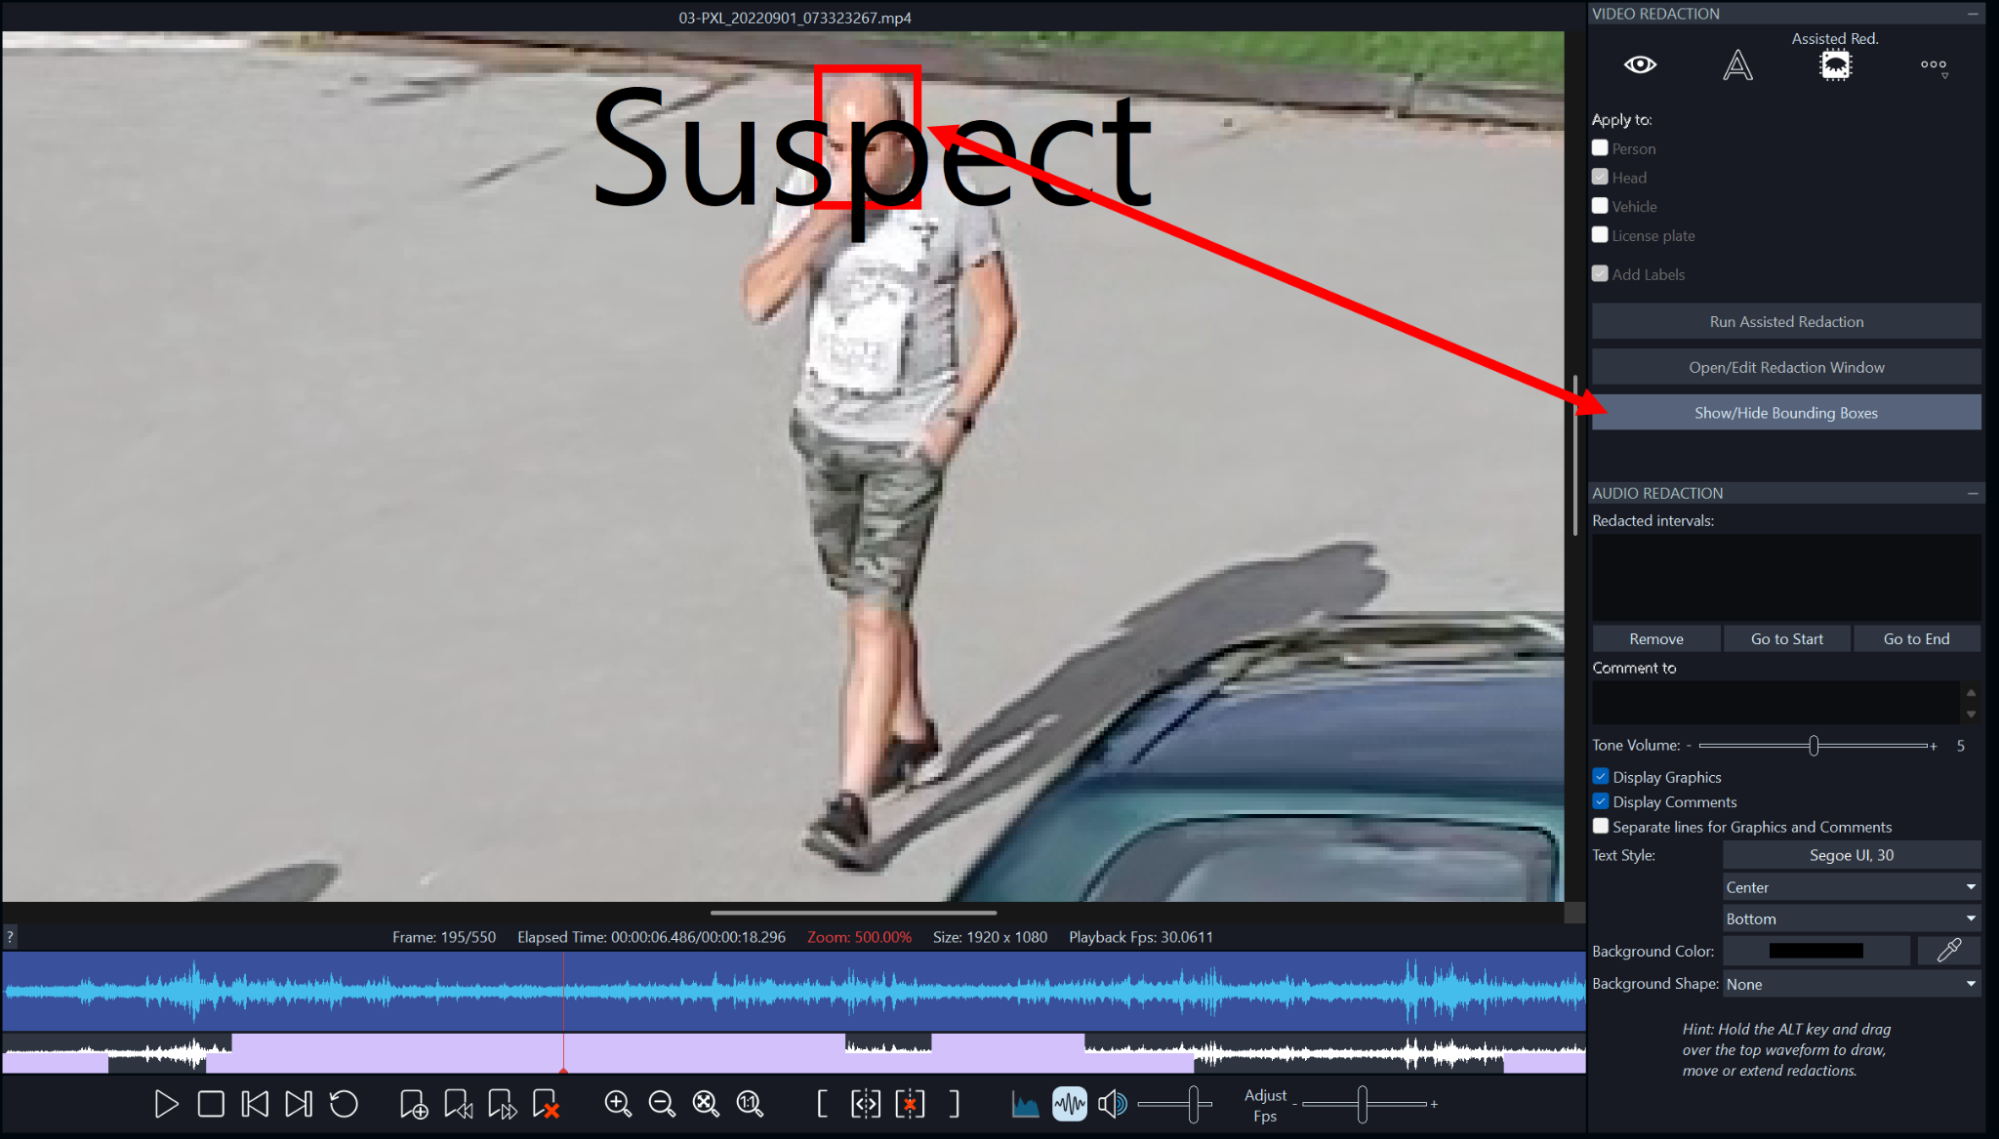
When the detection is completed, you will see a new panel on the left-hand side (the Sort Assisted Video Redaction panel). This panel lists all the detected redaction objects, with corresponding thumbnails, to help you visually identify them. In addition, a bounding box will appear on each detected object in the viewer. You can still play the video to preview how these boxes animate and perform throughout the clip. You can click on a specific object on the list to locate and highlight that object (in green, as shown below).
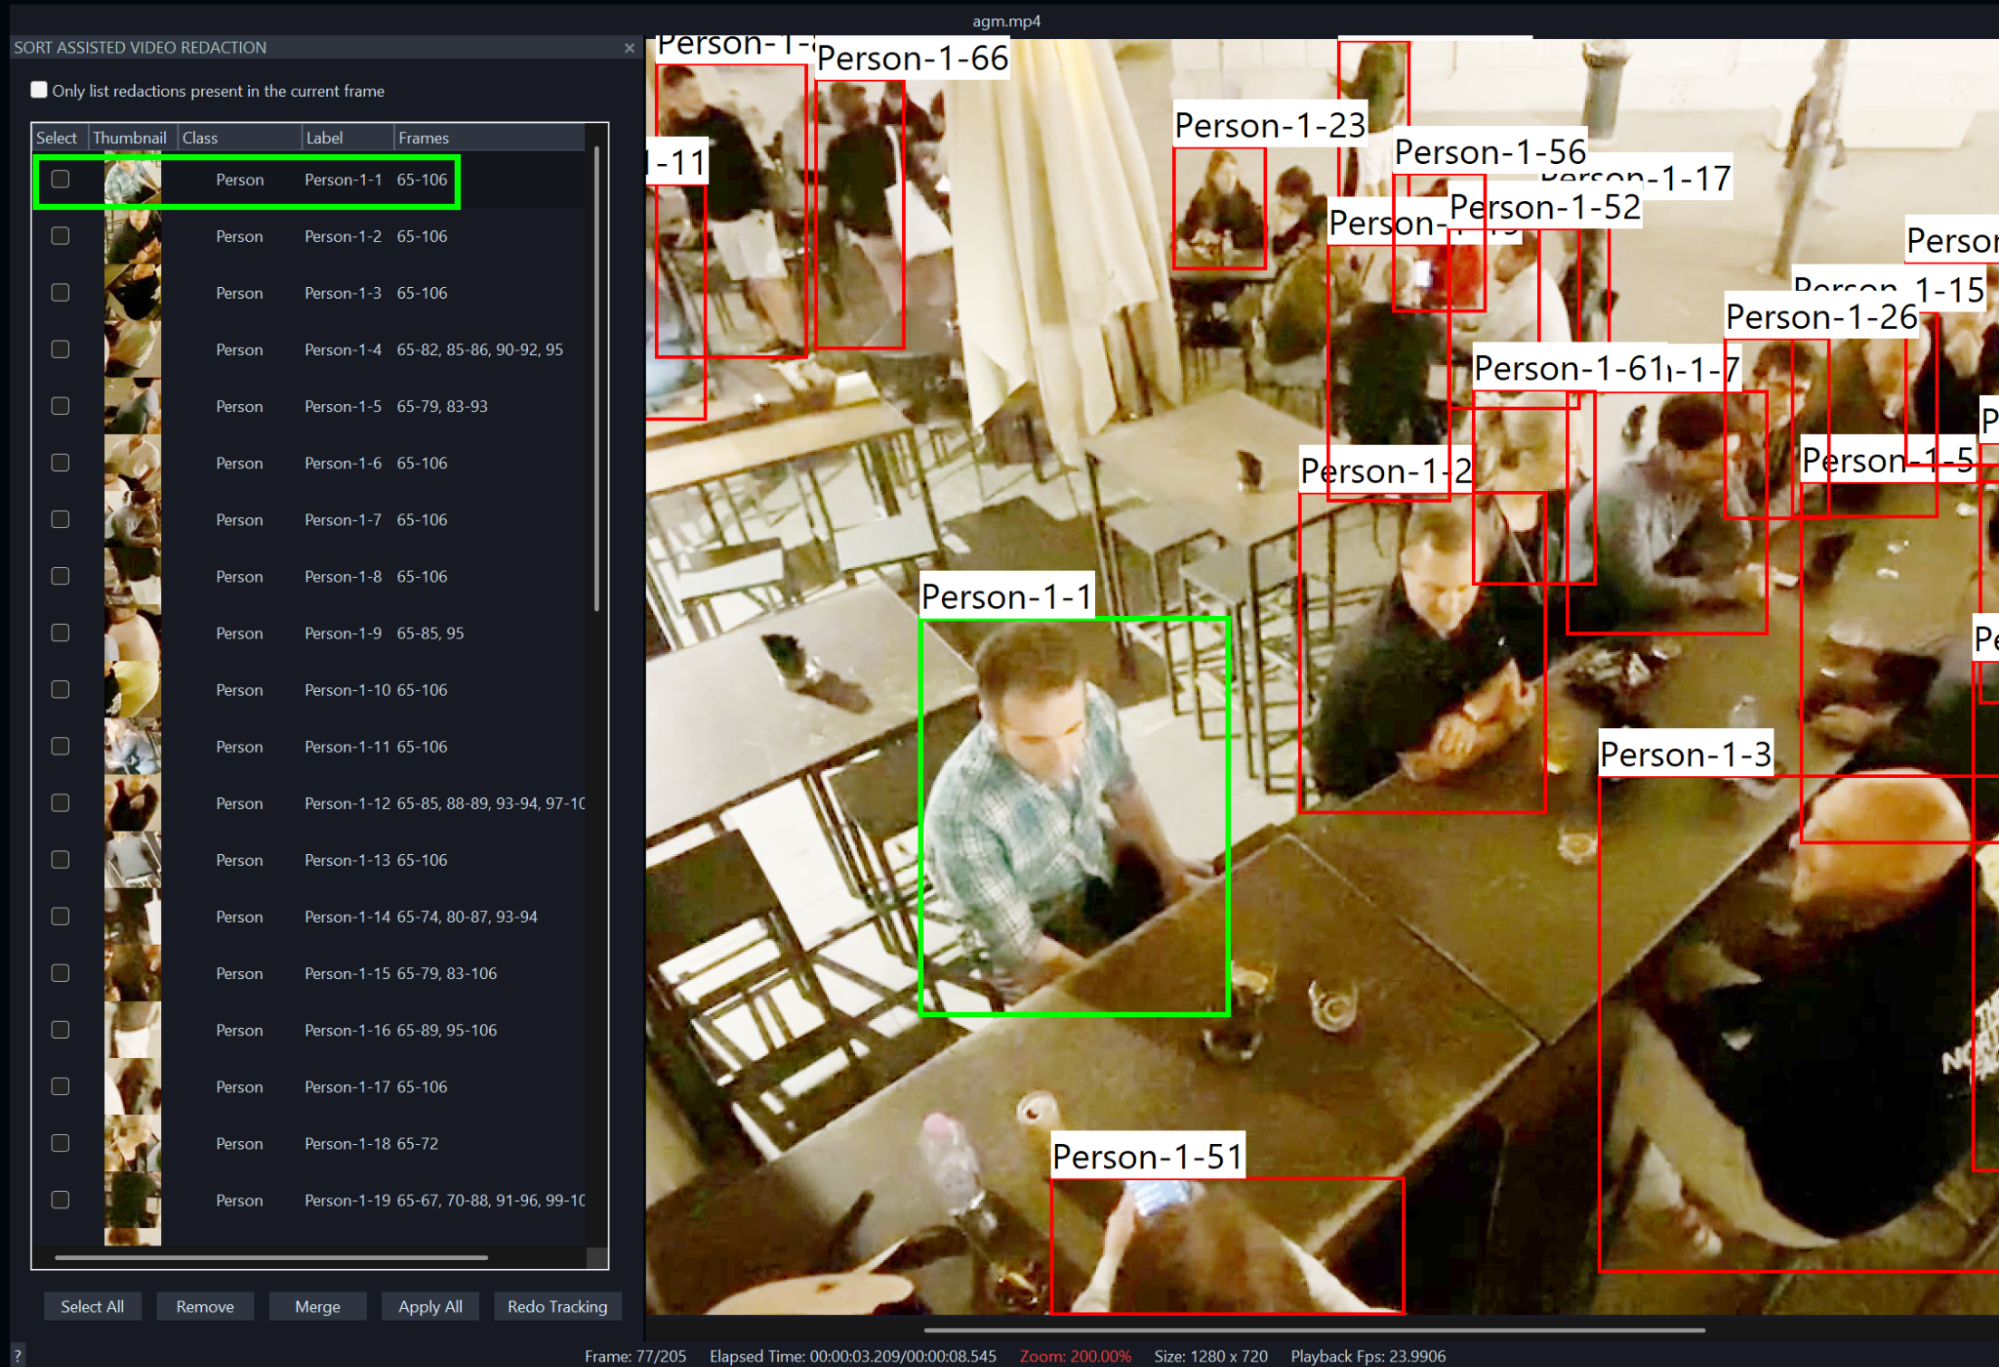
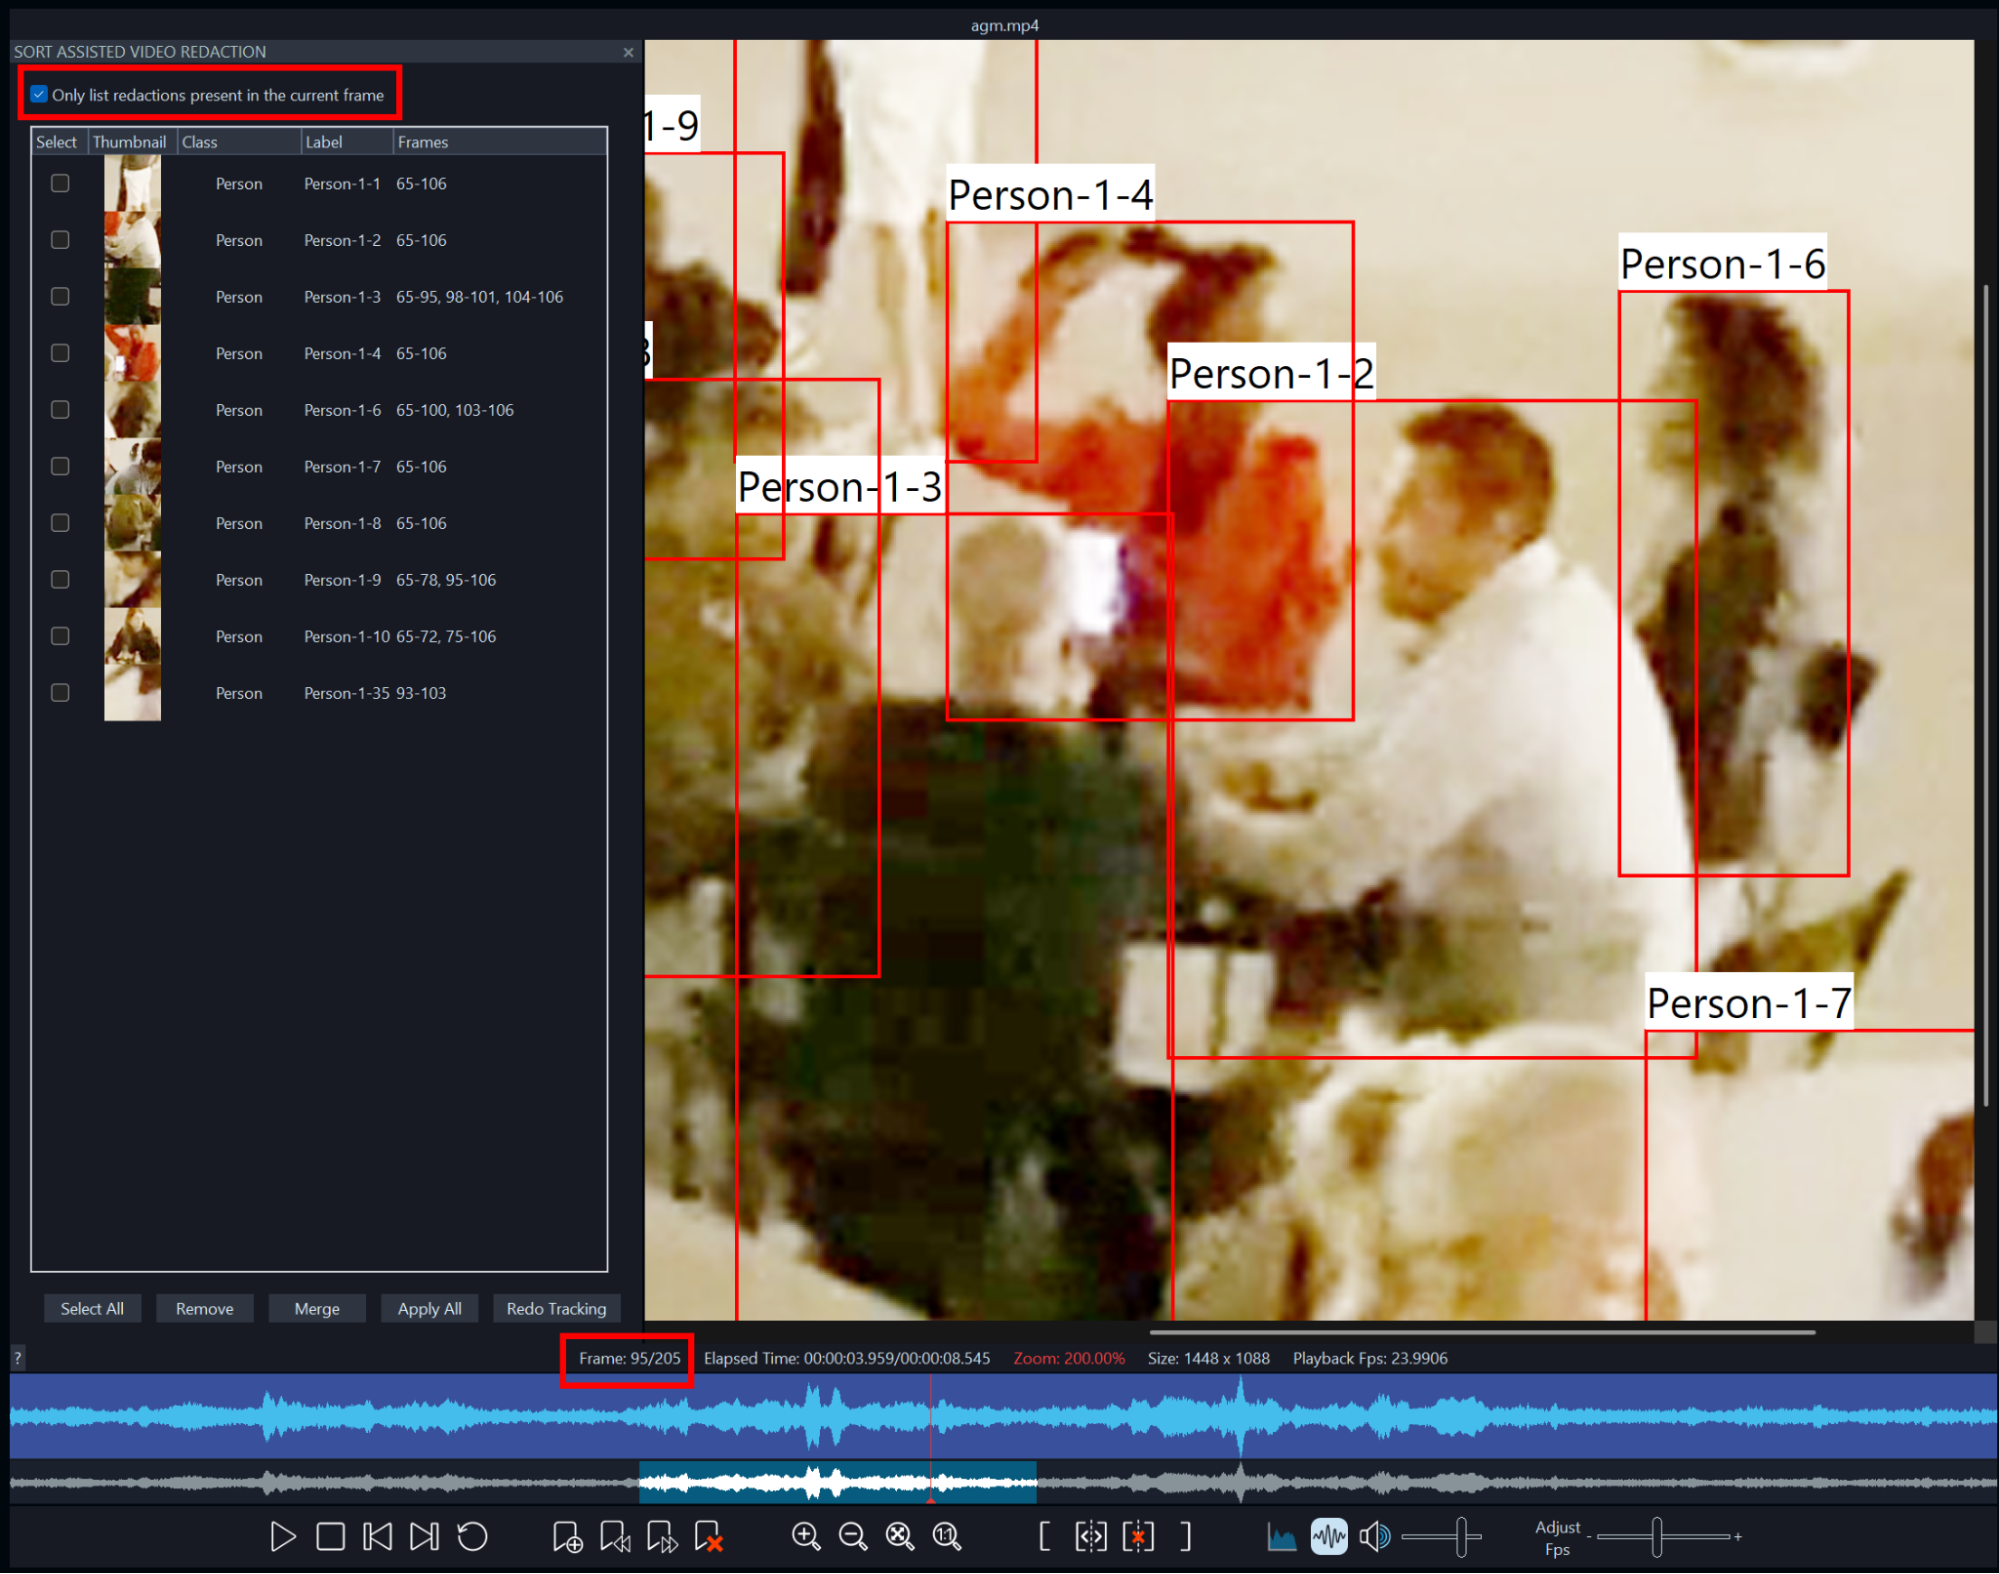
The list of objects can get overcrowded, especially when working with long videos. To make it easier to review, you can narrow down the list to display only the objects detected within a specific frame, whichever frame the playhead is currently at. To do this, simply click the tickbox at the top of the panel.
In the example below, the camera has zoomed in on a group of people sitting at a faraway table at frame 95 and only those people are now listed in the panel.
Customizing the Object List
We are only just getting started with the Sort Assisted Video Redaction panel. There are many other things you can do here.
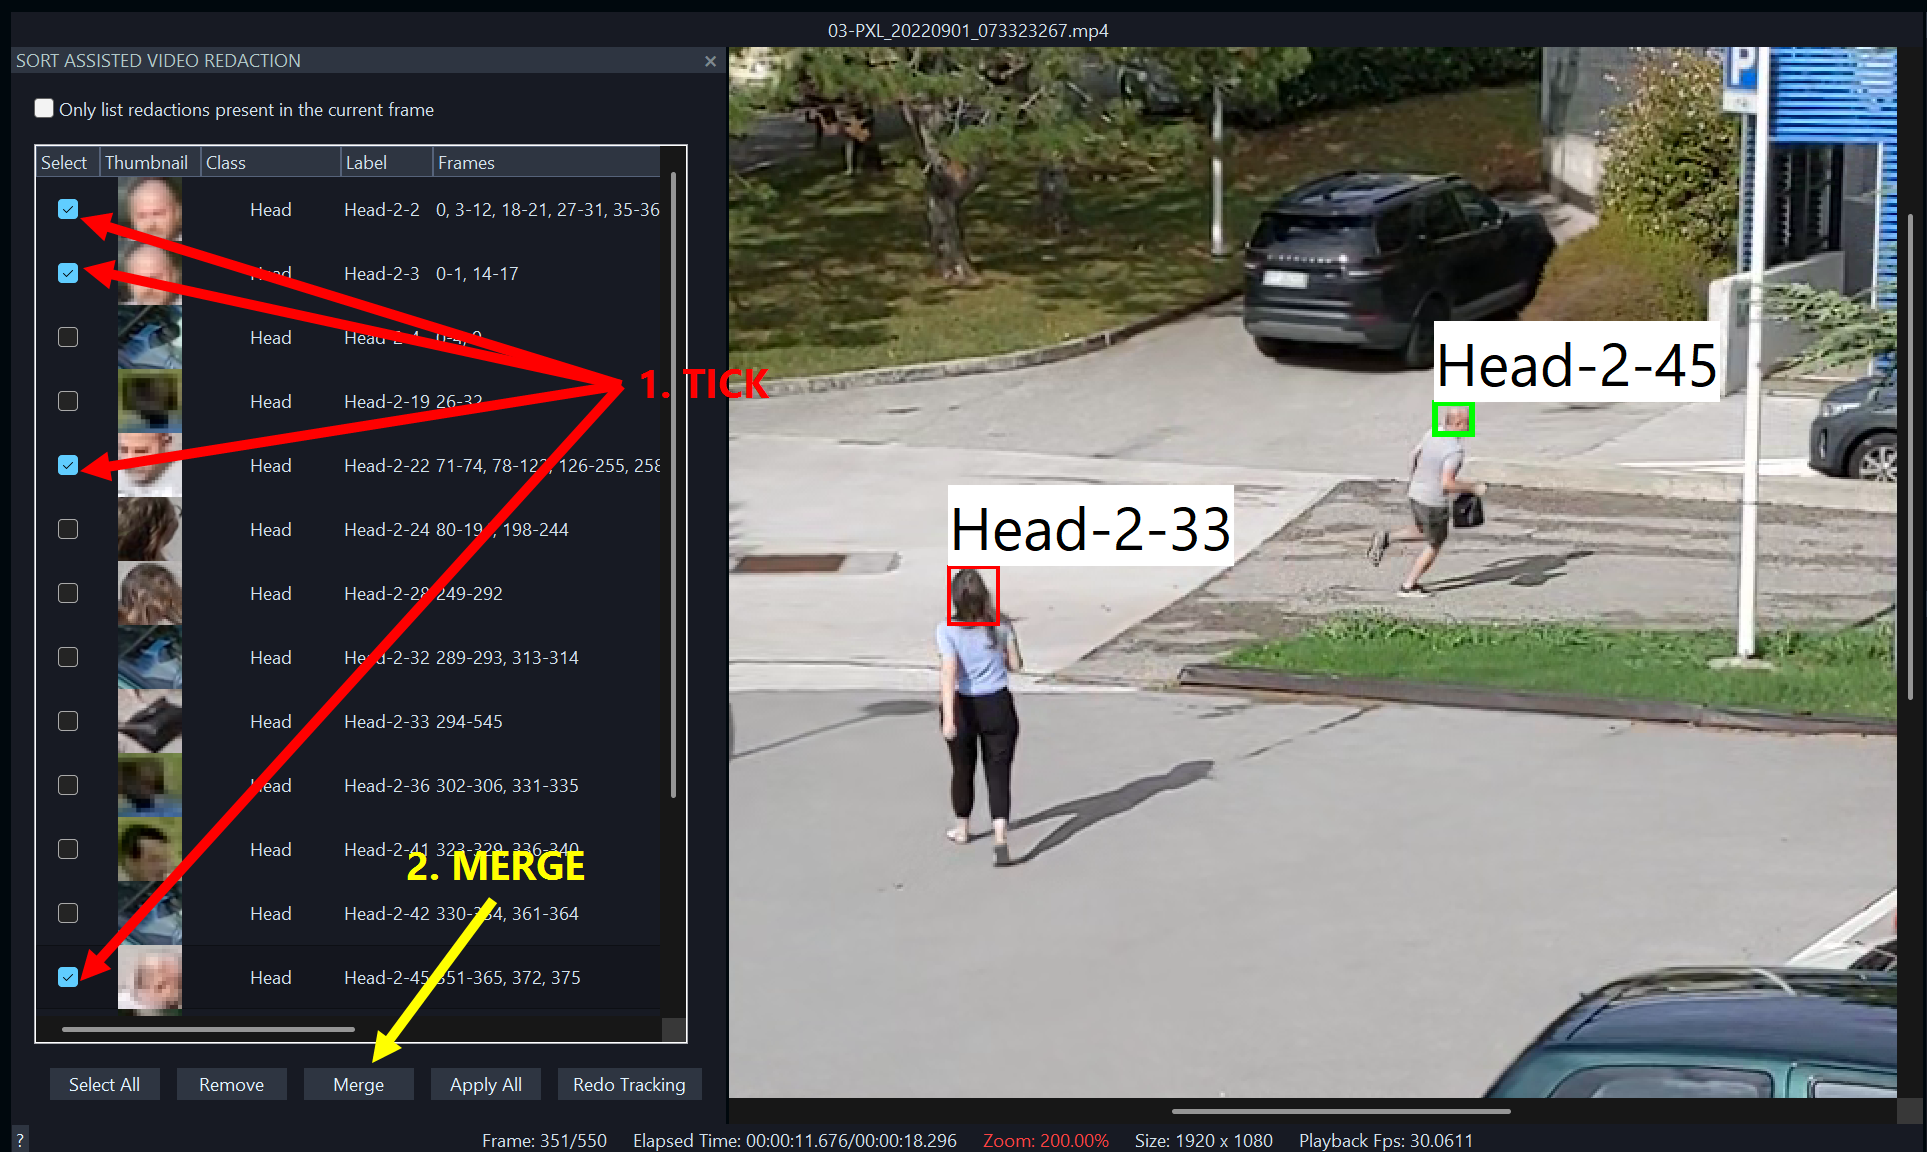
First of all, you can merge objects that the model has detected as different but that in reality depict the same person or vehicle. From time to time, depending on the angle of view, perspective or obscuration by other objects, the model may get confused about the identity of a person or vehicle.
It will still detect all the objects in most cases, as these issues are taken into account during the training stage of the model. However, it may not recognize them as one, especially when out of view for a period of time and then back into view.
But, as humans should always be those making the final decisions, we have the ability to merge objects when we are sure they depict the same person or vehicle. To do this, simply tick the objects that you want to merge into one, and then click on the Merge button to link them all together. Once linked, they will all be treated as one object, bearing one label and displaying all the frame numbers at which they appear on the relevant columns. In the image below, you can see the process by which objects have been merged together manually.
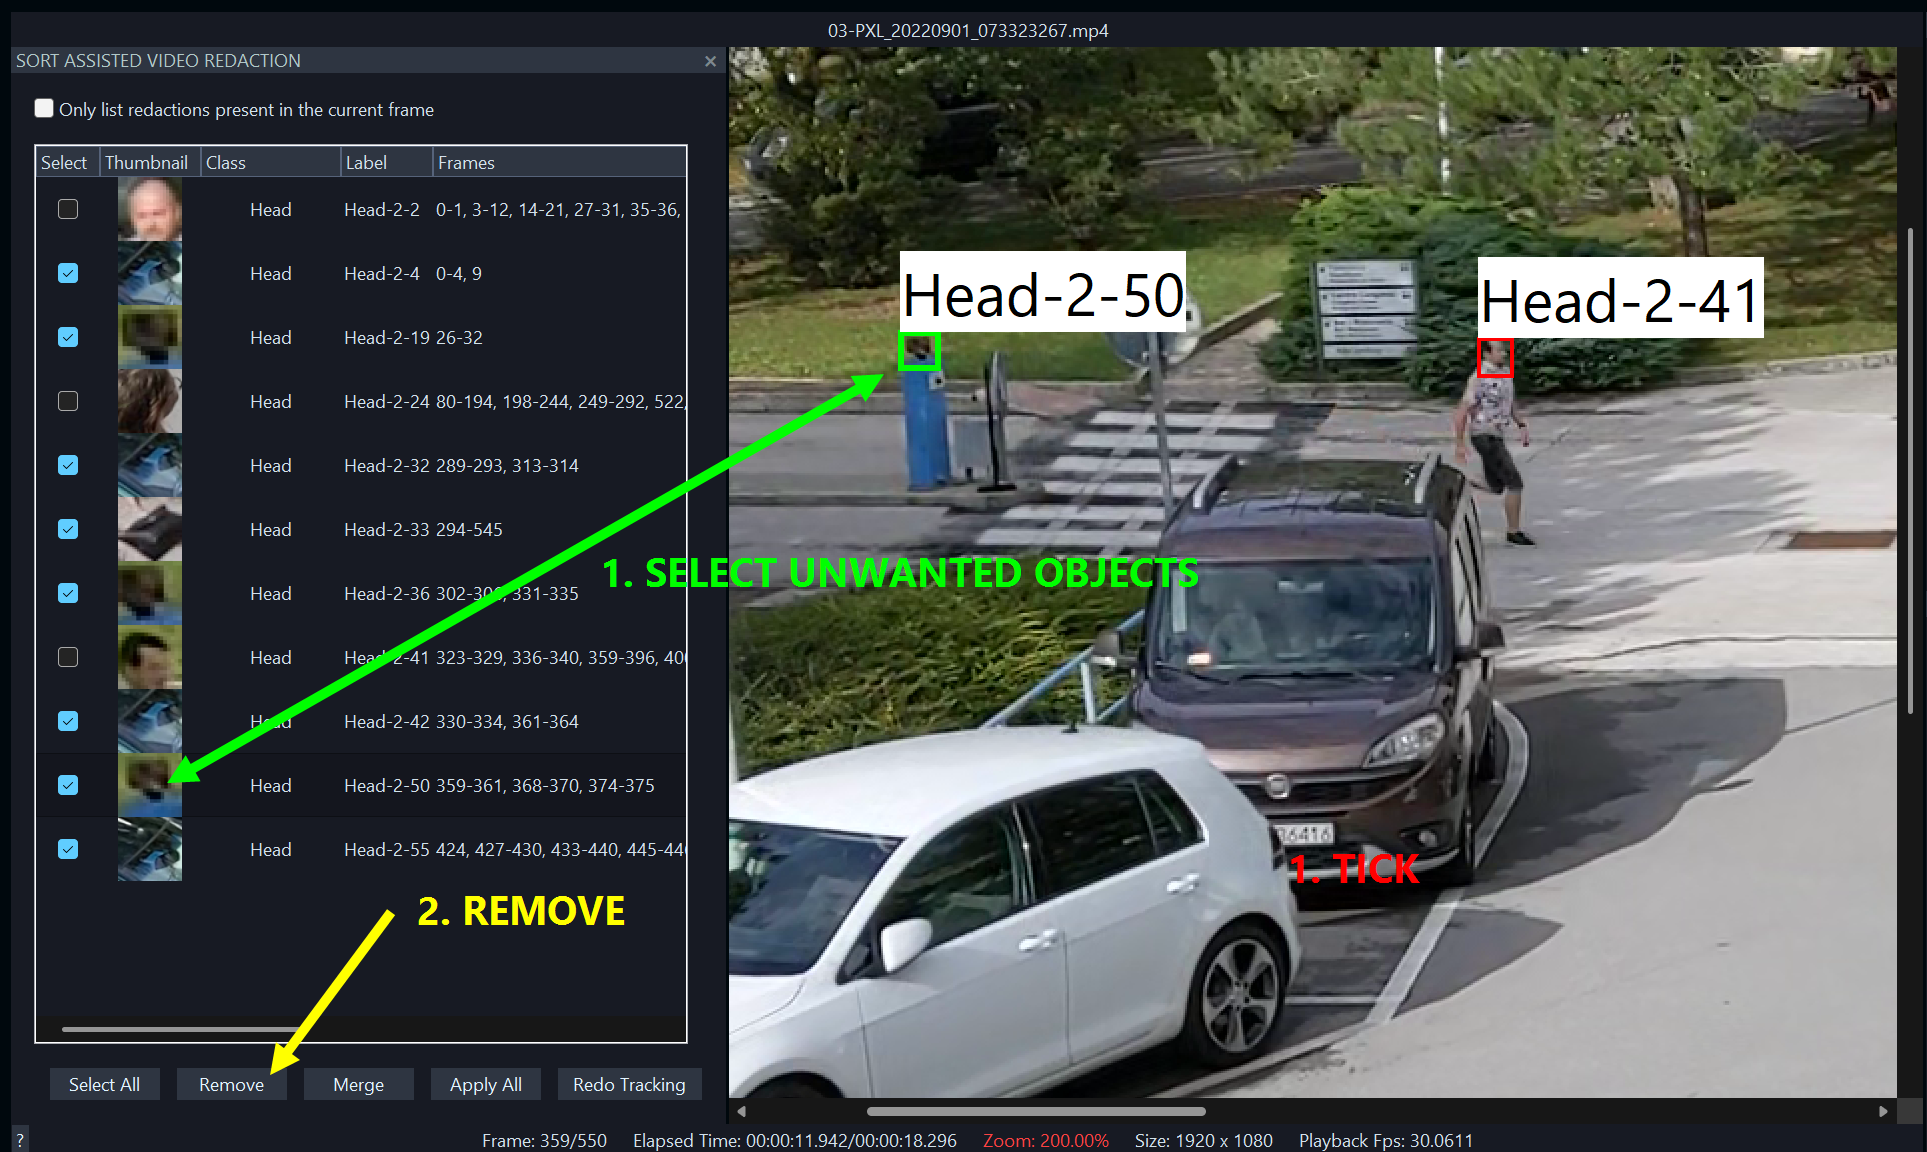
After merging objects, you may use the Redo Tracking button to update the tracking data with the updated information. You can also remove objects that have been detected in error or that you do not want to redact by ticking them and clicking the Remove button. Should you have more objects to be removed than to be kept, then it may be quicker to click on the Select All button to tick all objects at once, and then untick the objects you want to keep. The choice is yours.
You are now ready to redact. But before we do so, we can customize our objects further by changing their object class and/or by editing their text labels.
To do this, single-click on the relevant label and select or type your chosen label, as shown below.
Applying the Hide Filter and Text Labels to the Detected Objects
Have one final preview of the video by playing back the clip and checking that all objects are identified correctly. When happy to proceed, simply click the Apply All button as shown above. A Hide filter will be automatically applied to all the bounding boxes, as shown below. Should the detector miss some frames in the process, an automatic (keyframing) interpolation will be applied during redaction, as long as the bounding boxes belong to the same object (identifiable by label name).
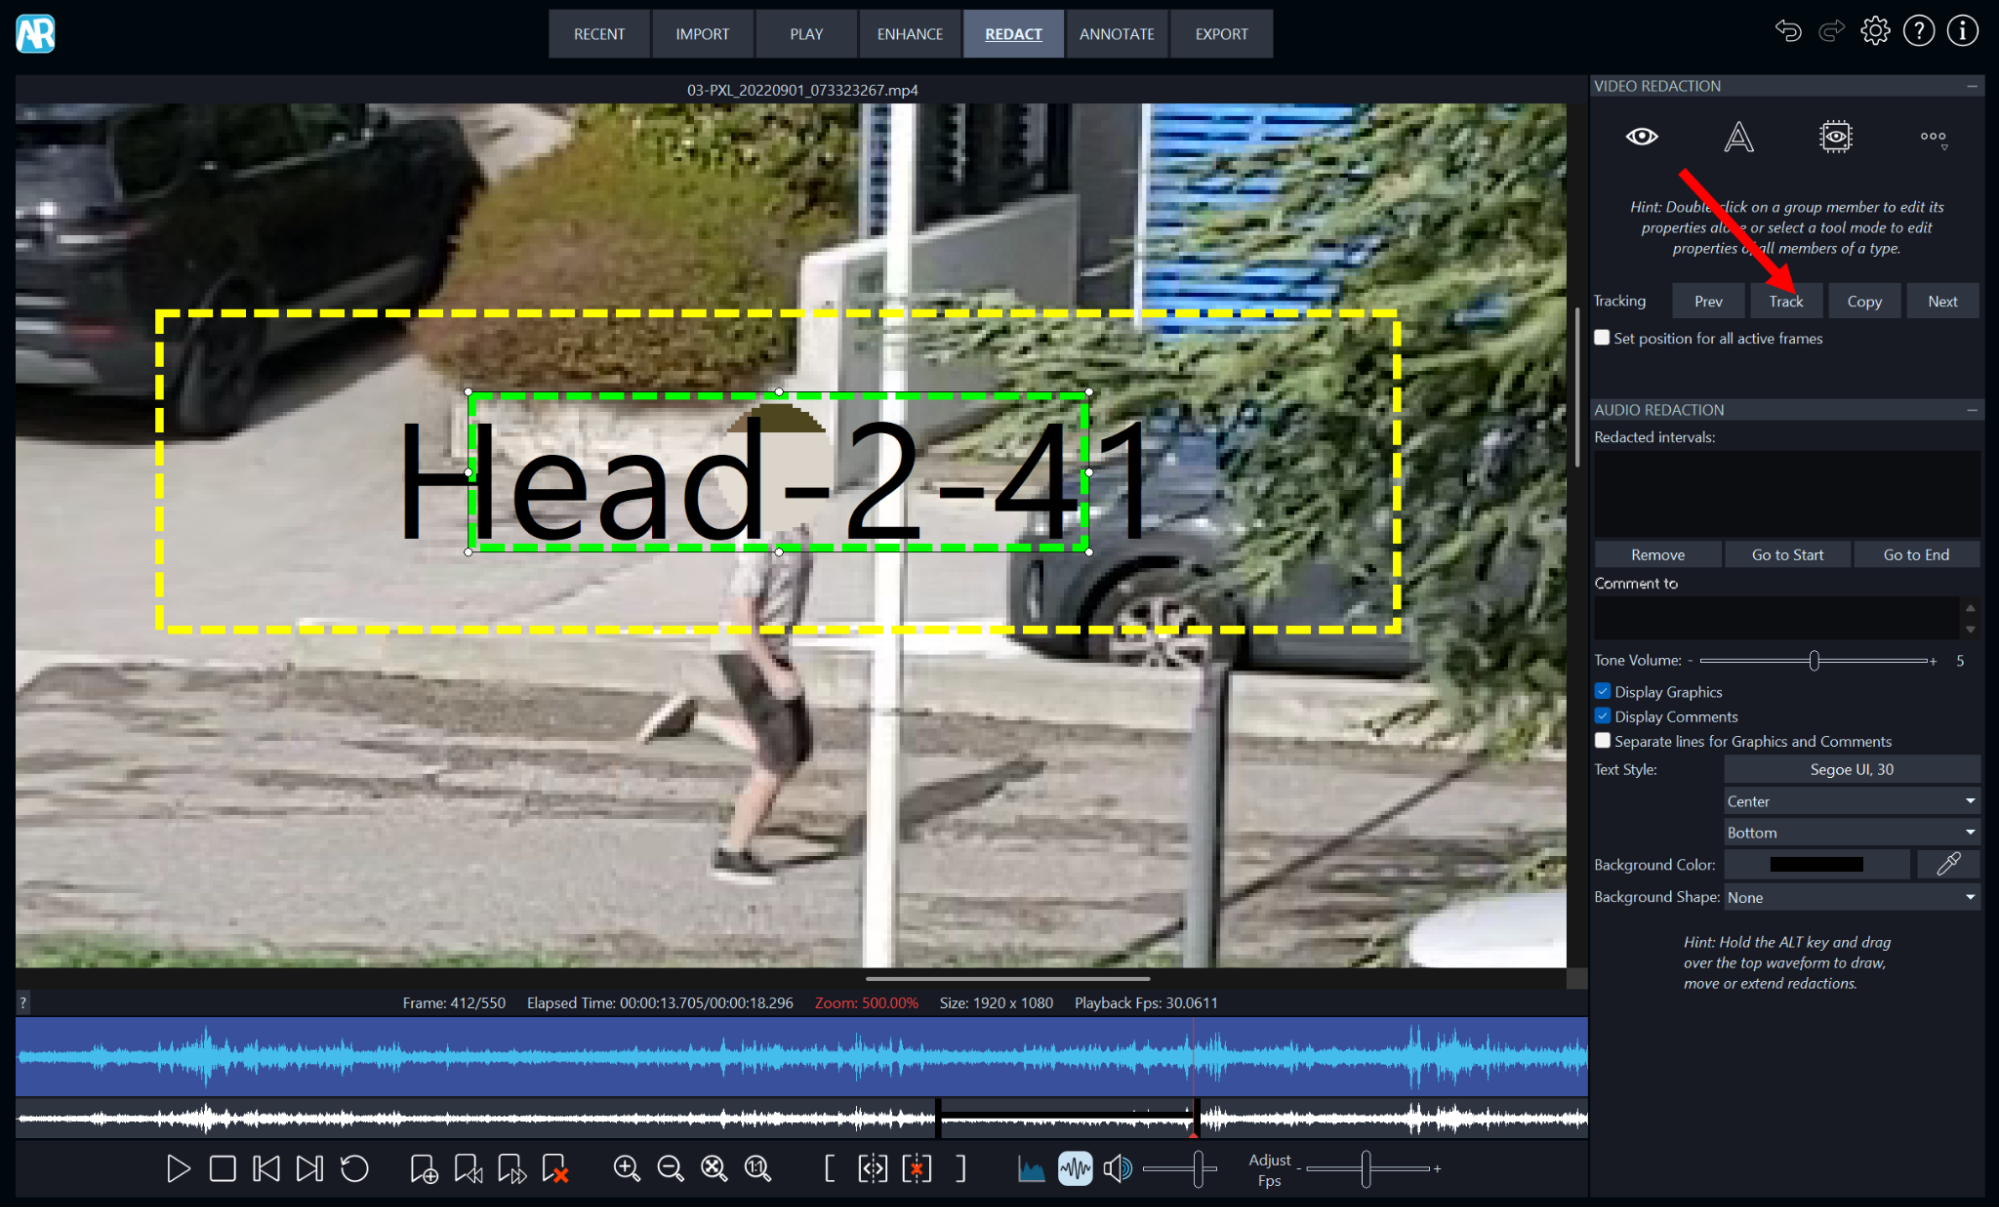
You may notice a lilac plot overlaid over the lower audio bar. This displays the amount of redactions throughout the video, with higher blocks indicating more redaction objects at a particular point in time. This plot will help you locate the areas that may require specific attention when refining or correcting your redactions. You can also now re-open the Sort Assisted Video Redaction panel by clicking the Open/Edit Redaction Window button and toggle the bounding boxes on and off by clicking the Show/Hide Bounding Boxes button.
Most importantly, you will now be able to customize redaction parameters, such as type and strength, individually or collectively.
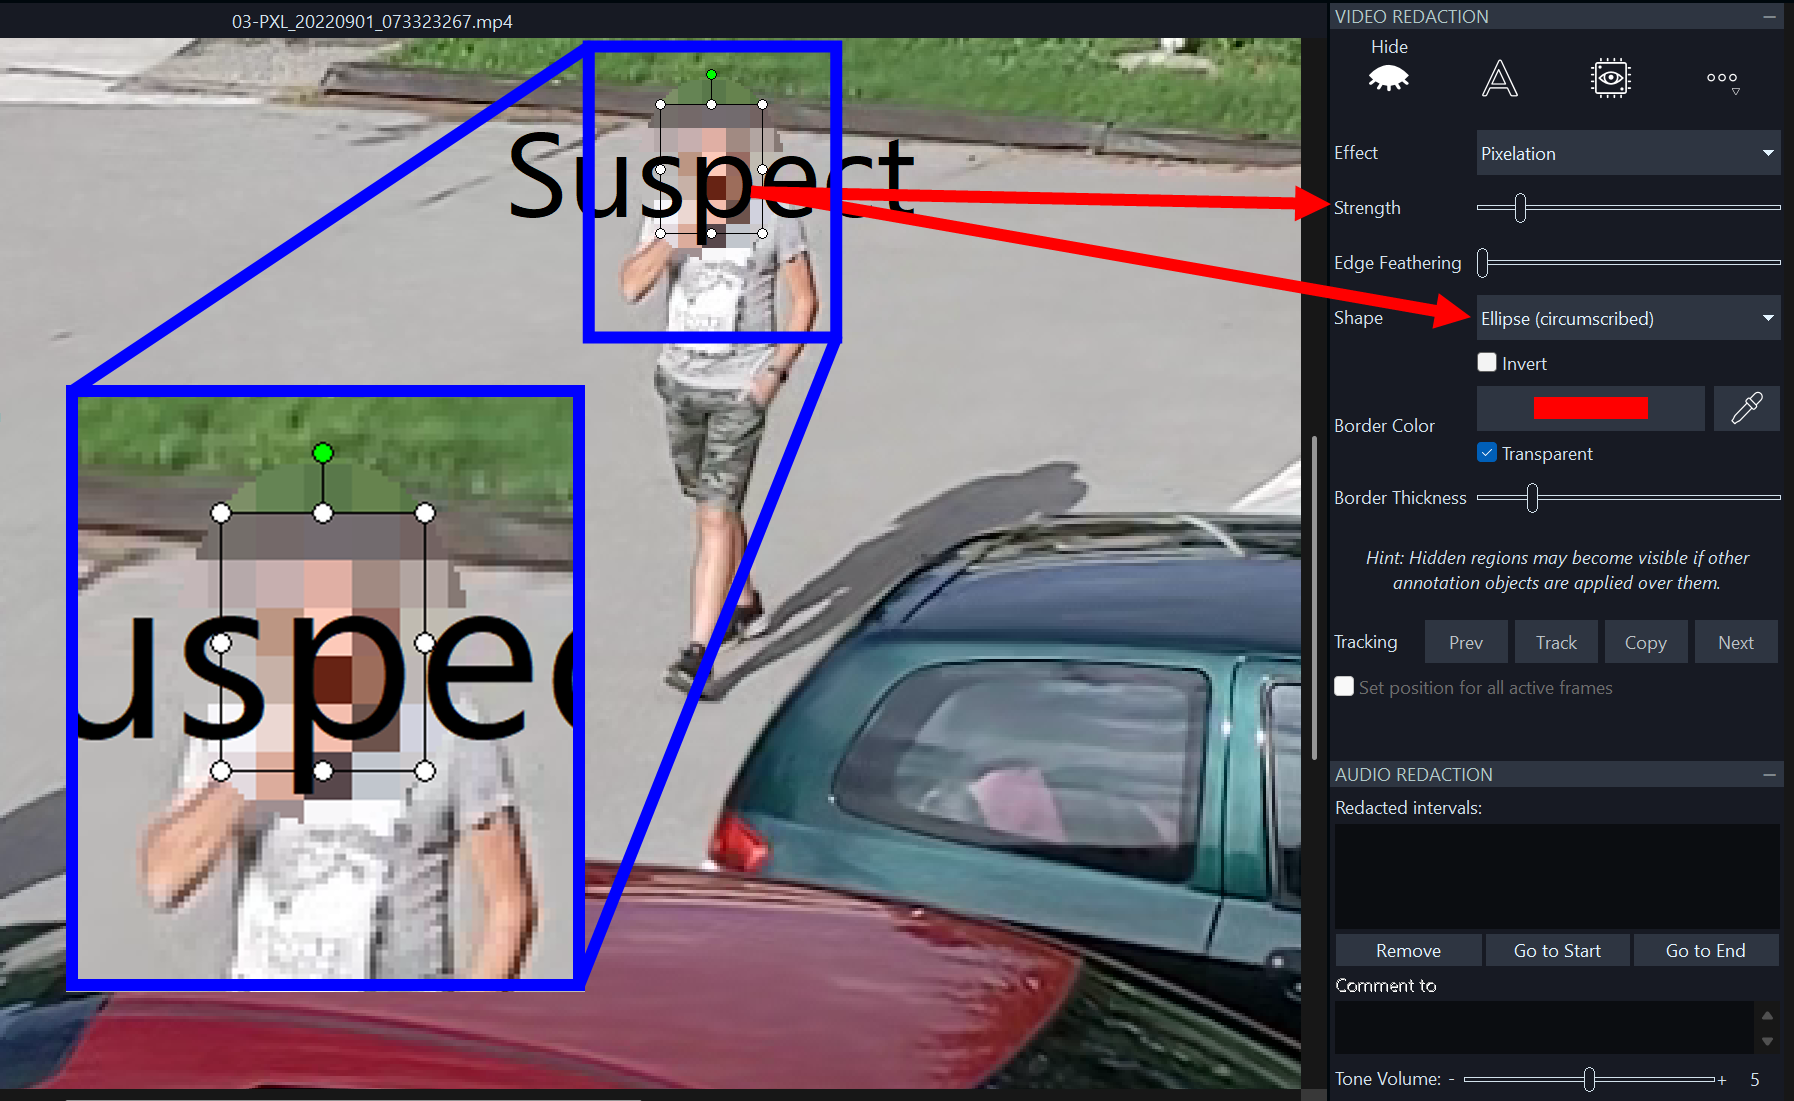
First, click on any redaction to activate its Hide parameters. Change type and strength as required, including the new Shape dropdown. In the example above, the strength of the Pixelation has been reduced and the shape has been changed to Ellipse (circumscribed) to draw the Hide filter outside the corresponding bounding box. This will ensure no facial features are visible, either fully or partially.
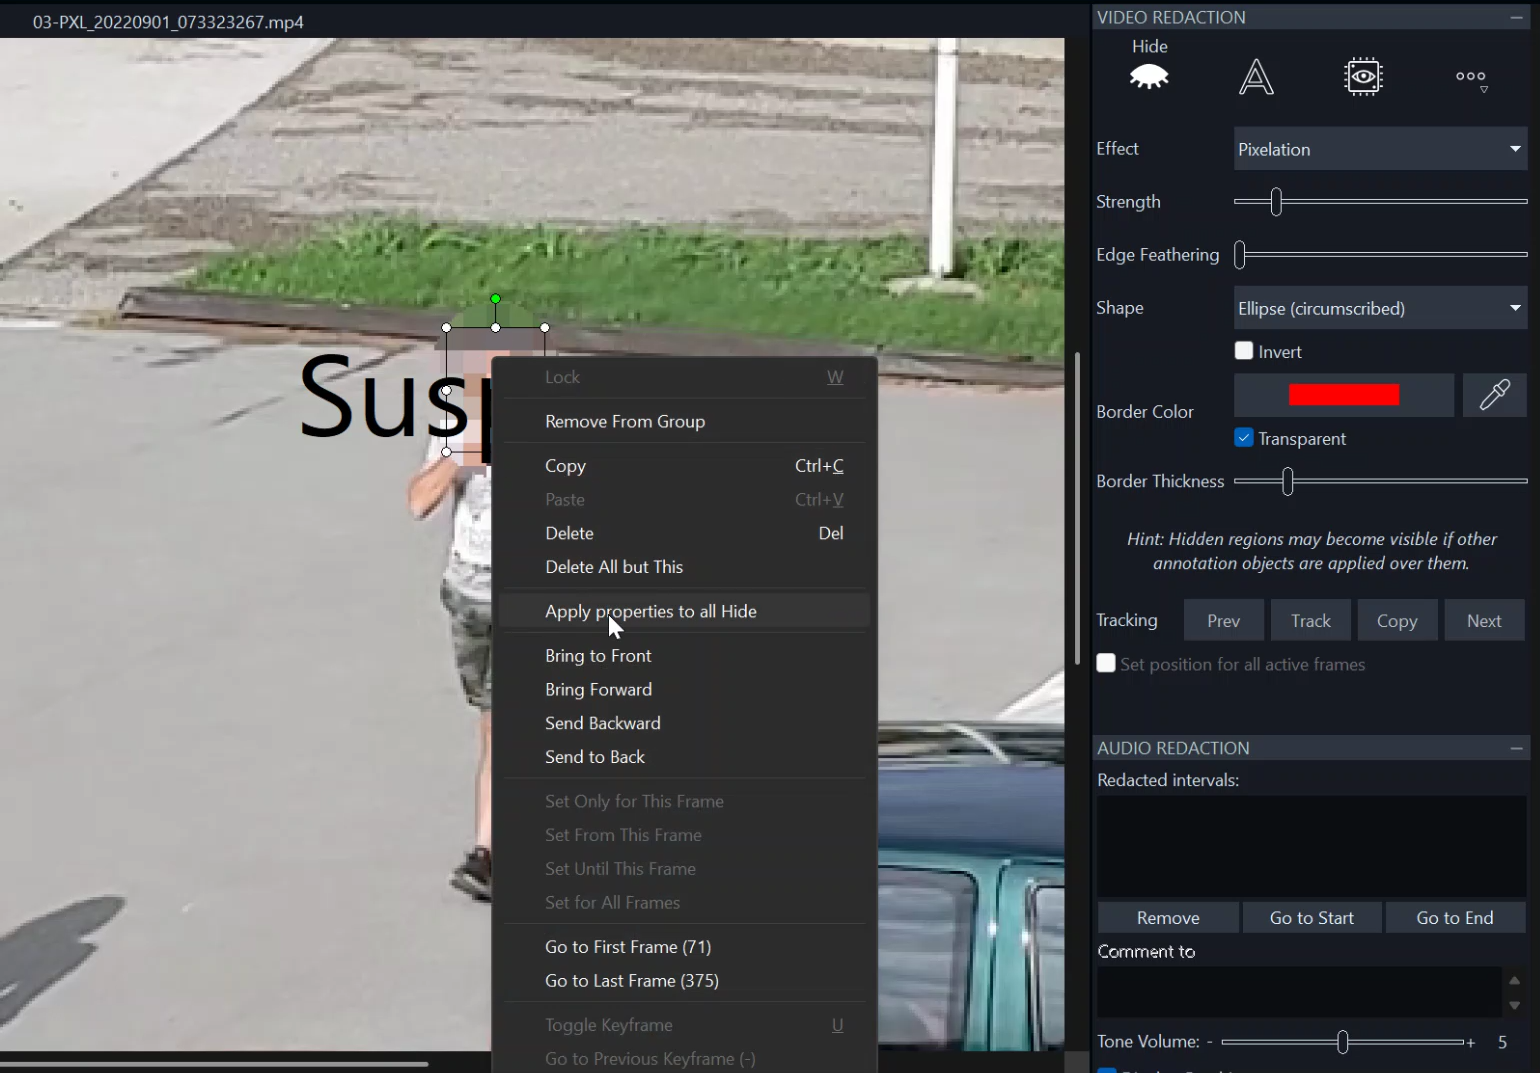
You can edit redactions individually of course. But if you want the parameters copied across all redactions at once, you can now simply right click on the redaction and select the option “Apply properties to all Hide” from the context menu, as shown below. This will instantly apply the parameters to all objects. You can do the same for the text labels as well, by clicking on the option “Apply properties to all Text” instead.
Reviewing and Exporting Your Redacted Video
And now comes the most important part of the whole process. That is checking your redactions and fixing any errors that the assisted redaction may have introduced. Amped are confident the model is accurate and will perform well. But it is important to understand that you are ultimately responsible for ensuring there is no sensitive content left uncovered, either fully or partially. Play or scrub the redacted clip. Ensure the redactions are properly applied and that they are not short in covering sensitive content, either spatially or temporally. You may find that a redaction disappears all of a sudden because a person has partially gone out of view or changed their appearance too drastically.
Simply click on that individual redaction to edit it independently. You can now extend it or retract it, or even change its shape by editing the Hide parameters and/or by using the conventional Replay tracking features or key framing. If lucky, you may only have to do this on a small number of stubborn redactions, therefore still saving a lot of time while ensuring accurate results.
Exporting the Redacted Video
It is time to export your redacted video. When you are 100% happy that all redactions have been applied correctly, click on the Export tab. Remember, you may still add some annotations or maybe redact audio as well. You can, of course, do any of these additional tasks in conjunction with the new assisted redaction feature. Amped would also advise you to play back the clip one last time while in the Export tab. Remember, whatever you see in this tab is what you will export later. Click on the “Export Processed Video as MP4”, as this is the only option that will produce a fully redacted video (with or without audio). You can also, of course, export redacted still images by clicking on the “Export Current Image” or “Export Bookmarks” if you have added any redacted bookmarks.
Generating the Report
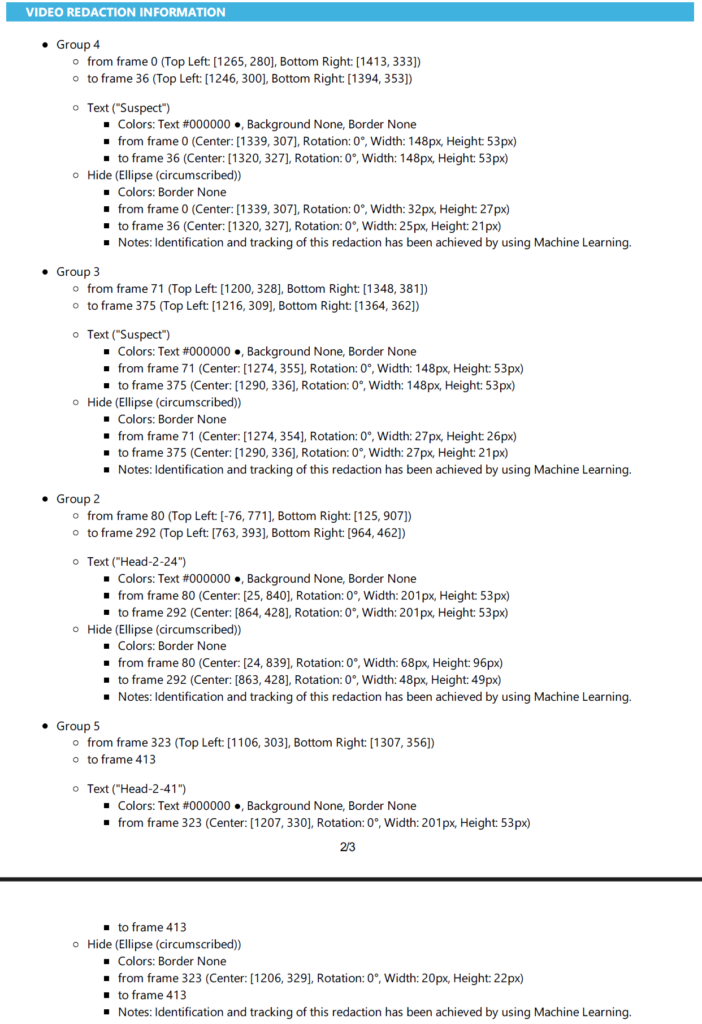
You may also want to export a report. This will contain details of all the redactions in your video. It also clearly indicates that a machine learning system has been used to assist the user in redacting content in the video. After all, full transparency is needed on how the video has been processed, and a fully disclosable and legal document containing all processing information can be easily produced. To generate the report, simply click on the Generate Report button, and a PDF document will be produced immediately.
Conclusions
Hopefully, this article has convinced you that using the new assisted redaction in Amped Replay is both time-effective and forensically secure. If your organization is ok with using it, then, by all means, go ahead and start using it immediately!
Take the new tool at face value; it is an artificially intelligent assistant that will do the tedious work for you. But remember, you are still in charge, ultimately, and in full control of how you output your video evidence.
If you have some spare time, don’t forget to share feedback directly with Amped on how you are getting on with the new feature. They will be happy to hear from you even if you are experiencing any issues or if you have some ideas on how it can be improved. One thing the good folks at Amped Software do quite well is listening to their users and improving their products, FOR their users.
Get redacting now, and have a fantastic 2026!