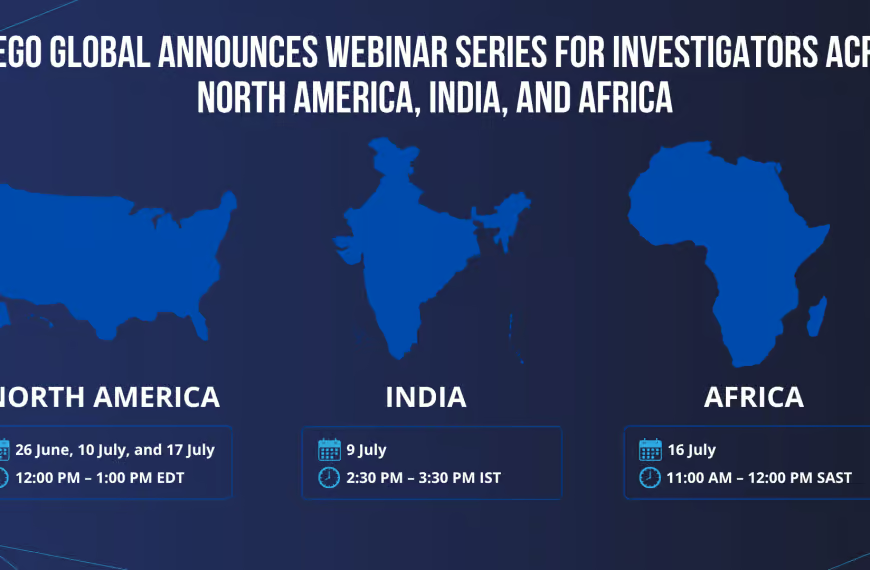
Join the forum discussion here.
View the webinar on YouTube here.
Read a full transcript of the webinar here.Hello everyone. This is Arman Gungor with Metaspike. Thanks for joining our webinar. Before we start, could we do a soundcheck? If you can hear me, would you say something on [00:16] I can make sure we’re okay?
Alright. I’m getting some answers here, so it looks like we’re good. So, today, we’re going to talk about challenges surrounding forensic email preservation – some challenges that we’ve faced and how we solved them … and how we can solve them, hopefully. I’ll try to keep the talk to around 45 minutes and leave some time at the end for your questions. In the meantime, if you have some topic suggestions or questions, there’s an Ask Question button on the bottom. Feel free to hit that and join the conversation. I’d love to answer some of your questions and make this into more of a conversation.
I’ll start by talking about some challenges that I’ve personally had in forensic email preservation, mostly … one of the issues that we had was about cloud reliability. When you collect emails from the cloud, it’s a little bit different than working with data that’s local on your network or on your computer, because cloud services do not have the same reliability [01:35] your connection, sometimes the server can disconnect. So, there needs to be a mechanism to make up for that and make sure that the acquisition goes smoothly, and if it is interrupted, then a process to recover and fill in the gaps. And that’s an issue that I’ve encountered many times over the years, especially with large and slow IMAP mailboxes.
That’ll be a long-running acquisition, for a few hours, and either the server will throw out the connection or disconnect or there will be a network issue or something along those lines, and there was no way, using the tools we had at the time, to go back and resume and fill in the gaps. So, we would have to do some manual QA to make sure what’s on the webmail interface matches with what we have; if it didn’t, then do a take two, take three, to make sure that we have the complete set – which was pretty troubling and it caused things to take a lot longer than they should, in some cases, left some room for error.
So, we wanted to be able to have a tool that keeps track of things in a database or some type of structure that facilitates, number one, accounting for all the messages and items, and, number two, if something went wrong, to be able to go back and recover, resume, even if it’s a local failure or an issue with the server or a speed issue, whatever you might encounter.
So, that was one of the issues, and the other major problem that I felt was one of performance. It wasn’t very clear why this was, but we were having pretty low performance, especially with IMAP acquisitions using other tools.
And it felt like … based on my experience with the providers, it felt like there should be a way to speed up the acquisition, but I didn’t know how exactly and what was going on. And once we started developing Forensic Email Collector, I came to realize a couple of things. Number one: most of the email clients for general purpose use for end users are not designed for forensic acquisition in mind, so they’re not very frugal with their requests. So, when they talk to the server, they pull a lot more information than the bare minimum that’s needed for a forensic collection, they first gather the headers, try to populate the user interface to make things nice and usable for the end user as quickly as possible.
That causes duplicate requests sometimes, and more importantly, if and when the server throttles the connection and says you’re exceeding the bandwidth limits, then most of the tools that I’ve used did not have a way to listen to that and back off a little bit. And when you don’t do that, and if you relentlessly hammer the same mailbox, that causes further performance degradation, and, in the end, things slow down even more and you can’t really … sometimes you can’t even complete the acquisition at all. So, that was another issue that I was having, that there needed to be a way to listen to what the server was saying, implement some of those exponential back-off algorithms that service providers recommend and, in some cases, slow things down a little bit and put a pause to [05:14].
Another thing that I ran into quite often was the lack of forensic safety, let’s call it. Because most tools are not, again, designed for forensic preservation purposes, so they facilitate a two-way sync, some of the general-purpose IT tools allow for mailbox migrations or some email clients obviously support creating new messages in the mailbox, sending, receiving, and all that. So, that leaves it open for the end user to either make a mistake and drag something out of place or move a message or delete a message, or just simply the tool creating additional folders for categorization or doing things in the background that change the original evidence, which is the mailbox. So, we wanted to have something that talks to the server in a read-only fashion, doesn’t change anything, and actually doesn’t have the ability to change anything, even if you wanted to.
So, let’s stop here for a bit. I have a long list of these challenges, but let’s stop here for a bit and I’ll start showing you a little bit of what we did with Forensic Email Collector, and while we go along, I’ll try to answer some of your questions, and also, I’ll show you what we’ve done to tackle these challenges that I’ve talked about so far. Let me start by sharing my screen here, on this side. Alright, so you should see a blank screen with the Metaspike logo here. I’m going to introduce you to Forensic Email Collector. Some of you from the list that I’m seeing here already are existing customers, but I’m sure there’s a lot of people that haven’t seen it yet or haven’t had a chance to use it yet. So, I’m going to show you a little bit of how it works and how it addresses some of these challenges that I’ve talked about and I will talk about in a little bit.
It all starts with the main user interface – it starts with entering the target email address and then there’s some background process that goes on to help you determine the server settings for the acquisition. I’ll talk first about how we tackle the first couple of challenges about the cloud reliability, being able to resume acquisitions if something goes wrong, the forensic safety aspect of it, and documentation and hashing and metadata. And then, we can go from there.
I’ll start by putting in a target mailbox on a custom domain. So, let’s … this mailbox here. So, when we say Next, you’ll see that Forensic Email Collector automatically realized that this is a mailbox hosted by GoDaddy. That happens because as soon as you type in the type of mailbox and hit Next, Forensic Email Collector does a mail exchanger record lookup using DNS, and it queries the domain to see what server handles the mail exchange for this domain. So, it determines, based on that, that this is on GoDaddy, so it pre-populates the server settings and the optimum configuration for the software. You could customize this if you wanted to, and make your own custom profile or edit this in some way.
Let’s put a password here – let me look up the password I have for this.
Alright. Let me answer a question here real quick. Alright, so as soon as we put in the password, the next screen that we see is some case information. So, this could be useful for your documentation. This goes into the logs that Forensic Email Collector keeps. I usually like to put some information here, like the evidence ID that we use for this evidence item. [09:29]
Alright. This is optional, you don’t have to fill this out each time. But this case, I’m just putting some information to show you. For the output path, [I’ve put] something like this. In the output options, you see that we have [10:07] to output [two, multiple formats] at the same time – that’s one of the issues I frequently encountered. We would want multiple Apple formats like PST and MSG and EML usually, but there had to be a separate, after-the-fact conversion step usually, because the tools that I’ve used did not allow for that. So, we built it, and you could choose MSG and PST at the same time – it automatically hashes by MD5, SHA-1 or SHA-256, and you could split the Apple folders into sub-folders to prevent very large folders from being filled up with hundreds of thousands of messages in some cases.
So, in this case, I’ll keep it simple. The point is just to show you how we recover from an issue in this case. So, let’s get the [mobile’s] contents. So, this is a little over 650 or so messages, so let’s get this started. So, Forensic Email Collector starts by doing a snapshot of all the folders. That part went a little bit quick, so you probably couldn’t see that. But it goes into each folder and gets essentially something like a folder listing, containing all the messages, their identifiers, and all that information from each folder. This is put in an encrypted database to keep track of that acquisition later on. So, as we are downloading these messages, they are being recorded in the database and being marked as successfully downloaded, along with their locations and hashes and all that information. So, if something were to go wrong … in a little bit, I’m going to cancel this to simulate a network error or the server stopping the connection or a power loss or something like that, and we’ll see how we can recover from that. I’ll wait a couple more seconds.
And there are a couple of different ways of recovery. I’ll illustrate that too soon. This is good point, I think, to stop – around 550 or so messages. Alright, so in this case I cancelled it. Let’s open up the [Outlook] folder. Let’s get out of this. Let’s say that something happened and our acquisition gets interrupted, so we have the forensic [12:20] project file for this case, we have some logs of what happened so far, which I’ll get into in a little bit, and then we have the Messages folder – in this case, we only selected [12:29] and we only collected from the Inbox folder so far.
I’m going to go back to the main case folder and I’m going to double-click on the Forensic Email Collector project file. This calls the project to be reloaded, and you see that there were a total of 688 messages and only 138 of them are remaining. So, we have a couple of options here. Number one: We could resume this acquisition and try and get the rest of the messages. And this will cause the messages to be exported into a [Save] folder as the remainder, so in the end you will have a complete set of messages, as if nothing was interrupted. We have another option to acquire just metadata for these items.
This is usually reserved for really problematic messages – if you’re encountering some messages, and maybe due to time constraints or because of a server issue you cannot get a few messages. You could use it to get some additional information about them. I’ll show you how that works really quickly.
So, let’s say I want to put this in the same folder as my main acquisition. So, in this case, Forensic Email Collector is going to go connect to the server and query each message one by one, and instead of trying to download it, it’ll try to get metadata for them. I’m going to show you how that looks in a second, and then we’ll actually go ahead and resume the [project here].
Let’s open that case folder. So, this is the Sent items folder now, and a couple more … the remaining 50 folders. This metadata acquisition is a process that’s done on an individual message level, rather than a [14:19] process that we use for the message downloads. The reason for that is because this is usually something that happens if something went wrong, so we want to make sure that we can get those messages. So, let’s go check out the [output] folder. I’ll hold this up here. I’m going to try to make this [folder better formatted] so you can see it [14:43]. Alright, so here, we see some metadata that Forensic Email Collector got for these messages. You see that there’s the IDs that we created internally. There’s the service identifiers for these messages – these are the UIDs from the IMAP server. There’s the folder where they came from, the from, to, cc, bcc, message IDs, the [internet] message ID, dates and subjects.
So, this could come in handy if you’re just trying to get some additional information on what [these message design,] why they failed. But if you wanted to really go and resume the project, again, you could reopen this, and instead of generating a metadata export, you could go and, say, resume. In this case, you’ll see that instead of retrying all 688, FEC is just going to try the remaining 138, so it’s just in the inbox now, and then it’ll switch over to [Sent items text] messages and all the rest. And you’ll see that the remaining folder is filled in and we have the messages for them here … [text] message, trash.
So, that’s how we resume messages, and we have a couple of options there. One of them is that when we are doing the acquisition, in the Preferences page, you are able to set a number of retries. These are automatic retries, and you can set this up to however many tries you want to do. I usually recommend about 10. This is a process where, if a message fails to download, then FEC will skip over it and move on with the process, and then it will come back 10 more times to try that folder or that message, until it gets it.
So, if you wanted to really set this up for the night and go and come back the next morning, you could set this up to a large number, like 100, and leave. And when those retries are happening, as I talked about it earlier, there is this issue of server throttling sometimes, and Forensic Email Collector actually listens to the messages coming from the server, and sometimes the server actually prescribes some wait times. It’ll say something like, “Hey, you’re exceeding the [rate] limits for this target mailbox, so why don’t you wait till October 25th…” It’s 3PM, for example … usually it’s not a very long time, but … usually a few minutes, or 10, 15 minutes. And they retry after that. So, if you’ll see, we’ll try to parse that server response and actually put a wait in the process, to stop and wait until the time comes. So, it definitely helps with not hammering the mailbox and spinning things along.
If we do not get a response like that from the server then we will still keep retrying but we will keep increasing that delay between the tries, using an exponential back-off algorithm. So, it’ll slow things down a little but until the server is responding again. And in the end, if you wanted to leave this running for a long time and get a notification, you can set up some notification emails here, using a relay server perhaps, and FEC will let you know that the process is finished.
And then … this is the automatic retries option. And then, in addition to that, like I said, whenever you wanted to, you could go back and manually retry a project by pulling up the project file and resuming it from there.
This is talking mainly about the reliability issue and being able to resume projects. This applies to IMAP Gmail API and Exchange acquisitions pretty much across the board. Another issue we had was the detailed documentation, hashing, and I’m going to talk to you a little bit about that, and let’s take a look at some of the logs that Forensic Email Collector keeps. When we started the acquisition, we entered some case information, so I’m going to show you a little bit about that, and here’s the acquisition log that we keep, which has timestamps, and it outlines the whole process of what happened.
So, it starts with the case information that we entered, the settings that we used for this collection – the output settings, the server information, and overview of how the acquisition went. And then, when you look at the individual IMAP logs, these are the raw communications that FEC has with the server, essentially a play-by-play of what we said to the server in terms of the IMAP commands, how the server responded, and how the acquisition went. We abbreviate some of these responses a little bit – we don’t need the full-body response because that would just make for a very long log file. But you can see the internal dates for each message, the internal identifiers, and the whole process [essentially is here].
And then, we have another log file for the downloaded messages, which is essentially a [20:03] [text] file again – I’ll make this a little bit more user-friendly. So, here we have a list of the identifiers for each message, the folder where they came from, any applicable hashes – so in this case, we’d only selected the MIME options, so you get the MIME hashes in SHA-256, we have the output paths for each message, and if there were any IMAP flags, we see the flags – in this case, some were [marked as C].
And then, in the event that there is an issue, if there are any remaining messages – in this case there were some remaining messages in the first one, because we had stopped the acquisition – then there is a dump of those remaining messages from that first cancelled acquisition, which was about under [38 IMs]. You’ll see that in your list here. So, I see a few questions popping up here, and I’ll take a look to see if there’s anything I can answer here … just a second.
Alright, so there are a few questions. I’ll start by answering the easiest ones. This question is from [Andy Townsend], and he says that what if more email arrives during the acquisition. Yeah, this is an issue that we encountered as well. If you’re acquiring emails and you don’t keep track of how the mailbox looked before the acquisition, then what happens is you end up with more emails trickling in as you acquire, and you could end up in a situation where the acquisition never finishes. So, what FEC does is before we start the acquisition, it takes snapshots of the mailbox. So, we essentially set in stone how the mailbox looks at the time you started the acquisition and there’s a database record of all that.
So, even if new messages trickle in, once you start the acquisition, then we’re not concerned about that. We are preserving it as of when the acquisition started. That helps with the resuming ability too, so … we don’t want to resume a project from yesterday and find that we had 51 messages coming between yesterday and today and now we have to go back and collect those. So, that’s all part of the snapshot and tracking process.
Let’s see … here there’s a question about if we need specific accounts with specific rights. I’m not too sure about this question as far as is this rights about … is this rights on the local computer where the acquisition is performed or user rights within the server. I’m assuming it’s about the server. So, in this case, if you’re preserving from an IMAP server, then you would need the password and username for that mailbox.
If you are doing an Exchange acquisition, then you could either have the username and password for the target mailbox or you could have an administrator mailbox with full mailbox access rights to that target, and you could use Exchange delegation to use that administrator mailbox to access the target mailbox. That usually helps with corporate situations where there are a long list of custodians and you can access all of their mailboxes from a central admin account.
And for Google, again, you would need either the username and password for the target or you would need to either use the auth workflow to authorize that with google or an authentication token to authenticate into that mailbox, which I’m going to get into in a few minutes.
One more question, about mailboxes where two-factor authentication has been set up. Yeah, this is one of the challenges that I’m going to talk about in a minute. But briefly, as we do support two-factor authentication – it’s part of the [24:25] flow. Let’s save that for a few minutes later, where we go over how we do Gmail mailboxes.
So, here’s what I had so far for the questions, so let’s get back to resuming this. Another issue that we had a challenge with forensic email collection is that a lot of times, we would get cases where there was a need to perform in-place searches directly on the server. And the reason for that varied, but oftentimes, it was a factor of privacy concerns – we would be collecting from maybe an opposing counsel, an opposing custodian, and they did not allow for access to their entire mailbox, so there was a need to run a search before we collected anything, and just collect the results of that search rather than the entire mailbox.
And then, there were issues of time – there would be cases where there would be a time-sensitive project and we would not have the time to complete the acquisition up front, so we would want to do either a very targeted collection first, to get things started, and then go back and do the full collection later, or, for law enforcement users, sometimes there’s the issue of when they’re running a search warrant and they’re onsite and they have limited time to get the emails, perhaps they don’t have time to set up shop there for a few hours to download entire mailboxes, they want to cut to the chase, put in some keywords and get the emails that are central to the case that they’re working on.
So, there was this issue of running in-place searches, and we did not have tools to tackle that pretty much in any scenario – not for Gmail or Exchange or IMAP. So, we started building this with Gmail, which turned out to be very interesting and useful to a lot of our users. So, if you have used Gmail’s webmail interface, you’ll see that there is the ability to make this [26:45] there’s the ability to search Gmail using the Gmail search syntax, which is pretty comprehensive. So, you could run searches based on labels, based on timeframes, Boolean operators, proximity operators, and things like that, to narrow things down here.
So, we implemented the same search capability using Gmail API into the Forensic Email Collector, so you could run a Gmail search directly on the server pretty much instantly, and get the results and only collect those.
I’m going to do a couple of test searches here, to maybe refresh your memory on what’s possible, and build a couple of searches here that we can use in Forensic Email Collector. So, we’ll start with something simple – let’s say that I’m looking for messages with a specific label, which is the terminology in Gmail. As opposed to folders, we have labels. So, let’s search for messages under the [27:46] label, for example. So, that’s a [pretty long] message under that label.
Let’s say that I want to search for a more complex set of terms including proximity operators. So, let’s use some [28:04] I’m going to use a [round file]. You might be familiar with this type of syntax from e-discovery searches or, in computer forensics, running proximity searches looking for a word or a phrase within a few words of another. I’ll do [EPA scientists around five apples] for example, and [they got me] one term. Let’s se how this looks.
Yeah, we can see that there’s [apples and EPA scientists]. The way we search this, Google doesn’t differentiate between if [EPA scientists] is the first term or [apples] is the first term, or the other way around – it’s just within a few words of each other. But if you put the whole thing around quotes, we could make that distinction. So, let me do that now for another term – let’s combine them and say something like … let’s do … [something like this].
This will cause … this will actually enforce the order. So, we’re looking for items here where [servers] is within four words of apple. And then let’s go back and add some more to this. Let’s say I’m going to add to this another [29:30] subject. One more, and then … [29:43] from here.
Alright, and then, let’s say that at the last term I had … okay, I’m back to here. So, let’s say that I want to add to this a date component, so I could put this in parentheses, and add another component, there’s something like after [30:22]. So, if you look at this, only one of them is within that time period. So, that’s coming down to just one message here.
Of course, this is a pretty contrived and small search [30:36]. The point is to show that you could actually go and [plug this search] and [30:42]. Well, let’s do that now, and with this, let’s also take a look at how we authenticate with Google. So, let me put in this first account that I have here.
And Forensic Email Collector picks this up as Gmail API, and we have a few options here that we can go over, but we are selecting the option to use the Gmail labels to construct the folder structure here. We could also collect this with IMAP from Google, which I’ll go into a little bit.
So, instead of Gmail API … I’ll skip over this part. And as soon as we click Yes, we need to authenticate with Google in this case. Because we don’t have an existing token, so we’re going to say yes and allow. So, this goes through the Google’s process to authenticate, if we see into that Gmail account. And we see the contents of the tree of the mailbox. So, we could perform a search here – go back to our search terms here. Put them into FEC. And find the same message that we had, and say … and this will cause the search query to be activated, which you can remove from here. And then, you can hit Next. And once you execute the search, you’ll see that as opposed to downloading the whole mailbox, we are getting only that one specific message that responded to the search. And when you look at the [output] folder, we see that again we have the logs, like we talked about, and then we have the messages, in this case only MIME, under the Apple folder, which was one of the labels, and the email file.
So, here’s an interesting thing. If you looked at this message that we downloaded … we see that it had multiple labels applied to it. So, it had the Apple label, the [sonos] label, it was starred, it had an Amazon label, it was under the Inbox in Gmail, and it had a label that corresponded to category promotions, so this is something that Gmail categorizes messages internally as a promotion. So, in this case, although this message had [lot] labels, we only downloaded it once, which is again one of the challenges we had. When you connect to Gmail using traditional tools over IMAP, like in [Thunderbird] or Outlook, what happens is Gmail’s IMAP server presents each message under each label as a virtual folder. So, in this case, you would see the same message multiple times and just performing the acquisition causes that message to be downloaded several times over, causing some inherent duplication, unnecessarily.
And then you can go back and de-duplicate that, but the issue with that is, number one, it takes longer to perform the acquisition, and number two, you are more likely to run into [rate and API] limits connecting to Gmail, because you’re pulling more data from that mailbox, or more than you should, in fact multiple times the size of the mailbox. And then, there’s an effect on the whole subsequent steps that follow, like ingestion, searching the duplication, possibly [34:03] [review]. So, it’s kind of undesirable to cause that type of duplication connecting to Gmail, the IMAP.
Gmail API solves that problem nicely – you get one copy of the message and then you get a list of the labels that were applied to the message, and you can overlay this information – that’s what I recommend doing, is to create a database field in your e-discovery tools or computer forensics tools, and take this Gmail label’s delimited data and overlay it into that field, maybe as a multi-value entry. And then you can [create] that information [search by … utilize it during internal] review, and still work with only one copy of the message, which is similar to how it works for Lotus Notes. If you collect from a Lotus Notes store, you might run into cases where the same message is visible under multiple views, so it’s more appropriate to capture it once or process it once, and list it under all these applicable views. So, this is a similar situation here.
Just for illustration, let’s pretend that we don’t have this ability to acquire from Gmail the API, so let’s go back and try to download that same message that we’re downloading but over IMAP. So, I’m going to do that by searching for this message by its ID, so I can pinpoint that. And with this, I’m also going to show you how the search console in IMAP works. After we accomplish this in-place searching in Gmail, we also set out to do the same for IMAP and Exchange service as well. So, this is how the IMAP search works, in a nutshell.
Let’s [go in] the same mailbox. But instead of Gmail API, I’m going to switch over to IMAP using this hyperlink here. FEC going to populate IMAP settings for Gmail. We can [36:05] here. Something like this.
So, this time, it’s going to do traditional IMAP method. You see that I did not enter a password, because the same [36:20] authentication method I used for Gmail API is also usable under IMAP, so I could authenticate with a token and still pull in the IMAP contents of the mailbox. I’ll go over that in a little bit. Let’s do the same search. In this case, as you see, all the labels are represented as folders here that are selectable. I’m going to just go into the Search option here. IMAP search looks a little bit different, because it relies on the IMAP search command rather than the Gmail API’s search functionality. So, it’s a [field] search, there are specific search commands for each type of IMAP search that you want to run.
In this case, I’ll search for the message ID field. I’ll put in my message ID that I got from Gmail, run a search for this. And you’ll see that because it’s folder-based in IMAP, it’s going through every folder, searching each folder one by one. And yeah, as you see, for the same message ID, we got six different results from different IMAP folders, which are the different Gmail labels applied to this message. So, I’m going to say yes, and I’m going to go through with this acquisition, [not stop]. And we’ll go through all the different folders here, do the acquisition. And you see that FEC found all the six messages because of the search terms. And I look at the output folder, you’ll see that in the acquisition log, we ran a search here, and the search [37:55] is recorded. That’s the same situation with Gmail API as well. And when you look at the output, we have the same message under Amazon and Apple and Inbox and some of those … all these different labels. And if you look at the downloaded messages that we got, it’s all the same message all over, with the same hash. Let’s do this one more time.
Yeah, so this is clearly counterproductive. It could be beneficial in some cases if your e-discovery workflow relies heavily on having some folder structure like this and having it for each and every label. But generally, my recommendation is to use Gmail API and create one copy based on one of the labels like we did earlier here – in this case, we used the Apple label – and then, record the rest of the labels and overlay them into the database. You could also export a flat folder structure from FEC. So, if you uncheck that option here … let’s go take a look at this real quickly.
So, when I do the Gmail acquisition, if I uncheck this option, then that’s going to cause all the [IMs] to be [39:15] folder structure, which makes it easier to deal with sometimes. Here let’s also keep the other options. So, when you select PST, we also have an option to split the output. That’s because Microsoft [own] tools have some limitations dealing with large PST files, especially after the PST gets over 50 gigs. Outlook has a hard time opening it. So, we put in some options here too, to limit that and go into the next PST when the time comes. And let’s do this. So, in this case, I’m just getting the whole mailbox, just to give you a sense of how the standard Gmail acquisition looks without the label-based folder structure.
If you choose that option, then everything will go into the flat folder structure, you will see sequential files here. So, this is a little easier in terms of processing and dealing with the files, but like I said, if you seek that folder structure in your output for your e-discovery tools, then we have a couple of options there. Here’s the PST and the [output … hash with the PST] calculated. As of the latest version of FEC, we do not require Outlook anymore. It used to be that FEC was dependent on Outlook to create its PSTs. Now we have a direct PST writer. So, you could put FEC on a computer without an Outlook installation, it’ll do just fine and create its own PSTs.
So, this was the issue we had with searching. Like I said, we tackled IMAP searches and Gmail searches, and also Exchange searches, which is the third provider. So, let me show you very quickly how searching in Exchange, and also delegation, that works. Let’s do a quick Gmail acquisition, and I’ll show you delegation here. Instead of connecting to … let’s put one of our internal mailboxes here. When I do this, Forensic Email Collector queries that domain and it knows that this [41:32] 365, and instead of putting in this person’s credentials, I’m going to put in mine, as an admin account. And let me grab the password for this. I’ll put in my password. Here you see that FEC automatically populated the Exchange web services URL for this mailbox, because it’s known – if you are dealing with an unknown Exchange account, maybe a corporate Exchange server or perhaps some type of hosted Exchange service at Intermedia or another provider, then we have the ability to do auto-discover, so that we could discover the credentials – not the credentials, but the server settings for that.
Let’s stick with the defaults here. And I’ll skip over these. We can see the folder structure here. Something to note is that towards the bottom, you see a few folders. These have to do with the Exchange [recoverable] items folder. So, especially deletions is essentially what used to be known as the Exchange dumpster. So, without having to restore those items, FEC can connect to an Exchange server and recover those deleted items as well, to the extent they’re available.
In this case I’m going to show you … this is [43:01] mailbox from my credentials, via delegation. I’m going to run a quick search here. This is similar to the Gmail search, but in this case, we are using advanced query syntax for Exchange, which is essentially what you would use if you were exporting mailboxes from the Exchange server using [PowerShell] over Exchange Management Console. I’m going to run a couple of small, simple searches here, like field-based searches like this. You’ll see that unlike Gmail, which doesn’t have the folder concept, Exchange is folder-based, so [43:38] each folder individually, and then we’re going to get the results combined from all the folders. But you could pick and choose which folders you wanted to target in the folder tree.
We found 12 results. I’m going to save this. Like I said, you could uncheck some of these or leave a few checked to focus on specific folders on … when I say Next, you’ll see that we are starting to make snapshots of each folder. Let me get to Inbox, which is where these target messages are. You’re going to see the total messages count jump up to 12 [44:16], so we are focusing only on those 12 messages and downloading them.
I’ll show you something else here, another challenge that we used to have, which is server-side metadata, for pretty much all server types. There’s metadata that you find within the email message itself, like the received and sent dates of the email message. But there’s also metadata above the message that’s kept on the server, about the message, similar to file system metadata for a file on a computer. That metadata doesn’t make it into the message itself. It’s found separately on the server and it can be querying.
So, we started doing that for IMAP, Gmail, and Exchange, and the metadata we fetch from the server we use to populate the file system that’s for these messages. So, when you look at these items, you’ll see that they have file system timestamps populated that reflect internal server creation and modification dates. Most of the time, you would expect these dates to match or roughly match the received and sent dates of the messages, but this is a critical piece of evidence for especially any authentication, where if you are looking at a message in isolation, it’s harder to confirm that the data on it is correct. But you can rely on the server dates as an additional piece of information. For example, if you were to take an existing email message from the mail server, manipulate that, and change the sent date and part of the body, and then add it back to a mailbox, maybe into the Sent items folder, using the IMAP append command, which you could do with something like Thunderbird, then when you look at that message in isolation, even if you downloaded it from the server, the message itself shows the date that you put on there, so it’s not very clear that there’s some type of foul play going on.
But if you query the server date, the internal date from the IMAP server, which we capture as well, then you have a good checks and balances system, and you could even spot this during [46:41] review, especially if you’re looking at a smoking gun document, then you would have, for example, [in Relativity] or in your [organizer tools], the sent and received dates of the message, and then you have the file system dates captured, as long as you’ve preserved this information. And you’ll see a big discrepancy there, like message seems to have been sent in 2015, but the internal date from the server is in 2018, so therefore it warrants some further investigation and looking in to see why that happened.
Did some process cause that message to be moved? Or did somebody fraudulently change that message and transfer it after the fact? We would want to get to the bottom of what happened there.
This was about mainly searching. We tackled searching in Gmail, IMAP … actually, let me do one more IMAP search, just to give you a quick idea about some of the possibilities there. Let’s do a Yahoo! account. I’ll put in the password for this. Then I’m going to move on to two-factor authentication. So, this is a mailbox that has over 20,000 messages in the inbox. So, I’m going to run a couple of searches just to show you a few things. Let’s say I want to search in the From field for [48:14] and I want to do a [48:17] search as well, and I want to restrict this to 2009 only. Something like this. And then, I’ll just preview … we don’t have to preview, but it helps do a sanity check to make sure the search is running correctly before you proceed with the next steps.
So, you’ll see that again we are running the search on each folder individually. An inbox is large, so FEC breaks it down into 1000-message chunks to get the search done in a reasonable timeframe. And this is not as fast as Google search, but still, you see that for a 20,000-plus-message mailbox, you’ll get the search results in probably a minute or two. So, we’ve got four messages here, so I’ll [48:59] we’ll just save the search query, proceed with the acquisition, and FEC will start running the search again on each folder as it’s creating the snapshots. And when we get to the part of the inbox where those messages reside, they’ll see the total messages pop up [to four], which should happen in a second there. And then, we will only collect those messages rather than collect the whole thing.
Now, I’m talking about the search capabilities of FEC on the server now. Don’t take this to mean that I fully recommend running in-place searches on the server always. I think there is definitely a good point to be made about running searches in your own e-discovery workflow or digital forensics tools. Number one, you would have more control over the process, more exception logs about items that could not be searched, like encrypted files or [exotic] filetypes and things of that nature.
I like to reserve this more for cases where there is a need to really run a search on the server quickly and efficiently, and you don’t have the time or you don’t have the permission to pull down the whole mailbox. If you have the ability to do that, then by all means, just download the whole mailbox. You can slice it and dice it after the fact, and one of the benefits of that is case specifications change all the time, so if there’s a change [to] the keyword search, you don’t have to go back and run a second acquisition, you can just go with what you have and change the parameters on your [end].
So, this was the search aspect of it. Whilst we tackle the two-factor authentication in Gmail, then there has been some thought about doing this authentication process remotely. And the reason for that is mostly two-factor authentication. So, when we do OAuth authentication with Gmail, you see that – we did it a little bit ago – the browser window popped up on my end, and I put in the username and password into Gmail to authenticate. But if two-factor is set on this account, then I may not have that second factor device to complete my authentication, the custodian might have it. And we were getting issues like this, where we would get Gmail credentials, but we would have no way of actually performing the authentication, because we don’t have the custodian’s phone or, even if we had it, we didn’t have authorization to use it for that. So, we would have to get on a conference call with the custodian and their attorneys, and coordinate that acquisition process.
What we did was, to streamline that process, we created Forensic Email Collector Remote Authenticator. You can download this from the web here, [51:55] on the desktop.
Alright, so this is actually a self-contained executable that does not require installation or a license, and this is something that you can give to the end user, the custodian, to run on their own computer, to authenticate Forensic Email Collector application into their account. And this has a few benefits: number one, they do not have to share their password with the forensic examiner. They just do the authorization and pass on an encrypted token. Let’s do an example.
I’m going to launch this … let’s assume that we are on the custodian’s computer now, and we are [52:38]. And saying authenticate. So, this is essentially like a miniature version of FEC, but it is not doing the forensic collection, it just does the authentication piece only. Again, the browser window pops up, but now, this is running on the custodian’s computer, so they have access to their phone or whatever two-factor device they have, so they can authorize. And when this is done, Authenticator says the authentication is done, you can save a token. I’ll put this on a folder here. [53:16] I’ll bring that into view. Yeah. Okay. And I’ll close it. So, this causes an authentication token to be created, has a cryptic filename, and if you look inside, it’s an encrypted file.
So, it looks like gibberish. But the point of it is that you can import this into FEC. So, what we do is whilst you get this token from the custodian, you can get it via email or with your file transfer system, let’s say. You can go into the Remote Authentication tab here and say Import Token, and go and … let’s find this token’s folder. Get this imported. So, the next time that you do the acquisition… I’ll go through this [54:06].
Now we don’t have to authenticate anymore or [54:12] the credentials or anything like that. So, you have the authentication covered through the authentication token. When you’re done, you can go back and clear the token cache and delete that from here, and when the whole process is done, you could actually tell the custodian that we are done with their mailbox, and they can go into their Google account security settings, and they will see that they granted access to Forensic Email Collector as an app, so they can come here and remove access to that app. And you can see that this only has access to Gmail. So, this gives them some control over the process.
Number one, they know that you can only access Gmail, rather than the whole Google universe, like Google Drive, Google Docs, Google Calendar, and everything else. And number two, they can control the duration of your access, so they tell you … they give you the token, which starts your access. And when you’re done, they can go into their account settings and revoke that access, so that stops your access.
So, it’s a more controlled environment, and more importantly, they don’t have to share their password with you and they don’t have to change that password, because changing of the password itself can have some consequences sometimes – if there are connected devices to that password, like Android phones, Google Home, and things like that. And whilst you change your password, you might have connection problems with those devices, which is a problem for the end user. So, you avoid all that issue.
This is what we have for two-factor authentication.
One of the benefits of this for law enforcement is that when you use Remote Authenticator as you see here and put in the private mailbox and authenticate, this launches the default web browser on the system. And it does not require entry of the password if the user has already logged in. You just say Allow, and you don’t have to put in the password. So, this is a pretty good benefit for law enforcement agencies, because if they’re executing a search warrant and if they want to collect emails from an uncooperative custodian who’s already logged into Gmail, then they could bring Remote Authenticator to that computer, run it, it’ll launch in the web browser to authenticate, and if the user is already logged in, they can use that existing login session to generate the token, and they can take that token into FEC, perhaps on their own agency laptop, and import it, run a search on the spot, acquire the [responsive] documents really quickly, and be done with it. This helps you to, essentially, without having to even discover the user’s password, get into the mailbox, pull down the emails quickly, and complete that acquisition onsite.
Let me close out of this … Remote Authenticator 1.3 we released this past week. Before, this used to have t he same system requirements as the main FEC application, which required Windows 7 Service Pack 1 and later. But to lower that bar, we worked on FEC Remote Authenticator a little bit and brought those requirements down to as early as Windows XP. So, now there’s a broad spectrum of Windows computers that you can run this on. And we are working actively on bringing this to other systems like Macs and Linux computers as well. So, it’s going to be possible to run this on pretty much whatever device, and generate your authentication token and go from there.
So, this is, in a nutshell, some of the challenges we had. Let me take a look to see if I [58:09] let me take a look at the questions here, I see a couple of questions here.
One of the questions I see here is: What advantages does FEC have over Office 365’s built-in e-discovery capabilities? We do not really suggest FEC as a replacement to that, generally. But I have seen some … I have gotten some positive feedback that favors FEC over the built-in e-discovery capabilities. Some of what I heard is that, number one, this is an easier workflow when you are tackling an individual custodian’s mailbox, as opposed to working on the whole corporate level, with the capabilities to run the e-discovery workflow.
So, if you have access to the Exchange server and you can run discovery there, then you might prefer that. But if you work with an individual custodian and you want to connect to Office 365 or an Exchange server as an email client and just get that mailbox, then FEC makes that easy. And as far as the workflow goes, Forensic Email Collector’s user interface is pretty friendly. I’ve gotten some negative feedback about Office 365’s discovery tools being a little bit clunky and some of our users choosing FEC over it. So, those are a couple of points about why you might want to use FEC for that. But particularly, if you are doing an entire Exchange server acquisition and if you have access to the physical server yourself, then I would say that would be my preference – I would want to sit in front of the Exchange server, fire up Exchange Management Console, and crank out PST files directly from there, because you can’t beat that performance right on the server and it will be faster than going through an Exchange client.
Let’s see. I see a question about the webinar dataset of emails – if we could provide the webinar dataset of emails. I’m not sure I understand that, so why don’t you either comment on that or send something on the chat to elaborate, if you’re talking about a sample of what we’ve collected, so you want to see what the output looks like, yeah, we can arrange for something like that, so you can take a look.
And then, I see a message about calendar items. This is something we’re working on actively right now, and we’ve gotten requests for this. So, FEC started with email messages in mind strictly, but especially in the Exchange realm, there are a large number of item types, and on the Google side there’s … you know of Google Calendar API, which is separate from Gmail, but it’s possible to connect to that fairly easily. So, we are now in the process of making that output possible into [MSG] and PST files, and Calendar and appointment item types, and we are testing this as we speak. So, once that’s done, then we are planning to implement calendar acquisition from both Exchange and Gmail – Google Calendar, essentially.
Alright, so that’s what I have as far as the … oh, here’s a question I see on the chat. So, let me reply to that here too. It says: With IMAP parameters, translate encrypted end-to-end emails like Proton Email. Let me show you a little bit about that. I don’t have a sample Proton account right now, but this [1:02:20] we’ll just get to that screen here. So, let’s say that I had a Proton email … I guess we could put a … something like that. Yeah.
So, if you have a Proton email account, then FEC supports that, it detects it automatically. But you need to use the Proton Mail bridge. This is something that Proton Mail provides, so you can install that on the local computer. It acts as a translator, essentially, and decrypts the Proton Mail encrypted emails and allows you to connect to that bridge and acquire those email messages. So, there is no way to get a direct connection to Proton Mail and get a decrypted version of those messages without this bridge. But yeah, Proton Mail made that possible with the bridge. So, you can do it with FEC, with built-in support – so it supports the port, [SSL mode, and address,] and everything’s pre-populated, so all you need to do is to set up that bridge on the local computer, get that up and running, and then FEC will connect to it and go from there. So, it’s possible.
Alright, so that’s all I see as far as questions go. And looks like it’s been a little over an hour, so I’m getting ready to wrap up here. But this webinar page will remain here. So, you could come back and watch the recording if you had a question about something that I went over a little too fast. You can continue to [send notes] through the chat here or at any time feel free to email me, and I’ll be happy to chat about email forensics whenever you want.
Thank you, everyone, for joining, and have a great day.
End of Transcript