Hi, this is Amanda Mangan with Oxygen Forensics. In this video, we’re going to go over Oxygen Forensics’ Call Data Expert.
The first thing we’ll discuss is, what exactly is a CDR? A CDR is a call data record, and we’ll talk about the different carriers and the different information that may come with each carrier’s CDR.
Next we’re going to talk about templates. You’ll find that once you’ve collected a few different carriers’ CDRs, you have all of the templates that you’re going to need, and they’ll be there in your storage to access at any point.
So here we will form our own templates. Then we’re going to go over unique callers. Here, Call Data Expert will graph the contacts inside of the CDR for you. And one of the more important features will be the Mapping feature. Here’s where you want your CDR to come to life. We can look at places, routes and common locations that are in your CDR.
And last we’ll go over how to export your work: how to save a session if you’re not finished and you need to come back to it later, or maybe you need to add more layers to your map; and how to save a snapshot or an image of your work. This can be very important when you’re presenting to a jury or to your client.
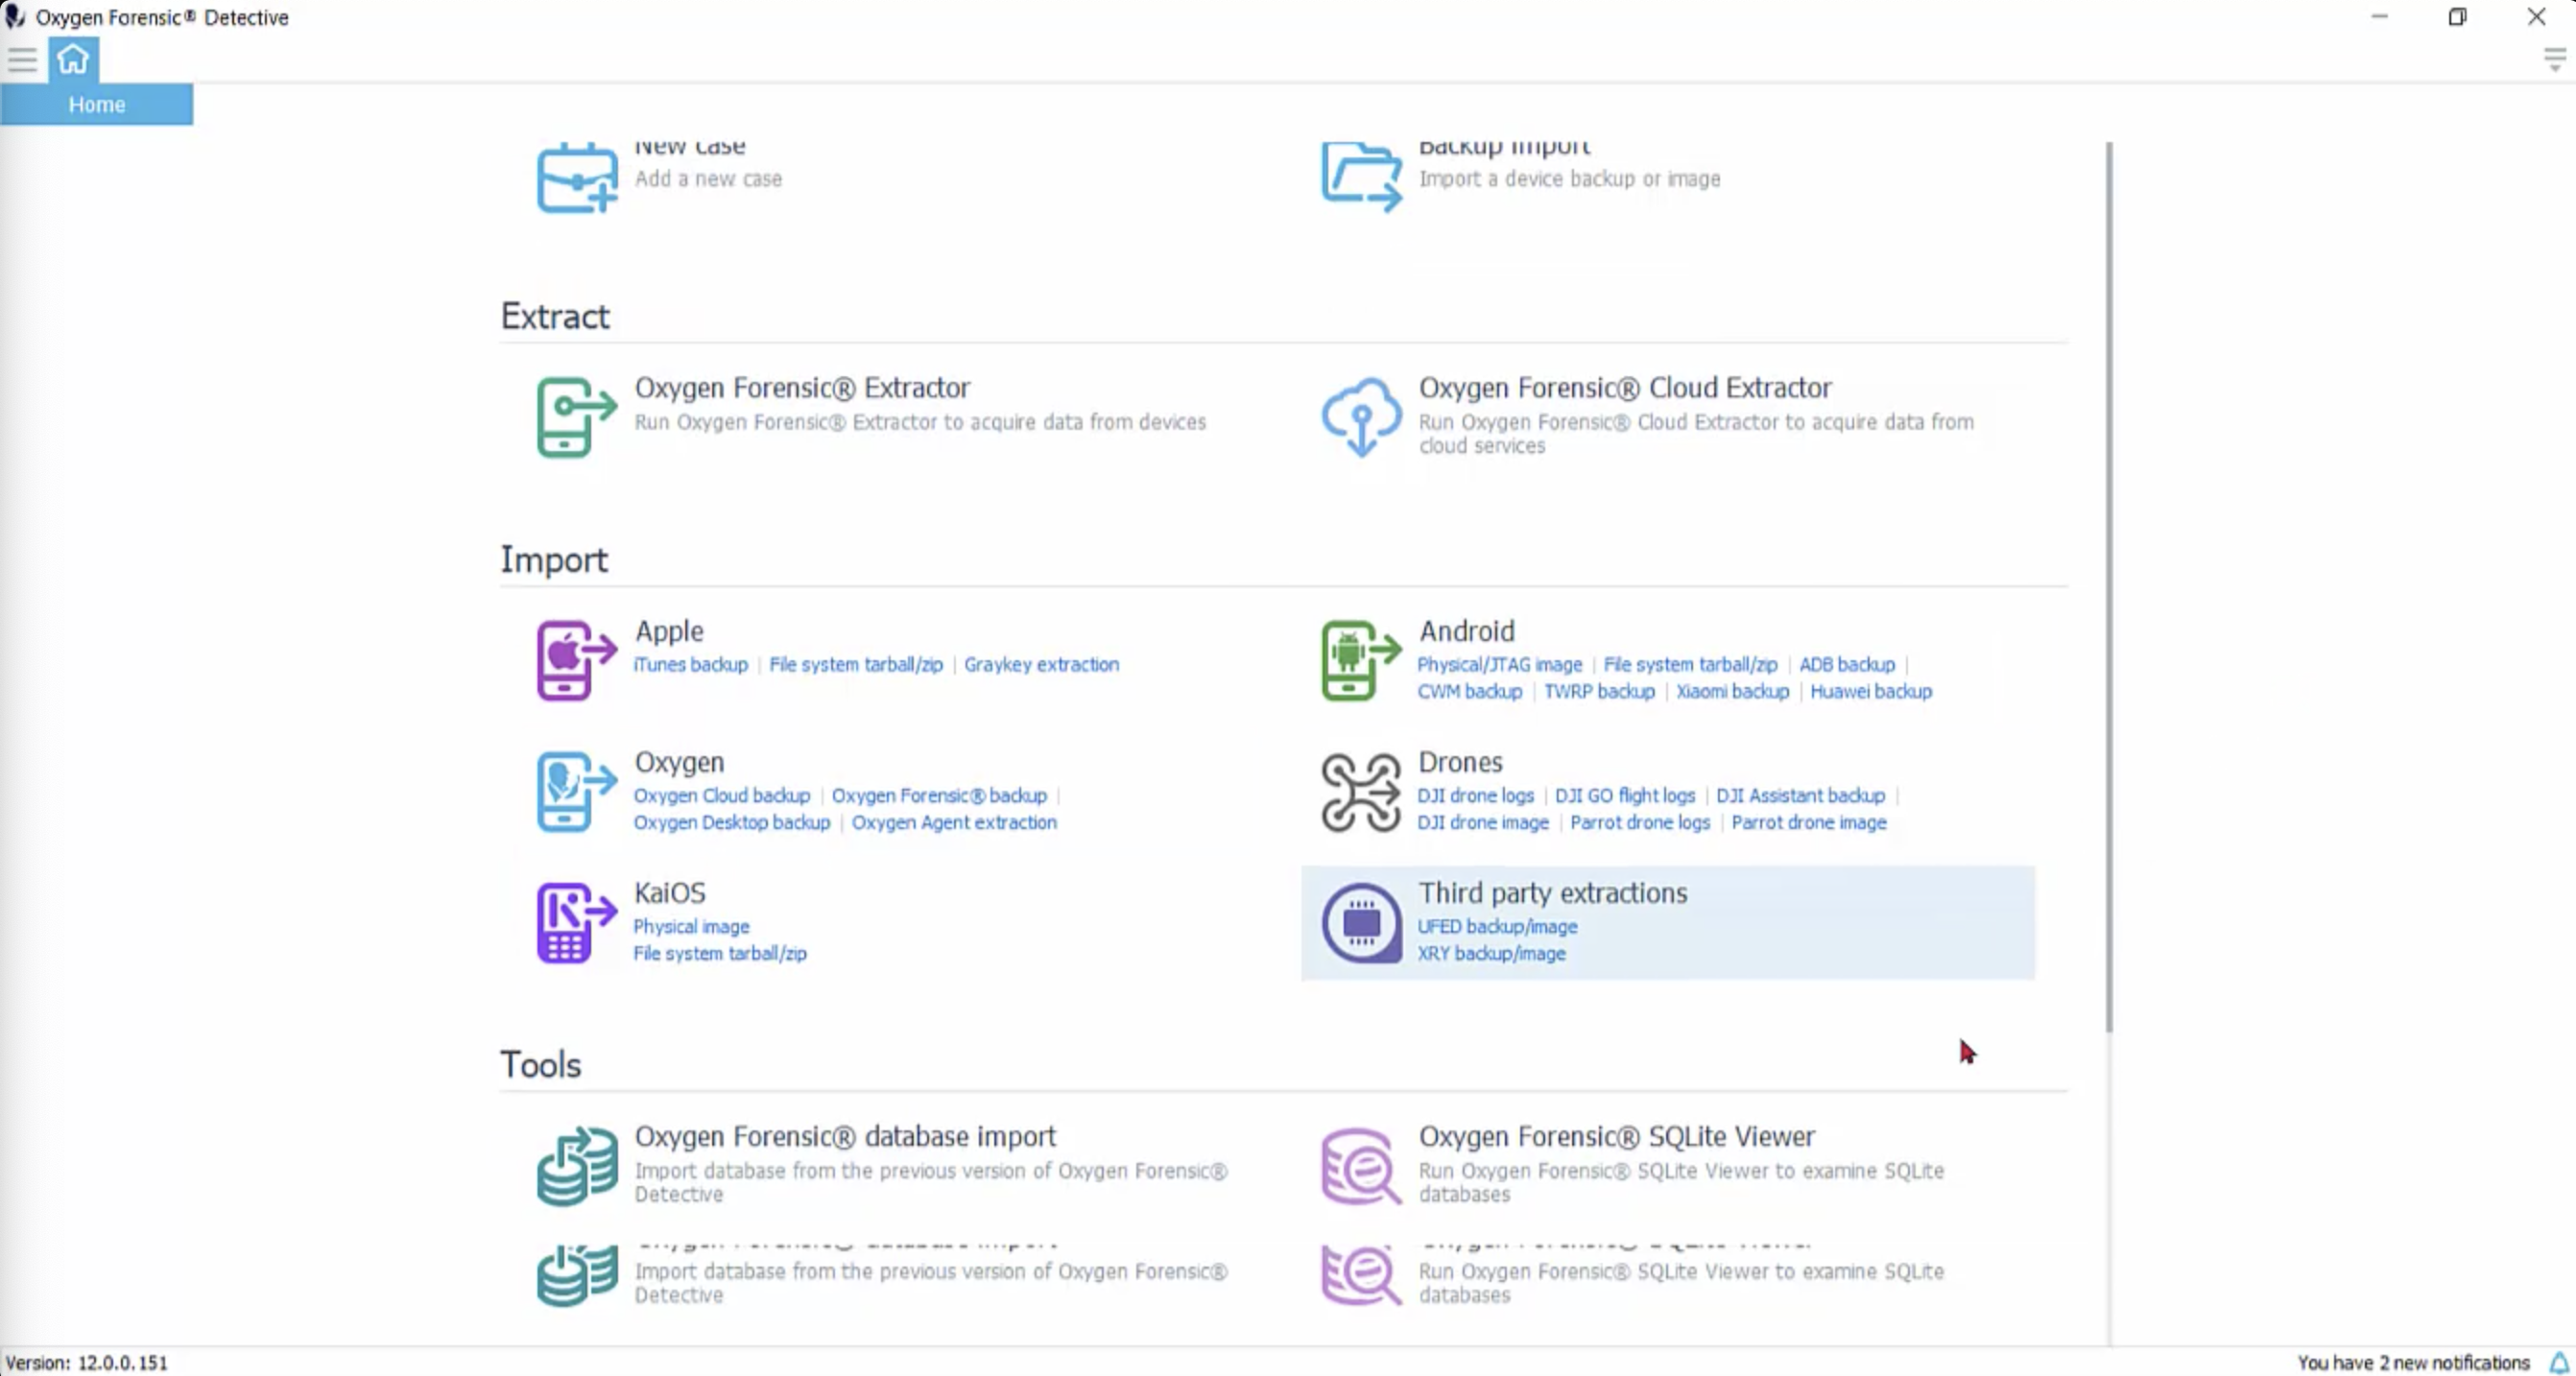
When you navigate to your homescreen and you look under your tool section, you’ll see that you already have Oxygen Forensic Call Data Expert. This is included with your Oxygen Forensic Detective. Let’s go ahead and run our Call Data Expert.
The first thing you’re going to do is navigate to the CDR so we can import it into our Call Data Expert. Choose your case that you’re concerned with, and click ‘Next.’
Here, on the bottom of the screen, you can see several columns with information in it. This is our CDR. The first thing I want to do, I’m going to fit this to the window so I can read all of the infomation.
Call Data Expert already comes with certain fields that you have to match with your call detail information. Here we’re going to form a template.
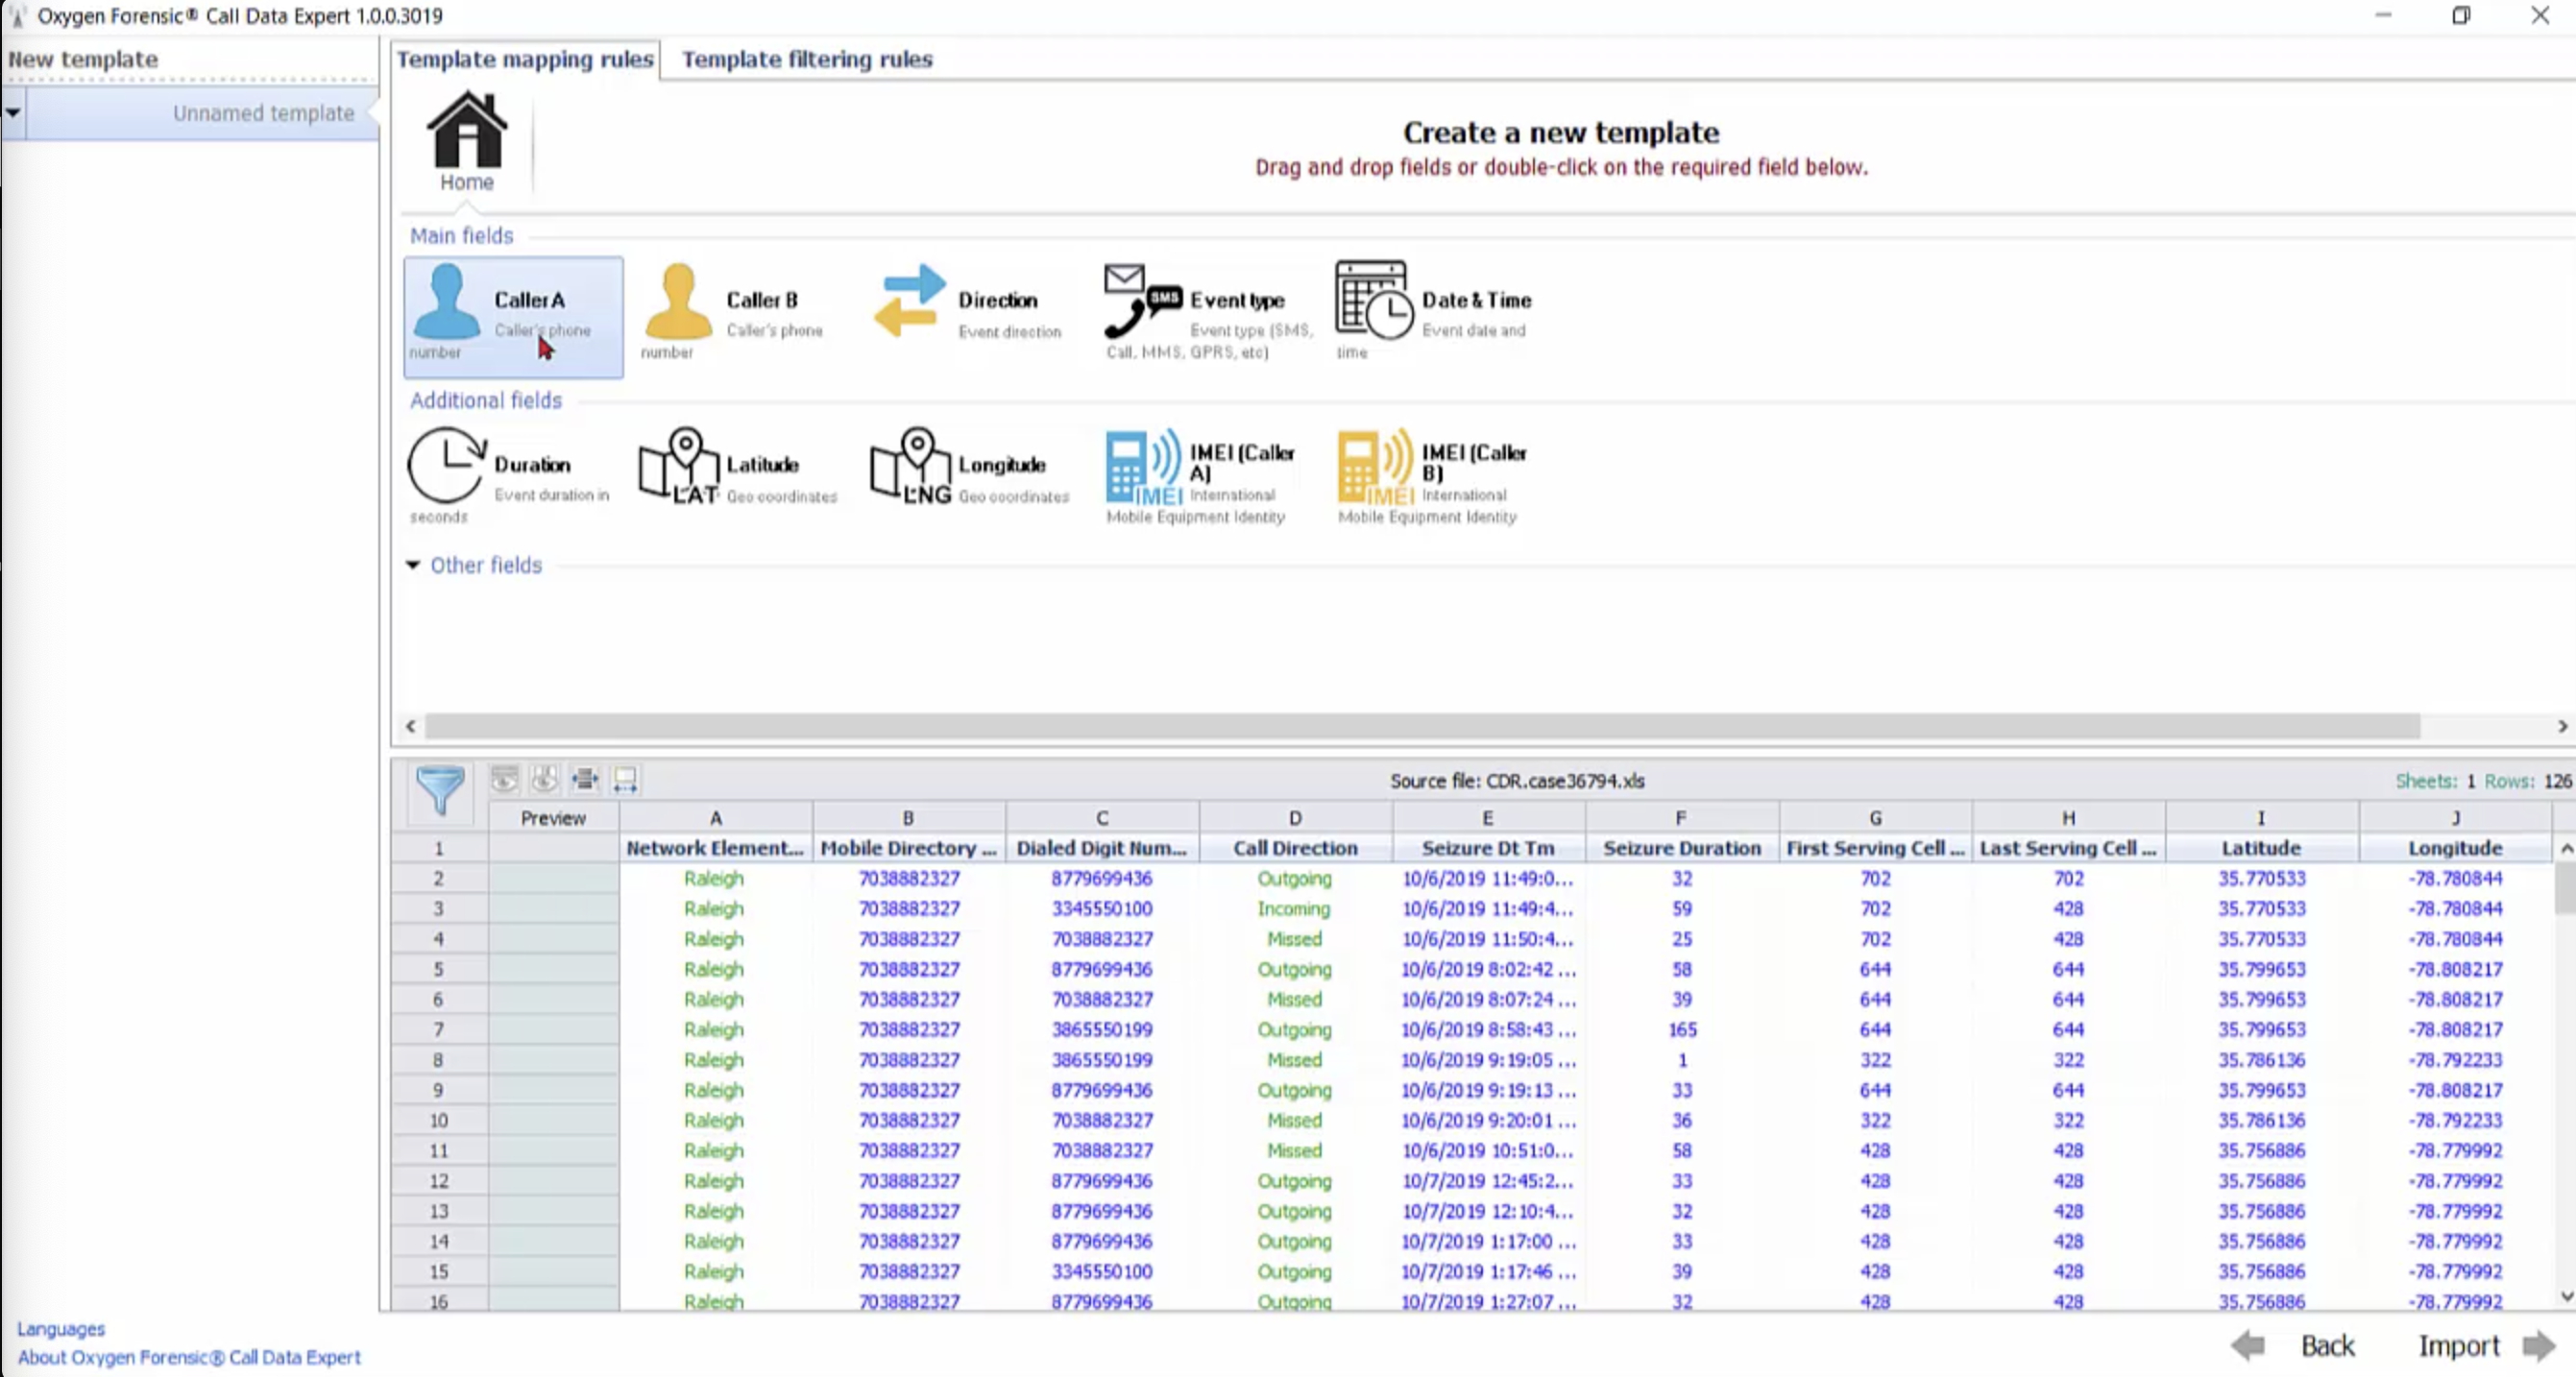
In the Call Data Expert, Caller A is referring to your device owner. Caller B will be the phone number that your caller made phone the call to, or the incoming call’s phone number. Then you have a direction of the event: is it incoming, outgoing, or is it a missed or failed call?
And in some of your CDRs you’ll have an event type, such as text messages or calls. This CDR does not have an event type: all events in this carrier’s CDR are only phone calls, so we won’t be needing this field.
The date and time: almost all CDRs will come with some sort of timestamp. This is where we’re going to place our timestamps.
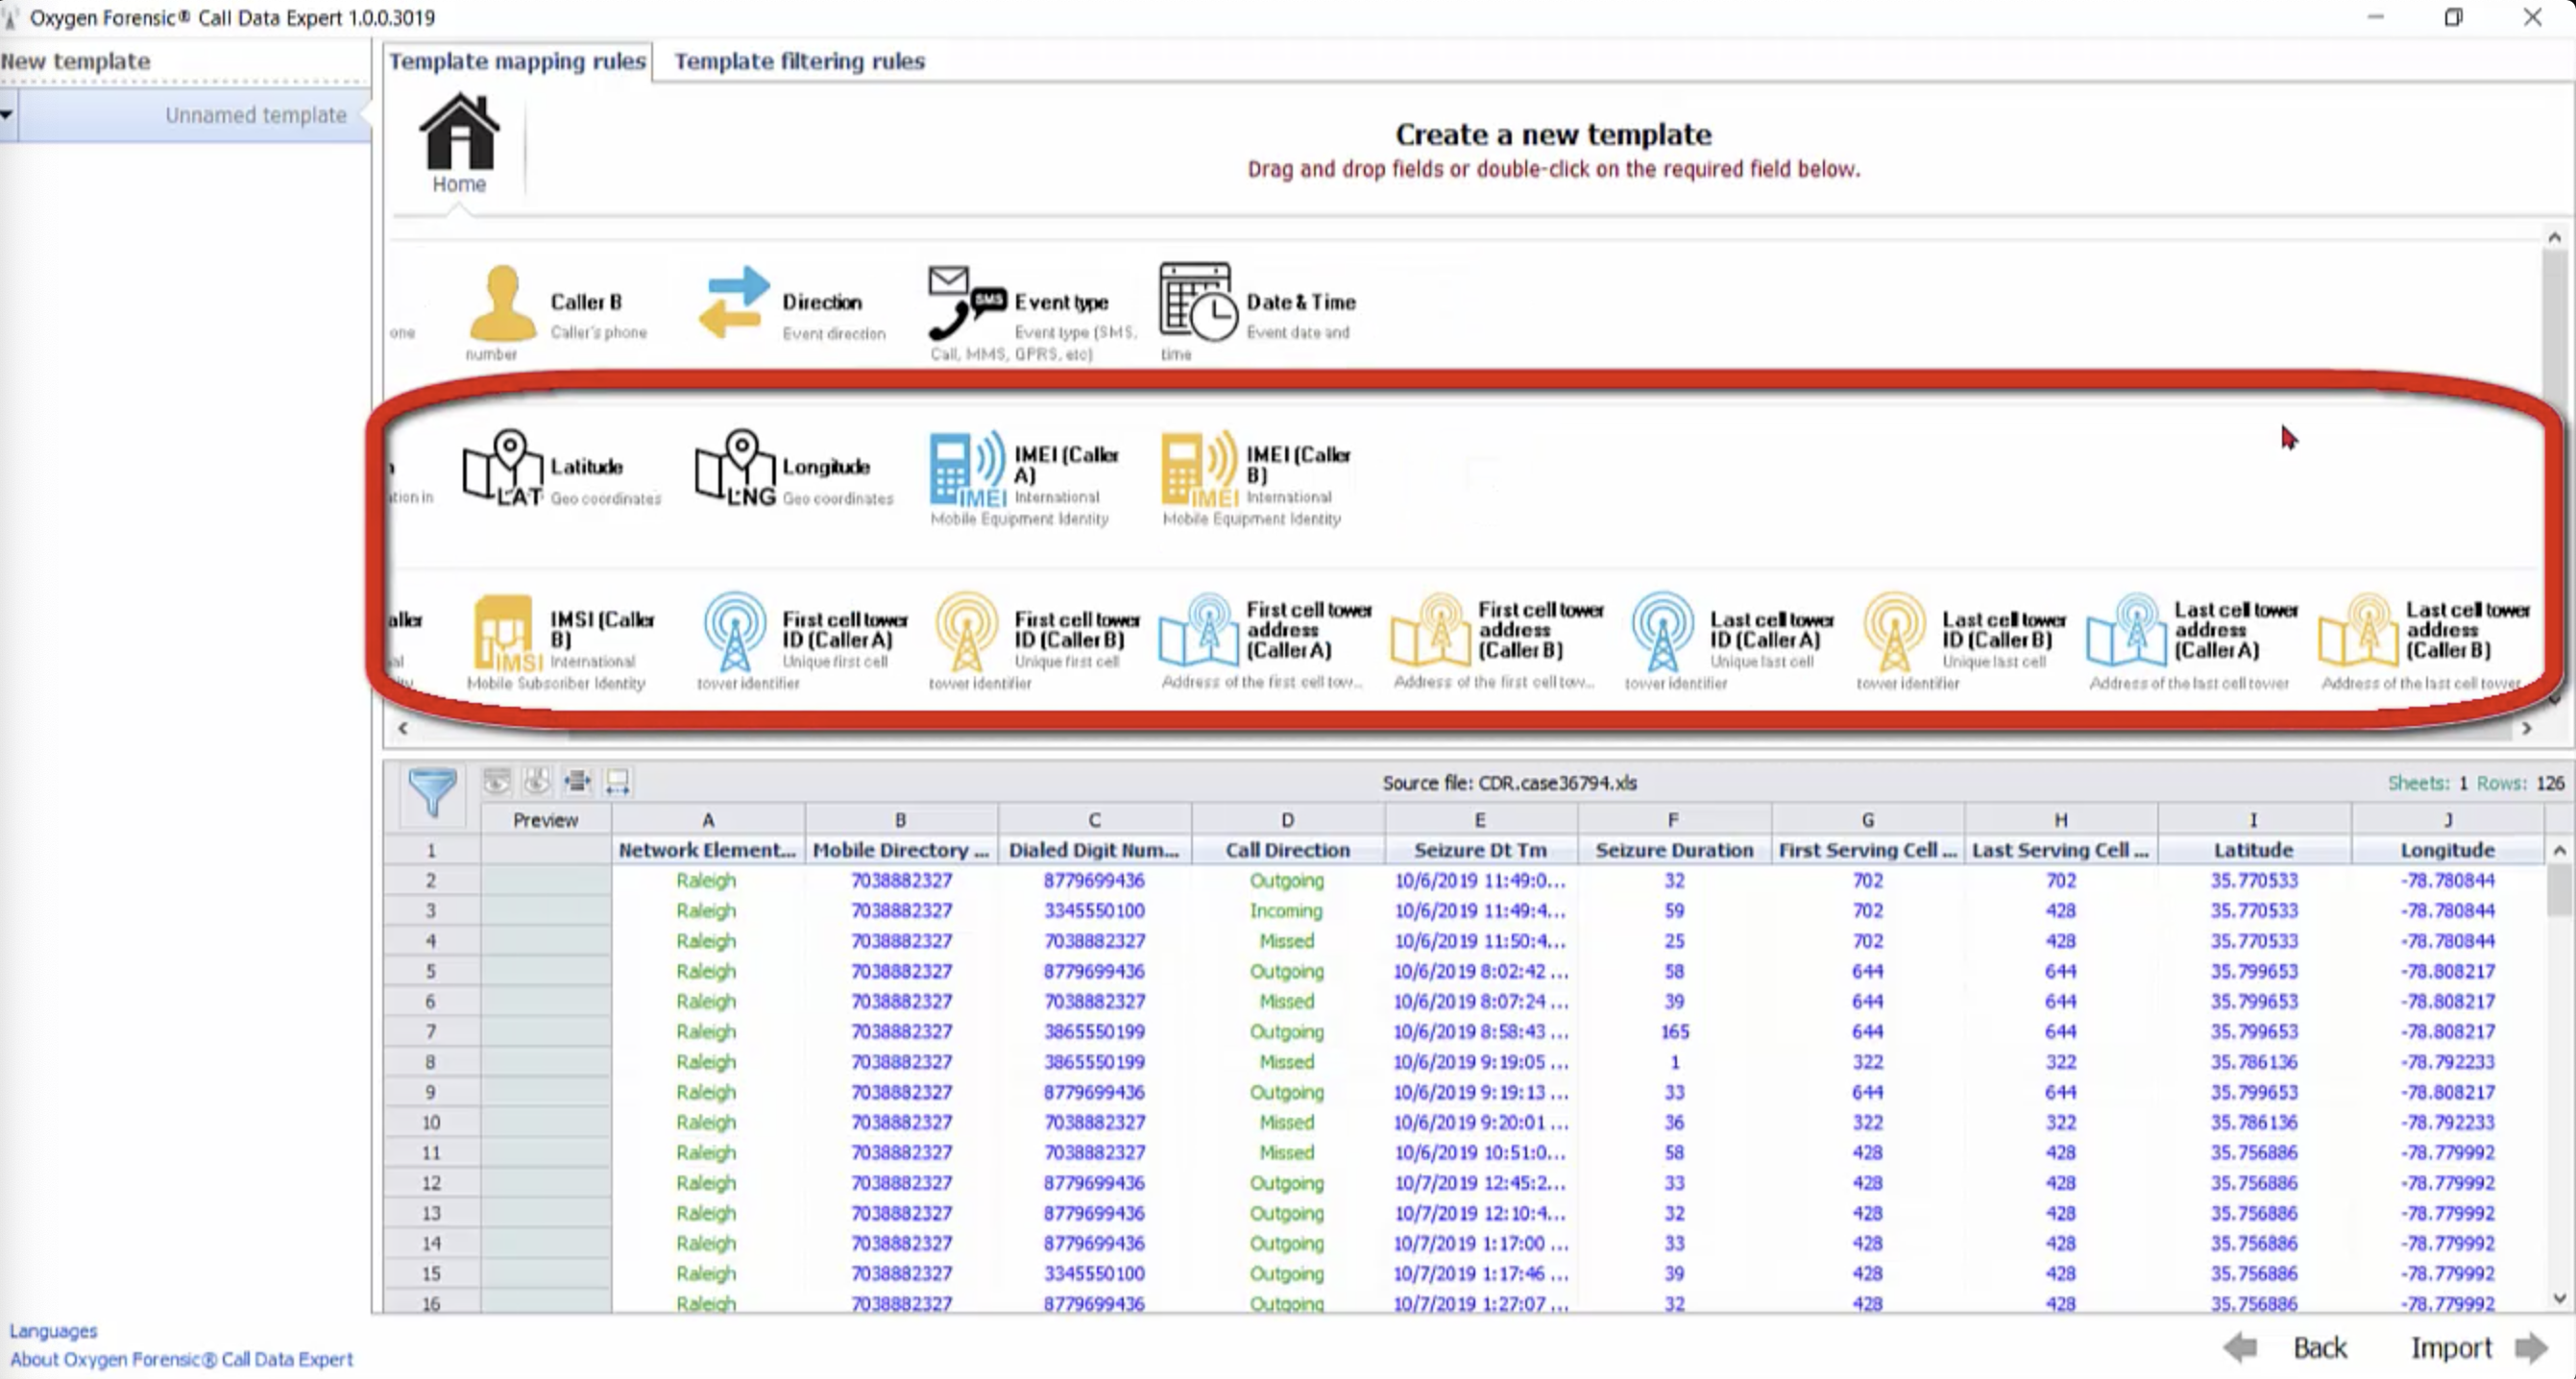
There are several other fields that you can potentially have; it very much depends on the carrier and the information that they give you. Here are several other fields that you may need for your CDR.
So here’s where we begin to map. I know that my Caller A is my device owner; and because of the key that my CDR has given me, I know that column B, the mobile directory number, is my device owner.
So Call Data Expert has made this very simple for you. All you’re going to need to do is click on column B and drag it to your Caller A. It’s now matched our Caller A to the column B that we know to be the device owner.
My Caller B, my CDR has told me, is column C. This will be the device owner that either called the device owner, or my device owner dialled this number. So I’m going to pick this up and drag it into Caller B. My direction is going to be call direction.
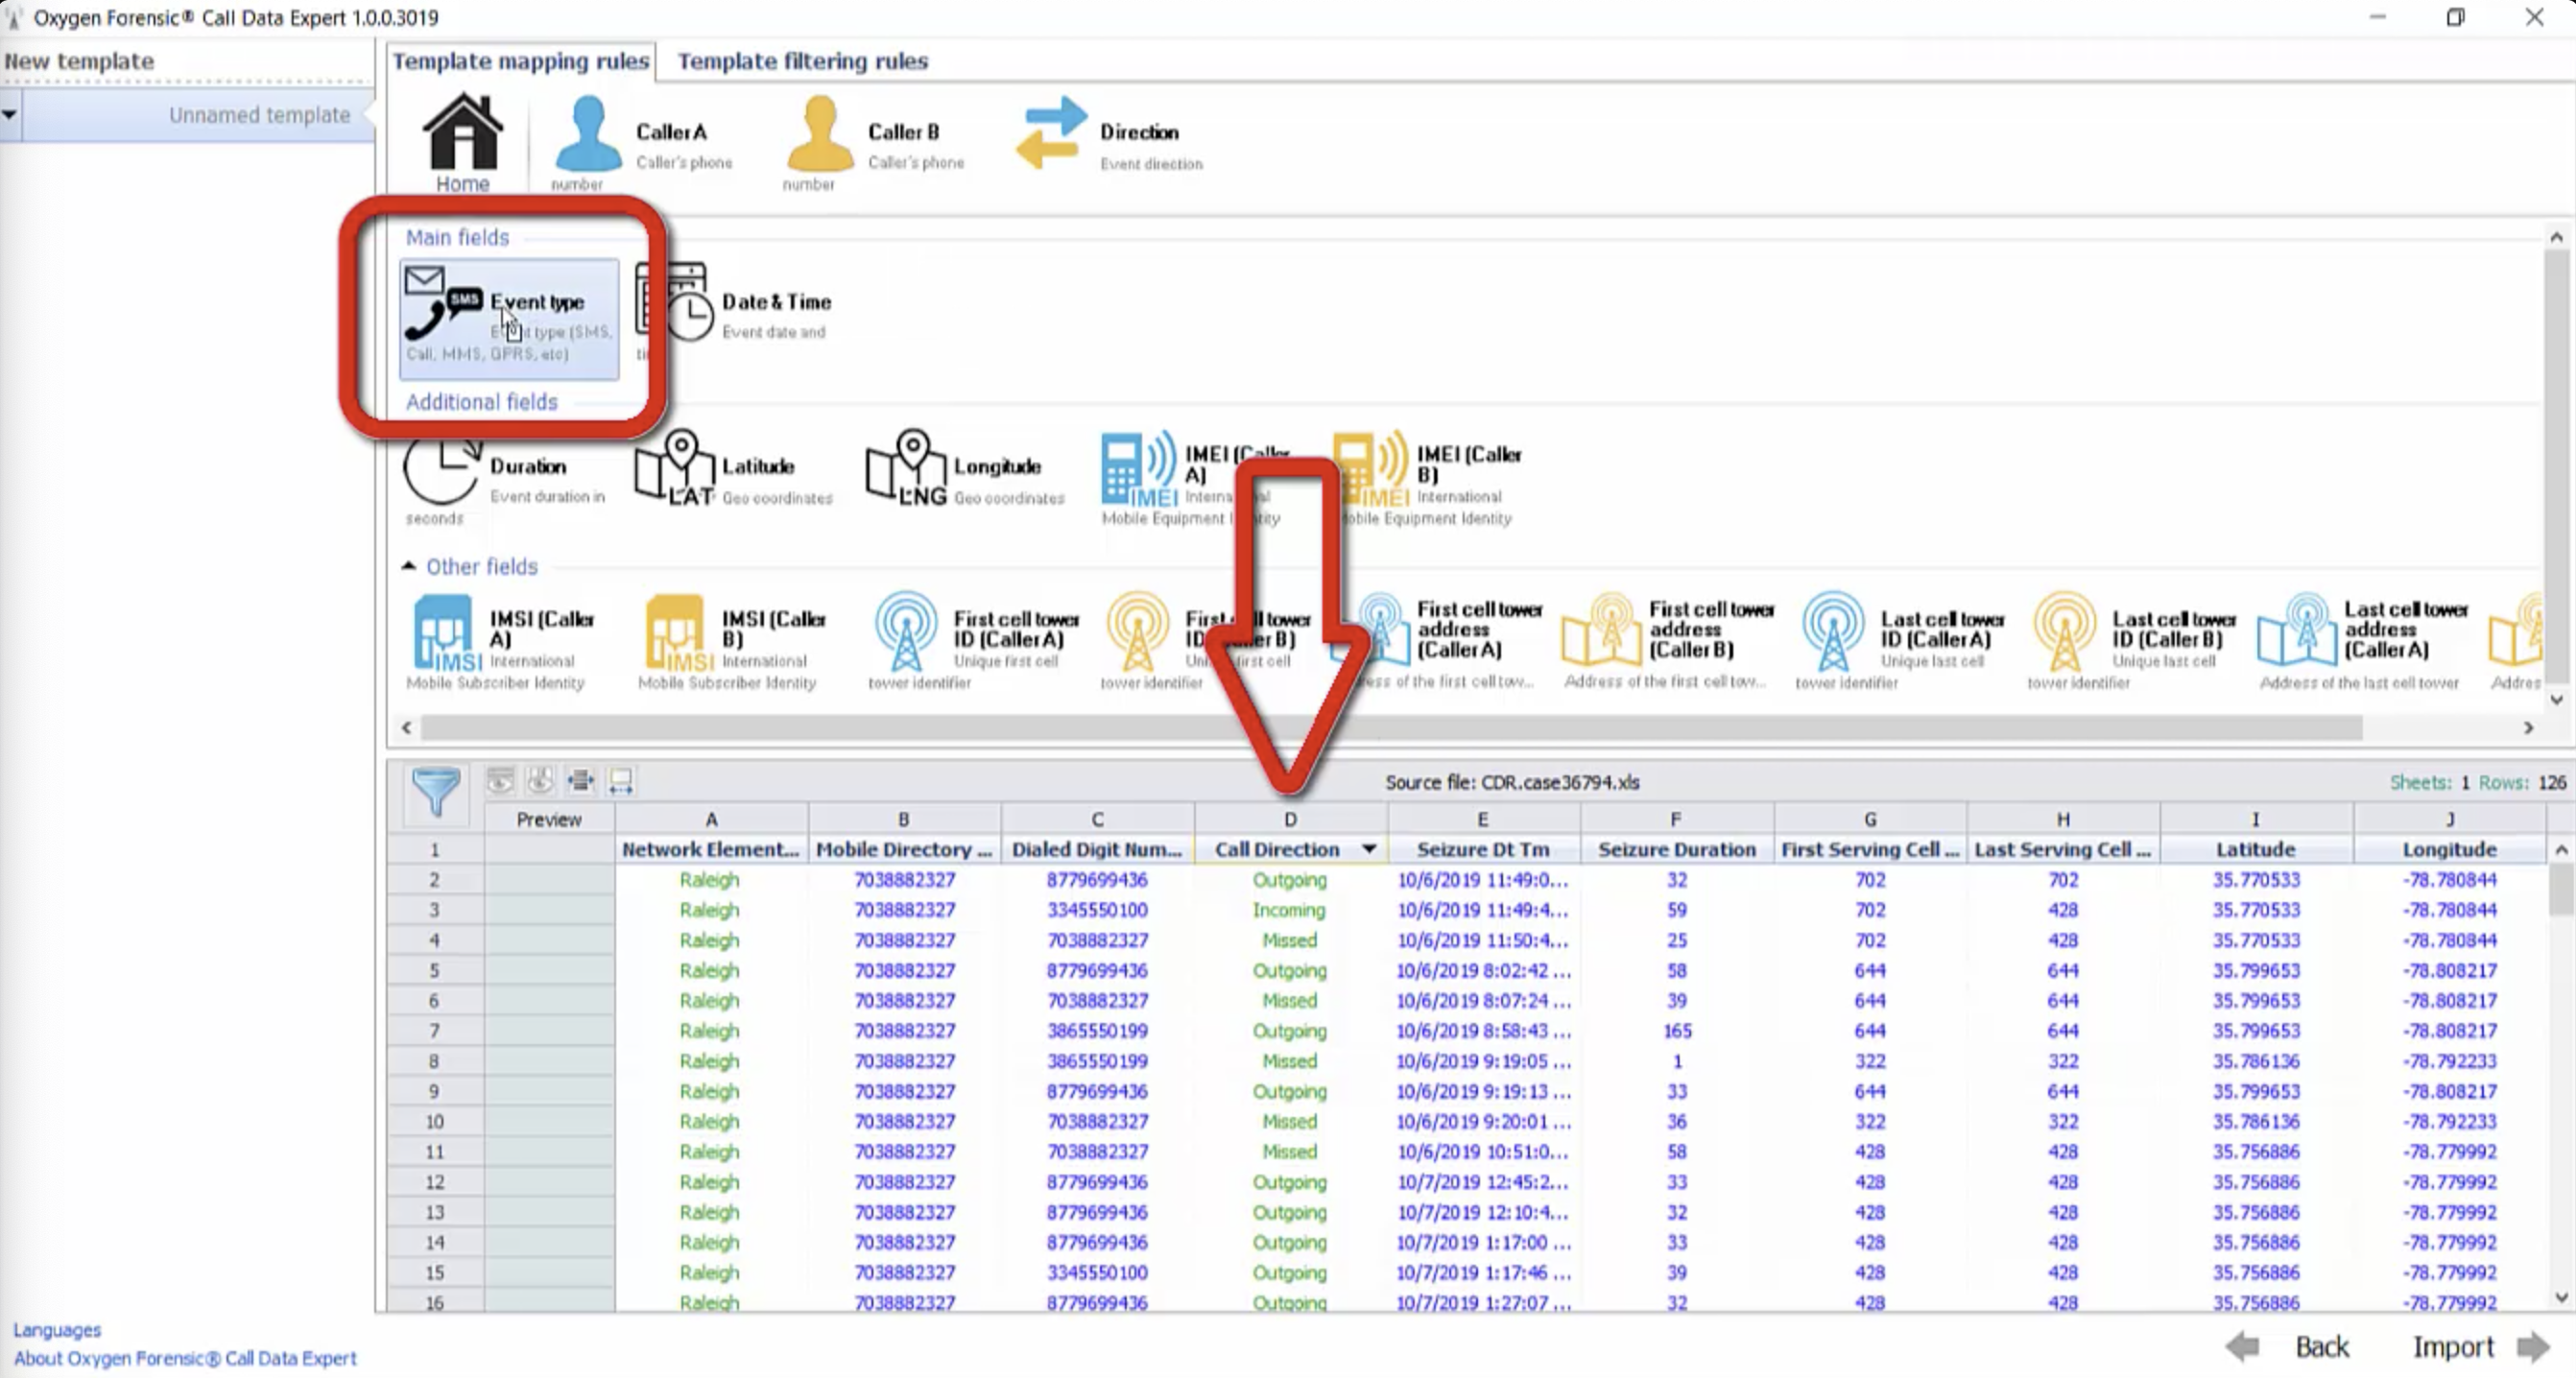
And as I said before, the CDR does not include an event type, as all of these events are phone calls, so I’m going to leave this one alone. Our date and time is going to be our seizure date and time.
Next I’m going to match the duration. Our column F is the seizure duration, and my carrier has told me that this is in seconds. So I’m going to pick this up and drag it and drop it into Duration.
Two very important things I want are my latitude and longitude. We are after all going to want to see this on a map. So I’m going to pick up my latitude, drop it into Latitude, and the same for my longitude.
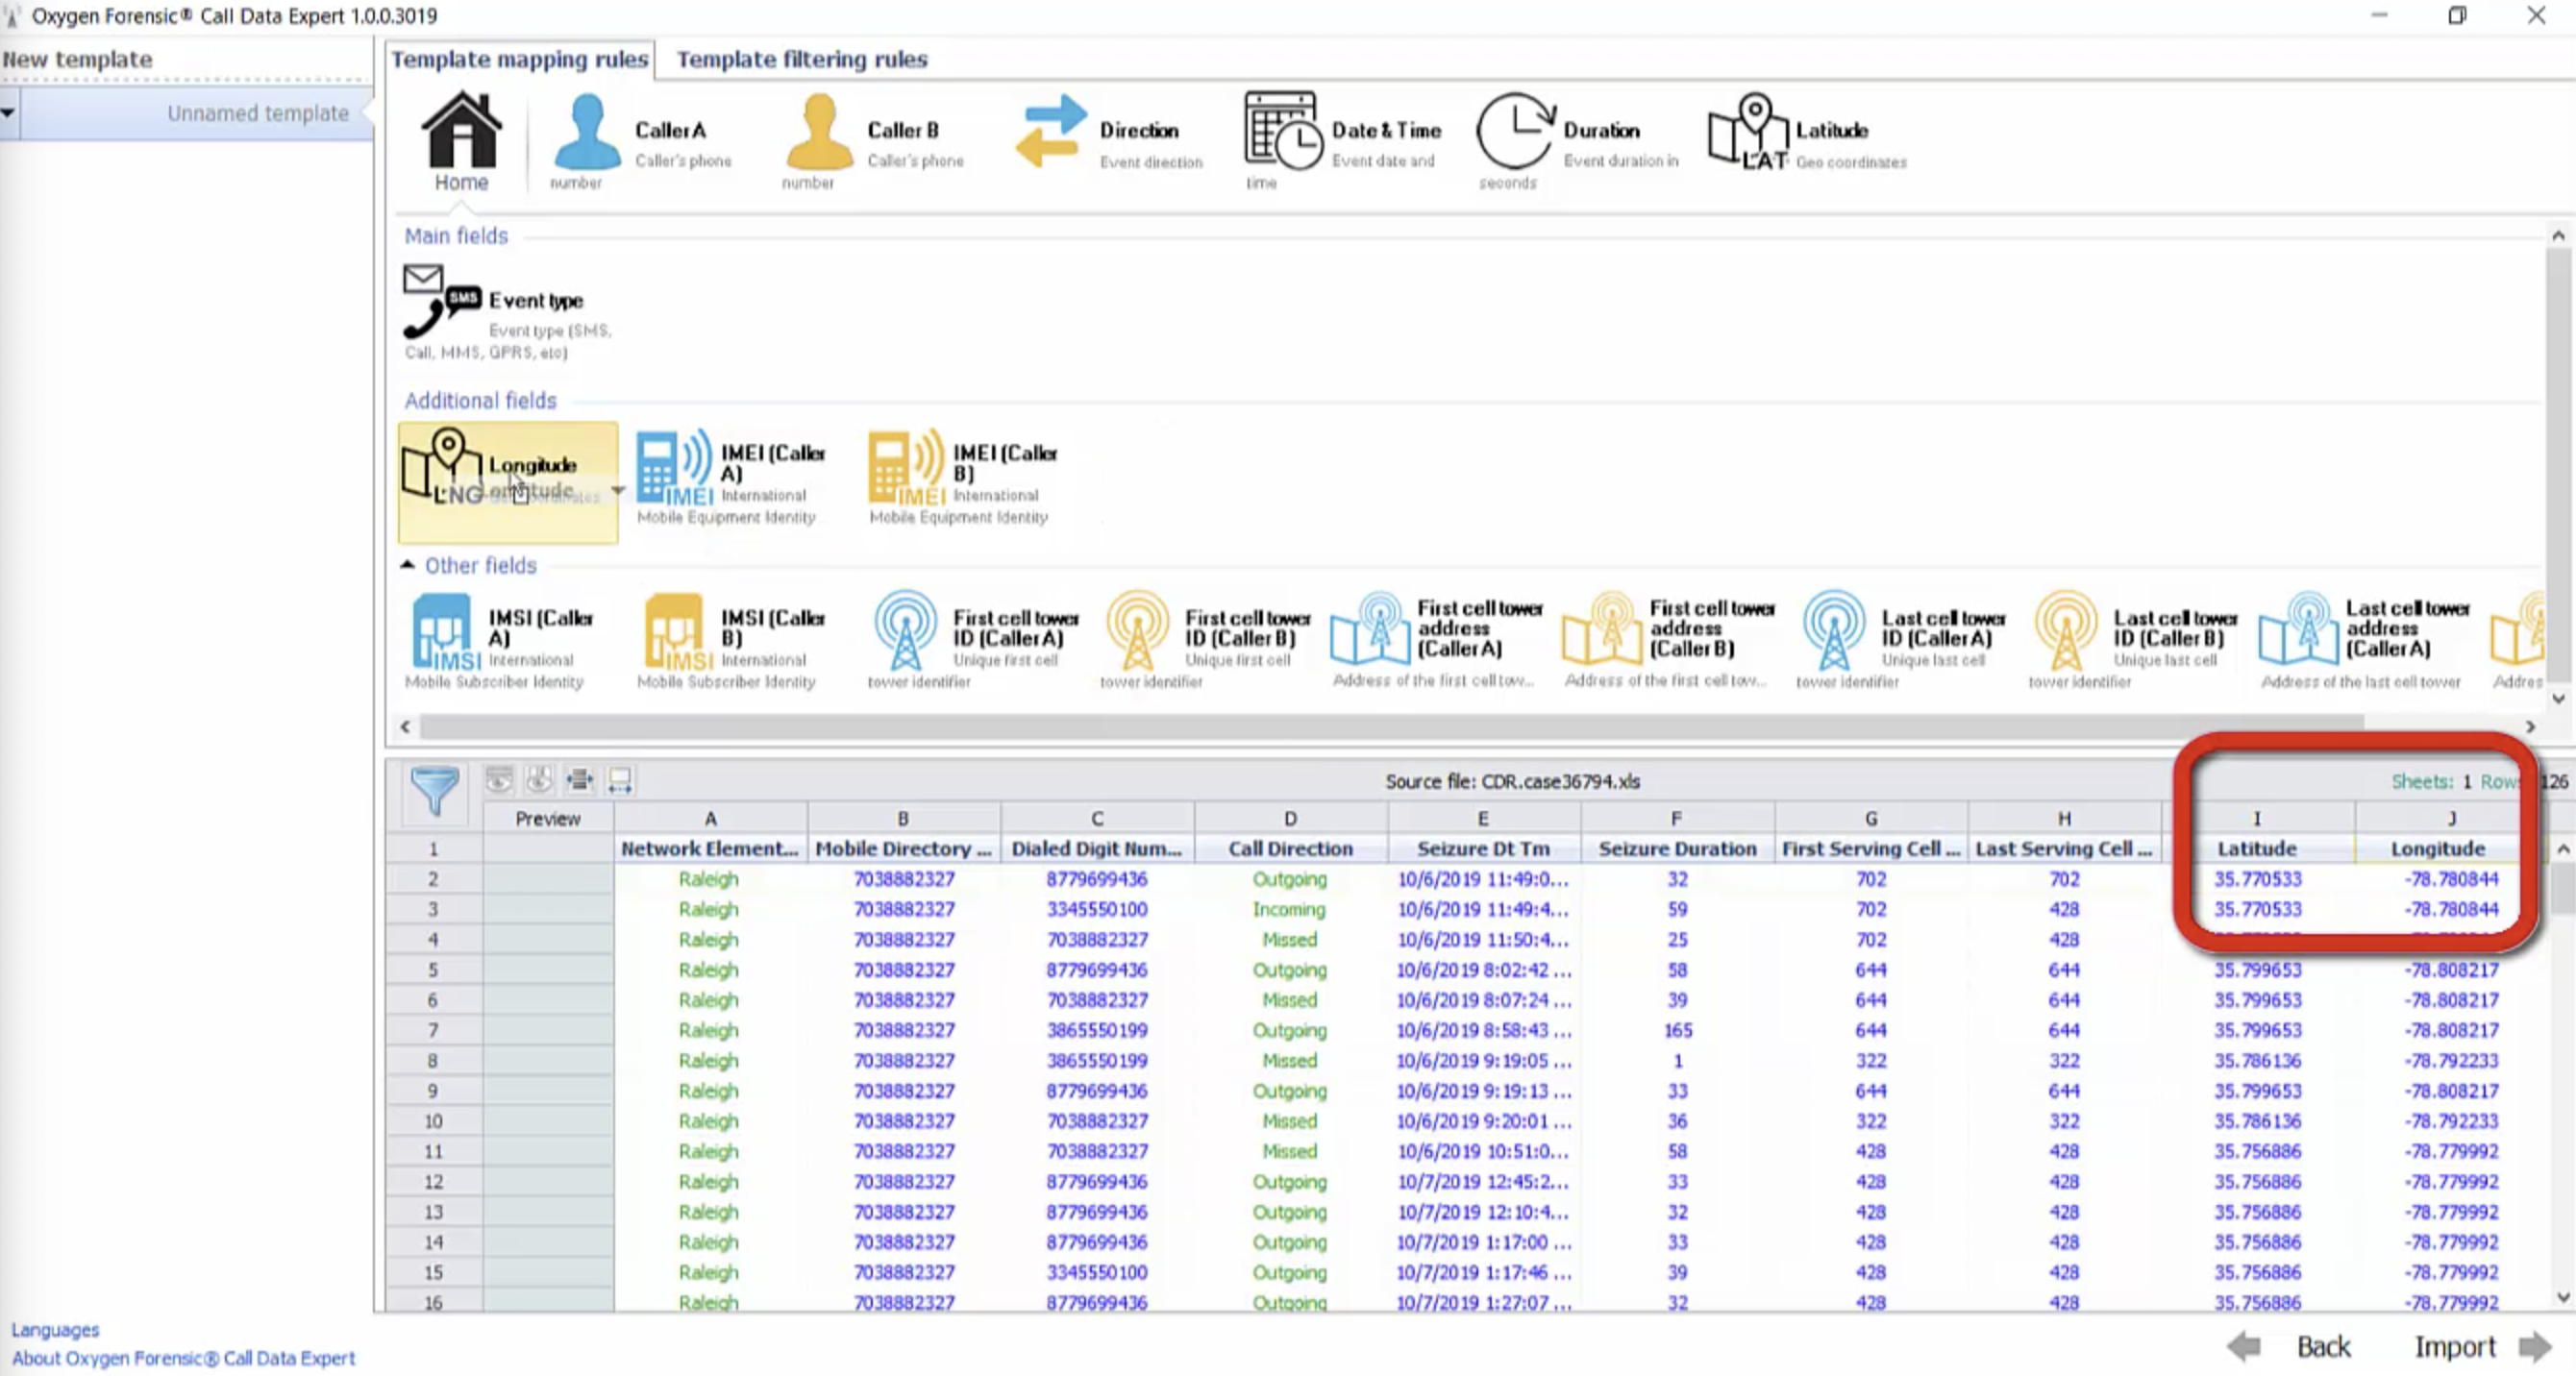
Now this is all of the information that I’m really concerned with. As I said before, you may receive much more information from any given carrier in their CDR, but this is what was given to me, so this is what I’m going to use.
I’m going to note my Caller A – did they call Caller B, or did Caller B call them? I’m going to want to know the time and the date; how long did the phone call last; and I want to see it on a map, so I’ve included my longitude and latitude.
Next you’re going to want to name your template. I would suggest that you name it after the carrier that gave you this CDR. This way you can always go back and use this template for the next time you get a CDR from this carrier. It makes it very simple.
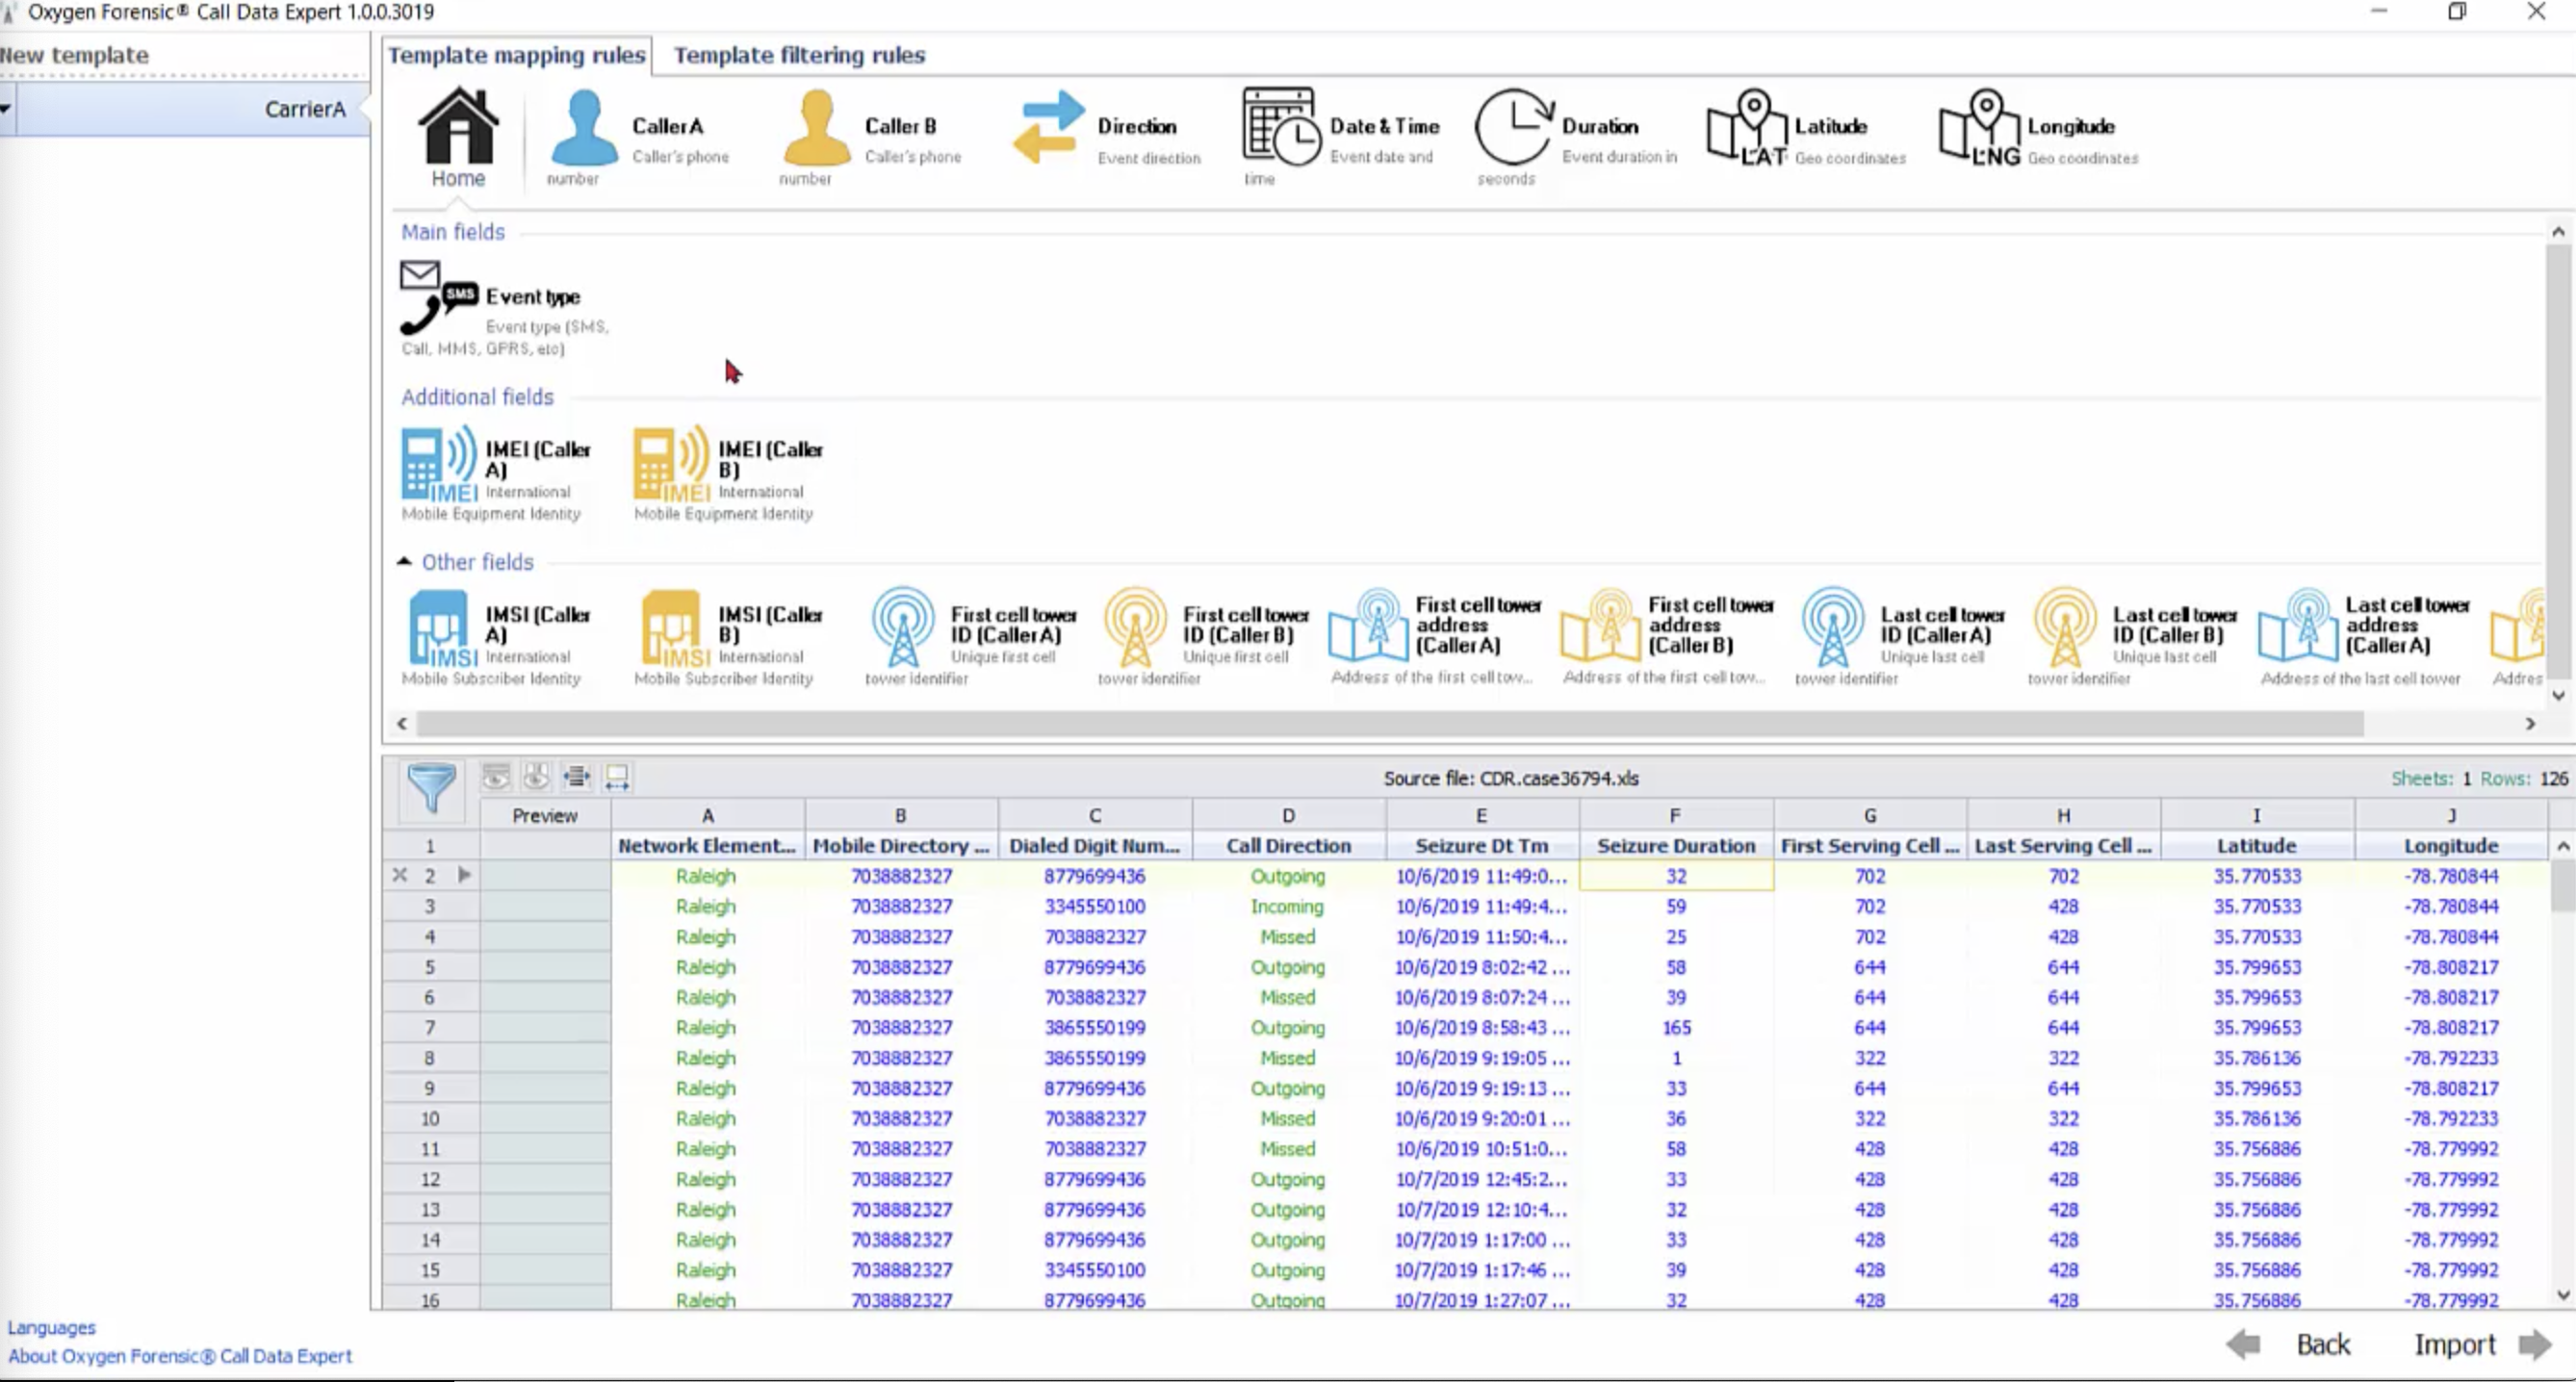
So I’m going to check all of my information. Sometimes you’re going to need to add a little more information in some of these fields.
My Caller A has been satisfied, so has my Caller B. Let’s look at our caller direction. So I know that my incoming calls, and outgoing calls, from this side, indicate that my CDR has these words in the field of call direction. So my incoming call from my CDR: I want that to come from my call direction field, and I want this in the Call Data Expert to mean incoming calls. So what I’ve said here is: My CDR equals my Data Expert incoming. I’m going to do this for all outgoing, incoming, and missed calls.
Next we’ll check on our date and time. We have date and time, and that is how it’s arranged under this field, so it’s correct. My duration, and latitude and longitude: everything looks good there.
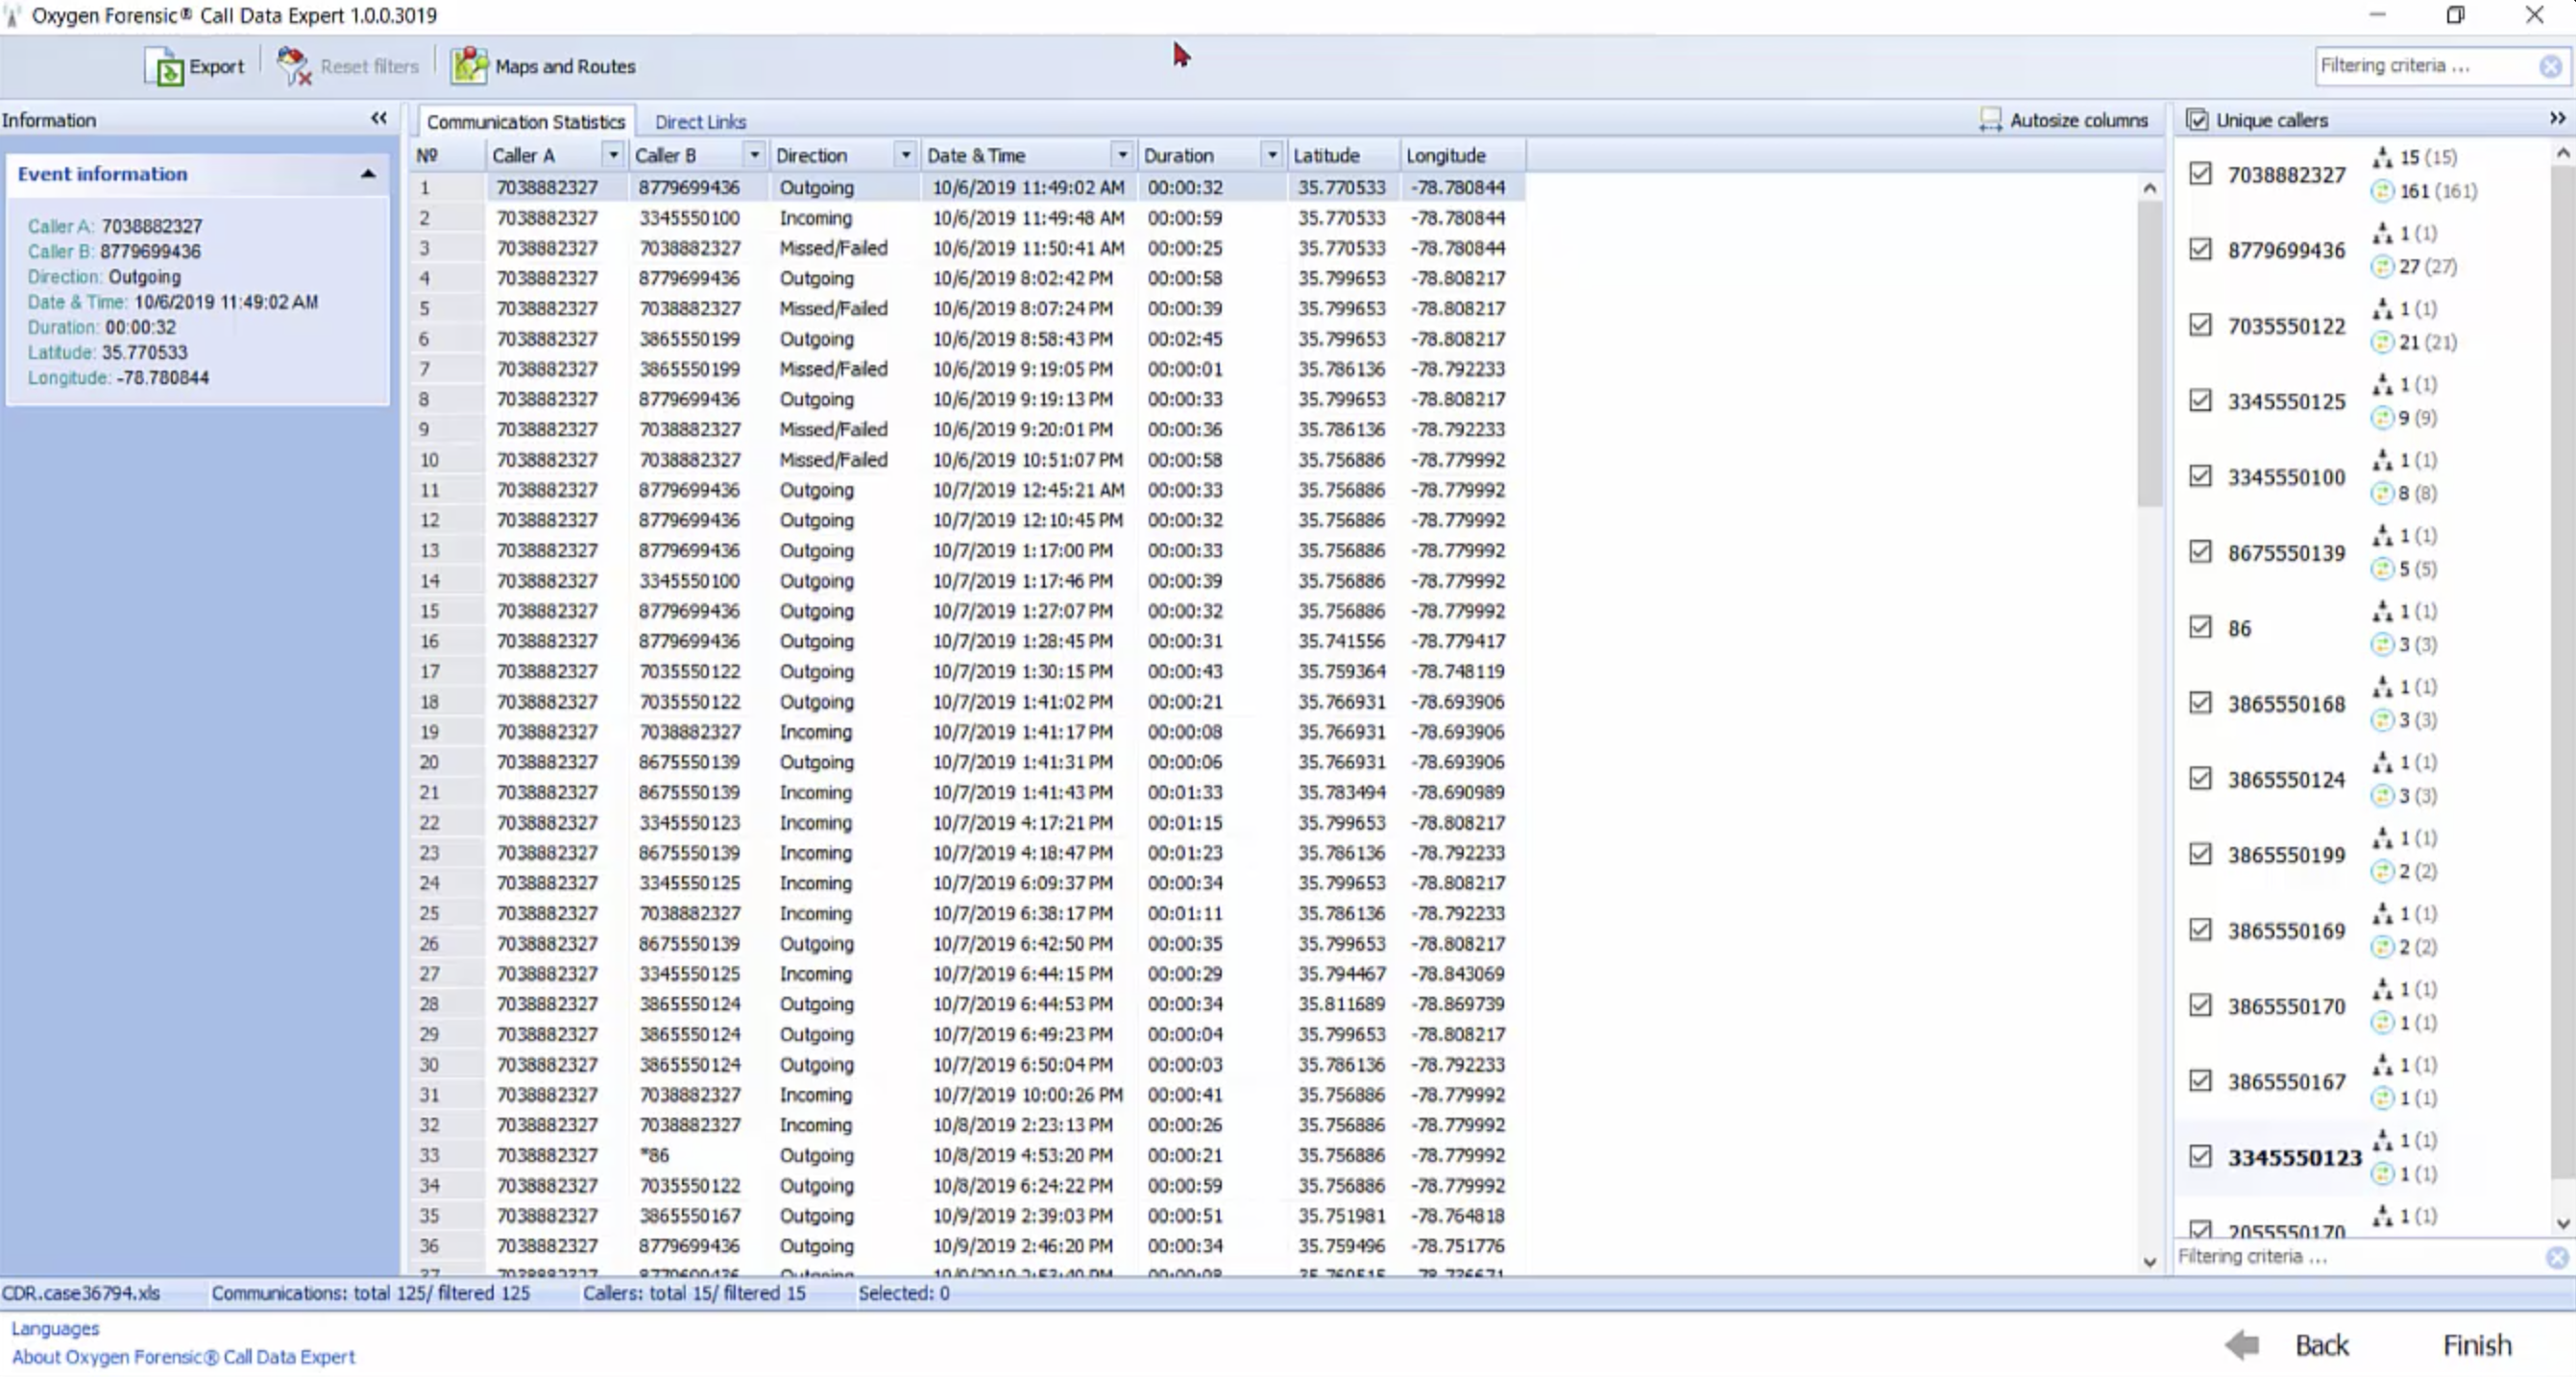
Now it’s time to import this into our Call Data Expert. So in the bottom right-hand corner, click ‘Import.’ In this screen, we can see how Call Data Expert is obeying the rules of the template that we’ve given.
So we know that Caller A is our main caller. This is our device owner, and there should only be one number in here. Our Caller B: we can actually filter down if we want to look at any particular number, and just look at that number.
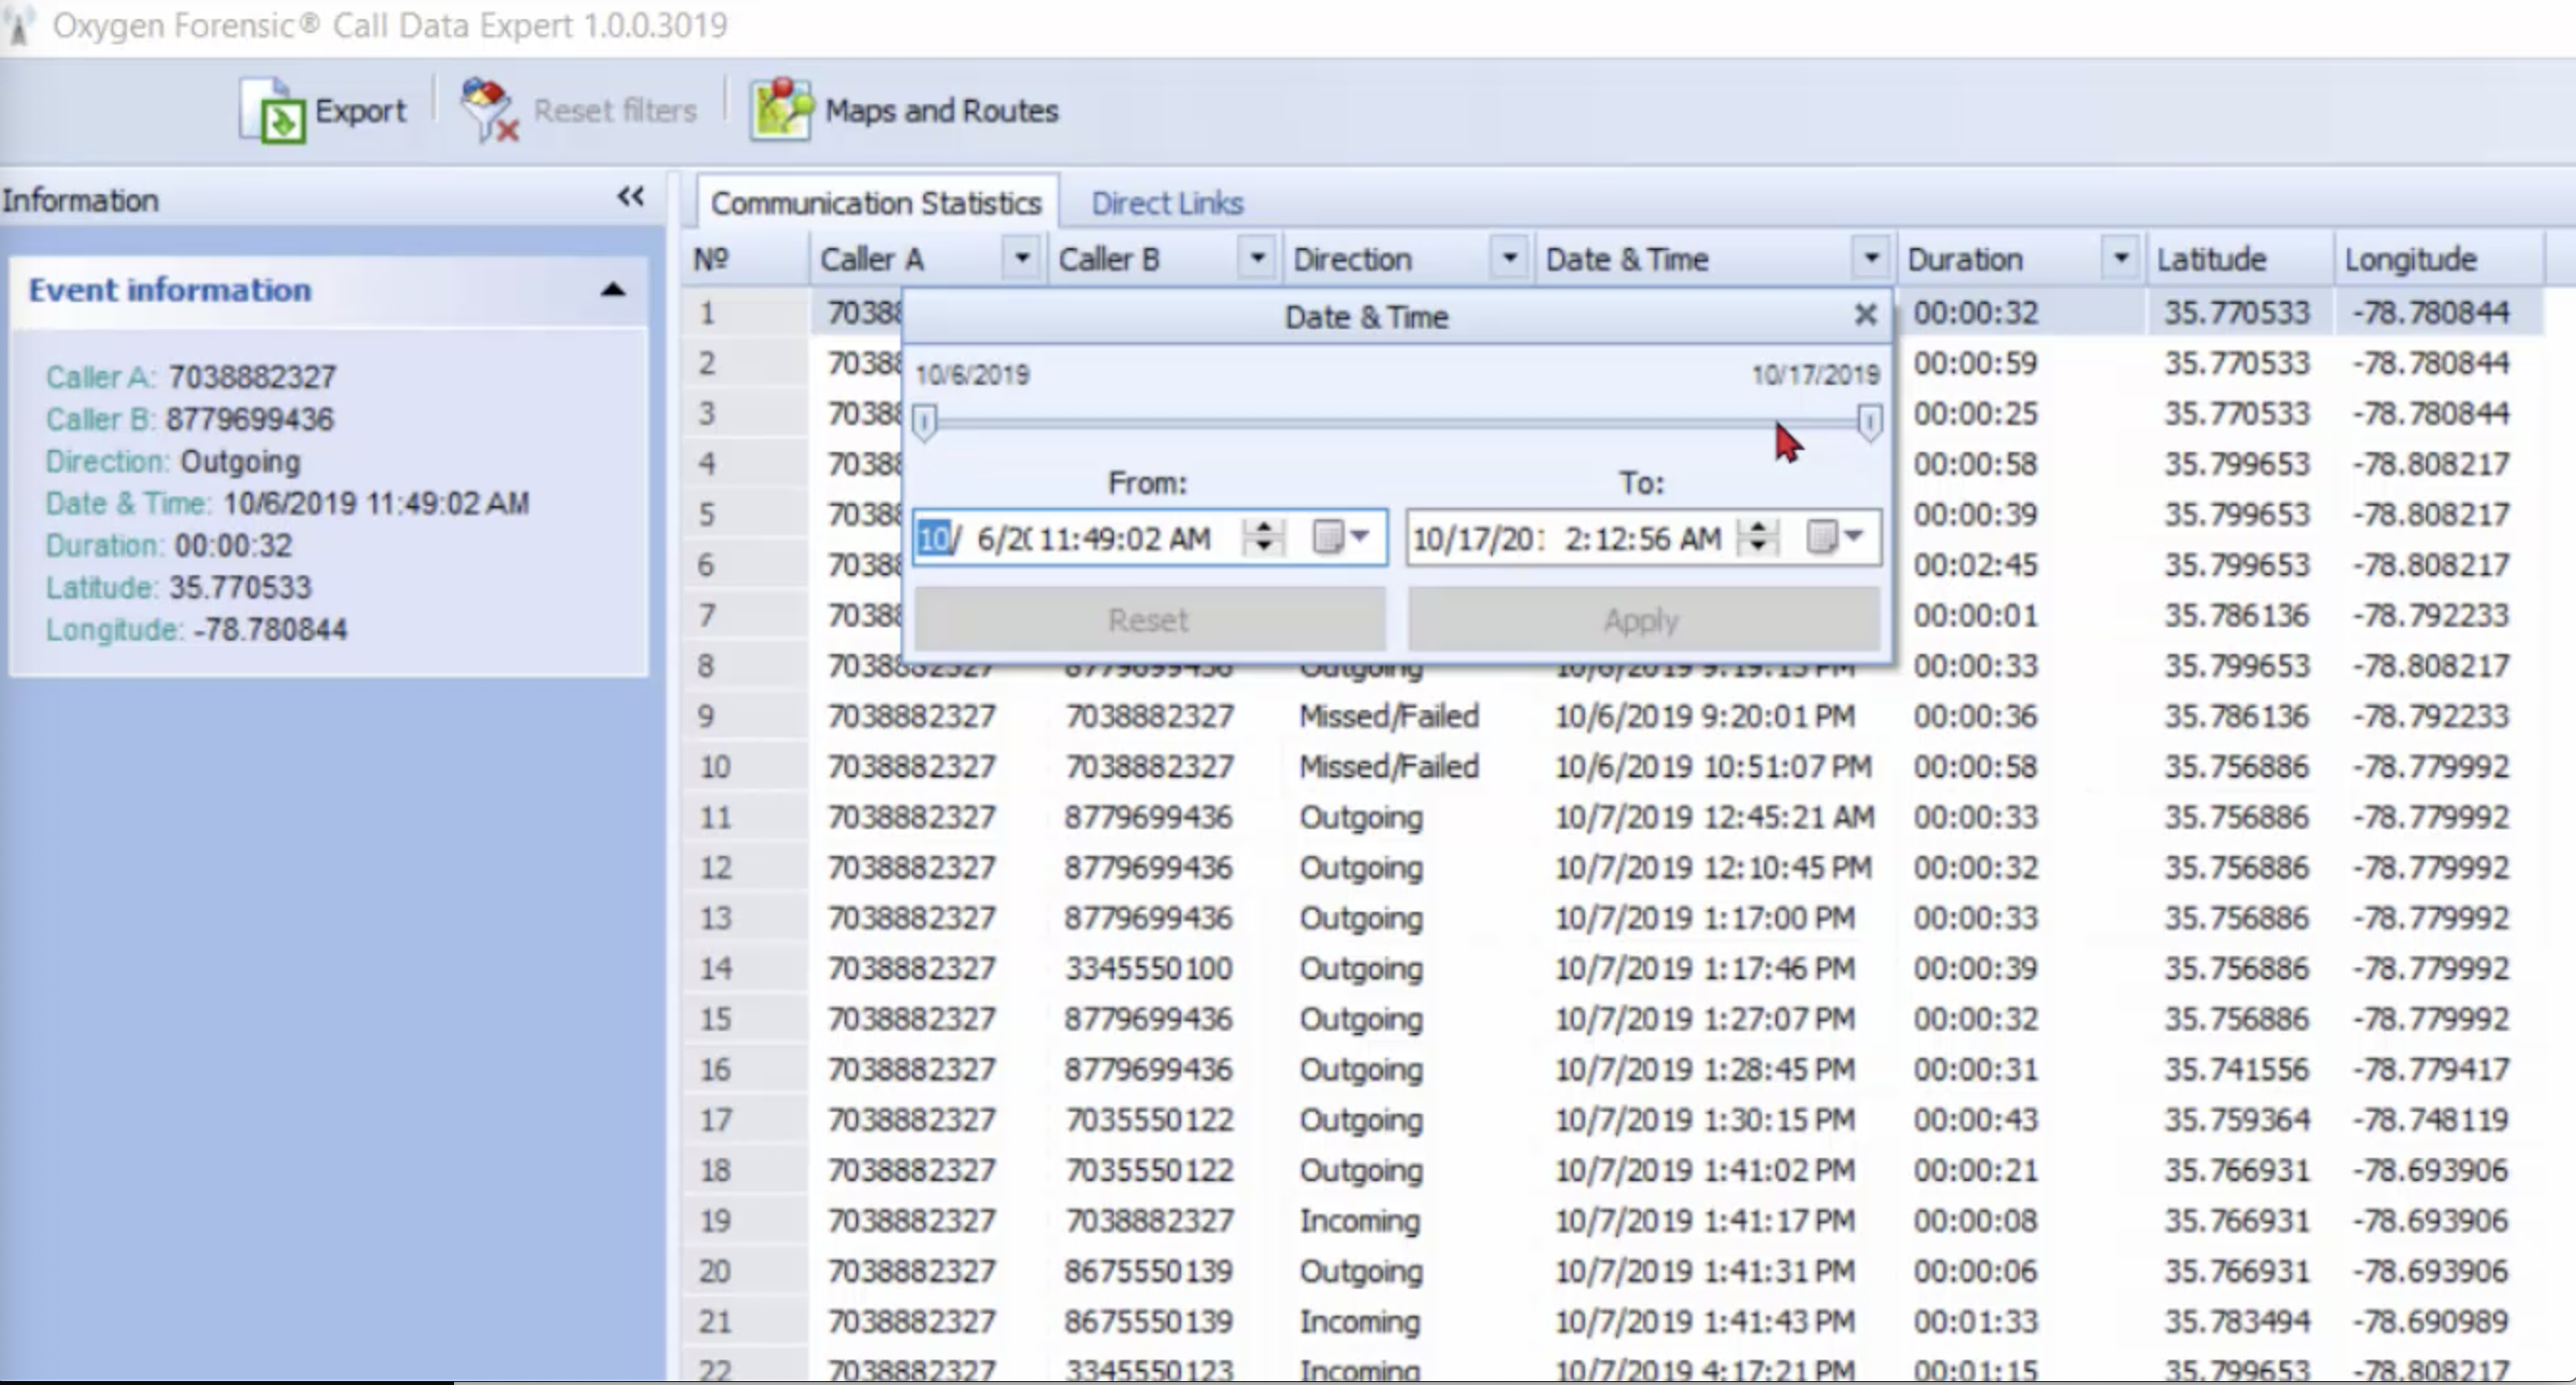
The direction: if we only want to see missed calls, or incoming, or outgoing, here’s where we can control that. And we can also filter down to a specific time that we may need. Let’s say that we sent out for a CDR for a specific date and time range, but our investigations have allowed us to narrow that time down to a specific time, and that’s what we want to see. This is where we can filter here.
Here’s our duration: we can filter from zero seconds up to the max; it looks like the maximum this person spoke on the phone was 404 seconds, in this particular date range.
Now let’s look at unique callers. This is where Call Data Expert graphs out our contacts. Essentially what this is, is another filter box.
Let’s look at our direct links. In the right-hand column you can see our unique callers again. If you look at the little eye, you’ll see that they’re marked out: it means that we’re not seeing these numbers. This is my caller: I definitely want to see my caller.
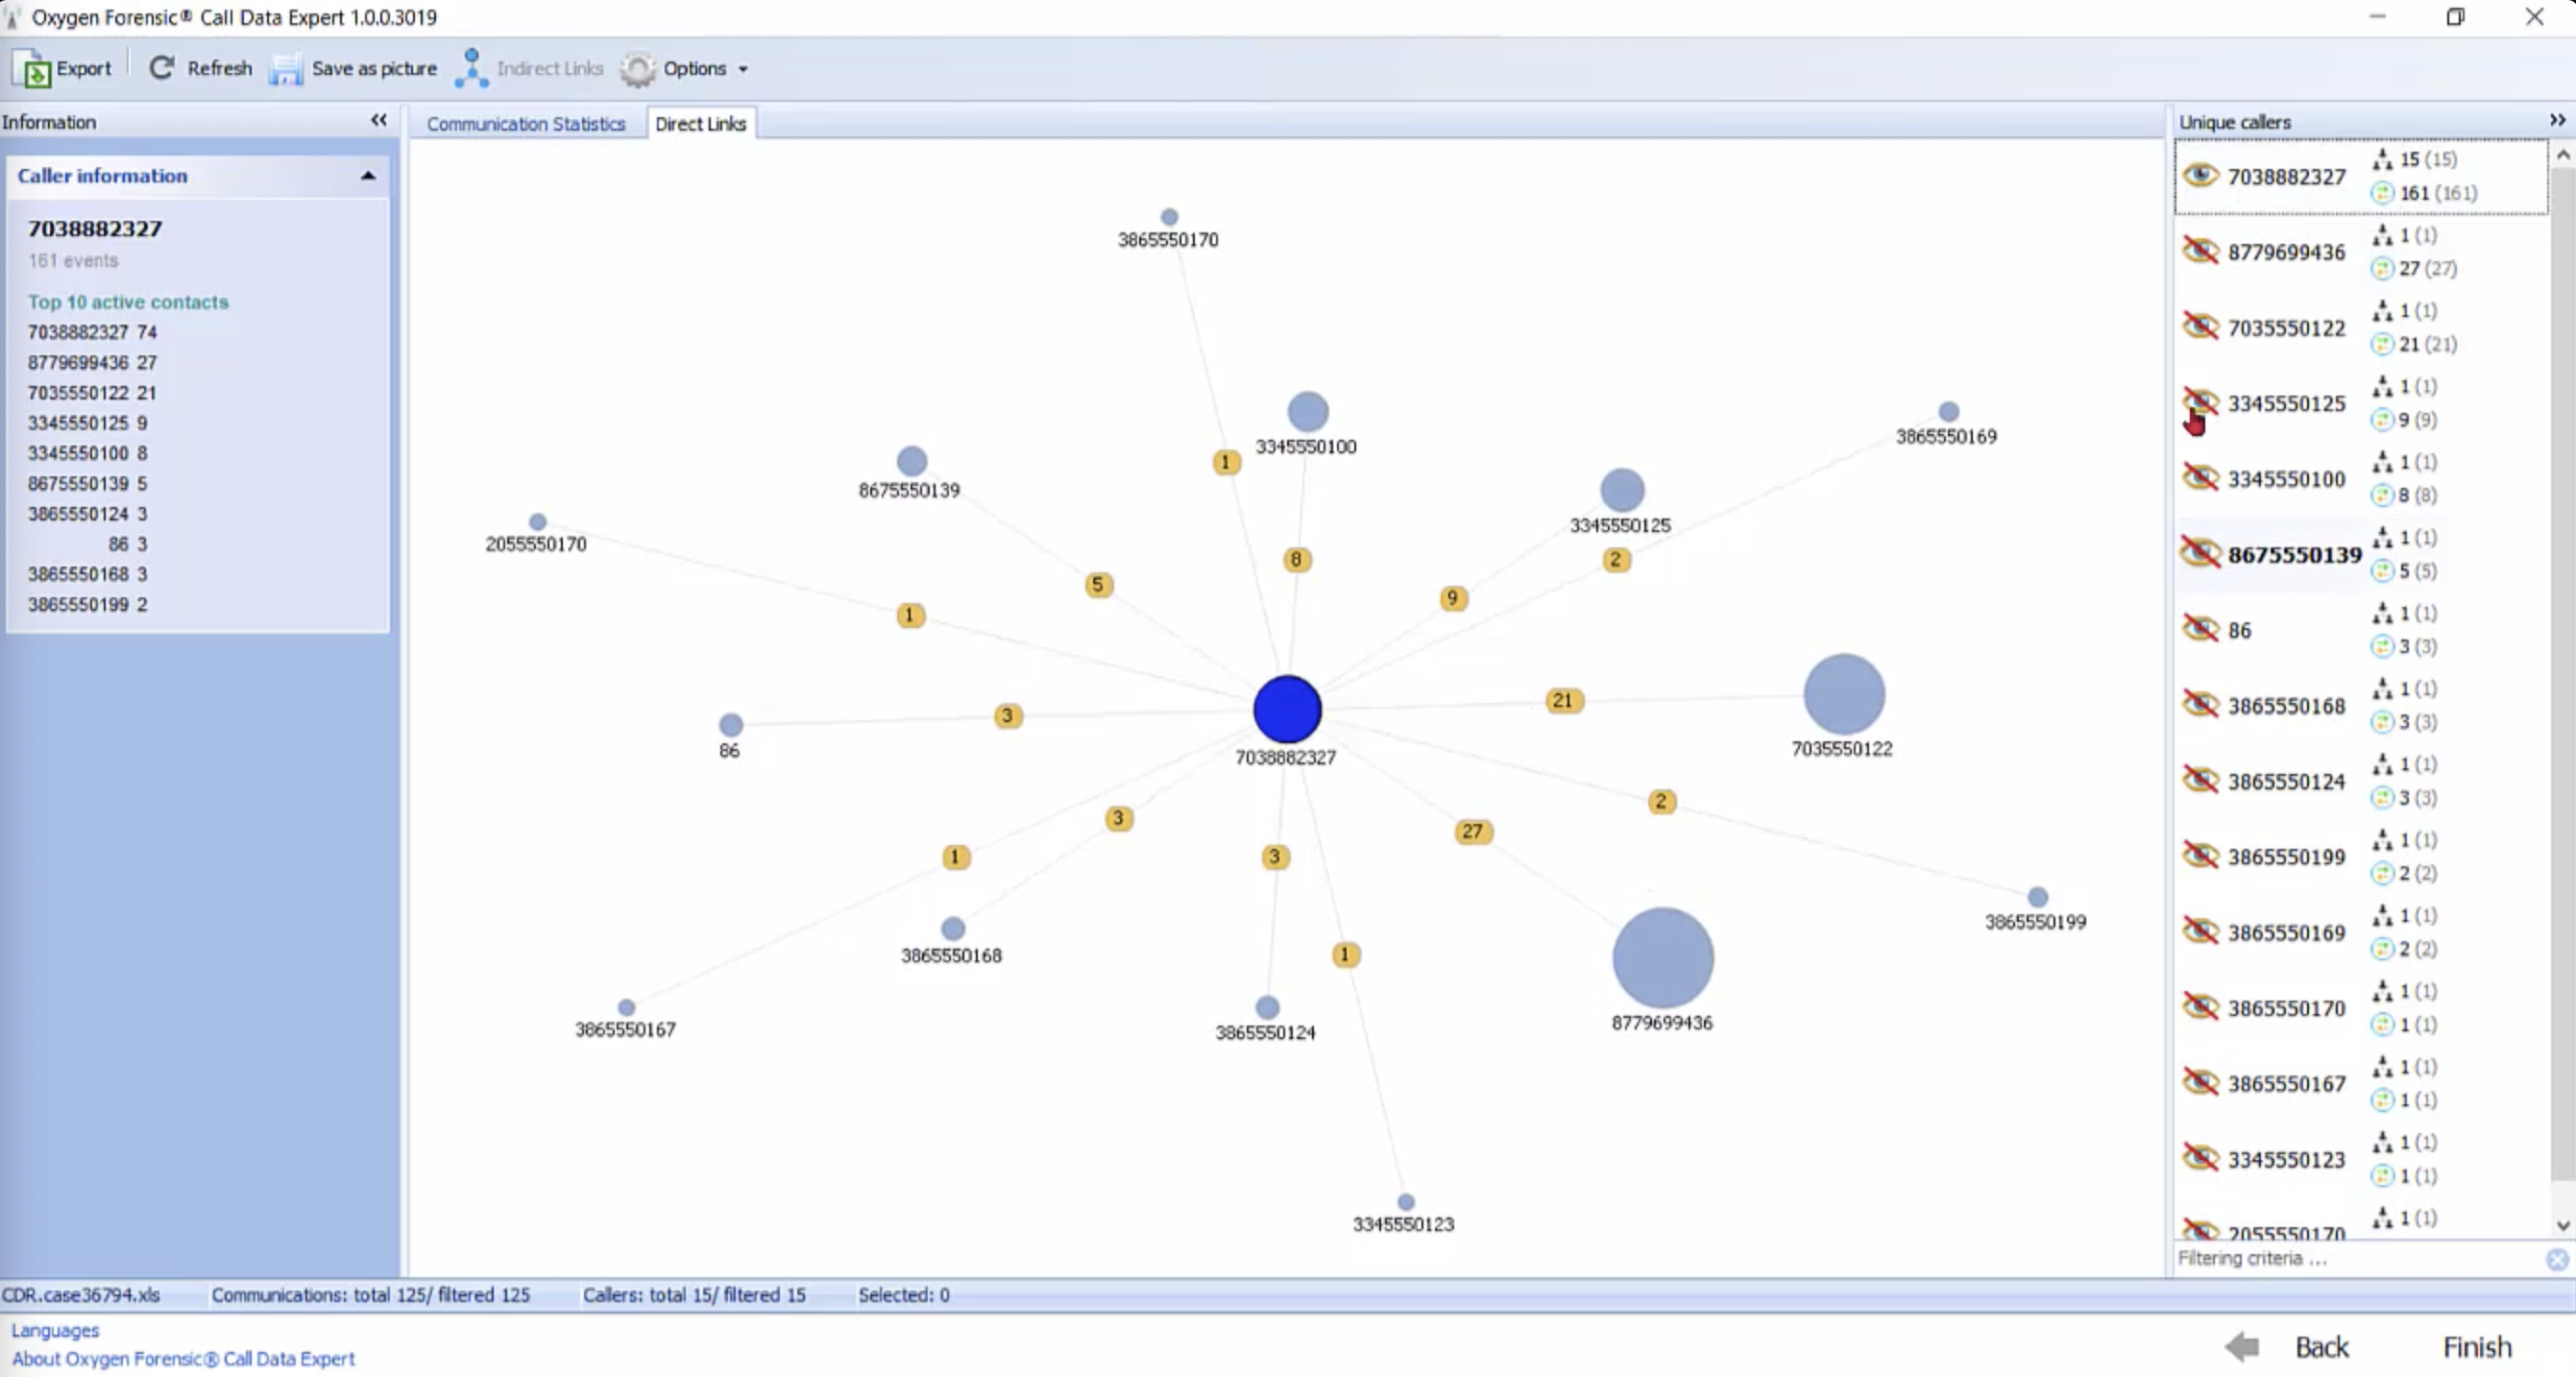 Here we can start unchecking, and our graph begins to form with all of those unique callers. This is where we have the opportunity to look on a graph at how many times our device owner talked to a specific person, and if you click on one contact, you will see how many communications our device owner had with that person.
In the upper left-hand corner, you will see that you can export all of this information. And anywhere in Oxygen where you see Export, this is where you’re going to make your report.
But we’re going to take this a step further. Click on your Communication Statistics. From this screen, you can see that there is a maps and routes button. This is where we want to go to see this CDR come to life. So let’s click on that and have a look.
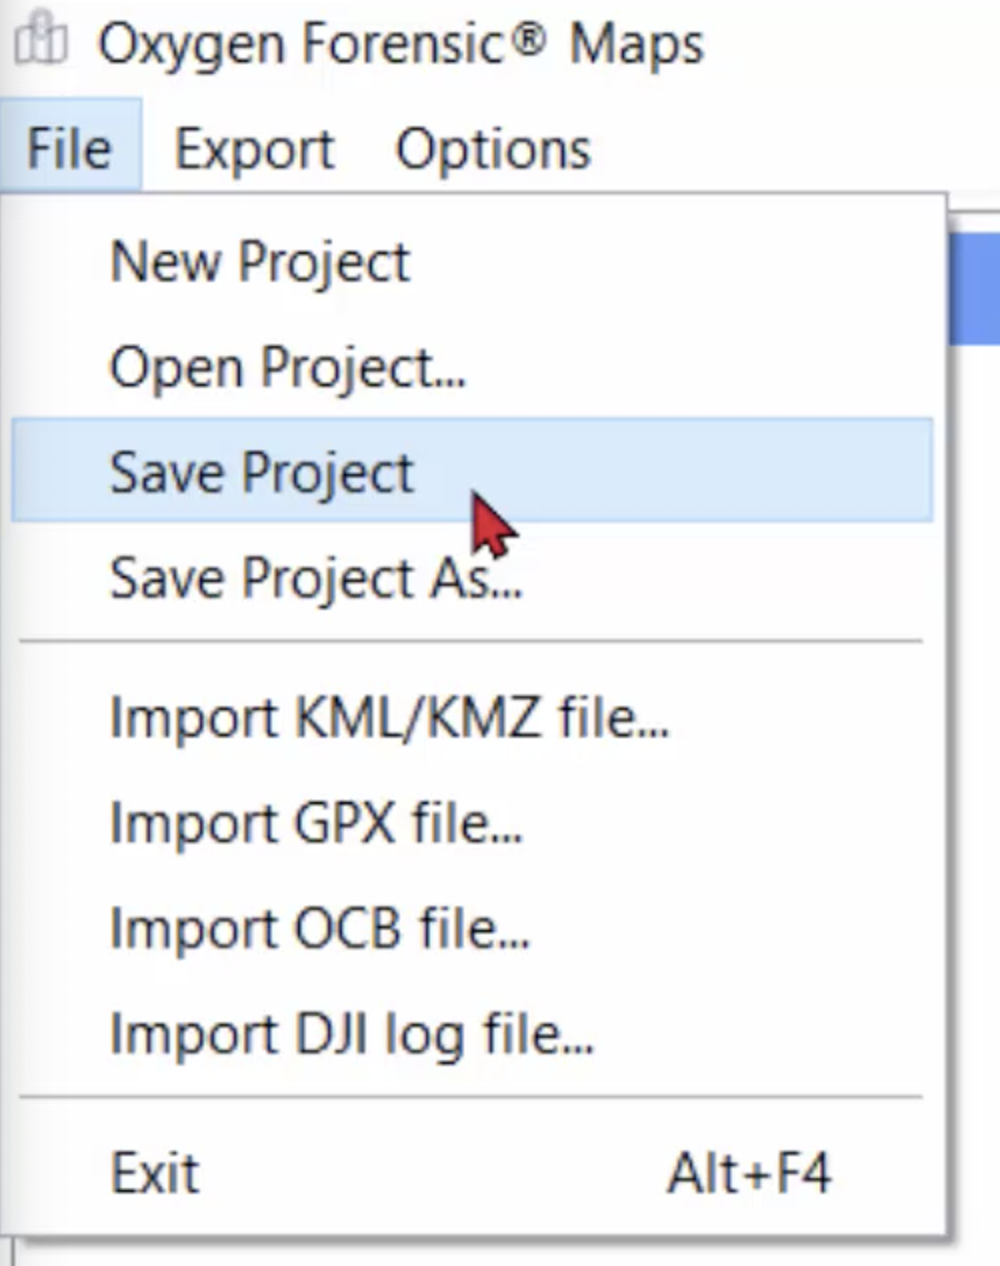
Let’s go over some of our map features. If you click on File, you’ll see here that you can save your project, which means if we get in here and start mapping things out, looking at routes, and identifying routes and locations that we’re concerned with, anything that has to do with our case, we can actually save this project and come back to it at a later date if we need to.
We can also import multiple file types, which we’ll do in a minute. And you will actually see it layer on top of our CDR, so now we can compare information. Specifically, if you have a piece of evidence and you have geolocated that evidence, you can import this information and see if the device owner was near the location of concern at a particular date and time.
Here we have our options. Something I really want to show you are the maps. We’re looking at a Google map right now, and we have the option to look at the Google map satellite view also. Just for demonstration purposes, I am going to navigate back to our Google map.
 You also have the option of the open street map, and this is where you can download your offline maps. This would come in handy if your machine was to never touch the internet due to some type of policy. You can download these maps onto another device, and then bring them over onto your machine.
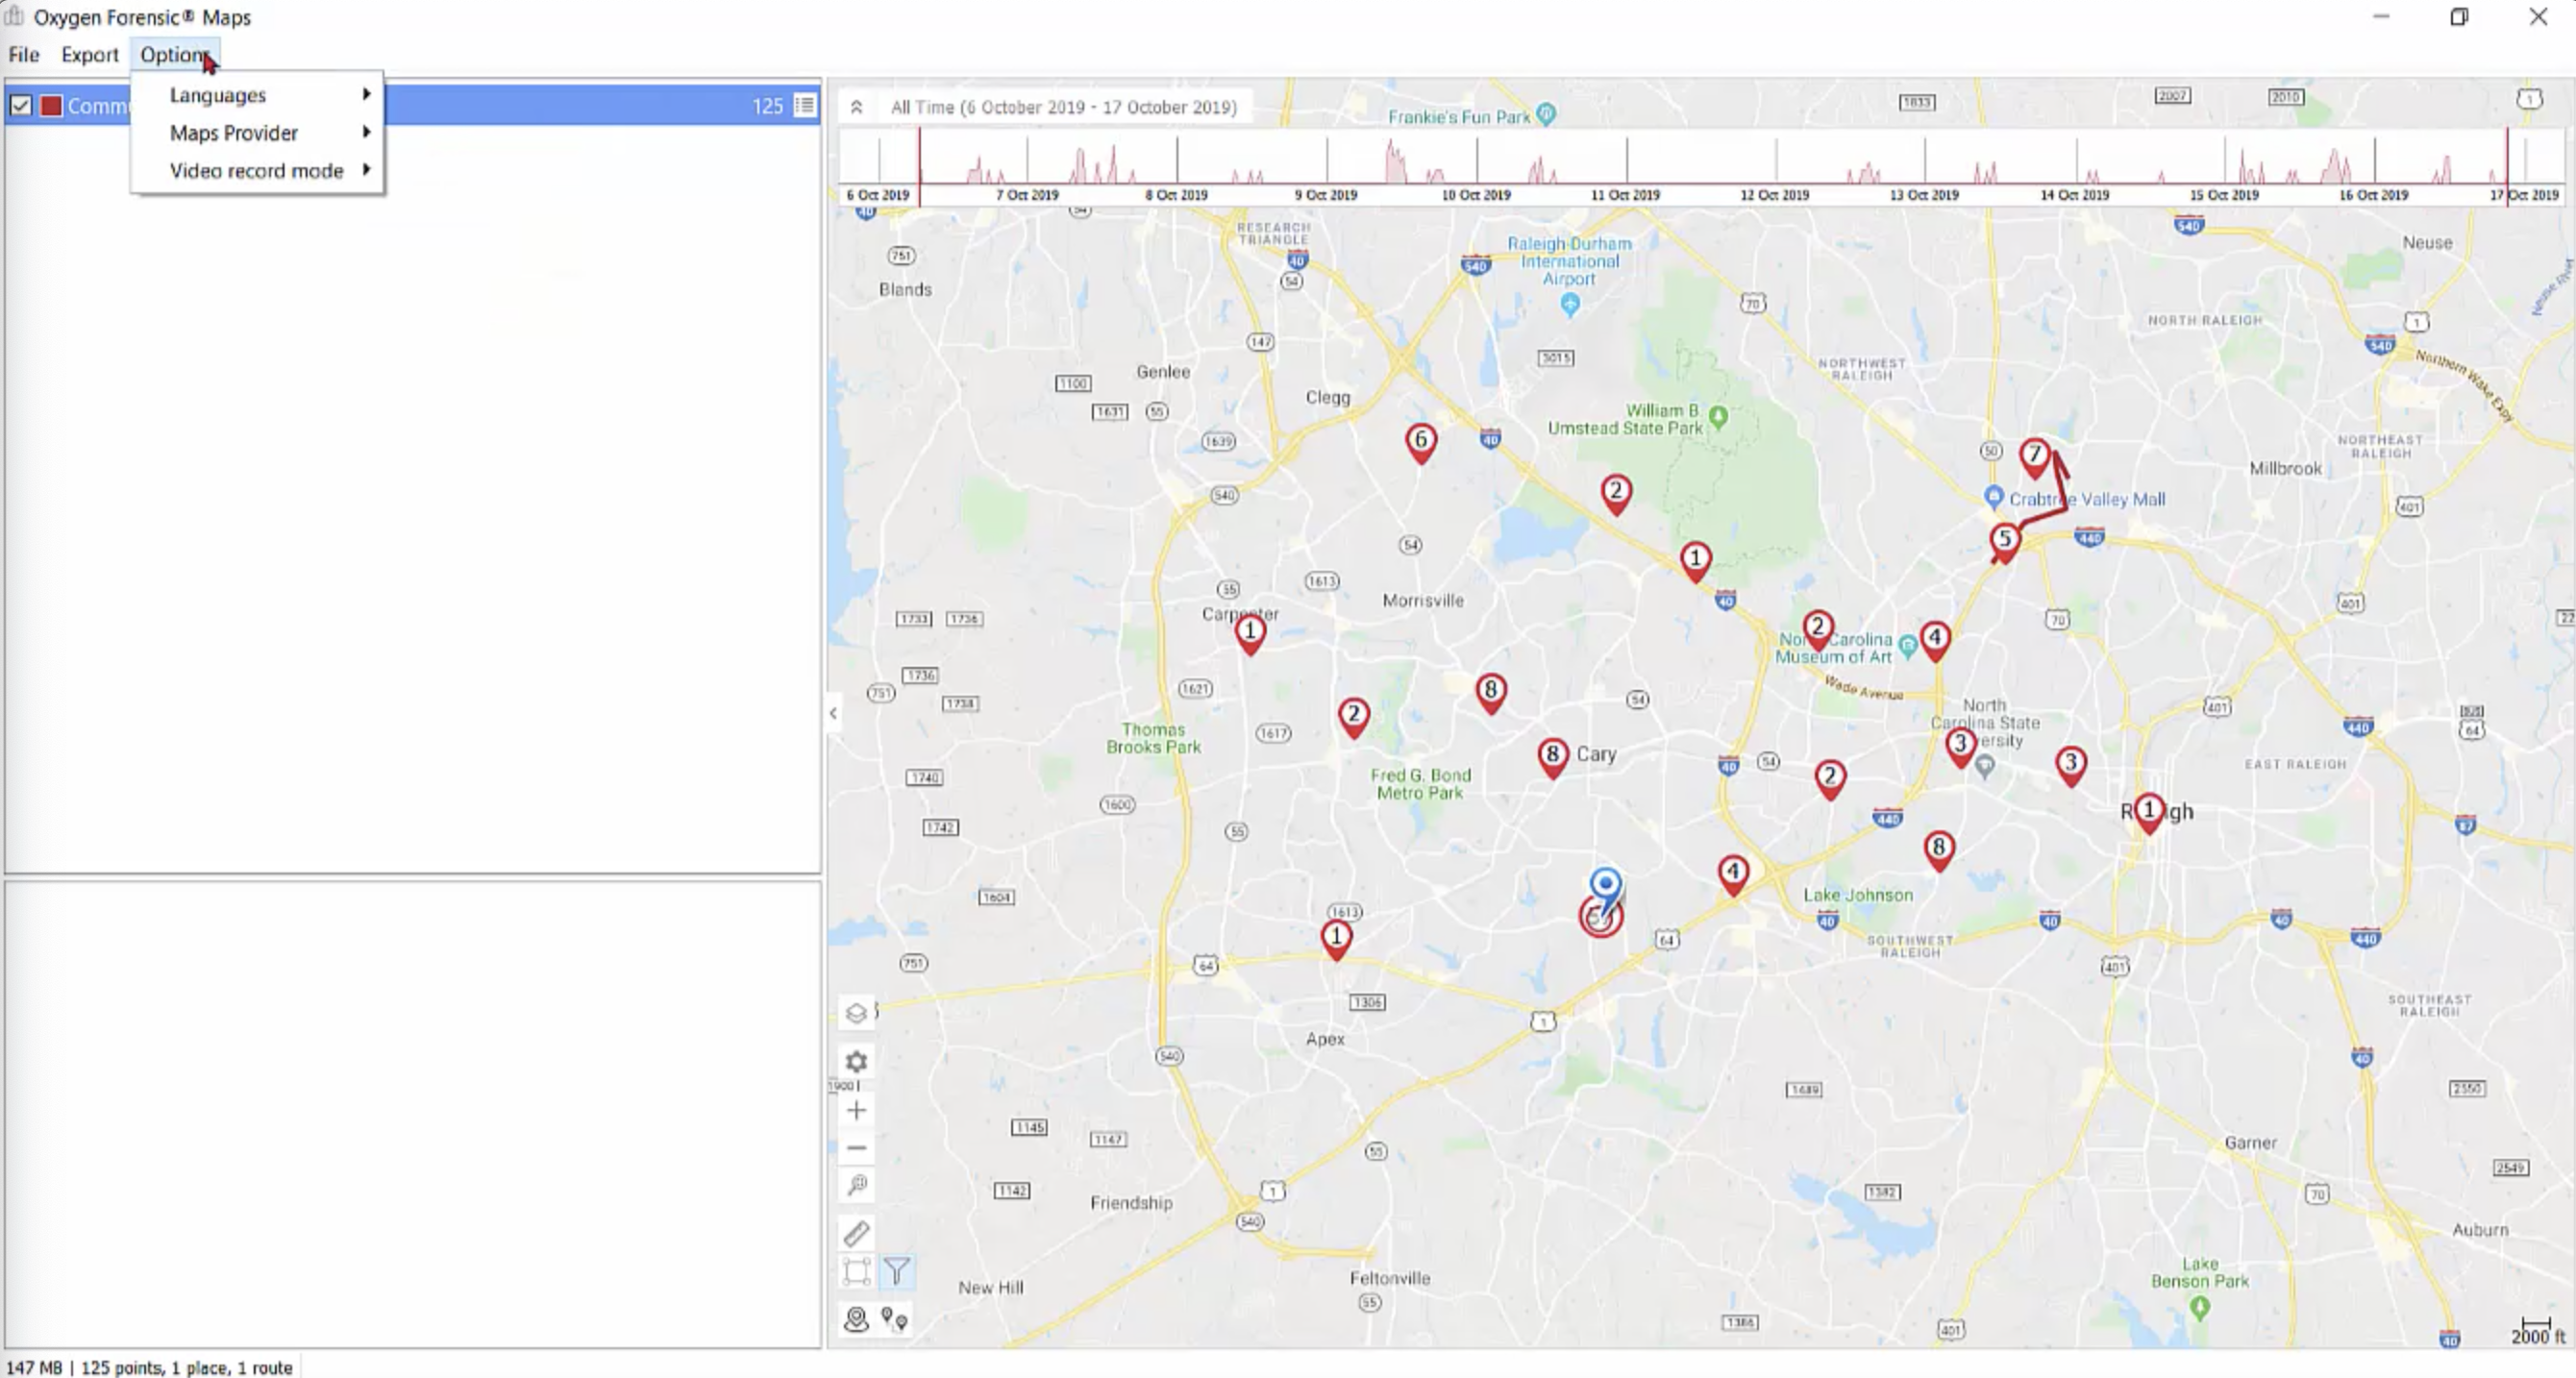
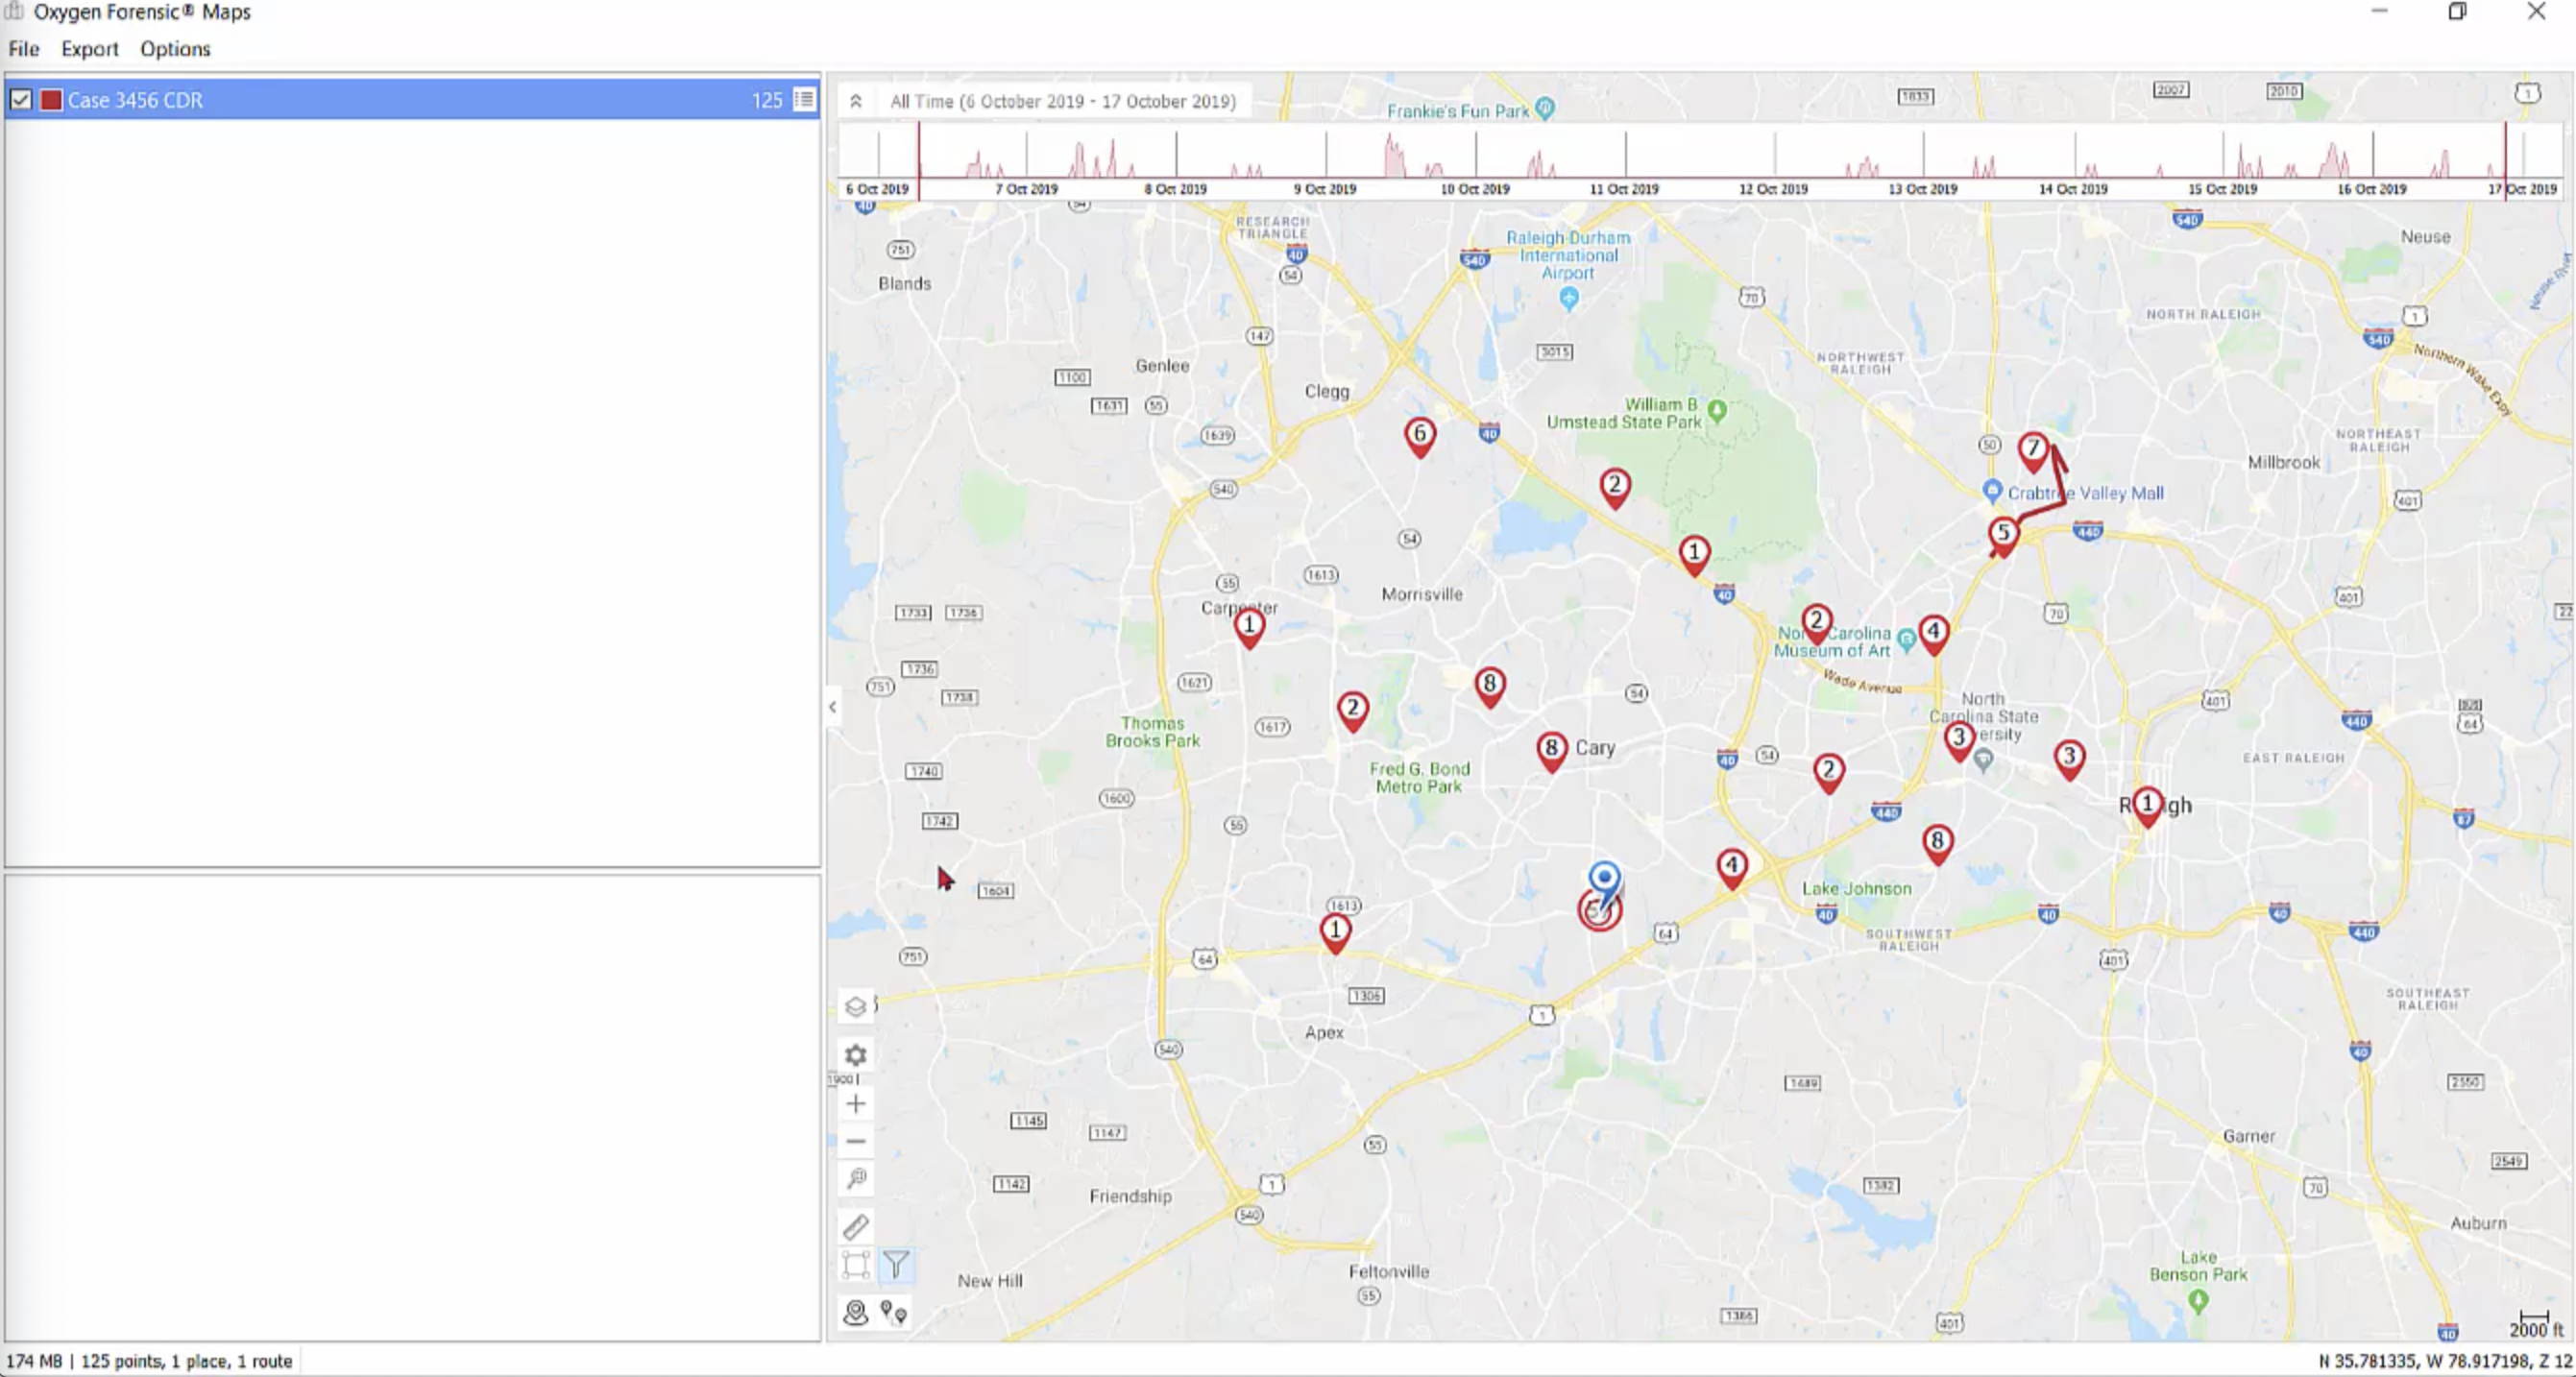
Here is our CDR that we have been importing. It’s currently named ‘Communications’, and I want to rename this to my case number. Here we can see the timestamp, along with the coordinates, and this is every piece of information that’s inside that CDR.
On your map there are a few functions that you can play around with. Here we can turn our markers into points, and our points back to markers. As you can see our markers have numbers inside of them: this tells me how many coordinates are near or in that particular marker, along with the date and the timestamps.
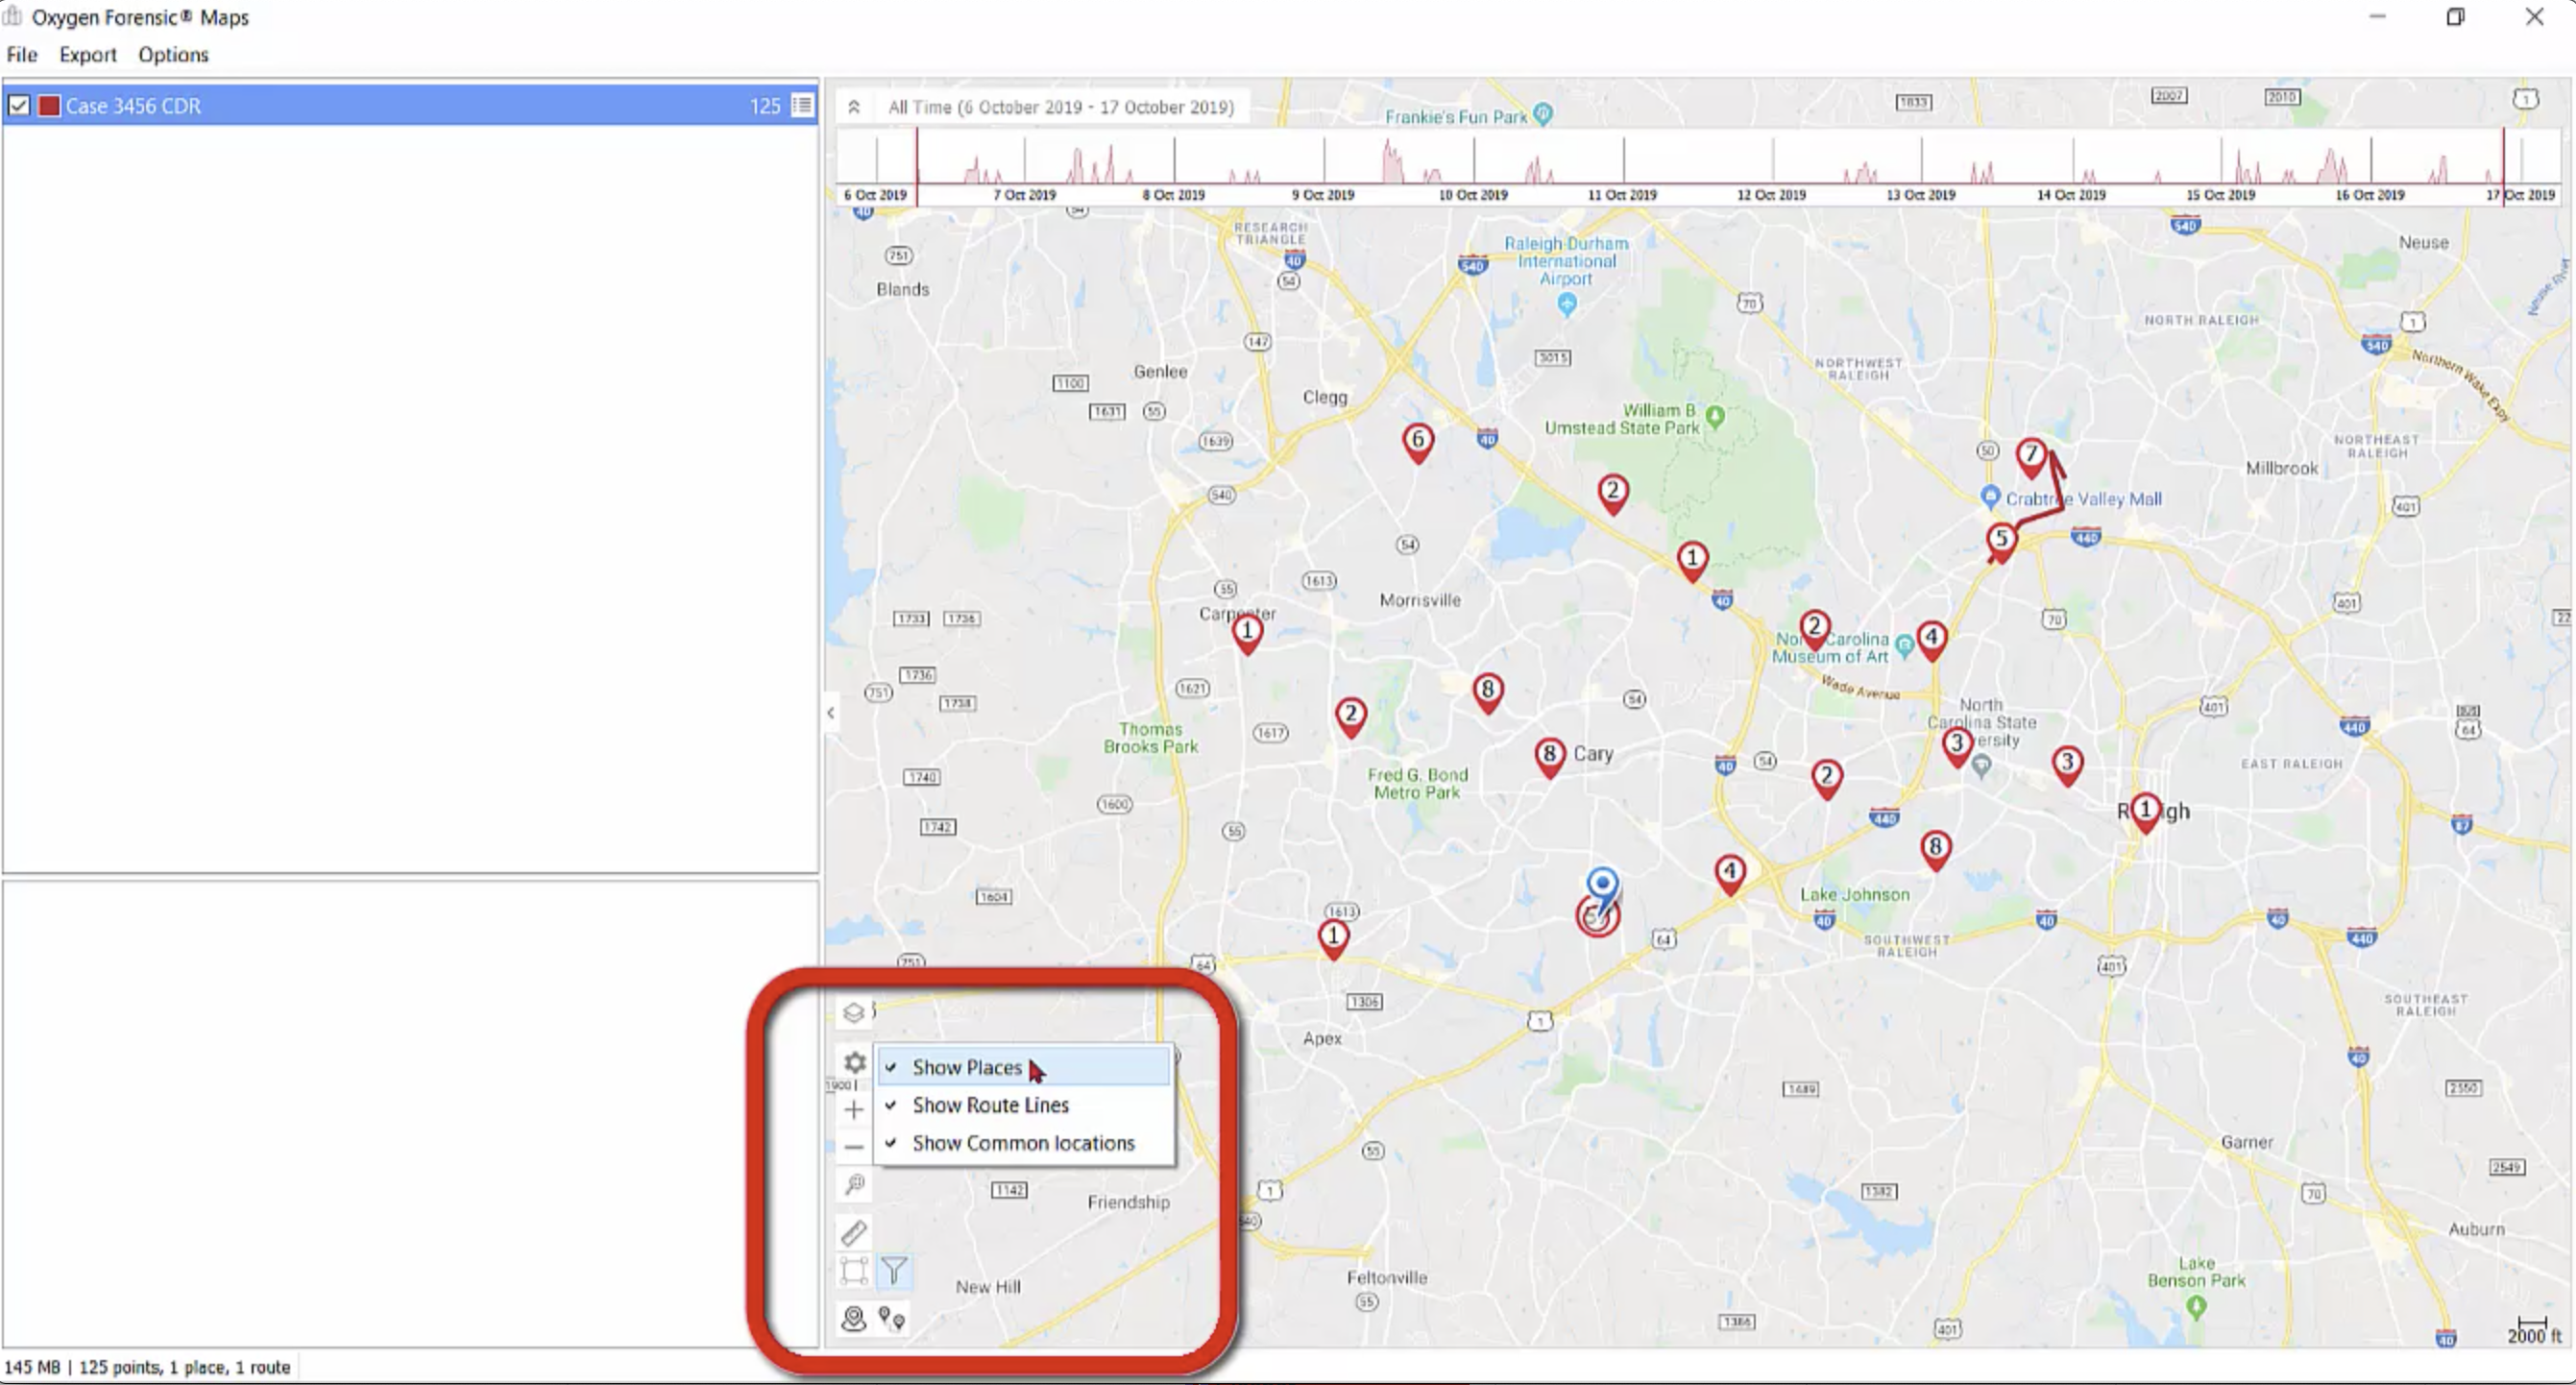 Here are some more options. This, when we start working with our maps, we’ll have places, routes and common locations on our map, and this is the check boxes here that will allow us to see it or get rid of it.
And here is our zoom in and out; and this is to show all of our geo-coordinates. Now, let’s say that I’ve scrolled in a little too far, and I’m assuming that this is all of my coordinates. Well, to make sure that I’m right and that I’m not missing anything, I’m going to click on this ‘Show geo-coordinates’, and then boom, there’s everything inside of my CDR, right on my screen. Now I’m sure I’m not missing anything.
It can also help you if you get lost somewhere in the map: just click on ‘Show all geo-points’ and you’re back where you’re supposed to be.
The ruler allows you to measure distances. Really all you have to do are click on points of interest. How far is this point to this point? 8.8 miles. Pretty simple. What about if I want to take this all the way to this point? Now it’s 10.2 miles. Now that’s from Point A, Point B, to Point C. That’s a 10.2 mile route. It’s pretty easy to get rid of this, too. All you have to do is click the ‘X’.
The next box is for geofencing: very simple function. Click on the points of your geofence, and there you go. Now we’re looking at just our geo-coordinates inside the fence we have created. It’s also very easy to manipulate. And to get rid of it, again just simply click the ‘X’.
Here you’ll see how to collect your places and your routes. Now if we were to add another layer to this map, then we can look for common locations between our CDR and whatever layer we put on top of that. Let’s go ahead and add a layer to this map. This is a CDR of a suspect, and I have a couple of pieces of evidence that I have put a geocoordinate to, and the time and date stamp.
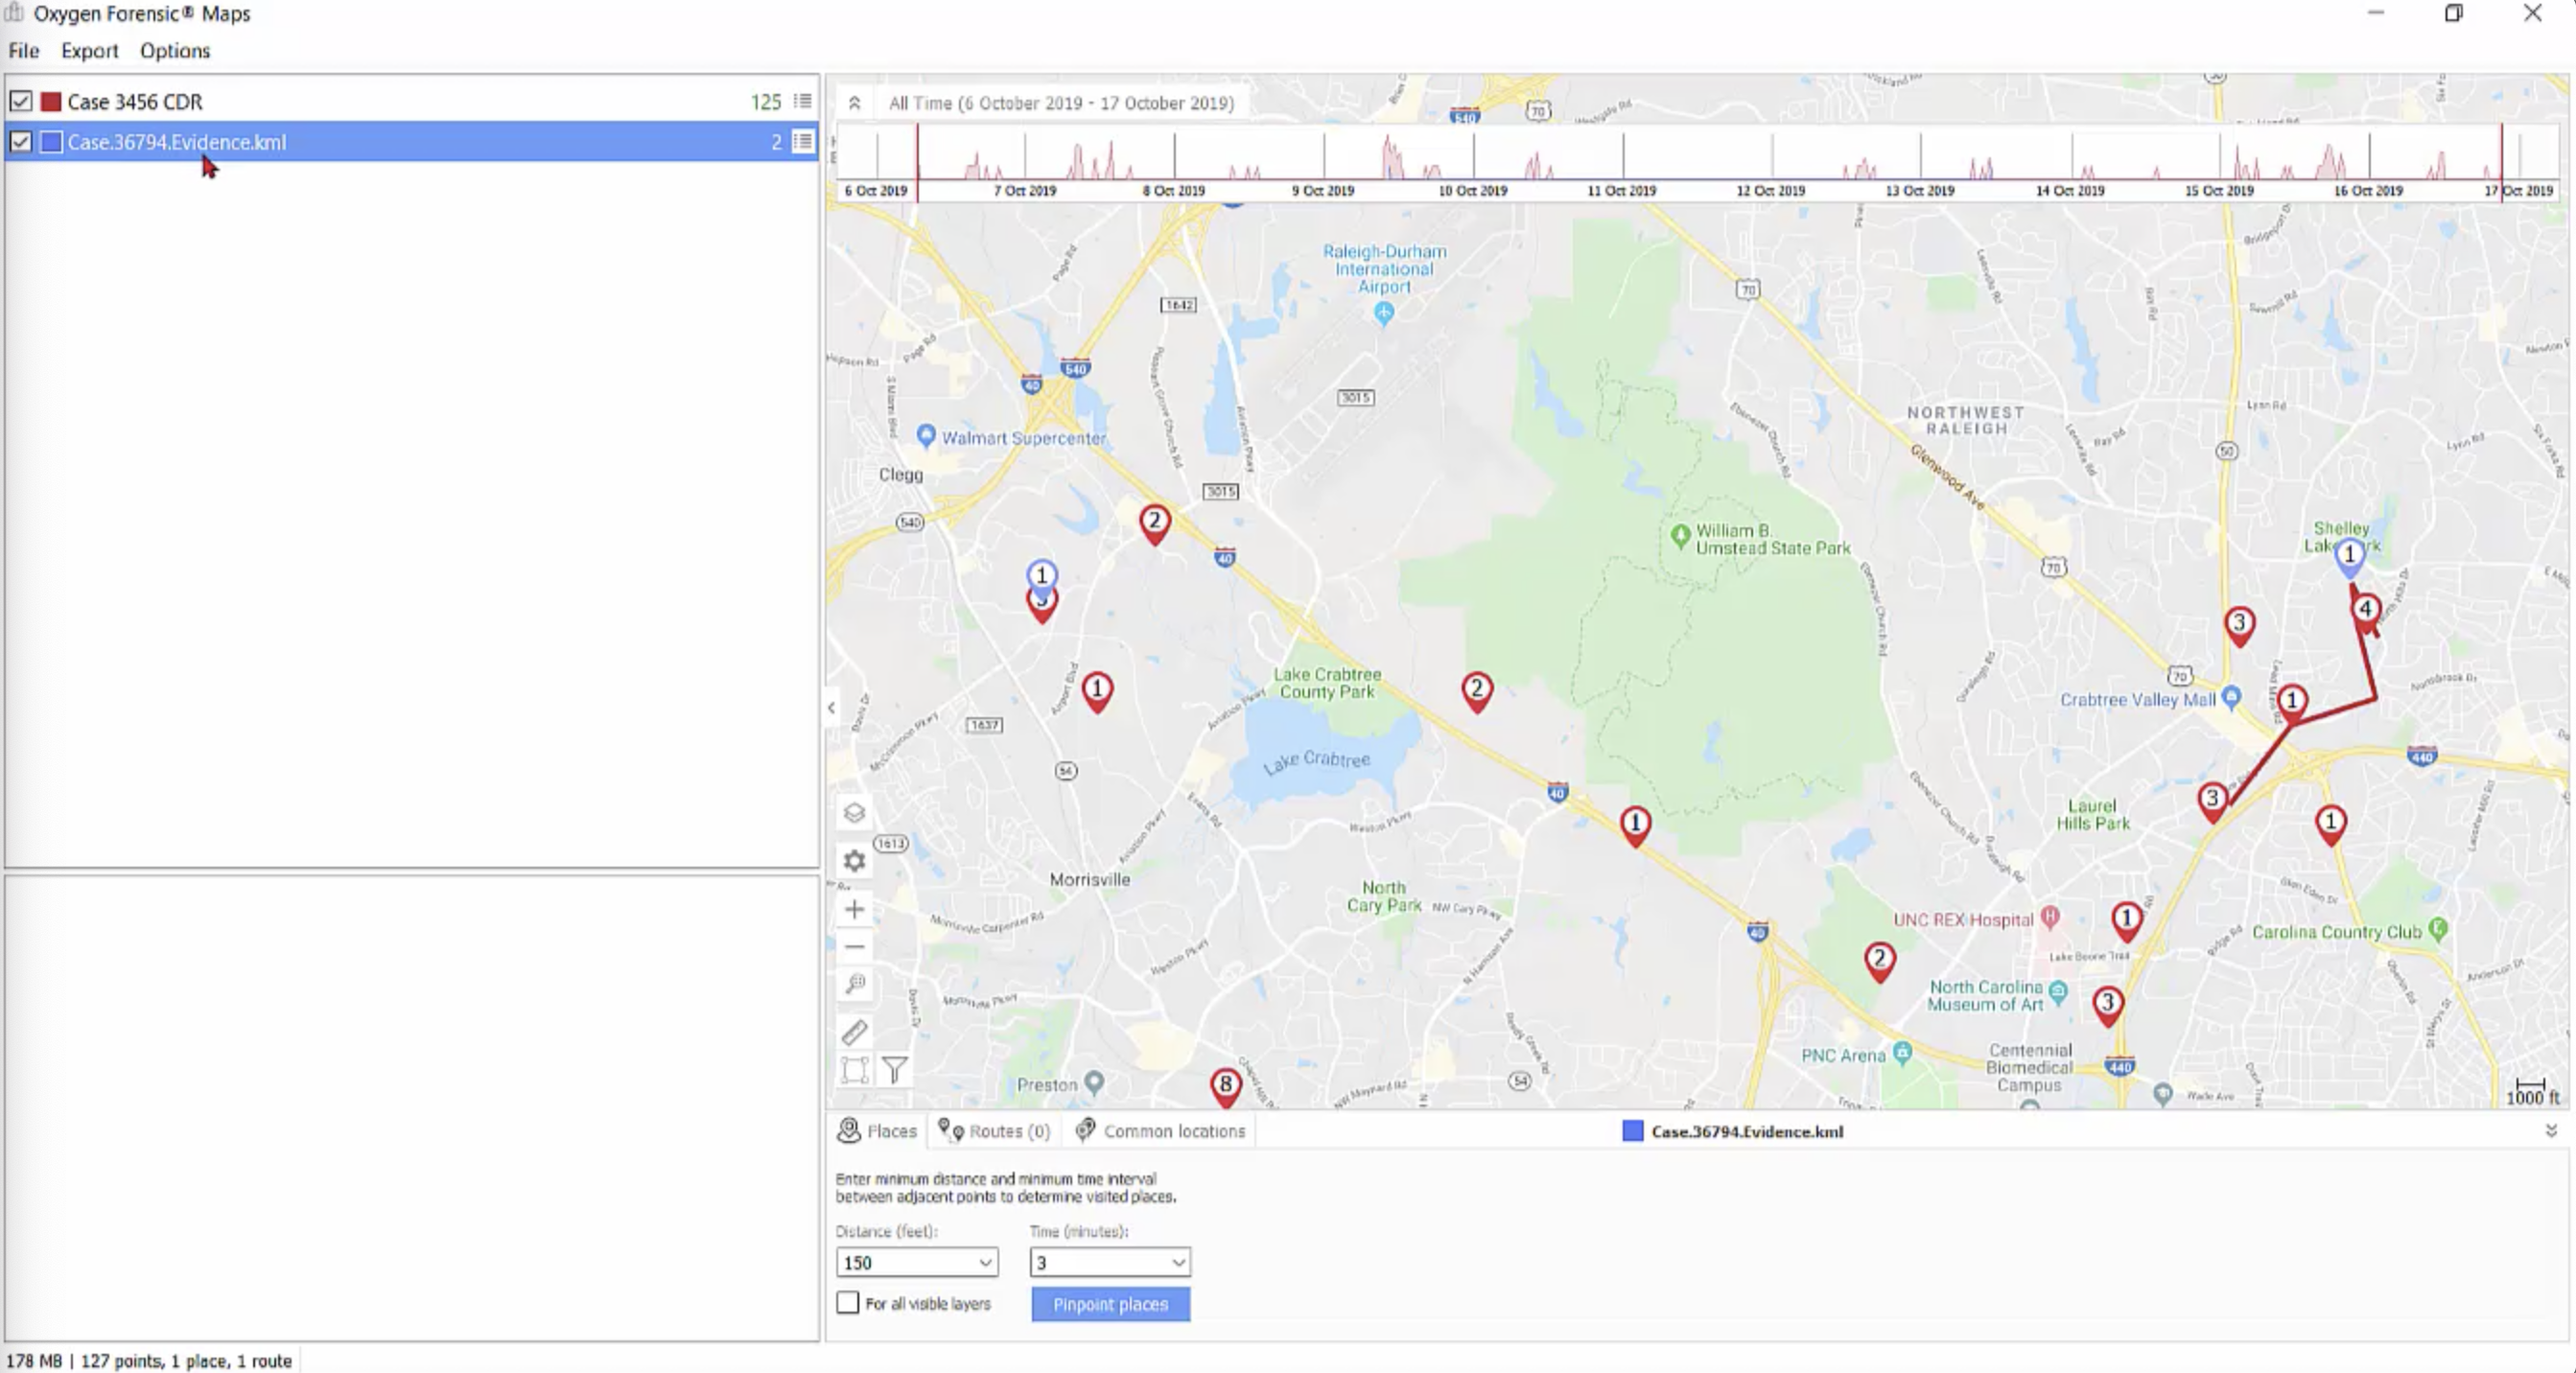
Click on your file, and I’m going to import the KML of the two pieces of evidence that I’m concerned with. Here is my case. I’m going to go ahead and open this up. And now I have added another layer to my map.
I see two points that are blue. We can change these points to a different colour, if we want: now they are green. I’m going to change them back to blue, because it’s easier to see. And I can see when I imported this that it zoomed in on my map a little too much, so I’m going to take myself back out and see all of my geocoordinates.
Now you can see at the bottom we have three options: places, routes and common locations. Let’s look at routes first.
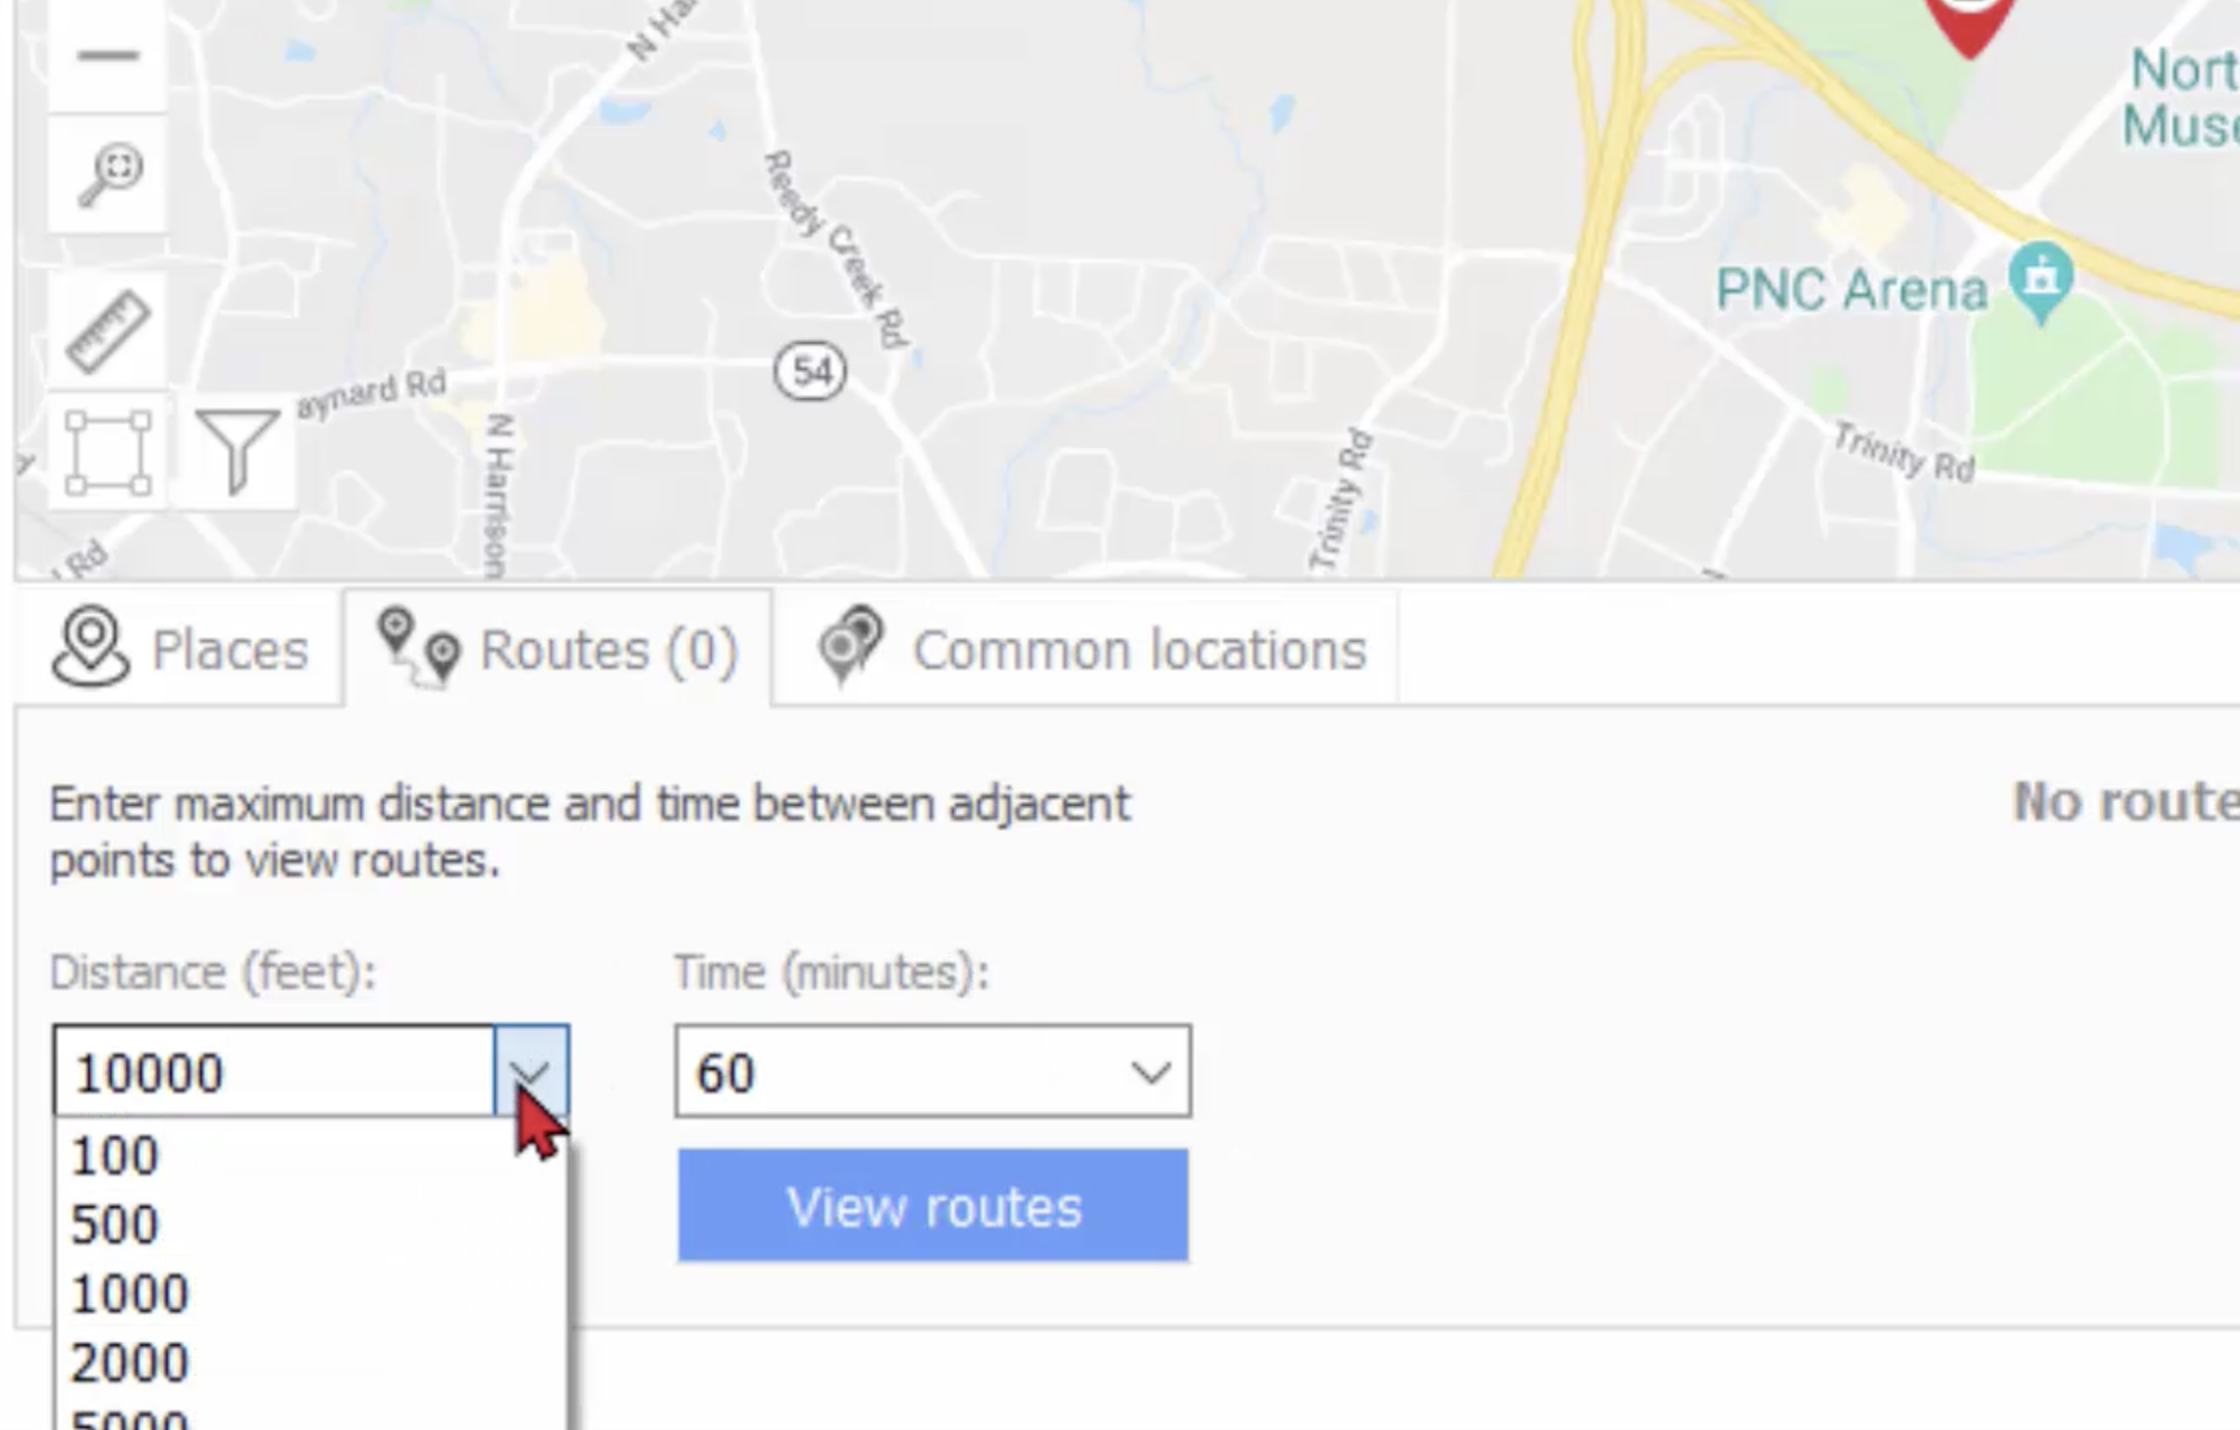
Here you can see that we have a couple of drop-down menus. We have options here, or we can manipulate these numbers. Let’s say that I want to look in my CDR, and I want to look for something that connects in approximately 4-5 miles within two hours of each cell phone ping.
So I’m going to look in my CDR, because that’s where I’m looking for the routes, and I’m going to come back down here and put 25,000 feet, because that’s roughly about four and a half miles; and minutes, I’m going to go 120, because that’s two hours. And I’m going to view routes.
Look at all these routes! This is an amazing showcase of where your suspect has been. And on top of that, we can see our two evidence points: that KML file that we imported.

Now I want to see: was he near those evidence points at the same time those crimes were committed? Well, let’s have a look at that.
So let’s have a look at this route. I’m now going to click on this, which chooses the route of concern, because I can see easily that this route goes past both of our evidence locations.
So you can see that we have a play button here. We can actually watch Point A move along to Point B. We see this route started on the 9th of October 2019, and it went for about two and a half hours, for 23.3 miles. So instead of watching this at a regular rate, I’m going to kick it up a bit. Let’s speed it up to x100, so we can watch the progress of this route.

What makes this so interesting and so compelling is that you can see our suspect, and just about which interstate he’s travelling on. We can see that he bypassed one of our locations here, and we want to see if he was near that location around the same time of concern.
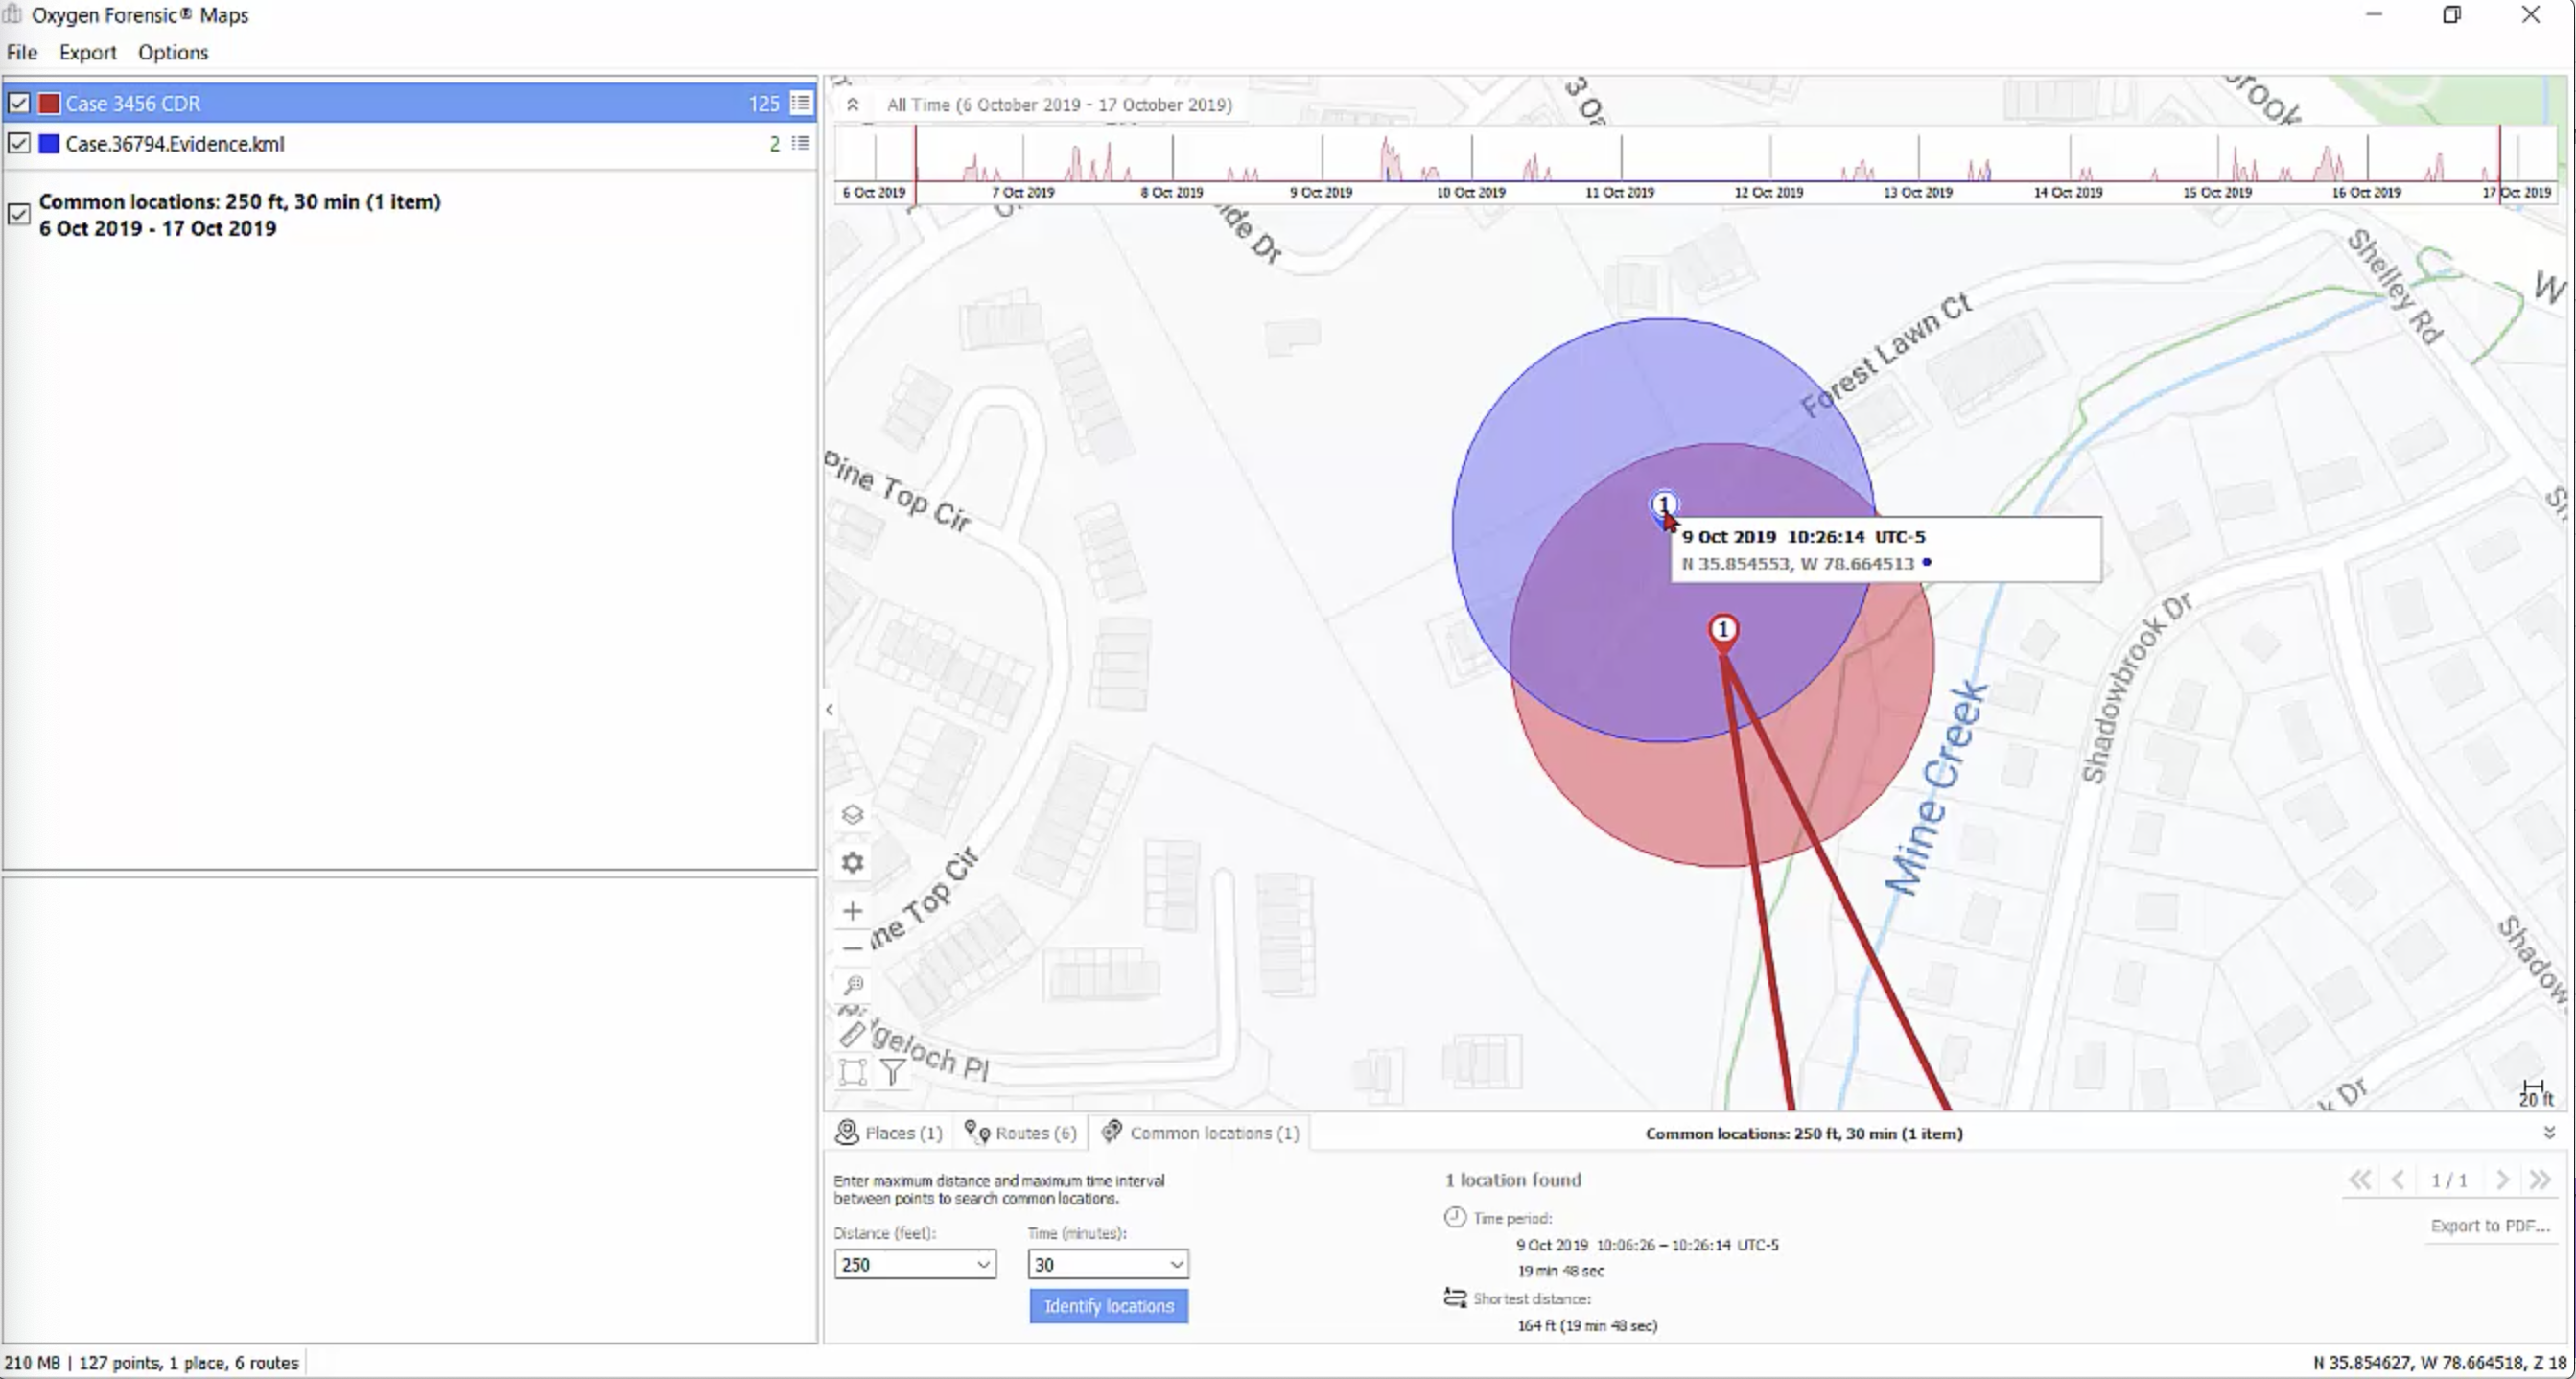
We can actually do that by looking at our common locations. Let’s click on our common locations. I’m going to look at a distance of about 250 feet, and let’s see if those geocoordinates were plotted at around a half-hour from each other. Now this could be some really compelling evidence, saying that your suspect was within 250 feet of the crime scene, within a half-hour of that crime being committed. Let’s look and see.
Look at this. We have a timestamp of 9th of October 2019 at 10:26; and this one, same date, at 10:06. 20 minutes later. So this is a very important piece of evidence, and I want to make sure that I include this in my report.
And as we said before, how do we make a report in Oxygen? We look for our Export button. Here, we can export this just as an image, or as a layer, export checked layers, or we can just save it as a snapshot and include it in our report later. We also have the option to export this to a PDF. Let’s export our image. Let’s also export this common location to PDF.
Here we can see the image that we exported, and our two common locations. And here is our PDF that we exported. This gives us all the geocoordinates, and the date and the time, and the shortest distance. So we can see that this is 164 feet from each other, at 19 minutes and 48 seconds. What a great piece of evidence to show a jury or your client.
In summary, now we know what a CDR is: it’s the call detail record that you get from a carrier. It can include geolocations, phone numbers, time and date stamps, and even cell tower numbers.
And I’ve shown you how to create a template; how to normalize your data; how to save your template; and now you’ll have it for future CDR imports. Your unique callers: the graph can become an important visualization for anyone that you need to present this evidence to. And your mapping features: now you can see places and locations, and you can even follow the route of your suspect.
There are several options to export. You can either save your session and come back to it later, or you can save your information as a snapshot or an image. And you can choose which layers you want to export. You also have the option to save your locations and your routes as a PDF.
Thank you all for watching the Call Data Expert video. If you’re interested in any of Oxygen Forensics’ trainings, please feel free to reach out.
Learn more about the Oxygen Forensic Call Data Expert and many other tools, tips and workflows with Oxygen Forensic Detective by attending an in-person or online training course. Check the Oxygen Forensics website for course dates, locations and descriptions.


This is an old post. The best way to do call detail records is the AI platform Cell-Ninja.com It’s made specifically for call detail records.