Topics
- Approaches to Integrity Verification
- A Short Intro to Video Compression
- The Variation of Prediction Footprint
- Detecting Double Video Encoding Using the VPF
- Experiment With a Surveillance Video
Introduction
In this article, Amped Software will start by defining video integrity and mentioning possible approaches to integrity verification. They will also make a very short introduction to some concepts of video coding and then, show how you can use Amped Authenticate’s VPF analysis to reveal traces of double compression in videos, and how important this could be as an integrity verification step. Let’s take a deep breath and dive in!
When dealing with video evidence, integrity verification is a fundamental, yet often neglected, task. The definition of integrity can be summarized as: “the file is original and unaltered since the time of acquisition”. It’s plain and simple: the file should not undergo any change once it’s acquired, and if it does, every change should be documented in the chain of custody. Notice that integrity is different than authenticity, which has a more “semantical” meaning, as it requires the video to be an accurate representation of what it purports to be. If you re-compress a video, its authenticity will normally be preserved, but integrity is broken.
Now, someone could think “the last thing I need is having to waste time checking one more thing in all my casework”. Understandable. At the same time, though, for those in the forensic field, it should be clear that working with video is not just “common sense”. We are not sorting holiday pictures; we are handling evidence that could change somebody’s life, and dramatically so.
In this article the word “pristine” will be used from here on to indicate that the integrity is preserved.
Approaches to Integrity Verification
Now, when it comes to integrity verification, it is important to distinguish between two completely different scenarios: when the original file is available, and when it’s not. If the original file is available, integrity verification is very easy: just compare your questioned file against the original, either directly bit-by-bit or using some cryptographical hash function (MD5, SHA-512, etc.) of the two files. If it’s a match, you’re good to go.
But what if the original is not available? What if you’re given a file, and you need to investigate whether it’s pristine? Once again, this task could come in many flavors. In a quite lucky case, you would at least know the model of the device that created the file, so you may look for another file and compare their container, metadata, file structure, etc. Or you may compare your files’ properties against a database of known file signatures and hope to find a match. The problem is that all datasets are limited, and if you don’t find any match, you will not know whether it’s because the file is not pristine or just because the dataset does not contain that file’s originating device.
Now, there’s a property of videos that is a curse and a bless at the same time: except for very rare exceptions, videos always come in a compressed format. In fact, virtually all video recording devices, may it be a smartphone, a bodycam, or a DVR, will encode frames during capture to save storage space. The bad side of it is that compression means quality loss, of course. The good side of it, though, is that if the video is altered, most of the times a “decode – manipulate – re-encode” workflow will be needed since most video processing algorithms only work on decoded pixels and re-encode the video when saving the result. Now, compression leaves artifacts in the pixels, both at the visible and statistical levels. So, if we can leverage these artifacts to demonstrate that a video has been compressed more than once, legitimate doubts will arise about its integrity. In other words: we expect a pristine video to have undergone one single compression since it’s done at capture time; if we find traces of further compression steps, we may have a serious issue with integrity.
The task of revealing whether a video has been compressed more than once is called “double encoding detection”. Researchers have published hundreds of papers on the subject; among these, one very promising way to reveal double encoding is the Variation of Prediction Footprint (VPF) analysis; the original scientific paper where it was presented counts more than 90 citations at present, according to Google Scholar. Before we can explain what the VPF does, let’s have a super-quick overview of how video compression works for most codecs.
A Short Intro to Video Compression
We start with a sequence of uncompressed images, that we call video frames. Frames are split into Groups of Pictures (GOPs), and we can think of each GOP as being encoded independently from each other. The number of frames inside a GOP is called “GOP size”. Some encoders use a fixed GOP size, which could be as small as 1 or as large as 400 or more, some others will use a variable GOP size.
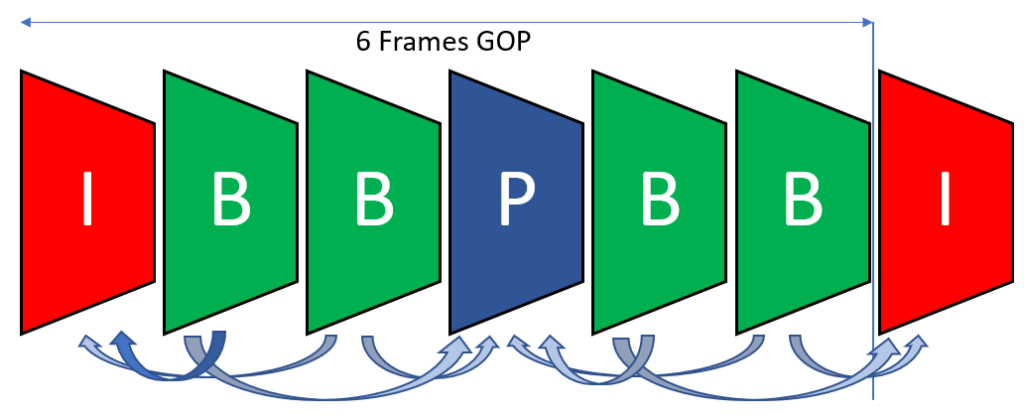
Every GOP begins with a keyframe, or “Intra-coded frame” (I-frame). All the following frames in the GOP are then Predicted (P-frames), possibly even referring to future frames inside the GOP, in which case, they’re called Bidirectional frames (B-frames). B-frames are not very common in recording devices since the encoder needs to store a memory buffer (it cannot predict the future!) and that could be impractical during live recording. However, they’re largely used during offline compression, for example by video editing software, YouTube, etc.
That was about frame types. Now, every frame is internally split into macroblocks (MBs) of size 16 x 16, which can then be further internally split in sub-blocks. For each MB, the encoder must figure out the most convenient way of encoding pixels, where “convenient” means having the best compromise between memory use and visual quality. Each MB can be encoded according to some possible prediction modes. In the worst case, the encoder won’t be able to “recycle” any information from surrounding frames to represent a MB, and so it will encode its pixels independently from the pixels in other frames: this makes an intra-coded MB (I-MB). On the opposite scenario, pixels within a MB could have remained just the same (think of a background wall in a static camera) and could have been just copied: this makes a Skipped MB (S-MB). Quite often, the encoder will be able to encode a frame by making up a mosaic of MBs from previous frames, moving them by some “motion vectors” where needed. The obtained mosaic would be visually horrific, but it should be used just as a prediction: then, the prediction is subtracted from the actual MB and only the difference is stored, which is usually much more compact in size. When this happens, we’re dealing with predicted MBs (P-MBs).
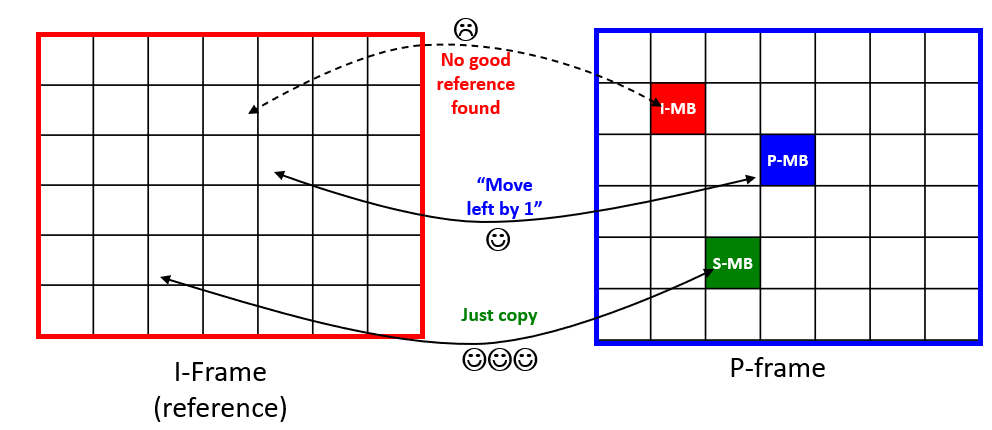
An I-frame cannot contain any P-MB or S-MB which refer to other frames, since it must be self-contained. A P-frame can contain P-MBs and S-MBs, but also, I-MBs when no suitable reference is found in other frames. In B-frames, predicted macroblocks can also reference future frames.
The sad life of a video encoder is all spent in deciding how to split frames into macroblocks, which kind of prediction mode to use for each MB, and so on. Choices are made through a mathematical process derived from the rate-distortion theory, which deals with lossy compression of data. The process is deterministic: if you encode the same video twice with the same parameters, you’ll get the same output. However, if you re-encode a video that was previously compressed, it could have an indirect impact on the decisions taken by the encoder during the second compression. This is exactly what the VPF analysis is based on.
The Variation of Prediction Footprint
The VPF is a phenomenon, firstly introduced in this scientific paper and then improved and extended in this other work, that occurs when an I-frame of a video is re-encoded as a P-frame or B-frame. Imagine you have a video whose first compression was done using a GOP size of 30, and then a second compression occurred with a GOP size of 50. The 30-th frame of the video was firstly encoded as an I-frame, but it will be encoded as a P-frame during the second compression. When this happens, the encoder will tend to use many more I-MBs than usual and many less S-MBs than usual for just that frame, and then revert to the “normal” behavior. This is visually explained in the picture below (green is used for S-MBs, red for I-MBs, blue for P-MBs):
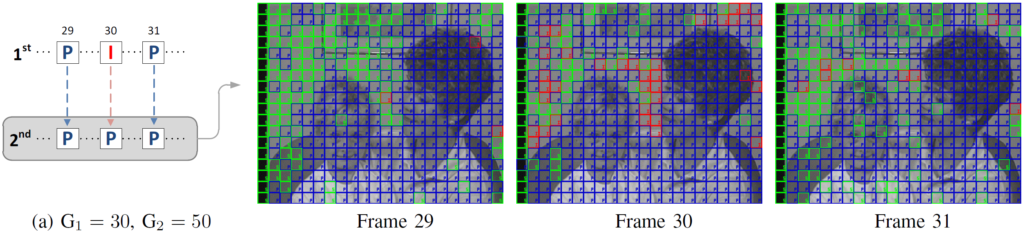
Now, if we assume that GOPs have fixed size, the same effect will happen again at frame 60, then at frame 90, then 120, then 180, and so on. We did not include 150 since that’s a multiple of both 30 and 50, so the original I-frame will be re-encoded as an I-frame and all its macroblocks will be I-MBs (in the picture above, all blocks would be red). Anyway, a consistent and periodic presence of this “anomaly” in MB prediction types is a strong suggestion that a video was encoded (at least) twice!
Detecting Double Video Encoding Using the VPF
This kind of analysis is a bit uncomfortable to carry out manually, of course. That’s why the latest update of Amped Authenticate introduced the VPF analysis tool for double video encoding detection. If you never heard of it before, Amped Authenticate is the most complete software for image authentication, and in its latest updates it started to cover video as well. Let’s see how we can do VPF analysis, it’s very easy.
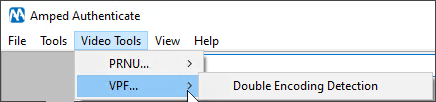
We open Amped Authenticate, head to the Video Tools menu, and choose VPF -> Double Encoding Detection
The only information we need to provide is the input video file. As a first example, let’s use a double compressed video where the first GOP size was 30 and the second 50, as in the example discussed above.
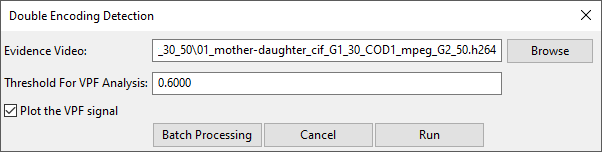
Let’s leave the rest to the default settings and click on Run. We get two windows as the output: a table and a plot. Let’s first look at the plot.
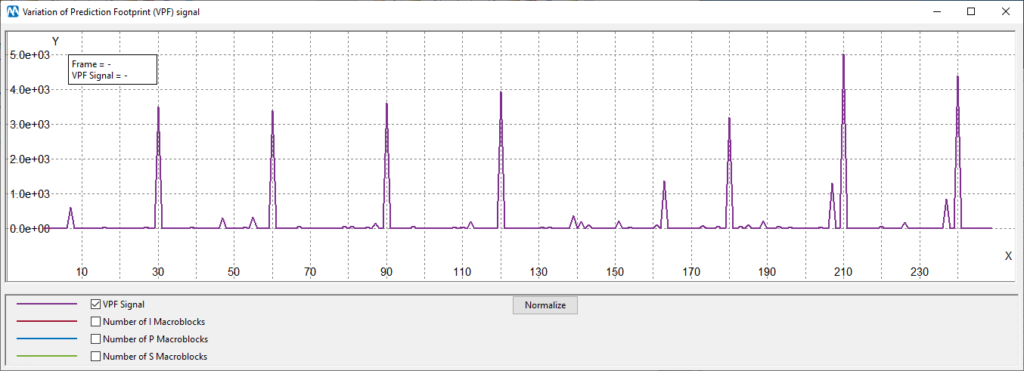
The plot shows the computed “VPF signal”. It basically measures the presence of the “sudden decrease of S-MBs and increase of I-MBs” in every frame. On the x-axis we have frame numbers, and on the y-axis the magnitude of the VPF signal. We can see from the plot that the VPF effect is mainly found in frames multiples of 30, which is indeed the previous compression’s GOP size!
The plot can be configured to display the number of macroblocks of various types found in each frame. Notice, however, that for current I-frames the value will be replaced by copying the preceding frame’s value, otherwise, huge spikes of “I-MBs” (red curve) would make the plot almost unreadable. We know that I-frames are made of I-MBs only, so we can safely take out that information and get a cleaner plot. Ok, let’s have a look at two curves simultaneously, I-MBs and S-MBs:
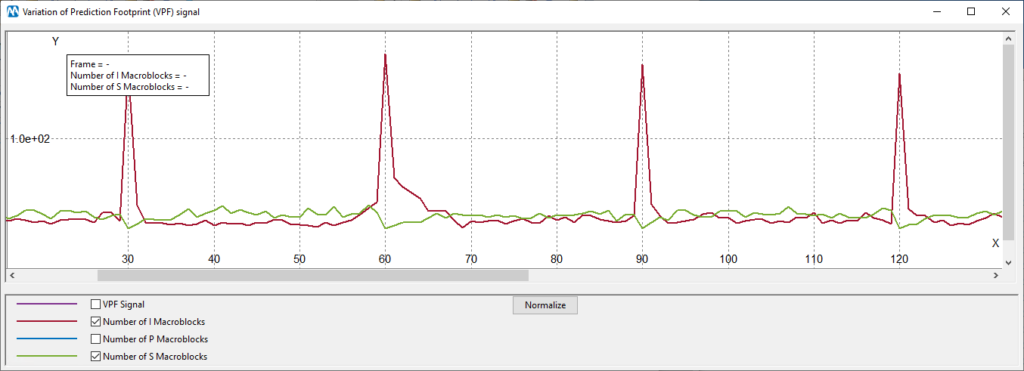
You can indeed see, even from “raw data”, that on multiples of 30 we have a decrease of the green curve and an increase of the red curve.
You may rightly argue that it may happen “by chance”, that for some frames of a video we have a similar effect in the number of macroblocks. You’re right: we can’t just see one peak and say the video is double encoded. However, if peaks are found repeatedly and periodically, then our confidence grows. That’s indeed what the VPF analysis does: it looks for the presence and “strength” of a periodic component in the VPF signal, and when it’s found, it says the video is double encoded and provides the estimate of the previous compression’s GOP. This is all reported in the output table:
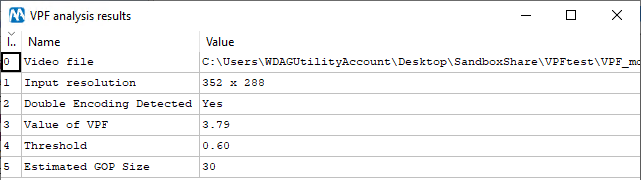
In Row 2, the table tells that double encoding was detected for this video: the Value of VPF (Row 3) is compared against the Threshold (Row 4); since it’s greater, then we say that double encoding is detected (Row 2), and we also provide the estimated previous compression’s GOP Size (Row 5).
When introducing a new tool, it’s always important to understand its working hypotheses, limitations, and expected performance. As to the working hypotheses, the VPF is very well positioned. It only requires that both encodings are carried out with a macroblock-based codec, such as MPEG-2, MPEG-4, H.264. You can also combine different codecs (so called “transcoding”), and this won’t be an issue. The requirements for the VPF effect to be present and detectable are:
- The first compression was carried out using a fixed GOP size.
- The GOP size used in the first and second compression are not identical.
- The first GOP size is not a multiple of the second GOP size (e.g., first GOP = 30, second GOP = 15).
If you managed to follow the article, you should be able to understand the reason behind each of the requirements above. The first one is needed so as to have a periodicity on the VPF signal: if the first compression was done with variable GOP size, you would still see the peaks in the plot, but no periodicity would be found, and the table would say “No” in Row 2. Requirements 2 and 3 are needed since the VPF effect only happens when an I-frame is re-encoded as a P- or B-frame. If all I-frames are re-encoded as I-frames, then no VPF effect will take place.
Okay, what about the performance of this tool? There’s good news: Amped Authenticate’s VPF analysis has been tested against the original validation dataset presented in the scientific paper linked before. It’s a huge dataset that explores several codecs, compression qualities, bitrate control modes, GOP length and structures (with and without B-frames, etc.). Tests were made by running the analysis on tens of thousands of videos, measuring the Value of VPF and then setting a threshold for it. When choosing the threshold, you have to balance the false positive rate (that is, the rate of single encoded videos that were wrongly classified as double encoded) and the true positive rate (that is, the rate of double encoded videos that were correctly identified as such). To keep things short, the experimental validation showed that, when no B-frames are present, if you set the threshold to have approximately 3% false positive rate, which can be considered reasonably low, then you get a 75% true positive rate on average, and this includes cases where the second compression was much more aggressive than the former. If you allow B-frames in the second encoding, the true positive rate drops to 43% for the same 3% false positive rate, which tells that B-frames act as a nuisance for VPF analysis.
If these performances scores do not look impressive to you, think that VPF analysis is probably the most versatile, robust, and accurate method for video double encoding detection in the state of the art! On top of that, it’s impressively fast compared to most “content based” video tools: analyzing 1 minute Full-HD video will take roughly 15 seconds on a standard computer. Finally, it’s not based on machine learning: there is no reference dataset, no neural network nor any other kind of “artificial intelligence” here, just pure and simple signal processing.
All of that being said, when VPF analysis does not reveal double encoding, that should not be taken as the single point of truth: it could be that we’re not able to detect it for the video at hand (which means, we’re having a false negative). On the other hand, if you do find a clear periodic signal like the one in the example above, you can be pretty sure that a double compression happened, and that’s a serious element against the integrity of the video!
Experiment With a Surveillance Video
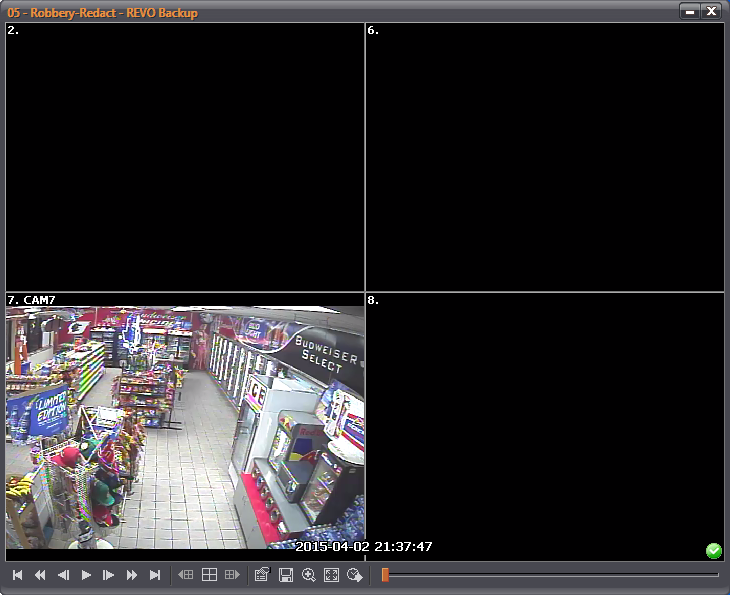
Now that we know how to use the tool, let’s do a test under a more realistic scenario. We have this surveillance video which is wrapped into an executable file.
How can we take it out of the player? A very good way is to drag it into Amped Replay, the advanced video player for investigators and front line officers. Amped Replay will decode the proprietary format and allow you to export the video in several ways. You can use Export Original Video as AVI (let’s use it and save the video as “stream-copied.avi“), or you can use Export Original Video as MP4 (let’s use it to create “transcoded.mp4“). The difference is that the former will only replace the container, without re-encoding the video, while the latter will transcode it, thus changing pixels. Despite none of the two videos have the original container anymore, one is still loyal to the original visual content, while the second has undergone one more compression step and is less good. Let’s see how VPF analysis can help reveal who’s who.
Here’s the output for the stream-copied.avi file:
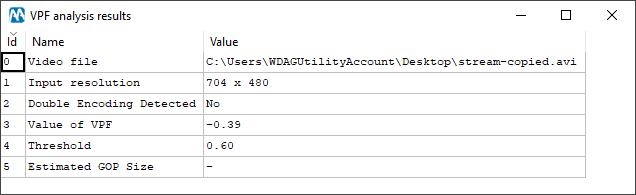
As you can see, no double encoding is detected, and that’s correct! The video has not been re-compressed. Let’s now run the analysis on the transcoded.mp4 file:
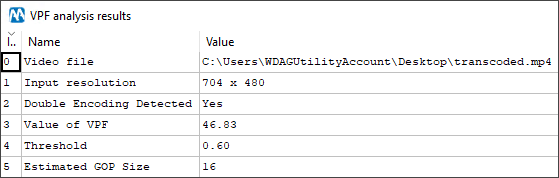
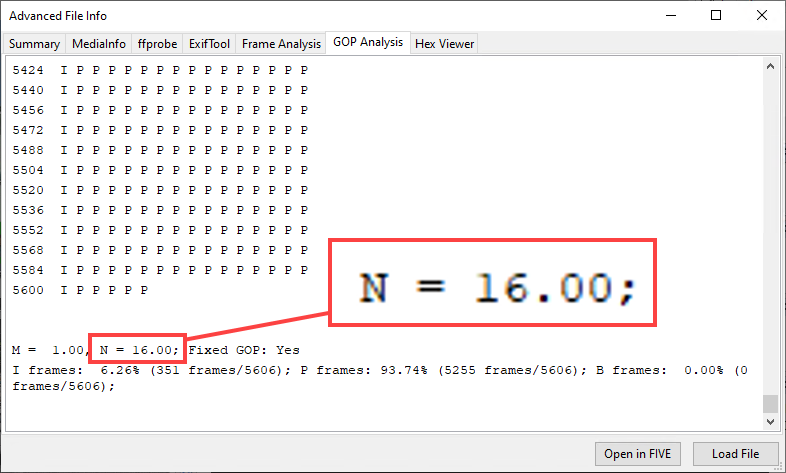
This time we do find traces of double compression (Row 2)! This is telling us that the transcoded.mp4 video is a recompressed version of an original video, whose GOP size was 16 (Row 5). And indeed, if we look at how the original GOP structure of the proprietary video was (you can do this with Amped FIVE’s Advanced File Info), we see that the original stream was encoded with a GOP size of 16!
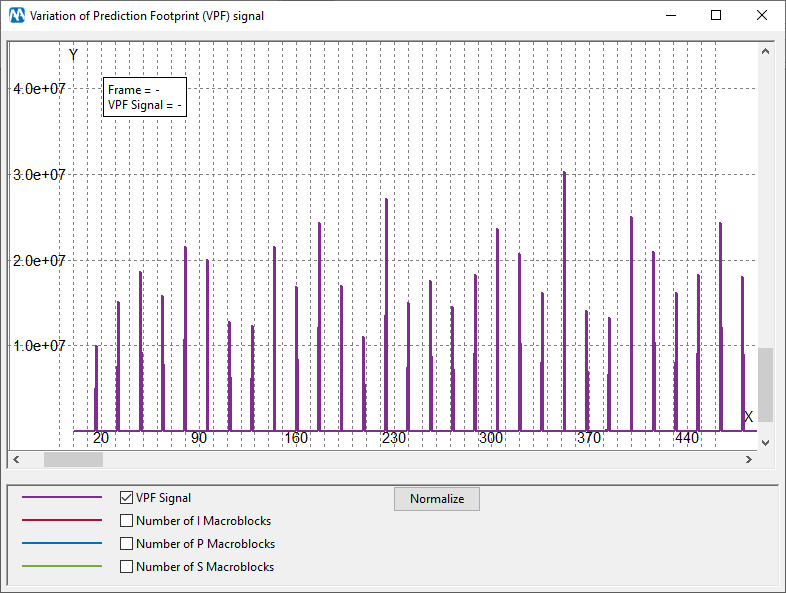
Let’s have a look at the plot of the VPF signal: a clear periodicity of 16 can be observed.

With such a clear outcome, we would be able to claim that transcoded.mp4 is with high probability a recompressed version of the original recording. We could then ask our colleagues why it’s so, and we could find out that a better version of the same recording, more loyal to the original, exists somewhere. Since the quality of surveillance video is usually very low to start with, we should at least make sure that we’re working with the best possible evidence.
Conclusion
In this How-To article many topics have been covered. Amped Software started defining the problem of video integrity verification, then looked at how compression analysis could be useful for that, and finally presented the VPF analysis. They’ve tested it first on a “toy example” and then on a real surveillance video, and we’ve learned about its limits and strengths. VPF analysis is an advanced tool, and it’s so easily accessible now in Amped Authenticate. One more item in the toolbox of forensic video experts!


