Keith: Hey, it’s Keith Lockhart, Director of Training with Oxygen Forensics. This video is titled “iOS Full File Extraction via Checkm8,” but the reality is it’s the evolutionary next step of a video that already exists in our knowledge library, in the training section of our website, where we externally jailbreak a device, bring it in to Detective to extract the data; and here, or now, we’re going to initiative the exploit and extract the data all seamlessly with Extractor, including the ability to target some of those selections of extractions that are doing the whole thing all at the same time, if we have that need.
Okay, let’s see how this works. So ironically I have on the screen an iPhone serving as a camera, that’s videoing the iPhone for our experiment, and I have Extractor. So in Extractor, I’m going to come up to the iOS extraction section and pick ‘iOS advanced extraction’ and just hit that link.
And what I’m presented with then is a menu where I can do a couple of things, or just check the support table. So if I click here, this would start the entire exploit and extraction process for Checkra1n. And here I could extract data from a previously jailbroken device, or here I could check the table to see what devices and what associated iOS versions are supported. And what happens is, you know, a new version will come out of iOS and the next build will have a support for that version of update the table here. So I’m going to go ahead and click the box to start the entire process.
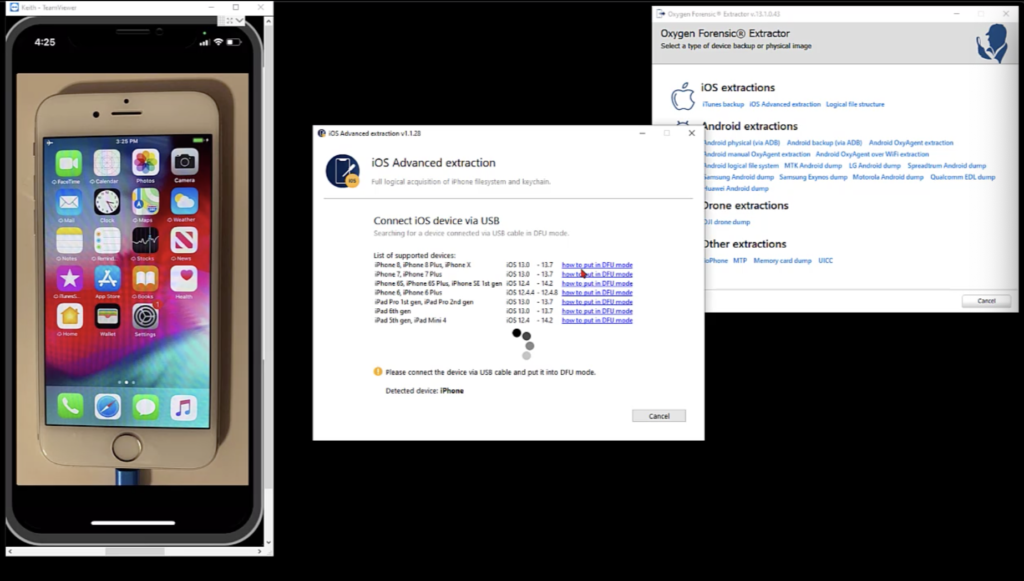
And what happens here is Extractor is looking for an iPhone and sure enough, there, it finds the iPhone that’s currently connected for us, but the trick is, or the necessity is, we need to get the device into device firmware update mode, and that’s for all intents and purposes accessing the device like it would in iTunes, but letting us do things without having to mandatorily install the latest iTunes version, or something to that effect. So the nice thing is, you know, per version, the link here will tell you how to put the device into DFU mode. Not recovery mode, that’s where it’s expecting the latest firmware. We want to put it into mode where we can do other things.
This is an iPhone 6 we have hooked up. So I’m going to say iPhone 6. Okay. let me click that link. And it says, here we go. At no time did my fingers leave my hands, however, there’s a lot of finger action, so I’ve got to make sure I get it right, or it will at least see how will I do.
So, connect the device to the computer, done; hold the home button and the power button at the same time. After eight seconds, release the power button while still holding the home button for another eight seconds. Now, if the Apple logo ends up on the screen, nope, try again; or, you know, if you ended up in recovery mode where you see the little USB thing with the computer, try again. We want a black screen, and that’s it. To get us in a DFU mode, we’ll know we’re there when we see just a black screen.
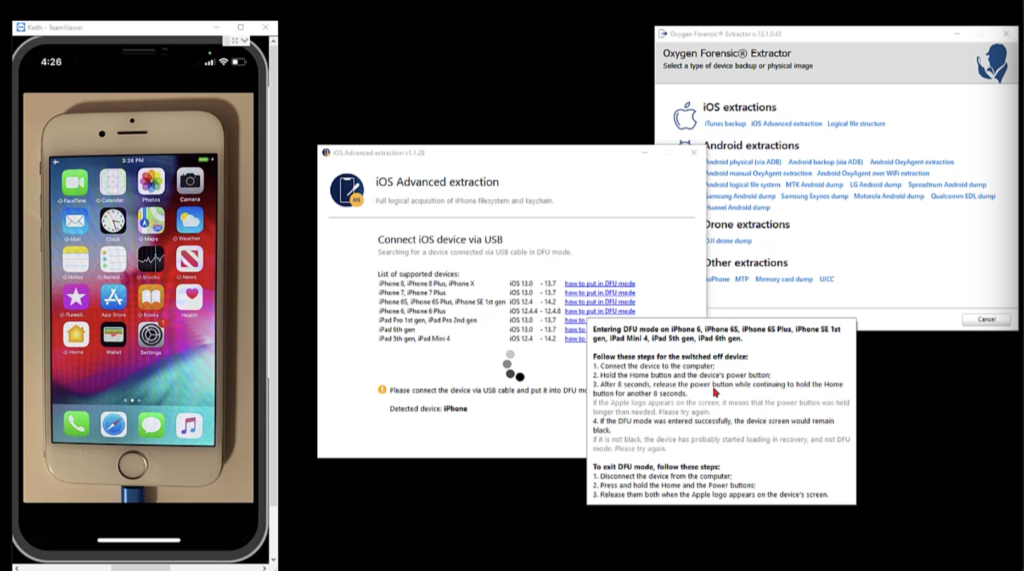
So here we go, home button and power button for eight seconds, releasing the power button while still holding home, let’s see how I do. So there’s home and I’ll reach over and do power. And one, two, three, four, five, six, seven, eight. I’m letting off home one, two, three, four, five, six. And I hear Windows do a little beep. So I’m going to let off at that point.
And if you saw the extractor itself, I think that Windows doopity-doop meant I’m in where I need to be, and Extractor recognized DFU mode. And it started as a process. So what we know about — if you watch the part one, anyway — we know that this exploit is a hardware-based exploit. That’s not necessarily patchable by an iOS update. It affects a huge range of devices that have system on chip versions that are susceptible to this. I mean, it occurs in a volatile area. So it’s kind of a tethered jailbreak. If you reboot the phone, you’ve got to start over again, which is fine for what we’re doing here.
The process now, I mean the part one version was externally jailbreaking it with Checkra1n. And I think I have a Linux box set up, or maybe a USB that boots to Linux to run Checkra1n. Not a Windows technology yet. But in that mode we broke it externally and then brought it to Extractor, and since then we’ve incorporated the process on our own, and you can see it walking through. We’ve done the driver installation that we need. We’ve completed the vulnerability exploitation. Now we’re going to reboot. And I’m making all this up. I boot and kernel patch to get what we need done and then reboot it. But the key will be when we watch the screen on the phone, as it turns back on after the exploit, we’ll see, you know, rows and rows and rows of text come across the screen. Like you’ve seen from the original Checkra1n implementation before the vendors put it in their tools. So it’s getting to that point now, and you see the phone is turned on, and in a moment, we’ll see lots of… there it goes… rows and rows of text scroll across the screen on the phone, as the things are done that are needed to get done. So that’s going to happen.
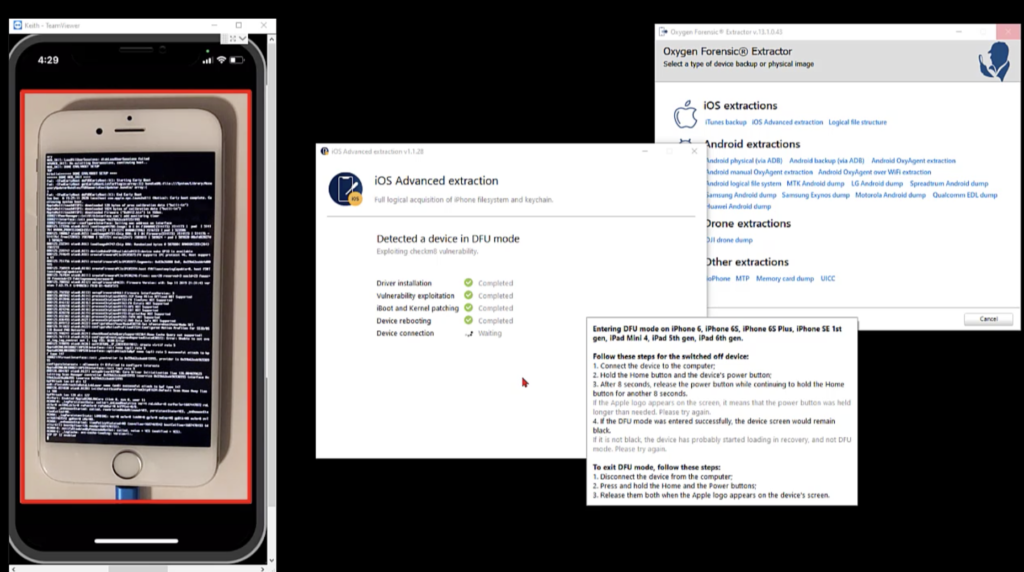
Then the device will reboot and connect, and that’s where we’re going to see our targeted menu option. You know, when we kick off the extraction, we’ll see the key chain gets sucked out of there and then the phone itself. So let’s give it a second to see how we end up next. If you heard the ‘bling’, there’s the iPhone fully on, and here, now we have our extraction menu. So there’s our device. It’s an iPhone, there’s the Apple model number, essentially; serial number for the phone; iOS version; the device ID; and the path of where this is going to go.
So I’m going to start the extraction, or at least click this button. And when I do, here’s where I get the options. I can do a selective extraction, which will go out and query the phone, where I can go. There’s nothing on this phone, essentially, but I could go pick just the photos or just the Safari browser stuff. Or maybe I don’t have time for the 40GB of phone or pictures that are out there… who knows? And there was really nothing out there from an app perspective because I just don’t have anything on this phone. It’s brand new, or just set up brand new. So I’m going to go back, but this is where we would select that targeted extraction.
Let me go back and do a full one extract, all available device data. And it says right there, Hey, unlock the screen, right? Screen unlock is required for the key chain extraction. And then off we go and keep it unlocked as much as you can. So I’m going to go ahead and click that. Well, before I click that, we could do it before first unlock scene here, where we get some things, but that’s just really not the point of the exercise here. So I’m going to go ahead and unlock the screen.
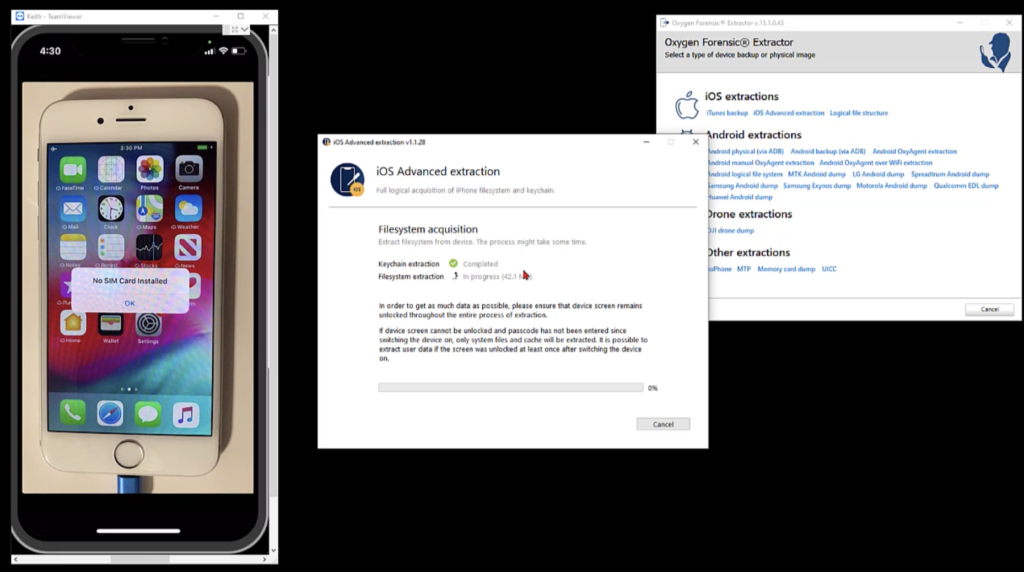
And as soon as I do it you can see the key chain it slurped out. And then the file system extraction continues on from there. The idea would be to get as much data as possible, ensure the screen remains unlocked. I mean, this is not a breakthrough, a PIN to get to the device. You need to know that: I can get a supply trust of the computer, things like that. So, you know, this is a, you have some opportunity here to interact with the phone and we want to jailbreak it to get way more data than we would get if we were just living with an iTunes backup.
And by that, I mean… well, let’s go look at an example.
Okay. I just want to jump over to Detective a minute where I have a Checkra1n dataset kind of sitting around handy for this conversation. So if I expand that case, here’s an iTunes backup of my iPad. Okay. I have 8,500-some-odd files. That’s great. Here’s a logical file extraction, which is 6309. And here’s a Checkra1ned version of that same iPad data where I have 219, almost 220,000 files, to deal with. So in terms of, Hmm, why would I want to do this? Well, there’s a pretty obvious reason. I have a lot more information at my disposal than I would have using just an iTunes backup or even a logical extraction. Okay. That covers that, let’s get back to our extraction.
Okay. That’s still going. So I’m going to activate time warp and I’ll see you at the end of this extraction.
Okay. Now we’re done with the process. And you’ve got to remember, this is a file system extraction. So the phone’s new, with not a lot of data, this is a great one for a demo. So I could show where the data ended up, or I could pull it into Detective for analysis at that point. And we’re done.
Okay. That’s a quick tutorial on how to implement the Checkm8 exploit via Checkra1n using Extractor, have a great day, keep on learning. Catch you later.


