Hey, everyone, Trey Amick from Magnet Forensics here, and today I’m excited to walk through AXIOM Cyber’s network acquisition features. With the recent release of AXIOM Cyber we now have the ability to complete remote endpoint collections, as well as collect from Cloud services like AWS, S3 Buckets and EC2 Instances.
For this case, we’re going to utilize AXIOM Cyber collect from a corporate end point that’s currently under investigation. And as you can see, I’ve already got AXIOM Process open for Cyber, and we have a new evidence source, which is this remote computer. I’m going to go ahead and select “Remote computer”, and this is where we’re going to have the agents’ table.
So, these agents right here, I’ve already created and have used in different investigations in the past. So, I can go ahead and if I needed to, I could connect back to the agent, I could redeploy the agent, or I can go ahead and remove these if I’ve already used them and I don’t need them again. And for this instance, I’m going to go ahead and delete these.
Now, I’m going to go ahead and start a new agent since this is a new endpoint I’ve never investigated before and I’m going to go ahead and hit “Create new agent”, and we’ve given you a lot of flexibility when creating these agents. So, the first thing is we can name this. If we wanted to change the name, we can absolutely change this to whatever we want to. So, if you wanted to signify maybe the file name, plus maybe your case number or some other way to designate which end point this was going to, you could absolutely do that from here. You can also hit “Show more options” here, and this really gives you a lot of flexibility.
So, we can add in different pieces of metadata into this file that you’re creating so that if someone finds it on their system and they right-click on it, they’re going to have, you know, whatever you populate information in here for. So, we could enter more information here if you want to, but you absolutely don’t have to.
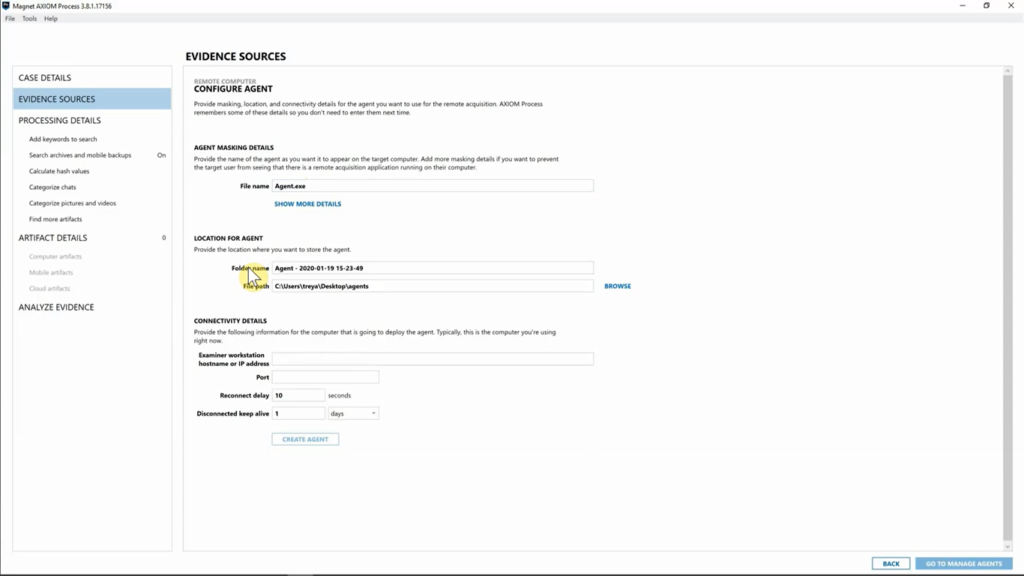
Next, we have a location for agents. So, this is going to be where the agent is saved to your computer. And the reason we did this is because you don’t have to use AXIOM to actually deploy the agent. If you have other endpoint utility agents that you’re using, or pieces of software, you can absolutely use those different pieces of software to deploy this agent. You can use AXIOM, but you don’t have to. So, this is going to be where the agent is saved so that if you need to have access to it, you will absolutely be able to do that.
So, I’m going to leave this as set to default. I have “Agents” folder on my desktop with all the different agents that I’ve created go to, but that being said, I’m going to leave that as is for now. This is going to be down under “Connectivity details” where the agent is going to call home to. So, this is going to be based on your information and where your examiner machine is.
So, I’m going to go ahead and populate this with my IP address. I have port signified 4321, that’s going to be where I’ve allowed AXIOM to navigate back and forth to my analysis machine, so I’ve got that set. And we have “Reconnect delay” and “Disconnected keep alive”. So, what’s cool about this is obviously in corporate environments a lot of people typically, you know, are going from meeting to meeting and maybe they shut their laptop and that kills your connection. And then you’re having to start that investigation over and waiting for them to get back online.
We’ve got it set up now to where it will automatically retry that connection for 10 seconds. And we also have the “Disconnected keep alive”, which will keep that agent alive for whatever time period you signify. So maybe at the end of a Friday you don’t get the collection and you need to wait till Monday, and instead of having to say, “You know what? I’m going to have to redeploy the agent Monday,”, you can set this to say, “You know what? I’ll go ahead and allow this to be disconnected for three days before this agent automatically removes itself from that system.”
What’s important about our agent is that this is actually going to be more of an ad hoc approach in that you are targeting one computer at a time. You’re not deploying this agent in a gold build where this agent is going to live on every endpoint that’s inside your environment. So just definitely keep that in mind, because basically you want to deploy this agent, collect the data off of the given endpoint and then have that agent dissolve itself so that you can move on to your next case.
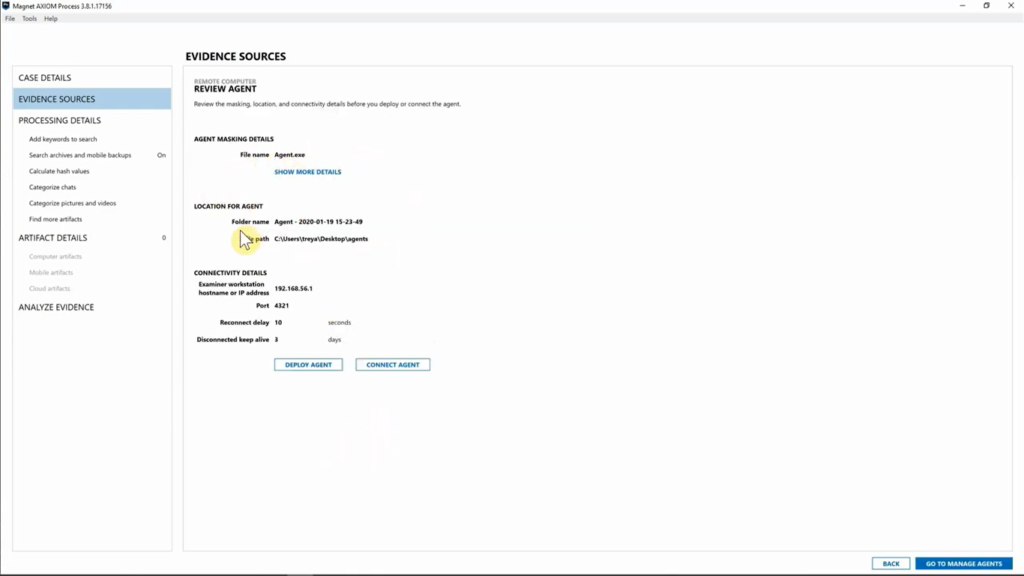
But with that being said, we’ve already created, or we have the information for our agent. We’re going to go ahead and hit “Create agent”. Now from here, we’re going to go ahead and review our agent details and we can see we didn’t change the name. We left that standard, I’ve got my agent going to my desktop in the “Agents” folder. You can specify this, you know, on your own. And I’ve got the connectivity details for this agent and where it’s going to call home to.
So I’m going to go ahead and hit “Deploy agent”. Now, this is going to be where we put in information about our target computer. And for this one, I’m going to go ahead and enter in the IP address. Something to keep in mind when you deploy this agent is you’re going to need a username and password. And most organizations will have admin profiles already set up on their endpoints. So, you could absolutely use that to make these collections, but keep that in mind, you’ll need to have that information handy to be able to deploy the agent.
And we can specify where we want to store this agent. Now, obviously you can hide this wherever you want to on your endpoint, but for this particular case, I’m just going to leave it at the root of the drive and hit “Deploy agent”. And as you can see, we’ve deployed the agent.
Now it’s launching that executable on our endpoint. The agent is now running, so I’m going to go ahead and hit “Connect to agent”. And here you can see we’ve got “Computer status” and that is we’re trying to connect.
And what’s important to note is you can still already select targeted locations, even if you aren’t actually connected to the computer just yet. We did that so that once there is a connection made, it will automatically start downloading some of those pieces. It’s important to note, though, before you’re actually connected to that endpoint, you won’t be able to select files and drives or memory, you’ll only be able to do targeted locations.
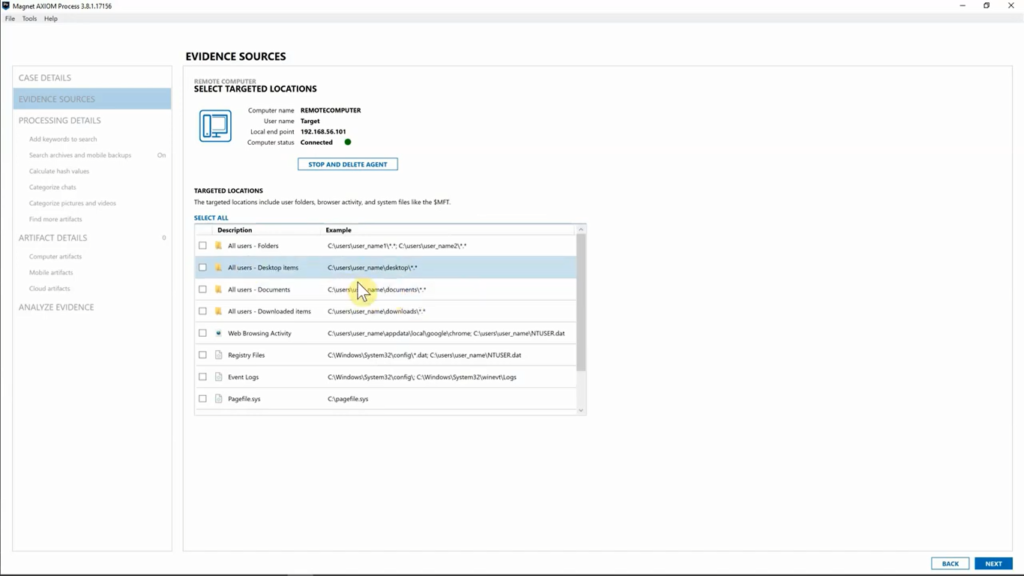
But here you can see, we are connected to that endpoint. we can go into “Targeted locations” and for this particular case we might want to go ahead and look at their download folder. So go ahead and select that and that’s going to grab everything from their downloads. I might want to go ahead and say, “You know what? I want to look at their desktop, as well.” Or maybe you wanted just the MFT file, you could grab just that and be, you know, good to go.
But I’ve selected those pieces for the targeted locations. So, we’ve got “Downloaded items” and “Desktop” selected. I’m going to go ahead and hit “Next”, and as you can see, it’s already downloading the information from that endpoint. So, before I’ve through files and drives, and if I need memory, you can see AXIOM is already collecting that data and you’ll be able to see exactly when those items are downloaded, as well. But for this, I’m going to go ahead and hit “Files and drives”.
Now, as you can see, we could select, if we wanted to do a full physical image of that drive, we could do that. Obviously, we don’t recommend trying to image, you know, entire drives over a network connection. That’s going to take a very long time. But for this particular case, I’m going to drill down to the C-drive. I’m going to go into the “Users” folder for this particular target, keep moving on down, and I want to look on their desktop to see if there’s a particular file there.
And sure enough, there’s an Excel file that we were looking for. So, I could say, “You know what? I just want to go ahead and grab that one file, as well.” It’s also important to note that we have a refresh button. So maybe you are working a case and you’ve been on this window for a long time looking for something and you want to make sure that that user hasn’t just created maybe a desktop folder and added pieces of evidence into that, you can hit “Refresh” at any time, and that will automatically pull in the updated information, so it’s very, very quick to do.
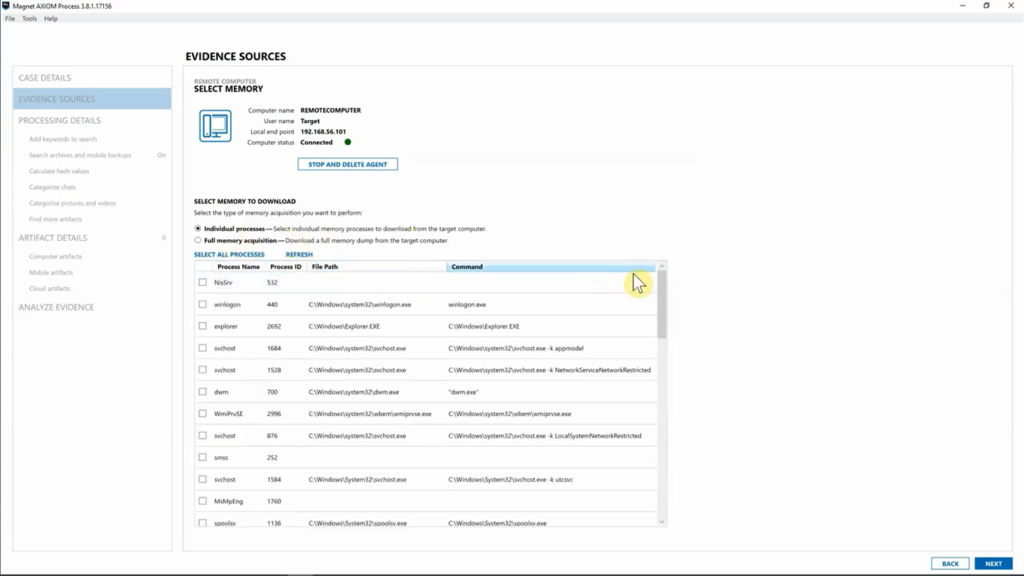
All right, so we’ve grabbed the one file that we are looking for. I’m going to go ahead and hit “Next”, and I’m going to move over to “Memory”. So, memory, you can grab individual processes. So, if you know exactly what process you’re looking for, you can absolutely grab just that. Or you can go ahead and grab a full memory acquisition that we will take from the target computer.
So, for this case, we don’t actually need any of the memory, but if we did, we could just say, “You know what? let’s go ahead and grab the full memory acquisition.”, and then we could use AXIOM Cyber that’s got Volatility built in to go ahead and process and examine that memory, which is great.
So, for this case, I’m going to go ahead and hit “Next” and as you can see, we’ve already started downloading all the different pieces of evidence that we needed for this case. So, I think we’re good here.
I’m going to go ahead and hit “Next” once again, and as you can see AXIOM Cyber’s prompting me, do I want to go ahead and delete the agent or keep the agent on that computer? And maybe you think you have everything you need, but you’re not exactly sure. You could always say, “You know what? Keep the agent on that.” So, you could just very quickly reconnect to that agent that you’ve already deployed.
But for this particular case, I’m going to go ahead and say, “Delete agent” and AXIOM is going to go ahead and remove that from that target endpoint. From here, you can see we’ve archived the items, we’ve hashed the zip file that we have created with all the evidence pieces that we just collected we’ve checked the RAM and we’ve checked for encryption just in case.
I’m going to go ahead and hit, “Add to evidence sources”, and as you can see, we’ve got our ZIP file now that has all the evidence that we just collected. And just like we’ve always done with AXIOM, I’m going to go on down to “Analyze evidence” and hit “Analyze evidence from here”.
And while AXIOM is processing that out, I want to show off what we’re kind of doing on the back end in terms of the image file that we’ve created and how we are providing users a hash of that so you know that it is a protected file in the sense of if anything’s been changed, you’ll know very quickly on that.
So, while AXIOM is processing that, I’m going to go ahead and open up my folder here and navigate to my “Case” folder. Now that I have my case folder open, as you can see on the right hand side, we’ve got the ZIP that contains our evidence files that we just collected using AXIOM Cyber and right below it, we have the text document, which I have open here, which gives you all the information as far as the output directory and the timestamps, as well as the MD5 and SHA1 Hash value of that ZIP file. So, you’ll always be able to revert back to this to confirm that that ZIP hasn’t been affected if you’re moving it around or you’re, you know, wanting to make sure that your evidence integrity is still intact.
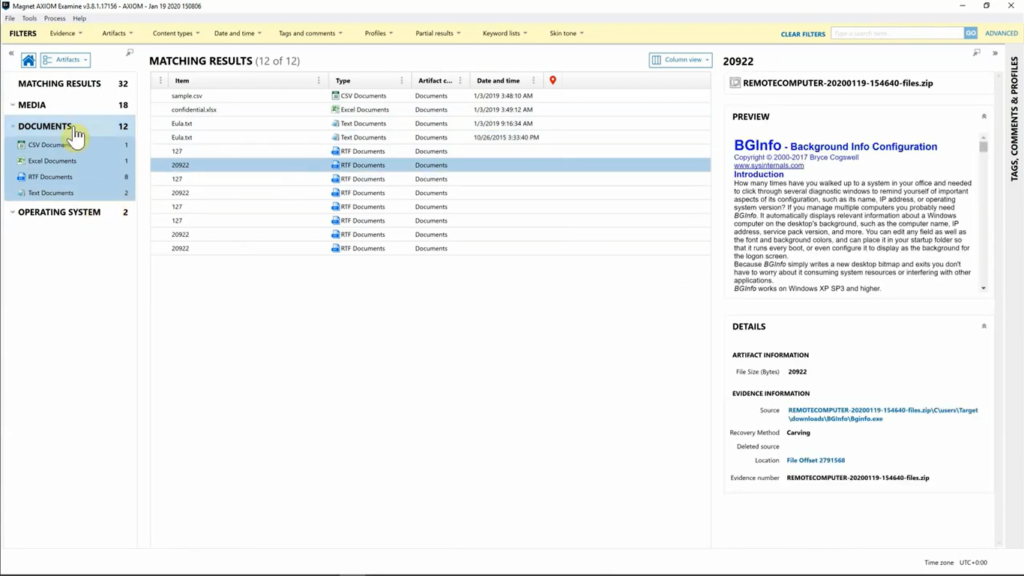
So, with that, let’s go ahead and I’m going to close this and let’s just take a quick look inside of AXIOM Examine Cyber. And here you can see we have our remote computer. I’m going to go from our “Dashboard” view onto our file system. And here you can see we’ve got the breakdown of the path where we collected both the desktop and the downloads folder. When we select that, we can see, we do have that Excel document, and we can get our preview just like you normally would inside of AXIOM. And then when we select “Downloads” folder, we can also see what’s going on in there, which includes a lot of pictures and it looks like some zip files.
If I go from “File System” view, I’m a hop on over to “Artifact” view. And once again, just as normal, you’ll be able to start digging through your data to see what all you’ve collected from the piece of evidence/ I’m going to go ahead and select “Pictures”, it looks like we’ve downloaded a lot of pictures. Once again, if we look on the right-hand side, looking down, you’ll get your path so you’ll always be able to source-link exactly what you’re looking for your investigation. So, it goes without saying we’re really excited about AXIOM cyber, and if you’re interested in learning more or getting a trial license, make sure to reach out to our sales team. Thanks for joining us.