by Jade James
BlackLight is a simple but smart investigation tool which allows examiners to quickly analyse computer systems and mobile devices. Searching is made easy with advanced filtering to sift through large data sets. The tool is aimed at law enforcement and federal agencies as well as corporations.
BlackLight R3 supports processing of the latest Mac systems including T2 chip, Fusion and encrypted devices. Examiners can also review history in APFS snapshots and Time machine backups.
Continuing support for Windows systems means that examiners can review, analyse and parse certain artifacts such as volume shadow copies, the registry, recent documents, the recycle bin, and much more.
Finally, BlackLight R3 offers new levels of support for iOS, GrayKey and Android, making it easy to view messages, location data and other information which can be crucial in an investigation.BlackLight R3 boasts many other new enhancements and improvements, including:
• New processing options to help triage data
• Parsing of Apple Unified logs
• New Windows artifacts parsed in ‘Actionable Intel’
• Passware Integration to decrypt images of devices with full disk encryption (FDE)
• Redesign of file filters, enabling the creation of complex file filters
• Additional support for processing Cellebrite extractions
• Support added to process macOS 10.15 Time Capsule backups
• Updates to parse artifacts in the latest versions of Firefox, Chrome and Safari
• Redesign of the Evidence Status view
A selling point of BlackLight is that it can be run on either a Mac or Windows system (macOS 10.14.6 or Windows 10), and is not limited to processing Apple systems. Due to BlackLight’s powerful processing capabilities, it should be run on a system that has at least 32GB of RAM, 5GB free disk space for installation, and 25GB temporary storage space. It is possible to run BlackLight on systems that do not meet these criteria, although this will have an impact on processing time.
I was provided with a download link and electronic licence key, which made for easy installation. There are various mobile device driver packs which you need to install at the same time, but you are prompted as you go along.
Firstly, BlackLight needs to be run as administrator in order to see mounted or attached devices.
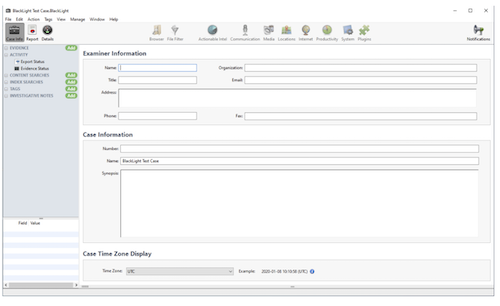
Initially a new case must be created. The case file should be stored on a different volume or device than the system running BlackLight, as it will really slow down your system otherwise. This will also prevent data loss in the event of a power cut or system crash. Note that you may be able to store data on network attached drives, although BlackLight does not officially support this.
Once the case is created, you can then add your evidence, which is as simple as clicking the ‘Add’ button next to ‘Evidence’. BlackLight supports many formats of data, including .E01, .EX01, .L01, RAW, DMG, AFF4, acquisitions from GrayKey, iOS and Android devices, and backup files.
You will be presented with attached/mounted disks, attached mobile devices if detected, and Files/Folders/Disk Images in the first column of the ‘Add Evidence’ prompt. The middle column is where you can select the volumes or partitions you wish to process.
You can select multiple volumes to process at one time, or you can process them individually. You are also given the option to rename the evidence, which can help to differentiate between multiple items in one case.
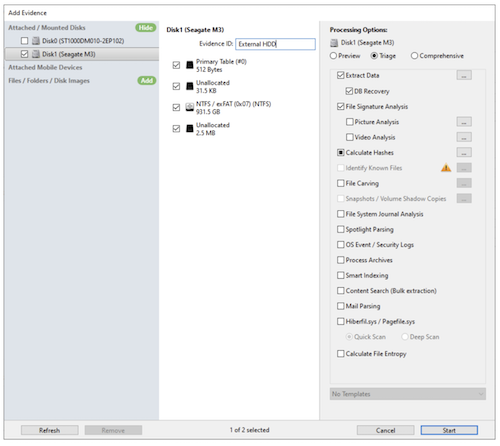
On the right-hand side are the processing options. As of BlackLight 2019 R3 and later, all processing options are now viewable. There are three default processing options. ‘Preview’ is a new and quick option in which no processing options are selected; this will parse the file system of the device and the results will be shared in the ‘Browser’ tab. This option would be the equivalent of browsing the file system on-scene.
‘Triage’ is the default processing option. There are three options selected as default: extract data, file signature analysis, and calculate MD5 hashes.
‘Comprehensive’ is self-explanatory: it will conduct extensive processing. With most of the processing options, there are additional sub-options which can help to narrow the focus of processing.
Encrypted evidence will show as a locked volume, and you will be prompted to input the password to decrypt it. The new Passware integration means that BlackLight is able to support the decryption of images with full disk encryption including Bitlocker, FileVault2 and LUKS (Linus Unified Keys Setup).
When I first started testing BlackLight I had trouble connecting my Android and iOS test devices as they needed to have been set up beforehand, which I didn’t realise. The iOS device is an iPhone 6, which was running v12.3.1; BlackLight could not parse this device until I had updated the software to v12.4.4. The Android device needed to be put in Developer mode; USB debugging had to be enabled; and I had to toggle between MTP and PTP; but eventually I successfully connected to the device.
Response from BlackBag: Sorry to hear that the attempt on the iOS extraction did not work until you updated the iOS version on the device. That isn’t expected behavior, but it would be difficult to troubleshoot now since it was updated. We have verified extractions on that version iOS. In some cases, the iTunes version, which also has the driver for the iOS version, could have previously had an issue.
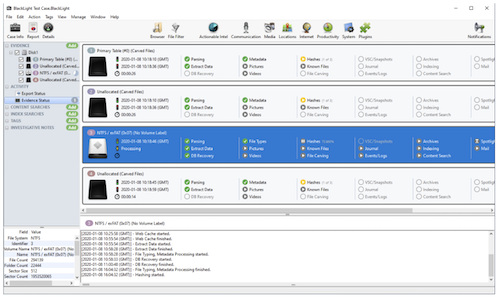
A BlackBag Acquisition Agent is pushed to the Android when it is connected. When you have added data to the case, it will appear as separate rows in the ‘Evidence Status’ view, which displays all the different processing options. The examiner is given feedback as to how the processing is progressing. A green tick means that the processing is complete; a yellow triangle indicates that the process has finished but there were more options to be selected which were not run. A red exclamation mark indicates that the process has failed. If this happens, it is simple to double click on the icon and reset the process.

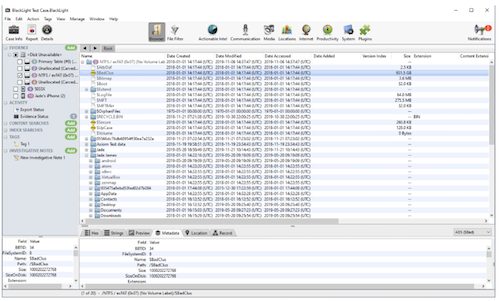
You can start to view the data while it is still being processed, but this will slow down the system. You can click on the ‘Browser’ tab to start viewing data, which will be shown in a typical file system view. If you double click on a folder, you will be shown the contents and the file path. It is simple to move back and forth between files and folders using the arrows. Right clicking on the files give you sub-options, including ‘Find Identical Files’, ‘Export,’ and ‘Reveal File on Disk.’
The BlackLight File Filter view is an excellent tool for filtering through masses of data. I found it very beneficial to add filters to search for key folders or files that I knew already existed in the data I had processed.
To add a filter condition, simply click on ‘+ condition’ > ‘filter’. This will organise the data in your chosen view. To remove the filter, just click the ‘X’ next to it. It is also possible to created nested filters or ‘groups’.
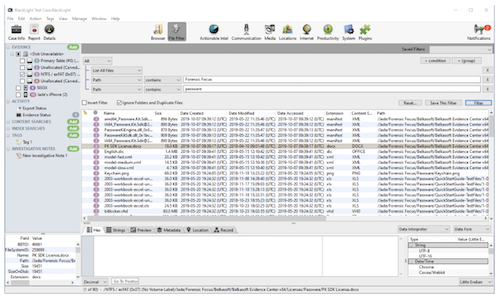
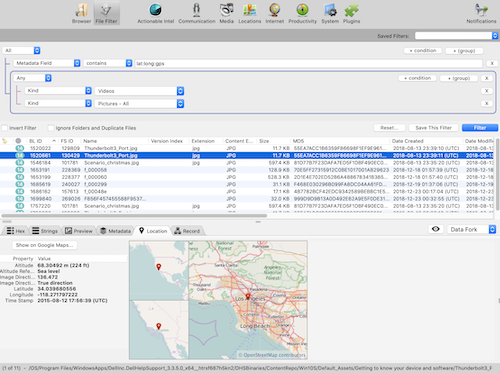
It is possible to create multiple standalone filters but group them together. For example, the user may wish to filter the data set for items within a certain date range, alongside another filter for tagged files. Within the tagged files filter, you can also create nested filters to stipulate filtering of images: those containing GPS data, for example. A nested filter group will be represented using a different colour to make it easier to distinguish.
In September 2016, when macOS Sierra was introduced, Apple replaced its classical Unix logs with a new logging format: Unified logs. The aim of this new logging system was to have a common log format which would be compatible across all Apple systems including macOS, iOS, watchOS and tvOS, and to increase efficiency for user and kernel mode.
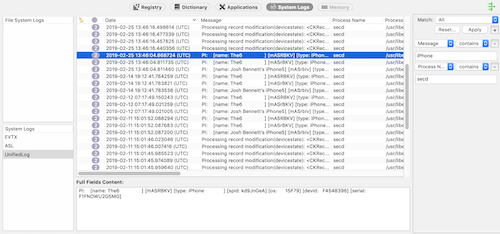
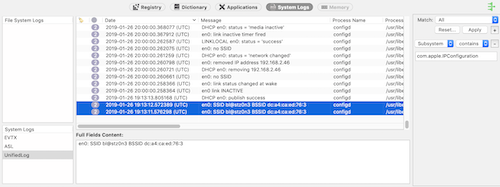
This innovation is now supported by BlackLight and can be parsed using the ‘OS Event/Security logs’ option in the initial processing options. It is possible to parse Windows and macOS artifacts, and these artifacts can be viewed by selecting ‘Events/logs’ from the Evidence Status view. As there is a large amount of data stored in Unified logs, to perform a more efficient analysis of Unified records you will need to make use of the advanced filtering options.
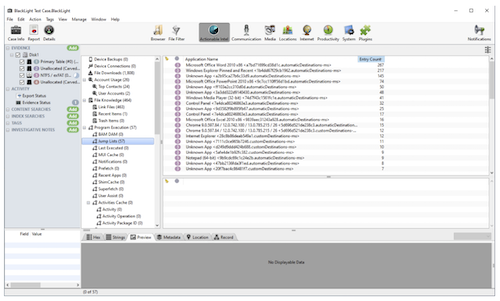
‘Actionable Intel’ allows the examiner to view various data items, which are mostly attributable to a user’s actions. This view is broken down into various categories: Device Backups, Device Connections, File Downloads, Account Usage, File Knowledge and Program Execution. Windows artifacts, including RecentApps and ShimCache, are now parsed in Actionable Intel.
Jump lists can be crucial within an investigation, since they can show recently viewed or open documents. Using the Actionable Intel view, it is easy to view these artifacts, and if there is more than one evidence item with the same attributes, BlackLight colour codes and numbers each one.
As a novice user of BlackLight, I found the tool simple but comprehensive; it would be a beneficial tool to have in any digital forensics lab. New users would benefit from reviewing the supporting documentation or receiving training, as there are functions and features you would not necessarily know about on first view.
The user interface is reminiscent of BlackBag’s flagship product, MacQuisition, but it stands alone in its own right as an investigative tool. The ability to support Mac and Windows systems is hugely advantageous, and the integrations with other key partners makes BlackLight a well-rounded tool with high functionality.
About The Reviewer
Jade James BSc (Hons) is currently a Cyber Security and Forensics Postgraduate Student. She has previous professional digital forensic experience from working at the UK’s Serious Fraud Office, IntaForensics, the Home Office Centre for Applied Science and Technology and the City of London Police. Jade has experience of conducting computer and mobile device examinations as well as drone forensics, and has been involved with ISO 17025 & Quality Standards both as a digital forensic practitioner and quality manager.