
Hello, everyone. Jordan here with the Oxygen Forensics training team. Welcome to another OxyCast webinar. Today, I’ll be showing you how granular the export options are in Oxygen Forensic Detective, and how to produce a report that will meet your desired specifications and layout.
Let’s talk a little bit about reporting. It’s not uncommon when dealing with, say a client, another detective or DA, when you ask them, “okay, what are you looking for? What do you want from me?” A lot of times they say, “I want everything you have on this person. I wanna see everything.”
And that’s totally fine, because that’s gonna make your job super easy. So, what you would do in that situation is right click on your device, go to “export data”. And if they said they wanted every single thing that there is to offer, all you would have to do is make sure that “only include data marked as key evidence” was not checked.
And everything you see here is going to be included in your report. If whoever you’re sending your report to is okay with that, then your job is done.
But it’s pretty likely that once whoever’s requesting the report receives a, say, 9,000 page report with a bunch of information that has nothing to do with the case and is completely relevant, it’s pretty safe to say that they’re going to want the report to be cleaned up a little bit.
One of the easiest ways to do that is to go through and find specific pieces of evidence that they’re looking for and mark them as key evidence. Then all you would have to do is pull up the same window and make sure you select “include only data marked as key evidence”.
That way, whoever you’re sending a report to will have exactly what they’re looking for. And it’s gonna be much shorter than, say, 9,000 pages. It’s a lot less scrubbing that they have to go through.
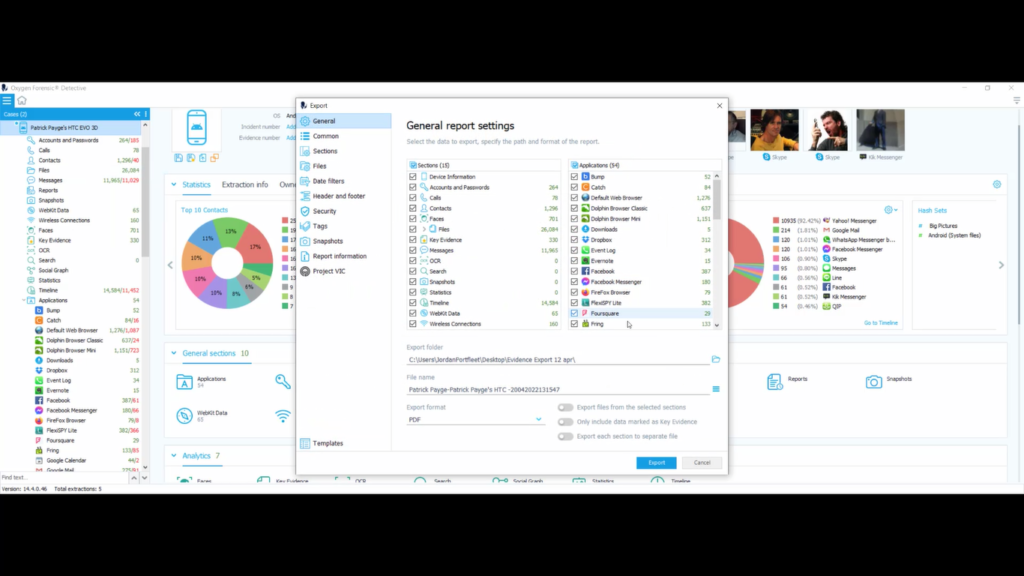
Now that you know two different options for submitting a report, let’s actually take a look at some of the report settings. So all you would have to do, again, is…when you’re working on your case, right click on your device and select “export data”.
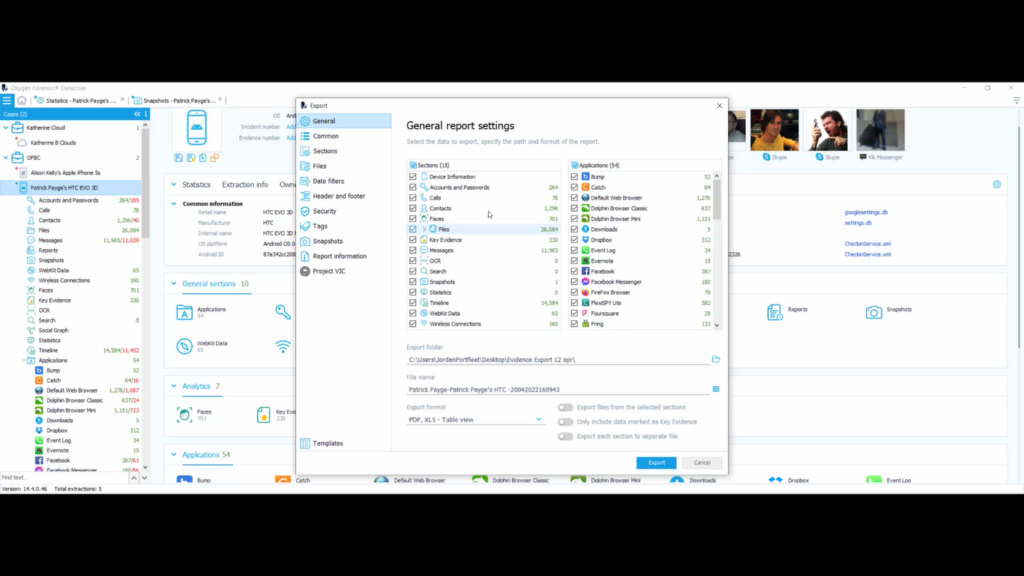
For this example, I’m going to make sure that “only include data marked as key evidence” is not checked. And I’ll start up here on the general report settings tab.
As you can see here, you can choose between any of these sections that are on the device, as well as any of the applications. You can also choose your export folder and where you wanna save your report. And you can also name the report wherever you want here underneath “file name”.
You also have the option to choose from a variety of different formats. I prefer PDF and XLS table view. And you have these sections right here. It gives you the option to export files from the selected sections. We had already discussed the ability to only include data marked as key evidence, and you have the option to explore each section to a separate file.
Now I’m going to select the common tab. In the common tab it’s basically just asking you to set your report view settings so you can change the status and direction and HTML and XLSX (I’m gonna keep mine on text). You can show file size and…I’m gonna keep mine selected as auto (you could change it to bytes).

You can split report into file size for PDF. I have mine set at a thousand. You can change it to whatever you want. Same with RTF and HTML. You can choose your font settings. So, say, you wanted to have your report in Times New Roman or Wingdings, you could do something like that. I keep my size as default.
You have the ability to choose embedded fonts, and compressed as well. And you also have the ability to choose sizes for your PDF and RTF reports. I’m gonna keep mine small at 125 pixels. And for application settings, you can choose to have all your data on one page for XLS or XLSX.
Now I’m gonna select the section settings. The section settings are fields and sections that will be included in the report. So what I will do is I will start up here in general sections. As you can see the sections that you’re in are on the left hand side, and on the right hand side here are your selectors.
So, say, I wanted to choose device info. What do I wanna see, and what don’t I want to see in device info? Say, I didn’t wanna see any photos, I could select or deselect the photos option.
Same with owner info. I’ll go down to accounts and passwords, and it’s the same thing. Say, I didn’t wanna see any deleted accounts or passwords, I could select or deselect that option right here.
I’ll go down to analytics. It’s gonna be the same thing: I’ll choose faces. Say, I don’t wanna see any tags or any notes, I can select or deselect those options here.
Same thing with applications. I’ll go down to, say, Viber. Say, I don’t wanna see any deleted Viber data, I could select or deselect that here. And that’s gonna apply to all of the applications. It’s just what you wanna see on your report.
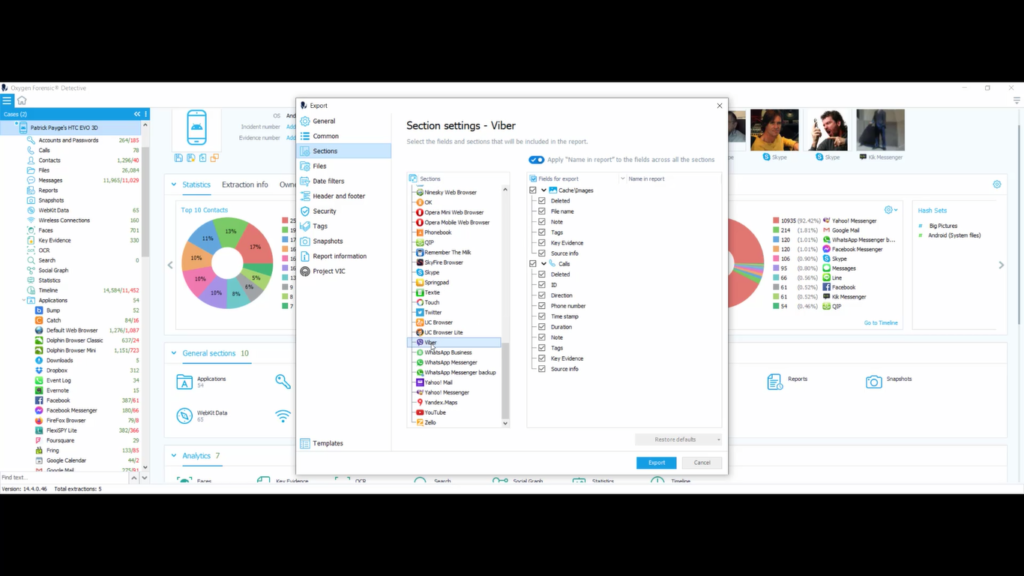
And up here, I’m gonna keep this selected: “apply name and report to the fields across all sections”, but you could also deselect that if you wanted to. One thing to keep in mind is if you select or deselect too many options over here on the right hand side, you always have the option to restore defaults.
Now I’m going to select my file settings. File settings is just choosing the file types that will be saved with your report. So, you have the option here…you can see this is all…you can’t click on it. If you select “export files”, that allows you to click on any of these here.
You have the option to add a new filter, so I just added a new filter called it “other”. You can delete your filter. You can restore defaults. So, it’s gonna gray out this export files option. “All files that are not selected will be saved into other’s folder”. I like to keep that one selected. “Do not include known and system files in a report”. And you have the option to group files by type in “file manager report”.
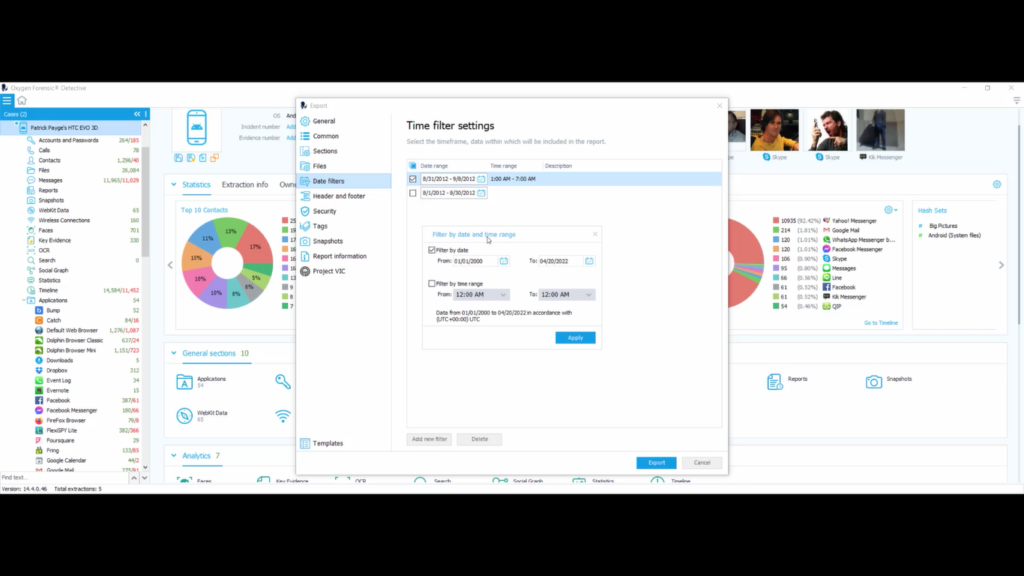
Now I’m going to select my date and time filters. As you can see here, I already have two date and time filters already in OFD. I’m gonna go ahead and create another one. And this is gonna be the timeframe and date of the data, which will be included in the report.
So, I can go in here and adjust the date to whatever date I wish. And I’ll just choose August 31st, and then I’ll change this to September 8th. I can also filter by time range. I’m gonna just select 1:00 AM to 7:00 AM, and then I’ll hit “apply”. And if I select this right here, that’s going to be the date and timeframe of the data that’s going to be included in my report.
I can also choose “add a new filter”. I can choose anywhere between January 1st 2000 and April 20th 2022, which is today’s date. I can filter by time range. I can just choose 2:00 AM to 7:00 AM again. Hit “apply”. And I can also delete that if I want to. So I’ll unselect this, I’ll take the new one I just made and I will delete it.
Now I’m going to choose my header and footer settings. So, all I’m doing is just telling Oxygen Forensic Detective what I want my header and footer to look like on my report. As you can see up here, I am on the main header page. I have the option to load an image for my header. So what I’ll do is, I’m just gonna upload a picture of the Oxygen Forensic logo.
Okay. So, now I have the option to “stretch picture by default header size”, so I can select and deselect that. (It looks a little bit better when it’s stretched.) I have the option to use the border for report headers. I can select and deselect that.
And I also have the option to sign a report on each page. And you can see the “signed by” comes up in the bottom right hand corner. I have the ability to choose how I want my page numbers to look: I can have it “1, 2, 3”, or “1 of 30, 2 of 30”.
I’ll select “page header”. I’m gonna go ahead and just add the Oxygen logo again. And as you can see right here, the ID is the IMEI or serial number for device, but that’s not showing up on this report because that information was not pulled, as well as the alias.
And then over here on the right hand side, we’ll have the product, which is gonna be our version of Oxygen. So, we can take a look at what our preview page looks like. So, as you can see, it says, “N\A, Patrick Payges HTC EVO 3D”. And over here is the version of Oxygen that we’re using.
Now I want to select my security settings. As you can see here, I already have a password set. There’s this little eye with the eyeball crossed out. I set the password as “oxygen”. You can set the password as whatever you want.
So, for any PDF report that I make, I would have to know the password in order to open that up. And you can actually take all your passwords off if you want, so you have no password, but I like to leave mine password protected. And you can also do the same for XLS or XLSX, just by selecting “on” or “off”.
Next, I’m gonna choose my tag settings. And these are the tags that are gonna be included in the report. As you can see here, we have the option to “export only tagged records”.
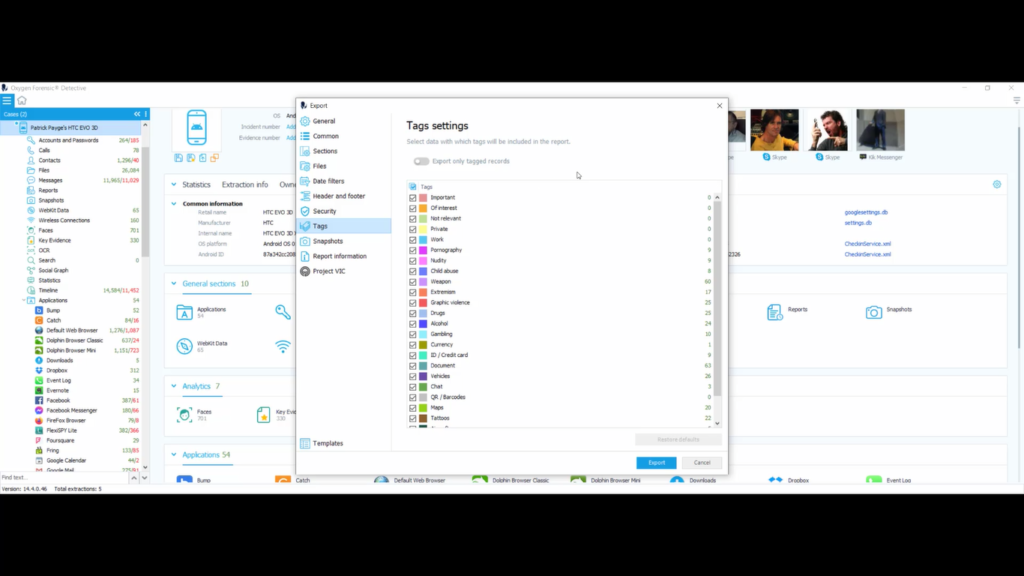
So if you turn that on, you’ll just be exporting only tagged records. And down here you can select or deselect any tags that you don’t want to see. So, say, I didn’t want to see anything about weapons, now I wouldn’t export any tags that are tagged as weapons.
And again, you can restore defaults just like some of the other sections and settings. You can restore defaults if you get too crazy in the weeds with the selecting and deselecting the different tags.
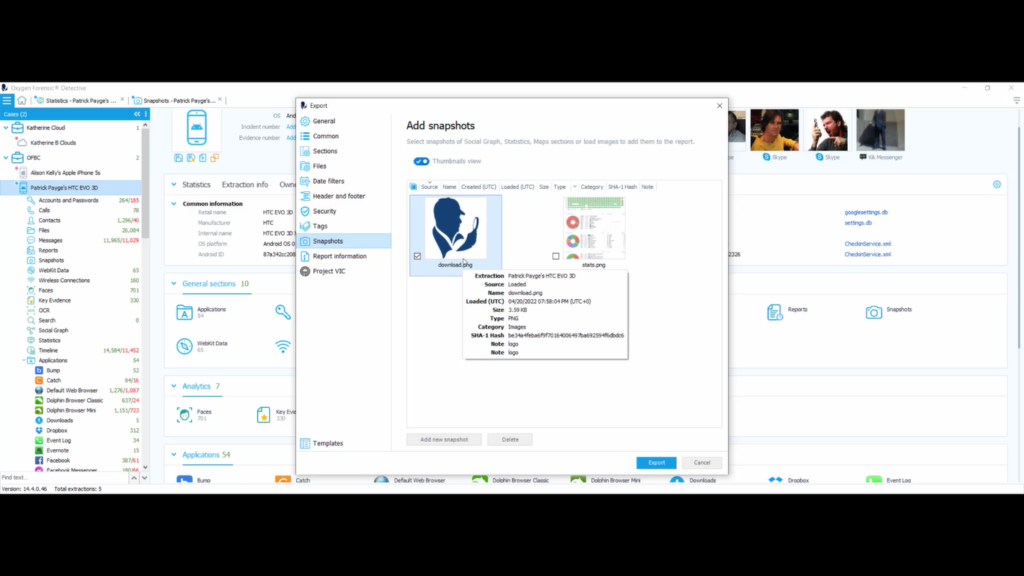
Next I’m gonna choose my snapshot settings. As you can see here, you can select snapshots of social graph, statistics, map sections, or load images, to add them to the report. I wanna keep them in thumbnail view. And what I’ll do is I’ll exit out of here…you have the option, you can add a new snapshot here, so I can actually add that if I want.
Add a note, say “logo”, select “add”. Or I can exit out of this, go into my actual case, and I’ll go to “statistics”, and then I’ll take a snapshot, and I will just put “stats” as my name, and then “stats for webinar”, and I’ll click “add”. So, now I go back to my extraction info and I will find my snapshot section. And those are my two snapshots within this case now.
So I’m gonna go back to extraction info, and I’m going to right click on “export data”, go back into my snapshots, and I can delete these snapshots if I want to, I can keep adding new snapshots if I want to.
This information that’s listed up here, if you actually hover over the picture, it’ll tell you the information: the source was loaded, the extraction’s name is “Patrick Payges HTC EVO 3D”, download.png. It’s got the time and date that it was loaded, the size, the type is a PNG, the category is an image, it also provides the SHA-1 hash, and the note that I added was “logo”.
And you can see the same thing here for the snapshot of the statistics. It’s gonna be: “stats.png”, the note I created was “stats for webinar”, it also provides the SHA-1 hash, the type, size, image, and category.
Next, I want to choose my report information settings. So, this is just gonna be additional information about the report. So, for “Investigator name”, I’ll put “SA Jordan”. “Location”, put “Fort Bragg, North Carolina”. “Company”: “Oxygen Forensics”. “Department”: “Training”. “Event type”: “Death Investigation”.
Now I want to choose my Project VIC settings. So, depending on whether or not your department participates in Project VIC, you can choose (at the case level) you can choose “total precategorized”, “source application name”, “source application version”, and “seizure date”.
For media, you have the ability to choose whether or not you want the “comments”, “Exif data”, “alternative hashes”, and then “media metadata”. For media files, you have the option whether or not you wanna see the “file name”, “created”, “modified”, and “last accessed”.
For OData, you can choose between “1.2”, “1.3” or “2.0”. And you have the option to choose “only within user category”, “elements within Project VIC category”, or “all selected elements”.
In the event that you have your export settings set up exactly how you want it, one of the options you have is to create a template. So, you just select “templates” underneath Project VIC. You can create a new template based off of all the selections you just chose, or you can load a template from a file. That way you can provide your customer or DA or detective the same type of report that you have previously, based off of their wants and needs.
Now that I have my setting selected, what I’m gonna do now, is export two different types of reports. One with everything being selected (as you can see here), and then the next export I’m gonna do is, I’m gonna choose the option: “include only data marked as key evidence”. So we’ll take a look at what that looks like.
Now, I’d like to show you the difference between the two reports I just exported. We’re gonna start out with the key evidence report. So I password protected it, I’m gonna go ahead and type in my password: “oxygen”, and then “open file”.
As you can see here, there’s a total of 308 pages. This report contains device information, owner information, and report information, and the rest is filled with faces along with just the key evidence that I had starred. So, I’ll go down to my key evidence.
So, it’s still a pretty decent sized report, but it doesn’t have all the…it doesn’t have a lot of junk in it, as far as application data and things like that, that may not be important to another investigator or, say, your DA.
So let’s go ahead and take a look at the report where everything was chosen. So, I’ll pull up that report. Again, that’s password protected as well. So, you can see here, when I had selected everything in the export menu, there is 22,395 pages. So that is a lot for someone to have to go through. So, like I said, one of the best ways to create a report and export it, is gonna be by actually marking key items of evidence and exporting them out.
On today’s video I showed you the different granular reporting options that are available inside of Oxygen Forensic Detective. Please keep in mind, the reports you export in Oxygen Forensic Detective are customizable allowing an investigator to produce an output that meets the specific needs of a requester or customer.
Thank you for taking the time to tune in with me today. If you have any questions or concerns, please reach out to us at one of the URLs listed on the slide. Thank you.


