
Marco Fontani: Hello everybody, thanks for being here. You should see me in the camera just for a few more slides. So, good morning everyone, and let’s introduce this webinar, which is Image and Video Analysis for Mobile Phone Investigations.
So we will want to show, in the next hour or so, how Amped products can be useful for investigations related to smartphone analysis, which is growing more and more in the last years, considering the amount of features that it is capturing and shared through the web.
Let’s start with a brief introduction about me. I’m Marco Fontani, as I said, and a computer engineering degree, and I own a PhD in multimedia forensics. And since some years, I work for Amped Software as a research and development engineer. I am their person who is mainly in charge of the research and development of Amped Authenticate, but I also collaborate on other projects of the company.
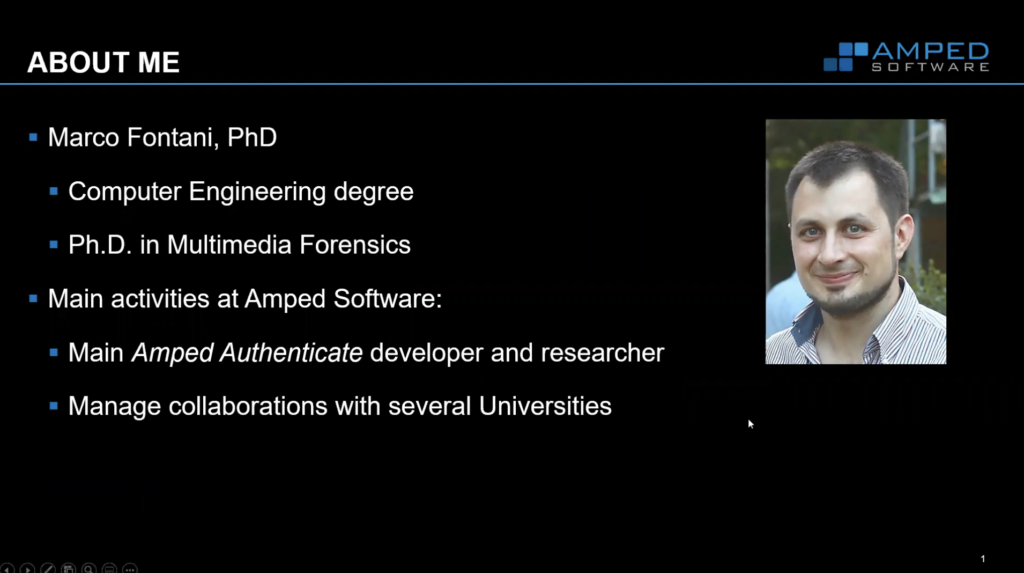
And I do manage collaboration with several universities. So if any of you connected is a university member, we can get in touch. I also have former experience as an expert witness for digital image and video forensics. So that was about me; let’s go about the company now.
Amped Software is an Italian company, founded in 2008, with a subsidiary in the US, with the original mission — which was very clear from the beginning — to become the one-stop shop for any needs related to image and video analysis and enhancement. And the vision was to reach justice through science.
So as you will see in during this webinar, our products are centered on scientific processing in analysis, reputability, forensic soundness. It’s succeeding. Let’s see, we have customers in more than 90 countries, and this is a picture of the team — actually part of the team, because there are lots of remote workers now.
Now, let me start with a brief introduction about the motivations behind this webinar. And I’m sure most of you are familiar with the 5WH investigative in model, which in practice says that these are the four questions, the five questions, that most investigators must face when dealing with a case, which are the classical one: who, where, what, when, why and how.
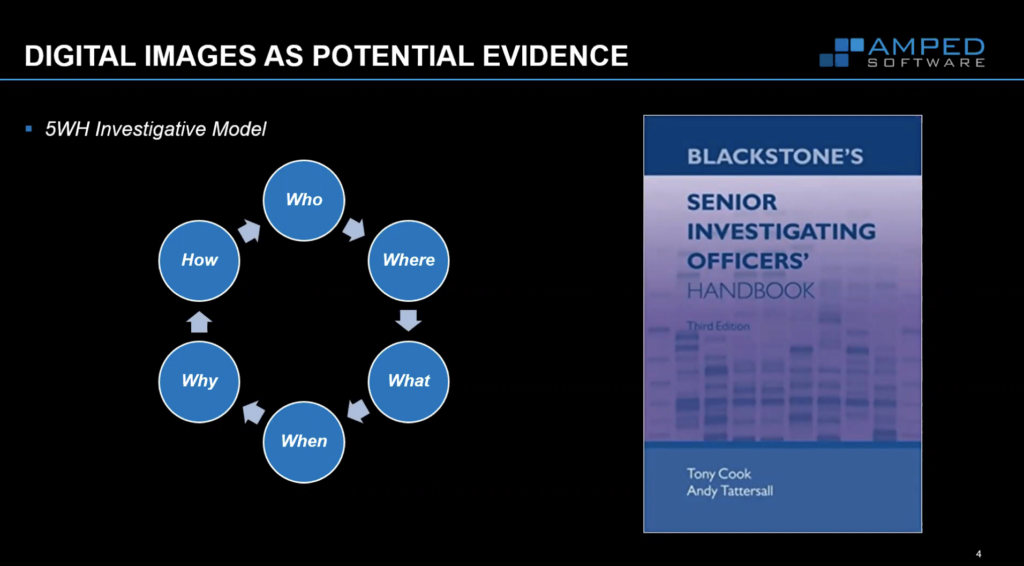
Now, the interesting part is that images, videos, can answer often most of these questions because they are a mine of information, especially those that you can capture today with modern devices, with the GPS information, lots of metadata, date and time information. They are a mine of information, which goes well beyond what you can see in pixels.
And another concept, which I like to stress this point, is the ABC rule, which means: assume nothing, believe nothing, challenge and check everything. We will see, this has an important impact on what you can do with our software.
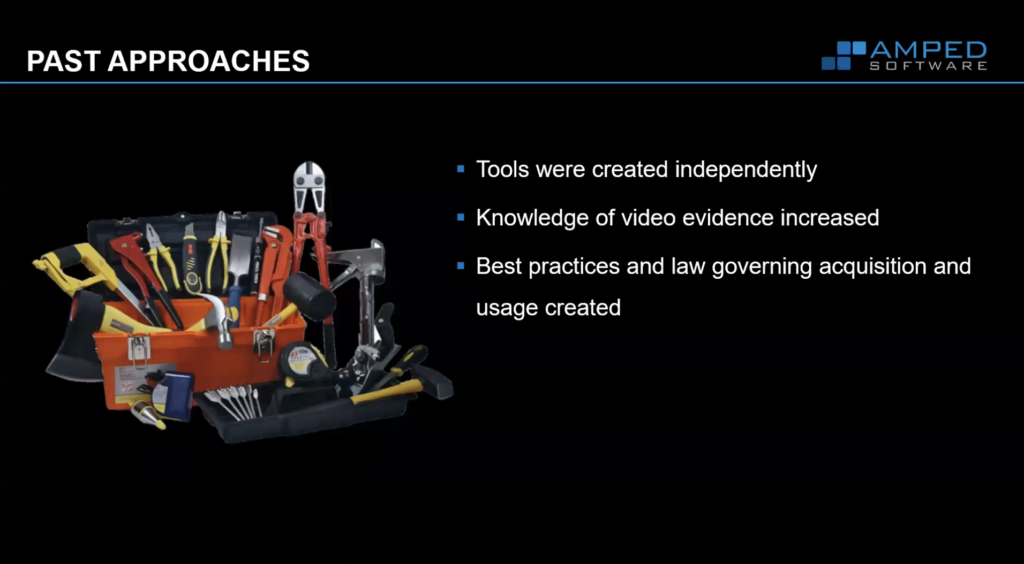
Now, what was the previous approach to the problem to video analysis and image analysis? There were lots of tools, actually, even powerful tools. The problem is that they were separate tools. So you needed something to make the learning, maybe, and something to make super resolution, and maybe they were written in different languages, or compiled for different kinds of operating systems. And so just for sending the content from one tool to the other, you had to spend a lot of time.
Then of course, knowledge of video evidence increased. And with time, also best practices and law-governing acquisition and users were created. So there was an increasing culture on this, and this is where Amped founder Martino Jerian decided to create the first tool of the Amped ecosystem, which was Amped Five, which is a tool which brings all of these necesary tools together into a single solution.
With Amped Five, you get more than 100 filters to process the video, enhance the video, analyze the video. So extract measures and annotate the video; export the video; and you get also a powerful video conversion system. Soon it turned out that this tool was probably too powerful for some kind of units who don’t have the necessary training to use it at its best. And so we had the feeling from what our users were asking us, that something seemed there was needed for first responders, something like this.
So with less options, but which allows the basic processing, and allows viewing the evidence video, and usually CCTV recordings. And this is called Amped Replay. Now I mentioned viewing the recordings because this is a very important part of the problem. So when you have videos that are stored on a DVR system, they are normally stored in a proprietary format, which will not play in normal players. Okay? So you don’t play it with VLC, with Windows Media Player, or so on.
You need often a proprietary player to view the video, but these players are not always available, or maybe they don’t run anymore on your modern operating system. So the fact to be able to view and evidence video, it’s not trivial at all. It’s not taken for granted. And so Amped invested a lot of time and a lot of work in developing a video conversion engine, which will take all different kinds of video and make them playable.
It turned out that this is a very important part in itself. So the ability to take all these different formats that you see here, and to flatten them to something which is playable and financeable, let’s say. So we decided to create a product which is just devoted to this and which allows to do batch conversion of videos. And this product is called Amped DVRCONV. Okay. So this is mainly devoted to units with large amount of video to be converted. Then you can just drag a lot of video here, and that will be converted fastly and overnight, maybe. And you will have all of them ready for your analysis later.
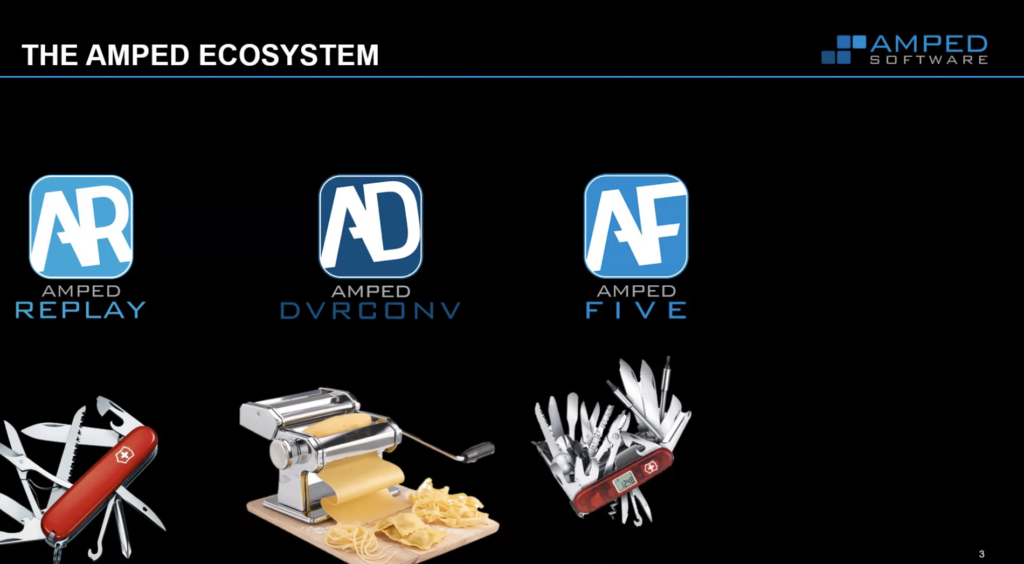
Finally, as you may remember, I mentioned the ABC rule. So we changed with the challenge and check everything, which means that we needed some tool to investigate the trustability, trustworthiness, of evidence, before admitting an image as evidence. This requires a deep inspection of the file… of the format of the file, of the metadata, of the content. So we created a tool about these, which is called Amped Authenticate. Today, Authenticate works with images, mainly. There are some tools which can be applied meaningfully to isolated frames of videos, but we are working to extend Authenticate capabilities to videos as well.
So as you can see, we can literally draw a line here, which sorts Amped’s solutions to solutions which are tailored to first responders on the left with the Amped Replay, then to the clinicians, with Amped DVRCONV, and to the analyst with Five and Authenticate. And since today, we are dealing with analysts in this webinar, we will mainly focus on these two products here.
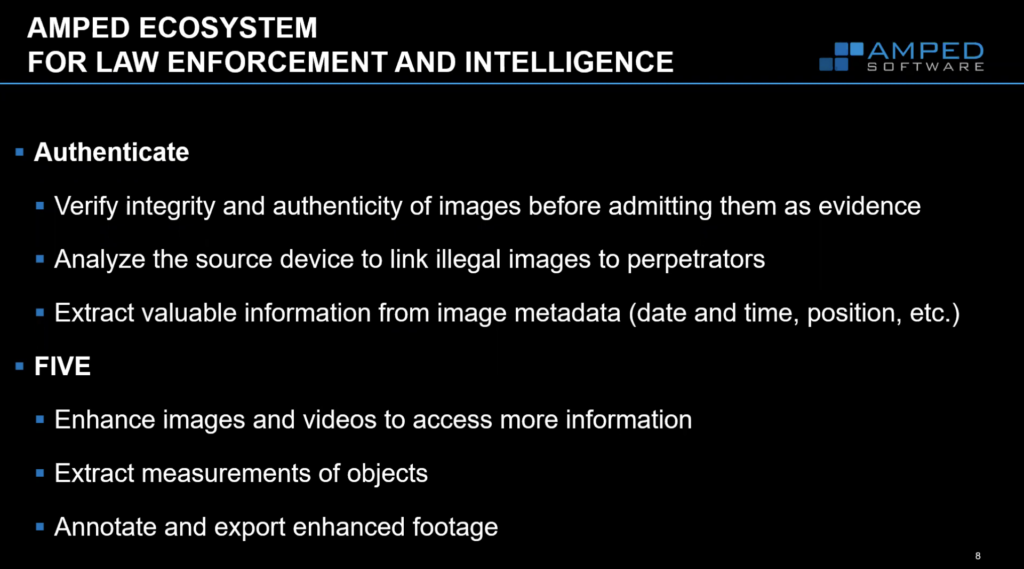
So, what are the benefits that law enforcement and intelligence and private labs can get from the Amped ecosystem? Well, with Authenticate, you’ll be able to verify the integrity and the authenticity of the images before meeting them as evidence. Uou’ll be able to analyze the source device or an image to link illegal images to perpetrators. We show that you can reliably link an image to the specific example which captured the image, much like you do with the bullet and the gun. You can also extract valuable information from image metadata. So we’ll see information about date and time, position, and much more.
And with Five, you will be able to do an advanced video analysis. So you’ll be able not only to enhance images and videos to access more information, you’ll be also able to extract measurements of objects; you’ll be able to compare videos at the pixel level; you’ll be able to annotate and export enhanced footage. And of course, you’ll be able to load these videos. So to play the video with the powerful Amped [indecipherable].
So, okay. I think we can start going more practical with the case study, which we prepared to work through this webinar. And let’s imagine this is a case study where a smartphone is seized during a police operations, contents are extracted with the standard mobile forensic software.
So we have images in a folder — images and videos — and we are asked to perform some actions. The first one is to know which images have been captured by the seized phone, and which are received from other phones. Then we’ll have to see whether two images of special interest are authentic. We’ll have to announce the content of a video to read the chat and enhance the content of another video to read a license plate.
Okay. So we are dealing with a case study which involves child sexual exploitation, and this phone that has been seized belongs to a friend of the victim who also knows the suspected perpetrator.
So let’s see what we can do with Amped Authenticate to deal with some of the questions, but before doing so we have to spend a few more words about the digital image life cycle.
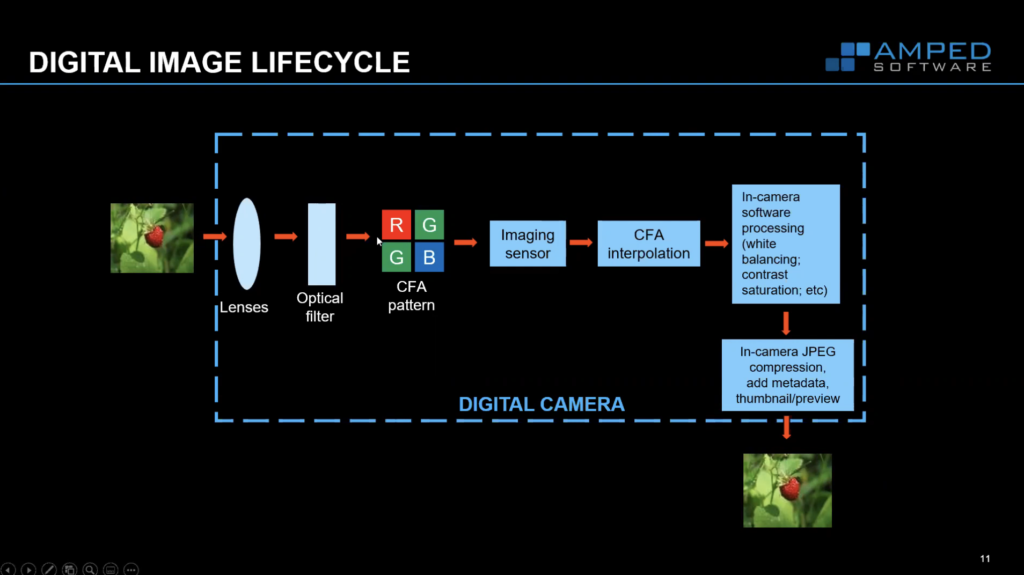
So what happens when you press the button on your smartphone and you take a picture? We start from the scene that we have here, this strawberry, which goes through the lens of the mobile phone, through an optical filter, which will remove unwanted light components. And then through this CFA pattern, which will separate different light wavelengths. So it will allow the imaging sensor, which captures only light intensity and not color, to capture a mosaic of red, green, and blue values, which will then be [indecipherable] by this CFA interpolation. So at this point we have a full color image, which gets processed by the software.
Now, once it was just balancing contrast and saturation; today, it will encompass much, much more than this. Of course, we have teeth whitening and skin enhancement, and all kinds of fancy things that artificial intelligence can do.
And finally, normally the image gets stored as JPEG or more modern formats. Lots of metadata gets added to the image, and also a thumbnail gets added, which is a tiny version of the image, which is used to show the image in a gallery without going into the code, the whole file. And so this is what we have at the end of the processing, which lasts, you know, less than a second.
Then of course, nobody today takes a picture to keep it for himself. Everybody wants to share. And so we have these more… these additional possible steps, which are shared through some social media platform.
Then perhaps somebody can take your image, modify it and share again, so that hopefully it will become viral sooner or later. And every time they do some modification, the image gets recompressed and recompressed. Even the bare sharing through the social media, when you upload an image to Facebook, let’s say, the image will normally get downscaled and compressed. So all of these has a deep impact, let’s say, on the image life cycle.

And finally, we are given this evidence image here, and we have to understand what’s happened in its life. Now, for the sake of clarity, when I will say ‘camera original image’ from now on, I mean the image as it is produced on the smartphone during capturing, let’s say at the end of the capturing process.
Okay. The funny part is that all of these steps that we have seen now will leave some traces — or artifacts, let’s say — in the image, which can be considered both a pleasure and the pain, meaning that when your goal is to study the processing… the life cycle, the process life cycle, of the image, then all these artifacts that are an asset, because we can use them to understand what happened. And we can check the consistency of these artifacts throughout the image, use them to authenticate the image, and so on.
But of course, when there is some annoying artifact which impedes the reading license plate, let’s say, then it means that we need to invert some of the defects that have been put here. And Amped Solutions faced both of these problems.
Okay. I think we can go with some practice now. So let me show Amped Authenticate. This is the main interface of the software. As you can see, you have here on the top bar an evidence image loader and a reference image loader, okay, where you can load two images to compare the results of the analysis.
On the left, we have the filters panel, which groups filters into different categories that you can see here. We have filters in the overview category, which allows to make a first assessment triage of the image, let’s say. The file analysis is devoted to all the information about how the image is coded and about social media, and about traces of social media processing. The global analysis is devoted to understand whether the image has been compressed more than once, whether it has been resized possibly or rotated as a whole, let’s say. So this category is to investigate the process life cycle of the image as a whole.
Then we have local analysis, which is the manipulation detection. So what we want to do here is to understand whether some part of the image has been tampered with, and you see, we have many different filters for many different kinds of manipulations.
Then we have geometrical analysis, which is very new. It was released today. And that allows to check the consistency of shadows inside the image, assuming of course, the images taken in the proper conditions.
Finally, there is the camera identification part, which I will show in today’s webinar, which allows to link images to the source device — to the specific example, which captured the image.
Okay. So let’s start with the images of our case study. We are given a folder with this number of images. Of course, normally there will be much more, but we don’t want to waste too much time with it for processing.

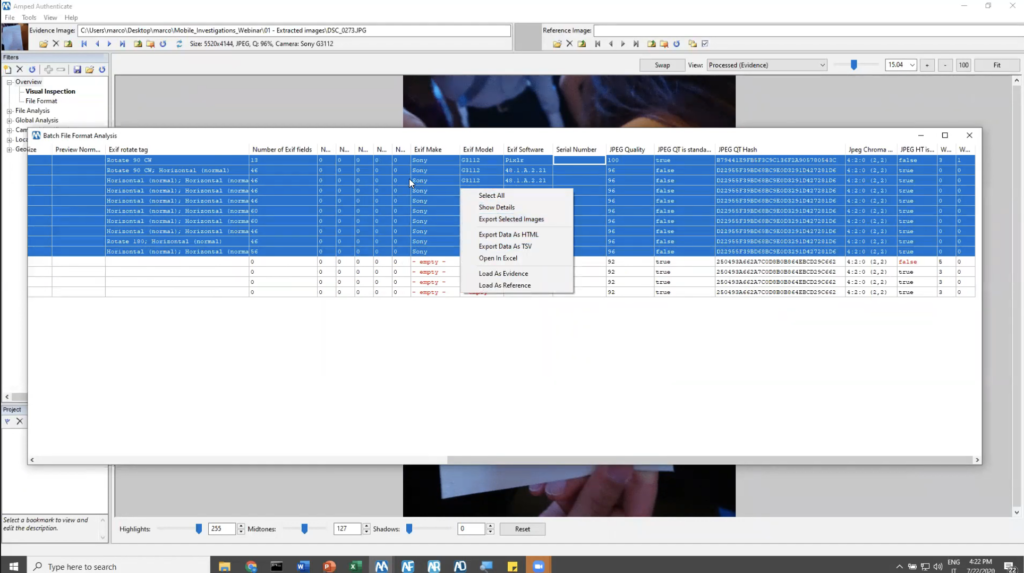
So you can see that many of these images, have the standard names that mobile phones use, some of them have their WhatsApp typical name. Let’s just start by loading one of the images and running batch file format analysis. So you can see that I clicked on this tool menu, where you can access even more processing tools. Okay? Some of these I will show you later.
The batch file format analysis will run through all the images, collect information about the compression… their format and their compression properties, and provide a table, which allows us to make a first triage of the images. Let me hide this column here… okay. You can see the table now. So we have the list of the images here, and we have a lot of information from simple image [indecipherable] resolution. We can see that some of the images do have a thumbnail. This is expected, as we have shown before. Some others don’t have the thumbnail at all, which is rather strange for a camera original image.
If we move, we can see that we have the number, the total number of EXIF metadata, okay, which is mostly consistent for most of the images, but some of the images have no metadata at all. And then we have these two very important columns from metadata, which are the make, model, and also the software column. And this does that for most images. The make and model is the same, it’s a Sony G3112, which is the technical name of a Sony smartphone. And there are pictures with two different software values. You can see 21 and 50 as the last number, which means that the device has been probably updated at a certain point in time. And some pictures were taken before and some after.
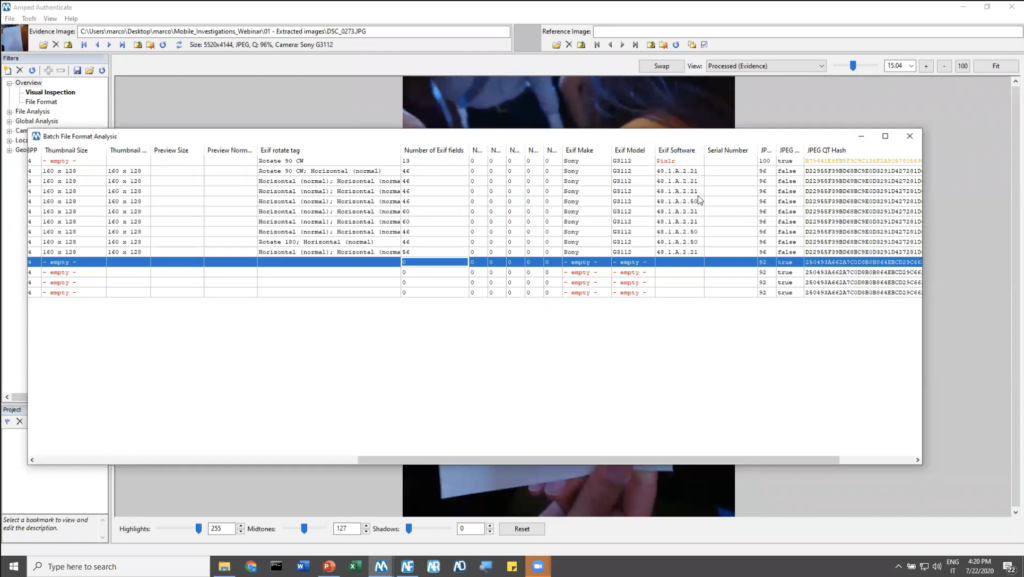
But the most important fact that we see is that some images don’t have this data at all. Okay? And this is marked in red because this is a strange fact for a camera original image. And this image here has Pixlr, which is a mobile phone image editing software, which is blacklisted — because Authenticate has a long list of image processing software — and so it is marked in red because it is a suspicious, suspicious information.
On the right, we can also see that the compression properties of the images are not the same. Okay? For most images, we always have the same JPEG estimated quality. We have the same quantization table, which is a technical thing of the JPEG compression. While for some other images, we have different compression properties. And this image up here has a higher quality and a different kind of quantization table, and different kinds of JPEG optimization strategies. So it is very different.
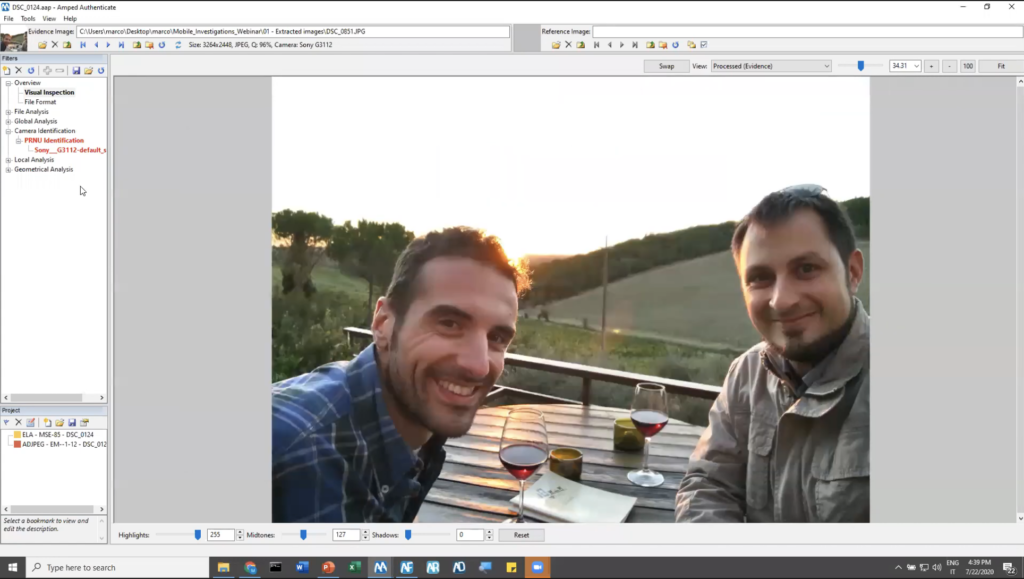
Now what we can do of course, is that we can group the images like this and export them to separate folders, if we want to separate the Sony-related images from other images. Now let’s focus on the two main images of interest, which are the image of this document and the image of this garden. Let’s start with the garden image.
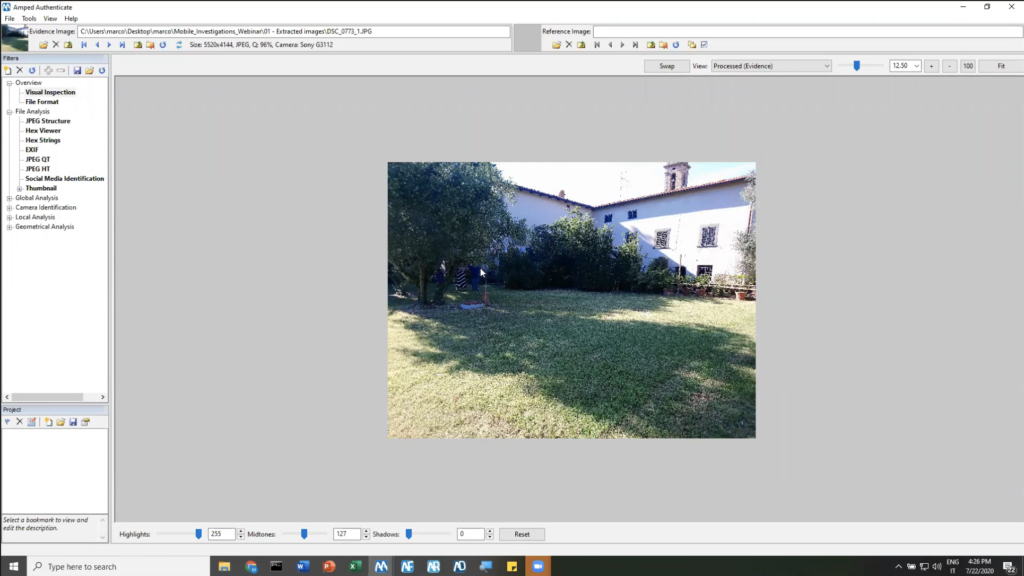
So we can load it from here. Load as evidence, okay. This image is important because it could be the proof that these persons were present in this place at the time, which is important to the investigation. Now this is the visual inspection filter, which as you would guess, allows to inspect the image. When the image is a bit dark in some parts, there are some simple enhancement tools here to adjust the levels and make details more visible, very simply.
Okay. What we can do right from the overview category is to take a look to the file format. And you will see a summary of the main image properties here in this table.
Now, the first thing I want you to notice is that this evidence image warning column is mostly empty. We only have one yellow — which means moderately significant — warning that the file is big, but this is just due to the fact that we are using a smartphone with very high resolution. But most of the other data, it looks just fine. So we have resolution; this is standard aspect ratio; we have presence of thumbnail; we have presence of EXIF metadata, which we expected to find in a camera original image. We have the common make, model and software metadata. And also we have compression properties which are consistent with this device, because Authenticate has a large data set of JPEG quantization tables, which are a customizable part of the JPEG compression, which changes from a device model to another. We have a large database with more than 14,000 tables. And we were able to find that the quantization table used for this image is indeed compatible with this device. Okay. So we have no warning here. Noticeably, the acquisition and last modification date reported by the meta data are also all the same, as you can see here.
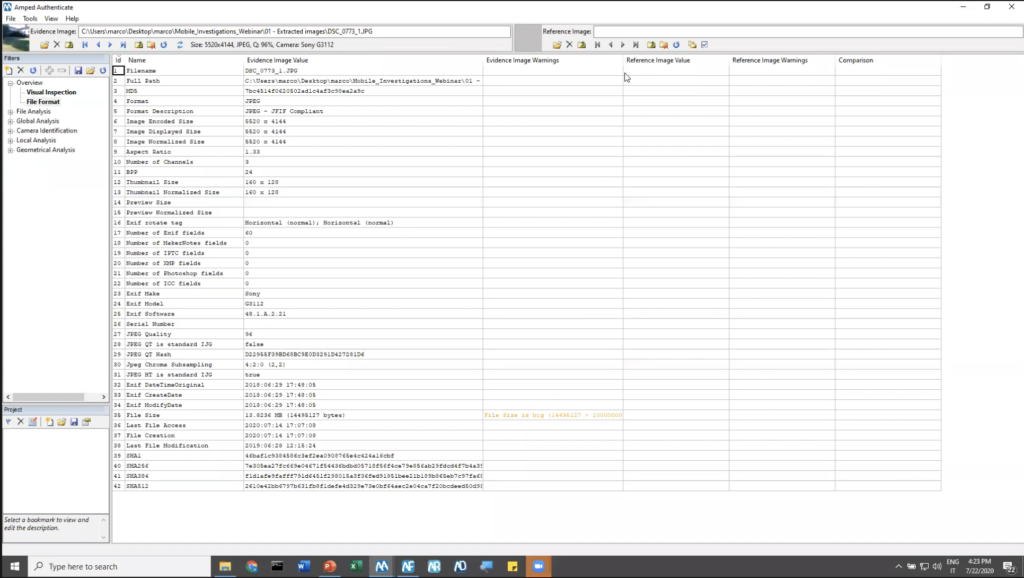
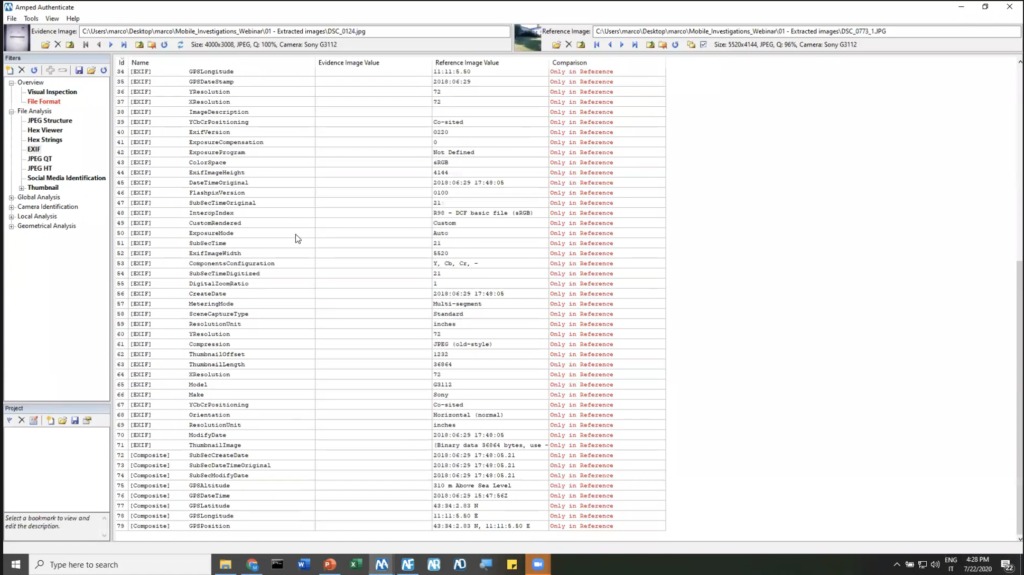
Okay. We can then inspect more the image. We can take a look to the structure of the JPEG markers. We can take a look at the hex content of the image. We can take a look through the full list of image metadata, and here we notice something interesting. We see that this image has got GPS information, which we can use both to check the correctness… the consistency of a date and time with those declared in the other metadata. And you can see that the GPS timestamp is not the same as the EXIF modified date, but this is likely due to the different time zone used by GPS clock and the mobile phone clock, which is something that of course we can verify.
Moreover, since we have the GPS position of the image, we can go to the Tools menu and click on ‘Show image location on Google maps,’ and we’ll be shown where the image was taken. Okay. We can click on the satellite view and zoom in… of course, you know GPS is not precise to the millimeter. You have to allow some meters, but nevertheless, we can see that there is a building and there is a bell tower here. And if you compare to what we saw in the visual inspection, I would say it is definitely consistent with what we have seen on the map. Not only, we can see the image has been taken in daylight. And so we can use another tool, which is the checksum position for image, location, and date on suncalc.org, which is a very nice website, which will show you for that specific date and time declared in the image, the position of the sun compared to the place where the picture was taken. So we see that the sun is expected to be here. And if we compare it with what we see in the image, we see that those are indeed in the consistent direction. Okay? So we could crosscheck a place and time with the external information, and it was a positive check.
We could also go deeper and deeper for this image, but I want the first to start working on the other image of interest and compare the two. Okay. So let’s move now this image as a reference, and let’s now load the other image that needs to be authenticated, which is this one, this document image, which is important to the investigation because it’s a proof of purchase of something that has been found in the victim’s house. Okay. And so we need to understand whether this is a picture which we can build on or not.
Now, you can see that file format filter has already turned red, which means that there is something wrong likely with this image. And if you click on it, now you can see, we have a comparison view with the evidence image part and the reference image part. And you can see that now the evidence image warning has several warnings. First of all, there is no thumbnail in this image, which is strange for a camera original image. We have an editing application as the EXIF software. And we also have some oddities in how the image is stored as JPEG. Okay. So all of these is suggesting as to why do the investigation on this image, because there are some suspicious properties. We also have a comparison column, which allows us to quickly spot different and similar values for the various columns.
If we go to the file analysis, and we take a look to the EXIF, we will also see that a lot of information has been removed. Okay? So probably this image went through a processing software, which removed, stripped away, a lot of metadata.
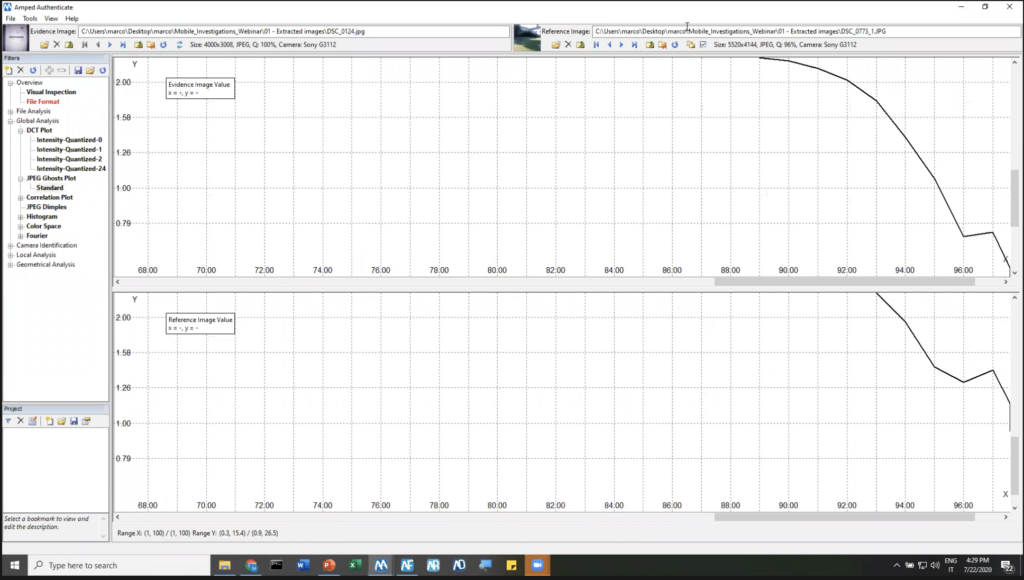
We can now close the reference image — or probably, we can keep it for the next category only. Let’s start the global analysis. This is a product which requires some knowledge of how the image generation life cycle works. However, I will just show you something simple. You can take a look to the DCT plot of the images, and this comparison shows you… below, you see the expected shape of a plot for our camera original image, and above, you can see the effect that you get when an image, a JPEG, is compressed twice. Okay? So the fact that we have this cone-shaped histogram is suggesting that this image was compressed once, probably during acquisition, and then one more time, likely after it has been loaded in a program. Okay? So it is a trace suggesting that something happened in the life cycle of this image.
We also have this other tool called JPEG ghosts plot, which tries to show you which could be the previous compression quality of the image. Now we see indeed that the reference image has a compression quality of 96%, while the evidence image has 100%. But if we look at the plots, they are very similar and they both have a minimum, local minimum, in 96. This is suggesting us that the image on the right was compressed once, just at this quality. But the image on the left, which now is at quality 100, was probably pre-compressed before, at quality 96. So we also have some hint about which was the previous compression quality of the image.
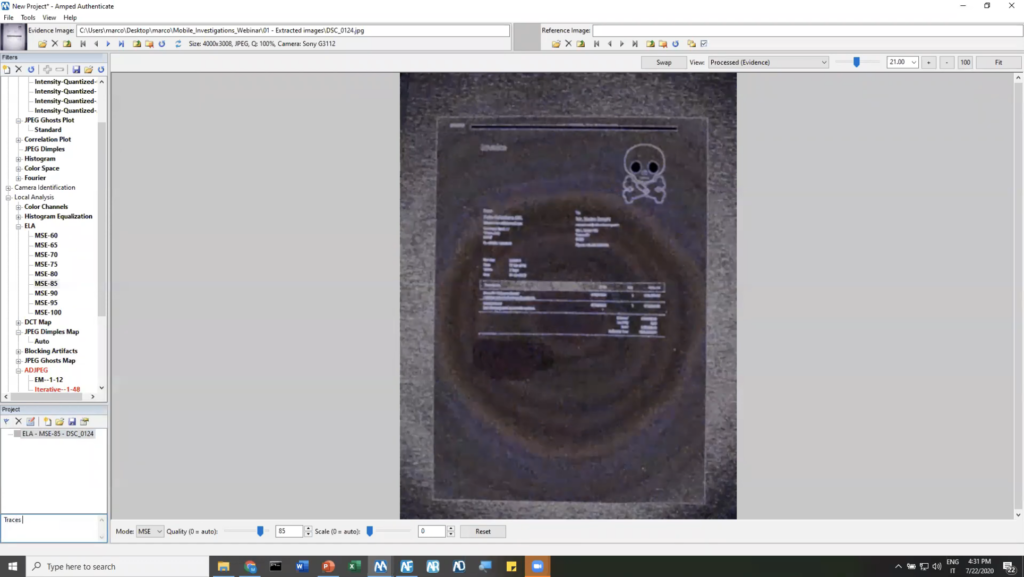
Okay. So now let’s take a look to the local analysis filters. You can see they are in bold here because the results have been pre-computed, because Amped Authenticate will cache results. So if you want to leave it processing during night, you can run a batch processing. You can configure it to run all the filters on your image of interest and come back a few hours later and everything is done, ready to be analyzed.
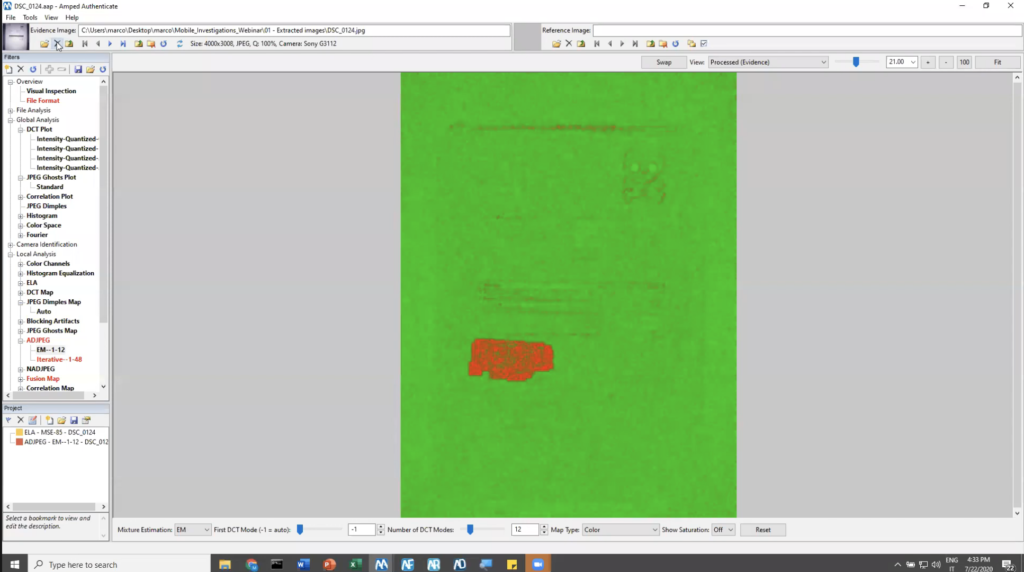
You can see here that this filter is red. It means that there is something wrong here. And indeed, this is a forgery localization map. This is the image. This is the map. And you see that here, this tool has detected that something is definitely wrong. Okay? And there is no apparent reason why it should be so, meaning that there is just a blank part of the page, which should be just like all the other one, but there’s a red dot here, okay? A red bubble. This is because the image was first compressed as a JPEG, then it was manipulated here, to conceal something, likely, and then recompressed. And thanks to this double compression phenomenon, we are able to distinguish the part that has been compressed twice, which are the green one, and the part for which only the last compression places are visible, which is the edited one. Of course you may find the similar traces also with other filters. There are lots of them. You don’t have to expect to find the trace on every single filter because of course they are complementary. You are not, you don’t have to find traces of them.
When you find an interesting result, you can bookmark it in your project. Clicking here, you can add a comment of course, and you can also set a warning level for the bookmark. Okay? Maybe this one is evident, but not so much, so we can put it in yellow, while this other one is much more evident, so we can bookmark it and put it in red.
And then we can save our project. Okay, good. Now, we don’t have time to go through all the details of single filters. However, there are some of them which are devoted to splicing detection; some of them which are devoted to copy move detection — so to detect parts of the image that has been copy/pasted inside the image itself. Now that we’re happy with this project, we can go to tools and generate report. You will see that we get our report, with all the information that that needed for repeatability. So the date; the software version; the build; the number of the software.
You get the table of content with all the comments that were made for your bookmarks, and for each bookmarked result, you have the input file with the hash value. We have the filter information and description of what it does and what each [indecipherable] do. And the value that was set. If you change the software to a different language, the report itself will go to a different language as well. And you can see scientific references to the filters that we implemented, because our vision is justice through science, so we only implement filters that have been validated from the scientific community, by the scientific community.
Okay. So we can say that we were able to find evidence of forgery for this image, while the [indecipherable] image seemed just fine. I wanted to show you also that, if you load one of the WhatsApp images, we have this filter called ‘social media identification,’ which will compare the image property with those of images coming from several different social media platforms. And we see in this case, it found traces of compatibility with WhatsApp, TinyPic and Facebook, and that you can see that there is also a file name analysis function, which tells us that this file name here — well, this one was easy to guess, actually — is compatible with WhatsApp and not with the typical TinyPic or Facebook naming scheme.
Okay. Let me now go to answer the second question, which was about which images have been captured by this specific device, and which not. Okay. So to show this, I will introduce this tool with one more slide: source camera identification is one of the most useful tools of Amped Authenticate. And it allows you to attribute an image to the specific [indecipherable] that captured it.
It is a two-stage process that is first a camera reference pattern creation phase. So we start from a reference camera; we take some pictures. Of course, there are rules to take good pictures, if you can do that, otherwise you can just take pictures from the memory card. And you use these to compute this camera reference pattern, which is just an estimate of the sensor noise of the camera. You know that every camera has a sensor, and this sensor has a unique noise pattern, which is due to the imperfections in the silicon buffer used to create the sensor. So two cameras produced in the same day, in the same place, will still have different noise patterns.
Now that we have this estimate, we can extract the noise from the image and measure a correlation score between the camera reference pattern and the noise in the image. And we can set a threshold, and if you’re above the threshold, we will say that then the evidence image is compatible with the camera, and otherwise, we will say the opposite. Now, it may seem complicated, but it’s very easy to do with Authenticate.
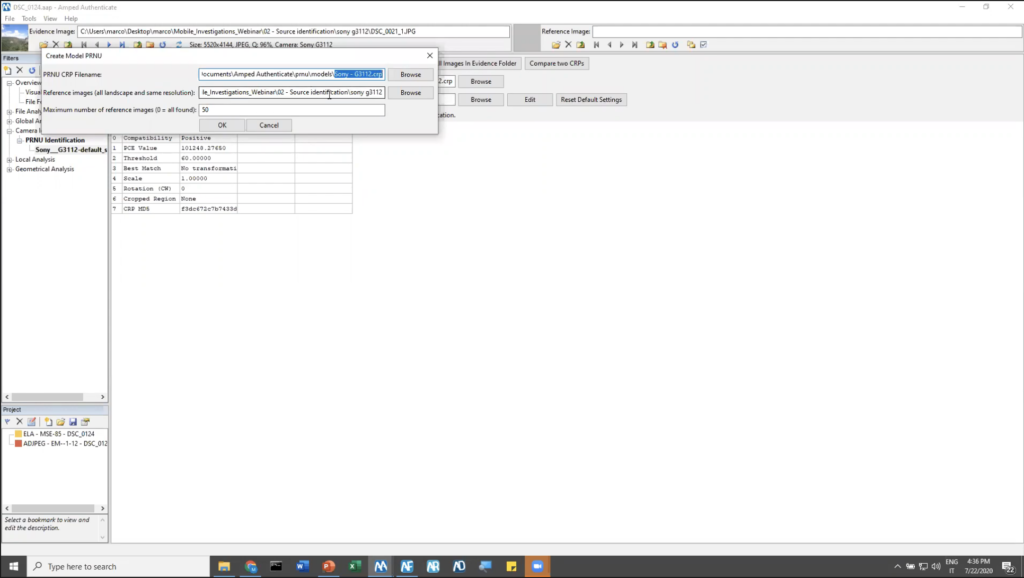
Let me show you. All you have to do is you put all the images that you gathered from the camera in a folder. Then you load one of them here. Okay? No, sorry. It’s processing now. Once you uploaded it, you can go to the ‘create PRNU reference’ button command, to start the creation of a reference pattern. You only have to tell where the camera reference pattern should be stored, and where images are located, which is guessed by the image location. And you can set the number of images to be used. Usually 50 images are enough, but of course you can use all of them and Authenticate will automatically filter out images which are not suitable, either because they have a different EXIF make or model, or they have different resolution, or they’re too much saturated, maybe.
Once you click okay, the camera reference pattern is created. It takes a few minutes, especially with this high resolution. So I pre-computed it and loaded it. We have it here. Okay. And we can use it to test our evidence images.
So we start with this one. You see that after running, we have this output table, which tell us the measure of the score, and the threshold. So the threshold is set to 60, which is a threshold recommended by most in the state of the art for this technology. And we see this PCE. This big correlation energy value is 5,000. So, much above the threshold. So in this case, we can say the compatibility is positive, reasonably.
We see that we also detected that this image has been resized and rotated. So compared to the full resolution of the sensor, this image has been downscaled and rotated. And indeed, we can see it’s 90 degrees rotation here.
We can also run a batch analysis for all the images in the folder. We will just wait for the analysis to finish, and we will have the same information that we can see here, but in an aggregated table. Okay, let me have this column here.
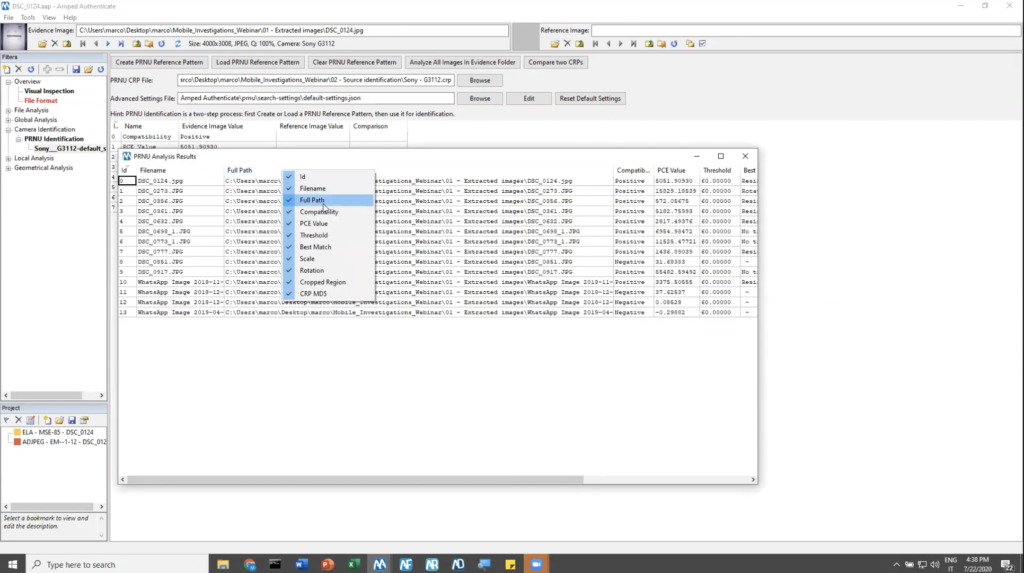
Okay. So, here we have the table. We can sort it by compatibility. We see that we have a lot of images in the folder which are compatible with this device. Then we have three images from WhatsApp, which have negative compatibility. So we can likely assume that these images have been received from other users. Okay? So they’ve been captured with other contacts’ cameras, and they are not compatible with this device. This image here is positive, and strongly positive, I would say, which suggests that it has been captured by this device and then shared to WhatsApp. Okay. So it remained in the WhatsApp folder, but we can tell that this one comes from the user device, while these three were likely received.
Interestingly, we see, we have one of the images which are declared to be from the same model, which is negative. And if we look at that, we find the reason why: this is a selfie picture. Okay. And of course, when you use the selfie camera, it’s a different sensor because it’s a different camera. And so you will not find the positive compatibility, because you have to create another camera reference pattern with images taken from the front camera of the device. So the output is correct, in this case.
Okay. I think this is all we have time to see today for Authenticate, and we can turn to the next questions we had to address in the original case. You remember, we had to enhance the content of a video to read a chat.
So if we go here into the folder [indecipherable], we have this video which was likely taken with the smartphone of the friend of the victim who captured a video of the victim’s phone while he was having a chat with the suspect person. Okay. If we load the video in Amped Five, let me introduce Amped Five interface.
So we have a viewer here where you can see the frames. We have a player here which will behave like a normal player, you can see, but has some advanced functions, like you can skip through keyframes, you can skip by second, by minute, you can set the speed. You can see the type of frame that you are watching now, and you can jump to specific positions in the video. Of course you can also advance frame by frame.
Here we have the list of filters. Also in this case, they are grouped in categories. So we have the load filters, which are used to bring contents inside Amped Five. We have the link filters, which are used to put together two different processing chains. We have filters to change the size and crop the image and change the perspective; filters to adjust the levels of the histogram of the image; filters to extract measures; filters to increase the sharpness of the image; denoising filters — lots of them, of course — deblurring filters.
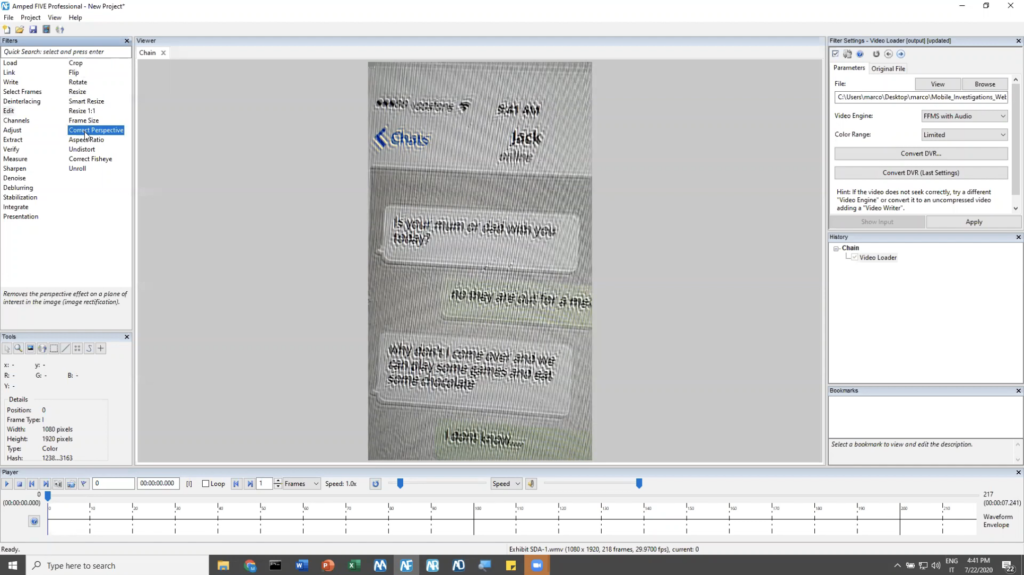
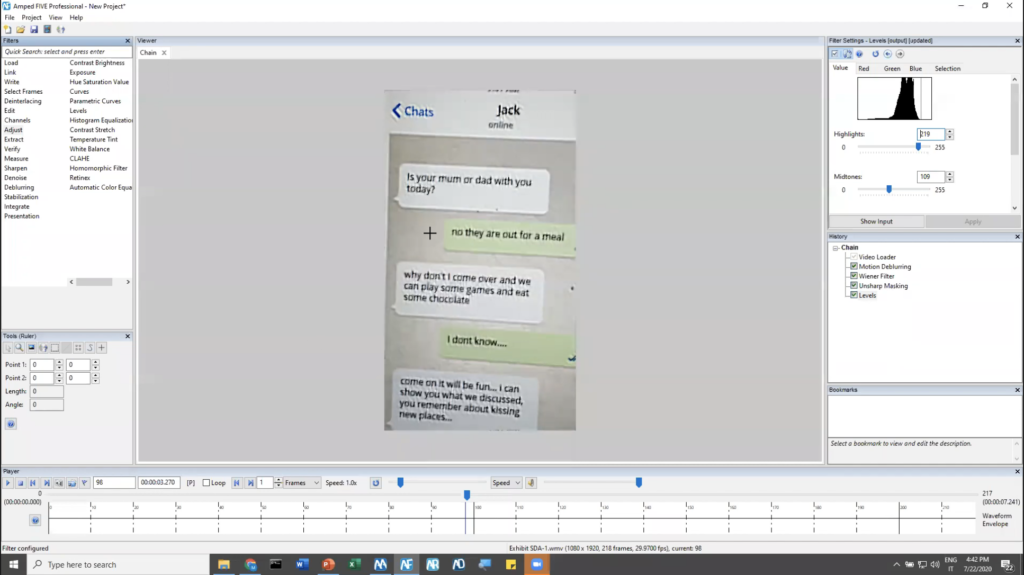
Now. If we take a look to this video, we see that we can hardly hardly read something, right? Because who took the video, kept moving during the whole scene. So if we focus on a frame — let’s say this frame here, maybe where the whole screen is visible — we may want to remove this artifact. You can see kind of a motion blur, okay. That can be effectively reduced with Amped Five. So we go to the deblurring filter category and choose motion, deblurring. Then we just have to connect. Let me choose a better place to do so. Okay.
We can connect two points that caused the blur, and we can zoom out. The image is still noisy, so we can raise the noise bar here to increase the denoising step. Okay. And we get this. I think it’s already pretty readable as it is now, but we can further use a denoise filter to reduce this [indecipherable] noise here. And perhaps we can then sharpen a bit, and we can adjust a bit the levels of the image.
Okay? Now that shot is readable. And if you take a look at the text, it can play a very important role in this investigation, because you see this man is inviting himself to the house of the victim.
Now you can compare the results that you’ve got with the original in side-by-side fashion, or you can put an overlay like this and choose where to put the… sorry, half, and choose where to put the separation bar. Okay. Once you ever reached the result that you want, you can bookmark it and we can generate a report for the processing.
Also, in this case, we get the date and software version and operating platform. We get the bookmarked images, and importantly, we get the full detail of the processing chain that we have used. So you see we have used the video uploader; motion deblurring; and so on and so forth. For each of these filters, you can click and go to a description of what the filter does, a description of each input parameter, what it means, and of course the value with which it was configured. And the scientific references as usual. So it’s a very complete forensic report.
Let’s save this project. And we can now turn to the other question that we had, which was to enhance this video, which was captured in the house of the victim. And this could be the car of the suspect, okay. Park it here. Unfortunately, the friend of the victim was running when he took this video. And so if you zoom in, it’s very hard to find a single frame where the license plate is visible. You see it’s very, very low resolution. If we take a ruler from the tools here and we go measuring it, it’s five pixels in height, okay. And this is, this is one of the most favorable frames.

Now until a few months ago, we would have said that there are little chances to work on an image like this. But recently we have developed a powerful super resolution filter, which is able to align the perspective across several different frames.
So let me show you how to work this filter. The first thing we noticed is that the… I’m sorry, let me just move this away…. The first thing we noticed is that the car is more visible at the end of the video, rather than at the beginning. So we will use the reverse filter to just reverse the order of frames. So we have the most favorable position at the beginning of the video.
And then we go to stabilization, perspective stabilization. All we have to do is to provide the software with four points that should be used on a [indecipherable], which includes the license plate, which should be used for stabilization. Click ‘Apply.’ What the software will do now, live, is to compute some registration parameters from one frame to the other, trying to align the perspective of one frame to the other. And after it is finished, if we play the video, you see that the perspective of frames changes to remain consistent with the first frame of the video. You can see the transformation has been applied now.
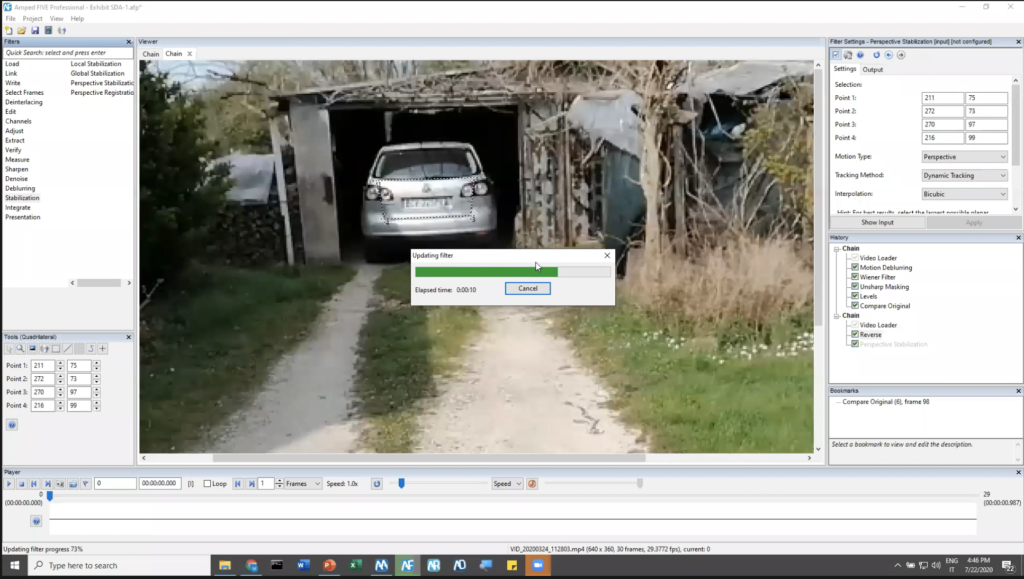
Okay. But in this case, our final goal is not to align the frames simply, but to obtain a super resolution version of the image. So we go to the output of the filter and we choose ‘Prepare for perspective superresolution,’ and here, okay, now it’s competing for the original value. We can ask the software to magnify by a factor of three. So it will use the information from all the registered frames to increase the resolution of the image. Basically, what we are doing is to trade time definition — so we had many friends at low resolution — with spatial definition. We only have one output frame, but at increased resolution.
And indeed, let me just apply a slight deblurring here [indecipherable]. And if you now move away and sharpen a bit the result, I would say that this license plate is mostly readable. And surely we can use this image to make a compatibility check with the car of the suspect. Once we’re happy with the result we can crop the region of interest. And we can, as before, compare with the original, where I would definitely say that the improvement is impressive in this case.
So we bookmark these results as well and generate our final report. So we have the previous chain here, and then your result that we get here. Okay. I could have magnified a bit more maybe, but that’s the idea.

Okay. So we were able to answer all the questions that we had in our use case. So of course there will be much, much more to explain about this software, but we don’t have much time today in this webinar. You can see yourself the amount of filters that are available, so if you have questions about some of them, please come and ask.
I forgot to show you that we also have powerful annotation features, like you can draw an arrow on frames to make something evident, or you can magnify a point of interest very, very easily. You can see like this. And you can also make some interesting effects like the following one.
And I want to thank you all for being with us today, for your time. And for any inquiry about the software or any information you may want to have, you can write to [email protected] and we’ll be happy to answer. Thank you. Thank you very much for being here today.


