Join the forum discussion here.
View the webinar on YouTube here.
Read a full transcript of the webinar here.Rich: Good day, everyone. Thank you for taking the time out of your day to hear about Mobile Device Investigator. I’ll be conducting a short PowerPoint presentation followed by a demonstration, questions, and then the link to obtain a trial version of MDI. You can also see us upcoming at the Crimes Against Children conference in Dallas, and the Northwest and Southeast ICAC conferences as well.
I’m Rich Frawley, I’m the Digital Forensics Specialist with ADF Solutions. Appreciate you joining me today. I hope by the end of the webinar you’ll share my excitement for a new tool, Mobile Device Investigator. Prior to my three years with ADF Solutions, I spent 22 years in law enforcement, 17 of those as a forensic examiner and an investigator. For those that may recognize my name, I’m still a volunteer with IACIS and I just returned from the Myrtle Beach in Atlanta conferences, and I see some names out there. So, we may have talked, shook hands, had a conversation, so nice to see you here again. Thank you for coming.
During my career, I examined and investigated devices from online undercover investigations, cyber-tips from ICAC task force, cases from other departments, our own caseloads – homicides, frauds, threats. One of my favorite cases was a jury tampering case, and that’s where the case was determined by the digital devices. So, I really love and miss some of the work that was out there.
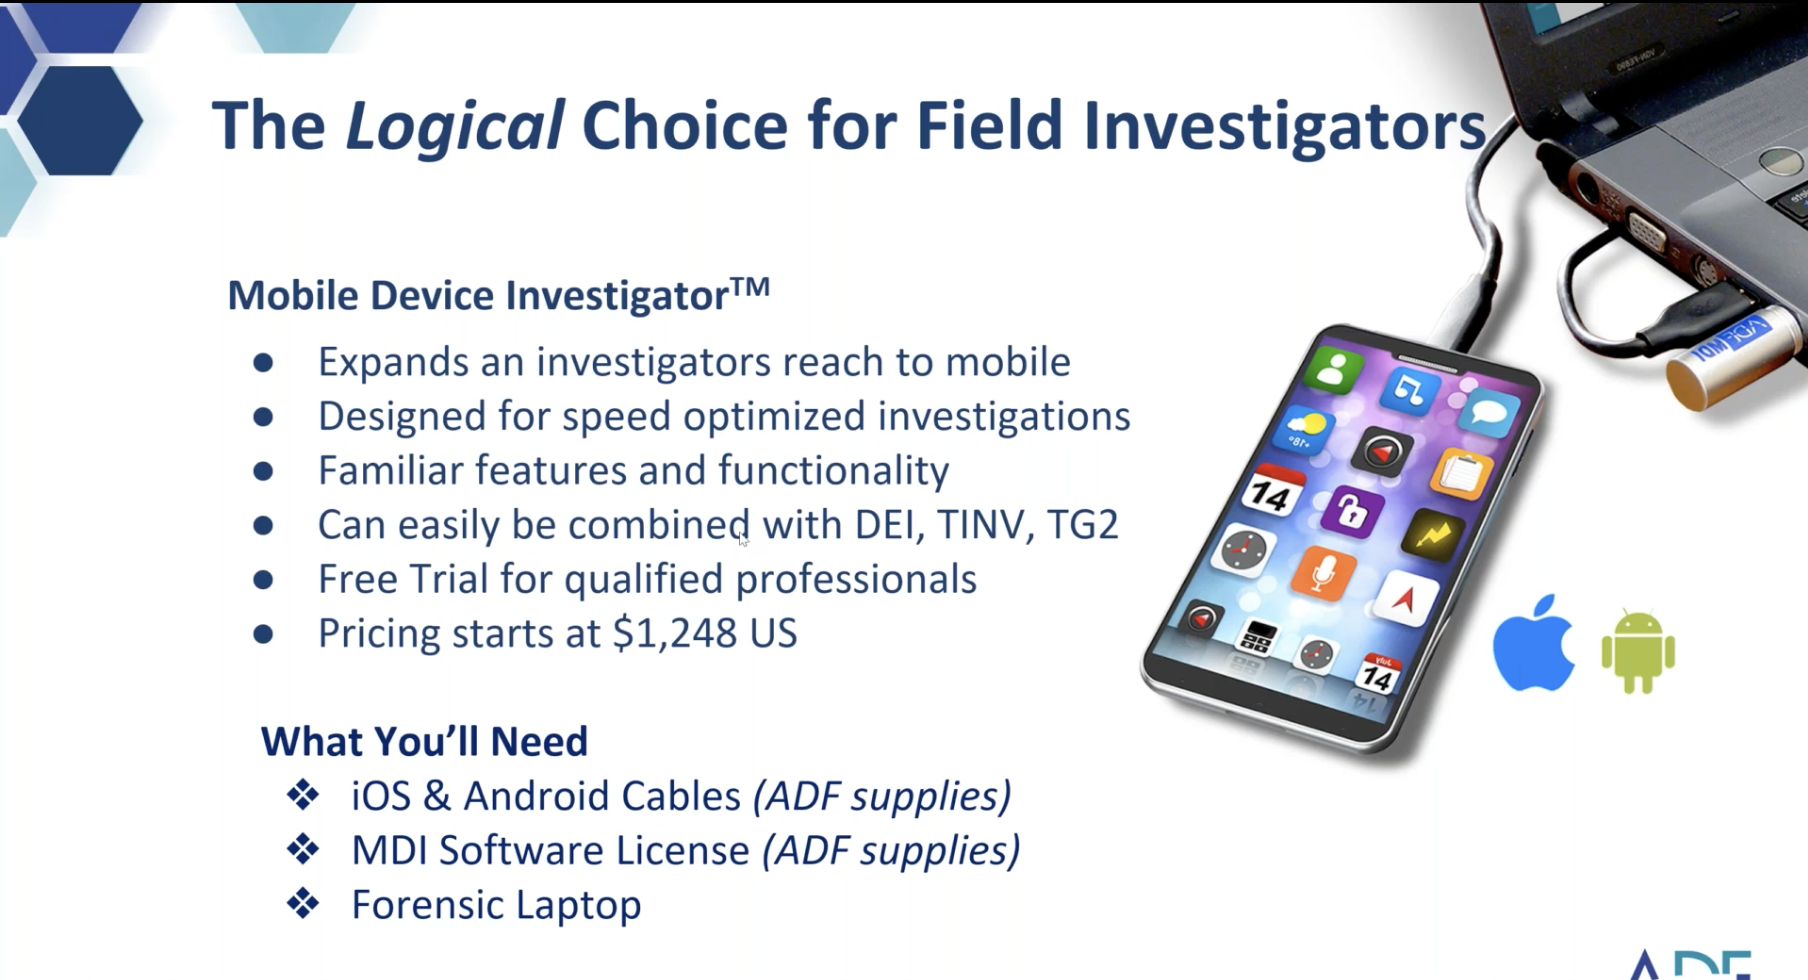
So, without further ado, I’m delighted to introduce you to Mobile Device Investigator for iOS and Android. ADF has been developing digital forensics software for 12 years. And every year, we’ve been hearing the steady drumbeat from our customers about not only the increase in digital evidence but the increasing need to investigate mobile devices. We hear from our customers that for every computer, investigators are seeing four to five smartphones or tablets. Thanks to this feedback, and to our development team, we released Mobile Device Investigator, which is designed to empower frontline investigators with a speed-optimized, easy-to-use, familiar forensic tool that builds upon ADF’s excellence and automated capture, analysis, and reporting.
If you’re already an ADF customer, you’ll be able to add MDI to your existing license. I’ll tell you about that in a moment. What I’d like you to understand, before we get to our demo in just a few minutes, is that we’ve listened to the market. We know that customers want tools that are better, faster, and cheaper. We believe we’ve positioned MDI to give you all three. And at a price point of just USD 1,248, you can get started investigating iOS and Android devices quickly, and with results.
Alright. If you’re a current ADF customer and have Digital Evidence Investigator, Triage Investigator, or Triage G2, you can upgrade to our professional bundle and enjoy the full functionality of our pro product – both products in a single license for iOS and Android, computers, external drives, drive images, and all your other media storage. The cost to upgrade is just 999 for one year.
We work closely with our customers to solicit feedback and understand specific use cases. We seek to design products to help you get your job done faster and more effectively. We designed our user interface based on the Microsoft Fluent framework and we combine ease of use with the ability to be highly configurable. So, we offer that automated process flow, help you identify that critical evidence fast, get you through the noise, it’s that early case assessment and triage, if you will. Identify correlated files, user activities and artefacts. We link artefacts together for you, to put that specific file or item that you’re looking at to the user. By eliminating that noise and putting this information together, you’re able to scale through those terabytes of data. You’re able to put together reports on the same day, go out on scene, do your investigation, put those reports together, and then you can also hand it off in a standalone viewer, distributing that … all the analysis and the collection to investigators and prosecutors, so they can go through it. Frees you up a little bit – if you’re doing the scan, frees you up to have other people go through and do their investigation as well.
And finally, before we dive into the demo, I just want to show you how easy it is to get started with MDI. I’ll show you the built-in wizard in the tool in a second, but before, we have this quick reference guide – makes it easier for any investigator to see the short number of steps to get your going, to start collecting your evidence. This is something that you get with the trial version, and it’s also something that’s available on our website. A lot of resources on our website, and if you’re going to try it, all these steps are up there for you as well. So, when you’re going to do something like this, a lot of resources for you to get through.
Let me just change over screens here. Alright, demo time.
You should be able to all see – and I’m just giving it a second here, for everybody to see it. This is Mobile Device Investigator. The first thing you’ll notice is the familiar look of the ADF family of tools and all the familiar tabs. Just like [earlier, there are] tools up on top. You can scan, so here’s scanning our Android and iOS devices. You can back up your Android and iOS devices, review your results, customize your scans, actually set up scans to tell it exactly what you want, your settings, and your user guide.
Let me go through scanning the devices here. If I go in to scan your devices … I already have one connected … I’m going to disconnect this here for a second. When you go in here, you have your phone disconnected. And again, we’re looking at logical iOS and Android. To get this started, the first thing you need to do is to know the passcode to unlock the device. You’re going to unlock the device, you’re going to make sure it’s in airplane mode if it hasn’t already been done. You’re going to prevent auto-locking. And there’s a couple of other steps, but let me add the phone here.
So, I go over to our toolbar, and you can see I have Add Phone or Add Backup – I can do either. I’m going to go with the phone. Again, Android, iOS, two choices – again, it’s logical, I need access to it, which I’ve done. The phone is in my hand – hard for you to see. But it tells you here, once you’re at this point to connect the device … so, when I connect the phone … you can see over on the left-hand of this ribbon or tool [are …] it’s going to walk you through the steps. So, this phone was already done, debugging was on, the drivers were installed, it’s communicating, it’s paired, it’s ready to go. If, for some reason, I did not have the debugging mode on, it would stop at that point and give you the instructions on how to proceed from there – what you need to do to get into developer mode. Where you need to go, tap seven times, and turn that on – so, it’ll walk you through that. And this is in conjunction with that guide that I gave you earlier that you can have taped to the side wall or taped next to your laptop. Wherever you’re working, in your toolbox, that quick guide can be there as well to help you walk through.
Once it’s connected, you hit OK. And now you can see under my Target Devices, the phone is ready to go. If I wanted to do multiples, I can also point it towards a backup. And you can see here, I added another backup of a phone as well.
You would choose your search profile – so, search profiles are made up of artefact captures and file captures, so that’s everything that you are looking for out of this scan, whether it’s device information, parsing out the chat applications, your connection logs, and collecting media. This is … the search profiles make that up, and I am going to get into that a little more with you.
Once it’s connected and I select a profile, the next step would be to give it its name and then hit the Scan button. Once I go into the scanning in this, because I chose the phone, what it’s going to do is create a backup first. We use all techniques and standard data access methods to collect the most data available without jailbreaking or rooting the phone. You’re not going to have those jailbreak or rooting limitations. As you’ll see, our data transfer speed is very competitive. We took some heavily used personal devices for backup and scan testing. And these phones have been used on a regular basis, and it was on a regular laptop, not a beefed-up forensic machine. So, an iOS backup took about nine minutes, and a comprehensive scan – that’s looking for everything that we can parse out of it – took about 25 minutes.
Same flipside Android – again, heavily used, personal, on a regular laptop, not a beefed-up forensic machine. The backup took seven minutes and that comprehensive scan took 15 minutes to complete. After that, backup is complete, at this point, if I were to hit Scan, it would go into the backup of this phone. I’m not going to make you sit through watching that. But I do have a backup here, ready to go. And I can just give it a name and hit Scan. And I can put my license in, just to show you that you do need a license in order to operate. And now I put that license in, and the scan starts.
One of the first things we do is we make a complete listing of all files and folders that are in that backup. And then, once that is done, we go through and parse out the artefacts. And then, once the artefacts are parsed out, we go through and start collecting files. And as you can see, it’s going fairly quick through this backup here. It will also run keyword traces. You can see up here we had cryptocurrency traces, I’ve already got hits on that; remote access, we didn’t have any on that. But you can see as your keywords, you have visual clues or cues as you’re going through, as to what you’re collecting. And if you add to that some customization, which I’ll show you in a couple of minutes, you would be able to see some stuff there as well.
What I’m going to do is you can go in and view your results as this is scanning. As the scan is going on, you saw something go by in the bar. I could come in here and go look at my gallery and take a look at the pictures, and some of the information on that was collected along with that. So, the scan is still running as I’m going through and looking at that information.
From this point, the scan’s going to finish up. I’d be able to conduct my analysis, create a report that I may need to pass along. Let’s stop this – let’s say I was doing just a quick triage, whether I wanted this phone or not, and I saw what I wanted. I can stop the scan. And I can back out, and anything that I’ve collected up to this point is in this point is in this scan. I have not lost any information, I can go right into my results and start my analysis.
What I want to do is back out here and show you one that has been completed. Let me go into iPhone 6 here. [Back up to summary page.] Okay, so when a scan is done and you go into your view results … you can see here I had an iPhone 6. You can see the information down on the bottom. The scanned information that I entered at the top. The search profile that I ran, the scan duration, that it completed, I didn’t stop it or interrupt it. It collected 4980 files. And the application that we used – Mobile Device Investigator. [14:08] you can also see here, I have tag statistics … so, these were items that were automatically tagged during my scan. So, if you have hashes you’re running or keywords, unique keywords that you’re running, or you’re looking for something specific, and you want to automatically tag it as it’s scanning, that’s what happens here again. One of those visual clues … you could be standing across the room, look over, you see that red line come up, and you know, “I got my level one tag or my contraband,” or whatever it is that you’re tagging. And you can see it there. And I have all my captures below that I can go into as well.
If my connection log was [imported] in my case, I can go right there first and see my connection log. You see I have a filter on this one. But there’s all the connections in this. Then I can go back to the home page again. I can go to my pictures; a couple of different ways to work with your picture gallery. A lot of times, you’ll be doing a case that involves images. I’m going to scroll back up to the top. I have 4500 records in here, and one of them is tagged as well, in there. One of the things I can do is I can filter … we talk about getting through noise. I can go into my filter and go into Photo Probability, and while we’re scanning and collecting images, we’re putting a percentage on each image as to whether it’s an icon, an emoji, a link file … or an icon … or an actual photograph. So, I’m just going to set this, and I’m just going to do this reverse, just to show you how it works. If I put in … let me do it this way. Let me put in 70. And I apply.
So, I said I want to see any pictures that are 70% or better. And you can see that it … out of the 4500 pictures, there’s 39. So, about 600 pictures or icons or emojis were filtered out. So, reduce some of the noise, bringing me more towards what I’m looking for. And we pretty much know what we’re looking for in a case. So, if I wanted to go through and I was looking for first-generation images on here … you can see I have a lot of different … if I go to my EXIF data for make, I have a lot of different photographs on here. But I’m looking for Apple, possibly first gen, so then I can put that filter on as well.
And now I’m looking at first-generation pictures from possibly this phone. We have all the metadata below, that we bring up here as well, and you can preview the picture here. A couple of other different ways to do that … if I can take off that EXIF data and just go through … you would be able to do it by model, you’d be able to do it by serial numbers, if you had the serial numbers in the metadata … dates, times, coordinates, if you’re looking for pictures with specific coordinates, or you wanted to view all pictures that had coordinates, you would be able to go through and filter those in as well. So, a lot of different ways to get you to exactly what you’re looking for.
One of the other things too, with pictures, is sometimes we focus in on the pictures first. You have somebody who has thousands of messages, but you know you’re looking for the pictures that were traded. So, if you come into … I was talking about linking artefacts and putting files to the user … and you can see here, I have what’s called linked artefacts. What it’s done is it’s gone through these pictures and linked anything that is in a message. This is my main gallery of all the images collected. I go into Messages and I hit Apply. And now I have all the pictures that were sent back and forth through the messaging – any messages that were parsed out. So, if this one was the one that was important to me, I would be able to see that, and the linked artefact here is hyperlinked, so I would be able to take that to the actual messages and see where that was sent back and forth.
So, that’s one way to get into what you’re looking for there. Also, with the linked artefacts, you have … well, you have all your property data in here as well. One of the other things that we have – and I’ll work my way down to it – but we have a timeline. So, it’s all the artefacts, individual artefacts that were collected, along with all the files that were collected, put into one nice timeline. And if this picture was of interest to me, I would be able to take that to, say, the last written date on that, and see what was going on around the time that that picture was taken. And what was going on minutes before, minutes after.
And one thing about our timeline as well is you can base it on a lot of different activities, people … so here, if I was looking at the interaction between two people, I’d be able to select the principal and recipient here and maybe add some activities that had to do with them, and actually build a timeline, built around that. So, you can really hone in again. Like I said, reducing that noise in that case.
Excuse me. Okay.
I’ve done that. Another thing we do – this runs after. So, after the case is opened and you’re done scanning, and you’re ready to do your analysis, we have a classifier. And this runs after. If you want your pictures classified, it’ll automatically start doing it. So, if you’ve done a scan and you’ve walked away and you’ve gone to lunch and you come back, this classifier may have already run and classified your images. So, it’s after the scan, and you can see here all the different categories in which we go through and classify pictures. So, if I were looking for pictures of weapons … and let me go back up to my Pictures, turn off my filters … turn off my filters and then, I can come through here. And I can go to my Visual Class … there we go. And then Weapons, and then apply that filter. And now it’ll pick up all the pictures of the weapons.
I couldn’t turn that one off and then go to, let’s say, currency, and it’ll pull up currency. So, you can see how that photo visual classification works as well. Let me turn that back off. I did some linked … did some videos or some images … let me move on to videos.
Getting through videos … you can see I have here a couple that have been bookmarked or tagged. But … one thing about videos … and I think a lot of you will like that, especially if you do a lot of child exploitation, and if you’re used to our DEI tools, we do the same with the mobile tool. We collect frames. So, it’s the first frame, the last frame, 48 from in between – gives you a good idea of what’s in that video. So, you can set it on the top and you can arrow through each video, and get a pretty good idea of what’s in each one. And then, if you thought that there was something of interest in one of them that you wanted to see, you can go to the preview pane, and you can stop, start, and scrub through that video, with sound. So, if you needed that portion of it, you have it. And you can do your full analysis there.
Again, you can see I have the path – so, I could take it to the path and see what else is there. I could go to my timeline again, and if this was a linked artefact or in a message, you would be able to see that as well. All the metadata frames and previews.
Our keywords – you can see here I only ran one in this case. It was for TeamViewer, but it picks it up here and shows there’s at least two files, or one file on here, with the word “teamviewer” in it. But what’s nice about the way we collect keywords is that we show you … and let me just step out of here for a second. Because I’ve got a couple of extra minutes to show you … I think I may have one in here. So, you can see here, with “green address” … and that’s a cryptocurrency program. You can see here that not only do I have browsing history looking for that keyword, but it’s also in search terms. So, by putting this together and looking at these different hits, I would be able to say that yeah, there’s some browsing history, yes, it’s installed, yes, it’s been searched for, it’s been messages, so if the keyword is found in messages, it’ll take me directly to the messages or the messaging tab. And we lay it out really nice for you, so that you can go through and see that as well.
Let me go back to my demo here, where I was. And as you can see, as I move along through this, it’s bringing me to … that’s the wrong one I opened. But it automatically saves as you go along. You don’t have to worry about “Did I hit the Save button? I walked away, I missed it.” It automatically saves as you go along. So does your bookmarking, as you’re making comments, as you’re doing your analysis. No need to worry about going up and looking for a Save button. And when I popped back into here, you could see it dropped me right back off, where I left off.
We have our timeline; again, everything that you want in every case. All the files and folders – I told you that was the first listing that we made, as we went through. That’s here. And this is where our tree view is. And that could be hidden, on the side as well. We have all our tagged items. We have our reporting. I’ll go over … and then, I can go to each individual capture, if I wanted.
So, how did I … I ran a regular scan against a phone. It was generic. I got what I wanted. I knew I was looking for a certain picture. I wanted to go to certain messages. But like I said, if you have uniqueness in case, if you have some hashes, if you have some keywords, if you know exactly what you’re looking for and where it may be, we give you that ability to set up your scans and create your own profiles to go in and scan these phones. Not every case is a “I want everything”, especially if you’re looking to eliminate noise, decide whether the phone is important, or you’re going to make a backup and give the phone back with somebody, your cooperating witness, your victims, somebody who is cooperating in the case, you want to give them the phone back. You could make that backup and then go in, and do … you can see how I have a custom scan here to match hashes only. Or go in and get all the communication information only.
So, we’ve customized that so I can go through and do this scan, have it done in a couple of minutes, give the results to whoever the results need to go to, and then I can go back and do a comprehensive scan if I want to. But we’re all about getting you to where you want to be, limiting noise, making your decisions. And especially now with phones, there’s a lot of need for you to hand that phone back. And time is … I was talking to somebody last week, and it’s like, you have a limited amount of time that you can keep this person occupied while you’re making a copy of their phone. So, the faster we can do that and get you the information, the more you’ll be able to deal with these people, especially with consent.
But we have our general profiling – we give you two out of the box, one for general, one for child exploitation. That’s what it’s geared towards. Very easy to set up. I’m going to copy this. So, if you wanted to start from a baseline of what we give you, and add your uniqueness to it, you can do that by coming in here. I copied it. This is our customization page. We have our categories. You can see Applications, Communication, Device data. And our captures. So, in Application, because it’s checked, we would go through Installed Applications and Remote Access Traces. Under Communication, everything is selected here. It’s going to pull calls, and you can see, it nicely lays out with your … by icon, and icon and description. So, you can see exactly what we parse and what we support at this time, and your contact [cell].
Device data, again, come through check … You can see I have some hash sets in here. These are hash sets that I brought in prior to this demo. You notice they’re here, but they’re not turned on. So, I’ve used them in other scans; now I’m creating a new scan, I can say, “Yeah, I want to look for these pictures of the weaponry again.” It’s the same case, same hashes, but a different phone. You would be able to just come in and turn it on. Once you bring your hash list in, you don’t have to do it again. Same with keywords. When you bring in your keyword search, you would … until I delete it, or edit it, or change the name, it’s always here for me to turn on or turn off.
Multimedia, we give you a couple of choices. It’s All Pictures and Videos, and Audio Files. But you can also customize this. So, let me step through customization really quick. If I wanted to bring in a hash set, head over to our toolbar, for a new capture. And you can see, in my new capture, I can collect files, search four keywords, or search for hash values. Very simple to use. I would put it in that group of my hash sets. I would give it a unique name, and we’ll start with … something close to ‘unique’, because I have fat fingers.
And then, it wants me to bring in the hashes. So, there’s a couple of different ways I could do this. You’re working a cyber tip. Or you have files in an IP theft that you think may be on this phone. You can point it at the folder that contains those images or the files that you want to hash, and select it. It gives you the opportunity to … it says, “If we find these files, do you automatically want to tag them? Do you want to add a comment?” And I say yes, if you find it, tag it as level one, give it a “cybertip”, hit OK, so it hashes those files for me. Now I’ve brought in that list. I could bring in my own CSV list and I could also bring in my project [VIC or CAID] json files. I could point it to that, and it will upload those as well, and those will automatically be categorized. You would just do this and point it towards that json file, and the same with the hashes, would select that CSV file and import it.
Once you have your hashes in, it’s a matter of telling the tool what the hashes are. These just happen to be pictures and videos. How I want to identify pictures and videos – we have three ways of doing it, file extension, thorough file header analysis, and it’ll do this middle one, does file extension until it come across the file that does not have a file extension, and then it does a file header analysis. So, that’ll get you through the apps that don’t put file extensions on their pictures, or cash, or so on and so forth. It’s the speed optimized, if you will.
So, it depends on what type of scan you’re doing. We give you that granularity.
If you want to look inside the archives embedded in documents and picture DB files, you would check it here. And then, where you want to look in the phone – it would be the entire file system, unless of course you’re going to target a specific location in this targeted folder. Or let’s say you just wanted to pull pictures from the DCIM folder. You would be able to enter that and, here, put the path in, and run it there. So, entire file system … here’s the files referenced by artefacts records. What that does is takes those referenced files I was talking about, like messages, and links them together. So, if it finds a picture or video and it has any of those messages, email, downloads, so on and so forth, it will link those artefacts together. And then, you would save it and the hash value would be … the hash list would be saved.
Same with keywords – I come in, I put it in my keyword list, I give it a unique name, and I can type in my keywords one by one. I remember doing that a lot, reading through my report and saying, “Okay, this name is unique and I want to use that in my report.” Here’s my IP address. That’s very unique; if I find that, I want to automatically tag it. So, you have the ability to do that. And you also have the ability to add comments.
When you’re going to search for these keywords, first thing we do is make a listing of every file and folder on that phone. This will run those … if I check this, it runs the keywords against it at the same time. Fast and seamless, doesn’t add time to your scan. The next thing we do is parse out all those artefacts, right? All your messaging, all your emails, your contacts, your device information. As it’s parsing all that out, it will run the keywords against there as well. And then, your third is your content and metadata. This is where you say, “Okay, if there’s documents on here, I want to run the keywords against it.” You pick and choose the files you want – again, granularity. How you want to identify the files you’re going to run the keywords against. Where you want to look. And again, against the entire file system. And you would hit OK, and that would save your keyword list. So, very easy. Do this once or twice, and you’ll be an old hand at it.
Collecting files – same way. I want to go in and set … I just want to pull pictures. And I’m going to do a thorough identification from the entire file system. And that’s exactly what this scan would do – go through the phone and only pull out your pictures. I can also say I’m looking at an IP theft and I believe on the SIM card there may be some PDFs. So, I want to just collect the PDF files, so I’d be able to get that granular, decide how I want to identify, where I want to look, and set that as well.
So, you have a lot of options open to you, to create this custom profile. So, if my hash set … if I brought that in, and then my keywords, I brought that in, and then I would give it a name … and I would save it. A couple of other options – you can add some fields here, for when you’re starting your scan, if you want to put in the person who did the scan of the phone, their name, who the person was that gave you the phone. Any of that information – it’s automatically going to give you the scanned name, date, and time. You can make them mandatory. And now I have my demo, my custom demo here. So, the next time I go to scan, I now have that custom profile.
Let me walk you through how this works. I have a backup of a phone. I handed it back, and now I want to scan it. I can go into my phone backups here. I could point it towards the backup. And here’s an iOS, Apple iPhone 7. I’ve backed it up, and I want just the communication information off of that phone, for now. Because I handed the phone back or I’m going to hand the phone back. I don’t want to do a comprehensive at this point; I just want the communication information. And I’m going to start my scan. So, it weeds out all that other information, everything else I’m looking for. It allows me to do a scan pretty fast.
Now, this is a large, regular used phone. This is one of those heavily used … lots of pictures, lots of videos, lots of text messages. So, the first thing it’s going to do is it’s making that listing of all the files and folders in that backup. Once that’s done, it goes into parsing out the information. So, you can see now it’s going through and parsing out the calls and parsing out the messages for me. So, within a minute of me sitting here talking, it’s already parsing out all that information. Right now, it’s doing … so, this is an iOS, that’s iOS text. If there are any other messaging apps on here, it will start going through that as well.
You see here it’s taken a little pause. And I’m sure it’s going to move on, because I believe there’s also Facebook and there is also Twitter on this phone. So, there you go – it moved on now. It’s done Twitter, it’s done Facebook, over 13,000 text messages. It’s gone through, it’s pulled out [contacts], out of the [contacts], out of the calendar, and out of any other messaging it has. You can see where … right here, what it’s pulled out. And it’s finished. Highlight that again. So, it pulled out, out of the calendar, the contacts, the iOS messages, Facebook and Twitter, it’s pulled the contacts from. And then, if I want to go see, I can go in to my results. So, again, there’s 14,000 or 13,000 messages in here. Pretty decent-sized call log. A lot of contacts. And you can see the backup that it ran against, and in a minute, 30 seconds, I’ve done that. And I have my information.
So, now that I have that information … Let me actually go back into that again, and show you … if I wanted to hand this off, in a report, I can just go into my Reporting, and I have several options here. I have HTML, PDF, CSV … if I was collecting images and stuff like that, I could export it in [VICS] data. And there’s that standalone viewer. I can put this off into a standalone viewer and let somebody else go through this. So, the standalone viewer – it’s the analysis portion of the tool; does not require a license. You save this out to a USB drive, hand it off to the other person. They can go through, filter, sort, tag, and do anything they need to do to put that case together and put it to bed. But I can also save all this out into a … let’s say a PDF here. And if I wanted everything that I scanned, I would just select “All Records”. It would put everything into this report, and I would export it. It would export this PDF file into a directory. And here, it is the default location of my desktop, but that can be changed in settings as well.
So, I did that. Minute and 30 seconds, I got through the communication data. I can now go back, if I have the time … that was for backing up … I can choose that same backup folder, and I can go into … maybe I want to match hashes on some pictures. I can also run that scan. Or if I wanted to run one of my comprehensive scans, I can start running that as well. So, in a minute … in 30 minutes, I did my communication, then I could go through and do the next 25 minutes of putting everything from everywhere into a scan. So, you can see, very customizable, very granular, kind of lets you determine where you’re going with your case. Puts a lot more into your hands.
Just think about this use case: frontline school resource officer, frontline [at a domestic], frontline at a … there was a big brawl at one of the local bars, and you got some video. You have this in your MDT, you have this on an SRO’s desk, you have this on your laptop, because you’ve been called out to collect evidence. You can go through and start making the backups, start pulling out the information fast, on-scene, right there, it’s in your hands to do. Make the backups, do the scans later; or do the backup and the scans all at once. Lot of different use cases, lot of granularity.
Another thing you could do with the tool, before I finish up here… if you know somebody else who is using the tool, one of the things you can go is import profiles. And export. So, I’ve made this, custom matches, hash matches. I’m working on my case, and I know somebody in my task force has the tool, they’re working on the same thing. I run it against all the information I have, or I create it, I can export this profile, send it to them, and then, they could import that profile into their tool. So, you’re both using the same scan, so you’re all on the same page. With task forces, they’re going out and hitting houses, on search warrants, and you all want to be on the same page and run the same scans. One person can create the profile and you can share amongst each other. So, again, keeping with that, a lot of different things we can do with that.
Let me show you … kind of where I left off in my slideshow. If this is a tool you are interested in …
Let me put this here. That did not work out the way I planned.
There we go. So, I’ve talked about it, I’ve shown it to you. It was a high-level overview of the tool. We do have resources on our website to show you a little more detailed. You can go to tryadf.com, request a free trial of MDI, Mobile Device Investigator. Again, the resources … ADFsolutions.com/learn. We have our support page. And with this, with a trial, it’s 100% fully functional and 100% support with that tool as well.
With that being said, I have taken up enough of your time I believe. And if you want, I can start answering some questions.
I believe I also have Brett with me.
Brett: I am here before you.
Rich: Yes.
Brett: We had a question: Rich, thanks so much for the demo and the presentation. Had a question about the entire program, the cost for everything you’ve shown here. I was asking if it is truly only USD 1300 – it’s actually USD 1248. And that’s for a single year, with the annual renewal of 999. And we have all that price in public on the website, and we’ll be happy to send that to you as well, if you need.
There’s a question also, about does it work with gray key.
Rich: Okay, good question. It’s something that we have and are looking into. We don’t at the moment. But you have to look at what our main function is. And it’s to get you to the information fast, not only in the lab, but frontline. So, we’re working on speed, we’re working on eliminating the noise, we’re getting you to the information to keep your case going and to start your case.
For right now, that is not … it is something we’re looking at, but not something we support at this time.
Brett: And a question about filtering – Brian asks if you’re able to filter out images from games and album art.
Rich: Right. So, along with that photo probability that I was talking about … it’s an AI, it goes through, and based on the algorithm, and we’re always training it, so we are working on getting it to filter that stuff out as well. As far as whitelisting, it is also another thing we are looking at doing, specifically for your images. Because that’s what gets in the way of your cases. So, as I mentioned before, our development team and the whole team at ADF really listens to what everybody has to say. And that we have heard and we work on.
Brett: Rich, also, there are some questions from a few of the users that I think were asking questions as you were going, but I didn’t want to interrupt you. So, what we might do, if you asked a question and we haven’t gotten to it, we can definitely follow up and capture your questions. We can absolutely follow up to dive in deeper with you on those. And I think that might be the best way to handle it because some of these were related to the actual demo itself. So, that’s it for questions, unless anybody else has any. And those of you that asked questions that we didn’t answer, we will follow up with you individual and make sure that we dive a little deeper technical for you on those.
Rich: Sounds good. And there was one mention of my email address being wrong. And I just fixed it. So, it is adfsolutions.com, not adfolutions. Appreciate you pointing that out to me. With that, thank you, everybody. Appreciate it. Any questions, again, there’s my email address. And I hope to see you at one of the shows or talk to you on the phone.
Brett: Thank you, Rich.
Rich: Thank you.
End of Transcript