
For those not already aware, FIVE does not refer to the number five. It stands for Forensic Image and Video Enhancement. Although the forensic enhancement of imagery forms the core of this powerful application, the key stages prior to enhancement, such as the lossless extraction and conversion of video from proprietary formats, are also present. This was detailed in a previous Forensic Focus article.
The final stage in any forensic video process, however, is Presentation. Here, Amped Software will explain in greater detail how various filters and techniques can help you in presenting the visual and data evidence.
The overarching Forensic Video Analysis (FVA) components of integrity and authenticity must flow throughout any forensic video process. An analyst cannot report on one thing and then present something different. Presentation media must also support any report or statement of facts by giving visual context to the documented information. Also, any cross-tool work must be validated. What was exported from one application may not be read correctly by another.
Presentation filters and methods have become a key element to every Amped FIVE update, ensuring users can process, convert, analyse, interpret, enhance, and then present image and video evidence all within the single application.
Let us use look at this CCTV executable file as a working example:
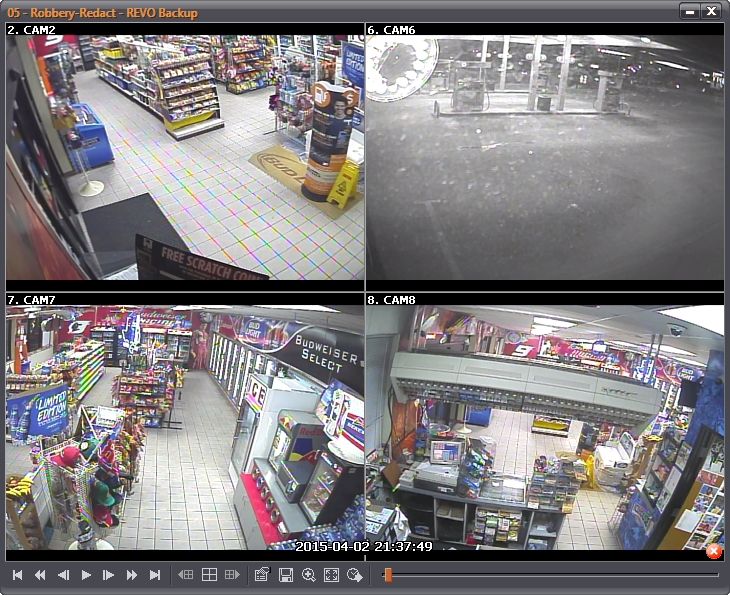
This digital file has the unique exhibit reference of AB/1.
The file type is relatively common, with the video, any audio, the date and time information and any other metadata all within a launching executable player. What is also common, is that it is often very difficult to do anything with it. Even when certain tasks are possible, the player may not present to you what was truly recorded, and the video may get transcoded if any proprietary export function is used.
Not with Amped FIVE however. Simply drop it in, and all the multimedia is extracted ensuring the pixel data is unchanged (where possible), and then it is loaded along with the date and time information.
You will notice that we have named the folder with the exhibit reference, which helps when working on multiple exhibits.
At this point we have some decisions to make, and these relate to the tasks you have been asked to perform or the questions being asked of the video. Consideration must also be given to who will be receiving the material and how it is to be used or viewed.
The first issue to be addressed is the visual representation of the imagery. Once any adjustments have been applied, all other chains can simply be copied. It’s one of the great things about FIVE, you can work on video and images in multiple ways and just copy the chains or filters to avoid repeating work.
For each question or task there will be a workflow, with the processing of video for legal use governed by national guidelines. Most will detail the importance of a forensic methodology when conducting any work. Consequently, when changes are required to be made to video, they must be conducted in a scientific manner and there must be a reason to make those changes. To put things simply, there must be objective reasoning to any processing, rather than subjective.
Another issue that is worth adding here is the decision not to change something. An example of this is when presenting what was recorded to how something should be displayed. To restore and enhance a licence plate, we may not adjust the Aspect Ratio of the imagery, as we should not be adding any unnecessary processing to the pixels. However, if we want to present the correct shape of the vehicle then we may have to correct the Aspect Ratio.
Task: Produce a viewable version of all the video.
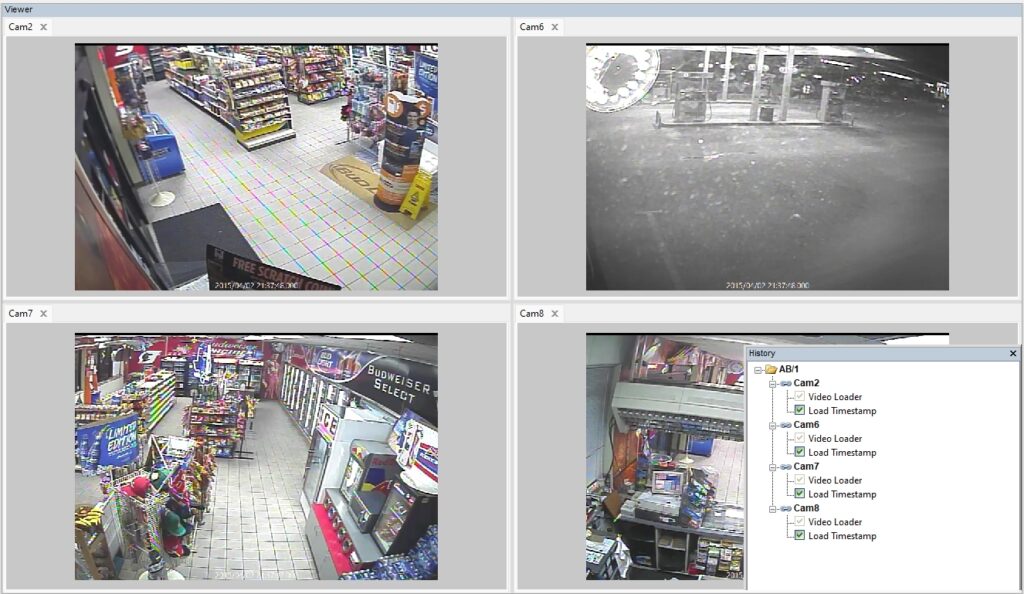
Three of the four cameras are of interest so, after copying those chains into a new folder, it is time to start working. It is easy to work out a filter chain using one camera and then simply copy and edit the others.
After a few moments, our first cameras filter chain is completed, and we can visually see the process flow used within the History Panel.
Taking it step-by-step, after the video is loaded, we have Aspect Ratio.
Many Digital Video Recorders (DVRs) are still attached to analog cameras and will therefore be ingesting an analog video signal. As the analog to digital conversion changes the display, we first need to adjust the aspect ratio. After adjusting the output to 4:3, it is time to move on.
The Undistort filter comes next to correct the lens distortion. This happens after Aspect Ratio as we must conduct restoration and enhancement in the reverse to when the issue was introduced during the image generation. This is known as the Image Generation Model.
Resize is here as we must consider how all the cameras are to be presented together. If no resize was conducted then when they are all viewed together, it would be larger than full HD. We would not be resizing for analysis, as this would affect the pixels. It is often required for presentation however and if we need to copy this chain for other purposes, we can simply remove the filter from that chain.
After adjusting some of the color, the original timestamp is loaded. However, we have disabled the presentation of this timestamp on the video but held the data within the chain. You will see why shortly!
The Range Selector is next, where we have set our first and last frame according to a specific timestamp. We will then be able to set the same time to each camera. Consequently, each camera will be starting and finishing at the same time.
Using the Time Calculator, we can see the real duration of the video.
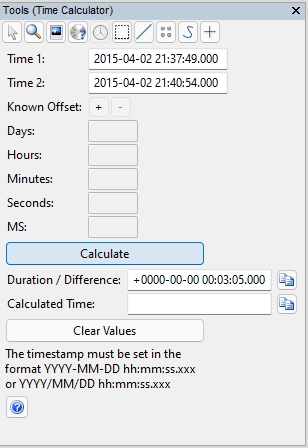
Change Frame Rate follows, and the video speed from this format is controlled by the time. By quickly adding our calculated time into the Change Frame Rate filter, our video plays in the correct, real time.
Adjusting the timestamp is often required. Here we have used the original timestamp data but added an hour’s difference to account for a time-zone error, and then interpolated the missing milliseconds. This is the timestamp that will now be displayed on the top of the video. Visualizing the milliseconds, which were never in the original file, is fantastic for camera synchronization.
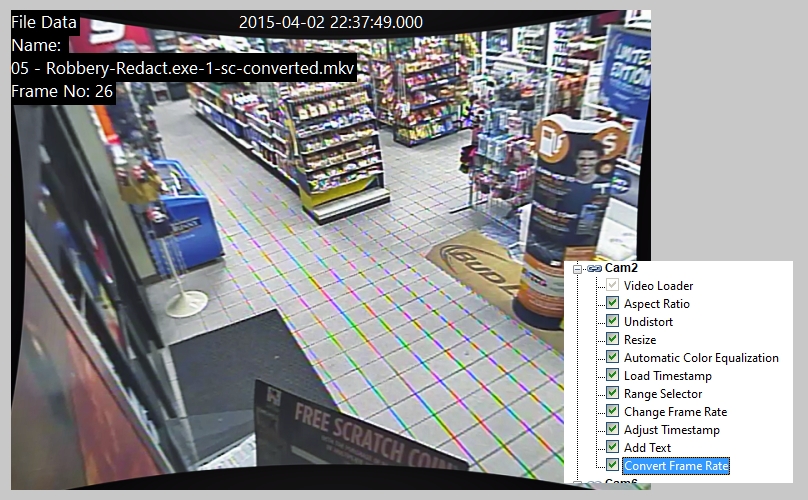
We have added some text data using the Add Text filter to identify each video and frame, before finally converting the frame rate.
Convert Frame Rate is required to ensure all the cameras have matching frame rates. This will ensure they are all in sync when we join them together.
After quickly copying the filters to the other cameras, and placing them into a folder that we have named ‘Visual’, it is time to join them together.
There are multiple linking filters to aid in presentation, from Timeline, to Picture in Picture. Here though, to achieve our first task, we will use Multiview. We already had this in mind when we were working on the visual presentation so we have already adjusted the camera sizes to fit.
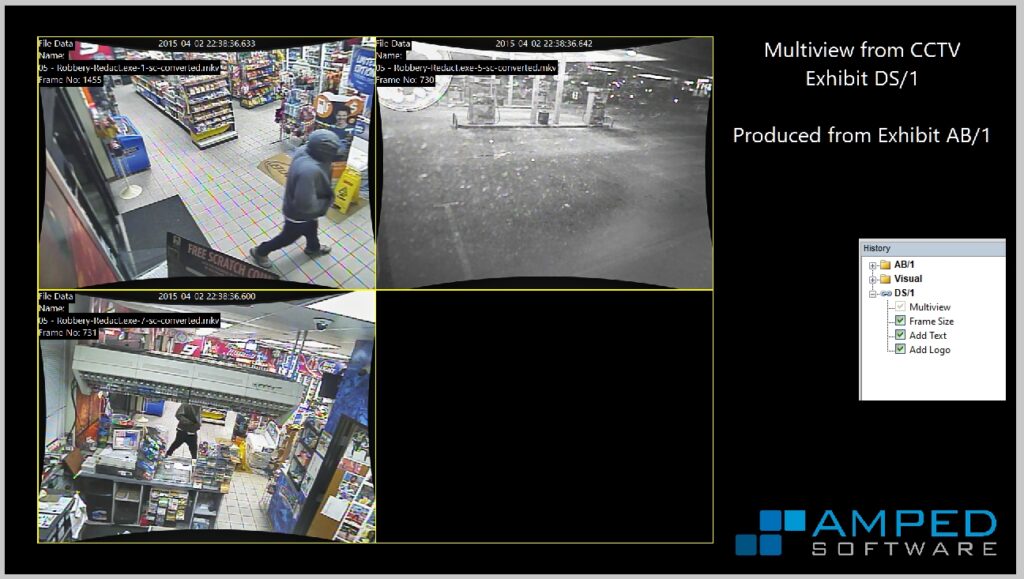
Multiview allows any point within any chain to be used as an input video. We used all the camera chains and then placed them into a quad view. Multiview also has resizing or padding/cropping options but we don’t need to use them here as we have already resized them individually.
After placing the Multiview in a Full HD, 16:9 Frame, it’s a quick process of adding the title text and the logo.
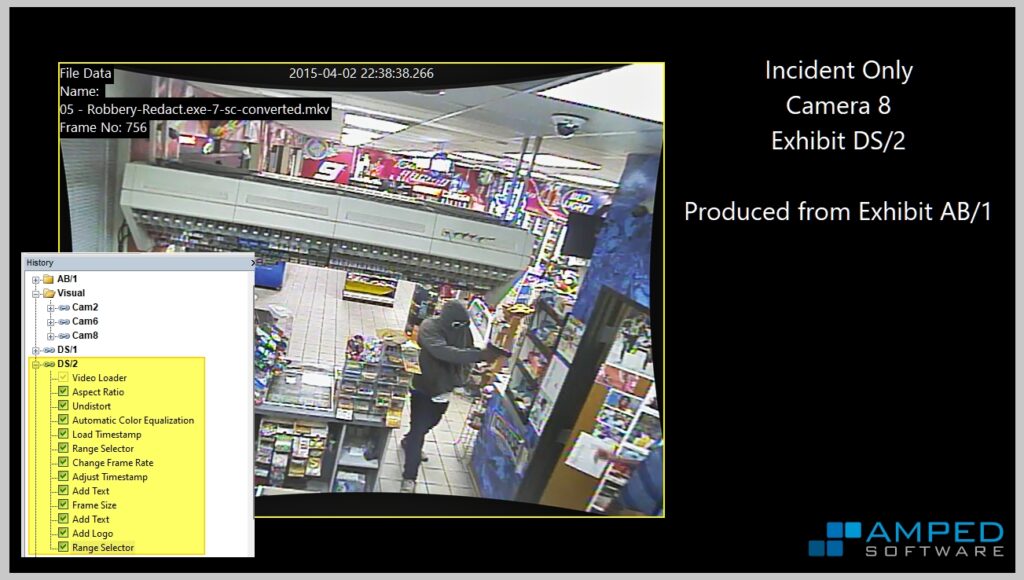
Task: Produce a single video of camera 8 of just the Incident.
Things get easier now as most of the work is already done.
After a quick Copy / Paste of Camera 8’s chain we have removed the Resize and the Convert Frame Rate filters. Copying, but then adjusting the Frame Size, Text, and Logo filters from our first exhibit nearly finishes our task but we finished it off with a further Range Selector as we have trimmed the beginning and end to only show the incident.
It is important to highlight though that the frame numbers displayed refer to the original extracted video. This ensures that whatever version is viewed, any person referring to a frame will be looking at the same one.
Task: Produce an image sequence showing offenders clothing.
This is a common request and may often be used when a suspect is known, and clothing will be searched for after arrest. Remember, if any CCTV is used where IR light has been introduced into the scene, color may be very different.
It is again a very quick process of copying the Camera chains required and removing some of the filters that were included purely for the video presentation. Finally, for each chain, we can use a filter called Sparse Selector to only select the frames we want to present.
We can link all those frames together using the Timeline filter. So, after selecting the two Camera chains with our selected frames, we can prepare the presentation.
For this exhibit, we know that it will be printed so, we have prepared the output ready for A4 using the Frame Size filter again.
Finally, after adding a title, we can annotate all the images to highlight any specifics.
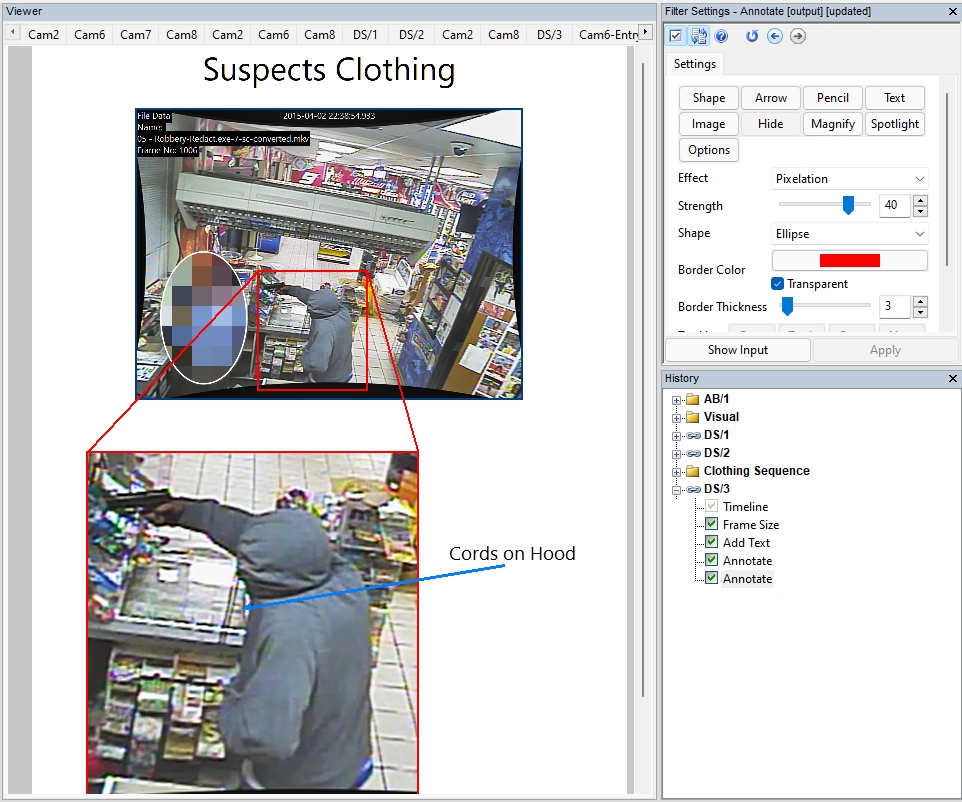
You may notice we have applied two Annotate Filters. The first is for the victim / witness, as we want to hide him. The second is for all our suspect annotations.
Annotation gives users many options on a frame-by-frame basis. Therefore, we can quickly magnify different areas on every page, and then mark specific points with arrows, text, or graphics.
Task: Produce an annotated full video sequence showing key moments
Again, we have already done all the hard work, so it’s back to using the Timeline filter again and simply placing the video chains in order. However, this time we must copy 2 of the chains again as they are needed twice. Once for entry, and again for exit.
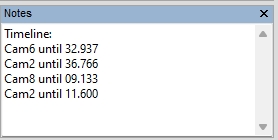
As we have interpolated the timestamps, using the Adjust Timestamp filter earlier, we can use the milliseconds as our cut points between the cameras.
Selecting our ranges for when the suspect is seen, to then moving to another camera, is quickly achieved with the Range Selector Filter.
Reminder: Using the Notes Panel is a great way to note down your timings.
Once we have our timeline created, it’s another simple process of adjusting the Frame Size, and then Annotating.
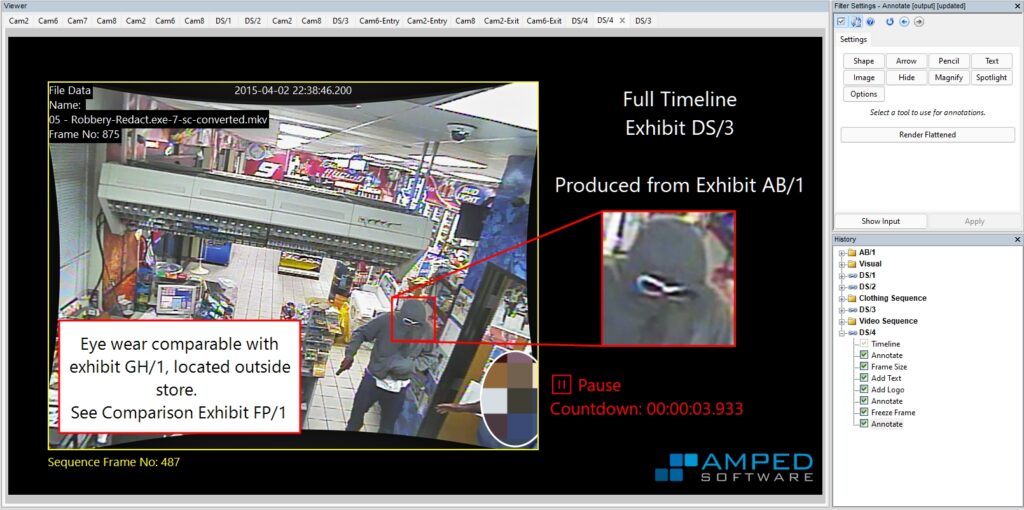
In this chain, we have separate Annotations for hiding the victim/witness, the suspects movements, and then another one after the Freeze Frame Filter where we have detailed the item we wish to highlight. Holding a frame for several seconds gives the viewer a chance to read the text and observe the object. The filter can add its own Annotations for the Pause and Countdown, which saves you doing that separately.
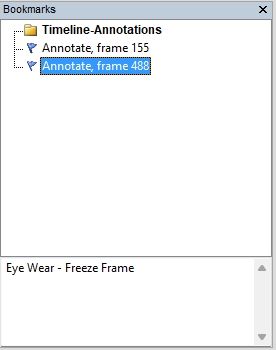
Reminder: If using multiple Annotation Filters for different objects or persons, you can bookmark each filter and either rename the bookmark or add a description to help you in navigating the sequence.
Our Annotated Timeline Sequence is now finished and labelled correctly with the individual exhibit number. We can export this at the end as a video using the Video Writer filter, along with any other video, images, sequences, or PDF documents.
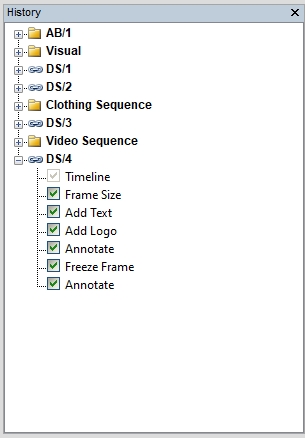
The History Panel now has a full record of every process and all our labelled exhibits. Even when working with multiple original exhibits and creating multiple derivative or demonstrative exhibits, every single process is logged and will be documented fully in the report.
The management of evidence, and the presentation of it, is such a huge topic. However, with a science-based approach to video conversion and enhancement, followed by powerful management and presentation filters, Amped FIVE users have everything they need to analyse and process images and video for legal purposes all within a single application.
Preparing images for a press release, creating large image comparison charts, or simply creating a video timeline, FIVE’s flexible workflow can manage any task.


