Michelle Coan: Okay. Hello everybody, and thank you all for joining us today in this session on how to quickly process all your videos and audio for release in Amped FIVE. My name is Michelle Coan and I’m a marketing specialist of Amped Software. Joining us today from Amped is today’s presenter Blake Sawyer whose role in Amped Software is technical sales support and training. The webinar will last about 75 minutes with an additional 15 minutes for questions. So if you have any questions during the presentation, please write them down in the Q & A box. We will either answer them directly at the end of the webinar, or if we’re not able to get them all because of the time, we will make sure to follow up by email after. So this webinar is being recorded. As you can see, there’s a little red button at the top. We will make sure to share this presentation with you so you can watch it again later. And you can share this with your colleagues and friends. Just one final note about the certificate of attendance: tomorrow we will send you an email with instructions to request yours. Please note that a certificate will only be issued to those who request it and who has attended the entire webinar. So without further ado, I’ll give the floor to Blake.
Blake Sawyer: Hey everybody, thanks so much for being here today. I appreciate everybody’s getting up and being here. Just to talk a little bit about the webinar that we’re looking at today. We’re going to talk about Amped Software in general. We’re going to discuss some of the challenges that come along with video and using video as evidence. We’re going to look at how Amped FIVE can help address some of those challenges, and then see once we’re done with those challenges, how we can prep our media to release either to the public or prepare for court.
Just a little bit about me. So I came on to Amped Software in 2019. I was a user for several years before that – I think our agency bought it in 2014. I was a former digital media examiner for the Plano police department in Plano, Texas. I averaged about 90 video requests a month and our department would get in about an additional 200 or so a month. We had about 300 video requests a month to get through pretty quickly. And FIVE was really the only tool we could do that with. I also taught some video courses for LEVA, specifically to officers to help them understand video, how to use it and how to get the best evidence out of it. My education, I have a computer science degree. I’m also a LEVA certified forensic video analyst, as well as a IAI certified forensic video examiner. If you have questions, if you ever reach out to support and we’re helping you out, we all have worked the cases, and we all have a lot of training that goes into that as well.
So a little bit about Amped Software. We started in 2008. We have a subsidiary here in the US. It’s an Italian based company, so a lot of our staff is going to be based either in Italy or throughout the rest of the world. Our mission is to become a one stop shop for any needs related to image and video analysis as well as for enhancements. So if you have a problem, we can help you solve it. The vision is to achieve justice through science. So everything that we do is going to be backed with a scientific process, going to be backed with the research and available science that’s out there. We’re in over a hundred countries or right at about a hundred countries. And then this is a picture of some of our staff, obviously not all of it. And I believe this might’ve been pre-COVID because you can see everyone’s face.
So some of the main problems that we get with video is most of the time, the best option, the best video option, doesn’t “just play”. When you get a file, it’s really hard to get it to play. Part of the reason is because there’s hundreds of video types and even more special players. So if you think of, as we’ll see, a lot of these video manufacturers and CCTV manufacturers, and even some body-worn, and the in-car videos, they all have their own flavour, and a lot of times they try to protect those by requiring a special player or obvious gating some of the ability to play that back. And even if we can get it to play, it’s going to be really hard to get those files to play, to get a video clip out, or create a still without losing some of our quality.
And then if you are able to get the information out, you are able to clean it up. Some of the challenges that come up are what are some court approved methods that we can use to make image clarifications, to be able to show that we didn’t just hit the magic Enhance button, that what we did was valid and can be reproduced and can be repeated reliably. And then often there’s a need to redact information or to annotate some of the details. If we’re going to release that information, or sometimes if we’re presenting it for court, we have to make sure that the information we’re showing is accessible and is the best quality version, but also if there’s sensitive information that it’s not obvious or easy to get to.
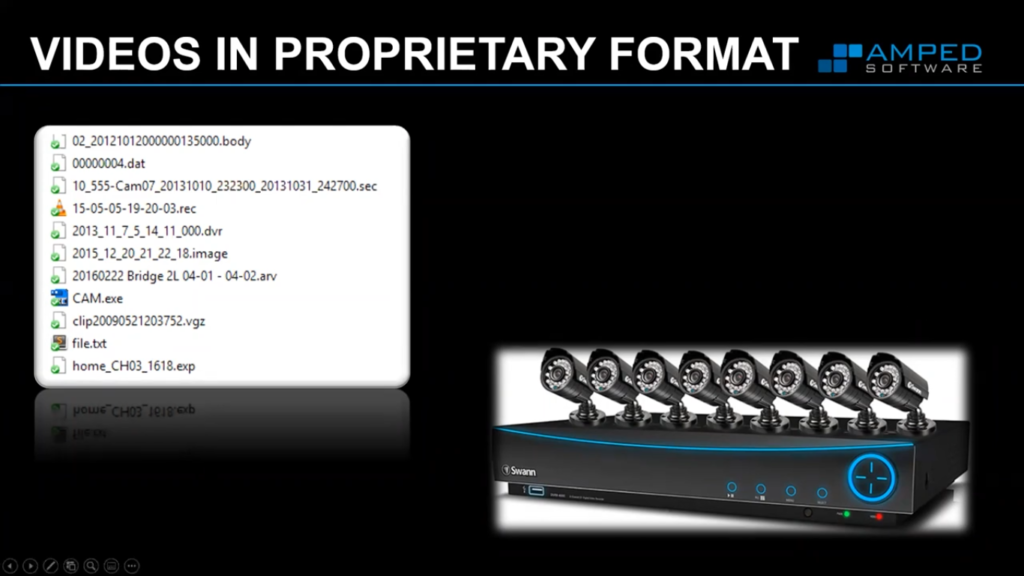
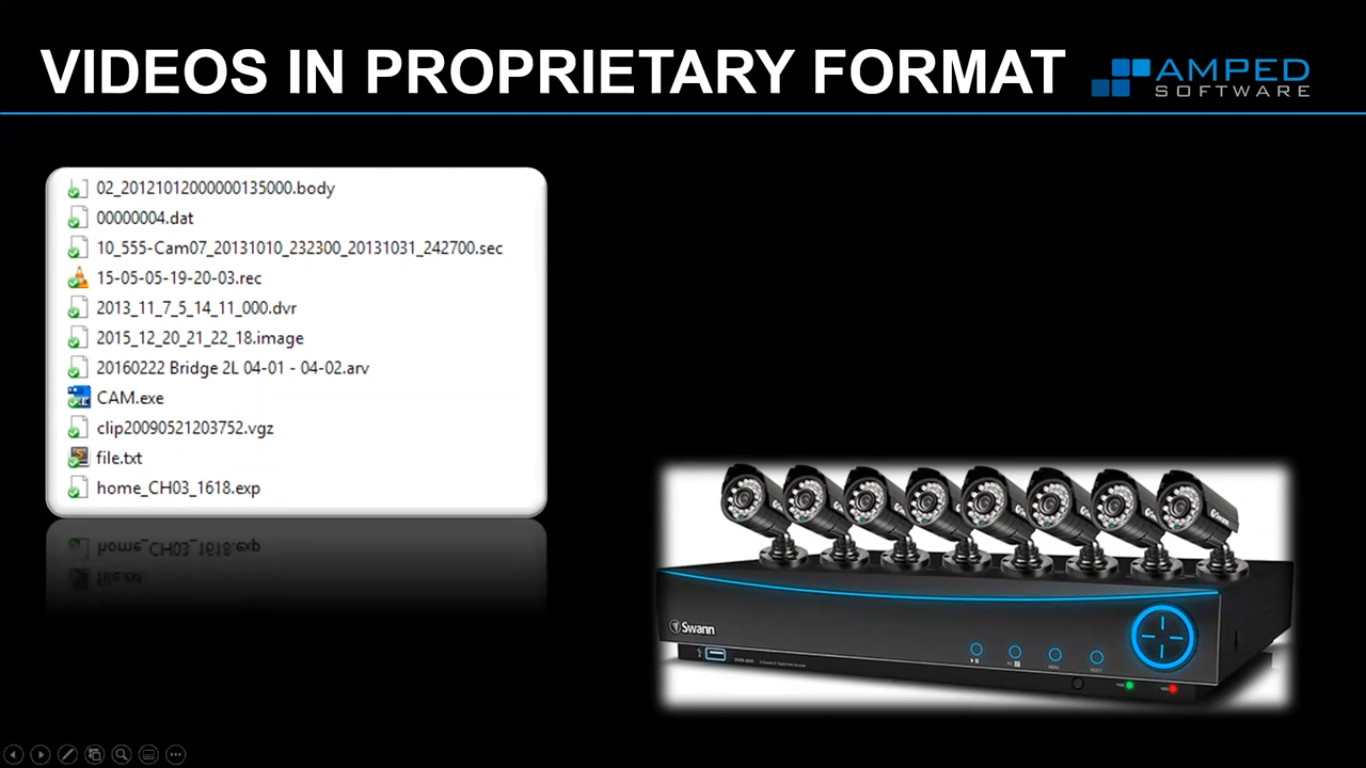
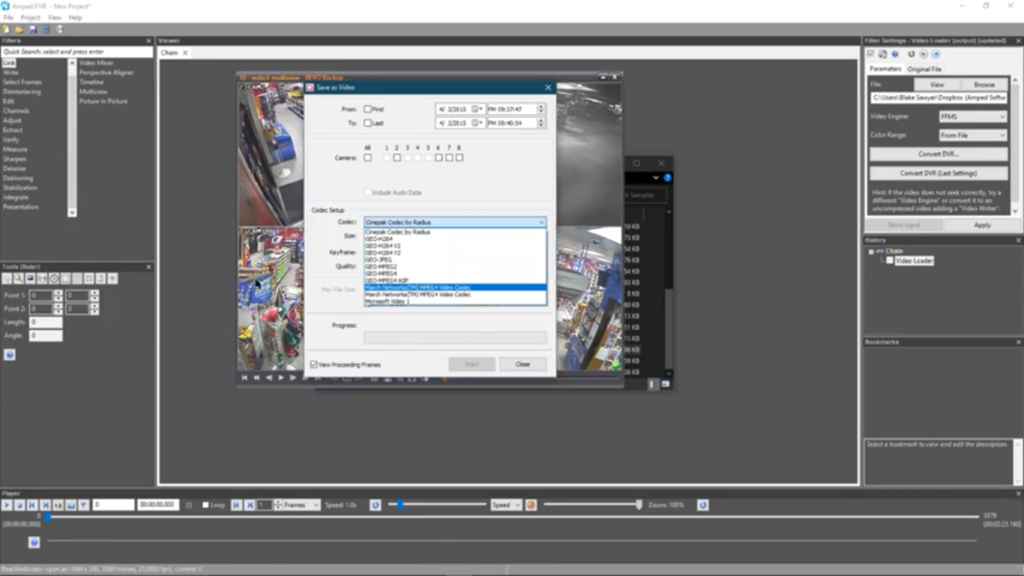
When we look at videos in proprietary formats, that’s going to be one of our first main issues. So you’ve probably seen things like this, that come from a CCTV manufacturer, where it’s a .DAT or a .SEC, or a .G64 or a .N3R, or there’s lots of these different file extensions, the little letters that show up after the file. And so being able to get those files is one thing especially from a CCTV device. But the other part of it is if you’re trying to go to that device and export the right one, which one of these is going to give you the best quality version? So this came off of an older, I think it’s a PC based system. And if you look at it, there’s eight different options, as well as a checkbox to write this to a CD or DVD. If you look at this file, the executable, that .EXE is the only one that’s not going to transcode your file, and, and where that comes into play, there’s a lot of times we get some confusion over the difference between a container and a codec.
So a container is just a box, the wrapper that contains the information. So if you see that .AVI, the .SEC, the .MKV, the container is that extension. And that’s just a list. It’s usually the way that box is designed, so that when it’s entered into your computer, your computer says, I know what a .AVI is, I know what program is supposed to open that up. Once you install the special player for the .264 file, then the next time you load that, it’s going to say I know what a .264 file is, it’s supposed to use this special player. So that container is really just, it’s like when you move into a house and you take your boxes and you label what room they’re supposed to go in. What the container is, is it’s just a box, and on the outside of the box tells it what room it’s supposed to go in, what program is supposed to open it. Inside the box, if you can open up the box and look inside, that’s where the codec lies. And the codec, again, it’s an abbreviation for coder and decoder. So you can like shrink that down to the word codec. What a codec is, it’s a way to tell the computer, it’s a list of instructions that tells the computer how to save the file, and then once the file is saved, how to open that file back up. And so you’ll see these pretty often, H.264 is probably the most common one we see, but there’s also others like motion JPEG, MJPEG, MPEG4, HEVC, or H.265. Those are all really common video specific codecs that we’ll run into in the wild.
And the other thing about a codec. So just to help visualize this, is just because I have that container that says AVI, if I look inside of that, I can have more than one video. I could have audio, I could have more than one audio, and then I could also have some metadata information. So a good example of this is are in-car videos. When I worked at Plano, we had an MP4 file, but if you opened up that file inside of the player, you would see additional text information such as the time code, the speed that the car was going, when the brakes were turned on, when the lights were turned on. That metadata is extra data that’s related to the video, but not necessarily something that VLC or Windows Media Player is going to understand. So if it doesn’t understand it, it ignores that. But that can be a good thing because that’s sometimes extra data that we don’t necessarily need, but it can also be a bad thing. I’ve seen several times where a file has had more than one video inside of it, but because the player that we use, the standard player only looks for a video, it goes to the first one, plays the first one and ignores the rest of the videos in that container.
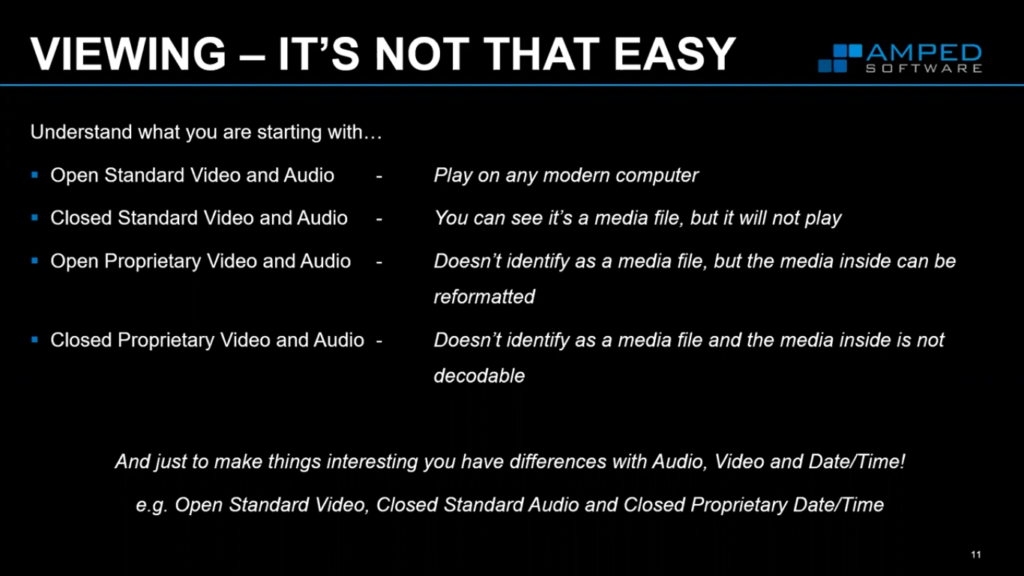
So to help put all this together, to be able to view that file, to be able to get that file out, it’s really not as easy as it looks like all the time. So part of the reason is these different categories that we’ve kind of come up with. The first one is an Open Standard Video and Audio. So this is going to play in almost any player. So if you get that file, you can play that file back in Windows Media Player, VLC, whatever player you decide to use. The other one is going to be a Closed Standard File. So you can see that it’s a media file, but the inside of it won’t play that file. Lots of times you may need the codec in order for that to happen. And then sometimes there’s an Open Proprietary File. This one doesn’t show that it’s a media file, so it’s a.SEC or a .G64. So it doesn’t show when you try to play it, it doesn’t show that there’s video, doesn’t show that there’s media inside of that. But if you can understand and get into the box and look at the stuff inside of the box, you may be able to get some playable files back. And then lastly, there’s the Closed Proprietary Video and Audio. These are ones that don’t necessarily identify to your computer that it’s a media file. And if you open up the box, the information inside may not make sense. It may not look like a video file to you or to a standard player, even if you were able to open that up.
And so that’s really just the difference between trying to get those files to look and play back. But sometimes you can have different combinations of that information inside of it too. So you could have a video that plays anywhere, but then audio that doesn’t play anywhere. And then some proprietary data that’s related to just the date and time, like the speed and the brakes, and when the lights were turned on, on that in-car video. But even if I can get these files to play back, we may run into issues with actually being able to view them.
So things like this, where there’s two videos that are playing at the same time from two different channels inside of this file. And so you get this kind of ghost effect where neither file really looks and displays the full image. Sometimes there’s analog artifacts that show up too. So if I’m able to get the file to play back, I may not be able to get a very clear picture just because it came from an analog system. So this is a video or an image that was sent out for identification. Does anybody recognize this person? You can’t see the person, but you can see here are these kinds of jagged edges around the edge. Let me make it bigger. So if I look at those jagged edges, what’s happened is there’s two different pictures at two different points in time that are being shown. And so it just kind of separates, makes it really hard to even see the logo.
So because of these problems, a lot of enterprising agencies resort to, well, what’s the best that I can do. And sometimes the best that they can do is just take a picture of the screen. So these are all images that went out for release. Can anybody identify these people? And you can see, either through the little waves that show up on the side of that first picture, or the pixels that show up on this picture in the middle, what we’re looking at is we’re looking at pictures that somebody took of a screen. And so we’re not getting the best information out, and one of these we’re even getting some glare from the room in the picture. So we’re losing detail and we’re making it more difficult to see what’s actually happening. But playing it’s not the only problem. Being able to get that information is not the only problem. Often the problem that we get, even if you can get a file to playback, is that the information we’re looking for is hidden in one of the few different ways.
The first one is the camera’s not placed well enough. So if I’m trying to get a picture of this guy way in the back, there’s no detail there. There’s not enough pixels there because the camera wasn’t set up to show that person. It was set to show people as they show up at the register. So because he’s so far away, we’re not going to be able to see much detail in his face, and that’s an issue with the placement of the camera.
Sometimes the placement is good, but there’s just not enough pixels. So here’s an example that was taken with a dashcam. And if you look at it inside of that license plate, there’s only six pixels for all of the text inside of there. Typically as a rule of thumb, what we teach in our training is that you should expect to work with a license plate and get a pretty good result if you have around 12 to 15 pixels as a minimum. And so this is half of that. So we have half the pixels that we need to be able to try and get good detail out of this.
Other times, there’s too much compression. So this is a video that was played placed on YouTube. And if you look at the file, there’s not enough information there because it’s all been compressed out. All the detail has been removed from this image to make it playable on YouTube.
And then sometimes we have enough pixels, we have a good amount of compression, but we just don’t have enough contrast. We don’t have enough information to be able to see the data inside of that license plate. So there’s not enough change from light to dark or dark to light.
So in the past, the past approach to being able to get a file to play back, get a file cleaned up so that you can get the best information out, send that best information out and compile it to make demonstrative exhibits, or to be able to prep something for court, be able to put together the story of the different video clips from different cameras, has been to use tools that were created independently. So you can get one tool for playback, and one tool for clarification, and one tool for presentations. You have to know each of those tools pretty well to know what’s happening at each one, and the potential issues with each one. So as a result, your knowledge of that video evidence gets increased as you have to go in and understand the different parts. And then a good rule of thumb, regardless of the tools, is just to understand the best practices and laws governing your acquisition and usage of the process and the materials.
What we’ve done is we’ve kind of created an all in one tool in Amped FIVE. So with Amped FIVE, it supports hundreds of different formats. So if you have a video, odds are really good that that file is going to play inside of FIVE. So if you have one of those random .SECs or .G64s, or .264 or any of those random CCTV video files, bring it into FIVE and FIVE will play it for you. If you can easily convert those files so that you can get that file in, convert it, and then you can watch it on your computer. Other people can watch it on their computers. If you have days’ worth of video, you can convert all of that video really quickly so that a person on light duty for example, can sit and watch days’ worth of video.
And then we have over 130 filters to be able to help you clarify the image, get the best result out of it, and then create a presentation piece that you can send out. It’s great. It’s a great tool for people that spend their time working on video, specifically for analysts. And the reason that I bring up analysts is because there’s a lot of analytical tools inside of FIVE as well.
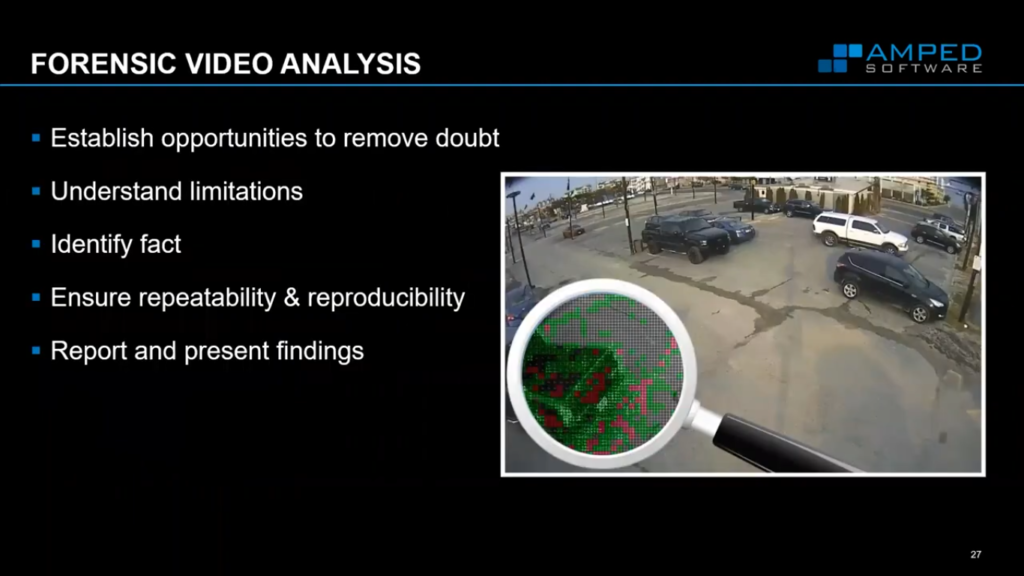
So it’s not just a clarifier tool, but understand what’s happening at the metadata level, at the block level, to be able to understand where there’s new information, where there’s copies of information. Going through an analyst helps to remove any doubt and remove the opportunities for doubt, by saying, this person has been trained. This is the information they know, this is the tool that they did.
They’re able to understand the limitations of the videos and the data that they’re working with, identify facts and say, this is useful inside of this. This is what I can say about this file. And then if they’re using a good tool, you can ensure that it’s repeatable and reproducible, and then report all that information and put it together in a scientific forensic report that they can then send to the court and get entered in as evidence.
Inside of our ecosystem, inside of the Amped ecosystem, there’s actually four different products. So Amped REPLAY is designed so that the frontline investigator, so that the investigator in a case can look at video, can play that video, can get the pertinent information out without having to have that analyst look at it, without having to have a full understanding of how video works and what’s happening in the background.
Up from that is a product called Amped DVRCONV. So it is a converter, kind of a batch converter that you can put onto a machine to convert all of the videos that come into your agency, or every video that comes into your unit. So that they’re all the same when they go out and they all are playable, they all have consistent information.
And then there’s Amped FIVE. FIVE is the one we’re going to focus on today. In it, it has the same player, same video engine that’s in REPLAY, has the same conversion pieces that are inside of DVRCONV, and has all the same presentation tools and items to get information out there in Replay. But then also has the clarification pieces so that you can get better views of faces or details or license plates or text, or be able to put together comparison or analysis charts inside of it. And then lastly, there’s Amped AUTHENTICATE, which helps as a tamper detection and source identification tool for images and videos.
So going from easiest to most specialized, Amped REPLAY, Amped DVRCONV are really kind of designed so that people with a minimal amount of video understanding can get the best quality evidence out to others inside of their agency, or to be able to put that out to the public. FIVE may need a little bit more training, and then Amped AUTHENTICATE needs a little bit more training and understanding of what’s happening in the background, just so that you can interpret the information that comes from the tool. If you follow that full forensic workflow, so if you use FIVE, you can take files like that one that we looked at earlier, where there just wasn’t enough detail because of compression, and a little bit of contrast issues, and we can get a good result out of it. So you can start to understand what’s happening inside of this picture, and be able to get more actionable information out of it. It’s a repeatable process, so everything I do is going to be repeatable. So every step of the process is going to have a full forensic report that I can send out to others.
So to help see that and help understand a little bit better what’s happening, it’s always helpful for me if we can look at the software and understand the tool and what it is that it’s doing. So if I bring up Amped FIVE, so this is the interface for Amped FIVE. When you bring it in, it has a player, it has the list of filters that you can use over here on the side, it has your settings over here, and then it keeps full track of everything that you do. So I’m going to bring in a file, and to bring in a file, even if it’s proprietary, like this first video right here, it’s just as easy as dropping it into the software. The software is going to say, hey, I know this file, I can get this file to work, but I may need to convert it first. You can choose the settings if you want. You don’t have to choose the settings. If you don’t choose the settings, it’s just going to do what it did last time. And then when you click OK, it’s going to create a converted version of that file so that other people are going to be able to watch it. And it’s also going to do that in a way that is forensically sound, keeps all of the information intact and allows us to watch this video.
So now it’s ready to go. It’s not a very big video like we looked at earlier. So the placement on this video was a bit of an issue. I scrubbed through a little ways. Here’s my suspect. And what I may want to do is I may want to show some important information about my suspect from this. So it’s a really large video. It’s 30 minutes long, it’s about 40,000 frames. But the part from this case, this was one of my old… it was a theft turned robbery. But one of the things that stood out in this case, that make him easy to follow from camera to camera to camera, was this white pocket in the back. So if I want to make a clip, so that I can show people that white pocket, then I can go into FIVE, make a Range Selector and say from that spot (scrub just a little bit), that spot to this spot, I want to make a clip. So I can click Apply, and if I want to make that clip, it’s really just as easy now as hitting this Lossless Trim inside of the software. And now I’ve made that clip. It’s playable. It’s going to play for anyone. And I have that in a medium that I can send out immediately. In fact, if I go to that folder that I started in, you can see here’s the original file. So this is the entire video that I can now play in VLC. And here’s just that little clip. So by using the Lossless Trim button, I’ve kept all of the pixels exactly the same as they were in the original. But I’ve done that in a way that I can now get this file out and I can play that for other people. So he’s waiting for the opportunity so he can go snatch a purse. Eventually he does. Then she chases after him. And that’s when it turns into a robbery.
You’ll notice there’s a couple of other things when I dropped in this file, the first one is this clean version. What we’ve done with FIVE is by bringing it in into FIVE, FIVE goes in to find the actual video information. So if you remember back to our box illustration, so the box was that .SSF and inside that box was the video that we’re trying to look at, but there were some other things as well. And so what the software did was it went in and said I really need the video information in a way that I can play that. It picked up the video information, put it in this little clean file, and then said from here, I need to put that into a file that will actually play back. And so that’s why it then converted it into this .AVI. And that AVI will now play in any player. We can do that with just about any file that you get. So here, for example, just another file. If I drop this file that says burglary into FIVE, we’ll just choose our last settings. FIVE will go in, look at the file, process it, take the information out, put it in a new box, and now it’s made it playable.
So here I have guys as they’re running out of the door from a burglary, I believe they stole a safe. So if I’m trying to get good information to send out to the public about these two people, what I can do is I can go ahead and make another range, say this is the part that I care about. I don’t care about the part where you can’t see anybody, but from here, we’ll say Range Selector, and just make a clip to show that they put the safe in the back of this vehicle. So now I have that clip, that’s ready to go, and I can send that out if I need to.
But there may be other things that I need to do with this. We’ll look at the Presentation pieces a little bit later in the talk, but just as a preview, one thing I could do is I can go to this part right here, where I can see-ish, a person right here, that’s pushing the safe and that he also has a backpack on. So I can pause the video for five seconds. And then I could just call attention to that backpack. So Presentation, go to Annotate. I’m just going to use the Magnify tool, put it down here in the bottom. And here’s my suspect. And now I’m going to make an arrow to the backpack and say, backpack, (backpack, nope, just backpack). Right, so I have my backpack. I have all that information laid out. And if I want to send this out so that other people can see it, I can just hit the M key to create a bookmark. And that bookmark is now going to be exported whenever I’m done with this file. So that image is ready to go. I can go to each of these now, and kind of keep those going so that they stay for that full five seconds. And now when I play this video, my video is going to have all of these played together (turn off my arrow). So the video pauses for five seconds so that people can see that information. They can see that, and then it continues on. So, if that was something important, I can put that into my clip, really easy so that people can see that. And then I can write this file out so that other people can watch it later.
So we have a playable version of a file that I can pause where I need it to, to show the information that’s important, send that information out in a repeatable way that’s always going to show up for me and always do the same thing every time I use the software. While that’s going, we’ll look at the next file. So the next file, if I try to play this, it’s a .MP4, but Windows Media Player does not like it. We’ll try it in something else. If I tried it in VLC, VLC might play it, but there’s a lot of issues that are happening with this file. The first is that it plays a little bit odd. It plays kind of scrunched down, and then the details in it are kind of being removed by the compression.
So if I have that file, I can bring that file into FIVE. FIVE will understand how that file is supposed to be played. And you can see that it did it at half height because that’s what the file was saved to play at. We can go in and there’s a couple of different ways that you can make this look more correctly. I’m just going to use the Aspect Ratio button, because Aspect Ratio is also available in Replay. So just like the Annotate tools that I just showed you a minute ago, the Aspect Ratio tool that will able to play this video back correctly is also available in Replay. And so now I can go to a part of the video that I care about. I don’t know, we’ll pause it here.
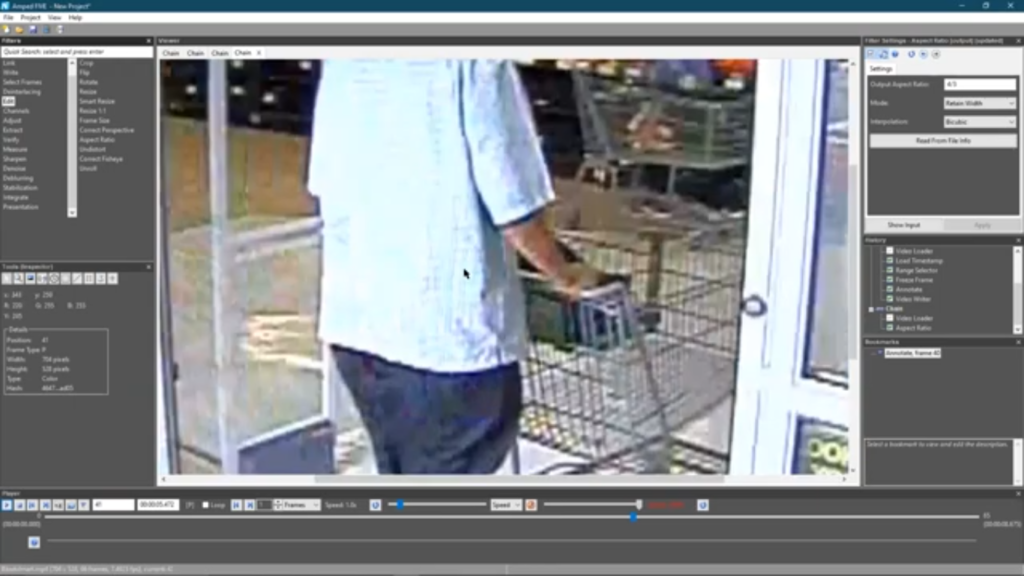
And you can see the detail on his shirt has been kind of washed out, and not only has it been washed out, but there’s all these blocks all over it. So if I need to go in and get a best version of this shirt, we could go about trying to clean this up by getting rid of some of the noise from the compression, maybe trying to adjust the levels a little bit, or adjust the exposure a little bit, just to make it a little bit easier to see. We’ll do a little bit of both of those with this thing called Automatic Color Equalization so it adjusts the noise and also the overall contrast into a single filter to make it as easy to see as possible. And then maybe I need to sharpen it up just a little bit to get some of that detail back. So now I have the detail, the best possible version that I need to get this file out, I can send this as an image by hitting the M key to create a bookmark, or if I needed to do something else with it, we could do that as well.
But that playable file that plays at half height, being able to play this back accurately and being able to send this information out accurately can really make the difference if you’re looking for a short vehicle versus a wide vehicle, or somebody who is kind of short and squatty versus tall and lean. So being able to accurately show to your officers, to the public, what the information is that you’re trying to get is crucial when it comes to investigations, especially when we know that every system is going to mess up the file in a different way.
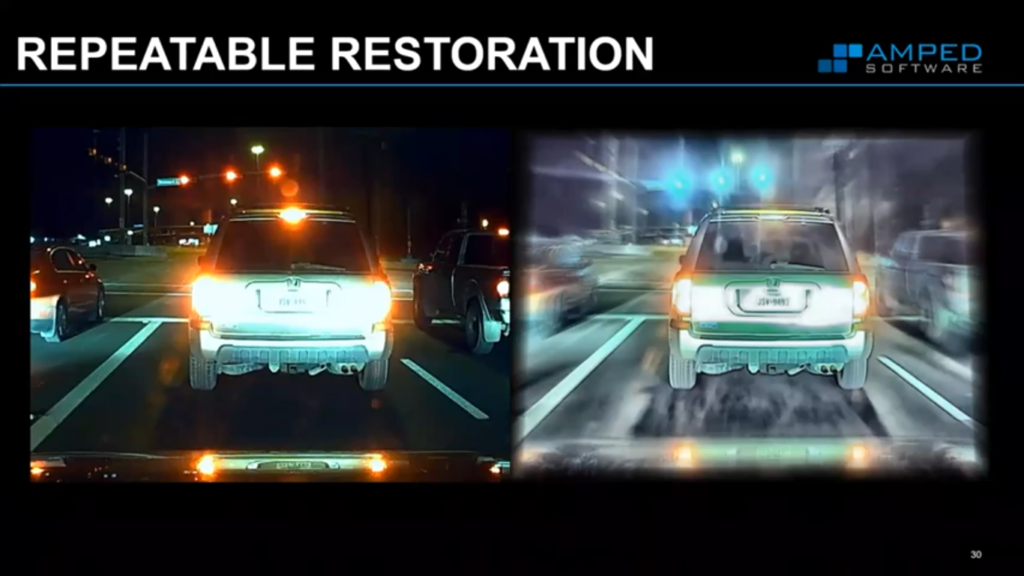
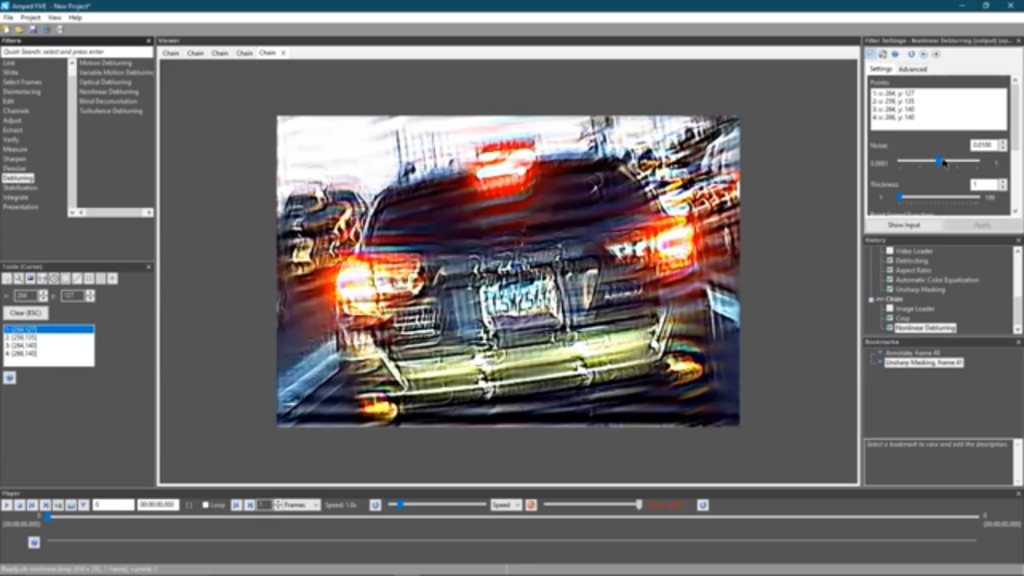
And it’s not just taking that file, like the one that we just had where the file was playing back at half height. But if I can understand what the issues are with a file, then I can start to reverse the information and get that information back. So here, for example, it’s a video from another dashcam. And it looks like right as the image was taken from the dashcam, there was a lot of, like maybe it hit a bump, there was a lot of motion that happened. So you can see on this license plate right here there’s just a whole lot of motion. But if I zoom in, what we’ll notice is that right here where the text is on that license plate, there’s about 13 to 15 pixels. So there’s enough information, even though it’s really blurry, for me to try to work with it.
So we can go in and maybe crop the file to make it easier to see, and then use a Deblur tool like the Nonlinear blur, to be able to tell the software this letter C right here, this, this blur that looks like a smear that kind of makes a little bit of a C. If I can trace that C, see how that line that I just drew follows that C. So if I can follow that C to say this is the issue, the issue is this blur. Then I can clarify it and I can tell the software, bring all that information back into a single image. And now I can see that license plate a lot better.
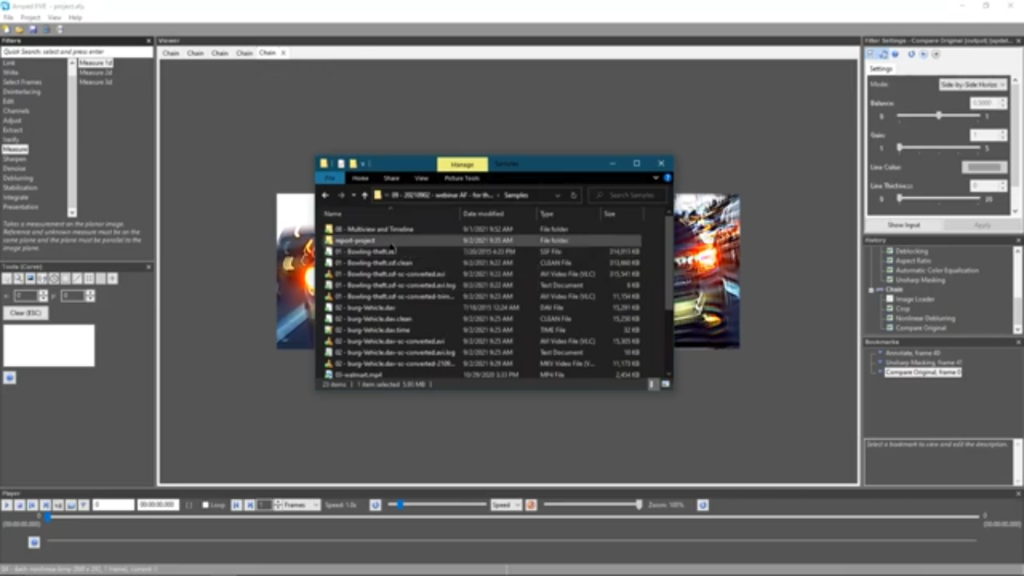
Usually what I like to do, if I’m actually sending out reports like this, is I will say, here’s the file, here’s the text that I got. And then down in the Presentation tools, there’s this filter called Compare Original that lets me play them side by side. So I can say here’s the original file; here’s what I got with the file. And then the great thing about FIVE. And so I’m going to create a bookmark to be able to document this process and say this was the original, this is what I got. And if I save this file out, save the project as Project. I can go in and fill in some details. So I can give this information my case report. So 21- that seems like a reasonable number. That’s a lot of instances for the year, but we’ll go with it. I can make my name visible and I can fill in any description. So details that I see, information that’s important to me can go into this little section right here. And when I’m done, I’ll just fill it in with…
And when I’m done, I can say Generate Report. And what I’m going to get is, I default to a protected PDF, which means nobody else is going to be able to edit this file. So if you have another tool to be able to use a PDF, you’re not going to be able to add to this or remove it, it’s kind of locked in its current state so that nothing else can change inside of it. I have all the images that I had bookmarked that show up. If I had titled them, I could get the titles and descriptions for each of these as well. But the important thing to me while getting the images into a report is always really important, what I feel like is almost as important, if not more important, is what happens down here at the bottom.
So if I go down here to the bottom, we can see the entire process, let me make this bigger so it’s a little easier to see. We can see the entire process that I followed. So for that file that was blurry, I loaded it in, I cropped the image, says, here’s what a crop is, here’s what it does, here are the pixels that I chose. So if somebody else is using FIVE later, or if they’re using some other tool later to reproduce this, then they’ll know exactly where I chose. Here are the pixels, here’s the size that I chose. And then I use that Nonlinear Deblurring. So Nonlinear Deblurring tells me what it is. It gives me more information about it in case somebody is more curious, like an enterprising attorney may want to understand more about what’s happening than just the short description. And then it says, these are the points I chose, that letter C that I traced, here are the points for that letter C inside of my image, here’s all of the settings that I used.
And then here’s the reference material, just to be able to say that this was backed by science, that this is reproducible, that it’s not the magic Enhance button where I brought it in, I hit Enhance, Enhance, Enhance, and now I’m able to see the button or see the text. This is the math and science behind what’s happening. It’s documented in here, partially so that you can have this as a reference to prove that it’s not new and novel, but also because it helps us tell the trier of fact, to tell the attorney later when this goes to court. But the math and science behind this have been around for a while, this isn’t something brand new. The math in this case for this Nonlinear Deblur has been around since the eighties and nineties, when it came to how do I use a computer to trace that blur? So everything I do gets documented, gets put into a report, so that I can show exactly what the steps were, describe what the steps were, and then give references that it wasn’t just me using a magic Enhance button to make it better.
And so then, the other thing I like about using a project and saving out my project, you may notice a couple of times I was saving those bookmarks. So the bookmark images show up in my report, but they also show up as images. So if I needed to get this image out, now I have a JPEG that I can send this out to whoever needs to look at that. So if I’m trying to send this out to the media, if I’m trying to put this into a bulletin, that information is now easily accessible. Same thing is true with that image that we looked at here.
So those are some of the files that we look at pretty regularly. There’s a couple of more advanced filters. It’s not just for cleaning up blurry license plates, but here for example, (I don’t actually want to open that file). Here for example, when I worked at the police department, this was one of the ways that you could go about getting detail from a phone, if somebody would sit there and they would record the pictures of the phone with their phone or with a camera so that you could document a text exchange. There’s definitely better ways to do that. But if I need to be able to see this a little bit better, you can see there’s a good amount of blur to this. So if I can follow that blur again, just identify it, trace it, maybe adjust the noise a little bit better so it’s not so in your face. Now I can see what’s happening in this text, make it easier to see the details and be able to show whether or not this was just some innocent WhatsApp exchange, or whether or not there was something more nefarious that happened.
This is especially useful for investigations where you get files from other machines that you’re able to clean this information up, show the details better. And when you do get a file that maybe you don’t, well for every file you get, the process that you should follow to make sure that everything is documented in your report is in the Verify tool. So I can go to File Info and add the details about this file to my report. I can use this one that says Hash Code. And now I’ve given this file a kind of digital fingerprint. So that two years later, when this goes to court, people won’t say, well, how do I know that nothing’s changed on this file? Well, because it looks the same. Well, looks can sometimes be deceiving, but if I can go in and say, this is the digital fingerprint from this file from two years ago, then I’m going to be able to more easily show what happened and that nothing changed in this file.
The benefit of doing this is not just so that it shows up in your project report. But also if I save this project, every time I reopen this project, it’s going to recheck that hash to make sure that the file that I’m looking at is the same as the file that I got a year ago, or six months ago, or yesterday. So if anything’s changed, it copied from one machine to another, and something happened in that copy, the software will let you know, it’ll say something changed inside of this file. You need to go back and find the original.
You might’ve noticed over in my History that things were starting to get a little bit, there were a lot of different filters in there and they all say chain. So if I have, let’s see this file, for example, we’ll look at one more and then we’ll look at a couple of other things. So we’ll look at this file. So this file came off of YouTube. This was one of the files that we looked at a little bit ago. So back in the days of civil unrest, one of the… So right here, I’m trying to get better detail on that car. What I can do is I can make my Range Selector, say this is the part of the video that I care about. Let me get to the part of the video that I care about. Say just these frames right here. I can then stabilize the video to say I want to make sure, even though the camera man was moving around, I want to make sure that that license plate stays in the same spot. And now it’ll move the rest of the video to make sure that video state, that license plate stays in the same spot. And then I can go about maybe trying to crop it down so that we don’t have all of the people that we need to worry with.
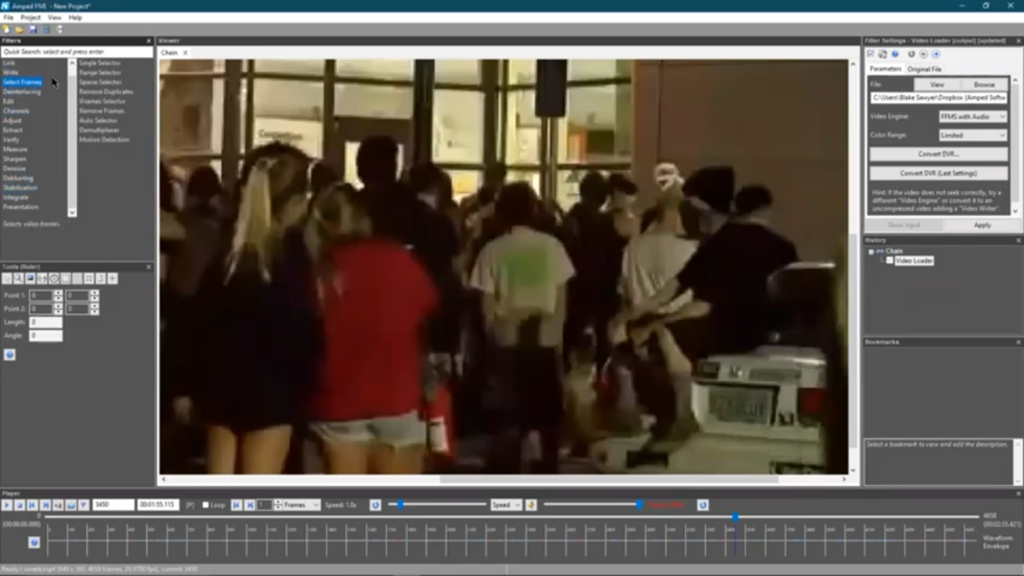
I can resize it so that it’s easier to see what we’re working with. Maybe I can adjust my light a little bit better to make the contrast stand out a little bit better, and then I can average this together. And when I’m done, (let me sharpen it too) when I’m done, I can get a single good image that shows maybe not the people in the background very well because they were moving, but I can get a better view of that plate. I can get a better view of the co-exist bumper sticker that was on the back. And so details like that are going to be helpful for us in an investigation. So every step that I applied in this was repeatable. Everything that I did, I can document, and I can create a bookmark. I can title that bookmark ‘License Plate’. I can title this ‘YouTube News’.
And then when I save my project and generate my report, my bookmark is going to have the title that I gave it. And my chain is not going to say chain anymore, but it’s going to have the title that I gave it. So YouTube News, I can’t spell, I apologize. And every step that I took along the way shows up inside my report so that other people can follow this process. Ideally you would give this to somebody else that has Amped FIVE. And what they would be able to do is instead of using that project report, is they would just be able to reload the project. And when you reload the project, now all of the steps will get recreated and they can see what you did and the steps that you took along the way.
So FIVE does a lot when it comes to clarification tools, but it’s not just a clarification tool. So if I have this video, which is really big and I bring it into FIVE. So this was an old case that I worked. We’ll call him a boss of evening employees. And these evening employees would go to different hotels where they would work for the evening. There was an altercation inside of this nail salon, and this is the video I have of him as he’s leaving the store. I don’t have a lot of really good information because it’s kind of compressed so I am not really able to see his face very well. But what I might be able to do is I might be able to correct the lens distortion in this image, to be able to tell the software, this line right here is supposed to be straight. And this line right here is supposed to be straight.
Then I’m not reliant on what my eyes see, to be able to say this is now corrected accurately. I’m relying on the software saying those lines that were not straight are now straight in the video. And now that I’ve corrected that image, I can do some more advanced analysis of this file. I can go to the Measure tool and choose Measure 3d, tell the software, this is a straight line in one direction. This is a straight line in that same direction. And I can tell by doing this, the software then starts to understand what this image looks like in 3d. If I can tell the software enough information about what this image looks like in 3d, we’ll use just two or three lines (choose this one too, not…) By giving it an X, Y, and Z, or Zed for those of you outside the US, I can tell the software these lines that are supposed to be straight in the real world but aren’t, should all be moving in the same direction.
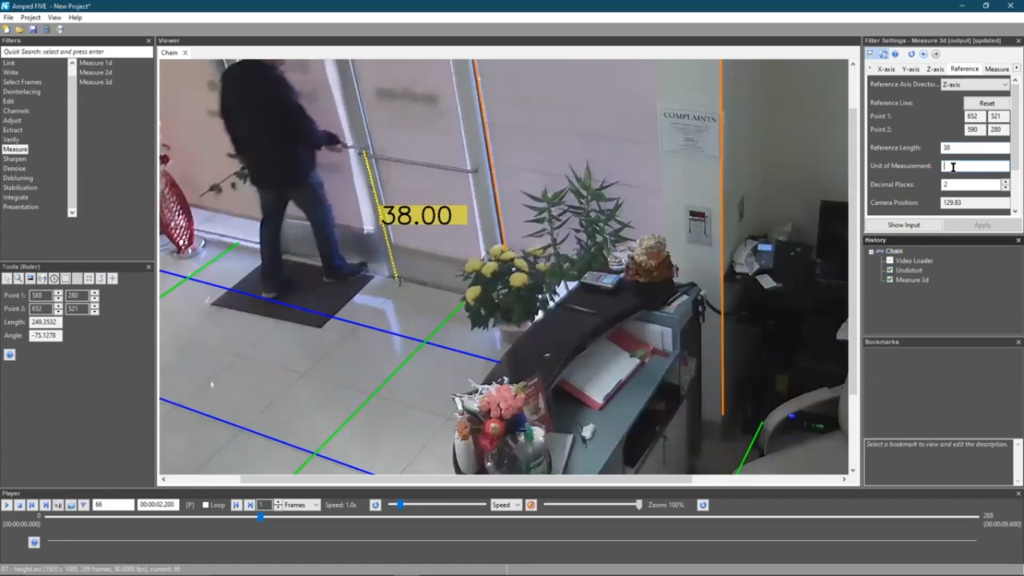
Now the software is going to be able to understand what this image looks like in 3d. And I can go in with just a single reference, tell the software that from the bottom of the door handle to the ground is 38 inches, because I measured it at the scene. So you do need to have one good measurement. So I know that this is 38 inches. And now if I go and say from the top of his head… we’ll say, there’s the top of his head, to his heel somewhere in here, there’s his heel… We get that he’s about 69.92 inches tall, give or take about half an inch. So if I was off by my pixels in a little bit, then I have actionable information, that I can say he’s somewhere around 70 inches tall. That then helps me send that information back out to my people in the field so that they can have a good identifier on about how tall that person is. Sometimes you can use the height strip as they walk past the doorframe, but here the nail salon didn’t think they were going to have need for a height strip. So they didn’t put one in.
And I can go ahead and create a bookmark for this if I wanted to, so that I can send that information out, and have that information not only show up in my report – here’s my report – but it will also then show up for me as an image that I can send out to other people, if I need to. So here’s 3d Measure, here are the lines I chose, here’s all of the information that is available inside of the software. And then here’s the math and science between what’s called Single View Metrology, So being able to identify measurements from just a single image and where that came out in the International Journal for Computer Vision 21 years ago. So again, 21 years in computer terms, that’s really old. Do you remember the computer you were using in the year 2000? I hope it is not the same computer you’re using today, but if it is, you could probably still play it using Amped FIVE with it.
So we’ve looked at a lot of different ways that we can use this as a playback tool. We’ve looked at how we can use this for clarification. What I want to show next is, now that we’ve seen playback, we’ve seen clarification, at some point I’m going to need to present this information. So file number nine is a really large clip. If I scrub through a little ways… all right, apparently I have the wrong video. It’s totally fine. We’ll look at the next one. Those two guys were supposed to get out of the vehicle, but they didn’t. So if I look at this executable, let me go over here to the executable.
So if I look at the executable, it came from an old backup system and the best way to save this file out is through the executable. If I decided I wanted to just one of these cameras, like I want camera number two on its own, and I try to save out camera number two, the only way to save these is I can use Save as a Video. And Save as a Video brings up all the different codecs that are on my computer, that it can use. The reason this might be an issue is every single one of these is not the way that this file was saved originally. So if I choose to save this as a video, it’s going to transcode this file.
And if you think back to we’ll say the nineties-ish, the way I like to think about transcoding. So if I had an old cassette tape and I want to keep all that information that was on the old cassette tape, but I want to play it for somebody else. Or I want to make a copy of what was on that cassette tape. Maybe I recorded a song off the radio. Now I want to save that song to another cassette because this one’s getting kind of old. I can hit Play on one side of my boom box and I can hit Play and Record on the other side. And as the song is playing inside of my system, all of the electronics that are inside of the system, all of the noise that’s there because that’s an old magnetic tape, and all of the new noise from that new cassette tape, all of that gets copied over. And maybe I’m recording over a song that I no longer cared about, like it really spoke to me at that point, but now I have a new group of friends that, that song’s not cool anymore. So I’m going to change the song. So I just record over it. When I do that, all that information, and all of the old data that was there, just gets written on and copied again. So all of the originalness that was on that original cassette tape gets degraded just by moving it and copying it to a new cassette tape.
The same thing is kind of happening when we transcode. So if I chose one of these options, it’s going to play the file out, it’s going to allow the computer to understand what the pixels are by playing it out and all the compression that’s there. And then it’s going to use this new codec, one of these terrible GeoVision codecs to re-encode the file. And when it does, it’s going to add new compression, it’s going to add new noise and it’s going to lose additional detail. So just by saving this out, using one of these options, I’m going to lose detail. And you may have noticed the only other way to save this was this thing called REVO-Backup, REVO-Backup – we’ll do it with camera number two. REVO-Backup goes really fast, but it’s going to save it as an executable. The only option I have is to save this back out as an executable, not super helpful.
So instead I can bring that executable into FIVE, FIVE says, hey, this is an executable, not a video file. Do you want this as a video file? I’m going to say yes. FIVE goes in, looks inside of this file, identifies where those videos are, creates little clean versions. We’ve looked at that earlier, where it makes a clean version of each file. So it’s made clean versions of all four cameras now, and now it’s making those files playable, so that they can play inside of FIVE, and now they can also play in any system that you want them to. And just by bringing it into FIVE, it’s going to load all four of them for me. (Yeah, that’s fine).
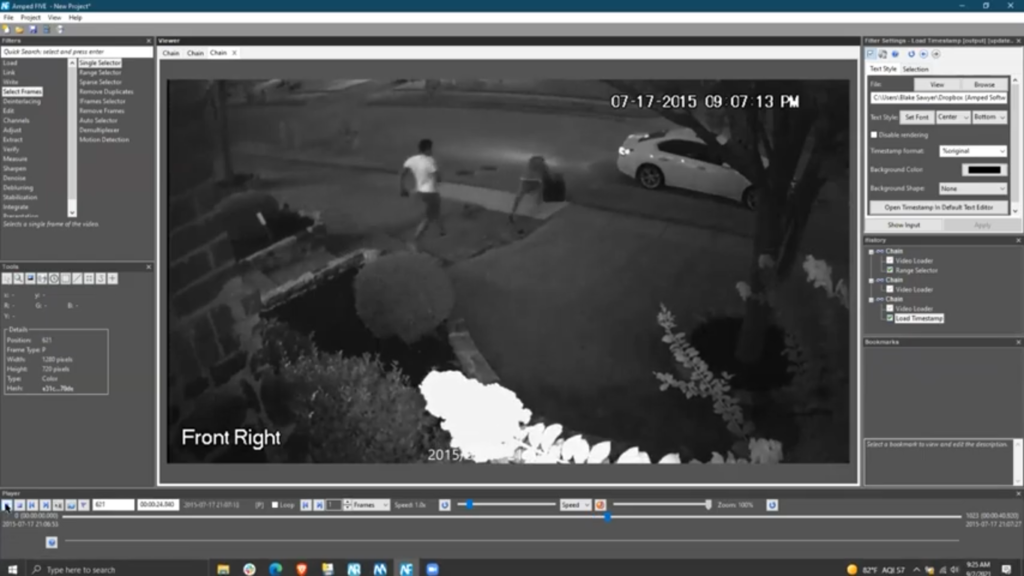
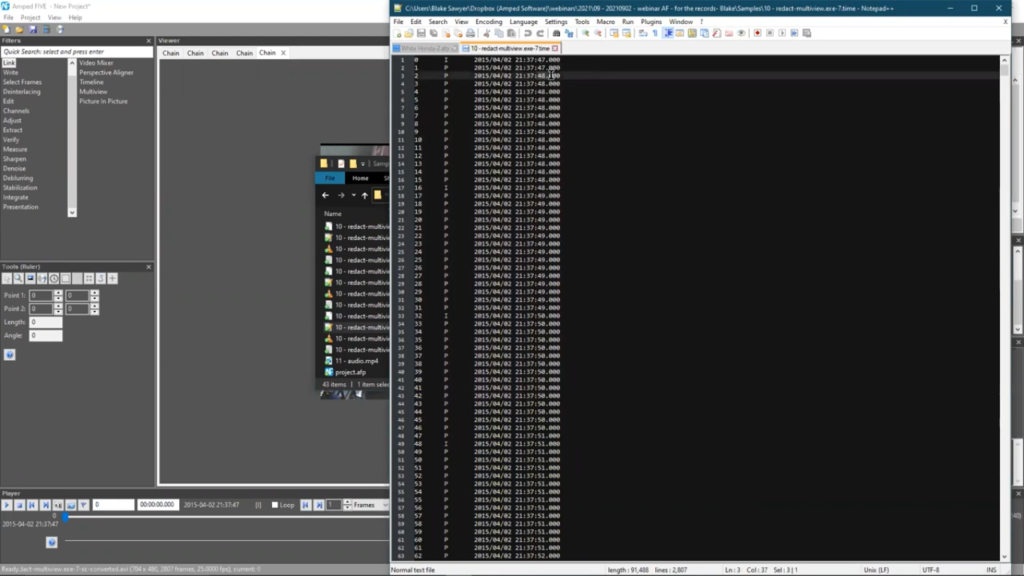
Time code: I could talk a lot about time code. We just had a huge update that changed how videos play to show how we can make corrections to the time code so that the time code plays more accurately, but also how we can get videos, especially variable videos, to play back more accurately. So that huge update came out about a week ago. If you are a FIVE user, I definitely encourage you to go download it. There’s some blog posts on how to do and understand some of that new information. But just by bringing in the file, I’ve got the original video, and then I have this other filter that says Load Timestamp. Let me make the little black box to make it easier to see. And we’ll put that black box at the top, because criming always happens right where the text is, so if I can move the text, maybe the crime won’t happen there.
Okay. So now I have my file. I have the time code that showed up just by saving the file. And in fact, if I go and look in this folder, you’ll notice not only do I have that .CLEAN now, but I also have this one that says .TIME, that .TIME file is just a way for the software to export the time as it’s recorded inside of the file. And you’ll notice part of the reason it said the time codes may need to be looked at is that it didn’t record milliseconds. So all of these just say they’re the same time until it goes to the next time. So that’s what FIVE was warning me about, that hey, you may want to look at this because the milliseconds don’t make a lot of sense and it was right. It’s always right.
So now I can get this file. I can get playback. And there’s a part of this file that I really need to be able to show people. So right here, I have my suspect come in, I have my victim over here in the corner. If I’m trying to send this out to the media, probably what I’m going to do to start is I’m going to make a clip, let’s make a clip from before he pulls the gun. We’ll say Select Frames, Range Selector, and we’ll just make a clip to about here. But just having this file and being able to show that information is maybe not the most helpful on its own. There’s information I need to show other people. There’s also information I may need to hide from the public before I send this out for release.
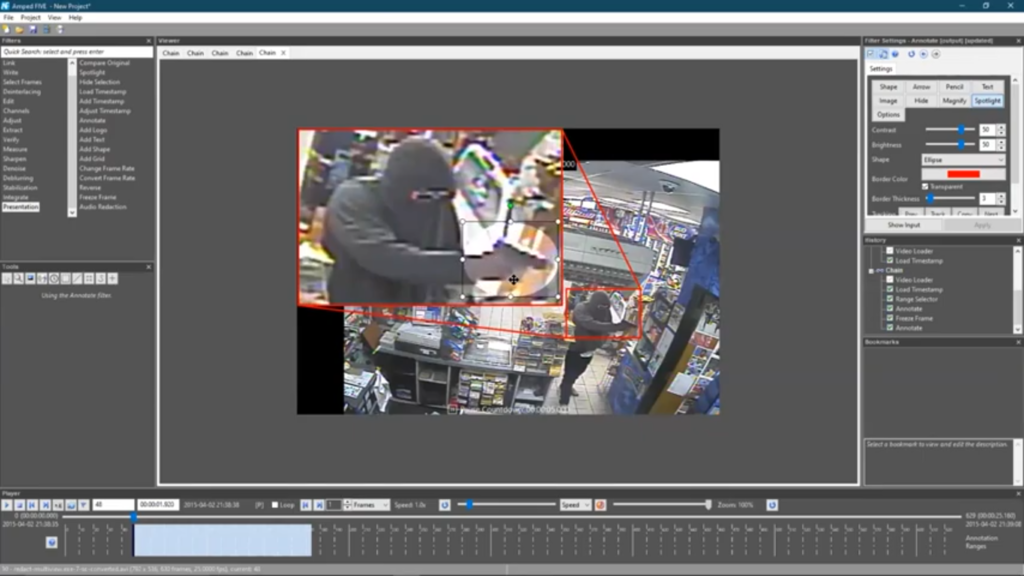
So what I can do is we can go back to our tools and say Presentation, Annotate. So I want to show my suspect here when he pulls the gun, to show that it’s not an airsoft gun or some other sort of fake firearm. So I’m going to go Magnify again. I like the Magnify tool because it makes things bigger, it makes it easier for people to see. And we’ll just do a couple lines so you can see that’s the part that I’m following. And if I want now to follow my suspect as he’s moving, what I can do is I can say down here in my Annotate tool, I can choose Track, tell the software, track this guy’s face. His face is going to be somewhere in this yellow box for the next frame. And now when I hit Track, it’s going to follow frame by frame where his face is. If it gets off, because now his glasses aren’t visible, I can widen the box, make small adjustments to make that a little easier for the software to find, or I can also just click on it, so if I don’t want the tracking on anymore, (oh, that’s fun. We’ll leave that for now.) If I don’t want the tracking on, I can also just click on that blue dot and then as the video plays, I can use that to have the blue dot follow him. So I’ve done that. I could follow him for the entirety of the video. I can also go here and make a freeze frame, or go back a couple of frames to make a freeze frame because actually before this shows up… let me do this, since I made it bigger, go ahead and extend the canvas, paint it black…
But now that I’ve done this, I can come to that part where you can see the firearm, right here, and I can use that freeze frame. So Presentation, Freeze Frame, freeze the video for five seconds and I can make any annotations where I need to inside of this file. So save this for five seconds, it’s going to pause on this video. And then I could go back and go to my Annotations, say the part that I care about is make a Spotlight right here. Maybe make a red line around it. Red is sometimes prejudicial so if you were actually making this, you may use a different colour other than red for trial or for public release. But I can make this file. I can show this is the part I care about. If I have any text that I want to add, I can add that text. If there’s any additional details that I need to show, I can do that as well. And when I’m done, I now have that Annotation done. So it’s going to export in my project, it’s going to show other people whenever I’m done.
The other part that I want is as my victim comes out, so we’ll go to about here. So as my victim comes out, I don’t want the victim’s face to be shown. So as he’s coming out, I could say Presentation, add another Annotate and just say Hide. And I can draw a box around his face. It’s going to hide his face for the rest of this video, because I can track him, and I can say his face is here. His face is not going to go off screen, it’s going to kind of move this way for the next few frames, and just allow the software then to track him as he moves. As he moves, I can go in and make those changes, and we’ll just make a clip to here. So I have that image. I can say Edit, Range Selector, and have that video now playable so that other people can see this.
If I want to add inside of this, the case information, contact information, it’s easy, just as easy as writing: ‘Please call’. Like I said, I’m terrible at typing. I can add text to this file. We’ll put the text up here so it’s easier to see. Maybe I want to make that text a little bigger so it stands out a little better. So 20-ish. So now I can see that text easier for us to be able to put that information out. And when I’m done, I can save this out as a video file that other people are going to be able to use.
So the last file that I want to look at for time sake is, so we’ve looked at how do I redact faces? We looked at how do I identify people? We’ve looked at how do I play back videos better? How do I better show the details that are there by using image and video clarification techniques? But the last thing I want to show is what happens when there’s audio. So here, this is another source that we got from public access. So here we have the makings of what could be a pretty serious circumstance with an officer-involved shooting.
Female Officer: [Name]
Blake: So I’m going to turn the audio down, but well, I’ll leave it up. (Let me do this). It’s going to be a little bit loud. But you can hear the head officer in this case as she is identifying the person in the video.
Female Officer: [Name], this is the armed police, please put your hands up in the air, do it now.
Suspect: No, you’re going to have to shoot me…
Female Officer: Nobody wants to shoot you
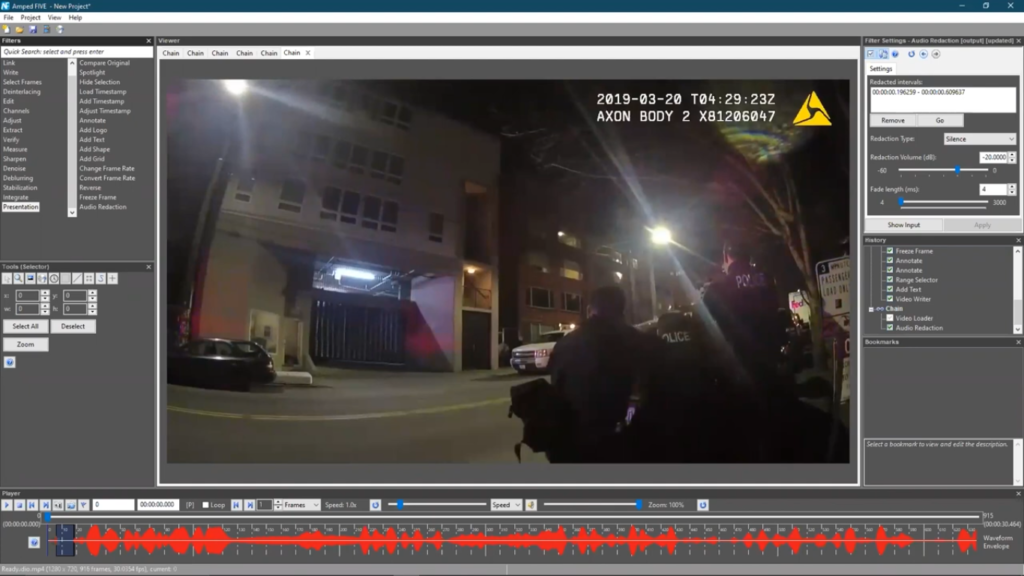
Blake: So in the middle of the standoff, she says his name. She actually says his name probably three times throughout this video. And if I’m releasing this to the public and that’s sensitive information, he gives medical history, he says a wide variety of things that may need to be redacted. In the Presentation filters there’s a group called Audio Redaction. And so what Audio Redaction allows me to do is go to this audio wave form that you can see at the bottom of my screen. And if it’s hard to see, you can hold the Shift key to make it a little taller, make it easier to see, or you can hold the Ctrl key to make it a little wider, but I’m going to go to this first part where she says his name…
Female Officer: [Name]
Blake: and I’m just going to hold down the Alt key and draw a box over that section. And now when she says his name,
Female Officer: …. This is the armed police…
Blake: his name is gone. You cannot hear his name anymore. It’s been removed. And that works for most redaction. What I would recommend, and if you go to an organization called SWGDE, the Scientific Working Group for Digital Evidence, in their redaction document, they talk about potentially adding a tone instead of having just silence, because sometimes silence can be perceived as an issue with the file. And so people say well, there was a glitch that caused that to happen. We don’t want people to think there was a glitch. We want people to think we purposefully removed this information. And so I can just go up to my Settings here. And instead of Silence, instead of the sound of silence, I can make a tone. And so now inside my Settings, I have the file went from this point, from 0.19 seconds until 0.6 seconds into the file, and created a tone over that section. So now if we listen again:
Female Officer: [Tone] This is the armed police, please…
Blake: So we were able to see that information, we’re able to see that we redacted that section of the audio, and I could go in a few more times, wherever she says is his name.
Female Officer: Nobody wants to shoot you…
Suspect: You’re going to shoot me, I’m not gonna…
Female Officer: I do not want to shoot you, nobody here wants to shoot you. I just want to talk to you, but I can’t talk to you with a gun in your hand…
Blake: As she’s talking…
Male Officer: Put it down…
Female Officer: [Name] Put it down…
Blake: So she says his name again here. I can make another reduction here just by holding the Alt key down. I believe she says it again, somewhere around here, so we can make a third redaction. So I’ve made three audio redactions. If there’s other things that I need to do inside of this to prepare it for court. Maybe for example, right here where you can kind of see they turn the lights on him, he’s kind of far away. It’s kind of hard to see, she is claiming there’s a gun in his hand. In 2021, maybe that information is not necessarily enough information.
So we can go to the Annotate tool. We can magnify that. So again, Magnify is one of my new favourite tools, and I can make that information bigger just to make it easier to see what’s happening in this case. So if there was an officer-involved shooting, you can see it’s still pretty far away. I can’t really see the details of his face, but I can either use the Go Frame by Frame to follow him as the camera shakes around, or I can use the tracking tools. Let’s say this section right here, I want to track, I know that he’s going to be somewhere around here. And now when I hit Track, the software is going to remember where he was from frame to frame, keep him in the middle of my frame.
So we have that information, we have that, you can see here he raises his hands. You can see a little bit of an object over in his right hand, shifts hands from right to left. So I have all that information. I can see that information and I can then do the same thing we’ve done in the past. So hit Write, Video Writer, save that information out. The audio redactions are going to be saved to my file. That Annotate is going to be saved as a file now. So all of the details and everything I’ve done is saved to a file.
It’s kind of a long video, so we may not do the whole thing. It’s kind of a long video but it will get saved as a playable file that I can then use inside of Windows Media Player. I can send this out to the public, and this, I feel like being able to do these things and create a playable version for the media, helps with what our news agencies do here, which is they go to the press briefing, they hold up their camera so that they can record the screen of the incident. So they record the screen of the officer giving the briefing, saying this is what happened at this date at this time. And then that video of them recording the screen is what ends up on the news. You lose a lot of detail whenever that happens, whenever that video that’s being recorded of the screen gets presented to the public. And that can sometimes cause, we’ll say confusion, whenever that information gets released, especially if they’re trying to get the information out the quickest way possible, the quickest way possible might be now to give them that playable file. (I think sound is turned off.)
Suspect: Well, you’re going to have to shoot me…
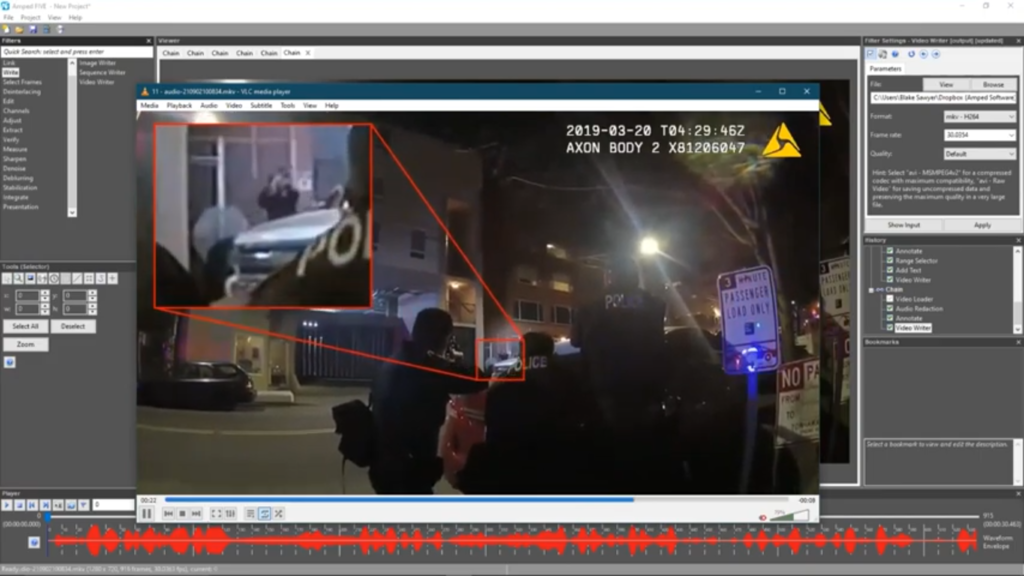
Blake: So now I have that playable file with that Magnify, so they can see better what’s happening in the file. And so if I can send that out, maybe I can get better information out to the public by just being able to redact the sections that I don’t want them to see, or that are not necessary for them to be able to see, and then annotate and add context to the parts that are important for them to see.
And so that entire project then can get saved. And when we look at my project file, we’ll kind of look at the project file and then have a little bit of a wrap-up. So in my audio redaction, here are those three sections. So these are the times that I redacted. That now shows up in my report so that when this goes to court later, or if the court has asked us to do the redactions, or if Open Records is trying to comply with an open records request, all that information is now documented. And when it’s documented, it’s repeatable, it’s reproducible and it’s something that we can send out and say, these were the sections we removed. This is why we removed these sections.
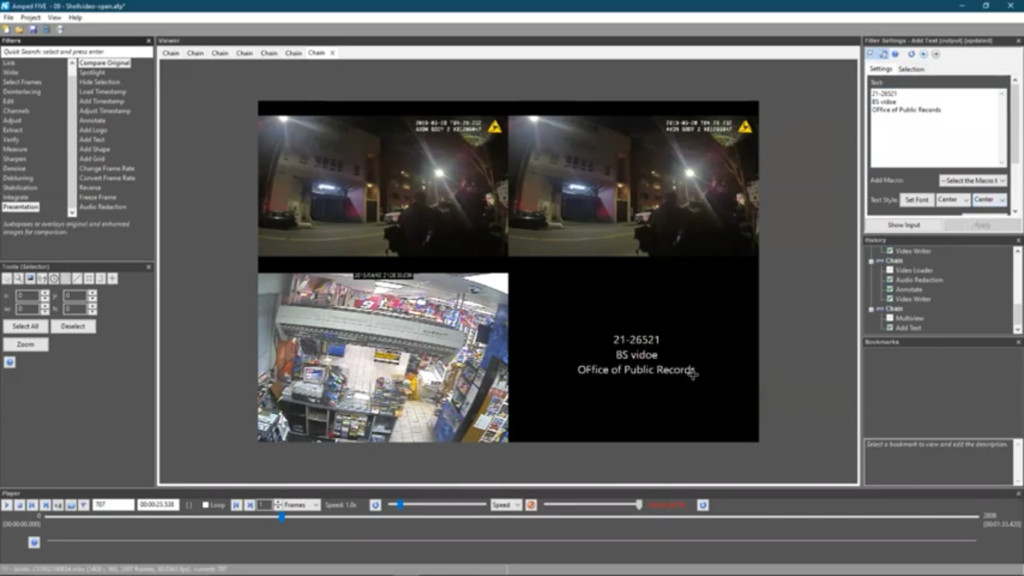
So just to circle back, there’s a lot of other filters that are available inside of FIVE. So it’s not just taking a single video and applying the Presentation tools to it, or clarifying it, or taking that one single playable file. But you can also put together a group of files. So for example, I don’t have enough time, we provide training for all of the tools that we offer. So Presentation tools like Timeline and Multiview and Picture in Picture. These are other options that allow you to take two or more videos, either put together the story from one clip to the next clip to the next clip, in a timeline so that you can say he started here, moved to a different camera, moved to a different camera, moved to a different camera.
Or I can do Multiview. Multiview, I don’t have time to align it so that you can see what it does, but it would allow you to take multiple videos and say, here’s one clip, take another video and say, here’s another clip, take another video and say, here’s a source from, I don’t know, what’s this? Load Timestamp. That’s great. The times aren’t the same, so might give us a bit of an issue but I have all of my different videos from different perspectives, from different sources and I can put them all together. I can use that Add Text from earlier, the Include, great. Right here, here’s my case information, 21-246, say, yes, those are my initials. It’s not saying anything badly about the case, it’s just those are my initials, BS-VIDEO…
And I can put that information then inside of this black box, that’s because I only use three of the four things. You can add. You could have 16 cameras that all play together. Like I said, my typing is terrible. But I could put that into the video, create this video now that shows the different points of view to show this is what happened from one camera from another. And I can align all of those cameras so that they all play back quickly and repeatedly so that everything is visible inside of our project.
So just a couple of final thoughts and then I think we had a couple of questions. So video evidence, like we’ve seen, can be extremely powerful but it’s really easy to either misunderstand what’s happening or maybe misinterpret what’s happening. So if we don’t have the ability to play this information back accurately, if we don’t have the ability to understand what’s happening kind of deep down inside of the files, that can be an issue. So FIVE was designed to help address a lot of these issues. It’s a single tool that allows you to take your video from the scene. You’ve collected the video. You can then play the video. You can process the video, you can convert the video. You can create your presentation pieces to either send out to the public or to the court.
And each step of the process is repeatable and documented. So we saw that report and how everything I did get saved inside of that report so that I can send that on to someone else later. The big thing is those new Presentation tools. There’s a lot of new Presentation tools that are even coming out soon. So we try to stay pretty current with our updates so that we’re always trying to make little improvements and add new things that people are asking for. So if you saw something and you’re like, I wish it did this, let us know. We will work to add that in as quickly as we can.
But the new Presentation tools like the Audio Redaction, like the Magnify, like the Multiview, help agencies to release actionable information quickly. You saw how quickly I put together that Multiview even, while preserving a lot of the sensitive data through redactions.
So if you guys have questions that you don’t want to ask right now, or maybe you need to get onto something else, you can email us. The email address [email protected] will go to either us here in the US if you live in the US and Canada, or it’ll go to our international office as well. I think there are a couple of questions. Let me see if I can address them, but thank you guys so much for being here.
So first question right out of the door: so can DVRCONV be used as command line to automate the conversion footage? If that’s something you want to look at, so DVRCONV is already set up to automate the conversion of footage. So all you have to do is have it open and it will convert the files automatically for you, based on what you tell it to do. But if you’re looking for a command line version, contact us. We can kind of put you in touch and see what we can do to help with that.
When saving a project, is the log filter automatically generated? So that project report, when I hit Generate Report is when that project file was reported. So when I saved the project, just by saving the project, it creates a little project file that I can send to someone else, or reopen that file later. When I hit the Generate Report, that’s when the bookmark images that I used, that I need to send out to our crime analysis unit, or be able to send out in a bulletin, that’s when those get generated, and that’s also when the report got generated.
That’s a good question, Alan. So in the YouTube news clip I stabilized the video before I did a crop. You can work either direction, it depends. I did the stabilize first because I didn’t want to kind of watch the video and see where that was going to go, and didn’t want it to go off screen. But you can crop first and that’ll give the software, it may work a little bit faster than it worked for me. So either way is acceptable. It’s really just because we teach a class, and I think that in our training, we talk about what’s called the Image Generation Model, which is how the file was created, so that you can restore that going back, because both of these kind of fall a little bit outside of that, there’s some freedom and where you can do those for sure.
And then this last question that Alan asked here, do you have specific training for the Presentation Tools? We teach that in our regular FIVE training class, but stay tuned, we may have some information about that soon.
Looks like there’s some questions in the chat too. Let me see if I can get to those… Yup, so resources for when you’re done, somebody said stay tuned to the YouTube channel. If nothing else, so every Friday we’ve been putting out videos that say this is how to use this filter, or this is the results you can get with this. And in fact, the Annotate tool here pretty soon, we should have a whole series that shows the different parts of the Annotate tool. Should it be really, really interesting.
Hopes for file standardization? It would be great if every file came to exactly the same format so that it was easy to get the playback on. I don’t see that as realistic goal, partially because a lot of these CCTV manufacturers intentionally make them a little bit difficult. I was at a scene one time from a hate crime, and the victim at the time was also looking at buying some cameras from a manufacturer. The installer was there, they said use our tools. We encode the file so that they can only be played inside of our tool. And by doing that, it’s now the only way to make sure that file’s able to go to court. And it’s a really good selling point and it’s what they kind of bank a lot of their money on. And so without going into too much, I don’t think that standardization will happen because you’d have to get the manufacturers on board with that. And there is that security piece that they think is useful in a lot of that.
Yeah. So Meg, good question. When you export, is there a better way to keep the file names so they’re less confusing, to see kind of the titles and what they show up in the report? There’s actually, let me switch back over real quick to FIVE. (Of course, my little task bar won’t show up so, great.) So if I was working on a video, I’ll take this one for example, I don’t think anything even happens on this camera. So if I was to go in and I wanted to create a couple of bookmarks, you’re right, it can be a little bit confusing. You can title them here to make them a little bit easier to identify in your report. But one thing that we’ve done recently, so let me go in and say, there are five or six frames that I want to use inside of here. We could go and just choose those frames, that frame, maybe this frame, like I said, nothing happens in this unless you really care about the hats on the stand, which I don’t think anybody cares about the hats. So instead of using bookmarks, what you can do is create a step-by-step that says these are the frames I care about. And then in the Write tools, there’s this Writer called Sequence Writer. And in Sequence Writer, I can then output these and say, this was cam7-hats.
And when I save this file out, I think it just did it. I think I hit Apply before I realized I did. So then I can go in to those files. (No, I should have seen where they were saving. All right. They’re saving in this folder here.) So then all of the pictures that I got can be exported as a sequence, but they also then get titled. So cam7-hats picture 0 1, 2, and 3. So if I was trying to create some better organization, that might be one way to do it. As always, if there’s something that you want done differently, shoot us an email and we will add it to the list. So actually, so it sounds like then, because based on what you just said in the next question, like that is kind of what you’re looking for, so that works out well…
Yeah, training is super important. I can see that kind of response there. So I teach one of our classes, we have two or three other really good trainers that kind of rotate through depending on where you live and the timing and who’s available to teach. But we really try really hard to make sure that you understand what’s happening with the filters, how they work, when to use them so that you can get the best results from your evidence for sure.
Well, thank you guys so much. Michelle, is there anything else we need to do?
Michelle: No, I think we are okay for today. Thank you, Blake, for answering all these questions and for the great presentation. If you want more in depth training on our products, or if you have more questions on this presentation, please be free to contact us. So that’s it for today. Don’t forget to register for the next webinar on Photo Analysis in Tampering Detection on the 22nd of September. So we have many webinars coming up in the following months. All right. So thank you again for attending. We hope you enjoyed the webinar and see you soon.