Hello everyone, and thank you for hitting play on this short video presentation from Amped Software.
This presentation is all about trust and how this single word underpins everything that we do at Amped Software with video and imagery evidence. My name is David Spreadborough, I’m a certified forensic video analyst and I’m the video analyst at Amped Software.
Just a little bit about me, I started off as a police officer in 1991 in the Met police in London in the United Kingdom and transferred to a smaller force in 1996. A few years later I started a CCTV unit there dealing with imagery and video evidence.
In 2015, after the the CCTV units closed, I decided to leave policing and go to work with Amped Software, and the reason why is because they had a clear vision on dealing with imagery and video evidence that does clearly align with my own moral values and my own beliefs on specifically CCTV and imagery evidence.
You can see some of the team there, there’s Martino Jerian. He’s the founder and CEO of Amped Software, in the middle there with his arms crossed. It’s an Italian company founded in 2008 and we do have a small subsidiary in the US.
We have a clear vision, and that is justice through science. Remember on the previous slide I said that’s the clear vision that aligns with my own moral values. I see every single day video and imagery evidence that has been badly acquired, or incorrectly acquired, badly managed, badly handled, misinterpreted and then presented incorrectly in courtrooms around the world and this is scary stuff.
And that’s why Amped Software will do everything that we can do to ensure that the video evidence and the imagery evidence is being dealt with correctly and is being presented correctly so a court can trust what they are seeing.
And here is that word trust again, and various other words linked to it: integrity, authenticity, reproducible, repeatable, positive, honest, confidence. All of these things relate to imagery and video evidence. Can it be trusted? Is there an integrity chain throughout the process between acquisition and presentation?

Let’s look at CCTV first of all. You’d think, and a layman may believe, that CCTV evidence, as it’s being recorded for sort of “preview” use, you’d be able to trust it. Not all the time, it’s very easy for video evidence in particular to be changed most of the time without anyone knowing, and it’s because it’s being changed perhaps just to help in watching it, but has that change affected its integrity?
And this is where we come in. This is where Amped Software comes in to ensure that what you are seeing is what was actually recorded.
Look at this CCTV system here. Basic home CCTV system purchased off the shelf — well, how do you know that what’s being acquired from that CCTV system is the best evidence? This unit in particular can output two different videos from the same camera, one which is designed for a cell phone so one that you can review this video evidence from a cell phone and you can then save that video evidence on your cell phone and send that perhaps to law enforcement.
However, on this digital video recorder itself is a much higher, better quality video and that may never be realized. Again, how can you trust what you’re seeing and is that best evidence?
All the various digital video recorders here. How is it being acquired? How is that video evidence being acquired and being sent to perhaps the law enforcement? This is so important now.
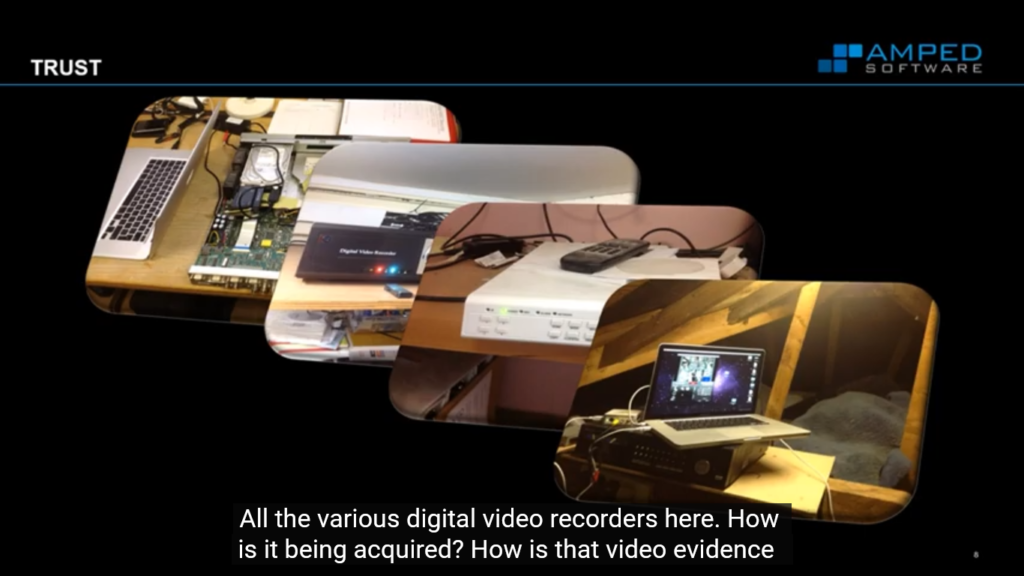
Every process must retain integrity from the digital video recorder or that could be network video recorder, it could be a body cam, it could be a Ring doorbell, it could even be a dash cam – whatever that recording device is, that’s where the integrity chain must start. How is it being exported?
How has the first responder handled it? The technician, the analyst, and then, how is the courtroom playing it? You can see there that there may be some storage involved for the first responder to upload it to some storage device. How is the technician or the analyst then downloading it? How are they then importing their derivative evidence and then how are the court playing it? Again the court must be able to trust that there is an integrity chain all the way back to what was originally recorded.
Now, legal acquisition is not always easy. You can see here the Scientific Working Group on Digital Evidence’s best practice for data acquisition from digital video recorders. Various countries are going to have different guidelines, and most police forces will have a standard operating procedure for the acquisition of video evidence. Can you trust who did it? Have they done it correctly? Can you trust how they’ve done it?
This is now so important. The initial acquisition of data, that’s where everything starts and it’s so important that we – over the past year – have been running some free webinars on getting started with video evidence so officers and first responders can learn a little bit more so they are getting it correctly. We’re seeing badly acquired video evidence daily, and it is so important that what was originally acquired is the video evidence that is being extracted from that device.
Looking through our products you can see that you’ve got Amped Replay, DVRConv, FIVE and Authenticate for the first responders all the way through technicians and then analysts. It’s so important that whatever those products do they can be trusted. What is it doing to the video evidence? How is it managing the video evidence? If it’s doing something can that be repeated? Is it reproducible and so a court can then rely on anything exported from those products?
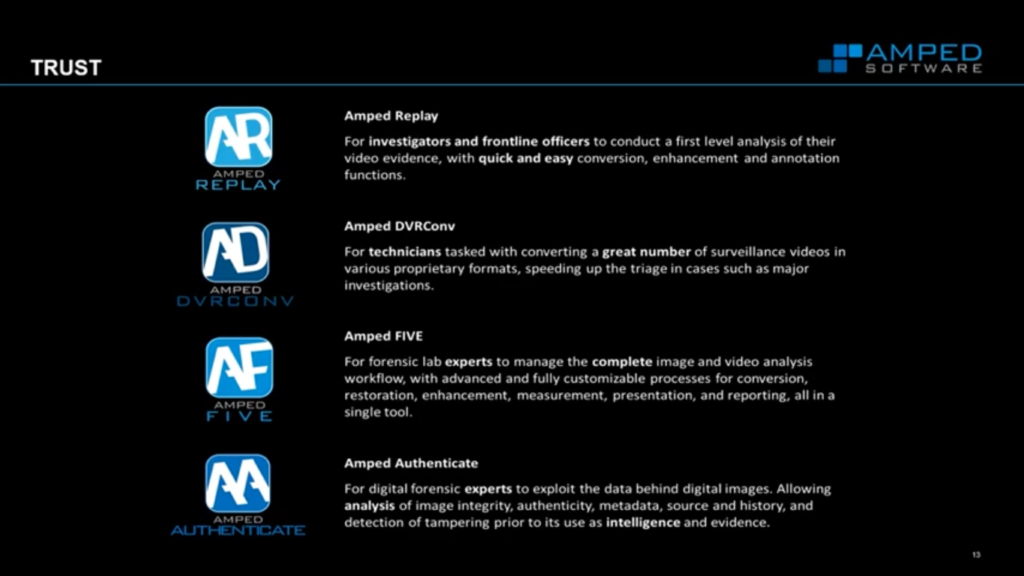
For those people that are not aware of the Amped Software portfolio of products, we have Amped Replay for the first responders, DVRConv for technicians, then FIVE standing for forensic image video enhancement. That’s your big single tool for everything to do with CCTV and imagery and restoration and enhancement and then Authenticate for the analysis of imagery.
Diving straight into Replay, you can see here that I’ve just dragged a video file over into the import box and you can see straight away we’ve got “Initializing video conversion”, now this is an automated process, Replay is designed for first responders so for those people that have to deal with video but don’t understand video.
This conversion process is behind the scenes, there’s no interaction and we do it in a way that is lossless, we do not change the pixel information on the original video, all we’re doing is taking it out of the proprietary container and placing it into a standard container so it can be played and analyzed correctly.
Video evidence being displayed here, and you can see throughout the video I’ve got my date and time down in the bottom left corner. That’s been extracted so it’s not over the top of the video. I can see important information, I’ve added in some case information.
It’s important to recognize that what we’re seeing here is the video evidence as it was recorded and as it was acquired from the CCTV system. Most CCTV players will do something to the video evidence, it may change the size, the shape, the color, some apply some sort of de-blocking and smoothing and sharpening.
Again, none of that is here in Replay. You’re seeing it as it was recorded, you can trust what you are seeing.
Moving to the Enhance tab, basic enhancements can be done and again, it takes about five to ten minutes to learn Replay, so it’s very, very simple but there’s basic enhancement tools and again everything can be trusted because all of these are recorded behind the scenes. You’ll see that shortly in the in the report.
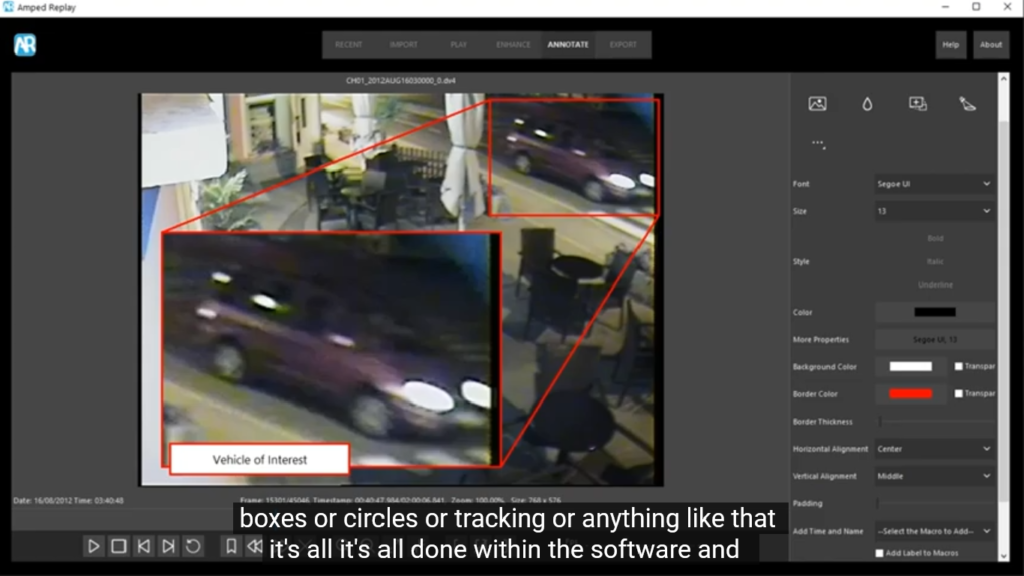
A key thing for Replay is the annotation. You don’t have to use another tool to put on arrows or boxes or circles or tracking or anything like that. It’s all done within the software, and all of these are again recorded and logged within the report.
Moving to the Export tab, I can export the original video, I can export a processed video, I can export my bookmarks and I can generate a report on what I have done.
And looking at the report, we’ve got all the key information including any processing that has been applied to the video.
There is a forensic workflow, and the key thing with Replay is that the forensic workflow is actually hidden. It’s done automatically, with the tabs at the top and the recording so a first responder who, again, may not know about the forensic requirements of video, it’s seamless to them.
However, for an analyst, this would be key information. There’s the forensic or the video forensic process as it’s documented by some organizations, and it’s key here to look at the processing, that Option D, when you’re processing video evidence, again, that has to have a forensic workflow.
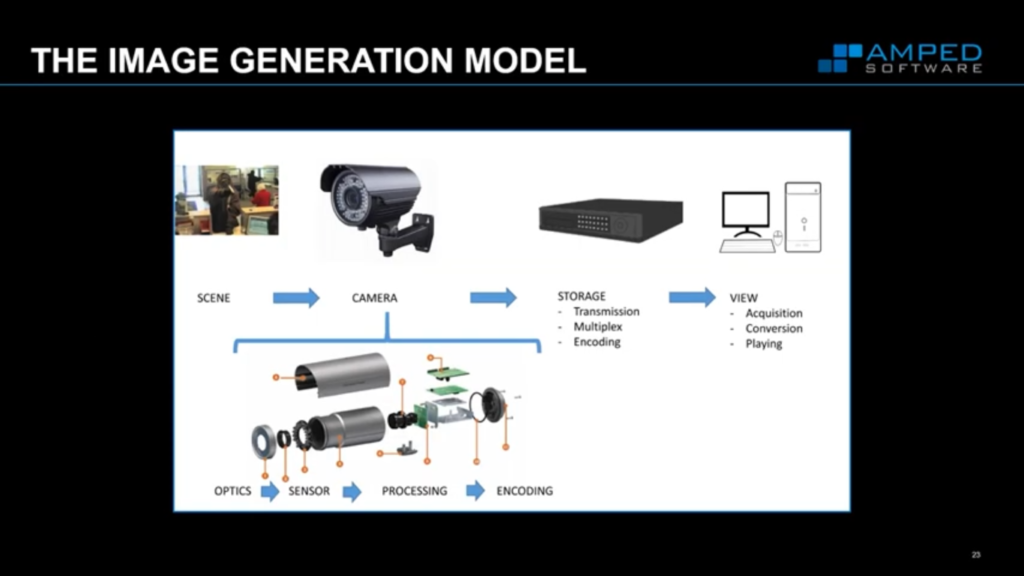
So each stage in there must be forensic, the processing of video and images must also have integrity. When you’re doing something, someone else has to trust what you’ve done. Well, the image generation model provides a workflow for this. The image generation model provides trust, in that you have changed that video evidence in a way that you should have changed that video evidence or the imagery evidence.
When you look at an image or a video and you see something in there that you need to correct, you’re seeing an effect and you have to understand cause – you have to understand the cause of that effect.
A good example may be motion blur. You can then identify what you’re seeing, and you know what has caused that, and because you recognize the effect and you understand the cause you can then conduct a restoration.
And you can conduct some enhancement, but obviously we see many issues in video, and we have to correct those things within a specific order, again, so a court can trust what we’ve done and a court can trust why we’ve corrected certain things within an image or within a video in a certain way.
We break down the image as to how it was created, how it was generated, and the image generation model allows us to reverse that so we can reverse what we’re seeing, so we can apply our corrections in the reverse order, so we end up with what we should be seeing – and it’s not what is always recorded.
Let’s have a look at this very, very basic example, then. Now I’m using Amped FIVE.
Faces are very, very easily distorted in video especially from CCTV systems because CCTV systems may change the imagery. We have to correct the imagery to how it should be.
So here we’re looking at a standard sphere on a stick in front of the CCTV camera. but I can see that my sphere is slightly squeezed. I have to correct that in order to then see it as it should be in real life.
So if we now think about a face, if I was doing something like a forensic facial comparison, I would have to correct that face in order to ensure that I am doing a correct comparison. So I deinterlaced my video footage here because I saw that there was interlacing artifacts.
I’ve already deinterlaced it, I’m then going to crop it. You can see down in my history, in my lower right hand section here, that these are all my filters that I’ve applied, and I’m applying them in the order that they need to be applied. I’ve then adjusted the aspect ratio to 4×3 because that is the display aspect ratio for this video, and again, I can put in something there manually or I can do it in an automated process.
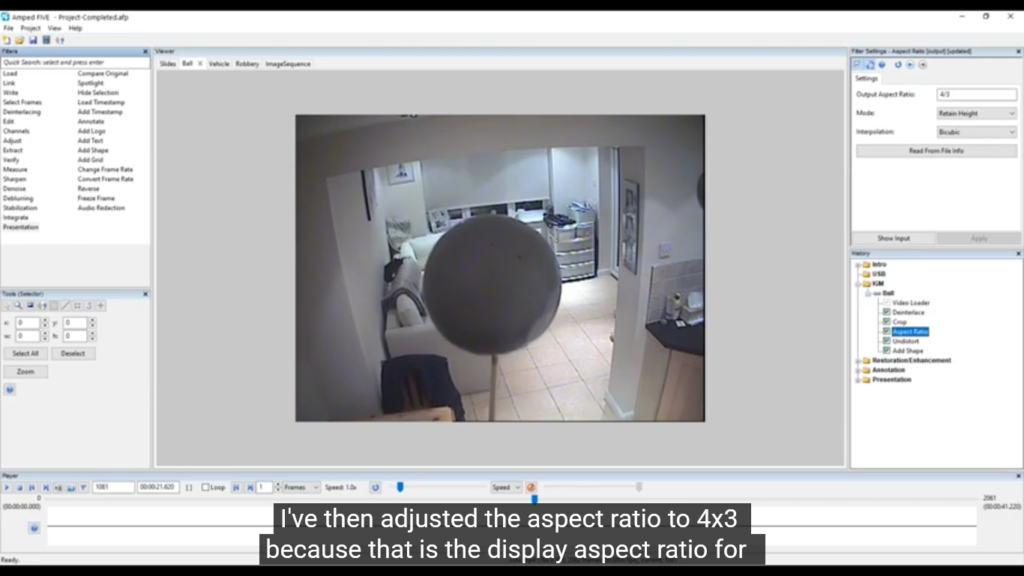
Next, I’ve applied some undistortion because that’s at the lens. Remember aspect ratio would be at the transmission and recording stage, but the lens distortion is further, or was done first because that’s when the imagery hits the camera. So again, I’m doing that last.
That’s your image generation model. We reverse the problems that we’re seeing, now we’ve got a much better sphere. So, again, if this was a person’s face, that would be much more correct and I can ensure that what I’m seeing is correct by testing that. I just put in a perfect circle over the top of my sphere to ensure that that is a perfect circle.
If you remember back – and let’s just go back, well actually I won’t go back to save a bit of time – and if we went back, you would see that we originally started off without a perfect sphere. We have to ensure that what we’re doing is correct, we’re doing it in the correct order and that we are seeing actually the correct scene as it was recorded, not how it was retained during the recording process.
So let’s quickly look back now at images and videos that are received at evidence. So we’ve been talking about presenting that correct evidence, let’s quickly go back now to images and videos that are received as evidence.
Images are very easily manipulated, they’re very easily changed, we see all the time about images that are Photoshopped. It’s very, very simple to do now, and this is where Authenticate comes in. You can see down the left side, we’ve got a vast amount of filters there.
The key thing with Authenticate is that you can trust that all of these filters and all of these tools work together and have been tested. We do a huge amount of testing with these in real life examples. We don’t create images in the lab and then run tests in the lab to see whether or not we can find out which ones have been changed. We use real-life examples so these are things, all of the filters that have been used, you can trust that are actually going to be reliable for you.
Again, remember I was saying we don’t just talk about the metadata, we don’t just talk about the file analysis or the imagery as itself, we look at how those pixels change and how those pixels differentiate from each other.
You can see here, we’ve got a big red warning flag over this person’s face. That would be a big alarm bell to say that this image has received some manipulation in the facial area. The amount of tools that are now available for you to use as well, with shadow analysis – looking here, we can see the shadow there, we can see where the sun was, we’ve got lots of ways of looking at that.
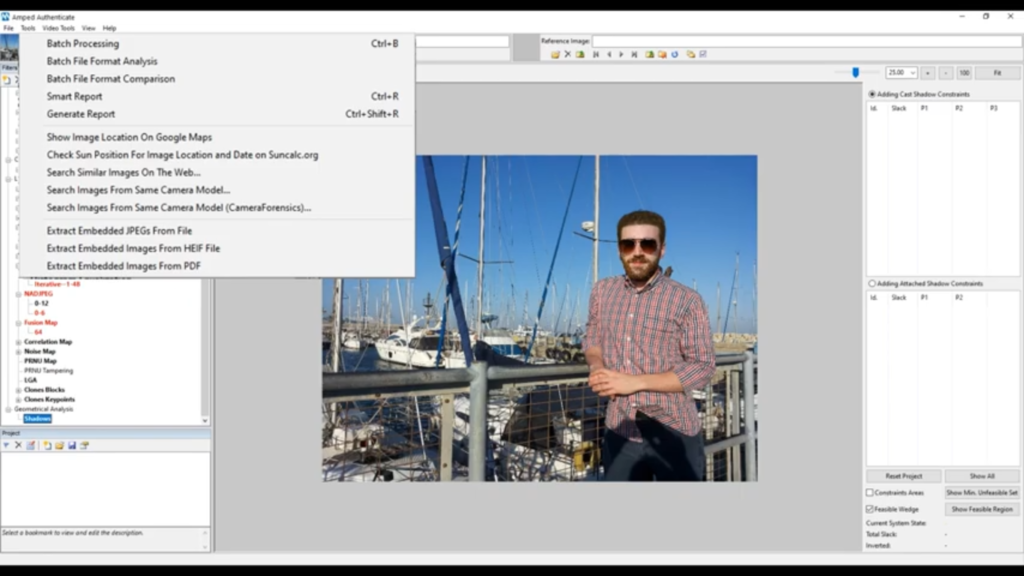
If there is metadata, and if we’ve got GPS information and if we’ve got date and time information, we can go to the tsun calc and actually see where the sun was and see whether or not the shadows are reliable. The shadows do show that it was recorded at that date and time or captured at that date and time, it’s a many many tools here and Authenticate [is] a hugely important piece of software for image authentication now.
Just running over [the] 20-minute mark here, and so I’m going to be wrapping this up now. Thanks for staying with me, as I said we’re here all about trust: in what you are receiving as evidence, in the handling and storage and management of that data, in the interpretation and processing of that data.
You need to be able to trust in the reliability of what is being produced, and the derivative evidence that is coming out of that product, and you need to be able to trust in the software that you’re using throughout the process. Finally, you need to be able to trust in the company that you partner with to provide you with that software.
Thank you for watching this presentation. I hope that you’ve learned a little bit and you can see that with our software, trust is everything to us, trust in the products, trust in what is being produced and thank you for putting your trust in us.