Employee Turnover And Computer Forensic Analysis Best Practices

by Larry Lieb

Organizations historically have struggled with addressing terminated employees’ important evidence sources such as company-issued laptops, oftentimes materially affecting the organization’s ability to deal effectively with disputes that arise after an employee leaves the company.

This article will provide a documented, transparent, and repeatable process with actual tools to identify and correctly preserve key evidence. There is also a SlideShare which runs through some of the best practices, along with case studies; and at the end of the article you can find some highly useful handout record request samples.

1. How To Create A Legal Hold External USB Drive To Hold Forensic Images

Preparation of the “Target” Drive to hold the forensic image

Before beginning the forensic imaging process, please prepare a Bitlocker encrypted external USB drive which will be used to hold the forensic image; this external USB drive will be known as the “Target” drive, to which the forensic image of a workstation’s internal hard drive will be written.

Applying BitLocker Encryption to the Target drive


Get The Latest DFIR News

Join the Forensic Focus newsletter for the best DFIR articles in your inbox every month.


Unsubscribe any time. We respect your privacy - read our privacy policy.

Once the Target drive is plugged into your workstation, open Windows Explorer and navigate to the Target drive.

Right click on the Target drive, and then left click on “Turn on BitLocker”.

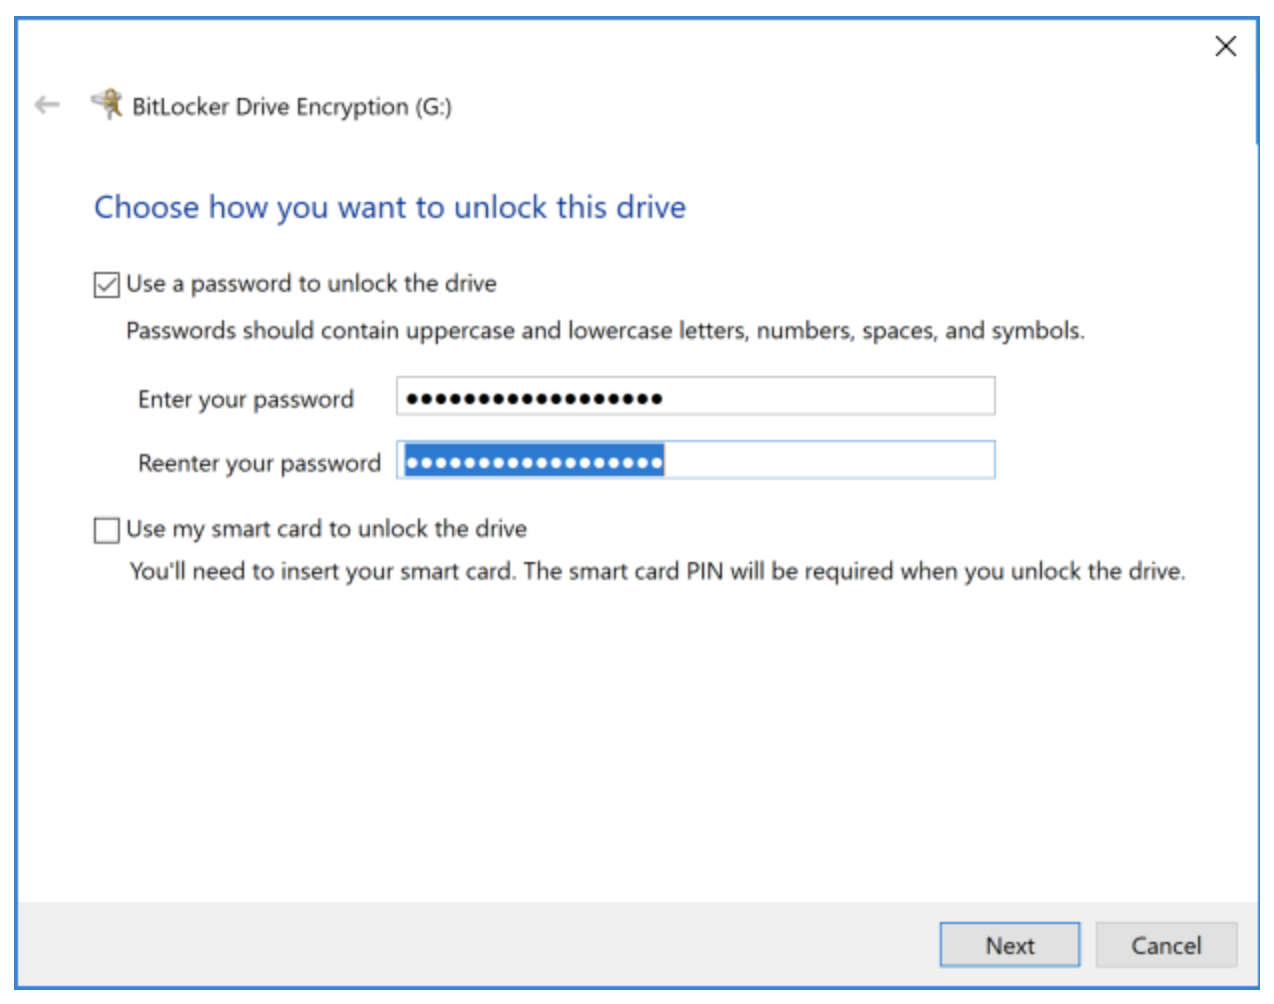
When the below BitLocker menu opens, check the box “Use a password to unlock the drive” 

Enter the same password into the “Enter your password” and “Reenter your password” boxes.  

A good password naming convention is YYYYMMDD_[COMPANY NAME];  for example 20181119_[COMPANY NAME]

Once you have entered and reentered the password, click “Next”

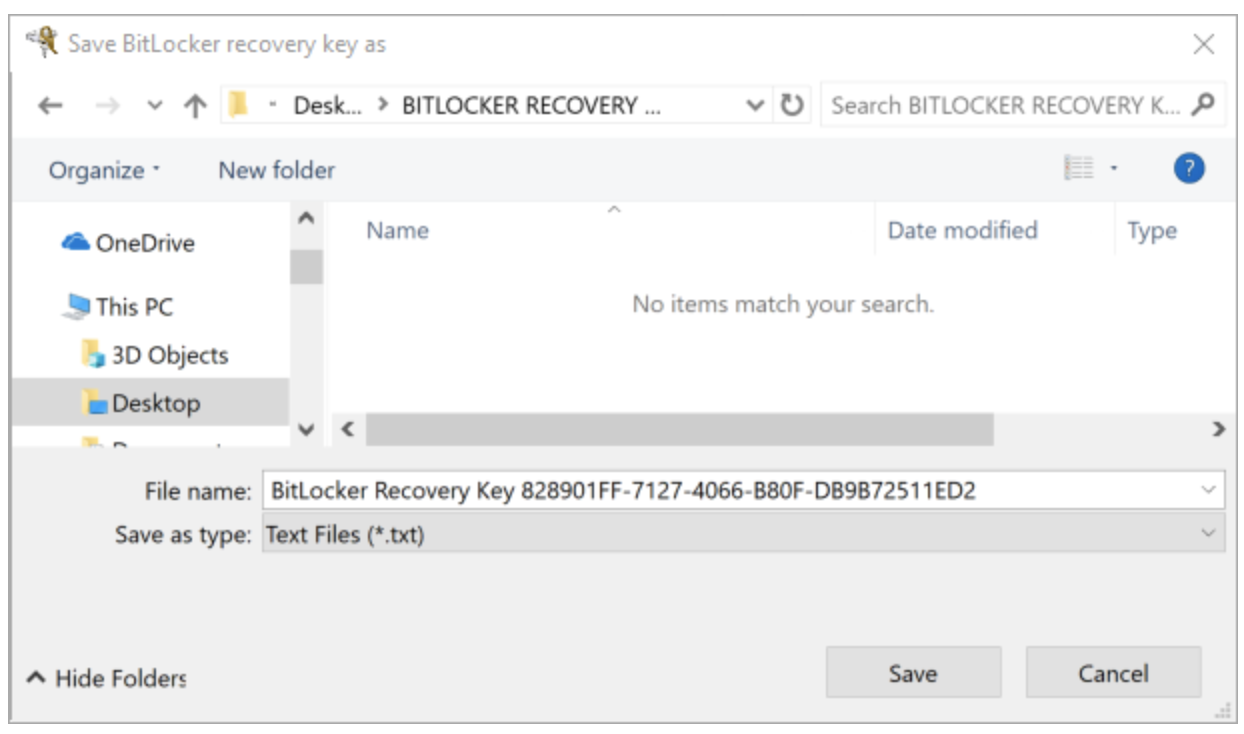
Save the BitLocker Recovery Key to a file by choosing “Save to a File”

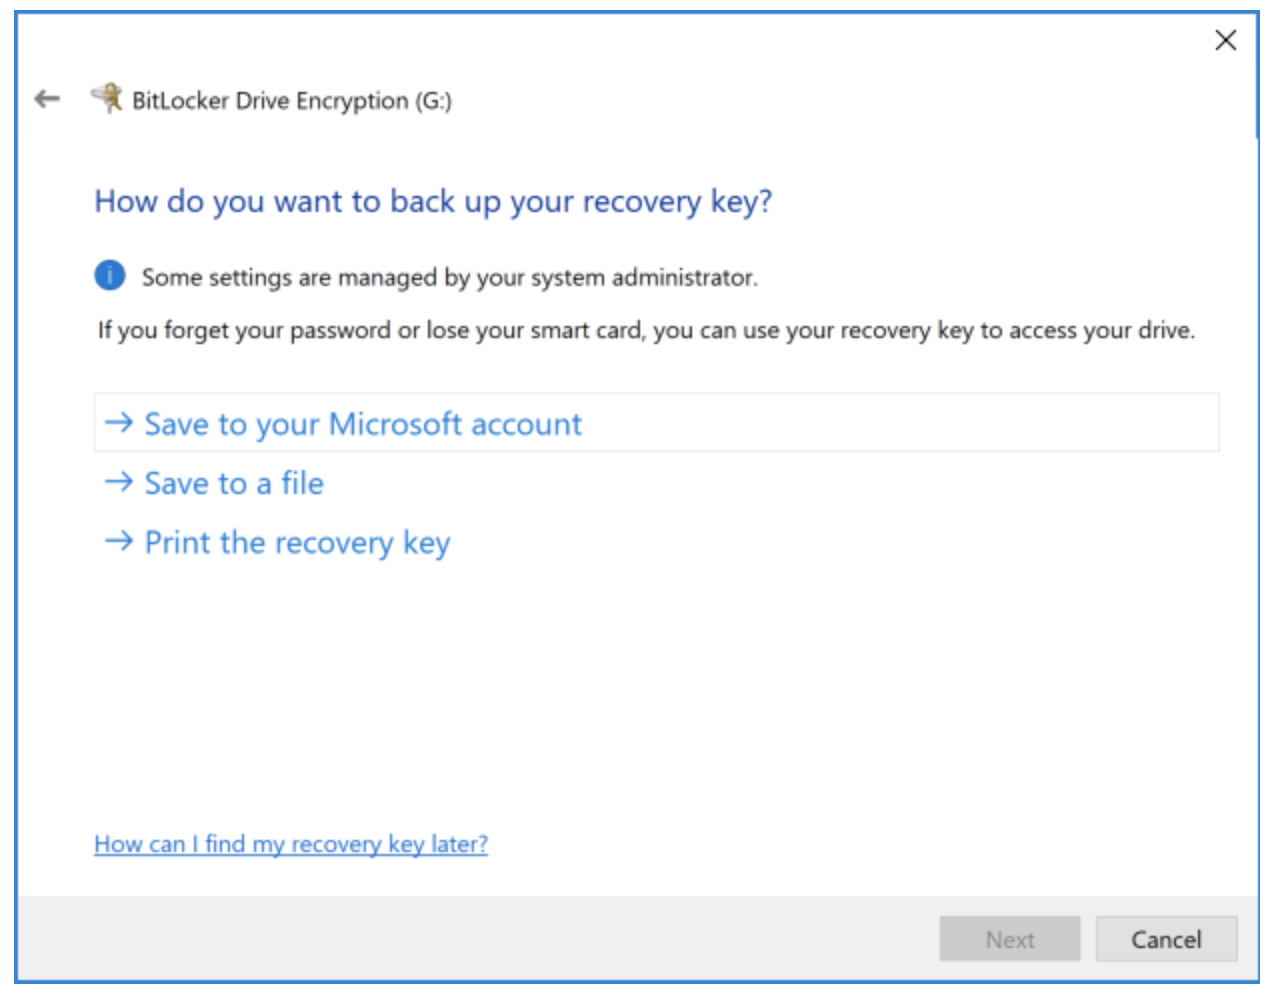
Save the Bitlocker Recovery Key file to a folder named “BITLOCKER RECOVERY KEY” on your computer desktop. This BitLocker Recovery Key file will be required to unlock the target drive in the event that the BitLocker password is forgotten.

Select “Encrypt used disk space only” (faster and best for new PCs and drives).

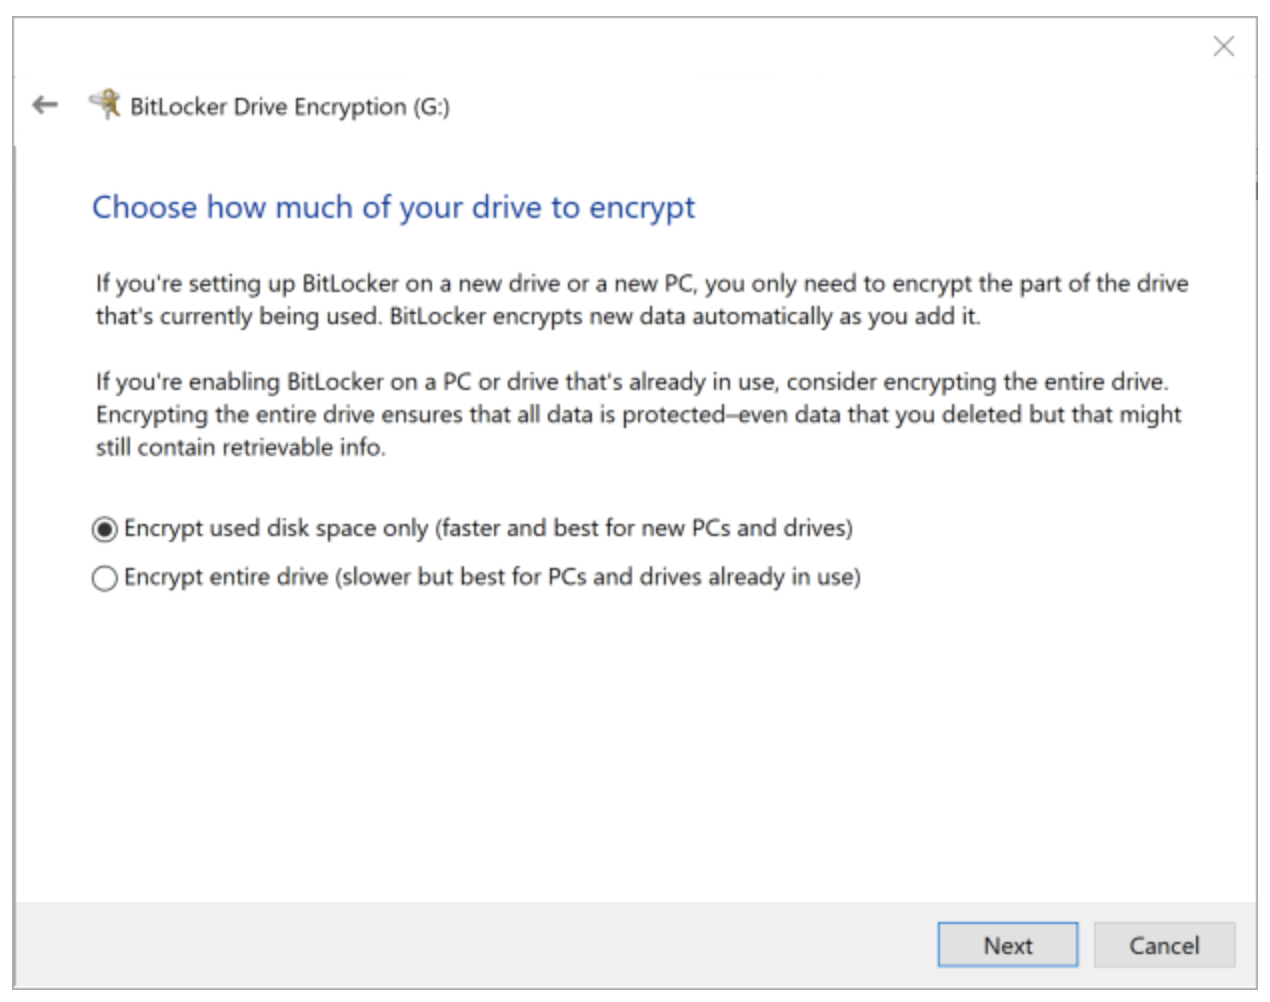
Choose “Compatible mode” (best for drives that can be moved from this device) and click “Next”.

Click “Start encrypting.”

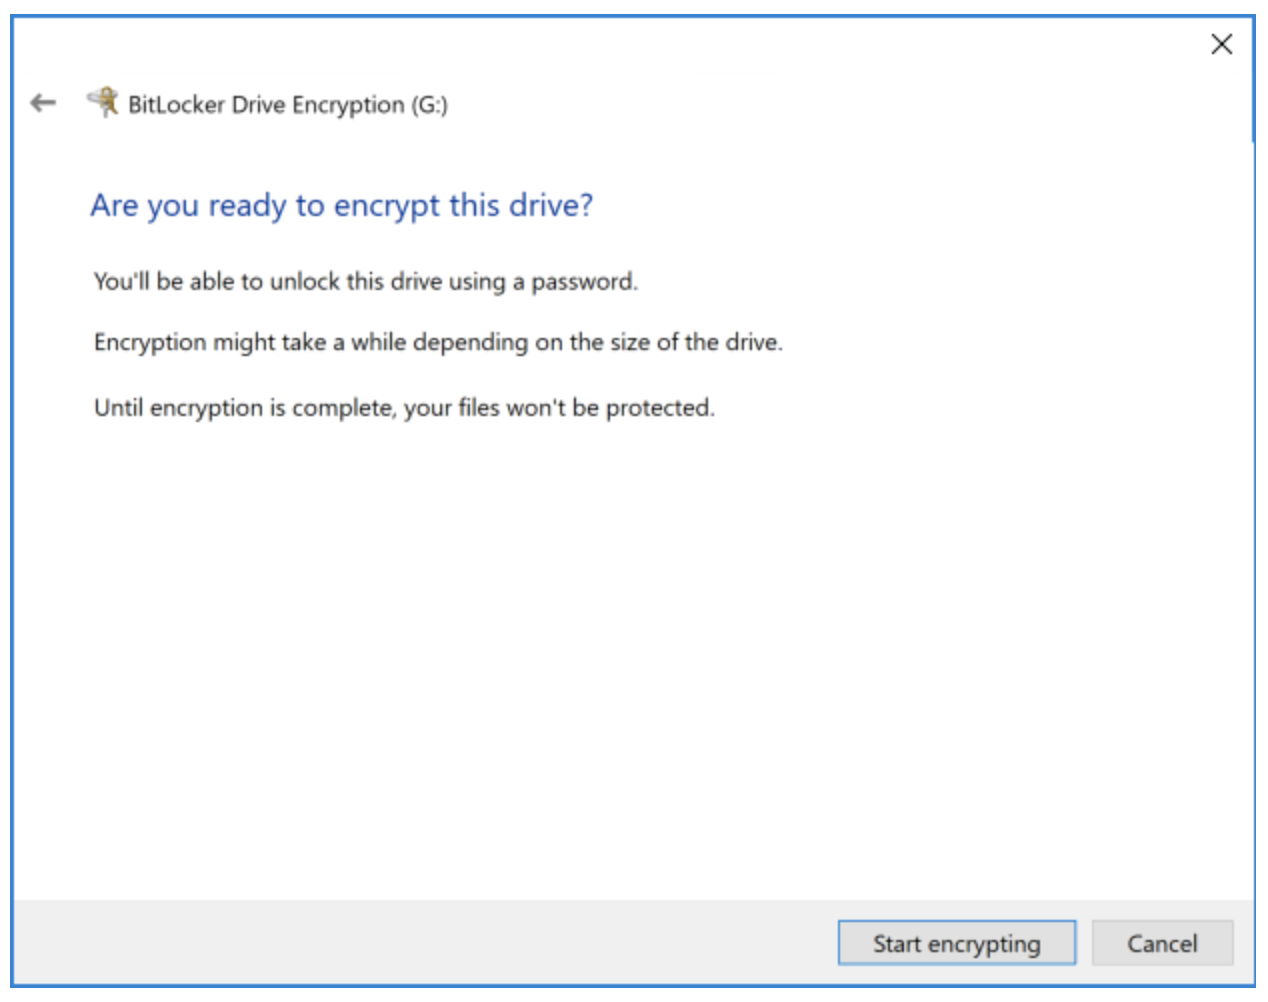
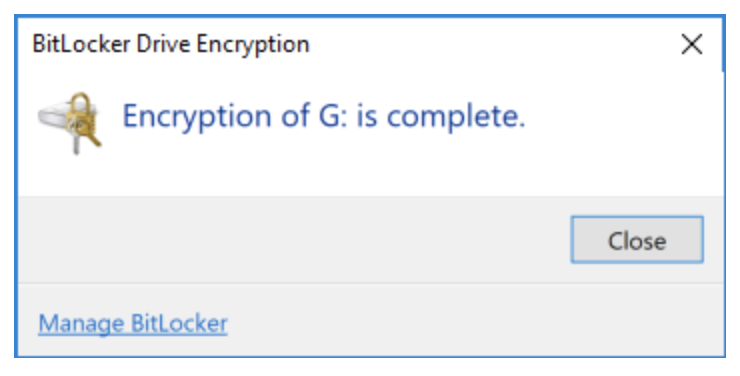
The BitLocker encryption process should take less than one minute to complete.  Once encryption is complete, the following message will appear:

When looking at the “Target” drive in Windows Explorer, one will now see a silver padlock next to the drive indicating that the drive has been successfully BitLocker encrypted:

2. Creating A Forensic Image

In order to create a forensic image of employee workstations, we will be using AccessData’s FTK Imager Forensic Imaging tool. FTK Imager is a forensic imaging tool commonly used by US and international law enforcement professionals.

FTK Imager may be downloaded from the following location:


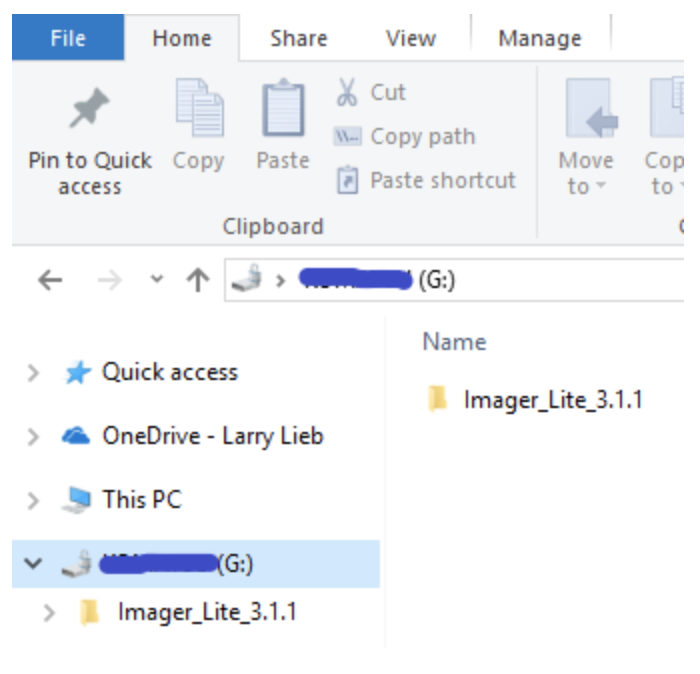
After you have downloaded FTK Imager Lite Version 3.1.1, please copy the entire software folder to the target drive so that the folder holding the FTK Imager Lite software is at the root of the target drive:

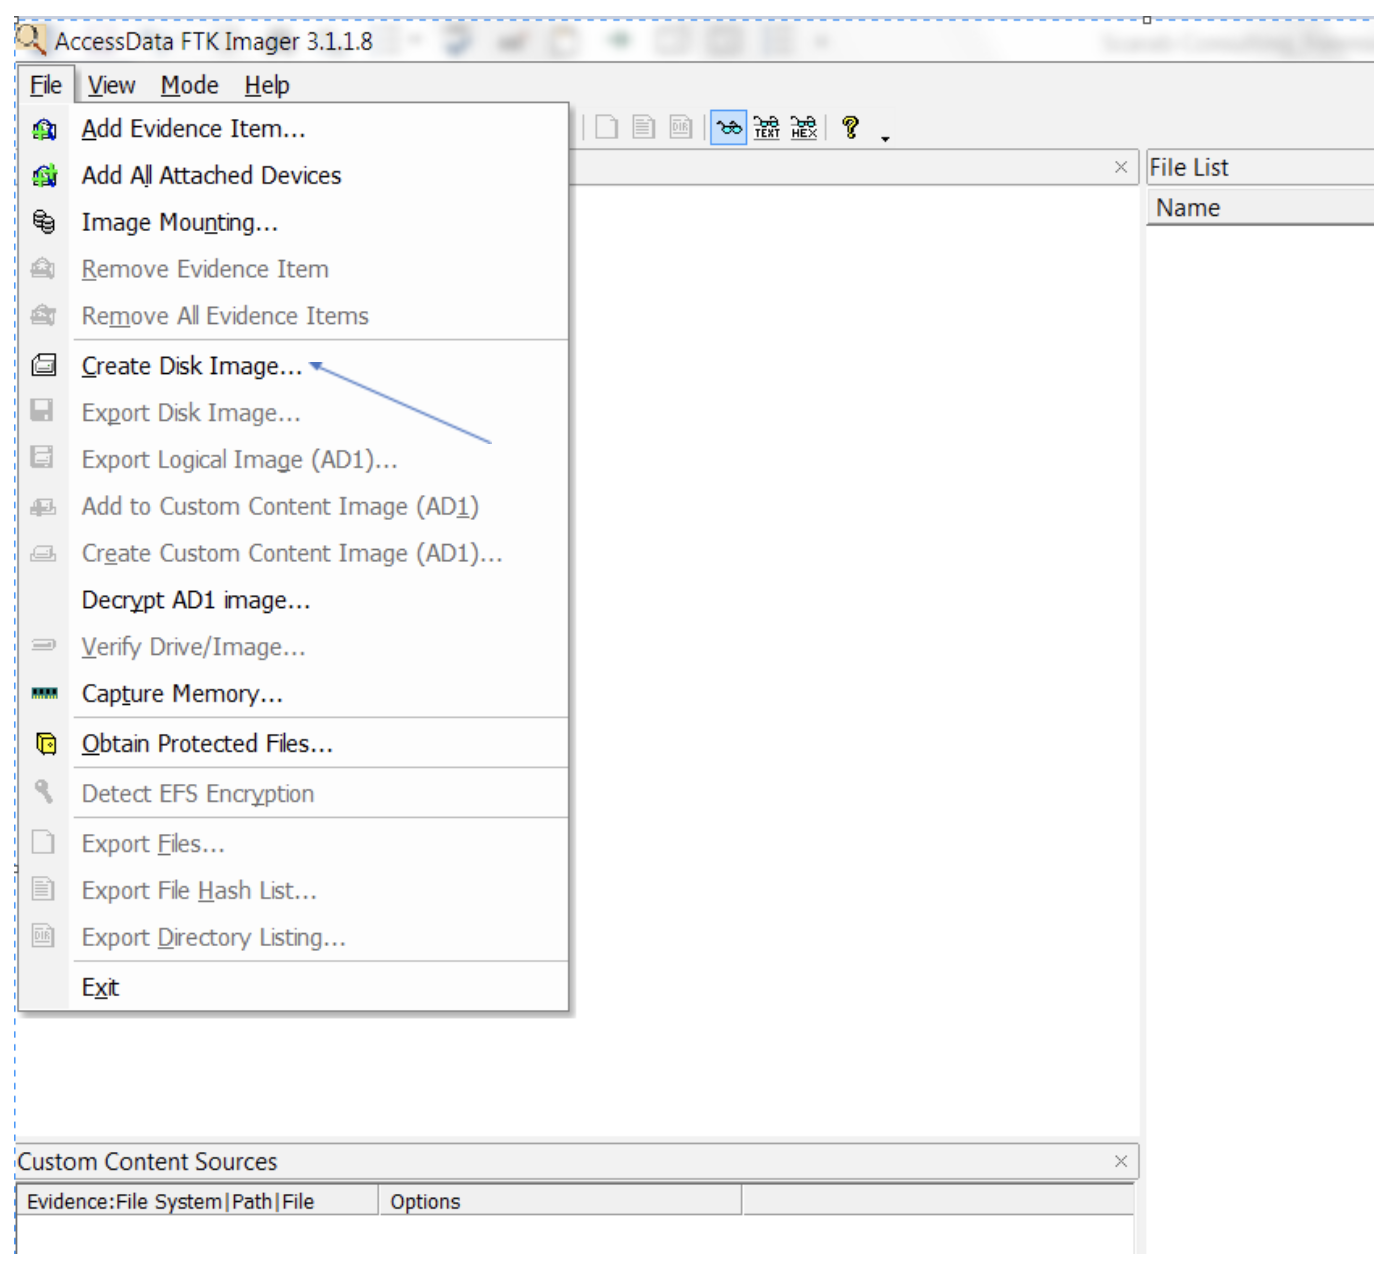
Once you have launched FTK Imager Lite, click on the “File” choice at the top left of the screen, which will bring up a drop-down menu with the the below options.  Click on “Create Disk Image….”

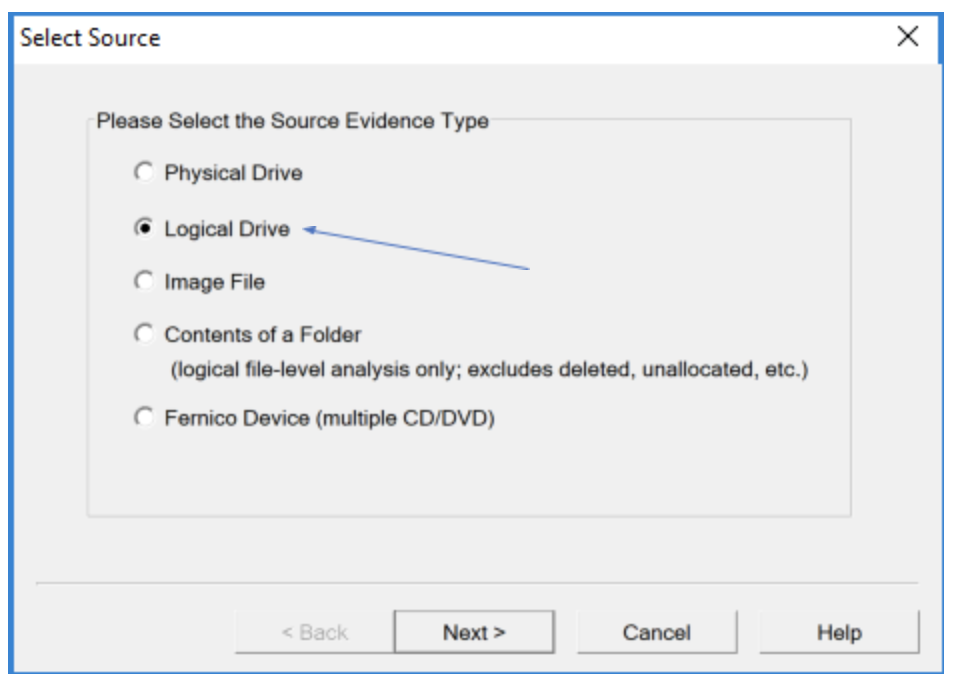
When the next menu pops up, click on the fourth choice from the top, “Logical Drive”.

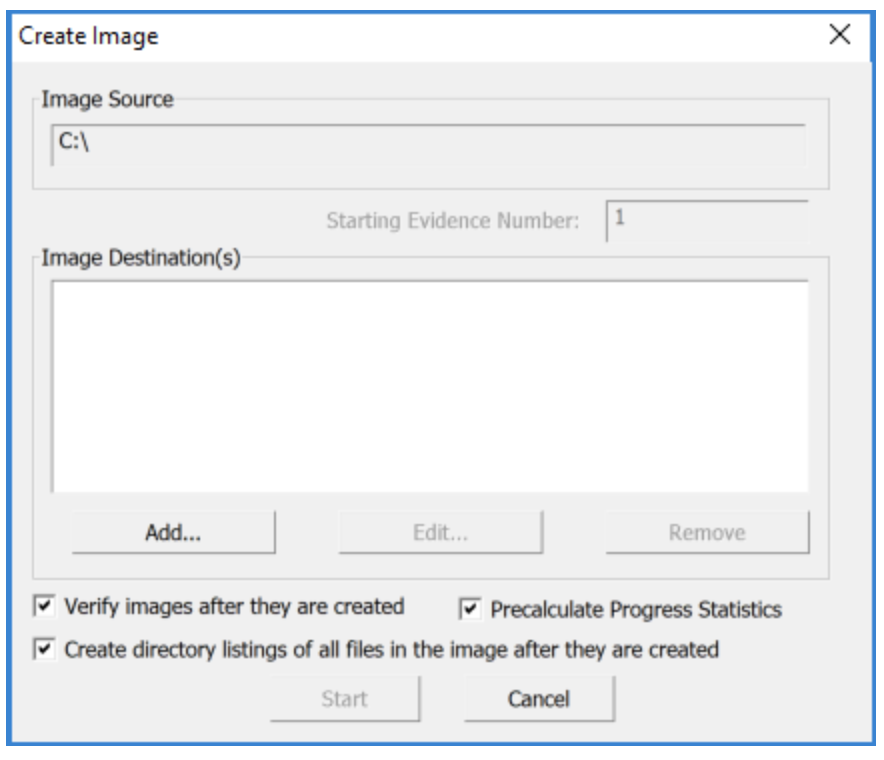
In the “Source Drive Selection” drop-down menu, please select “C:\ – [NTFS]” and then click on the “Finish” button.

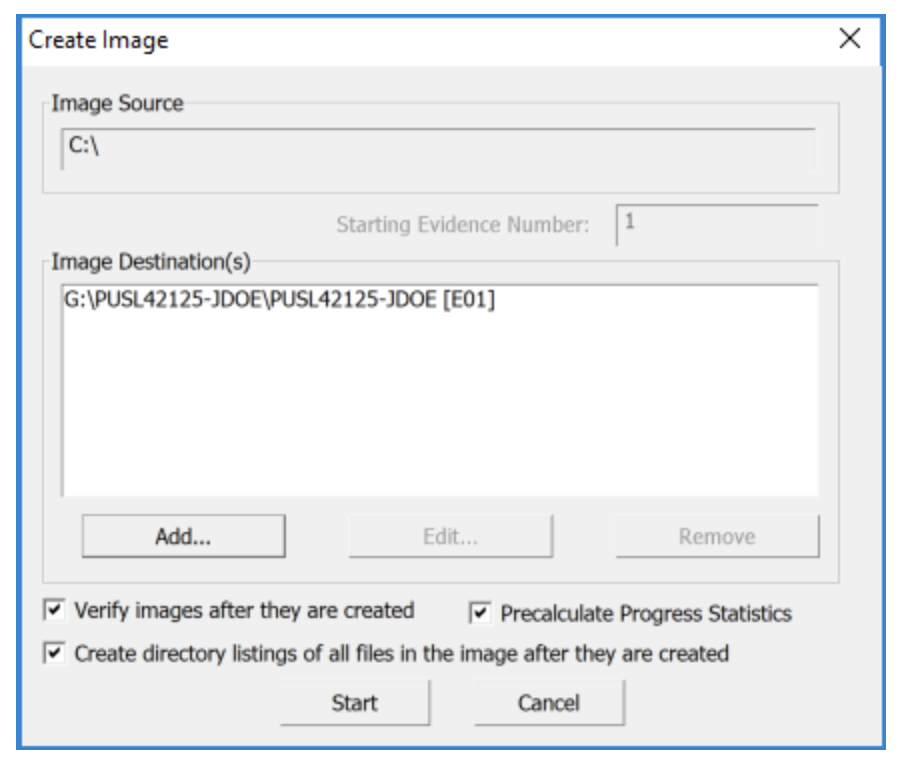
In the “Create Image” menu, please make sure that the “Verify images after they are created”, “Precalculate progress statistics” and “Create directory listings of all files in the image after they are created” boxes are checked.  Then, please click on the “Add…” button.

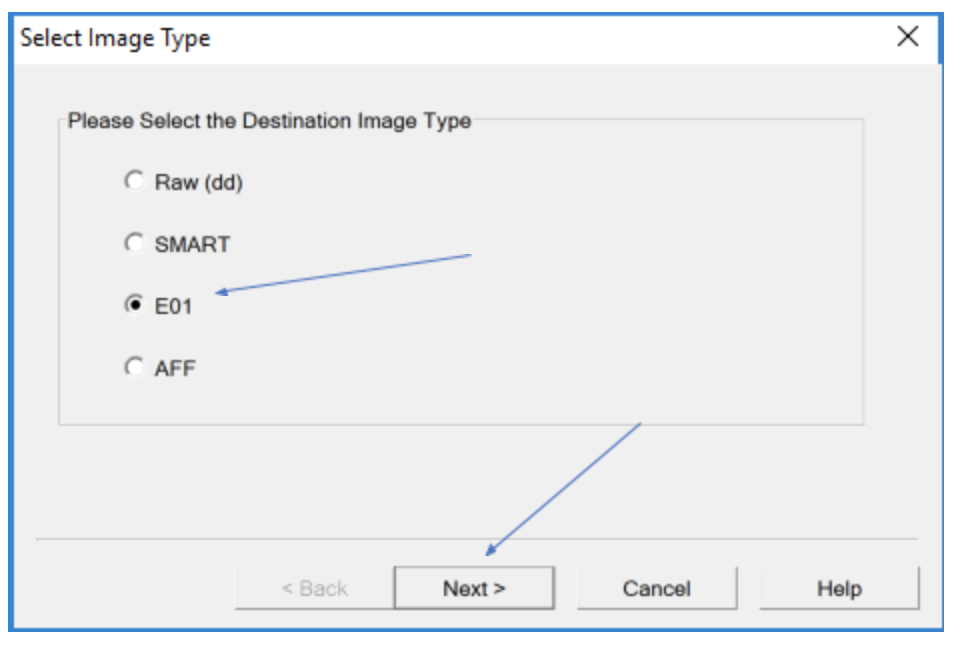
In the “Select Image Type” menu, please select the “E01” option seen below.  Then click on the “Next>” button.

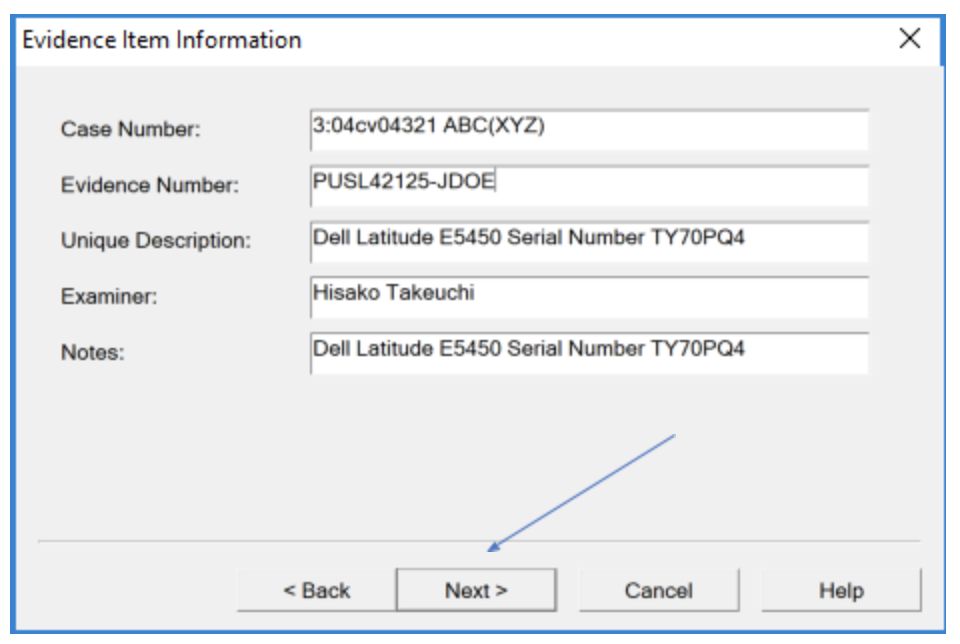
  1. In the “Evidence Item Information” menu, enter the following information:
    1. “Case Number:”  Enter a Case Number, if available, which will be provided by the company’s Counsel.   If there is no case or related law suit, please enter the same information found in the below “Evidence Number:” field in the “Case Number:” field.
    2. “Evidence Number:”  Enter a unique number based upon the type of device being imaged.  For example, the first laptop of five laptops being imaged for a specific matter would be “PUSL42125-JDOE”.  NOTE:  “PUSL42125” is the company’s internal workstation tracking number and “JDOE” is the first initial and last name of the employee to whom the workstation was assigned.
    3. “Unique Description:”  Enter the of the workstation being forensically imaged Make, Model and Serial Number here.
    4. “Examiner:”  Enter your first and last name here.

Click “Next>”

On the “Select Image Destination” menu, click on “Browse” at the top of the “Select Image Destination” tab in order to select the folder location that the forensic image file will be saved to.

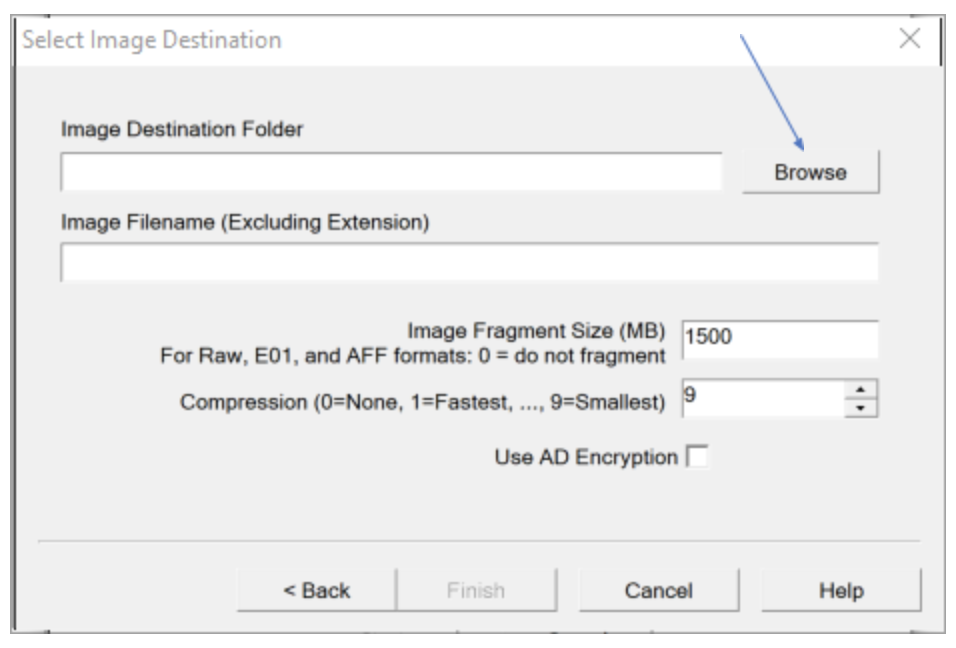
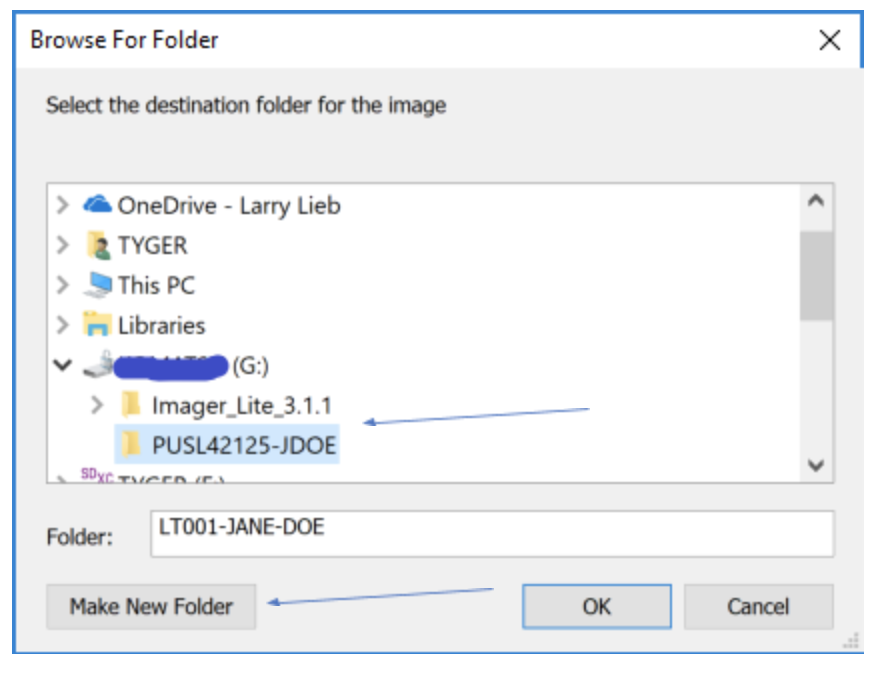
Select the BitLocker encrypted drive, in the below example “[COMPANY NAME] (G:)”.  Click on the “Make New Folder” button and create a new folder to hold the forensic image file.  In the below example, the forensic image file will be saved to the “PUSL42125-JDOE” folder.

In the “Select Image Destination” menu, in the “Image Filename (Excluding Extension)” box in the second row down from the top, type in the company’s workstation tracking number, then a dash, then the first initial and last name of the employee who used the workstation. In the below example we see “PUSL42125-JDOE”.  This will allow for easy identification of the forensic image.

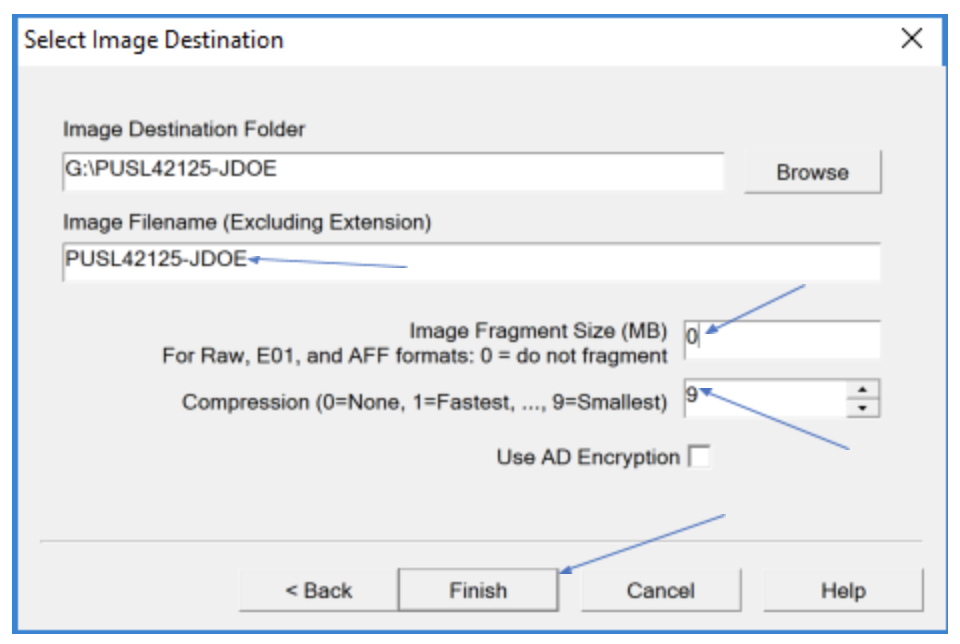
Change the “Image Fragmentation size (MB)” value to “0”.

Change the “Compression” value to “9”.  

Do not check the box called “Use AD Encryption”.

Click “Finish”.

In the “Create Image” menu, click on the “Start” button to begin the forensic imaging process.  In the screenshot below, one can see that a forensic image file named “PUSL42125-JDOE.E01” will be created on the “G:\” drive in a folder named “PUSL42125-JDOE”. 

Once the forensic image has been successfully created, a window will appear called “Drive/Image Verify Results” as seen in the example below.  

If the “Verify result” value equals “Match”, then a successful bit-for-bit forensic image has been created of the workstation internal hard drive.

All FTK Imager open windows may be closed at this point as the forensic imaging process is successful and complete!
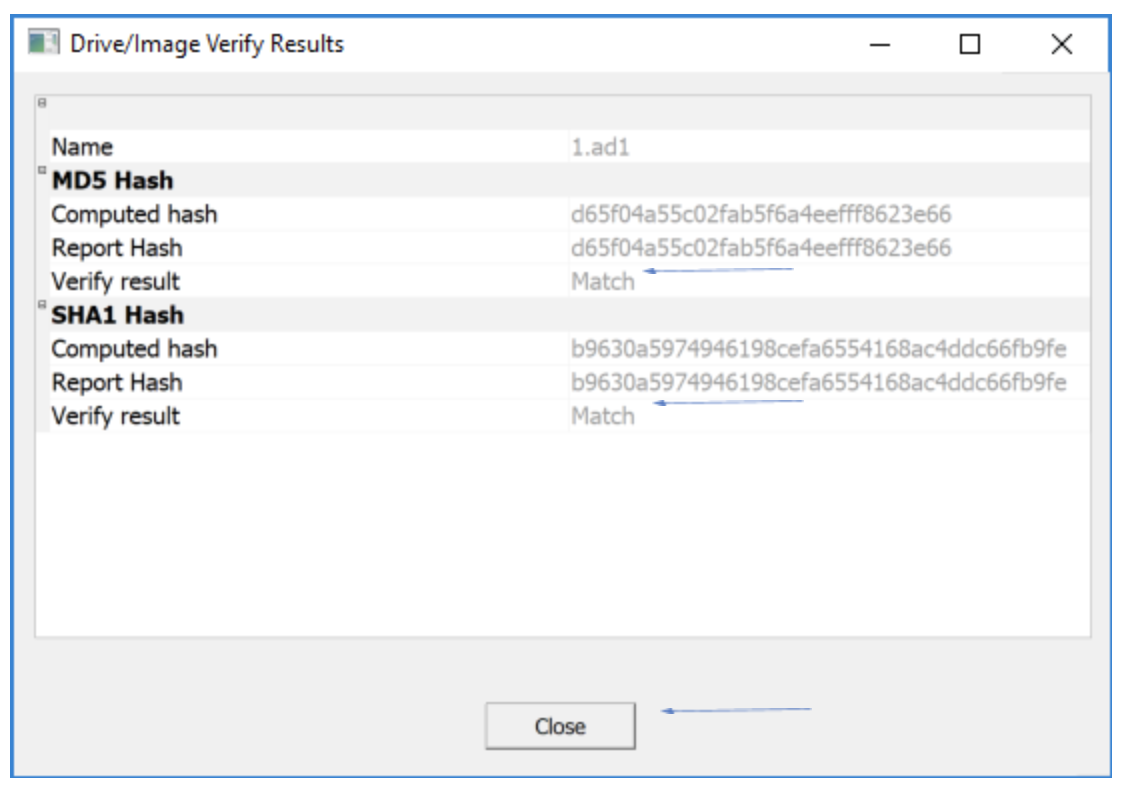
  • MD5 Hash” – This is a unique value calculated using a standard mathematical algorithm and is a court-accepted method of determining if a file is a true forensic copy of another file.
  • SHA1 Hash” – This is another, more complex, unique value calculated using a standard mathematical algorithm and is a court-accepted method of determining if a file is a true forensic copy of another file.   

Please see below for a SlideShare about employee turnover, originally presented as part of a class on best practices.

You can also download resources via the links below:

About The Author

Larry Lieb is a nationally known subject matter expert in the field of computer forensics and electronic discovery.  Larry has testified in both Federal and State courts on the subjects of computer and smartphone forensics.  Larry’s practice focuses on maximizing the limited dollars his clients have available for substantive legal work whilst minimizing wasted expense.

Leave a Comment

Latest Videos

In this episode of the Forensic Focus podcast, Si and Desi explore how artificial intelligence is being leveraged to uncover crucial evidence in investigations involving child sexual abuse material (CSAM) and examine the importance of exercising caution when implementing these tools. 

They also discuss a recent murder case in which cyber experts played a vital role in securing a conviction, and explore the unique challenges associated with using digital evidence as an alibi.

Show Notes:

A Practitioner Survey Exploring the Value of Forensic Tools, AI, Filtering, & Safer Presentation for Investigating Child Sexual Abuse Material (CSAM) - https://dfrws.org/wp-content/uploads/2019/06/2019_USA_paper-a_practitioner_survey_exploring_the_value_of_forensic_tools_ai_filtering_safer_presentation_for_investigating_child_sexual_abuse_material_csam.pdf

Man charged with NI murder ‘faked live stream to provide alibi’ (The Guardian) - https://www.theguardian.com/uk-news/2023/feb/02/man-charged-with-ni-faked-live-stream-to-provide-alibi

A YouTuber accused of murder faked a 6-hour livestream to produce an alibi (Sportskeeda) - https://www.sportskeeda.com/esports/news-a-youtuber-accused-murder-faked-6-hour-livestream-produce-alibi

European Interdisciplinary Cybersecurity Conference (EICC) 2023 - https://www.forensicfocus.com/event/european-interdisciplinary-cybersecurity-conference-eicc-2023/#more-493234

YouTuber reportedly faked GTA livestream to have an alibi while he committed murder (Dexerto) - https://www.dexerto.com/entertainment/youtuber-reportedly-faked-gta-livestream-to-have-an-alibi-while-he-committed-murder-2052974/

Forensic Europe Expo - https://www.forensicfocus.com/event/forensic-europe-expo/#more-493225

In this episode of the Forensic Focus podcast, Si and Desi explore how artificial intelligence is being leveraged to uncover crucial evidence in investigations involving child sexual abuse material (CSAM) and examine the importance of exercising caution when implementing these tools.

They also discuss a recent murder case in which cyber experts played a vital role in securing a conviction, and explore the unique challenges associated with using digital evidence as an alibi.

Show Notes:

A Practitioner Survey Exploring the Value of Forensic Tools, AI, Filtering, & Safer Presentation for Investigating Child Sexual Abuse Material (CSAM) - https://dfrws.org/wp-content/uploads/2019/06/2019_USA_paper-a_practitioner_survey_exploring_the_value_of_forensic_tools_ai_filtering_safer_presentation_for_investigating_child_sexual_abuse_material_csam.pdf

Man charged with NI murder ‘faked live stream to provide alibi’ (The Guardian) - https://www.theguardian.com/uk-news/2023/feb/02/man-charged-with-ni-faked-live-stream-to-provide-alibi

A YouTuber accused of murder faked a 6-hour livestream to produce an alibi (Sportskeeda) - https://www.sportskeeda.com/esports/news-a-youtuber-accused-murder-faked-6-hour-livestream-produce-alibi

European Interdisciplinary Cybersecurity Conference (EICC) 2023 - https://www.forensicfocus.com/event/european-interdisciplinary-cybersecurity-conference-eicc-2023/#more-493234

YouTuber reportedly faked GTA livestream to have an alibi while he committed murder (Dexerto) - https://www.dexerto.com/entertainment/youtuber-reportedly-faked-gta-livestream-to-have-an-alibi-while-he-committed-murder-2052974/

Forensic Europe Expo - https://www.forensicfocus.com/event/forensic-europe-expo/#more-493225

YouTube Video UCQajlJPesqmyWJDN52AZI4Q_7QiFTiuY7Vw

AI In CSAM Investigations And The Role Of Digital Evidence In Criminal Cases

Forensic Focus 22nd March 2023 12:44 pm

Throughout the past few years, the way employees communicate with each other has changed forever.

69% of employees note that the number of business applications they use at work has increased during the pandemic.

Desk phones, LAN lines and even VOIP have become technologies of the past workplace environment as employees turn to cloud applications on their computers and phones to collaborate with each other in today’s workplace environment.

Whether it’s conversations in Teams, file uploads in Slack chats, or confidential documents stored in Office 365, the amount of data stored and where it is stored, is growing quicker than IT and systems administrators can keep up with.

Corporate investigators and eDiscovery professionals need to seamlessly collect relevant data from cloud sources and accelerate the time to investigative and discovery review.

With the latest in Cellebrite’s remote collection suite of capabilities, investigators and legal professionals can benefit from secure collection with targeted capabilities for the most used workplace applications.

Join Monica Harris, Product Business Manager, as she showcases how investigators can:

- Manage multiple cloud collections through a web interface
- Cull data prior to collection to save time and money by gaining these valuable insights of the data available
- Collect data from the fastest growing cloud collaboration applications like Office365, Google Workspace, Slack and Box
- Login to a single source for workplace app collection without logging into every app and pulling data from multiple sources for every employee
- Utilize a single unified collection workflow for computer, mobile and workplace cloud applications without the need to purchase multiple tools for different types of collections – a solution unique to Cellebrite’s enterprise solution capabilities

YouTube Video UCQajlJPesqmyWJDN52AZI4Q_g6nTjfEMnsA

Tips And Tricks Data Collection For Cloud Workplace Applications

Forensic Focus 20th March 2023 12:00 pm

This error message is only visible to WordPress admins

Important: No API Key Entered.

Many features are not available without adding an API Key. Please go to the YouTube Feed settings page to add an API key after following these instructions.

Latest Articles

Share to...