Welcome to Logicube’s tutorial on the Forensic Falcon NEO. In this episode, we’ll show you how to perform a logical image.
The logical imaging feature of Falcon NEO shortens the evidence collection process by allowing investigators to select and acquire only the specific files they need, rather than the entire physical drive. Users can create logical images from source drives locally attached to the Falcon NEO, or from a network repository.
To perform a logical image, we’ll choose the Mode icon and select ‘File to File’. Choose the source drive – we’ll choose S1 – and then choose the Settings icon. Under the Settings icon you can add case information by clicking on the Case Info icon. So you can add a case filename, case ID, examiner, case notes, whatever you like.
Then we’re going to select the Root Directory icon. In this screen, the top-level directory can be set. All searches will start from this directory. The root directory can be entered manually, or you can browse the selected source drive by clicking on the Folder icon. And here you can see that there are two partitions in this source drive; we’re going to go ahead and select the one named ‘Partition 2’. And you can scroll through the contents by using the slider on the right-hand side. We’re going to go ahead and select ‘Demo Folder’, click ‘OK’.
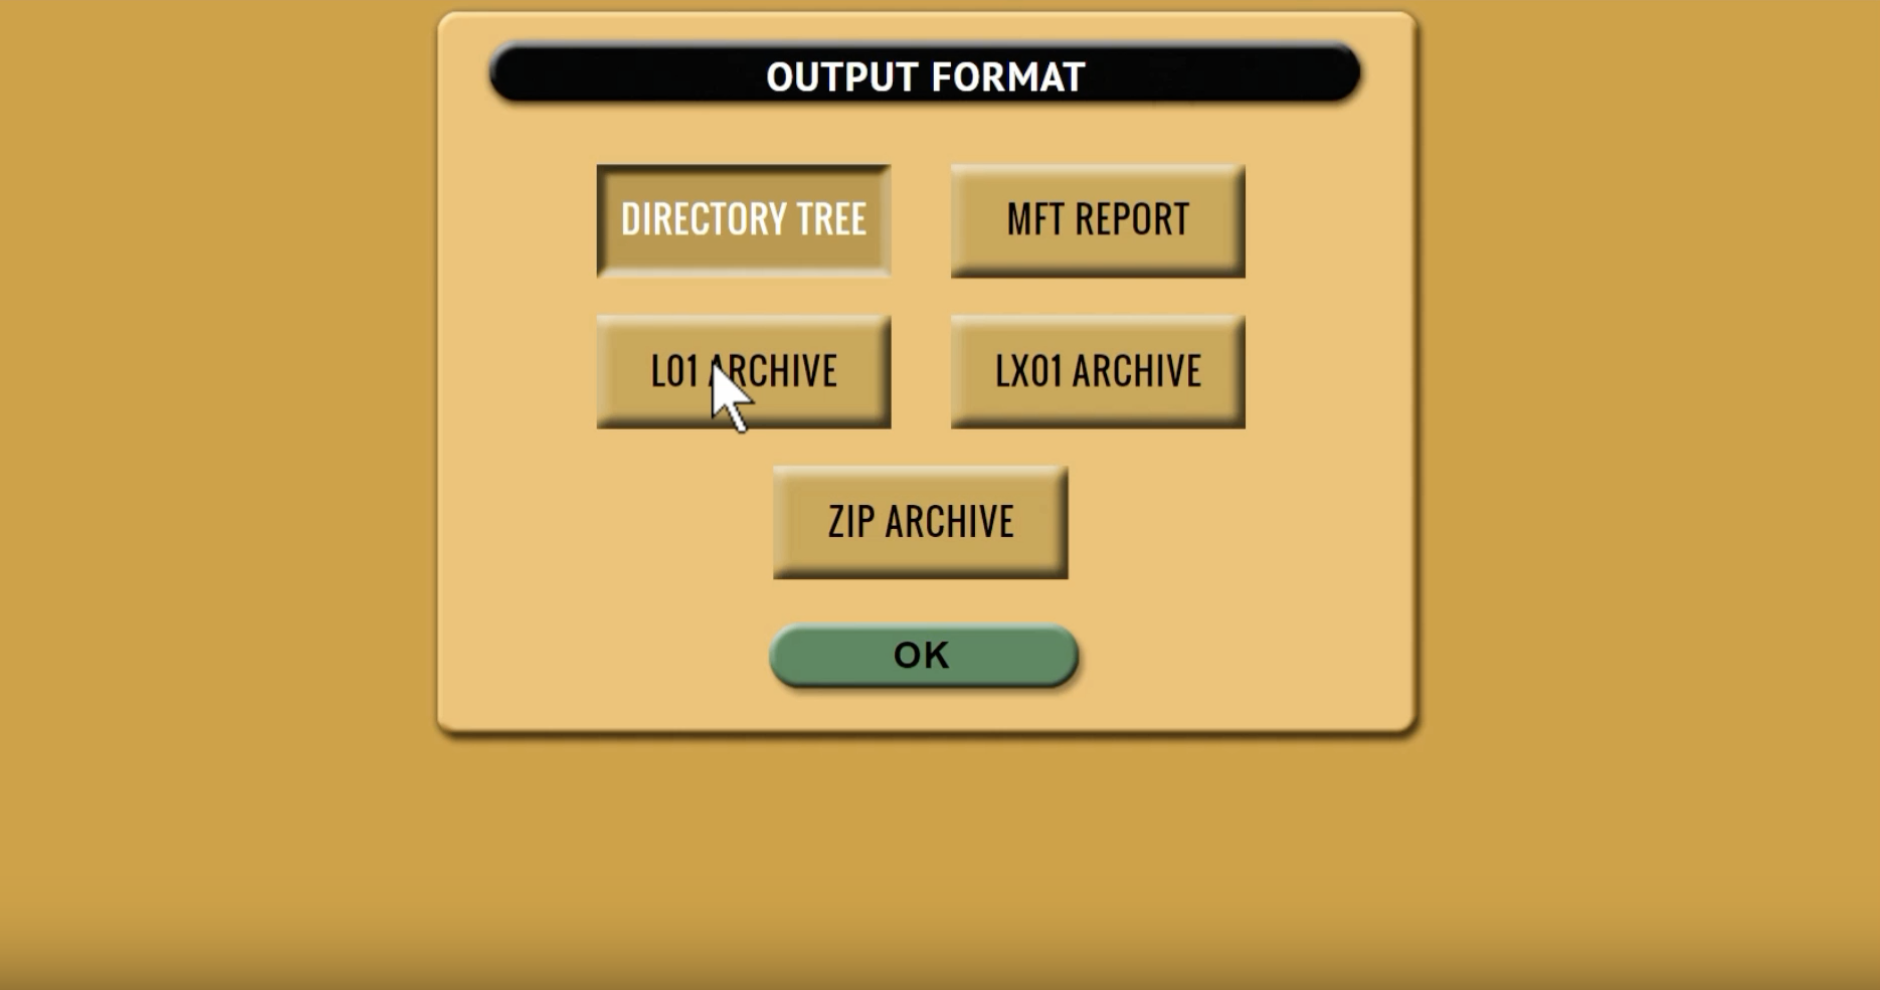
Next we’re going to select the output format. Here your choices are a directory tree format, so the results will be written in a directory tree format and all files will appear in the same directory structure as found on the source drive. An L01 or LX01 Archive, which is a logical evidence file format that can be used with a variety of forensic software tools; a zip archive; or an MFT report. In this case all results will list deleted files, if they’re present, that can potentially be restored or recovered.
We’re going to select ‘Directory Tree.’ Next we’ll move on to the filter settings. There are three choices: a Path Filter, Signature-Based File Categories, and/or Keywords. We’re going to start with Path Filter, and you’ll see there are two options: Preset and Custom Filter. Under Preset you’ll see there are things like ‘Include all user directories’, ‘exclude all program directories’; all of these are set to ‘no’ as default and we’re going to keep that default.
We move on to custom filter. The Falcon NEO uses POSIX extended regular expressions for the syntax of the filter. This is simply a special text strain for describing a search pattern. More information regarding POSIX can be found in the Falcon NEO users’ manual.
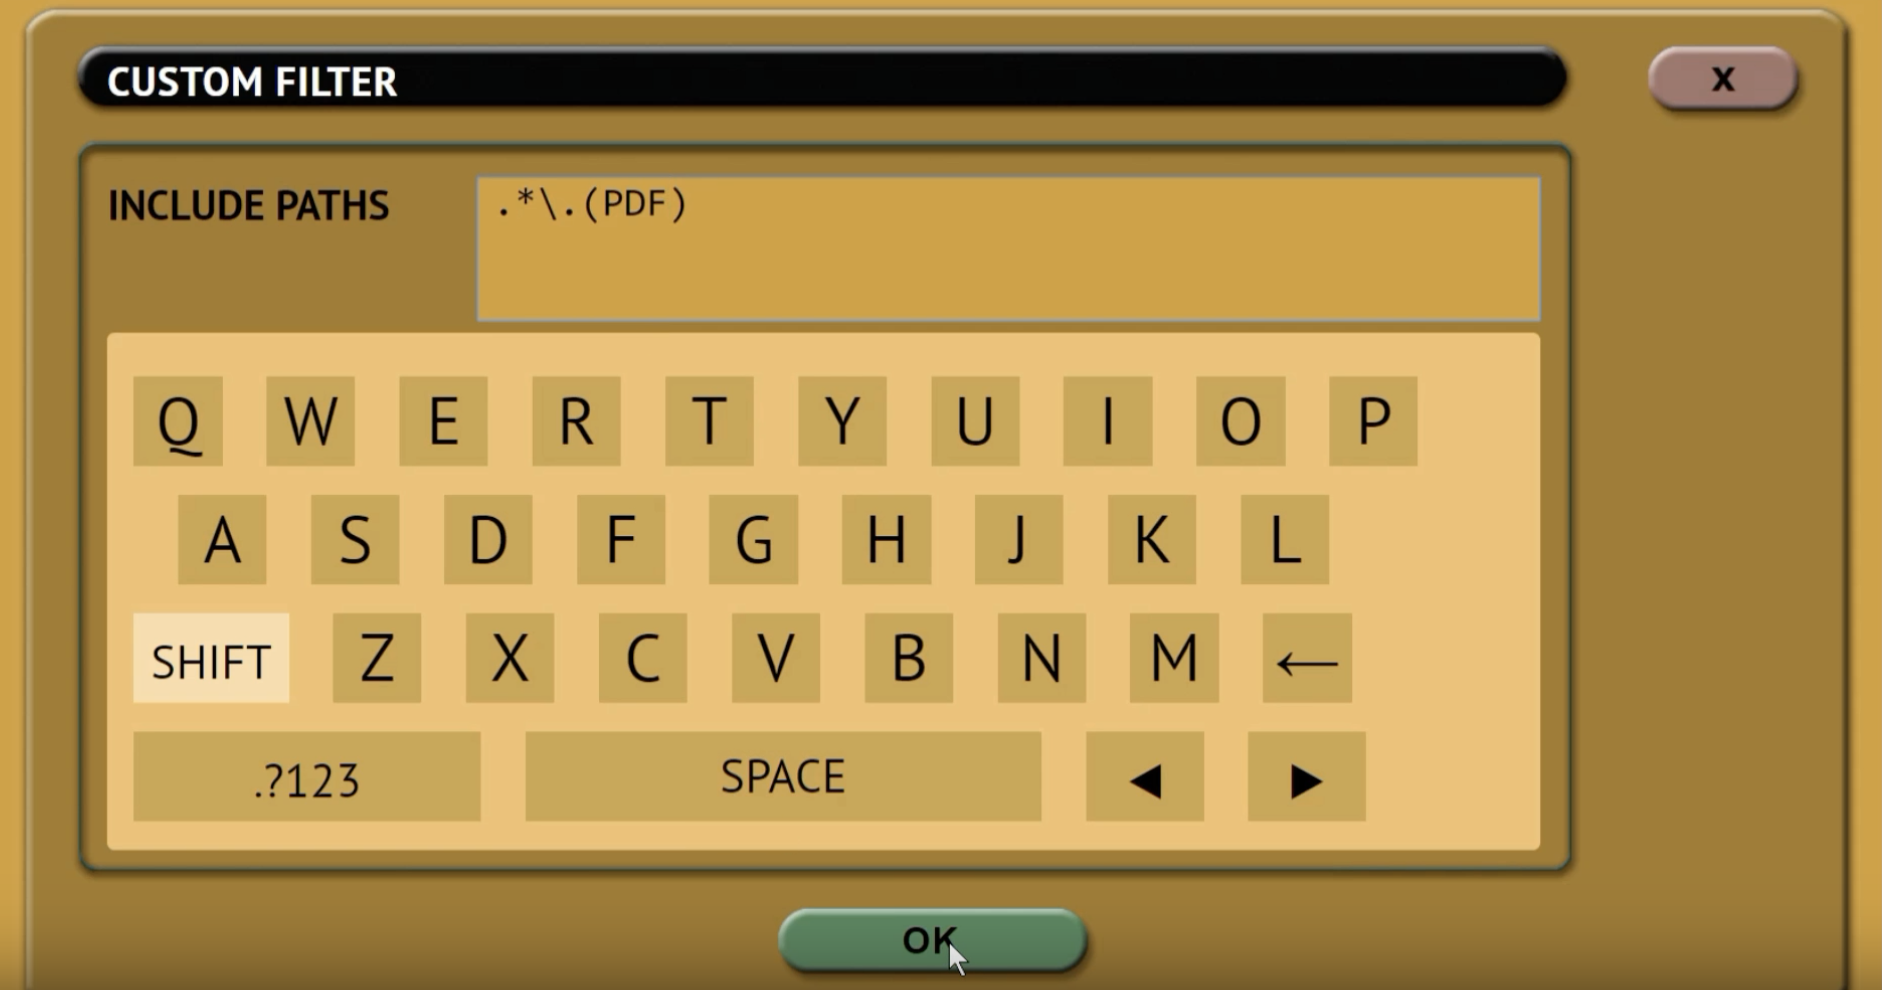
If we wanted to filter file names to a single keyword, we could enter period, asterisk, parentheses, and the word we wanted to search on, and close parentheses. In this case I’ve used the word ‘taliban’ so that it will search for any file names that include the word ‘taliban’. So taliban.jpg, taliban.txt, taliban.png. You could have multiple keywords by separating each keyword with a straight line within the parentheses, so for example I could add a straight line here and then add another word, for example ‘b-o-m-b’, and so now the custom filter will show any file name that included ‘taliban’ or ‘bomb’; bomb.png for example, it would search for that.
For this exercise, what I want to do is to search for file extensions, so for this type of filter we need to add a backslash to the end of the syntax. So we’re going to go ahead and add a backslash here, then a period, and in this case I’m going to add an extension for ‘pdf’, so for this search we’re going to look for any file names that have the extension ‘.pdf’. Click OK.
Next we’re going to choose the signature-based file categories. Here you can choose documents, audio, images, video, or archives. In this case we’re just going to look for documents.
And the next method of filtering is keywords. Here you can set specific keywords to search for within the results of the first two filters. Note that the keyword is searched within the content of a file, not on the name of the file. We’re also going to ignore the case, so it will ignore whether it is upper case or lower case, and we’re going to add the word ‘falcon’ as a keyword that we want to search on.
Each filter narrows down the results from the previous filter. Setting a custom path filter, all files with the extension ‘pdf’, then select ‘Documents’ as the signature-based file category, [this] will narrow down the results of the path filter to only document files with the extension .pdf, if you add a keyword such as ‘falcon’ under Keyword Filtering it will narrow the search to documents with a file extension .pdf and whose contents contain the keyword ‘falcon’. Setting the filter too narrowly may adversely affect your results.
Next you can select the hash verification method. In this case we’re going to choose SHA-1, and verify is ‘Yes’. Click ‘OK’, we’ll then select the destination; in this case we’re going to select D3. Once you have all of your settings done and you’ve selected your source and your image file, just press ‘Start’. You’ll get a prompt, click ‘Yes’, and as you can see there’s a progress bar that will appear and it will show you the number of files that were captured, the speed, etc.
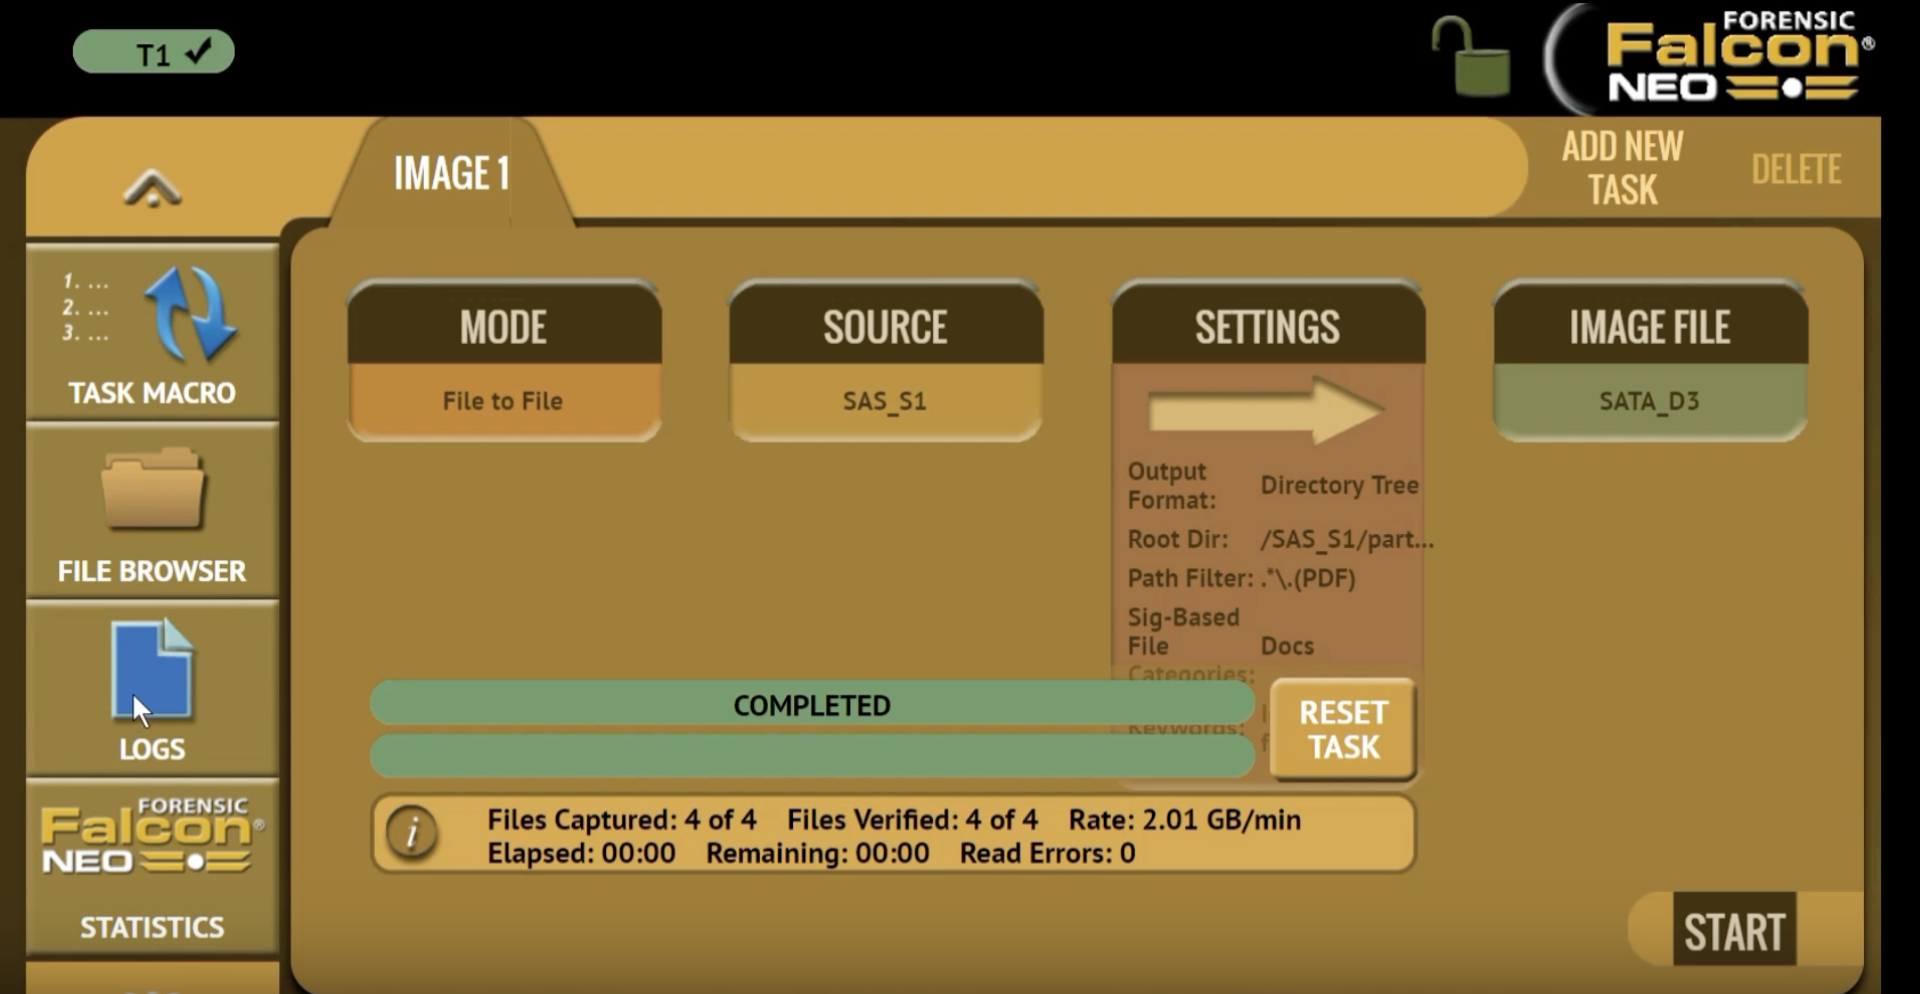
If we move to the logs and view the log file for this capture, you’re going to see under the operation parameters the search root path is ‘demo’, the format was ‘directory tree’, the path format was ‘.pdf’, we’re searching under ‘Documents’ and with a keyword ‘falcon’. OK.
And if you’ll scroll down, you’ll see the results of the logical image and it will show you there are four files that were found, we’ll see the hash as well and all of these documents are PDF, and all of them included the word ‘falcon’ in their content. You can close that out.
As drive sizes grow, it may be inefficient to image an entire drive. Logical imaging allows investigators to quickly zero in on relevant files and streamline the acquisition process.
We hope you found this tutorial of interest. To learn more about the Falcon NEO, please visit our website at logicube.com or contact our sales team at [email protected].


